Help Your Kid Develop Independence With ‘Autonomy-Supportive’ Parenting

Most parents of a certain age, myself included, had to learn to be independent growing up. Many households needed two incomes to sustain themselves, leaving children alone to fend for themselves when school wasn’t in session. It was far from ideal, but it gave me some confidence that I could take care of myself when necessary.

Something has changed in many caregivers in the decades since. Guardians often became highly involved, removing all obstacles from their child’s path. Instead of letting children develop their own coping muscles, parents give them what they want with a phone call to a school administrator or a friend’s parent. 

“We’re not giving [kids] the space to develop really important life skills because we’re so protective and heavily involved,” says Emily Edlynn, Ph.D., a licensed clinical psychologist and author of Autonomy-Supportive Parenting.

What is “autonomy-supportive” parenting?

Think about your day as a parent. From what they wear to school to what they eat for dinner or watch on TV, how often do you let your child decide things for themselves? It might be more often than you think.

Instead of handling nearly every aspect of their day, caregivers who follow autonomy-supportive parenting let children take the initiative. Parents guide a kid’s decisions instead of controlling them. 

“It’s an approach that focuses on building a child’s sense of agency in the world as well as a strong sense of self,” says Edlynn. “It’s trying to understand their experience of what’s going on right now and recognizing they have a different perspective or experience than we’re coming at.”

Instead of pushing our way of thinking on children, Edlynn suggests we let them do their own critical thinking and solve problems themselves, which will help them trust their abilities and give them self-confidence as they grow older. 

Guide kids to find their own solution

As any parent with more than one child can tell you, kids develop differently, which can mean we have to support them in different ways. While one child may find it easy to start their homework independently, the other might not be a self-starter.

Edlynn recommends nudging our kids to the next level by knowing their skill level and meeting them there, a process known as scaffolding. To help motivate the second child to do their homework, list everything they want and need to do. This will structure their afternoon. They’ll also get a self-esteem boost whenever they complete a task and check something off their list. 

“Part of the framework is asking a lot of these questions of your kid: What do you think? When is the best time for you to do homework? They may not know yet, but it’s good for them to think about it,” Edlynn explains. 

Let kids find their own fun

In the age of smartphones and tablets, children and parents have become conditioned to believe we never have to be bored. And when the blahs actually do hit our kids, we charge ourselves with giving them something to do instead of letting them make their own fun. 

“Our kids don’t know how to manage boredom, which really is a disservice to them,” says Edlynn. “It also sets us up to be their cruise directors at all times. That’s a huge burden on us!”

Letting children find their own thing to do when boredom strikes allows them to become self-sufficient and use their imagination to find fun on their own.

“It is amazing what creativity they can express, and it’s a really important life skill for them to figure out how to entertain themselves,” says Edlynn.

Being empathetic doesn’t mean giving in

Recently, my youngest son didn’t like the movie I picked for our family’s weekly movie night because it differed from what he would have chosen. 

I explained that I understood his disappointment and we would watch what he wanted next week. He could play in his room if he didn’t want to watch the movie we were watching. Rather than giving in, I tried to meet him where he was as best as I could, show him empathy, and then give him an option.

“Having empathy does not mean giving them what they want,” says Edlynn. “You’re not trying to make them happy. You’re just reflecting back that you’re understanding what’s going on.”

Trust your child to act in their best interest (or fake it)

Another characteristic of autonomy-supportive parenting is being open, curious, and flexible. Trusting children to be accountable to themselves (or acting like it) is the only way you will know if your child will be a responsible, independent adult. 

For example, if you ask your child when they think is the best time to do their homework, and they tell you it’s in the morning before school begins, support them and let them try it, no matter how odd it sounds. It may work.

“We may not really trust our kids, but we have to pretend,” says Edlynn. “This is low stakes. Nothing terrible is going to happen. Sometimes, we just have to listen to them.”

Don’t forget to support yourself

Edlynn says once you grasp autonomy-supportive parenting, you’ll see opportunities to put it into practice, even when they’re in preschool. (Her book breaks things down into age groups.) But no matter how old your kid is, adopting this style will not be easy, so forgive yourself if things don’t go right on a particular day.

“Give yourself grace,” Edlynn says. “The more you do that, the more likely you will have the energy to keep up with doing this. If you get hard on yourself because you’re not measuring up, you’re more likely to revert to the controlling practices. Some days are just going to be more autonomy-supportive than others.”


Source: LifeHacker – Help Your Kid Develop Independence With ‘Autonomy-Supportive’ Parenting

How to Prevent Your Bank from Closing Your Accounts Without Notice

So you go to use your debit card to make a purchase or withdraw cash, or you try to pay a bill from your checking account, only to find out that your card has been declined, your transaction denied, and your access to your money cut off. The New York Times recently reported that banks are increasingly closing customer accounts without warning or authorization—and for no apparent reason. They’re not even required to notify you if this happens, which means some people find out only when they can’t use their cards or withdraw funds. While suspicious activity and fraud are considered one possible explanation, there’s also no data source to confirm exactly how many accounts are being shut down and why.

How to protect your bank account from closure

The Times reporting suggests several possible scenarios that would raise red flags for a bank’s fraud department. One is related to how much you deposit and withdraw, and in what pattern. Under federal law, customers have to fill out a form for any transaction of more than $10,000, and choosing to reduce the amount rather than complete said paperwork is likely to be suspicious. Similarly, large cash deposits at ATMs or a series of high-value deposits and withdrawals in a short period of time may also be tagged as fraudulent. While this may be innocuous—you work in an industry that has cash tips, for example—the bank doesn’t see it that way.

Banks may also tag accounts for closure when there’s no activity for a period of time, or when there are frequent negative balances or overdrafts. Using checks can also put you on a bank’s radar due to the increase in check fraud in recent years, as can violating account terms and conditions (such as using a personal account for business purposes).

Given these possibilities, there are a few things you can do to head off account closure:

  • Overcommunicate with your bank. If you are making uncharacteristic deposits or withdrawals, moving large sums of money around, or going through any major financial transition (such as a move, a home purchase or renovations, or extended travel), give your bank a heads-up.

  • Check all bank messages. Don’t toss notices without opening them, and look into all messages you receive. Note that you shouldn’t respond uncritically to texts, calls, or emails, which may themselves be fraudulent. But if you are contacted by anyone claiming to be from your bank, call the number or send a secure message on the website or your client portal to make sure you don’t miss anything important.

  • Monitor your account activity. Set up transaction and low balance alerts, and check statements, deposits, and withdrawals regularly.

  • Limit your check usage. If possible, stop sending checks in the mail to reduce the risk of washing, or at least take steps to protect your checks from fraud.

What to do if your account shuts down unexpectedly

If you take precautions and your bank closes your account anyway, contact them ASAP and ask what steps you need to take to get access to your money. If your bank has a local branch, it may be effective to go in person. Communicate calmly but firmly. In some cases, such as a dormant account, you may need to go to your state’s unclaimed property office to obtain your funds.

Next, make sure you halt direct deposits and automatic withdrawals (such as bill pay) and switch these transactions to a different account that you can still access. If the bank will allow it, try to reopen the account or ask about other options, after which you can also consider switching to a different bank.

Finally, you can file a complaint with the federal Office of the Comptroller of the Currency if you believe your account has been closed without cause.


Source: LifeHacker – How to Prevent Your Bank from Closing Your Accounts Without Notice

The Biggest Differences Between Claude AI and ChatGPT

AI is a fascinating field, one that has seen a ton of advancements in recent years. In fact, OpenAI’s ChatGPT has singlehandedly increased the hype around generative AI to new levels. But the days of ChatGPT being the only viable AI chatbot option are long gone. Now, other options are available, including Anthropic’s Claude AI, which has some key differences from the AI chatbot most people are familiar with. The question is this: Can Anthropic’s version of ChatGPT stand up to the original?

What is Anthropic AI?

Anthropic is an AI startup co-founded by ex-OpenAI members. It’s especially notable because the company has a much stricter set of ethics surrounding its AI than OpenAI currently does. The company includes the Amodei siblings, Daniela and Dario, who were instrumental in creating GPT-3, the current model that OpenAI uses to power ChatGPT’s free version.

The Amodei siblings, as well as others, left OpenAI and founded Anthropic to create an alternative to ChatGPT that addressed their AI safety concerns better. One way that Anthropic has differentiated itself from OpenAI is by training its AI to align with a document of constitutional AI principles, like opposition to inhumane treatment, as well as support of freedom and privacy. The company prides itself on this approach to AI.

What is Claude AI?

Claude AI, or the latest version of the model, Claude 2, is Anthropic’s version of ChatGPT. Like ChatGPT, Claude 2 is an AI chatbot with a special large language model (LLM) running behind it. However, it is designed by a different company, and thus offers some differences than OpenAI’s current GPT model. It’s probably the strongest competitor out of the various ChatGPT alternatives that have popped up, and Anthropic continues to update it with a ton of new features and limitations.

Anthropic technically offers three versions of Claude, including Claude 1, Claude 2, and Claude-Instant. While each is similar in nature, the language models all offer some subtle differences in capability.

How do you use Claude?

If you have any experience using ChatGPT, then you’re already well on your way to using Claude, too. The system uses a simple chat box, which you can post queries in to get responses from the system. It’s as simple as it gets, and you can even copy the responses the Claude offers, retry your question, or ask it to provide additional feedback. It’s very similar to ChatGPT.

Can Claude do the same things as ChatGPT?

Ultimately, Claude can do a lot of the same things that ChatGPT can. However, there are some limitations. Where ChatGPT now has internet access, Claude is only trained on the information that the developers at Anthropic have provided it with, which is limited to events up to early 2023. As such, it cannot look beyond that scope.

Claude also cannot interpret or create images, something that you can now do in ChatGPT thanks to the introduction of DALL-E 3. The company does offer similar things to ChatGPT, including a cheaper and faster processing option—Claude-Instant—and its more premium Claude-2. Claude-2 is on-par with ChatGPT’s GPT-4 model, which is slower to respond, but offers more cutting-edge responsiveness.

How much does Claude cost?

Claude AI is actually free to try, though that freedom comes with some limitations, like how many questions you can ask and how much data the chatbot can process. There is a premium subscription, called Claude Pro, which will grant you additional data for just $20 a month.

Unlike ChatGPT’s premium subscription, using the free version of Claude actually gives you access to Claude’s latest model, you just miss out on the added data tokens and higher priority that a subscription offers.

How does Claude’s free version compare to ChatGPT’s?

Like ChatGPT, Claude offers a free version. Both are solid options to try out the AI chatbots, but if you plan to use them extensively, it’s definitely worth looking at the more premium subscription plans that they offer.

While Claude gives you access to its more advanced Claude 2 in the free version, it does come with severe limits. You can’t process PDFs larger than 10 megabytes, for instance, and its usage limits can vary depending on the current load. Anthropic hasn’t shared an exact limit, or even a range that you can expect, but CNBC estimates its about five summaries every four hours. At the end of the day, though, it does depend on how many people are using the system when you are.

ChatGPT, on the other hand, limits you to GPT-3.5 when using its free version. While GPT-3.5 is still a solid model, it misses out on a lot of the improvements made with the company’s GPT-4 model. However, there is no upward limit of how much you can use ChatGPT. That means you can use it as much as you want without paying a single cent. However, there are some limitations in place if the service is extremely busy, and you may see your requests taking much longer, or even returned if usage is high. It’s also possible that your free ChatGPT account may not even be available during certain times of high activity, as OpenAI sometimes limits access to free accounts to help mitigate high server usage.

It’s also important to note that ChatGPT 3.5 is more likely to hallucinate than GPT-4 does, so it’s important to double check all the information that it provides. (That said, you should always double-check important information generated by AI.)

Claude Pro vs. ChatGPT Plus: How much is a subscription?

If you’re planning to use Claude or ChatGPT extensively, it might be worth upgrading to one of the currently available monthly plans. Both Anthropic and OpenAI offer subscription plans (though new ChatGPT Plus subscriptions are currently closed). So how do you decide which one to purchase? Here’s how they stack up against each other.

Claude Pro costs $20 a month. Unlike ChatGPT Plus (which gives you access to OpenAI’s GPT-4 model) Claude already offers its latest and greatest model in the free and limited plan. As such, subscribing for $20 a month will simply reward you with at least five times the usage of the free service, making it easier to send longer messages, have longer conversations before the context tokens on the AI run out (context tokens determine how much information the AI can understand when it responds), as well as increasing the length of files that you can attach. Claude Pro will also get you faster response times and higher availability and priority when demand is high.

On the other hand, ChatGPT Plus seems to offer a bit more for that $20 subscription, as it offers you GPT-4, OpenAI’s most complex and successful language model. GPT-4 is capable of far more than the free systems available in ChatGPT without a subscription. Subscribing to ChatGPT Plus will also get you faster response times, priority access when demand for the chatbot is high, and access to the newest features, such as DALL-E 3’s image creation option. Subscribers can also take advantage of ChatGPT Plugins, which are community-created items that can expand the possibilities of what you can do with ChatGPT.

Is Claude AI more accurate than ChatGPT?

Accuracy is an area that AI language models, such as those that run Claude and ChatGPT, still struggle with. While these models can be accurate and are trained on terabytes of data, they have been known to “hallucinate” and create their own facts and data.

Ultimately, my own experience has shown that Claude tends to be more factually accurate when summarizing things than ChatGPT, but that’s based on a very small subset of data. No matter which service you go with, they’re both going to have problems, and you’ll want to double-check any information that ChatGPT or Claude provides you with to ensure it isn’t plagiarized from something else, or just entirely made up.

Is Claude better than ChatGPT?

There are some places that Claude is better than ChatGPT. For starters, Claude offers a much safer approach to the use of AI, with more restrictions placed upon its language models that ChatGPT just doesn’t offer. This includes more restrictive ethics, though ChatGPT has continued to evolve how it approaches the ethics of AI as a whole.

Claude also offers longer context token limits than ChatGPT currently does. Tokens are broken-down pieces of text the AI can understand (OpenAI says one token is roughly four characters of text.) Claude offers 200,000 tokens for Claude 2.1, while GPT-4 tops out at 32,000 in some plans, which may be useful for those that want to have longer conversations before they have to worry about the AI model losing track of what they are talking about. This increased size in context tokens means that Claude is much better at analyzing large files, which is something to keep in mind if you plan to use it for that sort of thing.

However, there are also several areas that ChatGPT comes ahead. Access to the internet is a big one: Having open access to the internet means ChatGPT is always up-to-date on the latest information on the web. It also means the bot is susceptible to more false information, too, though. So there’s definitely a trade-off.

OpenAI has also made it exceptionally easy to create your own custom GPTs using its API and language models, something that Claude doesn’t support just yet. ChatGPT also gives you in-chat image creation thanks to DALL-E 3, which is actually very impressive for AI image generation.

Ultimately, Claude and ChatGPT are both great AI chatbots that offer a ton of usability for those looking to dip their toes in the AI game.


Source: LifeHacker – The Biggest Differences Between Claude AI and ChatGPT

Frankly, a Modular Kitchen Remodel Is a Great Idea

No matter how much you love your current home’s design, the day will come when it’s worn down, worn out, and in dire need of a refresh and renovation. And those refreshes can be super expensive—especially kitchens, which cost an average of about $27,000 to remodel (and some folks pay a lot more than that). If you’re looking to remodel your kitchen, you’ve probably tried to figure out ways to keep the costs down—and maybe you despaired once you factored in demolition, materials, and labor. But there’s a kitchen remodeling strategy that can make the whole process a lot easier, faster, more flexible, and less expensive: the modular kitchen renovation approach.

Benefits of modular kitchens

A modular kitchen is a kitchen assembled from pre-built cabinet modules. Instead of everything in the kitchen being assembled separately, you purchase your kitchen in “chunks.” For example, you might buy a wall module with a cabinet, a sink, and a countertop. Or you might buy a tall cabinet with a wall oven. It can be a “semi-custom” solution where you can pick and choose different design elements and then piece your kitchen together like a puzzle.

Modular kitchens can offer a lot of benefits to anyone seeking to remodel their kitchen:

  • Price. Since the modules are pre-built and designed to just slide into place, this can be a pretty affordable option. How affordable? Well, Ikea, for example, will sell you an entire small modular kitchen for about $1,000. If you’re feeling super cheap and have a tiny kitchen space, you could even go for one of their kitchenettes for less than $650. If you’re looking for something a bit more upscale, you can still save a lot of money because the modules arrive ready to slide into place, so labor costs are reduced or eliminated.

  • Speed. Traditional kitchen renovations can drag on for weeks or even months, but a modular refresh can be completed in just a few days. All you have to do is measure your kitchen, choose a layout, and select the components you want—wall cabinets, upper cabinets, islands, and potentially built-in appliances. Then slide it all into place, hook up gas, water, and electricity, and enjoy your new space.

  • Flexibility. The modular nature of these kitchens means that you can move them around fairly easily. The placement of your gas, water, and electric hookups might dictate where appliances and sinks must be located, but if you want to swap your refrigerator and a cabinet after a couple of years, you can. And if modules get damaged, you can replace them individually instead of splashing out for a whole new kitchen. A modular approach also means you can start small with basic essentials and then add cabinets and other features over time.

  • Design choices. There are more modular kitchen suppliers than you might think, ranging from lower-priced options like Ikea to much more glam and expensive options with a designer touch. Since installation costs are generally lower, this means you can redirect some of your budget to upgraded materials and appliances.

  • Moveable. If you’ve watched international house-hunting shows on TV, you might know that in some European countries people actually take their kitchens with them when they move—and with a modular kitchen, so can you. If you spend money and time crafting a kitchen you love, you can move it like any other furniture to a new location, as long as you have the right space for it.


    Recommended products:

  • Wall-mounted kitchen cabinets with countertop ($399)

  • Modular kitchen with white cabinets ($1,011)

  • Small, modern kitchenette ($621)

  • Upscale option with four modules to choose from (prices vary)


    Tips for modular remodels

To make your modular kitchen even more cost-effective, keep a few options in mind:

  • The classic hardware swap. Buying economical cabinetry and swapping out the pulls and hinges is a classic money-saving remodeling trick, and works just as well on cabinets from, say, Ikea or Boxi.

  • Appliance choice. Some modular kitchen makers include their own appliances, which can offer a truly finished and cohesive look. But buying appliances separately can save you a lot of money, so consider all the options.

  • Consider DIYing. If you have rough-ins for gas, water, and electric ready to go, a modular kitchen is a fairly simple DIY project. If you can move cabinets into place and connect gas and water lines, you can go from delivery to functioning kitchen pretty easily, and this can save you what scientists call a “boatload” of money.

  • Single supplier. If your goal is a sleek, cohesively designed kitchen, choose a supplier that offers everything you need—not just cabinets but appliances, countertops, and options for drawers and other storage features. Sourcing things from different places can make a kitchen look pretty patchwork.


Source: LifeHacker – Frankly, a Modular Kitchen Remodel Is a Great Idea

Today's NYT Connections Hints (and Answer) for Wednesday, November 29, 2023

Today’s puzzle will keep you on your TOEs! If you’re looking for the Connections answer for Wednesday, November 29, 2023, read on—I’ll share some clues, tips, and strategies, and finally the solutions to all four categories. Along the way, I’ll explain the meanings of the trickier words and we’ll learn how everything fits together. Beware, there are spoilers below for November 29, NYT Connections #171! Read on if you want some hints (and then the answer) to today’s Connections game. 

If you want an easy way to come back to our Connections hints every day, bookmark this page. You can also find our past hints there as well, in case you want to know what you missed in a previous puzzle.

Below, I’ll give you some oblique hints at today’s Connections answers. And farther down the page, I’ll reveal the themes and the answers. Scroll slowly and take just the hints you need!

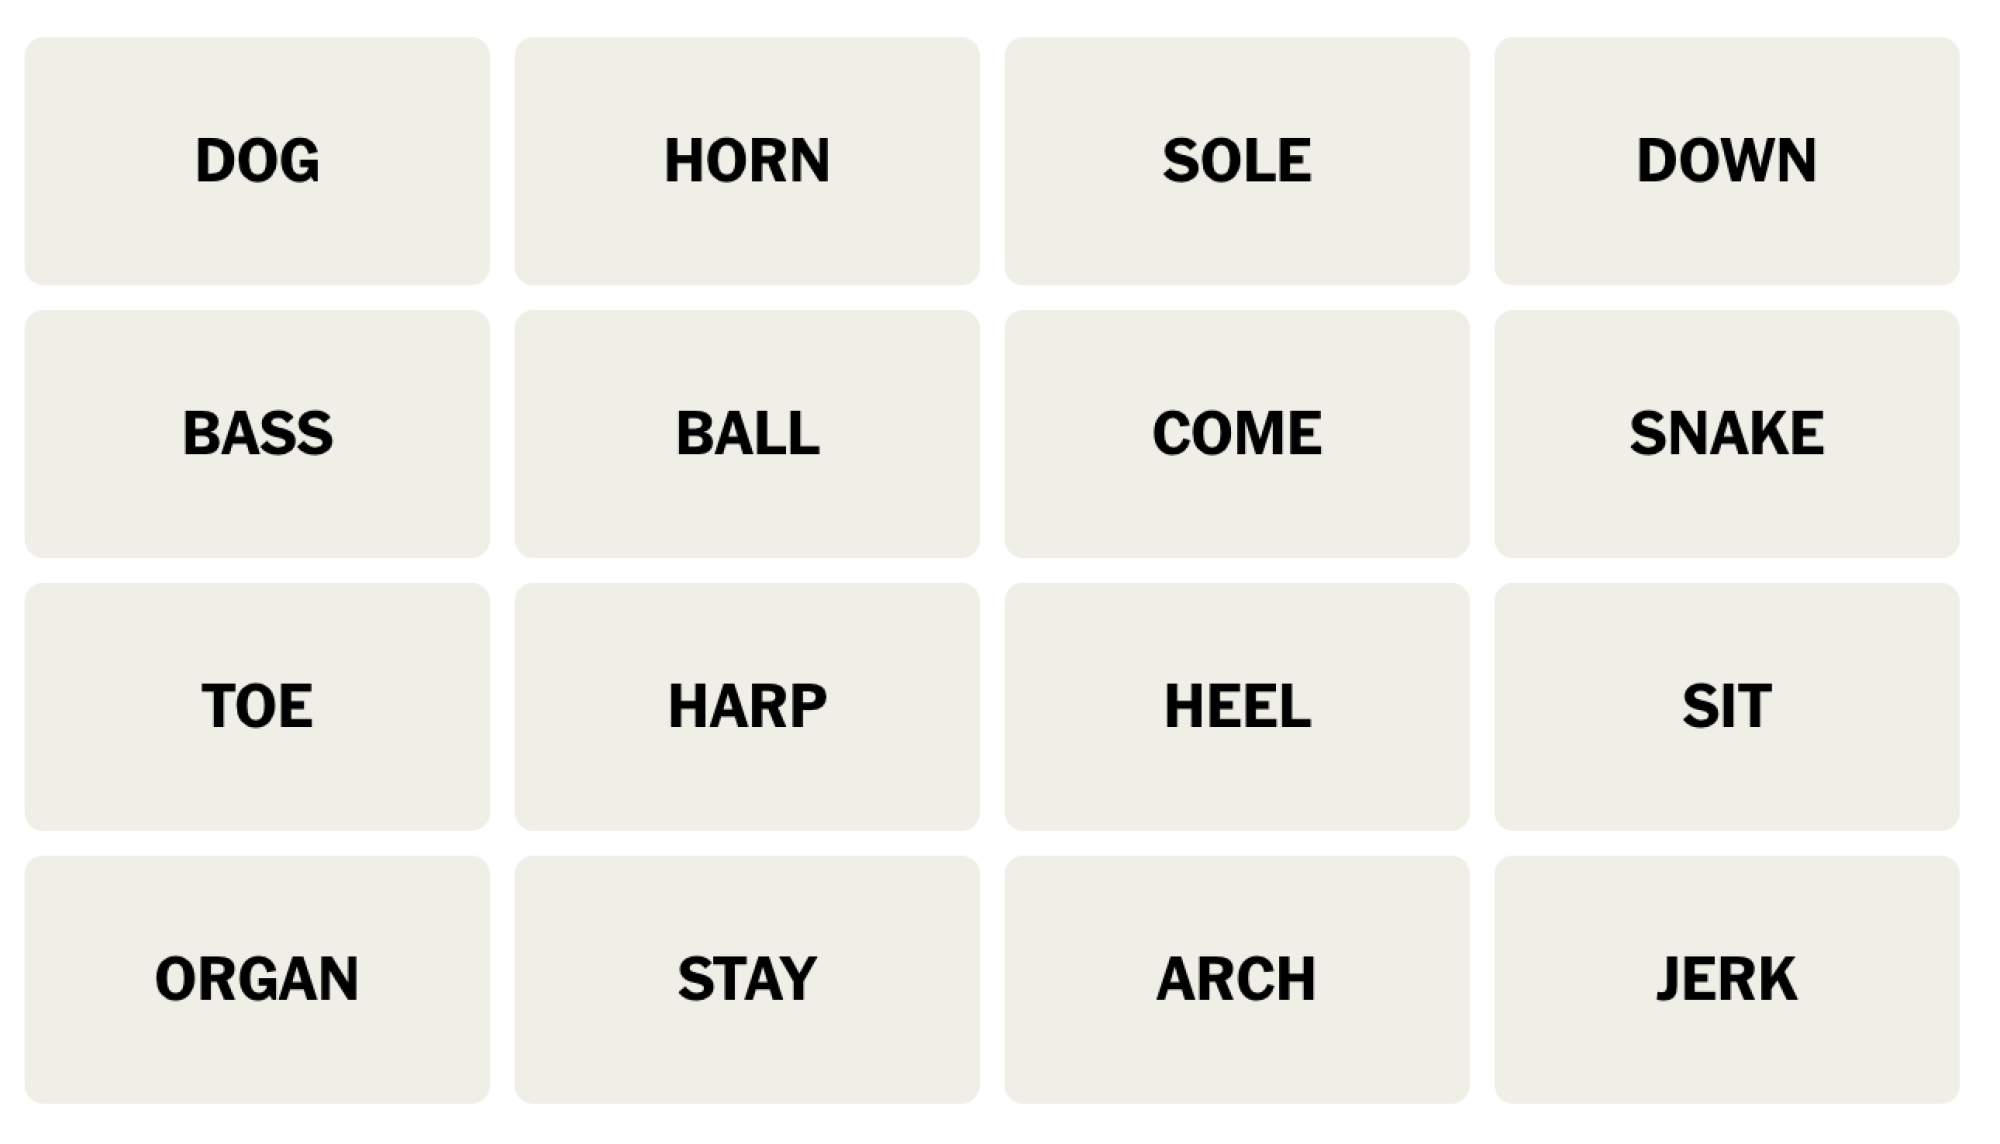
NYT Connections board for November 29, 2023: DOG, HORN, SOLE, DOWN, BASS, BALL, COME, SNAKE, TOE, HARP, HEEL, SIT, ORGAN, STAY, ARCH, JERK.

Credit: Connections/NYT


Does today’s Connections game require any special knowledge?

Nothing too unusual today.

Hints for the themes in today’s Connections puzzle

Here are some spoiler-free hints for the groupings in today’s Connections:

  • Yellow category – You’ll find these in socks and shoes.

  • Green category – These make beautiful music together.

  • Blue category – What you say before giving a dog treat.

  • Purple category – Bad guy.

Does today’s Connections game involve any wordplay?

Not in any traditional sense, but one of the words could fit in three different categories, so guess carefully. 

Ready to hear the answers? Keep scrolling if you want a little more help.


BEWARE: Spoilers follow for today’s Connections puzzle!

We’re about to give away some of the answers. Scroll slowly if you don’t want the whole thing spoiled. (The full solution is a bit further down.)

What are the ambiguous words in today’s Connections?

  • Depending on how you pronounce it, a BASS can be an instrument or a fish. (A SOLE can also be a fish, but there are no fish in today’s puzzle.) 

  • A JERK is an Olympic weightlifting move (the first place my mind went, obviously) or a sharp sudden movement (hence the name for the weightlifting move) but here you want to think of the “asshole” meaning. 

  • HEEL is the trickiest word here today–it’s part of your foot, it’s a command that tells a dog “walk nicely by my side, please,” and it’s a word you might use to describe something unpleasant. All three meanings could work in different categories today. 

What are the categories in today’s Connections?

  • Yellow: FOOT PARTS

  • Green: MUSICAL INSTRUMENTS

  • Blue: DOG COMMANDS

  • Purple: BADDIE

DOUBLE BEWARE: THE SOLUTION IS BELOW

Ready to learn the answers to today’s Connections puzzle? I give them all away below.

What are the yellow words in today’s Connections?

The yellow grouping is considered to be the most straightforward. The theme for today’s yellow group is FOOT PARTS and the words are: ARCH, BALL, SOLE, TOE.

What are the green words in today’s Connections?

The green grouping is supposed to be the second-easiest. The theme for today’s green category is MUSICAL INSTRUMENTS and the words are: BASS, HARP, HORN, ORGAN.

What are the blue words in today’s Connections?

The blue grouping is the second-hardest. The theme for today’s blue category is DOG COMMANDS and the words are: COME, DOWN, SIT, STAY.

What are the purple words in today’s Connections?

The purple grouping is considered to be the hardest. The theme for today’s purple category is BADDIE and the words are: DOG, HEEL, JERK, SNAKE.

How I solved today’s Connections

SIT, STAY, DOWN, and COME are DOG commands, but so is HEEL. I figure HEEL is more likely to go with TOE, BALL, and ARCH as parts of the feet, so I leave it out of this first grouping. 🟦

That’s when I notice I still have too many words for parts of the feet; SOLE is in there too. What else are we looking at? Aha–a HEEL can be a dislikable person (as in wrestling, or that song about the Grinch). JERK, SNAKE, and DOG fit with it. 🟪

That leaves us with TOE, BALL, SOLE, and ARCH as parts of feet (or shoes) 🟨, and four musical instruments: HORN, BASS, HARP, and ORGAN. 🟩

Connections 
Puzzle #171
🟦🟦🟦🟦
🟪🟪🟪🟪
🟨🟨🟨🟨
🟩🟩🟩🟩

How to play Connections

I have a full guide to playing Connections, but here’s a refresher on the rules:

First, find the Connections game either on the New York Times website or in their Crossword app. You’ll see a game board with 16 tiles, each with one word or phrase. Your job is to select a group of four tiles that have something in common. Often they are all the same type of thing (for example: RAIN, SLEET, HAIL, and SNOW are all types of wet weather) but sometimes there is wordplay involved (for example, BUCKET, GUEST, TOP TEN, and WISH are all types of lists: bucket list, guest list, and so on).

Select four items and hit the Submit button. If you guessed correctly, the category and color will be revealed. (Yellow is easiest, followed by green, then blue, then purple.) If your guess was incorrect, you’ll get a chance to try again.

You win when you’ve correctly identified all four groups. But if you make four mistakes before you finish, the game ends and the answers are revealed.

How to win Connections

The most important thing to know to win Connections is that the groupings are designed to be tricky. Expect to see overlapping groups. For example, one puzzle seemed to include six breakfast foods: BACON, EGG, PANCAKE, OMELET, WAFFLE, and CEREAL. But BACON turned out to be part of a group of painters along with CLOSE, MUNCH, and WHISTLER, and EGG was in a group of things that come by the dozen (along with JUROR, ROSE, and MONTH). So don’t hit “submit” until you’ve confirmed that your group of four contains only those four things.

If you’re stuck, another strategy is to look at the words that seem to have no connection to the others. If all that comes to mind when you see WHISTLER is the painting nicknamed “Whistler’s Mother,” you might be on to something. When I solved that one, I ended up googling whether there was a painter named Close, because Close didn’t fit any of the obvious themes, either.

Another way to win when you’re stuck is, obviously, to read a few helpful hints–which is why we share these pointers every day. Check back tomorrow for the next puzzle!


Source: LifeHacker – Today’s NYT Connections Hints (and Answer) for Wednesday, November 29, 2023

How to See the Geminid Meteor Shower

Sky watchers: Do not miss the Geminid meteor shower this year. This annual collision of the trail of asteroid 3200 Phaetho and the Earth’s atmosphere will provide a show for anyone who looks skyward at night from now until Christmas Eve.

The peak of the Geminids will occur in mid-December, and viewing conditions will be close to perfect this year. Since the new moon rises on December 12, the sky will be extra dark during the Geminid peak, meaning you might be able to see as many as 50 shooting stars per hour.

When and where to see the Geminid meteor shower

The Geminid meteor shower has been visible since mid-November, and it will continue until Christmas, but the peak of the shower is likely to be on December 13 or 14. Shooting stars should be visible around 9 or 10 p.m. local time, but if you stick around until much later, the show will get better. As the night progresses, the radiant point of the shower will appear to climb higher into the sky, and you should see a ton of fast moving, yellow meteors. The best time for viewing will likely be around 2 a.m. local time.

As you might expect from the name, the meteors of the Geminid shower seem to originate from the constellation Gemini. The easiest way to find Gemini is to locate Orion’s Belt. Follow the line from Orion’s right foot (that’s Rigel, the brightest star in the constellation), through the belt, and up towards Betelgeuse (Orion’s left shoulder). Keep following that line to Castor and Pollux, the main stars in Gemini. (You could also make this much easier by downloading a constellation-finding app like Star Walk 2.) Don’t sweat the direction too much, though. These meteors will likely be visible all over the sky.

For the best meteor spotting results, go to an area with a wide, unobstructed view of the sky and as little light pollution as possible. Give your eyes about a half hour to fully adjust to the dark, look toward Gemini, and wait.


Geminid Meteor Shower watching starter kit

All you’ll need is your eyes to check out the shooting stars during the Geminid meteor shower, but if you want to make the experience better, here are some meteor-peeping accessories.


Asteroid 3200 Phaethon: a space oddity

Widely regarded as the most impressive meteor shower of the year, the Geminids are unique because they are the result of an asteroid instead of a comet. The celestial father of Geminid shooting stars is 3200 Paethon, an asteroid that acts like a comet. Comets are made of ice and asteroids are made of rock, so most asteroids don’t have tails and don’t leave behind a trail of debris that causes shooting stars. But 3200 Phaethon has a tail that scientists believe is sodium gas.

That doesn’t explain where the material that creates the Geminid meteors comes from, though. There isn’t a solid answer for why the asteroid left so much material in its wake, but scientists speculate that a “disruptive event” a few thousand years ago could have caused the asteroid to break apart and eject the billions of tons of floating debris that make up the Geminids.


Source: LifeHacker – How to See the Geminid Meteor Shower

This App Makes It Easier to Keep Track of Everything on Your Watchlist

Frankly, there’s too much content out there to keep up with. I don’t know how anyone stays on top of new episodes of the buzziest shows rather than rewatching the same comfort shows over and over again. But, still, there’s new TV and movies to catch up on, and if you don’t want to lose your mind trying to keep track of it all, you’d be well served to turn to a platform to help curate your interests.

JustWatch has always been on my radar as a solid option for finding new shows and movies to watch, as well as keeping track of the titles you complete. The company hosts a giant compendium of shows and movies, including which streaming services you can find them on. Think of it like a TV Guide for the streaming era. It’s available as a website, as well as an app for iPhone and Android.

Recently, the company added some cool updates to its Watchlist feature that seem worth checking out. The JustWatch Watchlist is now broken into three different categories:

  • My Lists: This section is similar to the original Watchlist you may be familiar with, but there are some key new features here. You can now use it to build different lists of shows and movies you want to watch, which should work great for separating lists of titles to watch with your family from the ones you want to watch by yourself or with friends. (After all, Bluey and Oppenheimer don’t need to be on the same list.) You can also import lists from other JustWatch users or from IMDB, which should make finding something new to watch a little easier, and you can share your lists with other users. These imported lists will tell you which streamers each title can be found on, so you don’t need to go hunting for each one.

  • Public Lists: This section is where you can go to find lists of TV shows and movies from JustWatch curators. JustWatch says you’ll be able to find lists for categories from the Academy Awards, to lists about specific actors, directors, or franchises.

  • TV Show Tracking: This section should be a welcome addition to anyone who wants to keep tabs on the many, many shows that are out there to binge. You can add shows in your queue, then check them off as “Continue Watching”, “Haven’t Started,” or “Caught Up,” depending on their status.

In addition to the changes to Watchlist, JustWatch also updated its streaming service selection feature. According to the company, it should be easier to know how much each streamer costs, what you get with each, and where you can rent or buy content (as well as where you can watch that content for free).


Source: LifeHacker – This App Makes It Easier to Keep Track of Everything on Your Watchlist

The Specialty Cleaning Tools That Are Actually Worth It

This shopping season, you should invest in your home by upgrading your standard cleaning tools to something a little snazzier—and something with more features that make sense. Some of these save you time, some of these get your stuff even cleaner, and some of them will save you money by reducing the single-use products you rely on. No matter whether you want to make the place cozy for the holidays or get a head start on New Year’s resolutions, these are a good jumping-off point to get your home in order.


If you’re shopping for tools make home cleanup more convenient, here are some recommendations from this article:


Upgraded cleaning tools for the kitchen

Around your kitchen, it might be time to replace the tools that will help you clean everything from the floor to the countertops. In the kitchen, everything gets dirty way faster than you expect it, so it’s important to have the tools to help you keep the mess at bay. Regular old brooms and mops are fine, but a little upgrade can make a big difference.

  • It’s finally time to invest in a mop bucket with a wringing attachment, but it turns out it’s not a huge investment at all: These things have become so popular that the O-Cedar set is just $24.99 at Target (and that includes a cloth mop and refill head, too). You can also use the wringer on washcloths before you clean with them so you’re not getting your granite or hardwood too wet. 

  • Upgrade your Swiffer to a mop option that combines old-school techniques with a modern, eco-friendly approach: The Joymoop mop and bucket set ($37.90) features a flat head similar to a Swiffer, but you put reusable fabric pads on it and wring them out in the accompanying bucket. The bucket has a wet and dry chamber so you can squeeze dirty water out away from the clean stuff. 

  • Another superior broom swap is the silicone sweeper from Burferly ($32.99). One head has traditional bristles while the other is solid silicone, so you can round up floor debris super easily. Use this in your kitchen for broken glass, crumbs, and whatever else, but drag it along carpets all over your house to dislodge pet hair, too.

Upgraded cleaning tools for the living room

The living room presents its own set of cleaning challenges, ones that require all kinds of cleaning tools and techniques to keep it looking presentable. Here are some tools that might make things easier.

  • Pick up a blinds cleaner ($12.60) to easily clean between individual blinds on your window. You can use a tongs with microfiber cloths rubberbanded around the sides, but isn’t having a specific device just a little more elegant? 

  • Upgrade your lint roller to the Chom Chom roller ($22.46), which captures hair and lint in an internal chamber, making it easy to clean out like a vacuum. It never needs refills and can be used over and over again.

Upgraded cleaning tools for the bathroom

Bathrooms are the dirtiest and the grossest room in the house, so they require the most work to clean. You have plenty of tools for the task, but some could probably use a little update. 

  • Stop using an old toothbrush to scrub nooks and crannies when you could be using a special gap-cleaning brush, like this one from Rienar ($5.97). Unlike the poor old toothbrush that’s become your go-to scrubber, the handle on this is actually designed for you to scrub things, plus the bristles are really long, so you can get into cracks more easily. 

  • Upgrade how you clean the shower altogether with a cordless spin scrubber ($39.99) that revolves 500 times per minute and features a long pole that will stop you from ever needing to crouch down and try to scrub the inside of your shower again. It has brush heads to clean everything from tile to windows. 

  • Leave streaky glass cleaner behind with the cordless window vacuum from Sharper Image ($80). You fill it with water, kind of like what you do with a mini steamer, and it sprays the water onto your glass, then sucks it off and puts it in a separate reservoir for dirty water. It comes with a removable, washable filter and an extension handle for larger surfaces. 


Source: LifeHacker – The Specialty Cleaning Tools That Are Actually Worth It

The Good and the Bad of the 800-Gram Fruit and Vegetable Challenge

Diet “challenges” are, by their nature, strict and not sustainable. (That’s what makes them challenges.) They usually demand you restrict your food choices in some way, such as cutting out entire food groups. But what if there was a diet challenge that just wanted you to eat more vegetables? That’s the idea behind the 800-gram challenge. 

What is the 800-gram challenge? 

The basic idea is simple: You eat 800 grams of fruits and/or vegetables each day. That’s it, that’s the challenge. 

Surely it can’t be that simple! you might object. Well, you’re right. There is an official website for the challenge, and if you sign up for the newsletter, you’ll get a free guide telling you the rules for the challenge. This includes a big list of “Yes they count!” foods and a smaller list of “No, they don’t count” foods. (You can also view those lists at the main website.) Corn and potatoes count. Raisins, juices, and nuts do not.

It also includes a note that the hashtag #800gChallenge is trademarked, and “cannot be used for organized programs, challenges, or coaching without licensing from OptimizeMe nutrition.” 

Why 800 grams?  

The 800-gram challenge website cites a 2017 meta-analysis on fruit and vegetable consumption. The authors concluded that the more fruits and vegetables you eat, the lower your risk of cancer, cardiovascular disease, and “all-cause mortality” (which makes it sound like if you eat enough vegetables you’ll live forever, but they just mean you’ll live longer). The benefits level off at 600 grams per day for cancer risk, and 800 grams per day for everything else. If you eat more, that isn’t a bad thing, it just isn’t necessarily any better than eating 800 grams. 

They write: “An estimated 5.6 and 7.8 million premature deaths worldwide in 2013 may be attributable to a fruit and vegetable intake below 500 and 800 g/day, respectively, if the observed associations are causal.” That is, I will note, a big if

Despite what a few contrarians on TikTok want you to believe, fruits and vegetables are associated with good health—in this study and in others. Will you personally avert death by eating 800 grams of fruits and veggies? Nobody can guarantee that. But it isn’t likely to hurt. 


Need a food scale? 


How much fruit and vegetables does it take to hit 800 grams? 

I had to try the challenge, of course. The prescribed 800 grams sounded like it would be a lot, since that’s 28 ounces, or about 1.75 pounds. Per day. 

The OptimizeMe website helpfully offers that this amount of fruits and veggies is about six cups, typically totals 400 to 500 calories, and can fit on a dinner plate. You would split that up over your full day of eating, of course—so about two cups per meal. And it’s up to you how much of that you want to be fruit and how much will be vegetables. 

Here’s what I ate on the first day of the challenge: 

  • Banana, 199 g

  • Two small apples, 215 g

  • Carrot, 80 g

  • Black bean soup, ingredients 381 g (beans, onions, etc.—I weighed these as I made the recipe and then divided the total by the number of servings)

  • Total for the day: 875 g

In addition, I had a slice of pizza, some Sour Patch candy, a package of pork bao from Trader Joe’s, a leftover Olive Garden breadstick, a small portion of steak, and an Old Fashioned cocktail.  Total: 2,580 calories, which is neither unusually high nor low for me. 

I did have to work to get those veggies in. The soup was a meal I had already planned for the day, and I might normally have an apple or a banana at some point, but on this particular day I had two apples, one banana, and one carrot as snacks. It took extra effort, but not enough to be onerous. 

I kept up the challenge for over a week, with totals of 875, 804, 830, 838, 877, 777, 745, 765, and 756 grams. You can see I stopped worrying so much about meeting the magic number of 800. I also got a bit lazy about weighing: Bananas usually came out to around 200 grams, so instead of weighing a banana, I would just log it as 200. There’s an asterisk on those banana numbers, though, which we’ll get to.

How realistic is the 800-gram challenge?

Based on my experience—as a person who routinely buys fruits and veggies, preps meals on the weekend, and has a decently large calorie budget to work with—it wasn’t hard at all to do for a week. It was getting old by the end of the week, though. Here are a few things you should consider if you want to give this challenge a try: 

Weighing isn’t hard, but the way they want you to weigh things is annoying

I’m no stranger to the food scale, but come on, do I really have to weigh the onion that I’m about to chop to make some soup? If I’m following the challenge, I do. And then I have to jot it down on a piece of paper somewhere, because this isn’t something that apps do automatically (unlike calories, where I can scan the barcode on that pack of Trader Joe’s bao and have the data saved instantly to my phone). 

Another thing that annoyed me: I don’t think you’re supposed to count the peel on the banana, or the core of the apple. My 200-gram bananas were likely only supposed to count as 120 grams or so. But who is going to weigh their banana peel when they’re done? Or their apple core? The beauty of an apple as a snack is that you can eat it on the go. I’m not saving the core to weigh when I get back home. 

The rules don’t always make sense

And another thing! The rules of the challenge are arbitrary and—yep, I’m going to say it—stupid. Hummus only counts if you make it yourself, not if you buy it. (Sorry, I counted my store-bought hummus.) Applesauce and pickles  don’t count if there’s any sugar in them—what? Like the sugar somehow cancels out the fact that applesauce is made of apples? 

You could defend these rules by saying you want to make sure that the 800 grams only counts fruits and vegetables, not oil that might be added to the hummus or sugar that is added to the applesauce. But does that really justify not counting those items? It sounds more like an opportunity to restrict foods or to make foods less accessible. How many of us make our own hummus? 

The rule about juice had the same feel to it, too. Juice counted as fruit in at least some of the studies that the meta-analysis was based on. Striking it from the list for an internet challenge sounds like an attempt to make the challenge fit with other rules beyond just meeting a total. I’m not a huge fan of juice, nutritionally speaking, but it seems unfair to add an anti-juice rule. Even myplate.gov allows juice in your daily servings of fruit (they just recommend that you don’t allow it to be all your daily fruit, and cap it at half). 

Going from 0 to 800 grams may make your tummy unhappy

This isn’t an issue I had, but one I see reported a lot: Not everybody’s gut is ready to handle that amount of fiber all at once. It’s an 800-gram challenge that people tend to jump into all at once, not a “slowly work up to eating 800 grams every day” plan. Your intestines might prefer the latter.

You may be tempted to turn it into a weightloss diet

The challenge’s website asks if you are “sick of the lack of results” from restrictive diets,  which seems to imply that this challenge is a pathway to “results” that you have not heretofore gotten. Sure sounds like they’re talking about weight loss. PopSugar, in writing about the challenge, presents it as a “simple solution” for “trying to lose weight.” 

There seems to be a temptation to think of eating more vegetables as another way to say “eating fewer calories.” We’ve seen this in “healthy eating” talk in general (see my rant about how healthy eating is not the same thing as dieting). Fruits and veggies are great, but you also need protein, healthy fats, and other nutrients they don’t provide. If you’re chasing the 800 gram number, and allowing that to displace other foods on a low calorie diet, you may not be eating very “healthy” after all. 

Every time somebody says “800 grams by weight,” I want to scream

Finally, if you’ll allow me one pedantic quibble, the website and many of the people who talk about the #800gChallenge talk about getting 800 grams “by weight” of fruits and veggies. Unlike ounces, which come in both a measure of weight (“ounces”) and a measure of volume (“fluid ounces”), grams only work one way. And technically they are a measure of mass, not weight, but that’s a physics lesson for another time. 

Final thoughts on the 800-gram challenge

I feel conflicted about this whole thing. On the one hand, getting more fruits and veggies is a good thing, and I like that the challenge has you focus on what you are including in your diet, rather than encouraging you to cut things out. It also gives you credit for what you already eat, rather than demanding you add a certain amount; if you already eat 600 grams of fruit and veggies most days, you only need to add another 200.

I also like that the focus isn’t on body size, but on healthy eating. Even if you ignore the formalized challenge and just take the results of the fruit-and-vegetable research to heart, you’re eating veggies to make yourself healthier, not to lose weight. Not everybody needs to lose weight, but we can all benefit from working a variety of plant foods into our diet. 

Ultimate I think my biggest problem with the challenge is the challenge format. The OptimizeMe website promises an “antidote to dieting nonsense” and then tells you to weigh your food and consult yes/no lists. That sounds like dieting nonsense to me. 

But then again: If somebody told you it’s good to get 800 grams of vegetables, you’d probably agree and then ignore them. If your whole Crossfit gym is doing a “challenge” together for a limited time, you now have a structure encouraging you to see how much plant matter you’re actually eating, and take the recommendation seriously. Maybe the human brain needs silly challenges to thrive. 


Source: LifeHacker – The Good and the Bad of the 800-Gram Fruit and Vegetable Challenge

I Investigate Yet Another Internet Egg-peeling Hack

The art of peeling a boiled egg is one that people seem to take quite personally. It’s an inexplicable phenomenon in which every person on planet Earth has to do it differently, and so-called fool-proof methods don’t seem to work for everyone. It’s like reaching enlightenment when you finally crack the code, when karma bestows upon you your “perfect method.” Mine is steaming a hard-boiled egg and dropping it in cold water. It peels like a dream every time. But like the sun rises every day, a new method has crossed my path: boiling eggs in oily water for easy peeling. Does it work? I grabbed a few pots to find out.

The oil-boil method in question

Since boiling eggs can vary dramatically in time, cold-start versus boiling-start, or how to cool it, egg boiling tests can quickly blow out of proportion with details. This particular method comes from Tasting Table and leaves everything up to the user except for the simple addition of oil. Simply add a tablespoon of any oil (that you don’t mind pouring down the drain later) to the pot of water, and set it to boil. Then add the eggs and boil them how you normally would. According to the post, the oil seeps through the egg’s porous shell and “separates the shell from the membrane and the egg…” If this is the case, an egg rubbed with oil to ensure even coating should do well when dropped into boiling water too.

It seems plausible, so I set up three pots of water. Each pot had water in it and was set to boil. One pot with a tablespoon of canola oil added to it would get an egg, another pot with no oil added would get an egg that I rubbed with oil, and the last pot was the control with no oil involved in the water or on the egg. 

The method didn’t indicate what temperature the eggs should start at, so I used fridge-cold eggs. One egg cracked upon entering the boiling water from thermal shock. Obviously that one would peel differently than the others so I added a second one to that pot that did not crack. I boiled the eggs for nine minutes each and took them out to cool on plates.

The results

Hardboiled eggs on plates with labels

Credit: Allie Chanthorn Reinmann

The control egg. Honestly, peeling this egg was frustratingly fine. I haven’t boiled an egg like this in a while, so I was hoping it would be a horrible experience with ripped out chunks of white and membranes flapping in the wind. As you can see in the picture, the egg looks good. Actually, all of the eggs look good. I would totally use them all for deviled eggs. Since that’s a non-answer to the peeling issue, I had to make myself incredibly sensitive to the ease of peeling. From that lens, although there were no torn bits, peeling the control egg was slow going. I had to peel carefully and break off small pieces of shell to ensure the egg stayed perfect. The membrane was stuck to the egg white at times, so I had to go back and carefully peel it off in a few sections. A careful, patient hand was needed. If I had to rate the ease of peeling on a scale from 1 to 10, I’d put this at a 7.

The eggs in oily water. As I mentioned, I had two eggs in this pot because one of them cracked. I started with the cracked egg and peeling was stupendously easy. I was surprised that not much egg white had breached the shell when it cracked. There is an imperfection on that egg where the air bubble deflated, but it didn’t really ruin the shape inside the shell. Although I cracked the egg in multiple areas in order to peel it, the shell came off easily in only a few sections. It’s hard to tell if any oil seeped through the shell like the Tasting Table post claims, or if the water and oil only entered through the large crack, but the oil present made the egg shell and membrane feel looser. On my egg-peel scale, I’d rate this as a 9. Unfortunately, it’s impossible to duplicate it because the crack was out of my control.

Luckily, the uncracked egg in oily water was pretty darn easy to peel too, and I’d rate it as an 8. The shell came off in very few sections and I didn’t have to go back to remove much of the membrane. The oil that came off of the shell onto my fingers also helped me loosen the shell and membrane as I went along peeling. A small piece of the white came off, but hardly something to get upset with.

The oil-coated egg. I was able to peel this egg easily too. I cracked the shell in a few areas and set off to peel as I normally would. I think this one peeled as easily as the un-cracked egg dropped in oily water with the shell loosening and releasing in only three or four sections. This egg scores an 8 as well.

The easiest way to peel an egg 

The results from this oily water boiling experiment were too close for my liking to declare oil-tinged water the best way to boil your egg for optimal peeling results. Although I noticed a difference with added oil, adding absolutely no oil gave me nearly the same results as long as I didn’t rush it.

However, there might be something to having a little bit of oil coating the egg shell simply because it gets on your fingers. Even if the oil doesn’t make it through the shell and through the tacky membrane beneath, having some on my fingers did help me loosen the unwanted parts as I went along. My thumb was able to glide along the white without accidentally ripping into the egg, and that felt easier than normal. 

If you can’t seem to find the peeling method that works for you, then I’d encourage you to try this trick. It might be just the thing you’ve always needed. But if you already have a boiling method that leads to easy egg peeling, stick with it. What is your never-fail method for the perfect boiled (or steamed) egg? Write it in the comments; I’d love to try it out.


Source: LifeHacker – I Investigate Yet Another Internet Egg-peeling Hack

I Am Once Again Urging You to Wander Into a National Forest to Chop Down a Christmas Tree (but Legally)

Most of the time, it’s illegal to wander into a national forest to chop down a tree. Right now, however, the U.S. Department of Agriculture is all for it—provided you get yourself a Forest Service-issued permit first.

Cutting your own tree on federal land actually turns out to be a pretty affordable way to source a Christmas tree, but there are specific guidelines you need to follow to avoid running afoul of the Forest Service (which is as much a law enforcement agency as it sounds). So before you grab your axe and head into the woods this holiday season, here’s what you need to know about the USDA’s tree-cutting permit program.

Why you should cut your own tree from a national forest (besides the fact that it’s really cheap)

According to Recreation.gov, cutting down and carrying out your own holiday tree helps contribute to good overall forest health. Through this permit program, you’ll be helping to thin densely populated stands of small-diameter trees. Removing the trees already designated for removal by the Forest Service allows other trees to grow bigger and stronger. Plus, you’ll get the pride and satisfaction of chopping down the perfect Christmas tree for your home. It’s a true win-win. 

But this is Christmas we’re talking about. Who cares about the environment? This is about your needs and experiences. As the Recreation.gov team explained to me, in addition to helping maintain a healthy forest, cutting a holiday tree is a special tradition that can be shared with families and friends to create memorable holiday experience. For many families, venturing into the forest to cut a Christmas tree for the holidays is a treasured tradition carried on for generations. It’s also a lot cheaper than buying one from a tree lot!

How to cut your own tree from a national forest

The USDA Forest Service sells Christmas Tree permits through Recreation.gov. Prices range from $5 to $20, depending on the location of the forest. To buy your permit in advance and find your local participating forest, use this site, which also provides guidelines for the allowable cutting areas that you’ll need to review before you start choppin’.

In three simple steps, you can begin your quest to find and bring home your own “government Christmas tree.”

  1. Choose your forest. Determine which participating forest works best for your Christmas tree outing. Each forest will have specific guidelines and season dates for cutting a holiday tree.

  2. Be safe and prepared. Carefully read the details and rules of the applicable permit, and consider the Need to Know suggestions to prepare for your visit.

  3. Buy a permit. Purchase and print your permit before heading out to the forest.

Tips for cutting your own tree

I spoke with the Recreation.gov team to get some additional tips as families looking to prepare for their Christmas tree cutting adventure.

  1. Measure the space in your house so you can pick the right size tree once you are in the forest. (Don’t assume you can eyeball it, or you’ll find yourself with a Griswold Situation on your hands.)

  2. Check road and forest conditions and prepare for adverse weather.  

  3. Before cutting, make sure you are in a designated cutting area, and follow all guidelines for locations where tree cutting is allowed. Avoid venturing onto private property.

  4. Choose a tree in an overcrowded stand to help thin it out.

  5. Cut your tree close to the ground. The stump you leave behind should be about 6 inches tall.

  6. Bring a rope and tarp to move your tree from the cutting area to your vehicle.  

  7. Secure your tree to your vehicle to ensure it remains in place for your trip home.

What else you need to know 

Christmas tree permit sale dates may vary by national forest. Recreation.gov encourages families to check local forest guidelines to gather all information before purchasing to ensure they are prepared. A new permit is required each year to cut your own Christmas tree.

Again: You can only cut down trees located in designated and approved areas in the forest. This permit program is run by the USDA Forest Service, which is not the same thing as U.S. National Parks. If you’re unsure whether you’re allowed to snag a tree in a certain area, visit this page on Recreation.gov and type in either the name of your state, or the name of the forest you have in mind.


Source: LifeHacker – I Am Once Again Urging You to Wander Into a National Forest to Chop Down a Christmas Tree (but Legally)

Try the ChatGPT ‘Make It More’ Trend and Generate Absurd AI Images

AI art generators are in a weird place. They can attempt to make just about anything you can think of, from a dog skateboarding in outer space, to a cup of coffee floating in the ocean. Putting the ethics of AI art aside, some of these creations do not hit the mark on the first go around, and you need to prompt the AI bot with changes to tweak the final results to your liking.

But what if your end goal isn’t to produce a quality piece of AI art? What if your goal is to make something wild.

That’s what the “make it more” trend is all about. ChatGPT users are asking DALL-E to generate an image, then once that image pops out, they ask the bot to make it more of something. In this example from Justine Moore, DALL-E was prompted to create a bowl of ramen. After that initial prompt, Moore asked it to make it spicier. It followed suit, mostly by adding a lot of peppers to the mix. She again asked DALL-E to make it spicier. It complied by setting the bowl on fire in what appears to be Pepper Hell™. By the end of the exercise, the bowl of ramen was shooting fire beams into outer space, a truly spicy bowl of noodles.

There are plenty of examples of this trend online to peruse for your pleasure, from Mashable editor Stan Schroeder’s gigantic water bottle experiment, to this body builder getting more and more buff. If you want to try the trend for yourself, however, you should be aware of some constraints.

How to use the “make it more” trend with ChatGPT

First of all, DALL-E, like other elements of GPT-4, has a limit to the amount of prompts you can issue at any one time. OpenAI isn’t super clear when you’re about to hit your limit, but just be careful not to get too carried away with your experiments, or else you’ll need to wait a few hours to try again.

Second, DALL-E is finicky with this type of request. I’m not sure if this is something OpenAI adjusted since the trend picked up steam, but I’ve had trouble getting DALL-E to cooperate with making a piece of art more of something. I tried two different scenarios in particular. First, I asked the bot to generate an image of a dog running through a field. It did. I then asked it to make the dog faster. It complied. I asked it to make the dog faster again, but it rejected me, letting me know that it already made a dog that was fast, and didn’t feel the need to make it go faster.

DALL-E chat with me requesting it to make a faster dog.

Credit: Jake Peterson

I tried the dog trick again, asking it first to create the fastest dog in the world, then asking it to make the dog even faster. DALL-E rejected me again, saying it had already made the fastest dog in the world. Silly me.

I had more luck asking the bot to generate a cup of coffee, then asking it to keep making the coffee hotter. At first, it tapped out after a couple of iterations, but I was finally able to get the bot to generate about five progressively “hotter” cups of coffee. By the time it told me that it couldn’t represent heat any differently, the cup looked like it was undergoing the Trinity Test:

Screenshot of a DALL-E conversation, asking it to generate increasingly hotter cups of coffee

Credit: Jake Peterson

I encourage you to try the trend out for yourself in the AI generator of your choice. Just remember: Start small (e.g. “generate a cup of coffee”), then ask it to change it in a simple way (“make the coffee hotter”).


Source: LifeHacker – Try the ChatGPT ‘Make It More’ Trend and Generate Absurd AI Images

This Is Your Last Chance to Stop Google From Deleting Your Old Gmail Account

Consider this your final warning: Google will begin deleting million of Gmail accounts beginning on Dec. 1, 2023. (That’s three days from now!) The great purge is aimed at Gmail accounts that have been inactive for two years, and will erase all data—Gmail, Docs, Drive, Meet, and Calendar—from those accounts. If you don’t want that to happen to you, here’s how to save your data.

Before you worry unnecessarily, this doesn’t apply to all inactive Gmail accounts, just personal ones. Work and school Gmails are safe, as are any accounts with YouTube videos attached to them. Your personal Gmail won’t be deleted if there has been any activity on it in the last two years, including any active subscriptions.

Back in March, Google announced it was going to nuke accounts because older accounts pose a greater security risk. In a blog post in May, the company added that abandoned accounts are “at least 10x less likely than active accounts to have 2-step-verification set up,” and those vulnerable accounts can be compromised and used for “anything from identity theft to a vector for unwanted or even malicious content, like spam.”

Google promises it will warn users of impending deletions by sending emails to both the original account and any recovery addresses attached to it. Google will be deleting Gmail accounts in batches, beginning with those that were created and never used.

How to keep Google from deleting your old Gmail account

It’s easy to prevent Google from deleting your old gmail account: Just log into it and do something. That something can include:

  • Reading or sending an email

  • Using Google Drive

  • Watching a YouTube video

  • Downloading an app on the Google Play Store

  • Using Google Search

  • Using “Sign in with Google” to sign in to a third-party app or service

While you’re at it, update your Gmail security settings

While you’re logging in to save your old Gmail account, you might as well take a few minutes and update your security settings. Here’s how to make sure your Gmail is as secure as possible.

How to back up the data on your Gmail account

Screenshot of Google Takeout

Credit: Stephen Johnson/Google

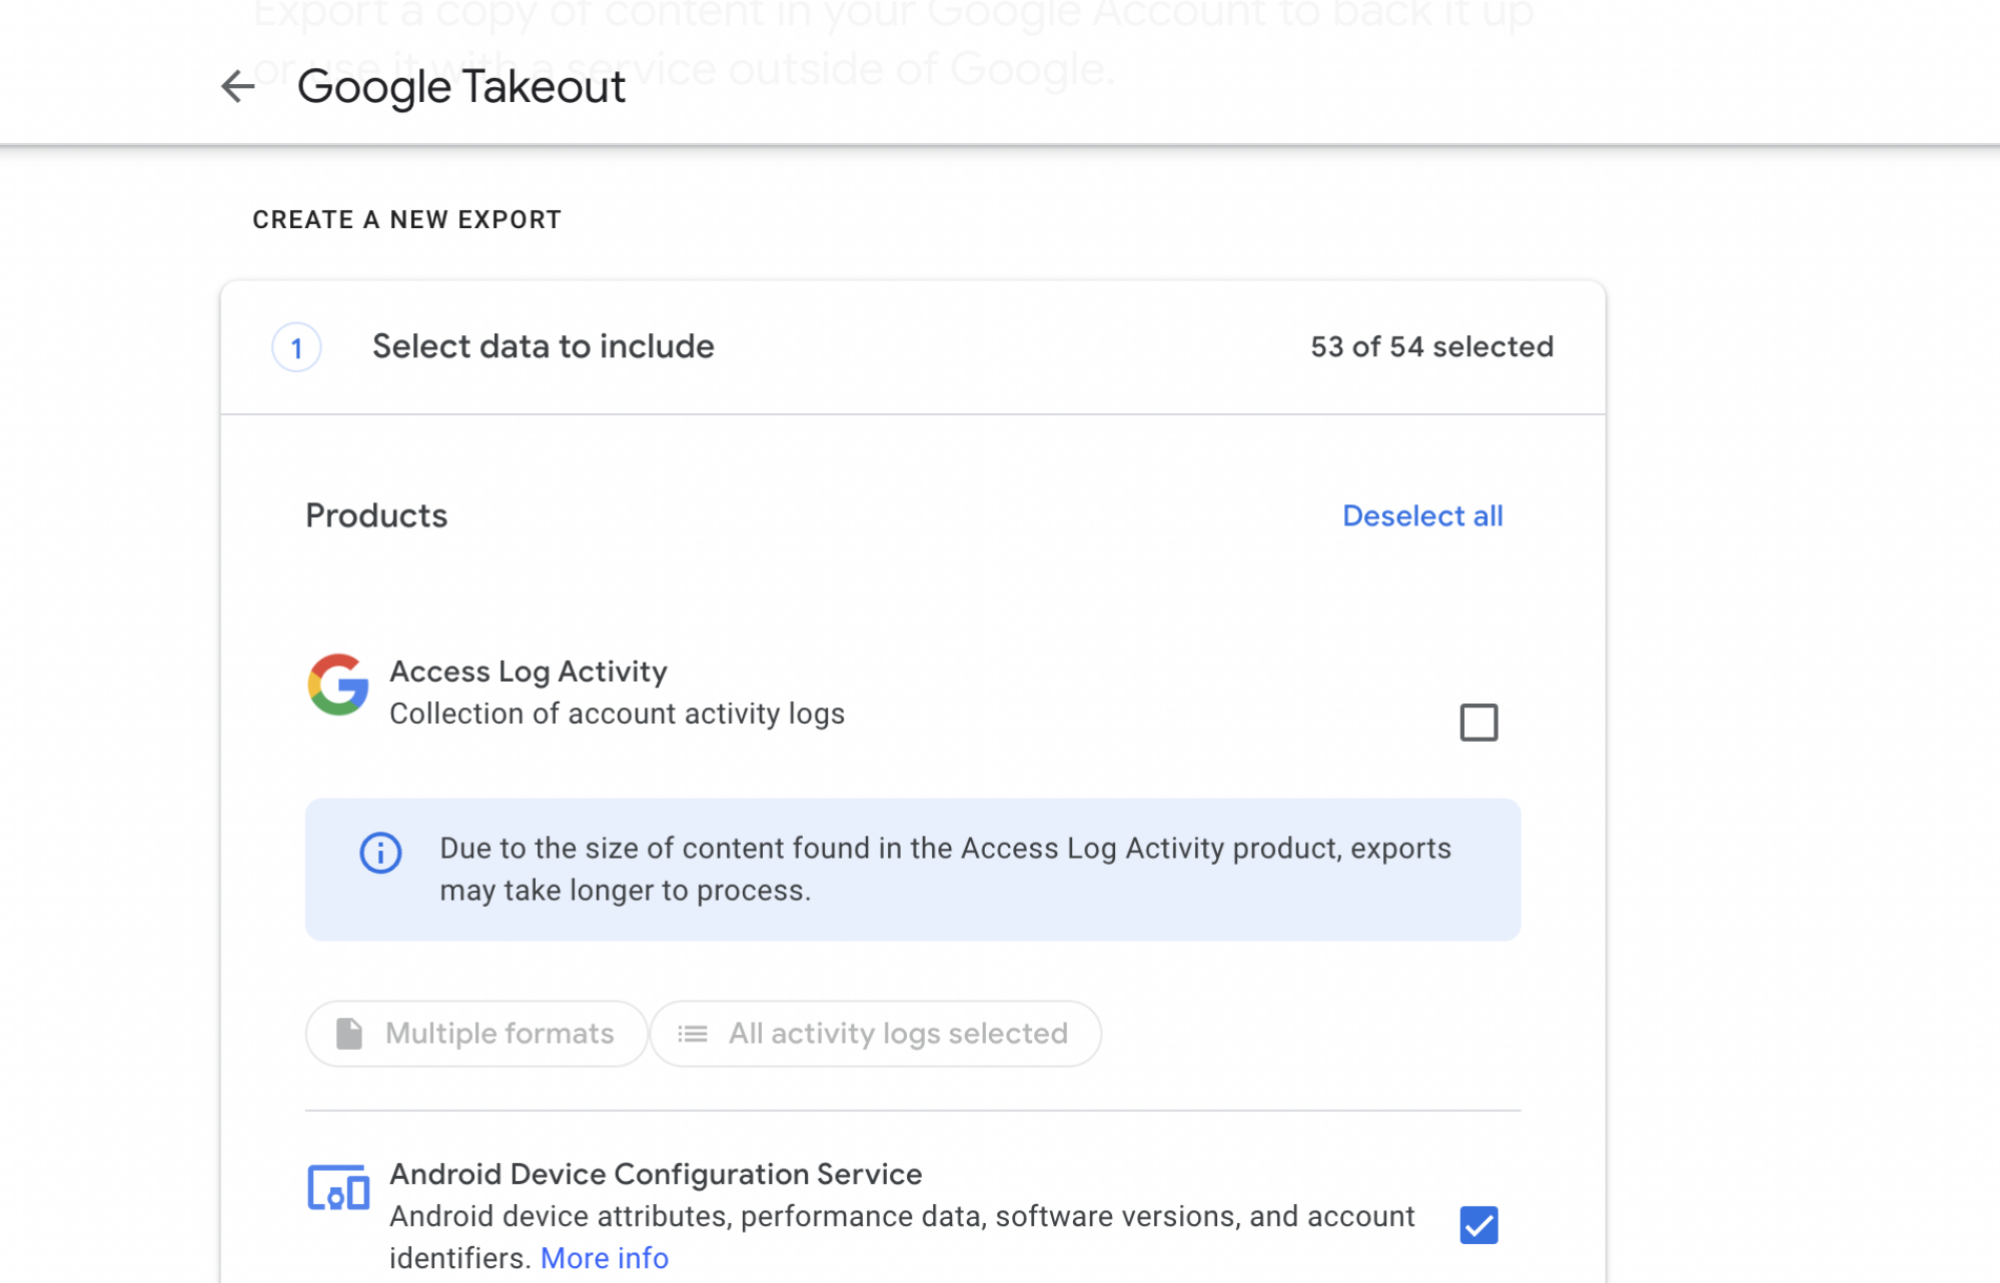
If you want to create a copy of anything on your Gmail account and be free of any future threats of account deletion, you should also take advantage of Google Takeout. Takeout lets you download your Google data or transfer it to another device. Here’s how to use it:

  • Navigate to takeout.google.com.

  • By default, everything is selected. If you’d like to pick and choose what to transfer, click “Deselect All”

  • Scroll down and choose which items you’d like to transfer/download.

  • Choose either “Export once” or “Export every 2 months for 1 year.”

  • Scroll down and click “next step.”

  • Choose whether Google should create a link to an archive of your requested data and email it to you, or transfer it to Dropbox, OneDrive, or another service.

  • Specify whether you’d like a .zip file or a .tgz file.

  • Hit “create export.”

  • When the archiving is finished, you’ll either receive a link to your data.


Source: LifeHacker – This Is Your Last Chance to Stop Google From Deleting Your Old Gmail Account

Here's Where to Find Your 2023 Apple Music Replay

As another year comes to a close (it’s almost December already!), it’s a good time to start looking back at your 2023. One way to do that is by taking a peek at your music listening history. While Spotify Wrapped isn’t here yet, your Apple Music Replay 2023 is now live. Check it out and share it with whomever you like.

How to check Apple Music Replay 2023

Unfortunately, Apple still won’t make Replay available as an in-app feature, so you’ll need to head to the official website to get started. To see a roundup of your year in Apple Music, go to the Apple Music Replay webpage and sign in with your Apple ID. (You can also find this link in the Apple Music app.) Once you do, you’ll see a message stating that your replay is ready. Click Jump In. You’ll then be able to see all of your highlights of the year.

The first thing you’ll see is your Highlight Reel. It compiles the biggest moments of your Apple Music year into a handful of highlights. You’ll see how many minutes you’ve listened, which artist was your top played of the year, how many songs you played (and which was your favorite), how many albums you listened to and the top one of your year, your top genre, and a concluding slide compiling it all together. It plays like an Instagram story with accompanying music per slide, so you can click through the slides if the autoplay is too slow for you.

After the Highlight Reel, you can scroll through Replay to see more details about all these statistics. When you scroll down, you’ll first see your top artists of the year and how many artists you listened to. My HomePod mini automatically plays jazz every morning, so it has some of my favorite artists—John Coltrane, Sonny Rollins, and Thelonius Monk—listed here.

Up next on the Apple Music Replay is a list of your top songs and how many times you’ve played them. My top song, however, is one I don’t recognize at all, and apparently my HomePod has played it 56 times. It’s a good things all of these songs will appear on my Replay playlist, which we’ll get to in a bit.

Scroll down farther and you’ll see your favorite albums of the year. This is where I finally feel like this is my Apple Music Replay. I’ve played all of my top albums many times and the list is a pretty accurate representation of my tastes. Note that if you play a song via a playlist, it won’t count it as an album play, but if you look up an album and play any song from there, then it’s counted.

Apple Music will then show you your top genres, playlists, and radio stations—all of these were spot on in my Replay. You then get to see some of your Apple Music achievements, such as having listened for over 50,000 minutes, etc., followed by a link to your 2023 Replay playlist. This is your chance to retain a lasting memory of what your year looked like, through the lens of your Apple Music tastes. 

How to share Apple Music Replay with others

Apple doesn’t necessarily let you share you entire Replay at once, which is a bummer. However, any element in the Replay can be shared as its own rich screenshot. All you need to do is hit the share icon next to any element to share it. For example, if you wanted to share the Highlights Reel slide about your listening minutes, you can hit the share icon, tap the contact you want to share it to, and you’ll see a preview of the slide in your message. This works for any section of Replay, whether in the reel or not, so you can go through and share each piece individually to give your friends the whole picture of your Apple Music year.


Source: LifeHacker – Here’s Where to Find Your 2023 Apple Music Replay

There's a Faster New Way to Send Photos in iMessage

iOS 17 changed the way you access Photos from the Messages app—a change that has, unfortunately, slowed down the process of sending images and videos. As it turns out, however, you don’t need to use the cumbersome default method. Instead, try this hack discovered by Reddit user Smiley-v2

Send images quickly in iMessage

To quickly send photos and videos, don’t press the (+), then hit the Photos. That’s too slow. Instead, open the Messages app, tap and hold the + button, and keep it held until you see the photo gallery replace your keyboard. Select the images or videos you want to send, and fire them away in your iMessage chats. 

Reorganize your iMessage app shortcuts

The Messages app in iOS 17 shows a few app shortcuts when you tap the + button in any of your chats. Only the top five shortcuts are shown here, however: You need to tap More to see the rest. The good news is that you can reorganize these shortcuts to prioritize the ones you actually use. Just tap and hold any of these shortcuts, and drag them up or down. If you drag them to the bottom, they go into the More section and are removed from the list of shortcuts that show up when you hit the + button. You can also open the More section and drag any of the apps there to the top.

Quickly delete unwanted iMessage apps

iOS 17 also has a neat settings page for you to remove iMessage apps you no longer use. This reduces the number of items that show up in Messages and allows you to retain only the ones you use. To trim this list, go to Settings > Messages > iMessage Apps. In the Only in Messages section, tap the red button next to any app, and press Delete twice to remove it. Scroll down to the Included with an app section and flip the switches on the right to disable the iMessage apps you don’t use.


Source: LifeHacker – There’s a Faster New Way to Send Photos in iMessage

Use Nair to Remove Hair From a Necklace

I found myself googling “how to get hair out of a necklace” this week after becoming frustrated with the little clumps and knots of hair that dot the chain of my everyday necklace. The chain gets stuck in the little hairs at the nape of my neck, pulling on them until I absentmindedly reach back there and yank it off—which doesn’t pull the hairs off the chain, but rather pulls them off my head. Sometimes, longer strands also get wound around the chain, which is simply the reality of, well, hair. I’ve tried pulling the hairs off, but it never works; they’re too small and tightly wound around the also-tiny chain.

Use Nair to remove hair from a necklace

I set about googling a solution and found suggestion after suggestion to use a pumice stone to remove the hair. I don’t have a pumice stone lying around and I also resent having to do that much manual labor, so I kept searching until I found a hack that would be accessible and easy, using something I could easily grab from the drug store and not have to put any elbow grease into. Finally, I found a suggestion so obvious that I couldn’t believe I hadn’t thought of it sooner: Nair. But does it work?

Like most women, I’ve had my run-ins with Nair, but some moderate successes, too. In my youth, I burned myself with it once, but those days are over and I’m smarter, wiser, and safer these days. I grabbed some Nair Body Cream ($5.99) from my bathroom and ran to the store to get another kind, just to see if there might be a difference. I picked up the Flamingo Facial Hair Removal Cream ($7.99). I’ve never used a facial hair remover—of all my lots in life, facial hair just isn’t one of them—but it’s supposed to be gentler than the one you slap on your legs, so I figured it might be better for the chain (although possibly less effective on the hairs themselves).

Nair to take hair off jewelry: Does it work?

The bottle of facial-hair remover told me it shouldn’t be left on more than 10 minutes; the Nair bottle said the same thing. I put the pendant of my necklace in the center of the chain and spread it across a paper towel, then applied Nair to the right of the charm and Flamingo to the left.

I left it alone for 10 minutes, but scratched at the hair periodically. When 10 minutes were up, I really scratched, using my fingernails and the paper towel to pull off the hair. It came off easily, in gooey clumps, but the Nair side did much, much better. On the side where I used facial hair remover, about half the hair came off, so I think with a second application, I’d be able to get it all.

Be advised that hair remover cream often contains thioglycolate, which can tarnish silver. That ingredient was listed third for the Nair and fourth for the Flamingo, so you may want to choose a facial hair remover if you’re worried about tarnishing. My necklace is sterling silver, so it could easily tarnish, but after inspecting it, it doesn’t look like it got that bad.

A final note: Make sure you rinse the chain well after doing this so you’re not accidentally rubbing Nair along the base of your neck all the time.


Source: LifeHacker – Use Nair to Remove Hair From a Necklace

How to Download Instagram Reels (and Stop Others From Downloading Yours)

Instagram finally allows you to download reels from public accounts now. But of course, there’s a catch: You won’t always be able to download reels with audio (due to licensing issues), and all of your downloaded reels will have an annoying moving watermark. But assuming the reel doesn’t have copyrighted audio attached, you’ll be able to enjoy your favorite Instagram videos without using the app first.

This feature is enabled by default, but you can stop people from downloading your reels if you want.

How to download Instagram reels

The download process itself is pretty simple. Go to any public Instagram account on your Instagram app and open a reel. Tap Share, then Download near the bottom of the screen. You may see a pop-up telling you the reel will be downloaded without audio, but otherwise, the download should begin immediately. When the process is complete, you’ll find the Instagram reel saved in your phone’s photo library.

It’s worth noting that older reels cannot be downloaded using this feature. You’ll only be able to download reels that were posted after Instagram enabled downloads.

Stop people from downloading your reels

Instagram allows you to stop people from downloading your reels, too. Once you’ve completed recording and editing your reel on the Instagram app, navigate to More options > Advanced settings, then disable Allow people to download your reels.

You can also turn your Instagram account private to stop others from saving your reels, but if you like keeping a public account, that’s likely a step too far.

Download Instagram reels without watermarks

If Instagram’s official download feature’s restrictions are dealbreakers for you, there are alternative ways to get the job done. We’ve got you covered with all the easiest ways to download Instagram reels without watermarks and with the music. On your iPhone, you can use the Shortcuts app paired with the Instagram Download shortcut, while on Android, you can use a third-party app.


Source: LifeHacker – How to Download Instagram Reels (and Stop Others From Downloading Yours)

The Unbreakable Rules of Sharing a Fence With Your Neighbor

If you own your home, it tracks that everything on your property belongs to you. But as you get closer and closer to your property lines, the space gets a bit more liminal: If there’s a fence separating your property from your neighbor’s, it’s a shared feature, even if only one of you technically owns it. After all, a fence defines both private properties, and you both benefit from it.

That’s why practicing proper fence etiquette is vital. A fence can literally form the edge where two lives rub up against each other, and it can be a source of friction if you’re not careful. And since fence ownership and rights can be vague and complicated, it’s in everyone’s best interests to follow a few simple rules to ensure that minor fencing disputes don’t grow into major problems. Here are the rules you need to follow so you’re always be on the right side of fence etiquette.

Know the facts of who owns the fence

The rule of fence etiquette is to always know what you’re talking about. That starts with knowing your property lines: If the fence was already in place when you bought the house, you probably have no idea if it’s on your property, your neighbor’s, or on the line itself. If it’s entirely on your property, it’s your fence and vice versa—if it’s literally on the boundary line, it’s a boundary fence and your local area may have specific laws governing how that’s handled. If you’re not sure of your property lines, you might need to have a land survey done to establish them, which can cost anywhere from around $400 to $750.

Most local governments have specific requirements for the height, style, and other aspects of fences, and if you have a homeowner’s association (HOA), you should check if they have any rules regarding fencing as well. You want to know everything so you can avoid inadvertently breaking a law—or offending a neighbor.

Finally, if you’re building a new fence, you’ll need to know if your neighbors enjoy what are known as “prescriptive easements” on your property. An example of an easement is when a neighbor has to drive across a small section of your private property to access their own lot. If they’ve enjoyed that access for a long time, the law may recognize it as a right, and you could get into trouble if you suddenly fence that access off (not to mention making an enemy of your neighbor). Again, you’ll want to know about that before making any fence-related decisions.

Practice the rules of fence etiquette

Once you’re armed with the facts about your fence, property lines, and the local requirements, you’re ready to have all the fence conversations with your neighbor. Here are the general rules of fence etiquette that will avoid an all-out Neighbor War:

Respect property lines

Knowing where your property ends and your neighbors’ begins is one thing—respecting those lines is another. Don’t let your fence dribble over onto the lot next door just to avoid some rocky dirt or to shave a few dollars off the installation costs without discussing it with your neighbor and obtaining permission.

Communicate before changing things

Many local governments require you to alert your neighbors about a fence installation or replacement, but you should do so even if there’s no such law in your area.

Avoid unilateral decisions

Even if the fence is entirely on your property and thus your property, always discuss changes with your neighbors before doing anything to a fence. They don’t own it, but they will appreciate having the opportunity to make you aware of any unforeseen impact your plans might have on them.

Respect the neighborhood style

When building or replacing a fence, your HOA may have a lot to say about style and material. Your local government may have a lot to say about height and other requirements. But you should also take care to keep your fence in line with the look and feel of the neighborhood. Yes, it’s your property to do with as you will (within reason), but fences are weirdly shared aspects of your property. The courteous thing to do is to blend yours in with the rest.

Install with the good side out

Many fences have “finished” and “unfinished” sides. The unfinished side has the bracing and supports, the finished “good” side looks nice and clean. The good side should always face your neighbor. Again, this is simple courtesy, and doing so can avoid bad blood.

Don’t insist on sharing the expense

The laws regarding maintenance and fence-related expenses vary widely around the country, and are often a bit vague and difficult to enforce. If you think your neighbor should pay for some portion of a fence repair or replacement, you should broach the subject, but keep in mind that you probably can’t force them to pony up. If they refuse, your best bet is to just walk away.

Compromise

If your neighbor is willing to share some of the fence expenses with you, they should get a vote on how the work is done. If you don’t agree on a style, material, or other aspect of the fence, try to find a compromise that works for you both.

A fence offers security, privacy, and—if done correctly—beauty to a property. They can keep the peace between neighbors by being a buffer zone—or they can be something to fight about. Good fence etiquette can avoid a lot of problems.


Source: LifeHacker – The Unbreakable Rules of Sharing a Fence With Your Neighbor

Upgrade Your Leftover-Turkey Sandwich With Thai Curry Paste

Sure, the leftover Thanksgiving turkey sandwich is a classic for a reason, but part of the joy of eating is refreshing the classics. When you’ve layered sandwich bread with turkey and mashed potatoes so many times it’s become a chore, it’s time to reach for a new flavor. Get excited again for that leftover poultry and make a turkey sandwich—but not the kind stacked with cranberry and stuffing. Instead, clear out your fridge and your sinuses with a fiery Thai curry turkey sandwich.

Since poultry has a reputation for drying out in the fridge and losing flavor, I wanted to add powerful ingredients and a bit of moisture. I reached for a can of massaman curry. Thai curry is something I keep stocked in my cabinets, and I find that the flavors pair up brilliantly with any protein. Thai curries use a varying combination of ingredients, like shallots, ginger, makrut lime leaf, garlic, and chilies, depending on the type you choose, but something you can count on is that it will be flavorful. Toss cold, shredded turkey with a tablespoon of curry paste and you’ll trigger a bright new outlook on all of your holiday leftovers. 

Thai curry paste can be pounded or processed at home, but my family has always used premade Maesri brand cans for cooking. You can find Maesri in Asian grocery stores, but big box grocery stores like Shoprite and Whole Foods carry different brands of Thai curry as well. The benefit of jarred curries is that you can use a spoonful and close up the lid again. (The cans can be a little annoying if you don’t use the whole thing.)

Ingredients for a sandwich on a cutting board

Credit: Allie Chanthorn Reinmann

A Thai turkey curry sandwich will be a bit spicy, of course, but you can control that with this recipe. Thai curry paste is powerful, even in small quantities, but not every curry packs the same amount of heat. Heat is a personal preference, but if I want mild spice I’ll use massaman, yellow, or red curry paste. For medium heat, I use pad prik king paste. To make myself sweat I’ll use green curry paste. Use any of these according to your preference, and then control the heat further. Use just a teaspoon or so of paste and mix it with two tablespoons of mayonnaise. The mayo will cut the spice level down further because of the fats involved. Taste it. If you’re spiced out, add more mayo. If the flavor is too weak, add more Thai curry paste. Toss a cup of shredded turkey with the mixture and load it onto a couple slices of bread.

This hack is especially helpful in this final day or so of turkey scraps, but you can ignite your taste buds with this recipe any time during the year using leftover chicken or pork. I like to make a quick, crunchy slaw with shredded cabbage tossed with lime juice and salt. These are some classic Thai ingredients and it rounds out the flavors of the sandwich beautifully. The massaman turkey filling is spicy and sweet, and the slaw is crunchy, salty, and tart. 

For even more of a flavor boost, add a couple leaves of torn basil (Thai basil if you can get it), and a chopped raw Thai chili pepper. Those last ingredients will really rock your sinuses, and make it the kind of sandwich that you can’t stop talking about (even while you’re actively eating the sandwich).

Thai Curry Turkey Sandwich recipe

Ingredients:

  • 1 cup shredded turkey

  • ½ tablespoon to 2 tablespoons Thai curry (adjust according to taste)

  • 2 tablespoons mayonnaise

  • 1 Thai chili, chopped (optional)

  • 2-4 leaves Thai basil,  (optional)

  • ¼ cup shredded cabbage

  • 2 teaspoons fresh lime juice

  • ⅛ teaspoon salt

  • 2 slices of sandwich bread, toasted

1. In a small bowl, toss the cabbage together with the lime juice and salt. Set aside on the countertop for 10 minutes, tossing periodically.

2. In a different bowl, mix curry paste with mayonnaise until combined. Taste the mixture and add more curry paste if desired. Mix the shredded turkey into the dressing. Mix in the chopped chili and basil, if using.

3. Mound the turkey mixture onto a slice of toasted bread. Add the cabbage slaw and top it with the other slice of bread. Give the sandwich a press with your hands, and enjoy.


Source: LifeHacker – Upgrade Your Leftover-Turkey Sandwich With Thai Curry Paste

No, NameDrop on iPhone Won’t Automatically Share Your Contact Information

According to a report by The Washington Post, police departments and news sites are spreading misinformation about “NameDrop,” a new feature in iOS 17. These outlets claim that simply bringing your iPhone close to another iPhone allows the other user to steal your contact information, without your consent or any action on your part. If that sounds scary, don’t worry: It’s pure hogwash.

Yes, NameDrop is enabled by default on all iPhones running iOS 17.1 or higher, and Apple Watches running watchOS 10.1 and higher. But it can be only used intentionally, and only with your consent. That’s what a lot of news outlets and law enforcement agencies are getting wrong. The City of Chester Police Department in Ohio says, “This feature allows the sharing of your contact info just by bringing your phones close together.” Of course it’s going to seem dangerous.

How NameDrop actually works

First of all, both iPhones or Apple Watches have to be unlocked. Then, the two devices have to be very close to each other, almost touching. When they come in close contact, your iPhone will prompt you, asking if you want to share your contact information and your Contact Poster, with the other iPhone. From here, you get two options: Receive Only and Share. It’s only when you tap Share that the two iPhones will do the dance of swapping contact details. If you choose Receive Only, the other person’s contact details will show up for you if they choose to share, but your contact details will remain private.

If your iPhone is locked, and there’s an unknown iPhone on top of it, this won’t work. Even if it’s unlocked, without your action, there’s no risk of losing your personal information. Rest assured, your contact details are safe. Hypothetically, this could be a problem if your iPhone is both unlocked and in someone else’s hands. But if that’s the case, you have a much bigger problem than losing your email address and phone number.

How to disable NameDrop on your iPhone

Still, if you want to disable the feature, it can be done from Settings > General > AirDrop > Bringing Devices Together > Off. But again, we wouldn’t recommend this, as it’s not worth losing the excellent AirDrop bump gesture.


Source: LifeHacker – No, NameDrop on iPhone Won’t Automatically Share Your Contact Information