This is creepy, and we love it. OK, it’s not REALLY creepy, it’s just that some people have an aversion to dolls that appear to move of their own accord, due to a disturbing childhood experience — but enough about me.
Smart Fairy Tale is a whimsical, unique community project created by Berlin-based installation artist Niklas Roy and interaction designer Felix Fisgus.
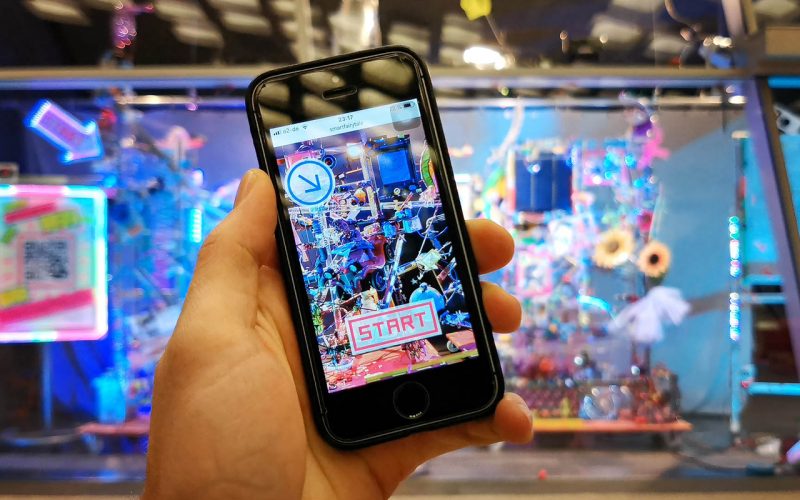
Using a smartphone app, viewers determine which way a ball travels through transparent pipes, and depending on which light barriers the ball interrupts on its journey, various toys are animated to tell different stories.
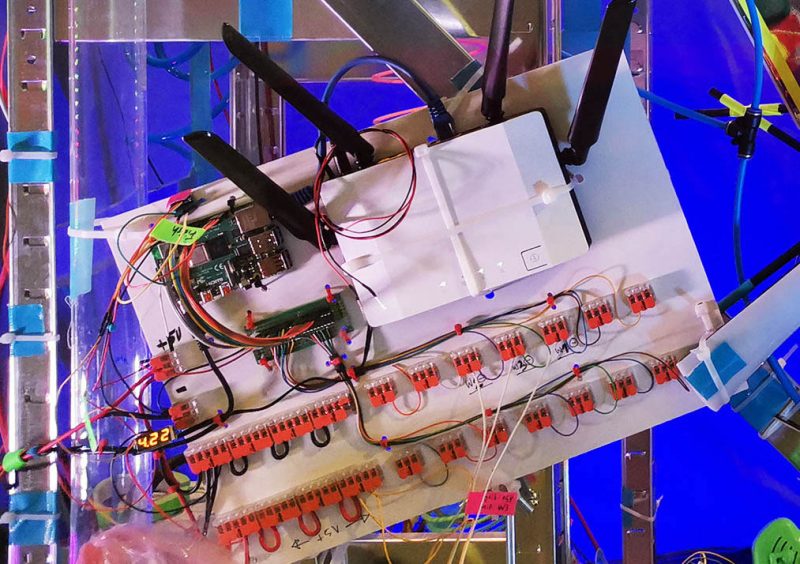
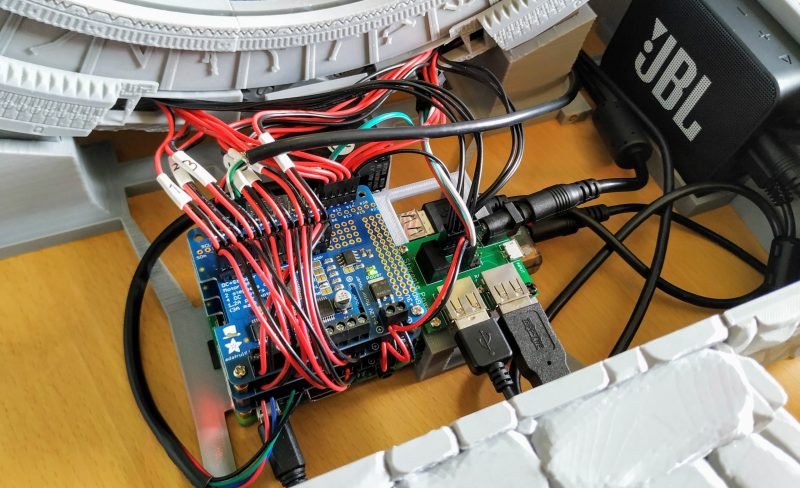
The server of the installation is a Raspberry Pi 4. Via its GPIO pins, it controls the track switches and releases the ball.
Raspberry Pi 4 tucked in the top right-hand corner, mounted together with the router. Photo courtesy of Niklas’ project page
The apparatus is full of toys donated by residents of Wolfsburg, Germany. The artists wanted local people to not only be able to operate the mechanical piece, but also to have a hand in creating it. Each animatronic toy is made as a separate module, controlled by its own Arduino Nano.
Smart Fairy Tale can be remotely controlled by viewers who want to check in on the toys they gifted to the installation, and by any other curious people elsewhere in the world.
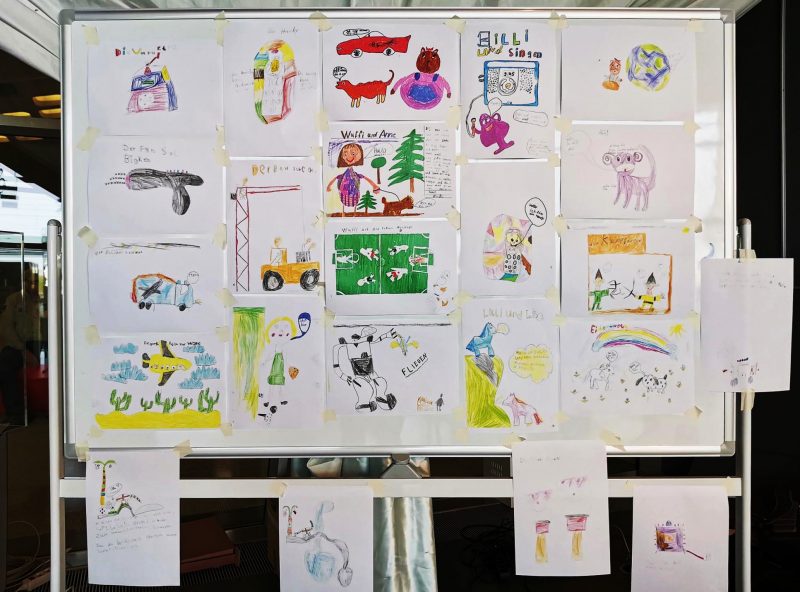
Better yet, the stories the toys tell were devised by local school students. The artists showed the gifted toys to a few elementary school classes, and the students drew several stories featuring toys they liked. The makers then programmed the toys to match what the drawings said they could do. A servo here, a couple of LEDs there, and the students’ stories were brought to life.
Some of the storylines drawn by local children. Photo courtesy of Felix’s project page.
So what kind of stories did Wolfsburg’s finest come up with? One of the creators explains:
“There were a lot of scenes to interpret, like the blow-up love story, the chemtrail conspiracy, and the fossil fuel disaster, which culminates in a major traffic jam. The latter one even involved a laboratory for breeding synthetic dinosaurs by the use of renewable energies.”
Felix Fisgus
We LOVE it. Don’t tell me this isn’t creepy though…
WHY DO YOU HAUNT MY DREAMS???
You’ll find tonnes of extra technical specs and images in the project posts on both Felix and Niklas‘ websites.
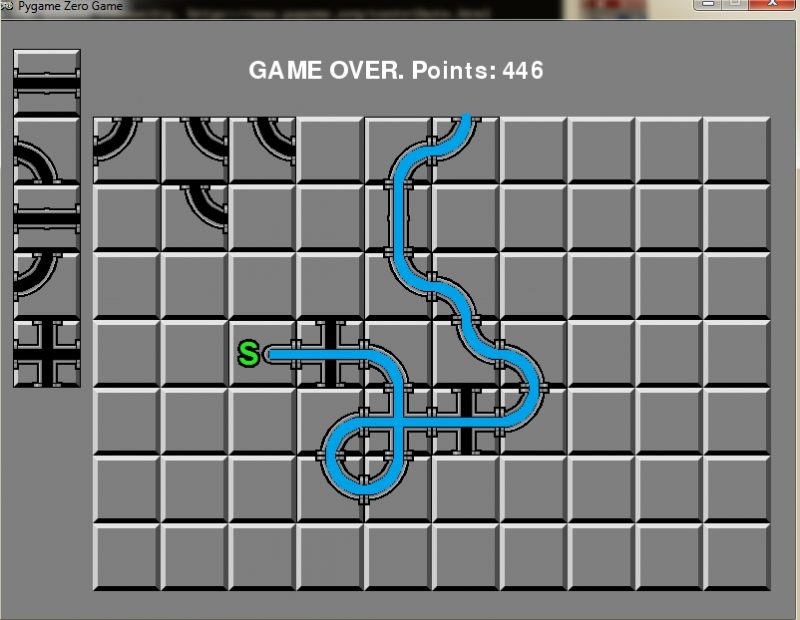
Create a network of pipes before the water starts to flow in our re-creation of a classic puzzler. Jordi Santonja shows you how.
Pipe Mania’s design is so effective, it’s appeared in various guises elsewhere – even as a minigame in BioShock.
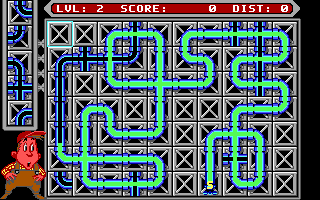
Pipe Mania, also called Pipe Dream in the US, is a puzzle game developed by The Assembly Line in 1989 for Amiga, Atari ST, and PC, and later ported to other platforms, including arcades. The player must place randomly generated sections of pipe onto a grid. When a counter reaches zero, water starts to flow and must reach the longest possible distance through the connected pipes.
Let’s look at how to recreate Pipe Dream in Python and Pygame Zero. The variable start is decremented at each frame. It begins with a value of 60*30, so it reaches zero after 30 seconds if our monitor runs at 60 frames per second. In that time, the player can place tiles on the grid to build a path. Every time the user clicks on the grid, the last tile from nextTiles is placed on the play area and a new random tile appears at the top of the next tiles. randint(2,8) computes a random value between 2 and 8.
Our Pipe Mania homage. Build a pipeline before the water escapes, and see if you can beat your own score.
grid and nextTiles are lists of tile values, from 0 to 8, and are copied to the screen in the draw function with the screen.blit operation. grid is a two-dimensional list, with sizes gridWidth=10 and gridHeight=7. Every pipe piece is placed in grid with a mouse click. This is managed with the Pygame functions on_mouse_move and on_mouse_down, where the variable pos contains the mouse position in the window. panelPosition defines the position of the top-left corner of the grid in the window. To get the grid cell, panelPosition is subtracted from pos, and the result is divided by tileSize with the integer division //. tileMouse stores the resulting cell element, but it is set to (-1,-1) when the mouse lies outside the grid.
The images folder contains the PNGs with the tile images, two for every tile: the graphical image and the path image. The tiles list contains the name of every tile, and adding to it _block or _path obtains the name of the file. The values stored in nextTiles and grid are the indexes of the elements in tiles.
Here’s Jordi’s code for a Pipemania-style puzzler. To get it working on your system, you’ll need to install Pygame Zero. And to download the full code and assets, head here.
The image waterPath isn’t shown to the user, but it stores the paths that the water is going to follow. The first point of the water path is located in the starting tile, and it’s stored in currentPoint. update calls the function CheckNextPointDeleteCurrent, when the water starts flowing. That function finds the next point in the water path, erases it, and adds a new point to the waterFlow list. waterFlow is shown to the user in the draw function.
pointsToCheck contains a list of relative positions, offsets, that define a step of two pixels from currentPoint in every direction to find the next point. Why two pixels? To be able to define the ‘cross’ tile, where two lines cross each other. In a ‘cross’ tile the water flow must follow a straight line, and this is how the only points found are the next points in the same direction. When no next point is found, the game ends and the score is shown: the number of points in the water path, playState is set to 0, and no more updates are done.
Get your copy of Wireframe issue 46
You can read more features like this one in Wireframe issue 46, available directly from Raspberry Pi Press — we deliver worldwide.
And if you’d like a handy digital version of the magazine, you can also download issue 46 for free in PDF format.
As the UK — like many countries around the world — kicks off the new year with another national lockdown, meaning that millions of young people are unable to attend school, I want to share an update on how the Raspberry Pi Foundation is helping young people to learn at home.
Please help us spread the word to teachers, school leaders, governors, parents, and carers. Everything we are offering here is 100% free and the more people know about it, the more young people will benefit.
Supporting teachers and pupils
Schools and teachers all over the world have been doing a heroic job over the past ten months, managing the transition to emergency remote teaching during the first round of lockdowns, supporting the most vulnerable pupils, dealing with uncertainty, changing the way that schools worked to welcome pupils back safely, helping pupils catch up with lost learning, and much, much more.
Both in my role as Chief Executive of the Raspberry Pi Foundation and as chair of governors at a state school here in Cambridge, I’ve seen first-hand the immense pressure that schools and teachers are under. I’ve also seen them display the most amazing resilience, commitment, and innovation. I want to say a huge thank you to all teachers and school staff for everything you’ve done and continue to do to help young people through this crisis.
Here’s some of the resources and tools that we’ve created to help you continue to deliver a world-class computing education:
The Teach Computing Curriculum is a comprehensive set of lesson plans for KS1–4 (learners aged 5–16) as well as homework, progression mapping, and assessment materials.
Working with the fabulous Oak National Academy, we’ve produced 100 hours of video for 300 video lessons based on the Teach Computing Curriculum.
Isaac Computer Science is our online learning platform for advanced computer science (A level, learners aged 16–18) and includes comprehensive, interactive materials and videos. It also allows you to set your learners self-marking questions.
All of these resources are mapped to the English computing curriculum and produced as part of the National Centre for Computing Education. They are available for everyone, anywhere in the world, for free.
Making something fun with code
Parents and carers are the other heroes of remote learning during lockdown. I know from personal experience that juggling work and supporting home learning can be really tough, and we’re all trying to find meaningful, fun alternatives to letting our kids binge YouTube or Netflix (other video platforms and streaming services are available).
That’s why we’ve been working really hard to provide parents and carers with easy, accessible ways for you to help your young digital makers to get creative with technology:
Hundreds of step-by-step guided projects for coding in Scratch, Python, and more. The projects are self-guided, tailored for different levels of experience, and translated into dozens of languages.
Getting computers into the hands of young people who need them
One of the harsh lessons we learned last year was that far too many young people don’t have a computer for learning at home. There has always been a digital divide; the pandemic has just put it centre-stage. The good news is that the cost of solving this problem is now trivial compared to the cost of allowing it to persist.
That’s why the Raspberry Pi Foundation has teamed up with UK Youth and a network of grassroots youth and community organisations to get computers into the hands of disadvantaged young people across the UK.
For under £200 we can provide a vulnerable child with everything they need to learn at home, including a Raspberry Pi desktop computer, a monitor, a webcam, free educational software, and ongoing support from a local youth worker and the Foundation team. So far, we have managed to get 2000 Raspberry Pi computers into the hands of the most vulnerable young people in the UK. A drop in the ocean compared to the size of the problem, but a huge impact for every single young person and family.
This has only been possible thanks to the generous support of individuals, foundations, and businesses that have donated to support our work. If you’d like to get involved too, you can find out more here.
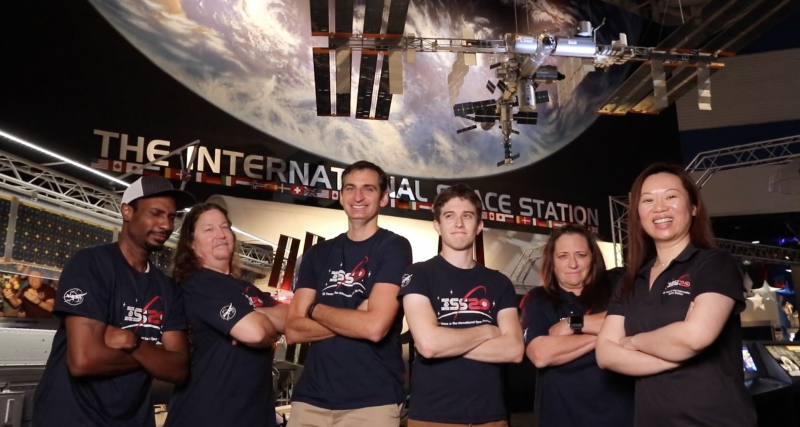
Quite possibly the coolest thing we saw Raspberry Pi powering this year was ISS Mimic, a mini version of the International Space Station (ISS). We wanted to learn more about the brains that dreamt up ISS Mimic, which uses data from the ISS to mirror exactly what the real thing is doing in orbit.
The ISS Mimic team’s a diverse, fun-looking bunch of people and they all made their way to NASA via different paths. Maybe you could see yourself there in the future too?
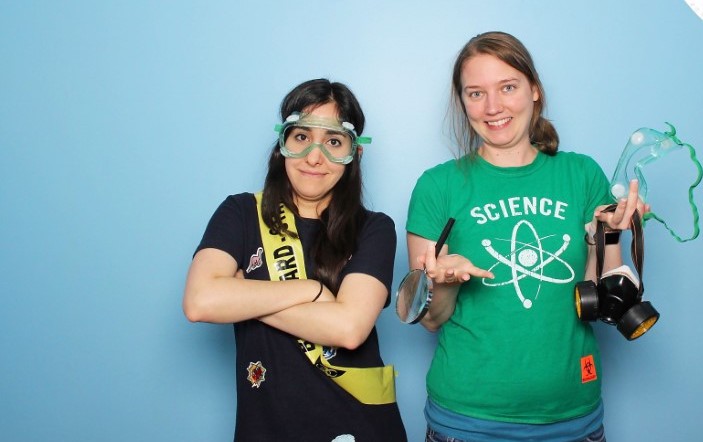
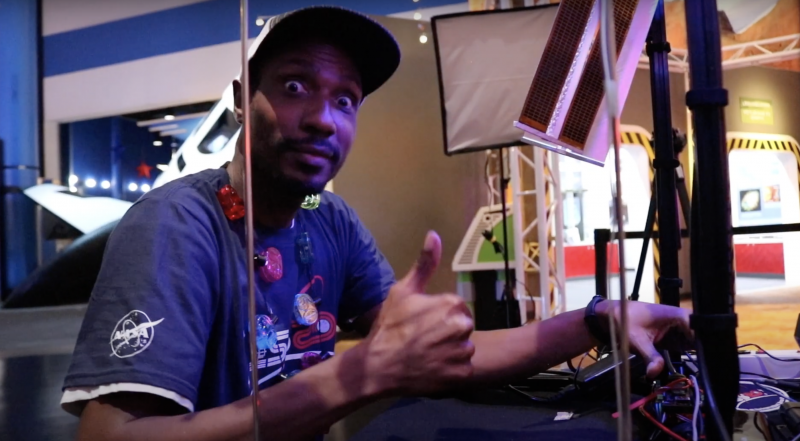
Dallas Kidd
Dallas (in the green t shirt) having a lark with teammate Estefannie. Safety first!
Dallas Kidd currently works at the startup Skylark Wireless, helping to advance the technology to provide affordable high speed internet to rural areas.
Previously, she worked on traffic controllers and sensors, in finance on a live trading platform, on RAID controllers for enterprise storage, and at a startup tackling the problem of alarm fatigue in hospitals.
Before getting her Master’s in computer science with a thesis on automatically classifying stars, she taught English as a second language, Algebra I, geometry, special education, reading, and more.
Her hobbies are scuba diving, learning about astronomy, creative writing, art, and gaming.
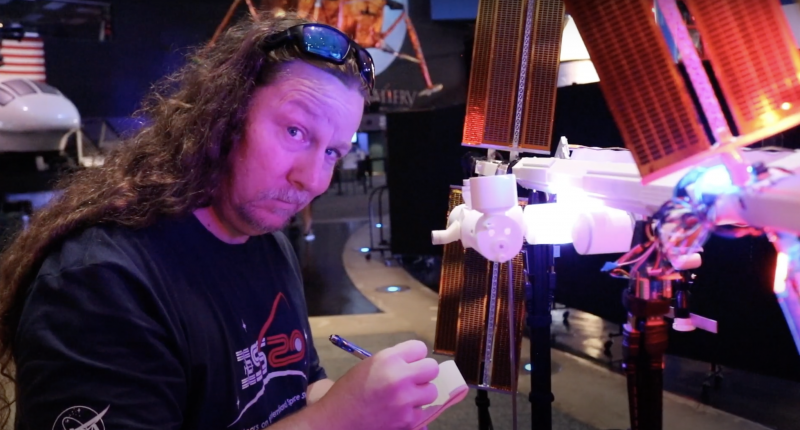
Tristan Moody
That’s Tristan on the right. NASA does not currently hire small children.
Tristan Moody currently works as a spacecraft survivability engineer at Boeing, helping to keep the ISS and other satellites safe from the threat posed by meteoroids and orbital debris.
He has a PhD in mechanical engineering and currently spends much of his free time as playground equipment for his two young kids.
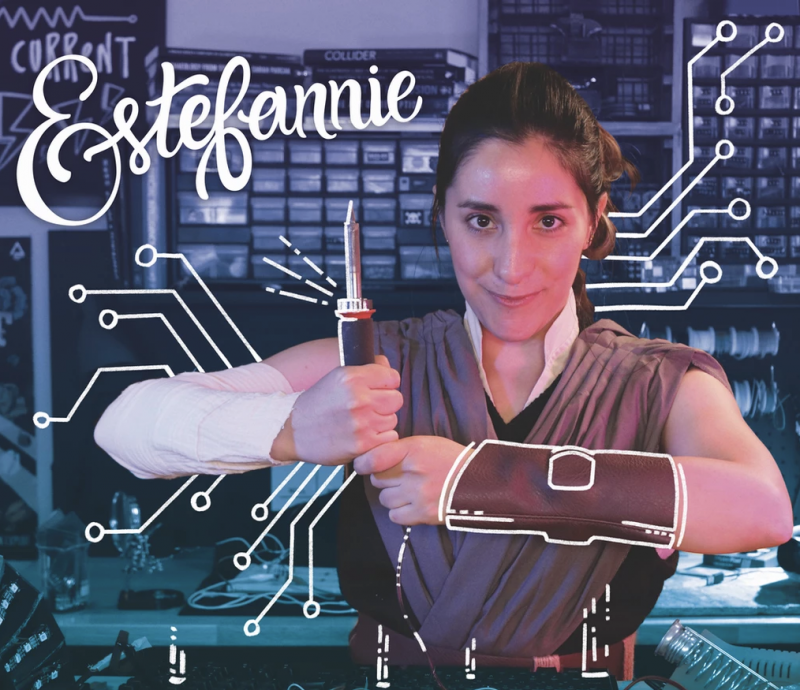
Estefannie is a software engineer, designer, punk rocker and likes to overly engineer things and document her findings on her YouTube and Instagram channels as Estefannie Explains It All.
Estefannie spends her time inventing things before thinking, soldering for fun, writing, filming and producing content for her YouTube channel, and public speaking at universities, conferences, and hackathons.
She lives in Houston, Texas and likes tacos.
Douglas Kimble
Where are the dogs, Douglas?!
Douglas Kimble currently works as an electrical/mechanical design engineer at Boeing. He has designed countless wire harness and installation drawings for the ISS.
He assumes the mentor role and interacts well with diverse personalities. He is also the world’s biggest Lakers fan living in Texas.
His favorite pastimes includes hanging out with his two dogs, Boomer and Teddy.
Craig Stanton
Craig’s knows what’s up. Or knows a secret. We can’t tell. Maybe both?
Craig’s father worked for the Space Shuttle program, designing the ascent flight trajectories profiles for the early missions. He remembers being on site at Johnson Space Center one evening, in a freezing cold computer terminal room, punching cards for a program his dad wrote in the early 1980s.
Craig grew up with LEGO and majored in Architecture and Space Design at the University of Houston’s Sasakawa International Center for Space Architecture (SICSA).
His day job involves measuring ISS major assemblies on the ground to ensure they’ll fit together on-orbit. Traveling to many countries to measure hardware that will never see each other until on-orbit is the really coolest part of the job.
Sam Treagold
Sam: not to be trusted with hardware you don’t want shot in the desert
Sam Treadgold is an aerospace engineer who also works on the Meteoroid and Orbital Debris team, helping to protect the ISS and Space Launch System from hypervelocity impacts. Occasionally they take spaceflight hardware out to the desert and shoot it with a giant gun to see what happens.
In a non-pandemic world he enjoys rock climbing, music festivals, and making sound-reactive LED sunglasses.
Chen Deng
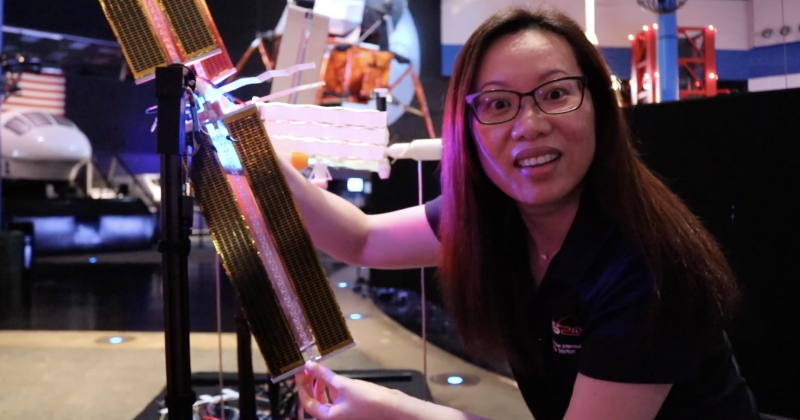
Chen showing off the very shiniest part of the ISS Mimic (solar panels)
Chen Deng is a Systems Engineer working at Boeing with the International Space Station (ISS) program. Her job is to ensure readiness of Payloads, or science experiments, to launch in various spacecraft and operations to conduct research aboard the ISS.
The ISS provides a very unique science laboratory environment, something we can’t get much of on earth: microgravity! The term microgravity means a state of little or very weak gravity. The virtual absence of gravity allows scientists to conduct experiments that are impossible to perform on earth, where gravity affects everything that we do.
In her free time, Chen enjoys hiking, board games, and creative projects alike.
Bryan Murphy
Bryan, adorned with an LED necklace, posing next to ISS Mimic’s rotating solar panel ‘wings’
Bryan Murphy is a dynamics and motion control engineer at Boeing, where he gets to create digital physics models of robotic space mechanisms to predict their performance.
His favorite projects include the ISS treadmill vibration isolation system and the shiny new docking system. He grew up on a small farm where his hands-on time with mechanical devices fueled his interest in engineering.
When not at work, he loves to brainstorm and create with his artist/engineer wife and their nerdy kids, or go on long family roadtrips—- especially to hike and kayak or eat ice cream. He’s also vice president of a local makerspace, where he leads STEM outreach and includes excess LEDs in all his builds.
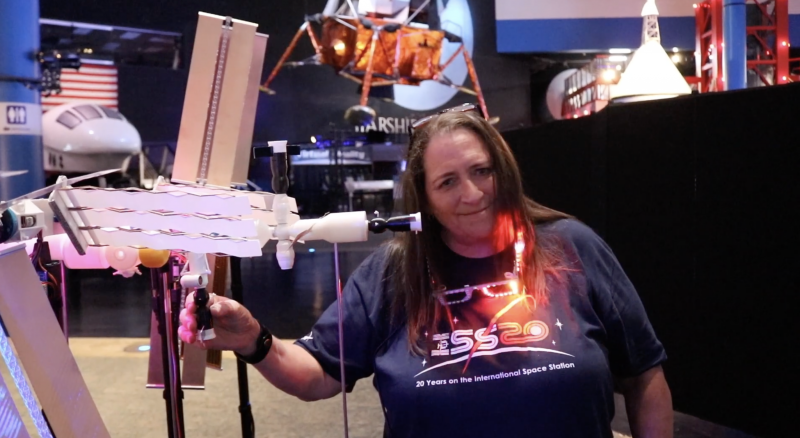
Susan
Here’s Susan rocking some of those LED glasses and getting a good grip on ISS Mimic
Susan is a mechanical engineer and a 30+-year veteran of manned spaceflight operations. She has worked the Space Shuttle Program for Payloads (middeck experiments and payloads deployed with the shuttle arm) starting with STS-30 and was on the team that deployed the Hubble Space Telescope.
She then transitioned into life sciences experiments, which led to the NASA Mir Program where she was on continuous rotation for three years to Russian Mission Control, supporting the NASA astronaut and science experiments onboard the space station as a predecessor to the ISS.
She currently works on the ISS Program (for over 20 years now), where she used to write procedures for on-orbit assembly of the Space Xtation and now writes installation procedures for on-orbit modifications like the docking adapter. She is also an artist and makes crosses out of found objects, and even used to play professional women’s football.
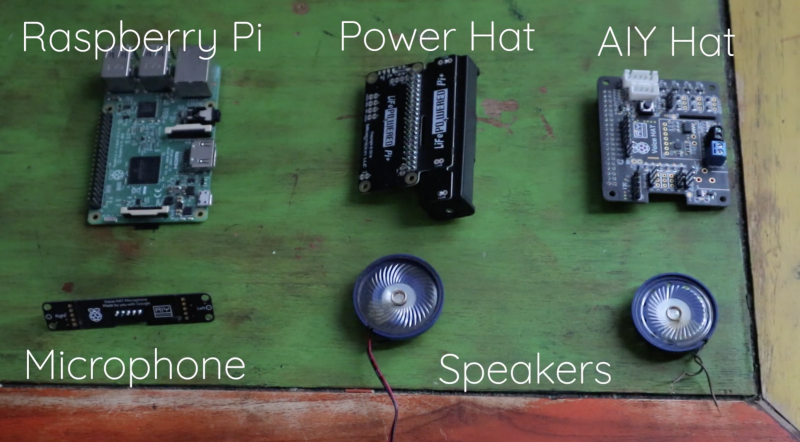
Why use a regular swear jar to retrain your potty-mouthed brain when you can build a Swear Bear to help you instead?
Swear Bear listens to you. All the time. And Swear Bear can tell when a swear word is used. Swear Bear tells you off and saves all the swear words you said to the cloud to shame you. Swear Bear subscribes to the school of tough love.
To teach Swear Bear the art of profanity detection, Swear Bear creators 8 Bits and a Byte turned to the profanity check Python library. You can find the info to install and use the library on this page, as well as info on how it works and why it’s so accurate.
You’ll hear at this point in the video that Swear Bear says “Oh dear” when a swear word is used within earshot.
The microphone allows Swear Bear to ‘hear’ your speech, and through its speakers it can then tell you off for swearing.
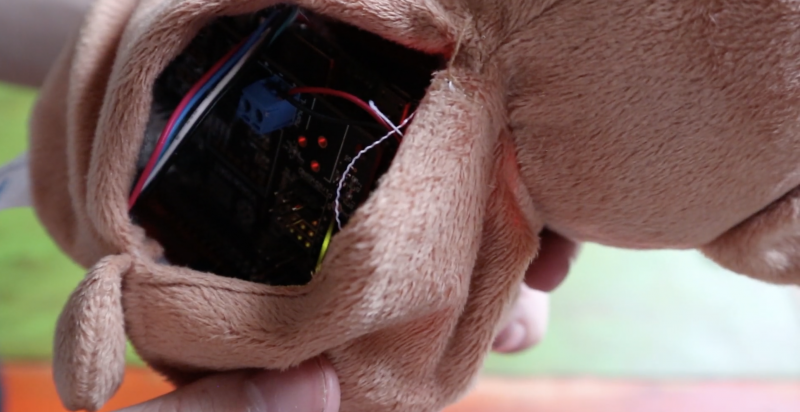
All of hardware is squeezed into the stuffing-free bear once the text-to-speech and profanity detection software is working.
Babbage Bear hack?
Babbage the Bear
8 Bits and a Byte fan Ben Scarboro took to the comments on YouTube to suggest they rework one of our Babbage Bears into a Swear Bear. Babbage is teeny tiny, so maybe you would need to fashion a giant version to accomplish this. Just don’t make us watch while you pull out its stuffing.
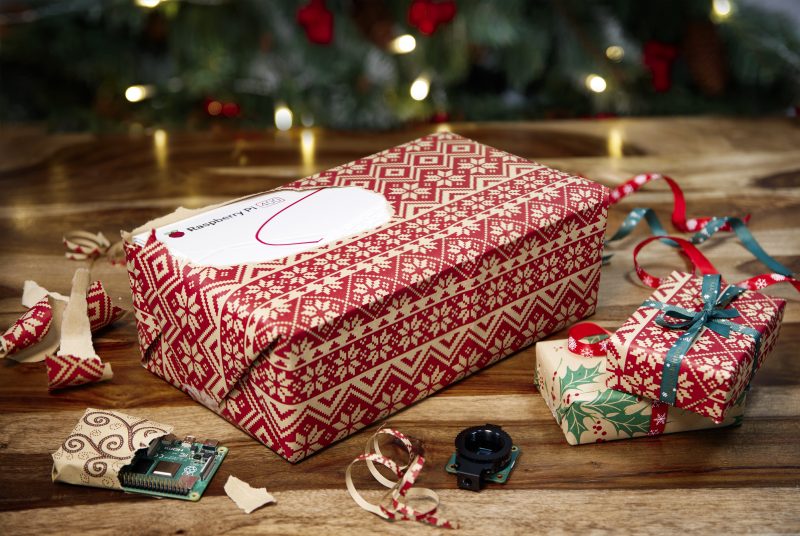
Note: We’re not *really* here, we just dropped in to point you in the right direction with your new Raspberry Pi toys, then we’re disappearing again to enjoy the rest of the festive season. See you on 4 January 2021!
Photographer Brian’s wrapping skills are A+
So… what did you get? We launched a ton of new products this year, so we’ll walk you through what to do with each of them, as well as how to get started if you received a classic Raspberry Pi.
Community
First things first: welcome! You’re one of us now, so why not take a moment to meet your fellow Raspberry Pi folk and join our social communities?
Tag us on social media in a photo with your favourite Christmas present and let us know what you plan to do with your new Raspberry Pi!
Raspberry Pi 400
The nail polish that shook the internet
If you were lucky enough to get a Raspberry Pi 400 Personal Computer Kit, all you have to do is find a monitor (a TV will also do), plug in, and go. It really is that simple. In fact, when we launched it, Eben Upton described it as a “Christmas morning product”. Always thinking ahead, that guy.
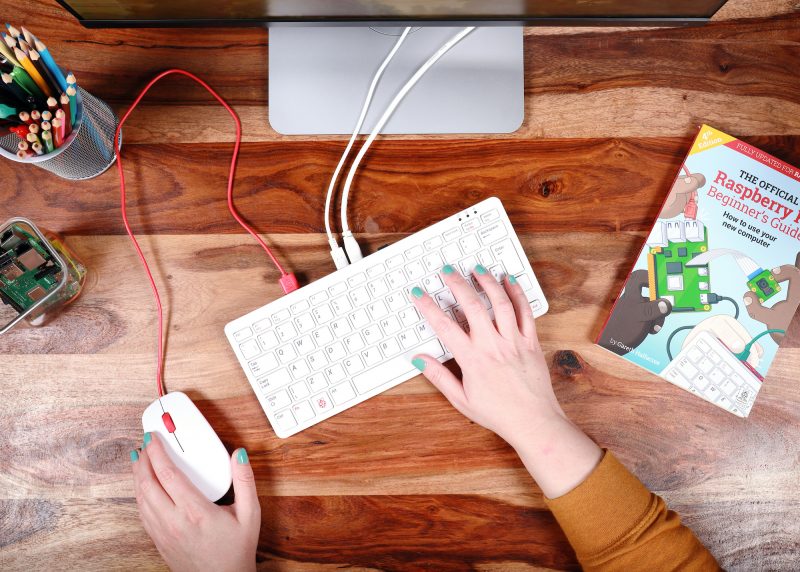
If you got a Raspberry Pi 400 unit on its own, you’ll need to find a mouse and power supply as well as a monitor. You also won’t have received the official Raspberry Pi Beginner’s Guide that comes with the kit, so you can pick one up from the Raspberry Pi Press online store, or download a PDF for free, courtesy of The MagPi magazine.
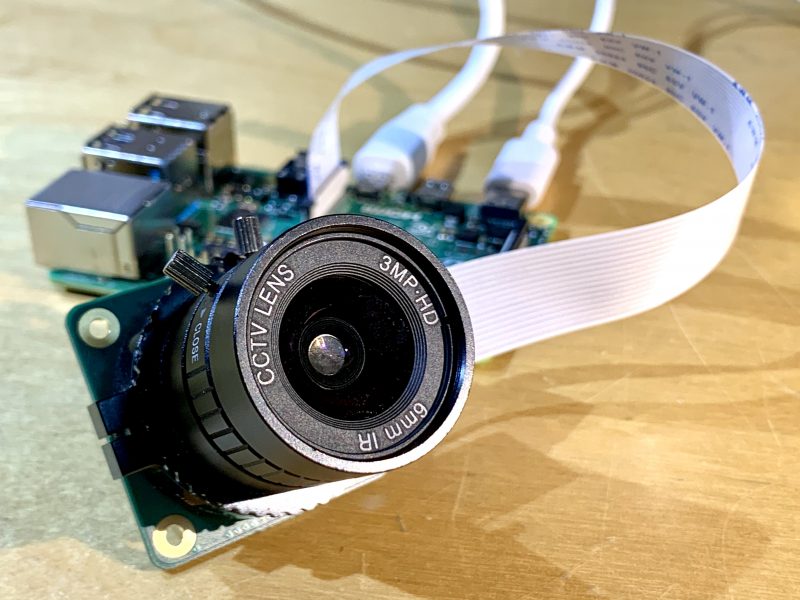
Raspberry Pi High Quality Camera
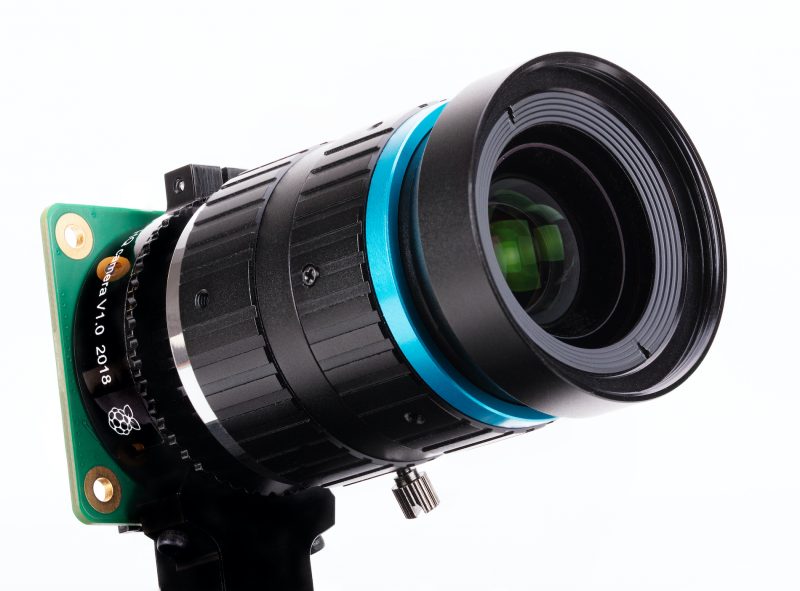
Raspberry Pi High Quality Camera, with additional lens attached
You are going to LOVE playing around with this if you got one in your stocking. The Raspberry Pi High Quality Camera is 12.3 megapixels of fun, and the latest addition to the Raspberry Pi camera family.
This video shows you how to set up your new toy. And you can pick up the Official Raspberry Pi Camera Guide for a more comprehensive walkthrough. You can purchase the book in print today from the Raspberry Pi Press store for £10, or download the PDF for free from The MagPi magazine website.
Share your photos using #ShotOnRaspberryPi. We retweet the really good ones!
Operating systems & online support
Adorable family snap
If you got one of our classic Raspberry Pi boards, make sure to get the latest version of Raspberry Pi OS, our official supported operating system.
The easiest way to flash the OS onto your SD card is using the Raspberry Pi Imager. Take 40 seconds to watch the video below to learn how to do that.
Help for newbies
If you’re a complete newbie, our help pages are the best place to start in case you’re a bit daunted by where to plug everything in on your very first Raspberry Pi. If you want step-by-step help, you can also take our free online course “Getting Started with Your Raspberry Pi”.
Once you’ve got the hang of things, our forum will become your home from home. Gazillions of Raspberry Pi superfans hang out there and can answer pretty much any question you throw at them – try searching first, because many questions have already been asked and answered, and perhaps yours has too.
Robots, games, digital art & more
When you’re feeling comfortable with the basics, why not head over to our projects page and pick something cool to make?
The Raspberry Pi blog is also a great place to find inspiration. We share the best projects from our global community, and things for all abilities pop up every week day. If you want us to do the heavy lifting for you, just sign up to Raspberry Pi Weekly, and we’ll send you the top blogs and Raspberry Pi-related news each week.
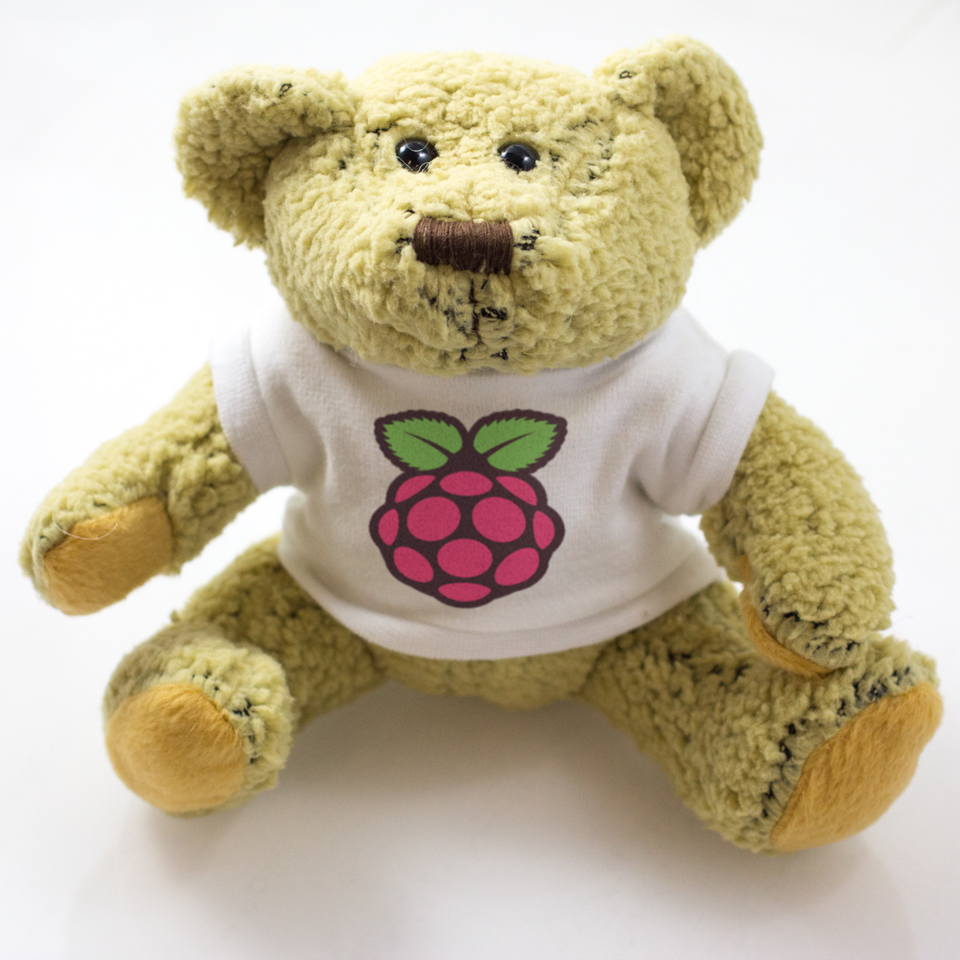
Babbage Bear
What a QT
And if you got your very own Babbage Bear: love them, cherish them, and keep them safe. They’re of a nervous disposition so talk quietly to them for the first few days, to let them get used to you.
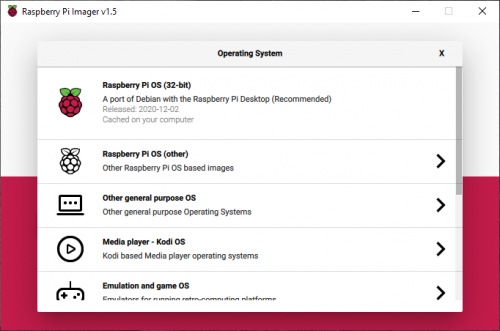
Just in time for the holidays, we’ve updated Raspberry Pi Imager to add some new functionality.
New submenu support: previous versions of Raspberry Pi Imager were limited to a single level of submenu. This limitation has been fixed so we can group images into different categories, such as general purpose operating systems, media players, and gaming and emulation.
New icons from our design team: easy on the eyes!
Version tracking: the menu file that Imager downloads from the Raspberry Pi website now includes an entry defining its latest version number, so in future, we can tell you when an updated Imager application is available.
Download telemetry: we’ve added some simple download telemetry to help us log how popular the various operating systems are.
You can go to our software page to download and install the new version 1.5 release of Raspberry Pi Imager and use it now.
We haven’t done telemetry in Imager before, and since people tend — rightly — to be concerned about applications gathering data, we want to explain exactly what we are doing and why: we’re logging which operating systems and categories people download, so we can make sure the most popular options are easy enough to find in Raspberry Pi Imager’s menu system.
We don’t record any personal data, such as your IP address; the information we collect allows us to see the number of downloads of each operating system over time, and nothing else. You’ll find more detailed information, including how to opt out of telemetry, in the Raspberry Pi Imager GitHub README.md.
You can see which OSes are most often downloaded too, on our stats page.
As you can see, the default recommended Raspberry Pi OS image is indeed the most downloaded option. The recently released Ubuntu Desktop for Raspberry Pi 4 and Raspberry Pi 400 is the most popular third-party operating system.
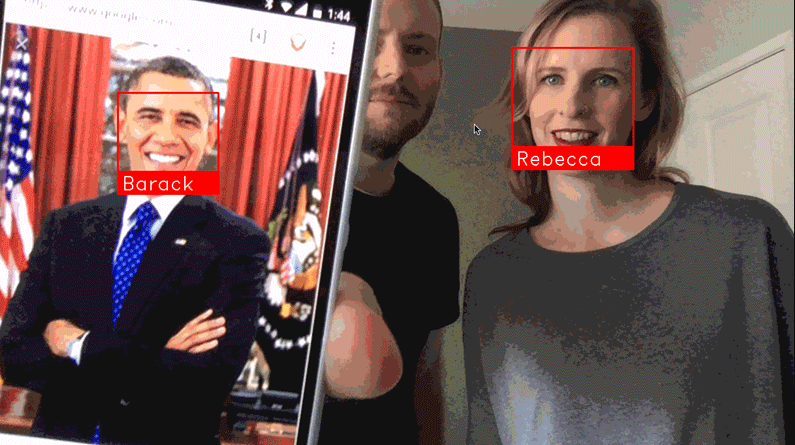
It’s hard to comprehend how far machine learning has come in the past few years. You can now use a sub-£50 computer to reliably recognise someone’s face with surprising accuracy.
Although this kind of computing power is normally out of reach of microcontrollers, adding a Raspberry Pi computer to your project with the new High Quality Camera opens up a range of possibilities. From simple alerting applications (‘Mum’s arrived home!’), to dynamically adjusting settings based on the person using the project, there’s a lot of fun to be had.
Here’s a beginner’s guide to getting face recognition up and running.
Face recognition using machine learning is hard work, so the latest, greatest Raspberry Pi 4 is a must
1. Prepare your Raspberry Pi For face recognition to work well, we’re going to need some horsepower, so we recommend a minimum of Raspberry Pi 3B+, ideally a Raspberry Pi 4. The extra memory will make all the difference. To keep as much resource as possible available for our project, we’ve gone for a Raspberry Pi OS Lite installation with no desktop.
Make sure you’re on the network, have set a new password, enabled SSH if you need to, and updated everything with sudo apt -y update && sudo apt -y full-upgrade. Finally, go into settings by running sudo raspi-config and enable the camera in ‘Interfacing Options’.
2. Attach the camera This project will work well with the original Raspberry Pi Camera, but the new official HQ Camera will give you much better results. Be sure to connect the camera to your Raspberry Pi 4 with the power off. Connect the ribbon cable as instructed in hsmag.cc/HQCameraGetStarted. Once installed, boot up your Raspberry Pi 4 and test the camera is working. From the command line, run the following: raspivid -o test.h264 -t 10000 This will record ten seconds of video to your microSD card. If you have an HDMI cable plugged in, you’ll see what the camera can see in real-time. Take some time to make sure the focus is correct before proceeding.
3. Install dependencies The facial recognition library we are using is one that has been maintained for many years by Adam Geitgey. It contains many examples, including Python 3 bindings to make it really simple to build your own facial recognition applications. What is not so easy is the number of dependencies that need to be installed first. There are way too many to list here, and you probably won’t want to type them out, so head over to hsmag.cc/FacialRec so that you can cut and paste the commands. This step will take a while to complete on a Raspberry Pi 4, and significantly longer on a Model 3 or earlier.
3. Install the libraries Now that we have everything in place, we can install Adam’s applications and Python bindings with a simple, single command: sudo pip3 install face_recognition Once installed, there are some examples we can download to try everything out. cd git clone --single-branch https://github.com/ageitgey/face_recognition.git In this repository is a range of examples showing the different ways the software can be used, including live video recognition. Feel free to explore and remix.
5. Example images The examples come with a training image of Barack Obama. To run the example: cd ./face_recognition/examples python3 facerec_on_raspberry_pi.py On your smartphone, find an image of Obama using your favourite search engine and point it at the camera. Providing focus and light are good you will see: “I see someone named Barack Obama!” If you see a message saying it can’t recognise the face, then try a different image or try to improve the lighting if you can. Also, check the focus for the camera and make sure the distance between the image and camera is correct.
Who are you? What even is a name? Can a computer decide your identity?
6. Training time The final step is to start recognising your own faces. Create a directory and, in it, place some good-quality passport-style photos of yourself or those you want to recognise. You can then edit the facerec_on_raspberry_pi.py script to use those files instead. You’ve now got a robust prototype of face recognition. This is just the beginning. These libraries can also identify ‘generic’ faces, meaning it can detect whether a person is there or not, and identify features such as the eyes, nose, and mouth. There’s a world of possibilities available, starting with these simple scripts. Have fun!
Issue 38 of Hackspace Magazine is out NOW
Each month, HackSpace magazine brings you the best projects, tips, tricks and tutorials from the makersphere. You can get it from the Raspberry Pi Press online store, The Raspberry Pi store in Cambridge, or your local newsagents.
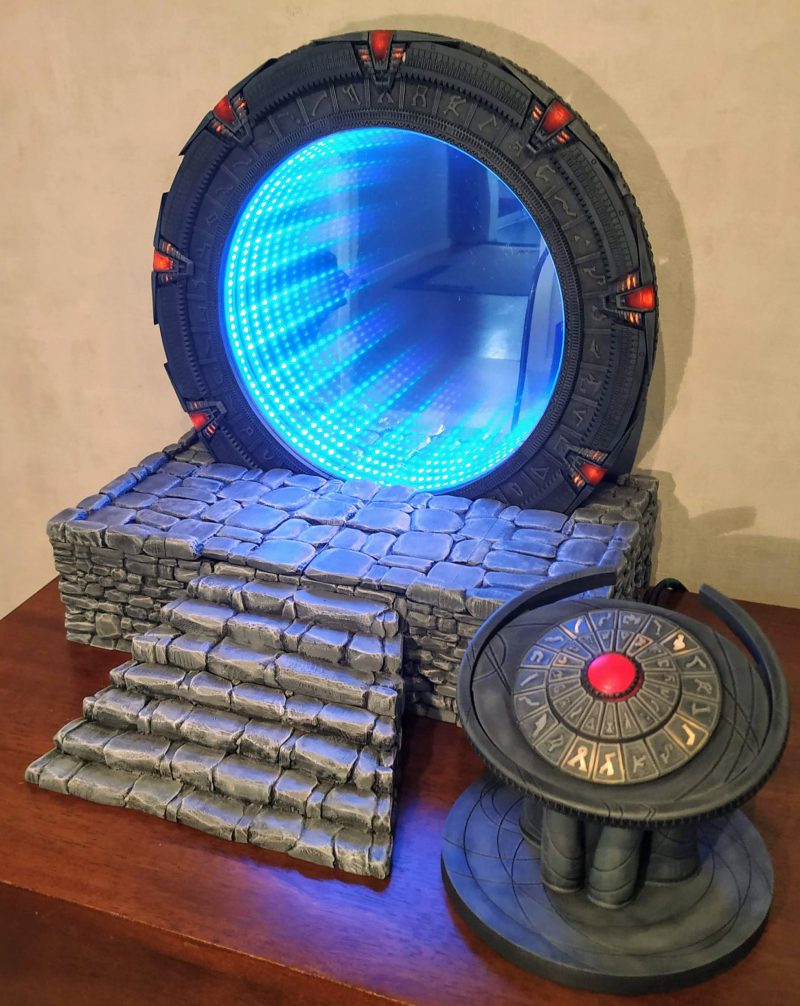
Fans of the Stargate SG-1 series, prepare to be inspired: a fellow aficionado has fashioned his own model of the show’s iconic portal. Nicola King takes an interstellar trip in the latest issue of The MagPi Magazine.
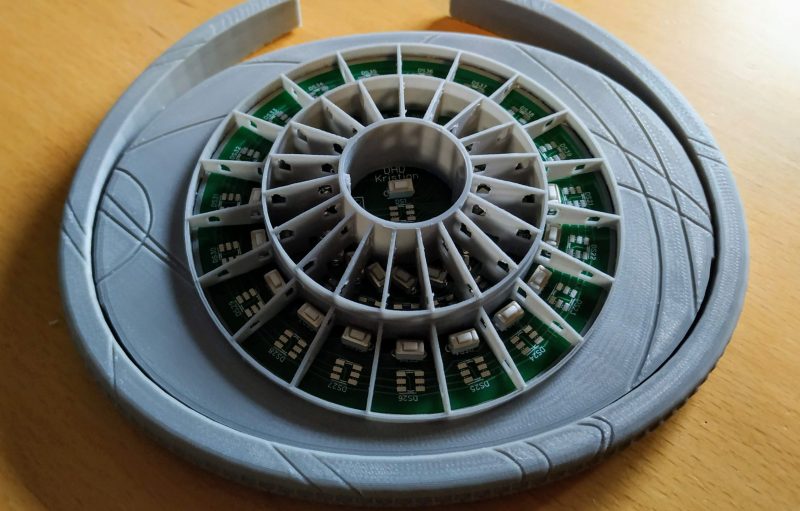
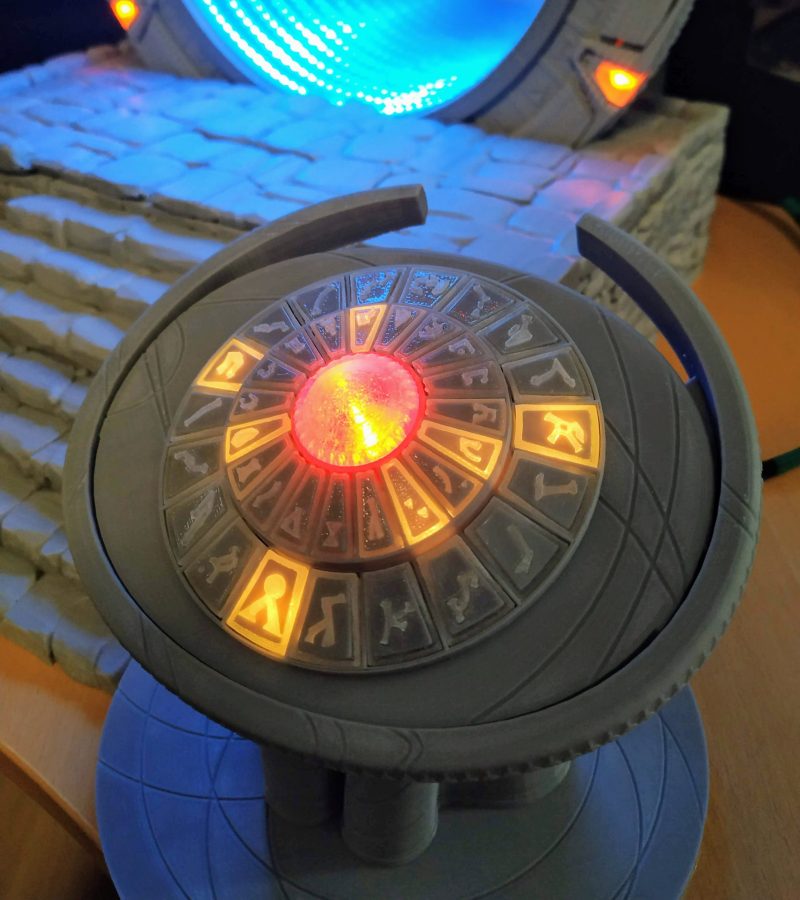
When Kristian Tysse began making some projects on his new 3D printer, he soon became aware that the possibility of printing his own ‘working’ Stargate SG-1 model was within his grasp at last. “I suddenly realised I might now have enough knowledge about 3D printing, Raspberry Pi, motors, and programming to actually make a Stargate model of my own,” he tells us. “I wanted people who are familiar with the show to immediately know what it was, and tried to make it work as best I could, while staying as true as possible to the feeling and essence of the TV show.”
Kristian also wanted to use a Raspberry Pi within this fully interactive, light-up, moving-parts project as “it is a powerful device with lots of flexibility. I do like that it functions as a full computer with an operating system with all the possibility that brings.”
Model minutiae
You only have to look at the model to see just how much 3D printing was needed to get all of the parts ready to piece together, and Kristian created it in segments. But one of the key parts of his model is the DHD or Dial Home Device which viewers of the series will be familiar with. “The DHD functions as a USB keyboard and, when the keys are used, it sends signals to the (Python) program on Raspberry Pi that engages the different motors and lights in a proper Stargate way,” he enthuses. “If a correct set of keys/symbols are pressed on the DHD, the wormhole is established – illustrated on my Stargate with an infinity mirror effect.”
“I wanted people who are familiar with the show to immediately know what it was”
Kristian Tysse
However, the DHD was a challenge, and Kristian is still tweaking it to improve how it works. He admits that writing the software for the project was also tricky, “but when I think back, the most challenging part was actually making it ‘functional’, and fitting all the wires and motors on it without destroying the look and shape of the Stargate itself.”
Dazzling detail
Kristian admits to using a little artistic licence along the way, but he is keen to ensure the model replicates the original as far as possible. “I have taken a few liberties here and there. People on the social media channels are quick to point out differences between my Stargate and the one in the series. I have listened to most of those and done some changes. I will implement some more of those changes as the project continues,” he says. He also had to redesign the project several times, and had a number of challenges to overcome, especially in creating the seven lit, moving chevrons: “I tried many different approaches before I landed on the right one.”
The results of Kristian’s time-intensive labours are truly impressive, and show what you can achieve when you are willing to put in the hours and the attention to detail. Take a look at Kristian’s extremely detailed project pageto see more on this super-stellar make.
Issue #101 of The MagPi Magazine out NOW
Never want to miss an issue? Subscribe to The MagPi and we’ll deliver every issue straight to your door. Also, if you’re a new subscriber and get the 12-month subscription, you’ll get a completely free Raspberry Pi Zero bundle with a Raspberry Pi Zero W and accessories.
The year is drawing to a close, and we are so excited for 2021!
More than 700 young people from 39 countries shared their tech creations in the free Coolest Projects online showcase this year! We loved seeing so many young people shine with their creative projects, and we can’t wait to see what the world’s next generation of digital makers will present at Coolest Projects in 2021.
Mark your calendar for registration opening
Coolest Projects is the world-leading technology fair for young people! It’s our biggest event, and we are running it online again next year so that young people can participate safely and from wherever they are in the world.
Through Coolest Projects, young people are empowered to show the world something they’re making with tech — something THEY are excited about! Anyone up to age 18 can share their creation at Coolest Projects.
On 1 February, we will open registrations for the 2021 online showcase. Mark the date in your calendar! All registered projects will get their very own spot in the Coolest Projects online showcase gallery, where the whole world can discover them.
Taking part is completely free and enormously fun
If a young person in your life — your family, your classroom, your coding club — is making something with tech that they love, we want them to register it for Coolest Projects. It doesn’t matter how small or big their project is, because the Coolest Projects showcase is about celebrating the love we all share for getting creative with tech.
Everyone who registers a project becomes part of a worldwide community of peers who express themselves and their interests with creative tech. We will also have special judges pick their favourite projects! Taking part in Coolest Projects is a wonderful way to connect with others, be inspired, and learn from peers.
So if you know a tech-loving young person, get them excited for taking part in Coolest Projects!
“We are so very happy to have reached people who love to code and are enjoying projects from all over the world…everyone’s contributions have blown our minds…we are so so happy ️️Thank you to Coolest Projects for hosting the best event EVER ️️“
Want inspiration for projects? You can still explore all the wonderful projects from the 2020 showcase gallery.
Young people can participate with whatever they’re making
Everyone is invited to take part in Coolest Projects — the showcase is for young people with any level of experience. The project they register can be whatever they like, from their very first Scratch animation, to their latest robotics project, website, or phone app. And we invite projects at any stages of the creation process, whether they’re prototypes, finished products, or works-in-progress!
To make the youngest participants and complete beginners feel like they belong, we work hard to make sure that taking part is a super welcoming and inspiring experience! In the showcase, they will discover what is possible with technology and how they can use it to shape their world.
And for the young creators who are super tech-savvy and make advanced projects, showcasing their creation at Coolest Projects is a great way to get it seen by some amazing people in the STEM sector: this year’s special judges were British astronaut Tim Peake, Adafruit CEO Limor Fried, and other fabulous tech leaders!
Sign up for the latest Coolest Projects news
To be the first to know when registration opens, you only have to sign up for our newsletter:
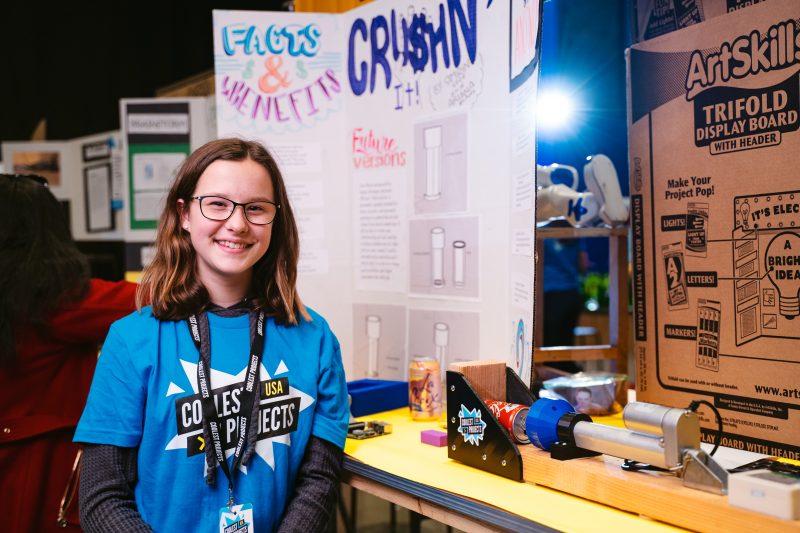
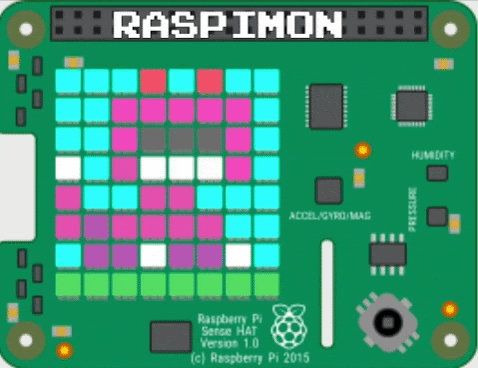
To round off Computer Science Education Week 2020, the Google Code Next team, working with the Raspberry Pi Foundation and some incredible volunteers in the Chicago area, helped over 400 Black and Latinx high school students get coding using Raspberry Pi 400. Here’s Omnia Saed with more.
In partnership with Google Code Next, the Raspberry Pi Foundation curated a computer science activity for over 400 Chicago Public Schools students. Over 1000 kits with the newly released Raspberry Pi 400 were sent to six public schools to mark the end of Computer Science Education Week (7-14 December).
— Kelly College Prep SkillsUSA (@Kelly_SkillsUSA) December 8, 2020
Google Code Next
Google Code Next is a free computer science education program for Black and Latinx high school students. Between 2011 and 2018, Black and Hispanic college students each only made up 3 percent of computer science graduates; Code Next works to change that. The program provides students with the skills and inspiration needed for long and rewarding careers in computer science.
“We aim to provide Black and Latinx students with skills and technical social capital — that web of relationships you can tap into,” said Google Diversity STEM Strategist Shameeka Emanuel.
The main event
The virtual event brought over 80 Google volunteers, students and teachers together to create their very own “Raspimon”—a virtual monster powered by Raspberry Pi. For many students, it was their first time coding.
Matt Richardson, Executive Director of the Raspberry Pi Foundation North America, opened the event by telling students to share their work with family and friends.
“I hope you find new ways to solve problems or express yourselves creatively. More importantly, be sure to share what you create with someone you know – you might just spark curiosity in someone else,” he said.
— Kelly College Prep SkillsUSA (@Kelly_SkillsUSA) December 9, 2020
In an interview with the Chicago Sun Times, Troy Williams, Chicago Public Schools interim director of computer science, explains, “Our students being able to have access to these Raspberry Pis and other resources supplements the learning they’re doing in the classrooms, and brings another level of engagement where they can create on their own. It really helps toward closing the digital divide and the learning gap as well.”
Want to join in with the fun? You’ll find a copy of the activity and curriculum on the Code Next website.
And if you’re looking to introduce someone to coding over the holidays, there’s still time to order a Raspberry Pi 400 computer kit from our network of Raspberry Pi Approved Resellers.
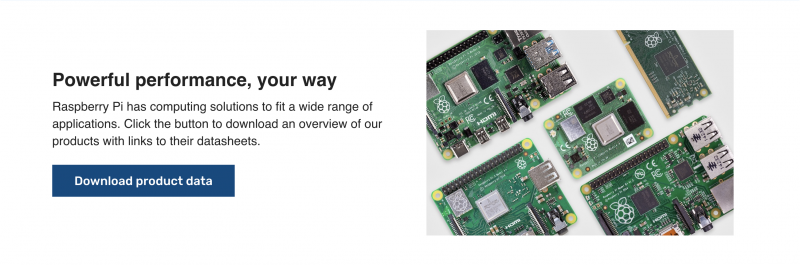
Raspberry Pi computers have always been used in a huge variety of settings, since the combination of low cost, high performance, and ease of use make it an ideal device for almost any application. We’ve seen a large proportion of sales go into the industrial market – businesses using Raspberry Pi, rather than educational settings or individual consumers. Today we’re announcing new support for this group of customers: a dedicated area of our website for industry, and our Raspberry Pi Approved Design Partners programme, connecting businesses that want to integrate Raspberry Pi into their products with hand-picked design partners who can help.
The industrial market for Raspberry Pi has grown over the years, and now represents around 44% of our annual total sales. We’ve seen this borne out with new releases of Raspberry Pi products: typically sales of a consumer product drop off once a new product is released, but we still see incredible sales of older models of Raspberry Pi. Our inference is that these are destined for embedded applications, where changing to the latest model is not practical.
A new online resource for industry
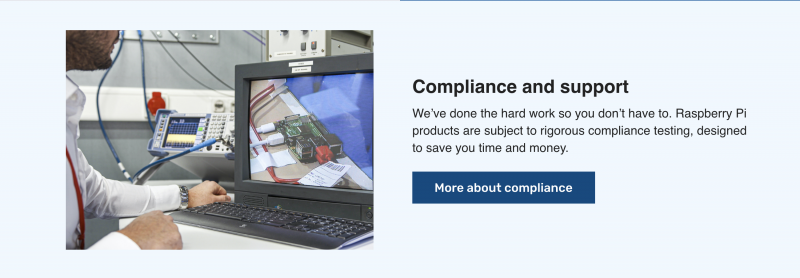
To support Raspberry Pi’s industrial customers, we have developed a new, dedicated area of our website. Our For industry pages are the best place to go for industrial applications of Raspberry Pi. They provide access to the information and support you need when using our products in an industrial setting, with links to datasheets, compliance documents, and more.
As part of our commitment to industrial customers, we guarantee product lifetimes until at least 2026 on all products. We rarely ever end a product line – in fact, you can still buy Raspberry Pi 1 Model B+ from 2014. And we’ve made it easy for you to take a product through the necessary regulatory compliance steps, with the Raspberry Pi Integrator Programme.
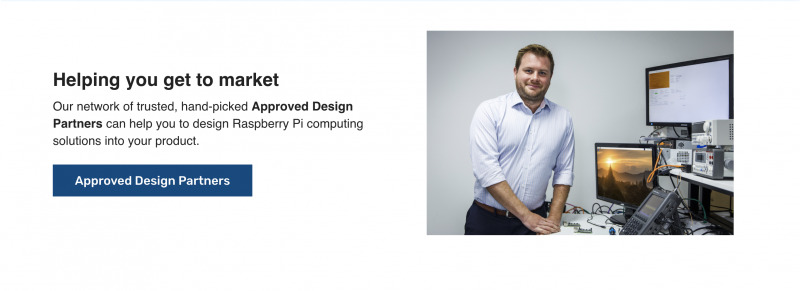
Raspberry Pi Approved Design Partners
Along with our online resources for industry, we’re announcing a new programme to help customers who want to integrate Raspberry Pi into their products, and to recognise companies with specialist knowledge and proven expertise in designing with Raspberry Pi. The Raspberry Pi Approved Design Partners programme is a way of connecting trusted design consultancies with customers who need support designing Raspberry Pi computing solutions into their products.
We’re launching with a select set of designers whom we already know and work with, and we hope to grow this group over the coming years. If your company provides hardware, software, or mechanical design services with Raspberry Pi, and you’d like us to promote your offering on our website, you can find out more about applying to become a Raspberry Pi Approved Design Partner.
If you have a product or a piece of work that uses Raspberry Pi, and you need technical assistance, Raspberry Pi Approved Design Partners have the capacity to provide you with effective help. All our Design Partners have been through a rigorous application process, and we will monitor them regularly for quality and ability. You can be confident that Raspberry Pi Approved Design Partners have the backing of Raspberry Pi, and have access to a deep level of technical knowledge and support within Raspberry Pi.
We’re excited to help customers build fantastic products using Raspberry Pi, and we’re looking forward to working with a diverse range of designers across the world.
Hi folks, Ladyada here from Adafruit. The Raspberry Pi folks said we could do a guest post on our Adafruit BrainCraft HAT & Voice Bonnet, so here we go!
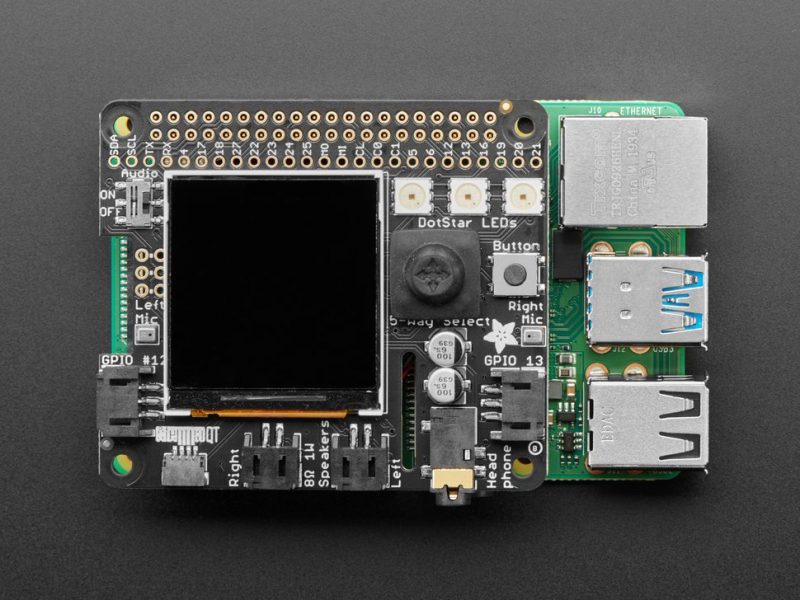
Adafruit BrainCraft HAT for Raspberry Pi
I’ve been engineering up a few Machine Learning devices that work with Raspberry Pi: BrainCraft HAT and the Voice Bonnet!
The idea behind the BrainCraft HAT is to enable you to “craft brains” for machine learning on the EDGE, with microcontrollers and microcomputers. On ASK AN ENGINEER, we chatted with Pete Warden, the technical lead of the mobile, embedded TensorFlow Group on Google’s Brain team about what would be ideal for a board like this.
BrainCraft HAT
And here’s what we designed! The BrainCraft HAT has a 240×240 TFT IPS display for inference output, slots for camera connector cable for imaging projects, a 5-way joystick, a button for UI input, left and right microphones, stereo headphone out, stereo 1W speaker out, three RGB DotStar LEDs, two 3-pin STEMMA connectors on PWM pins so they can drive NeoPixels or servos, and Grove/STEMMA/Qwiic I2C port.
This will let people build a wide range of audio/video AI projects while also allowing easy plug-in of sensors and robotics!
A controllable mini fan attaches to the bottom and can be used to keep your Raspberry Pi cool while it’s doing intense AI inference calculations. Most importantly, there’s an on/off switch that will completely disable the audio codec, so that when it’s off, there’s no way it’s listening to you.
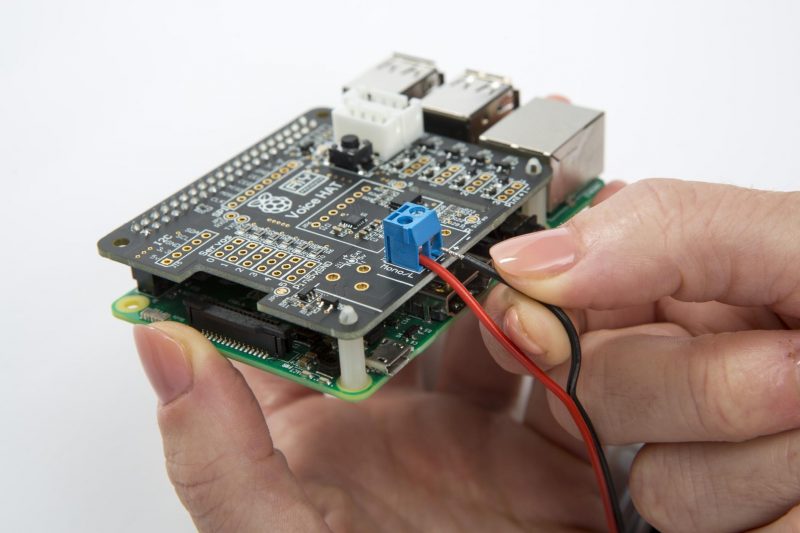
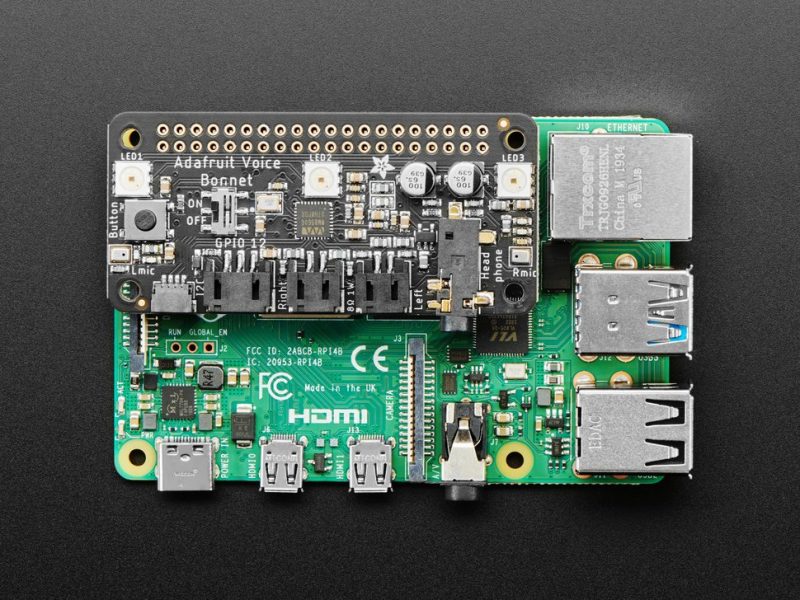
Next up, the Adafruit Voice Bonnet for Raspberry Pi: two speakers plus two mics. Your Raspberry Pi computer is like an electronic brain — and with the Adafruit Voice Bonnet you can give it a mouth and ears as well! Featuring two microphones and two 1Watt speaker outputs using a high-quality I2S codec, this Raspberry Pi add-on will work with any Raspberry Pi with a 2×20 GPIO header, from Raspberry Pi Zero up to Raspberry Pi 4 and beyond (basically all models but the very first ones made).
The on-board WM8960 codec uses I2S digital audio for great quality recording and playback, so it sounds a lot better than the headphone jack on Raspberry Pi (or the no-headphone jack on Raspberry Pi Zero). We put ferrite beads and filter capacitors on every input and output to get the best possible performance, and all at a great price.
But you could do various voice-activated or voice recognition projects. With two microphones, basic voice position can be detected as well. Check it out here, and see the guides as well!
We’re delighted to round off 2020 by welcoming four of the most popular IQaudio products to the Raspberry Pi fold. DAC+, DAC Pro, DigiAMP+, and Codec Zero will all be available to buy via our network of Raspberry Pi Approved Resellers.
We’ve had a busy 2020 here at Raspberry Pi. From the High Quality Camera to 8GB Raspberry Pi 4 to Compute Module 4 and Raspberry Pi 400, this year’s products have been under development for several years, and bringing them to market required us to build new capabilities in the engineering team. Building capabilities, rather than money or engineer time, is the real rate-limiting step for introducing new Raspberry Pi products.
One market we’ve never explored is hi-fi audio; this is a world unto itself, with a very demanding customer base, and we’ve never felt we had the capabilities needed to offer something distinctive. Over time, third parties have stepped in with a variety of audio I/O devices, amplifiers, and other accessories.
IQaudio
Founded by Gordon and Sharon Garrity together with Andrew Rankin in 2015, IQaudio was one of the first companies to recognise the potential of Raspberry Pi as a platform for hi-fi audio. IQaudio products are widely used by hobbyists and businesses (in-store audio streaming being a particularly popular use case). So when the opportunity arose to acquire IQaudio’s brand and product line late last year, we jumped at it.
Today we’re relaunching four of the most popular IQaudio products, at new affordable price points, via our network of Raspberry Pi Approved Resellers.
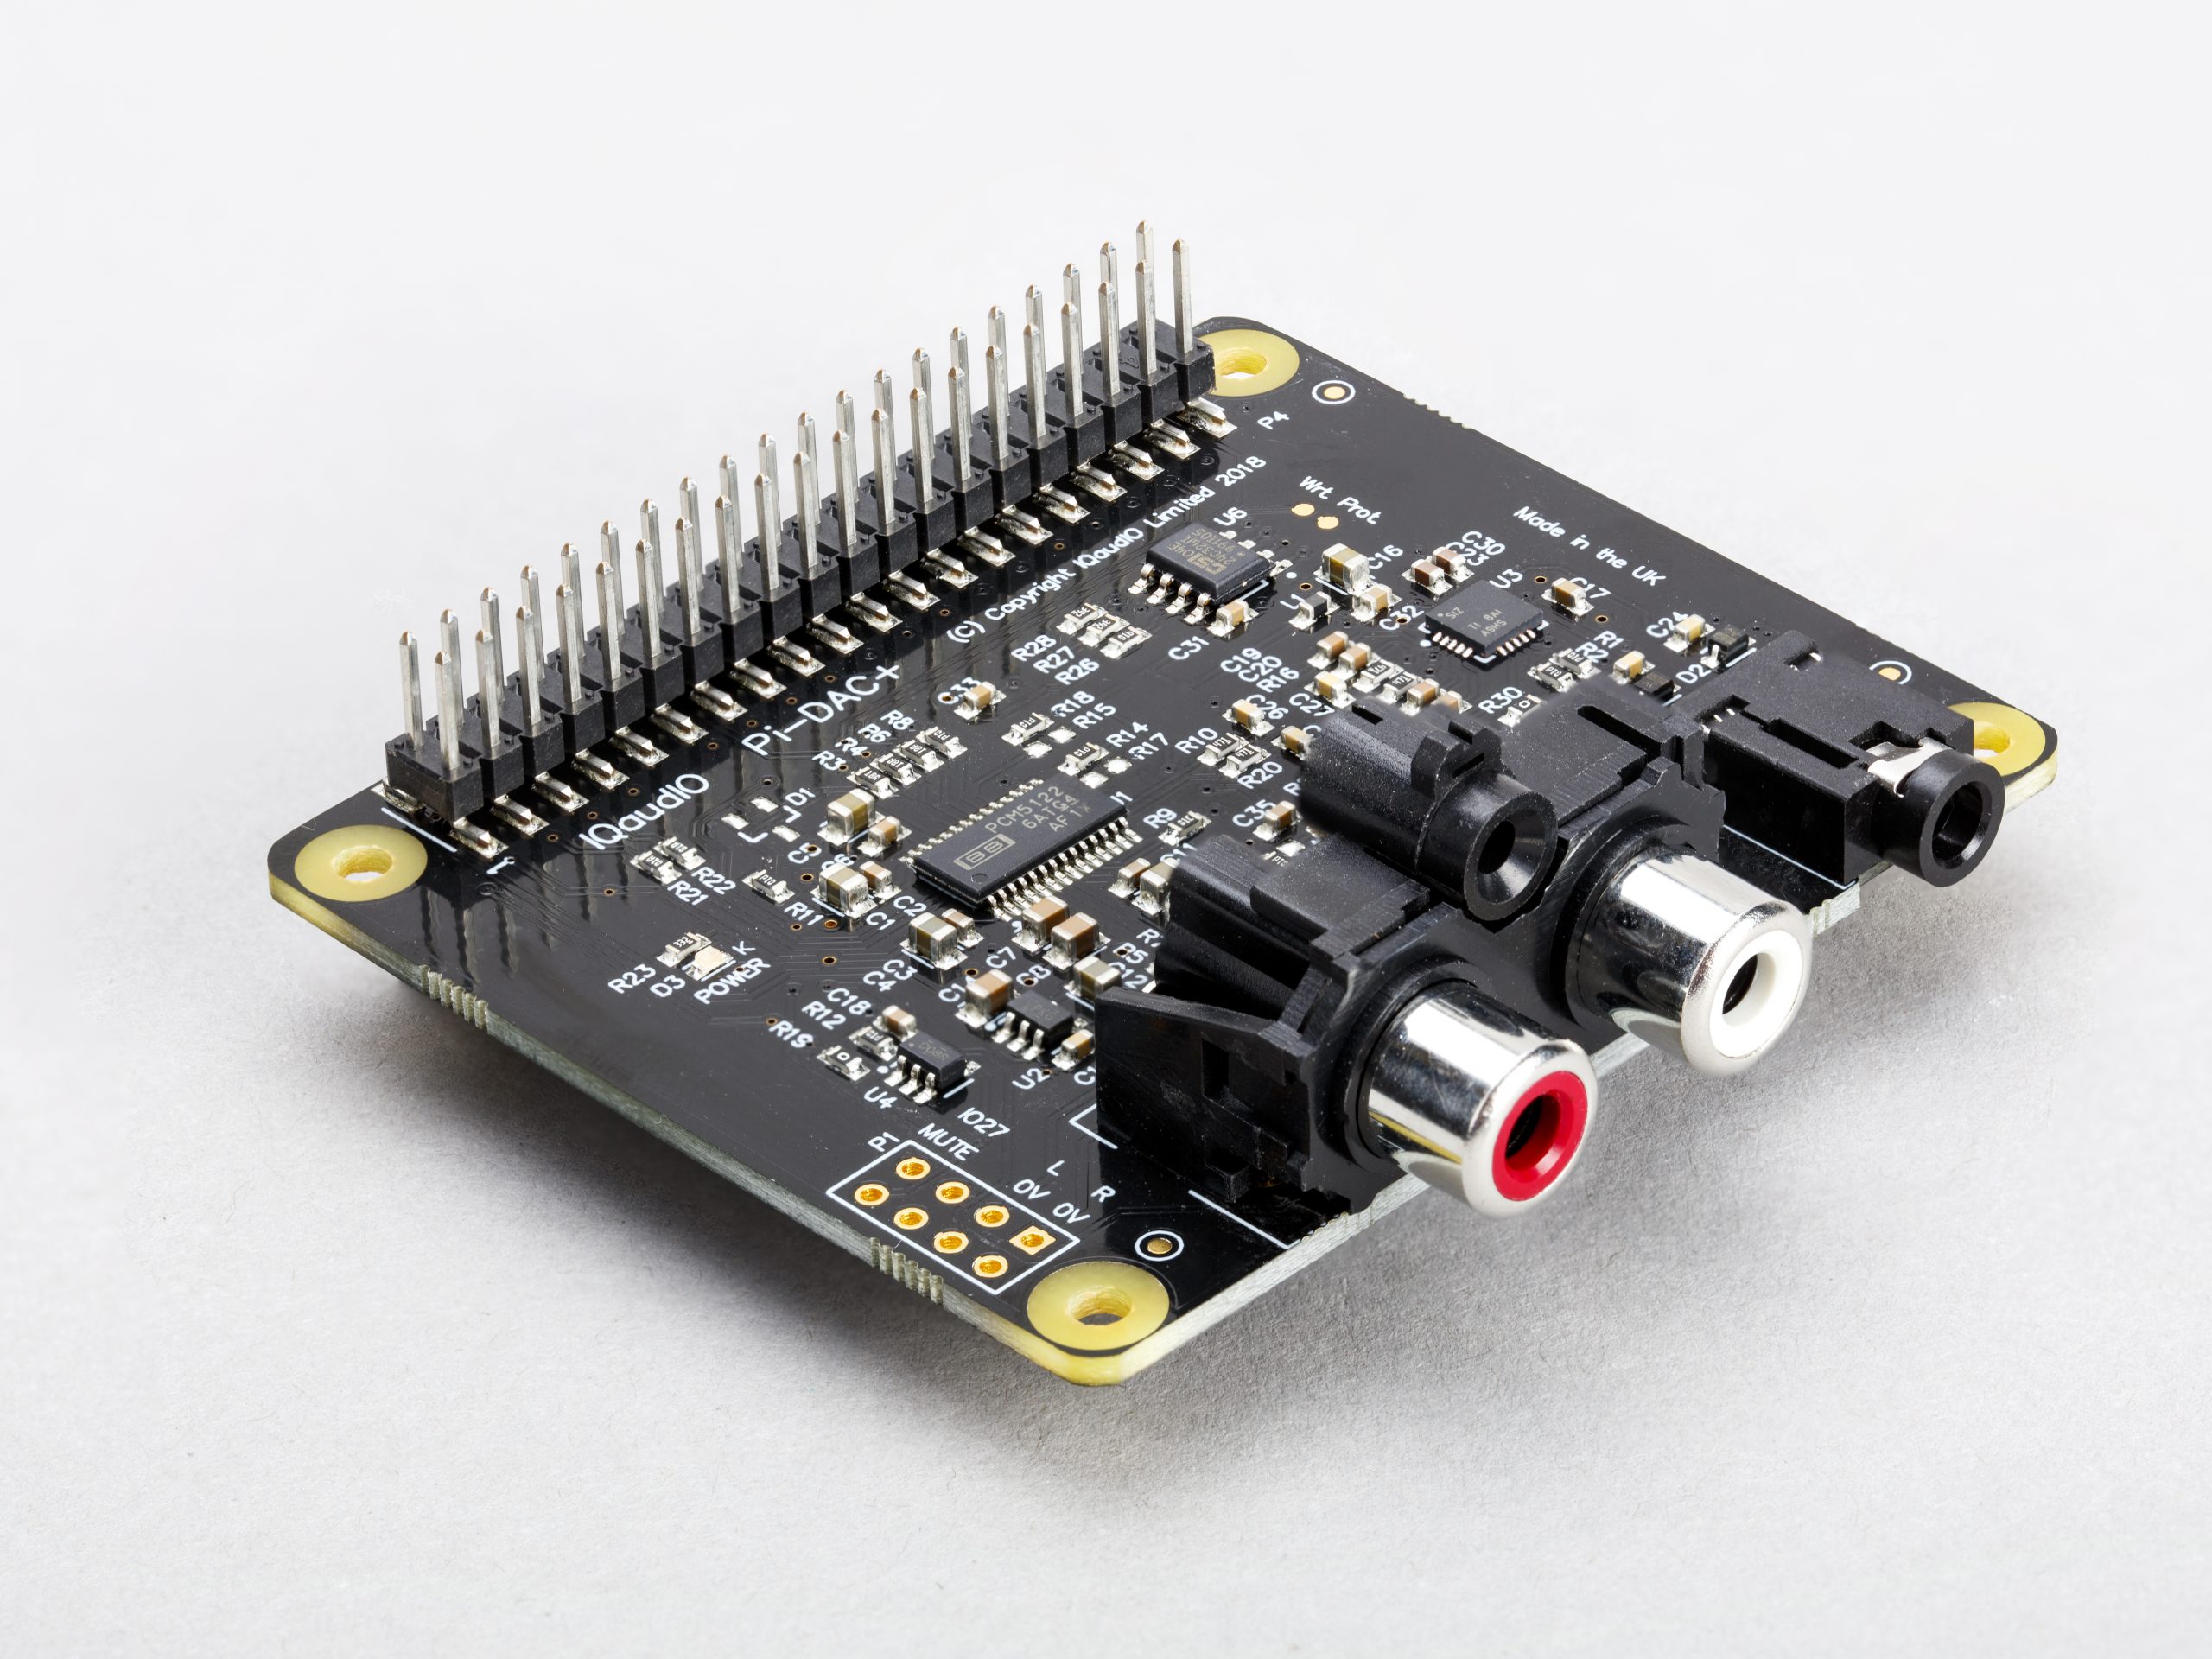
IQaudio DAC+
Priced at just $20, DAC+ is our lowest-cost audio output HAT, supporting 24‑bit 192kHz high-resolution digital audio. It uses a Texas Instruments PCM5122 DAC to deliver stereo analogue audio to a pair of phono connectors, and also provides a dedicated headphone amplifier.
IQaudio DAC+ HAT
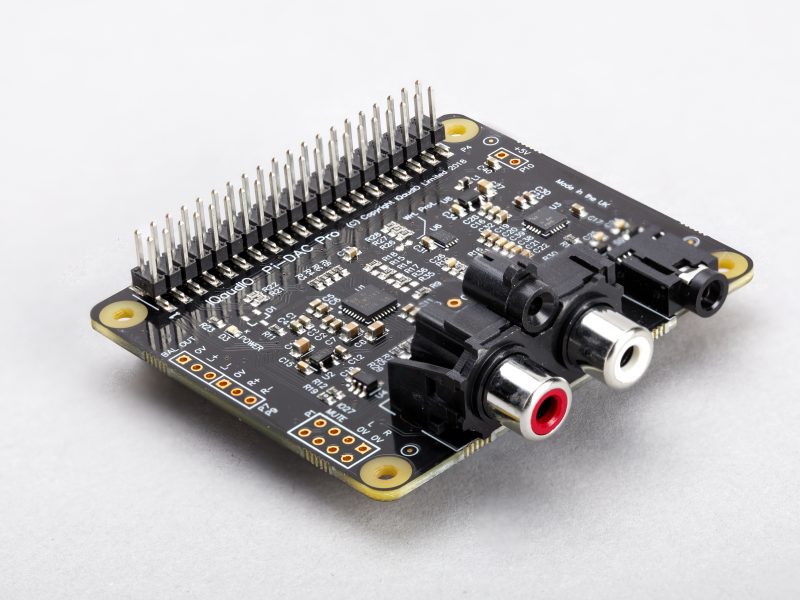
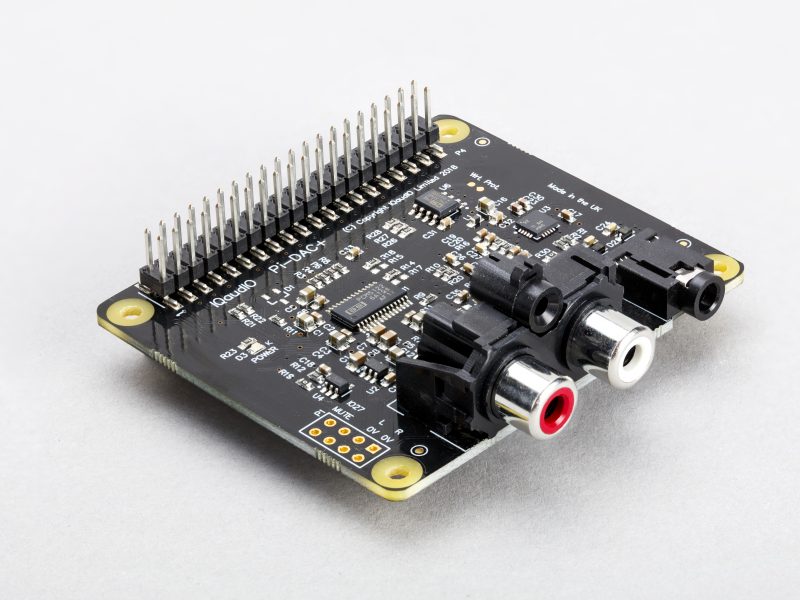
IQaudio DAC Pro
Priced at $25, DAC Pro is our highest-fidelity audio output HAT. It supports the same audio input formats and output connectors as DAC+, but uses a Texas Instruments PCM5242 DAC, providing an even higher signal-to-noise ratio.
IQaudio DAC Pro HAT
In combination with an optional daughter board (due for relaunch in the first quarter of 2021), DAC Pro can support balanced output from a pair of XLR connectors.
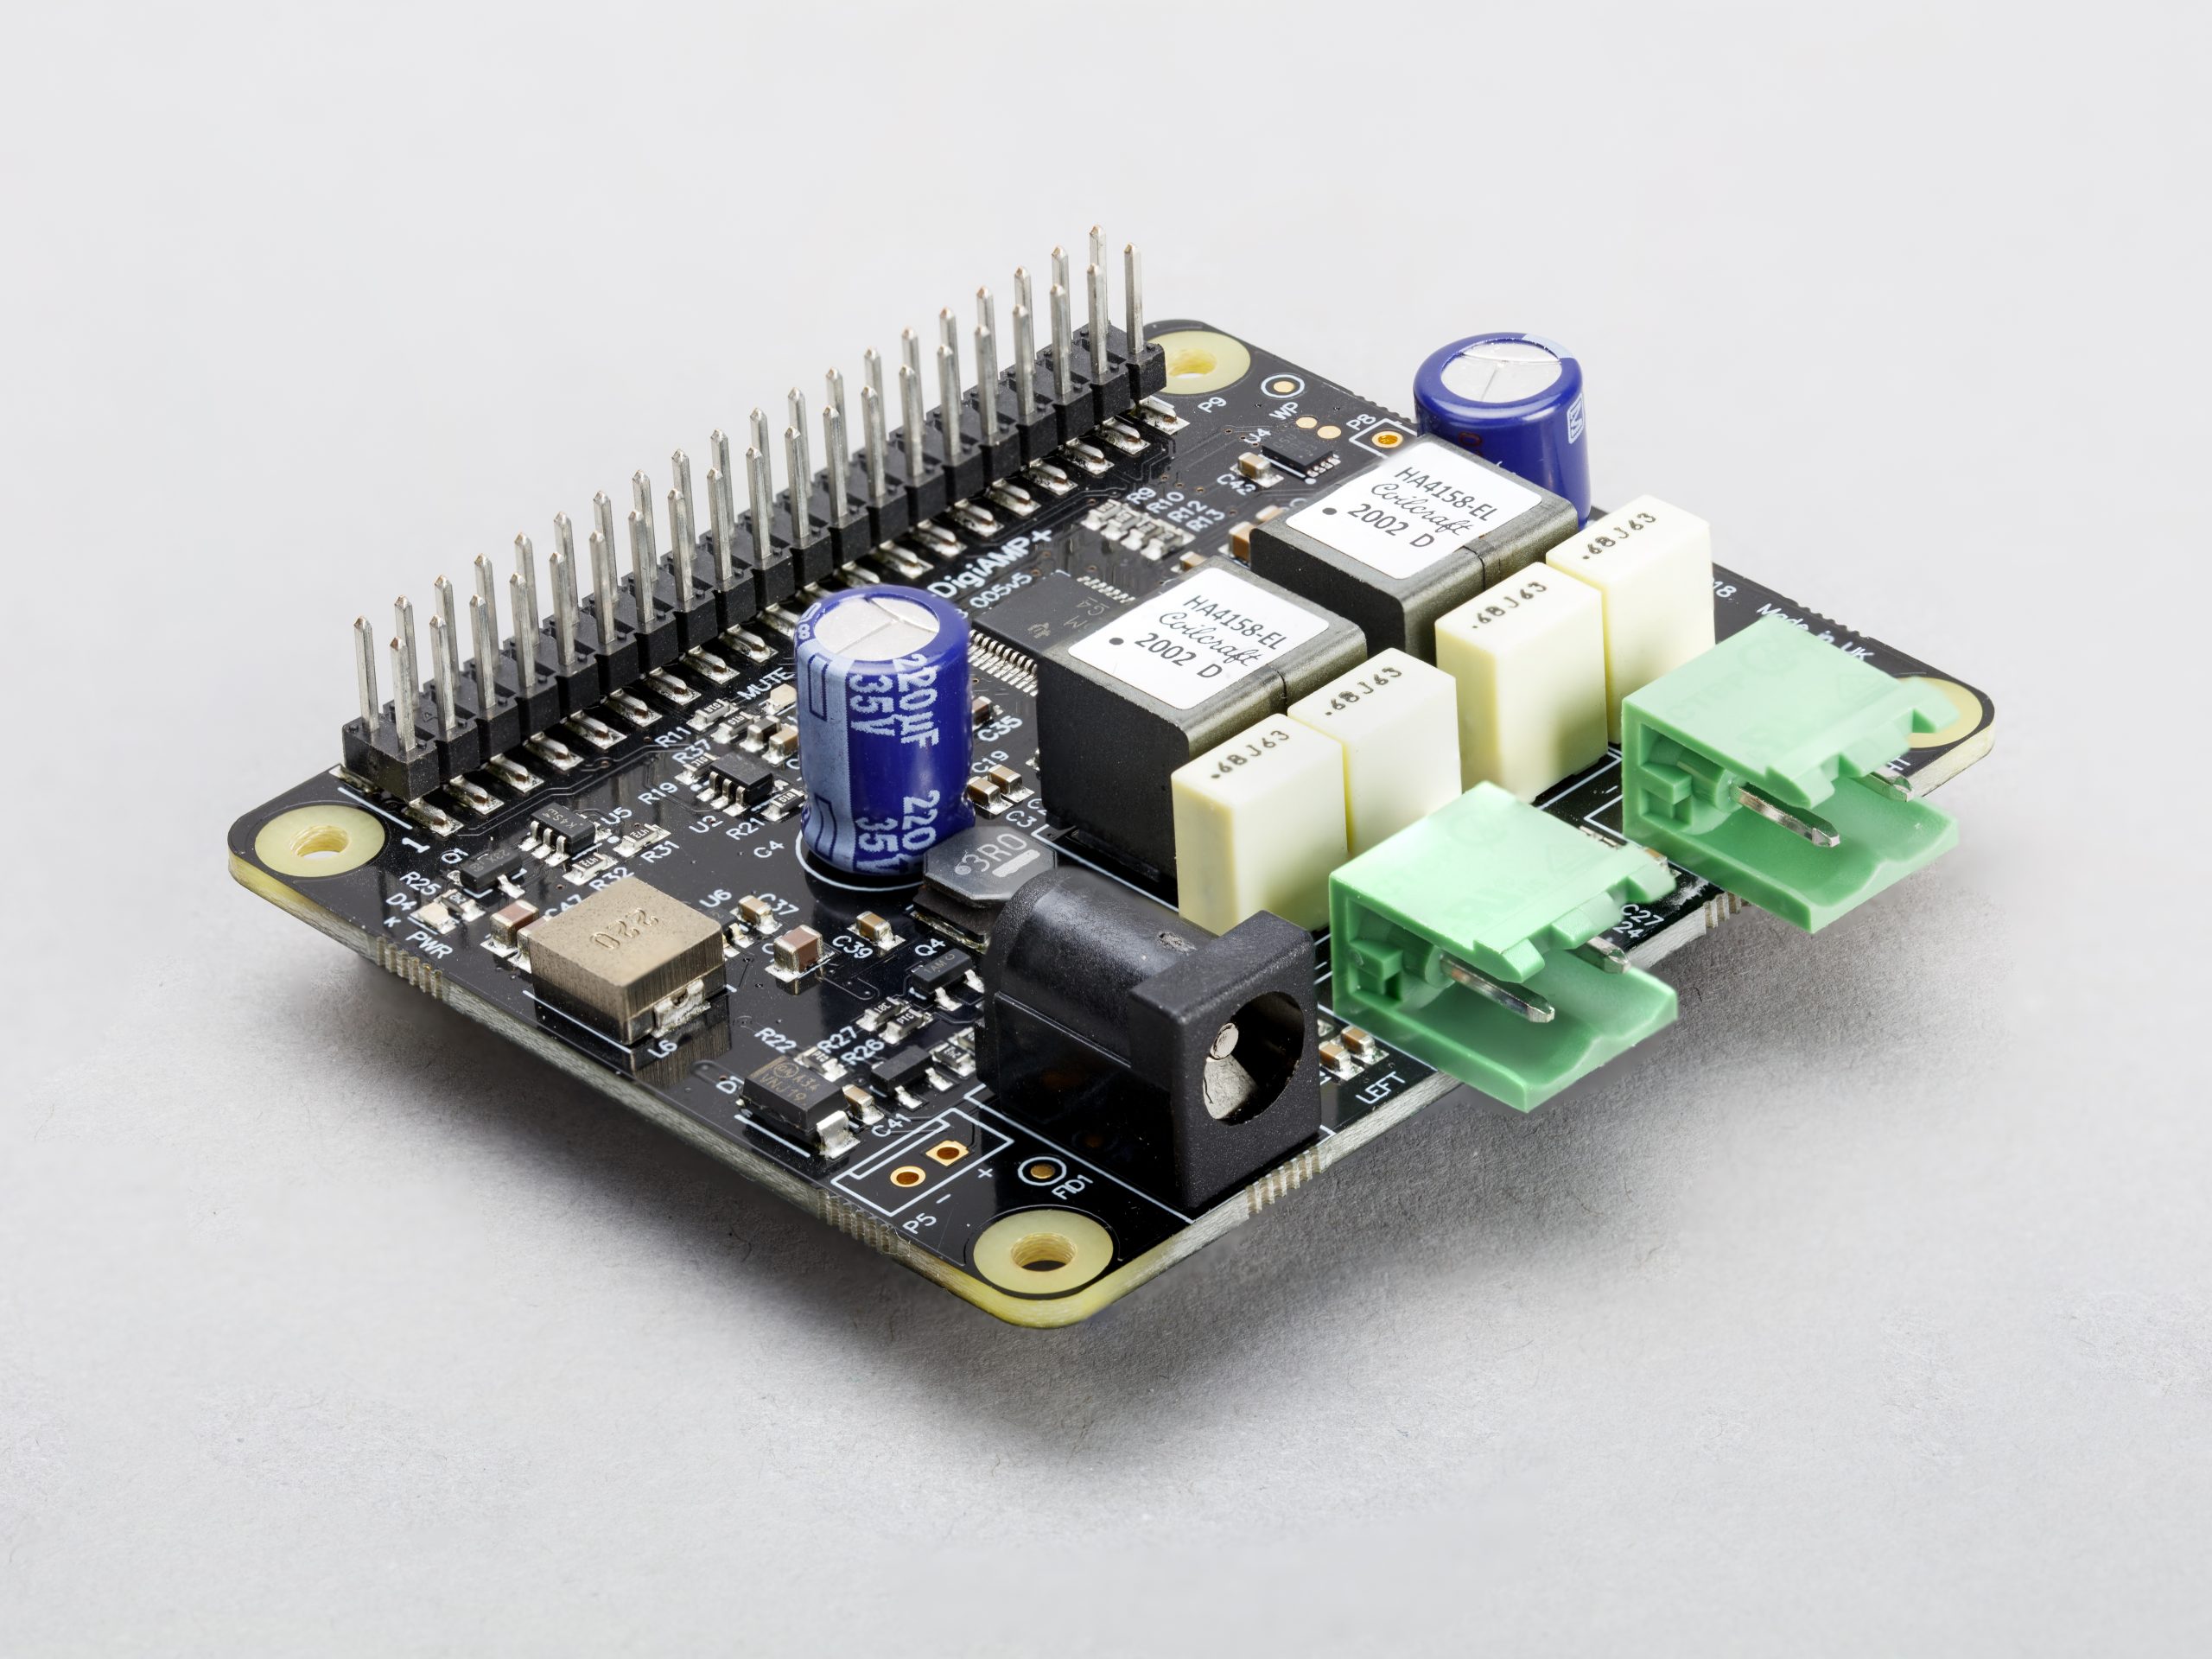
IQaudio DigiAMP+
Where DAC+ and DAC Pro are designed to be used with an external amplifier, DigiAMP+ integrates a Texas Instruments TAS5756M digital-input amplifier directly onto the HAT, allowing you to drive a pair of passive speakers at up to 35W per channel. Combined with a Raspberry Pi board, it’s a complete hi-fi that’s the size of a deck of cards.
IQaudio DigiAMP+ HAT
DigiAMP+ is priced at $30, and requires an external 12-21V 3A DC power supply, sold separately. XP Power’s VEC65US19, available here and here, is a suitable supply.
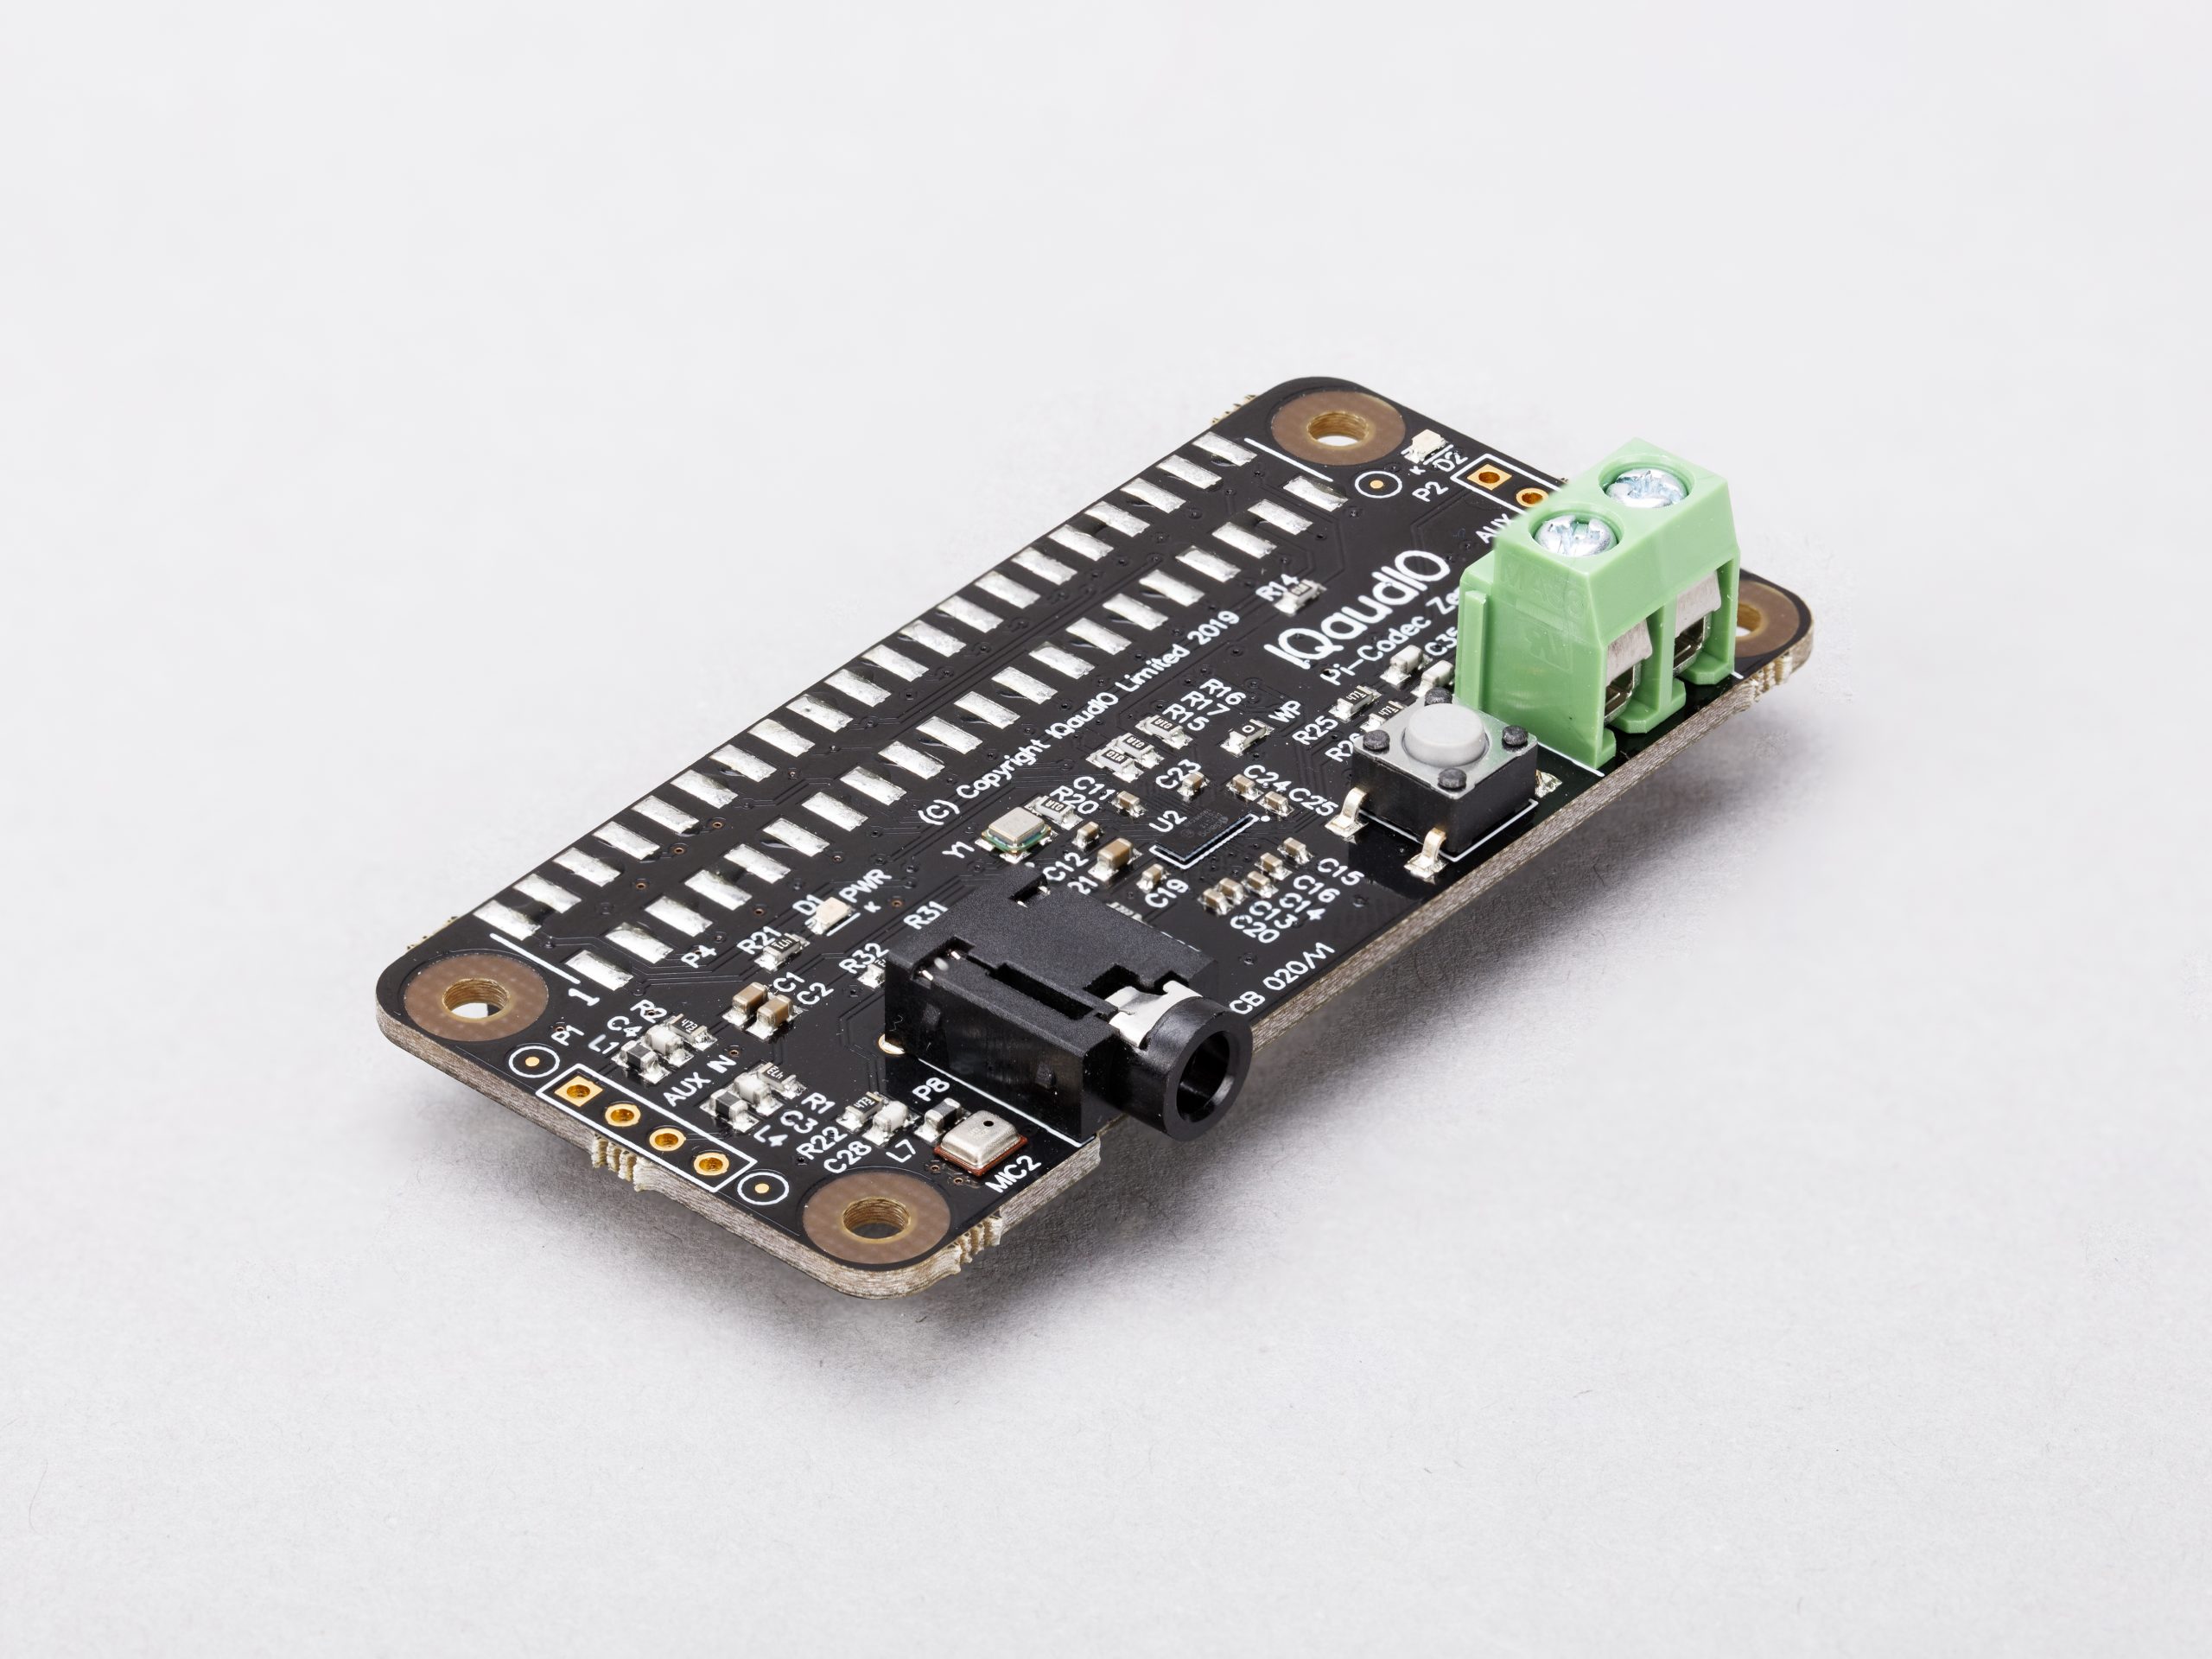
IQaudio Codec Zero
Codec Zero is a $20 audio I/O HAT, designed to fit within the Raspberry Pi Zero footprint. It is built around a Dialog Semiconductor DA7212 codec and supports a range of input and output devices, from the built-in MEMS microphone to external mono electret microphones and 1.2W, 8 ohm mono speakers.
IQaudio Codec Zero HAT
Unlike the other three products, which are in stock with our Approved Resellers now, Codec Zero will ship early in the New Year.
So there you have it. Four (nearly) new Raspberry Pi accessories, just in time for Christmas – hop over and buy yours now. This is the first time we’ve brought third-party products into our line-up like this; we’d like to thank the team at IQaudio for their help in making the transition.
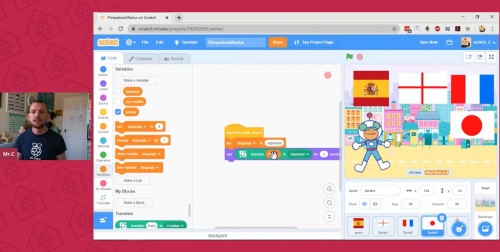
At the Raspberry Pi Foundation, we are continually inspired by young learners in our community: they embrace digital making and computing to build creative projects, supported by our resources, clubs, and volunteers. While creating their projects, they are learning the core programming skills that underlie digital making.
Over the years, many tools and environments have been developed to make programming more accessible to young people. Scratch is one example of a block-based programming environment for young learners, and it’s been shown to make programming more accessible to them; on our projects site we offer many step-by-step Scratch project resources.
But does block-based programming actually help learning? Does it increase motivation and support students? Where is the hard evidence? In our latest research seminar, we were delighted to hear from Dr David Weintrop, an Assistant Professor at the University of Maryland who has done research in this area for several years and published widely on the differences between block-based and text-based programming environments.
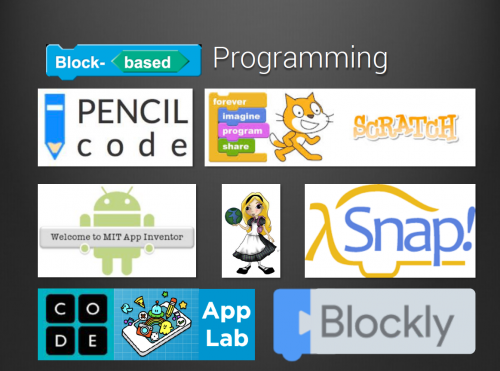
A variety of block-based programming environments
The first useful insight David shared was that we should avoid thinking about block-based programming as synonymous with the well-known Scratch environment. There are several other environments, with different affordances, that David referred to in his talk, such as Snap, Pencil Code, Blockly, and more.
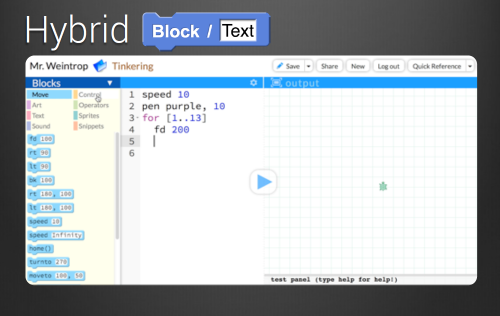
Some of these, for example Pencil Code, offer a dual-modality (or hybrid) environment, where learners can write the same program in a text-based and a block-based programming environment side by side. Dual-modality environments provide this side-by-side approach based on the assumption that being able to match a text-based program to its block-based equivalent supports the development of understanding of program syntax in a text-based language.
As a tool for transitioning to text-based programming
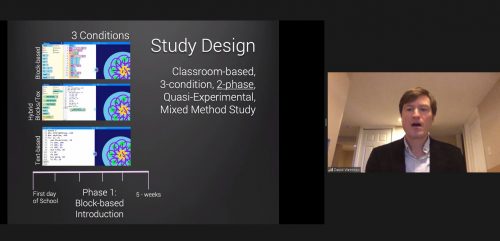
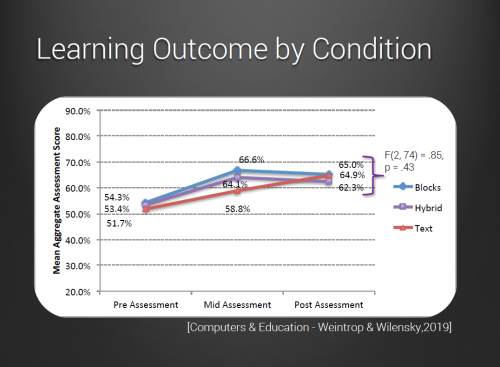
Another aspect of the research around block-based programming focuses on its usefulness as a transition to a text-based language. David described a 15-week study he conducted in high schools in the USA to investigate differences in student learning caused by use of block-based, text-based, and hybrid (a mixture of both using a dual-modality platform) programming tools.
The 90 students in the study (14 to 16 years old) were divided into three groups, each with a different intervention but taught by the same teacher. In the first phase of the study (5 weeks), the groups were set the same tasks with the same learning objectives, but they used either block-based programming, text-based programming, or the hybrid environment.
After 5 weeks, students were given a test to assess learning outcomes, and they were asked questions about their attitudes to programming (specifically their perception of computing and their confidence). In the second phase (10 weeks), all the students were taught Java (a common language taught in the USA for end-of-school assessment), and then the test and attitudinal questions were repeated.
The results showed that at the 5-week point, the students who had used block-based programming scored higher in their learning outcome assessment, but at the final assessment after 15 weeks, all groups’ scores were roughly equivalent.
In terms of students’ perception of computing and confidence, the responses of the Blocks group were very positive at the 5-week point, while at the 15-week point, the responses were less positive. The responses from the Text group showed a gradual increase in positivity between the 5- and 15-week points. The Hybrid group’s responses weren’t as negative as those of the Text group at the 5-week point, and their positivity didn’t decrease like the Blocks group’s did.
Taking both methods of assessment into account, the Hybrid group showed the best results in the study. The gains associated with the block-based introduction to programming did not translate to those students being further ahead when learning Java, but starting with block-based programming also did not hamper students’ transition to text-based programming.
David completed his talk by recommending dual-modality environments (such as Pencil Code) for teaching programming, as used by the Hybrid group in his study.
More research is needed
The seminar audience raised many questions about David’s study, for example whether the actual teaching (pedagogy) may have differed for the three groups, and whether the results are not just due to the specific tools or environments that were used. This is definitely an area for further research.
It seems that students may benefit from different tools at different times, which is why a dual-modality environment can be very useful. Of course, competence in programming takes a long time to develop, so there is room on the research agenda for longitudinal studies that monitor students’ progress over many months and even years. Such studies could take into account both the teaching approach and the programming environment in order to determine what factors impact a deep understanding of programming concepts, and students’ desire to carry on with their programming journey.
Next up in our series
If you missed the seminar, you can find David’s presentation slides and a recording of his talk on our seminars page.
Our next free online seminar takes place on Tuesday 5 January at 17:00–18:00 BST / 12:00–13:00 EDT / 9:00–10:00 PDT / 18:00–19:00 CEST. We’ll welcome Peter Kemp and Billy Wong, who are going to share insights from their research on computing education for underrepresented groups. To join this free online seminar, simply sign up with your name and email address.
Once you’ve signed up, we’ll email you the seminar meeting link and instructions for joining. If you attended David’s seminar, the link remains the same.
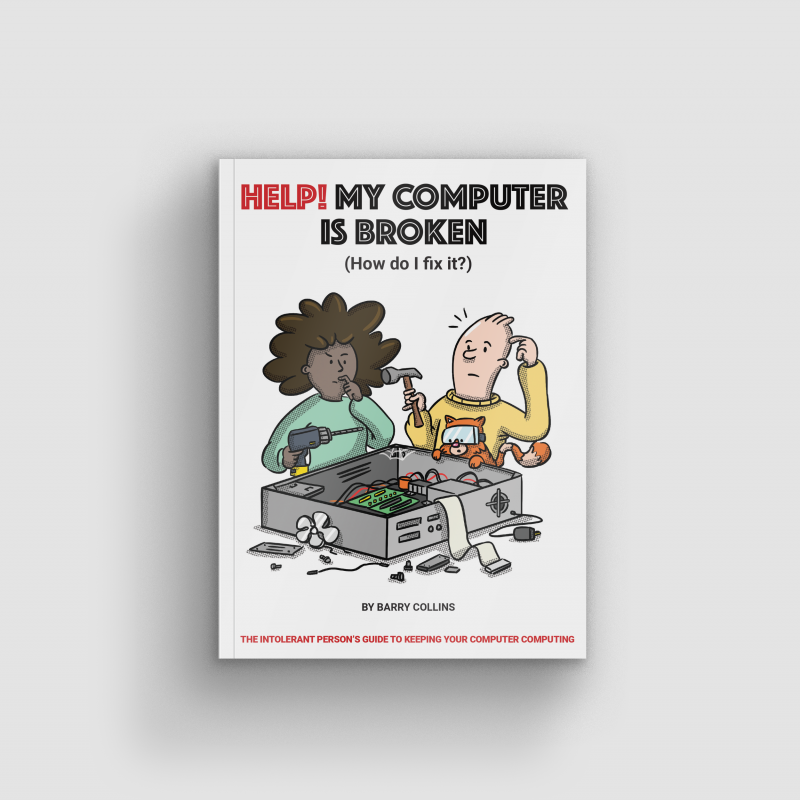
It’s “the intolerant person’s guide to keeping your computer computing.” If that sounds like you, we recommend you hop straight over to the Raspberry Pi Press online store and pick up a copy for just £10.
What’s it about?
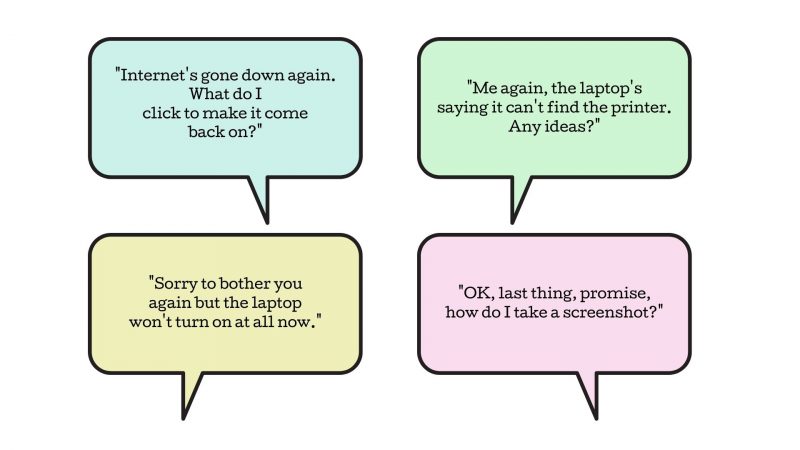
It also makes a good, only mildly passive-aggressive, gift. If the above text messages ring a bell, and you’re fed up with being the in-house tech support for your family, then Help! My computer is broken (How do I fix it?) can assist. It shows readers how to fix common computer problems, without having to wade through technical jargon or pester said tech support person.
Who wrote it?
We had the brilliant Barry Collins, who has been a technology journalist for more than 20 years, write it for you. He’s written for most of the UK’s leading tech publications, and he is a former editor of PC Pro as well as former assistant editor of the Sunday Times‘ technology section.
He’s now co-editor of The Big Tech Question, a site designed to answer people’s tech queries – in a similar vein to this book. Barry also makes regular appearances as a tech pundit on TV and radio.
While you’re shopping at the Raspberry Pi Press online store, make sure you check out our Black Friday deal, which we’ve decided to keep rolling until Christmas Eve.
If you buy just one book from the Black Friday range (priced £7 – £10), you get two more completely FREE!
What if you could give the joy of opening a Raspberry Pi–themed gift every single month for a whole year? But what if the thought of wrapping 12 individual things fills you with Scrooge-level dread?
Snap up a magazine subscription for one of your nearest and/or dearest and we’ll take care of the packaging and delivery while you sit back and reap all the credit!
You could end up with a few extra gifts depending on what you sign up for so, read on and take your pick.
The MagPi magazine
The official Raspberry Pi magazine comes with a free Raspberry Pi Zero W kit worth £20 when you sign up for a 12-month subscription. You can use our tiniest computer in tonnes of projects, meaning Raspberry Pi fans can never have enough. That’s a top gift-giving bonus for you right there.
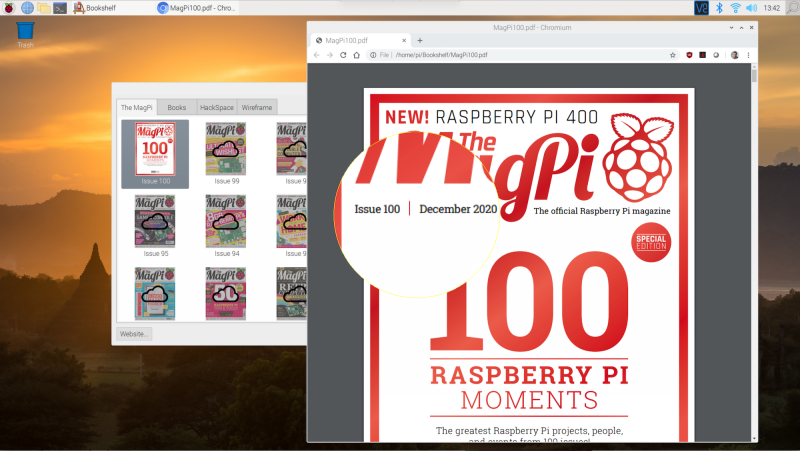
Every issue of The MagPi is packed with computing and electronics tutorials, how-to guides, and the latest news and reviews. They also hit their 100th issue this month so, if someone on your list has been thinking about getting a subscription, now is a great time.
HackSpace magazine is the one to choose for fixers and tinkerers of all abilities. If you’re looking for a gift for someone who is always taking things apart and hacking everyday objects, HackSpace magazine will provide a year of inspiration for them.
12-month subscriptions come with a free Adafruit Circuit Playground Express, which has been specially developed to teach programming novices from scratch and is worth £25.
Custom PC is the magazine for people who are passionate about PC technology and hardware. And they’ve just launched a pretty cool new giveaway with every 12-month subscription: a free Chillblast Aero RGB Gaming mouse worth £40. Look, it lights up, it’s cool.
Wireframe magazine lifts the lid on video games. In every issue, you’ll find out how games are made, who makes them, and how you can code them to play for yourself using detailed guides.
The latest deal gets you three issues for just £10, plus your choice of one of our official books as a gift. By the way, that ‘three for £10 plus a free book’ is available across ALL our magazines. Did I not tell you that before? My bad. It’s good though, right?
And as an extra Christmas gift to you all, we’ve decided to keep our Black Friday deal rolling until Christmas Eve, so if you buy just one teeny tiny book from the Raspberry Pi Press store, you get two more completely FREE!
Better still, all of the books in the deal only cost £7 or £10 to start with, so makes for a good chunky batch of presents at a brilliantly affordable price.
The official Raspberry Pi magazine turned 100 this month! To celebrate, the greatest Raspberry Pi moments, achievements, and events that The MagPi magazine has ever featured came back for a special 100th issue.
100 Raspberry Pi Moments is a cracking bumper feature (starting on page 32 of issue 100, if you’d like to read the whole thing) highlighting some influential projects and educational achievements, as well as how our tiny computers have influenced pop culture. And since ’tis the season, we thought we’d share the How Raspberry Pi made a difference section to bring some extra cheer to your festive season.
Projects for good
The Raspberry Pi Foundation was originally launched to get more UK students into computing. Not only did it succeed at that, but the hardware and the Foundation have also managed to help people in other ways and all over the world. Here are just a few examples!
Computers for good
The Raspberry Pi Foundation provides free learning resources for everyone; however, not everyone has access to a computer to learn at home. Thanks to funding from the Bloomfield Trust and in collaboration with UK Youth and local charities, the Foundation has been able to supply hundreds of Raspberry Pi Desktop Kits to young people most in need. The computers have allowed these children, who wouldn’t have been able to otherwise, to learn from home and stay connected to their schools during lockdown. The Foundation’s work to distribute Raspberry Pi computers to young people in need is ongoing.
Elsewhere, a need for more medical equipment around the world resulted in many proposals and projects being considered for cheap, easy-to produce machines. Some included Raspberry Pi Zero, with 40,000 of these sold for ventilator designs.
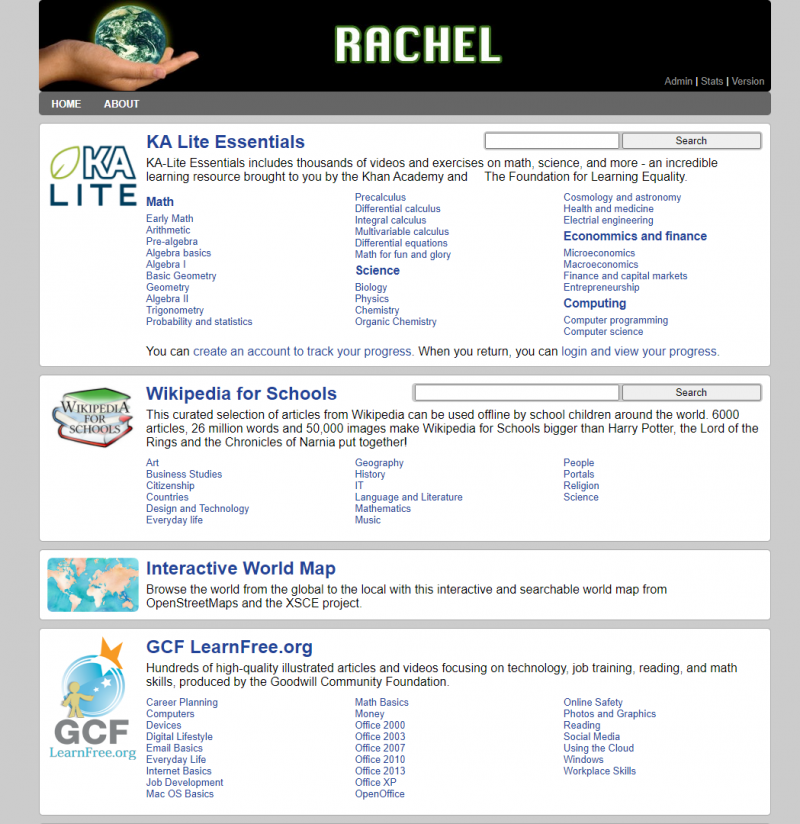
While there’s no global project or standard to say what an offline internet should contain, some educational projects have tried to condense down enough online content for specific people and load it all onto a Raspberry Pi. RACHEL-Pi is one such solution. The RACHEL-PI kit acts as a server, hosting a variety of different educational materials for all kinds of subjects, as well as an offline version of Wikipedia with 6000 articles. There’s even medical info for helping others, math lessons from Khan Acadamy, and much more.
The RACHEL sites are available in English, French, and Spanish
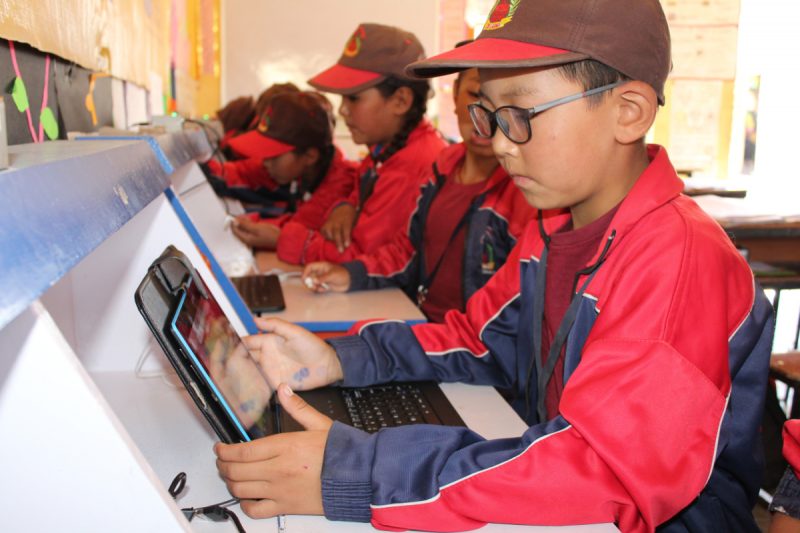
17,000 ft is another great project, which brings computing to schools high up in the Himalayas through a similar method in an attempt to help children stay in their local communities.
Ladakh is a desert-like region up a mountain that can easily shut down during the winter
Education in other countries
The free coding resources available on our projects site are great, and the Raspberry Pi Foundation works to make them accessible to people whose first language isn’t English: we have a dedicated translation team and, thanks to volunteers around the world, provide our free resources translated into up to 32 other languages. From French and Welsh to Korean and Arabic, there’s a ton of projects that learners from all over the world can access in their first language.
And through the Code Club and CoderDojo programmes, the Foundation supports volunteers around the world to run free coding clubs for young people.
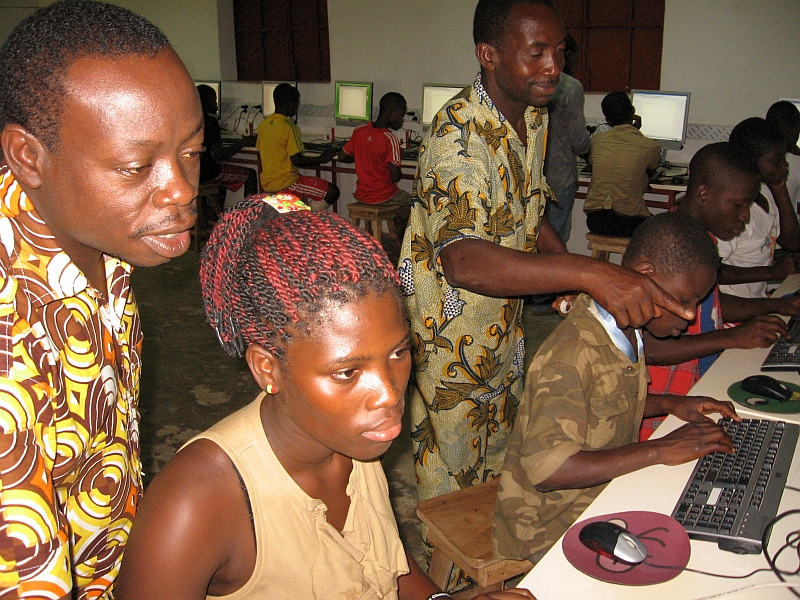
A Raspberry Pi lab in Kuma Adamé, Togo, that Dominique Laloux helped create and update
That’s not all: several charitable groups have set up Raspberry Pi classrooms to bring computing education to poorer parts of the world. People in African countries and parts of rural India have benefited from these programmes, and work is being done to widen access to ever more people and places.
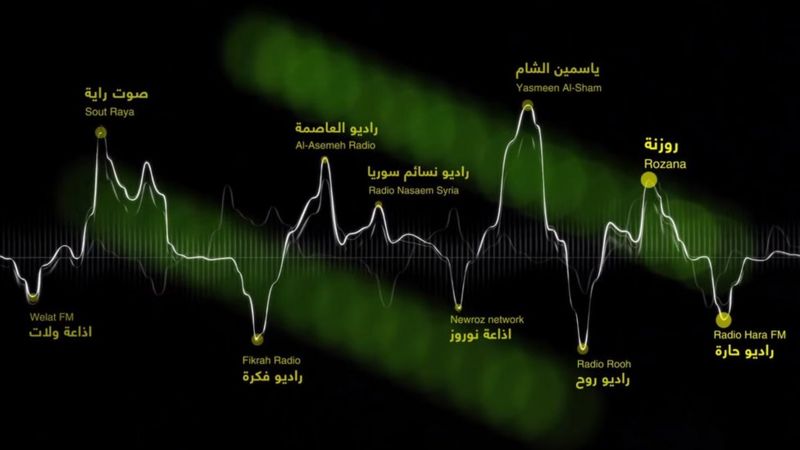
Pocket FM
The Pocket FM is far smaller than traditional transmitters, and therefore easy to move into the country and set up
The HAM radio community loves Raspberry Pi for amateur radio projects; however, sometimes people need radio for more urgent purposes. In 2016, German group Media in Cooperation and Transition created the Pocket FM 96 , micro radio transmitters with 4–6km range. These radios allowed Syrians in the middle of a civil war to connect to free media on Syrnet for more reliable news.
There are a number of independent radio stations that transmit through Pocket FM
Raspberry Pi powered these transmitters, chosen because of how easy it is to upgrade and add components to. Each transmitter is powered by solar power, and Syrnet is still transmitting through them as the war continues into its tenth year.
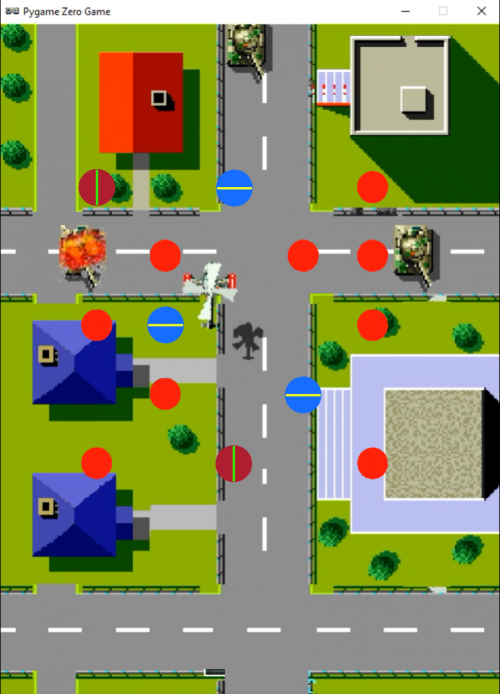
Code an explosive homage to Toaplan’s classic blaster. Mark Vanstone has the details
Tiger-Heli was developed by Toaplan and published in Japan by Taito and by Romstar in North America.
Released in 1985, Tiger-Heli was one of the earliest games from Japanese developer Toaplan: a top-down shoot-’em-up that pitted a lone helicopter against relentless waves of enemy tanks and military installations. Toaplan would go on to refine and evolve the genre through the eighties and nineties with such titles as Truxton and Fire Shark, so Tiger-Heli served as a kind of blueprint for the studio’s legendary blasters.
Tiger-Heli featured a powerful secondary weapon, too: as well as a regular shot, the game’s attack helicopter could also drop a deadly bomb capable of destroying everything within its blast radius. The mechanic was one that first appeared as far back as Atari’s Defender in 1981, but Toaplan quickly made it its own, with variations on the bomb becoming one of the signatures in the studio’s later games.
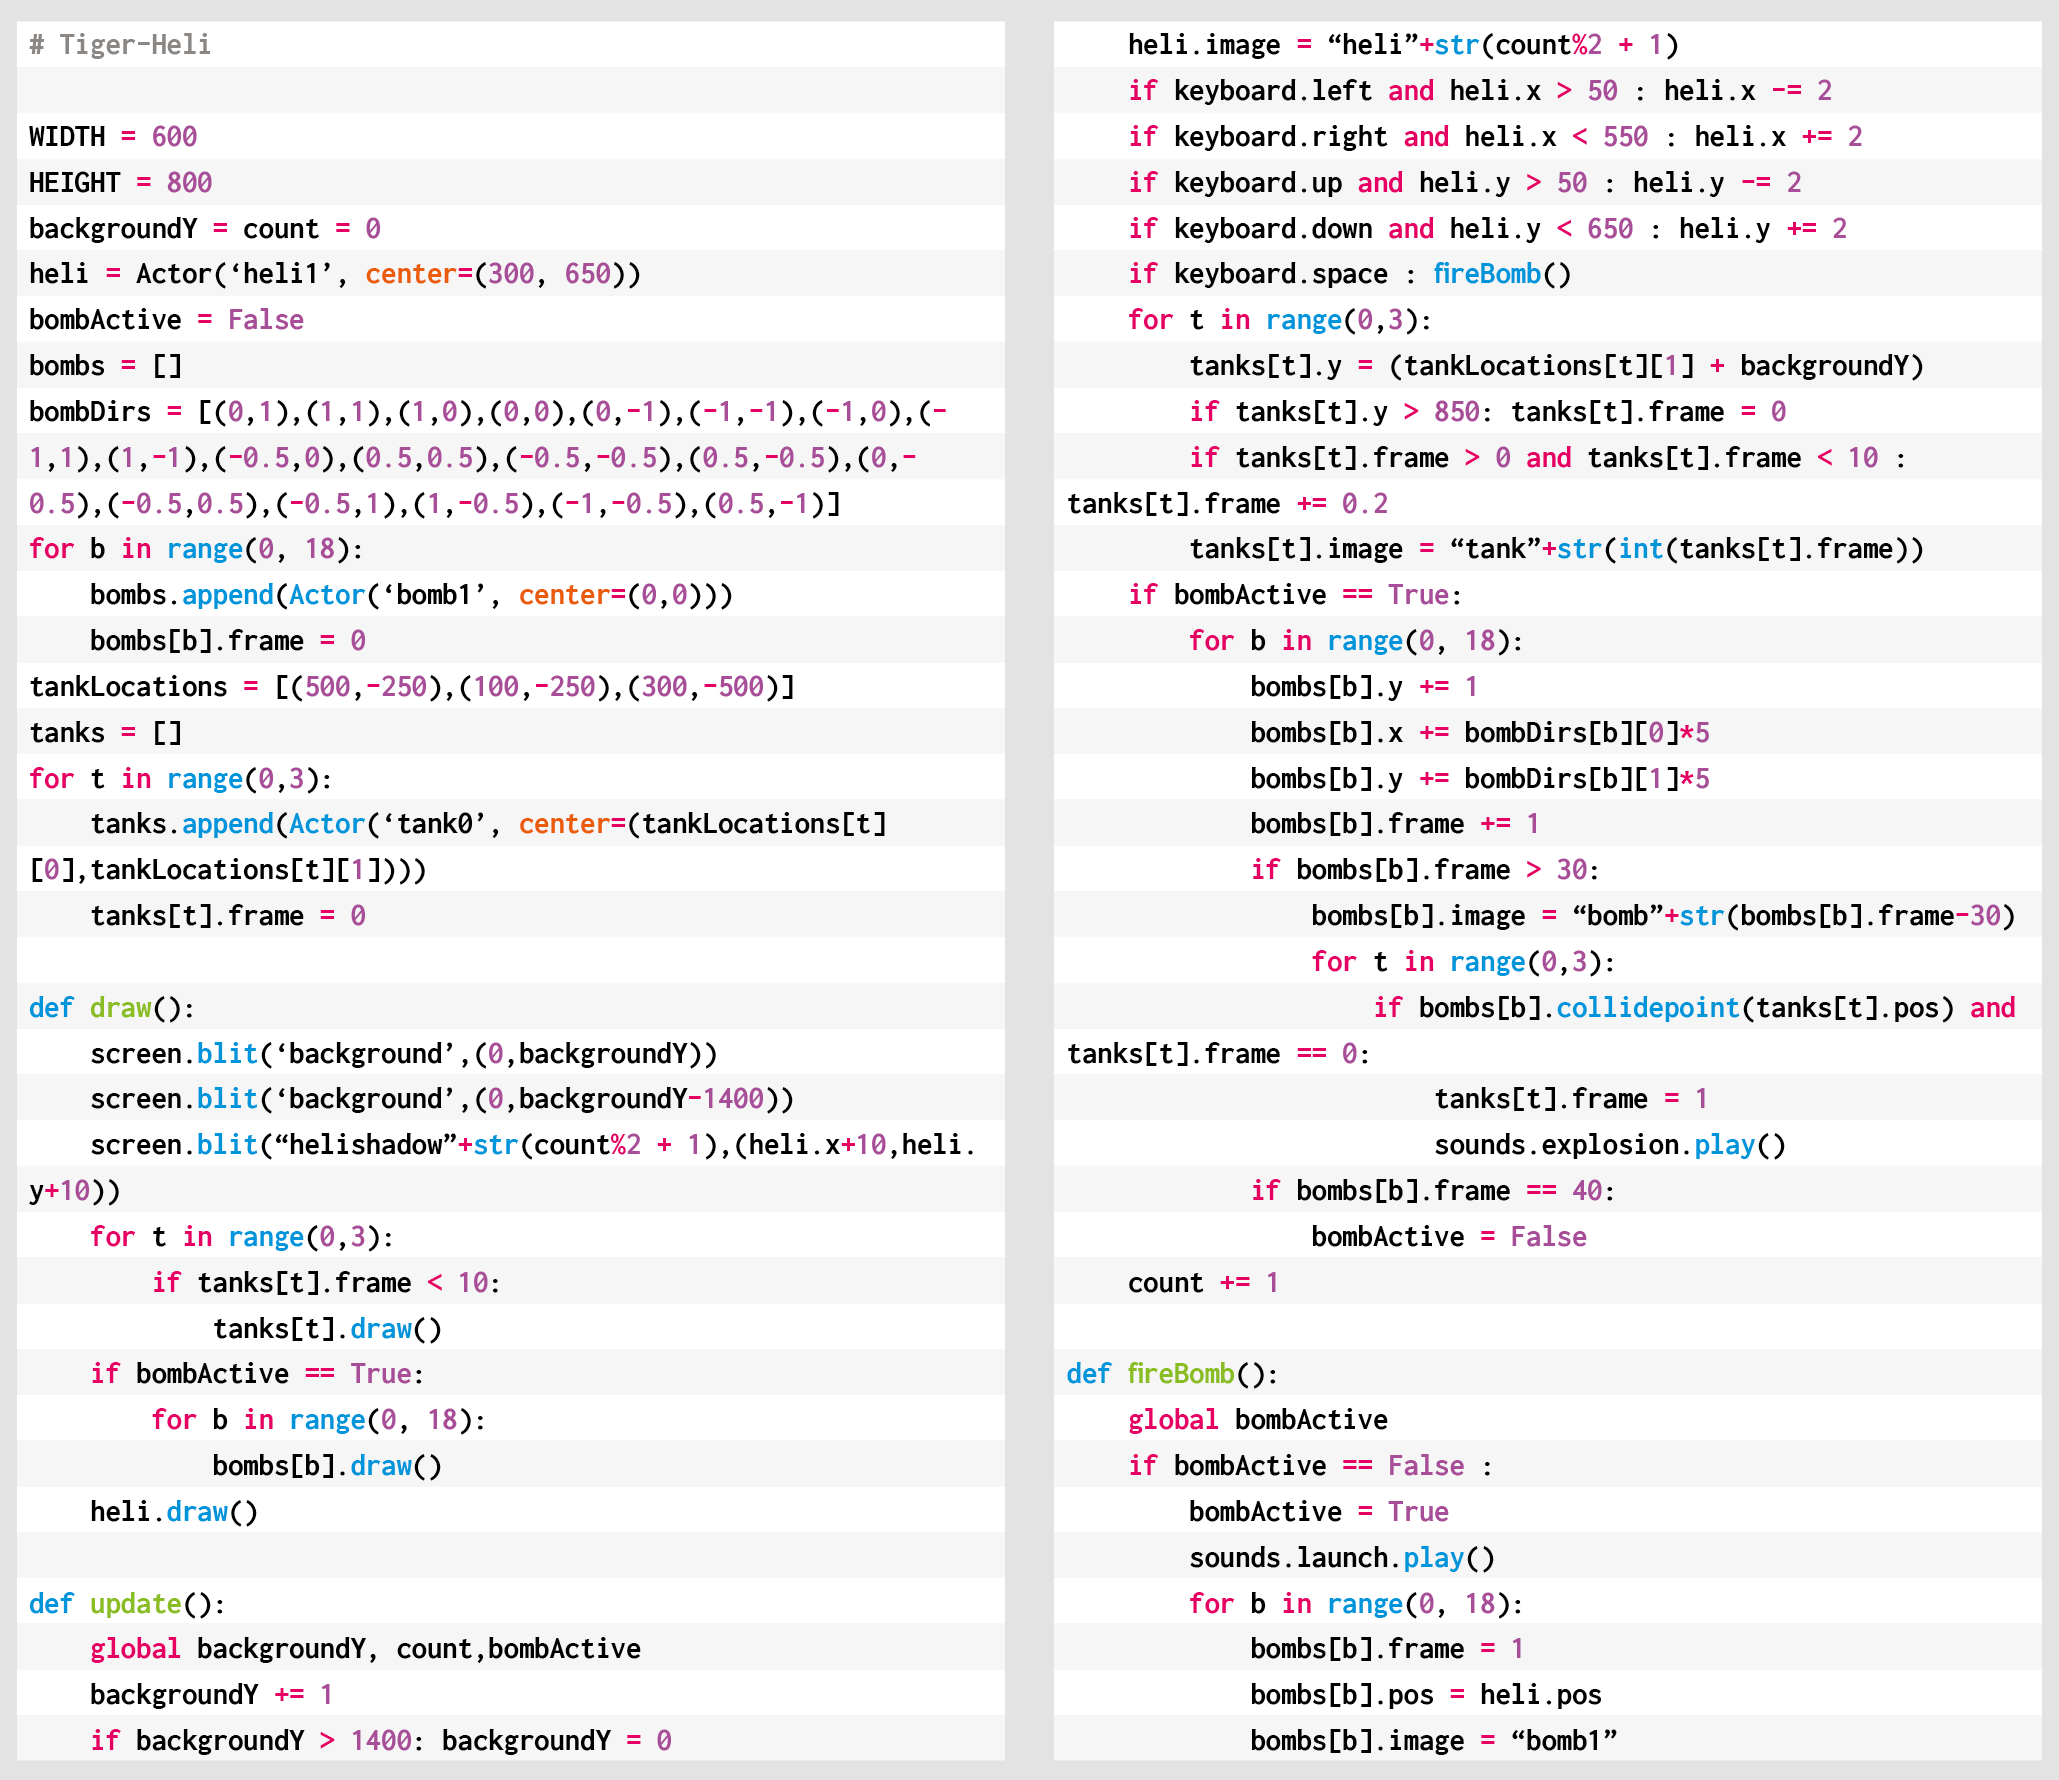
For our Tiger-Heli-style Pygame Zero code, we’ll concentrate on the unique bomb aspect, but first, we need to get the basic scrolling background and helicopter on the screen. In a game like this, we’d normally make the background out of tiles that can be used to create a varied but continuous scrolling image. For this example, though, we’ll keep things simple and have one long image that we scroll down the screen and then display a copy above it. When the first image goes off the screen, we just reset the co-ordinates to display it above the second image copy. In this way, we can have an infinitely scrolling background.
Our Tiger-Heli homage in Python. Fly over the military targets, firing missiles and dropping bombs.
The helicopter can be set up as an Actor with just two frames for the movement of the rotors. This should look like it’s hovering above the ground, so we blit a shadow bitmap to the bottom right of the helicopter. We can set up keyboard events to move the Actor left, right, up, and down, making sure we don’t allow it to go off the screen.
Now we can go ahead and set up the bombs. We can predefine a list of bomb Actors but only display them while the bombs are active. We’ll trigger a bomb drop with the SPACE bar and set all the bombs to the co-ordinates of the helicopter. Then, frame by frame, we move each bomb outwards in different directions so that they spread out in a pattern. You could try adjusting the number of bombs or their pattern to see what effects can be achieved. When the bombs get to frame 30, we start changing the image so that we get a flashing, expanding circle for each bomb.
Here’s Mark’s code for a Tiger-Heli-style shooter. To get it working on your system, you’ll need to install Pygame Zero. And to download the full code and assets, head here.
It’s all very well having bombs to fire, but we could really do with something to drop them on, so let’s make some tank Actors waiting on the ground for us to destroy. We can move them with the scrolling background so that they look like they’re static on the ground. Then if one of our bombs has a collision detected with one of the tanks, we can set an animation going by cycling through a set of explosion frames, ending with the tank disappearing.
We can also add in some sound effects as the bombs are dropped, and explosion sounds if the tanks are hit. And with that, there you have it: the beginnings of a Tiger-Heli-style blaster.
Get your copy of Wireframe issue 45
You can read more features like this one in Wireframe issue 45, available directly from Raspberry Pi Press — we deliver worldwide.
And if you’d like a handy digital version of the magazine, you can also download issue 45 for free in PDF format.
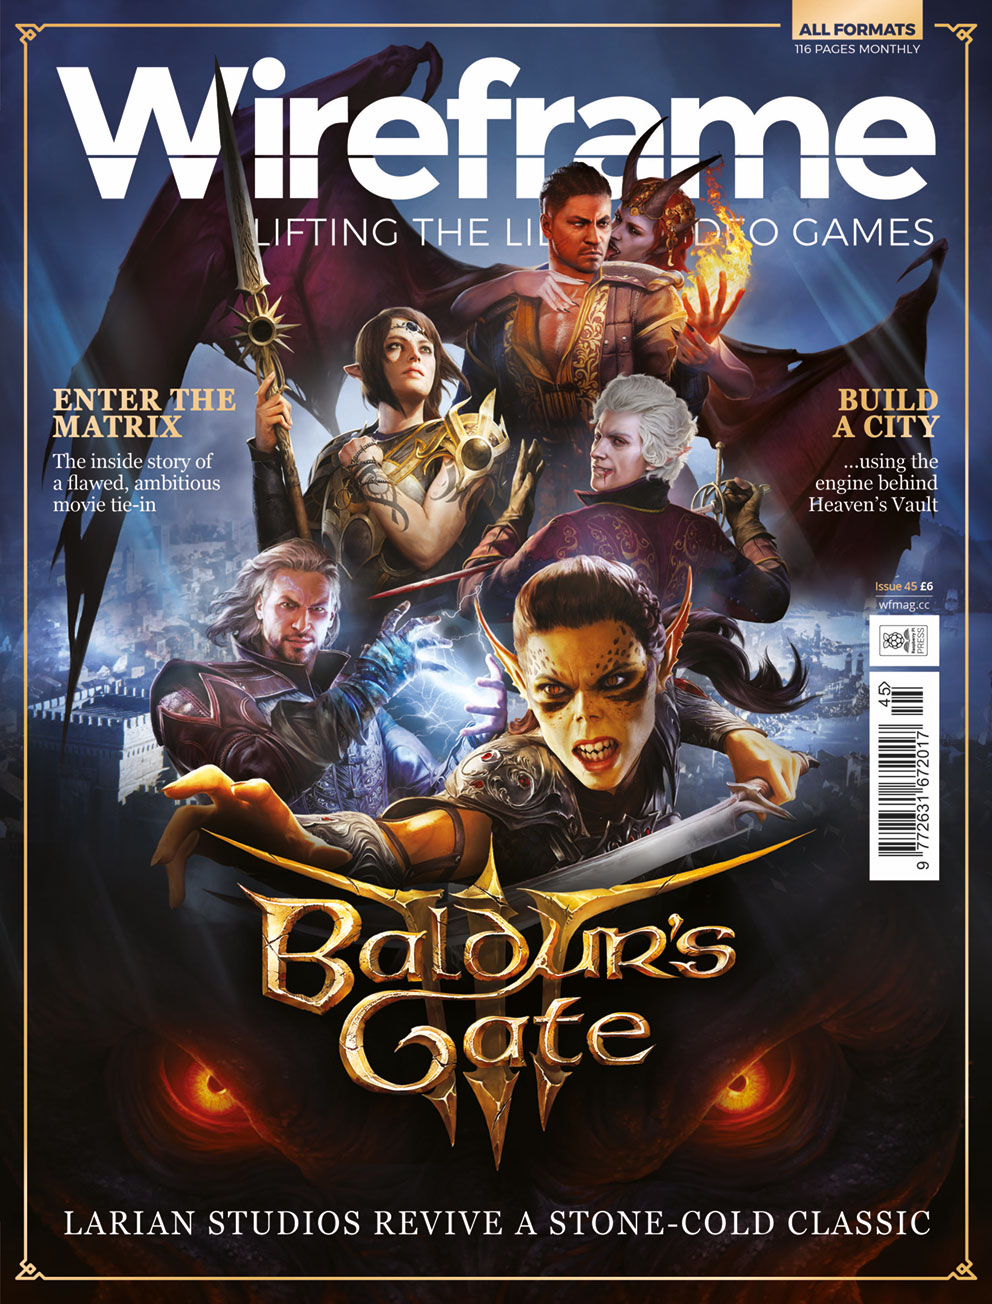
Baldur’s Gate III: our cover star for Wireframe #45.
Make sure to follow Wireframe on Twitter and Facebook for updates and exclusive offers and giveaways. Subscribe on the Wireframe website to save up to 72% compared to newsstand pricing!
Well, in a year as disrupted and strange as 2020, it’s nice to know that there are some things you can rely on, for example the traditional end-of-year new release of Raspberry Pi OS, which we launch today. Here’s a run-through of the main new features that you’ll find in it.
Chromium
We’ve updated the Chromium browser to version 84. This has taken us a bit longer than we would have liked, but it’s always quite a lot of work to get our video hardware acceleration integrated with new releases of the browser. That’s done now, so you should see good-quality video playback on sites like YouTube. We’ve also, given events this year, done a lot of testing and tweaking on video conferencing clients such as Google Meet, Microsoft Teams, and Zoom, and they should all now work smoothly on your Raspberry Pi’s Chromium.
There’s one more thing to mention on the subject of web browsers. We’ve been shipping Adobe’s Flash Player as part of our Chromium install for several years now. Flash Player is being retired by Adobe at the end of the year, so this release will be the last that includes it. Most websites have now stopped requiring Flash Player, so this hopefully isn’t something that anyone notices!
PulseAudio
From this release onwards, we are switching Raspberry Pi OS to use the PulseAudio sound server.
First, a bit of background. Audio on Linux is really quite complicated. There are multiple different standards for handling audio input and output, and it does sometimes seem that what has happened, historically, is that whenever anyone wanted to use audio in Linux, they looked at the existing libraries and programs and went “Hmmm… I don’t like that, I’ll write something new and better.” This has resulted in a confused mass of competing and conflicting software, none of which quite works the way anyone wants it to!
The most common audio interface, which lies underneath most Linux systems somewhere, is called ALSA, the Advanced Linux Sound Architecture. This is a fairly reliable low-level audio interface — indeed, it is what Raspberry Pi OS has used up until now — but it has quite a lot of limitations and is starting to show its age. For example, it can only handle one input and one output at a time. So for example, if ALSA is being used by your web browser to play sound from a YouTube video to the HDMI output on your Raspberry Pi, nothing else can produce sound at the same time; if you were to try playing a video or an audio file in VLC, you’d hear nothing but the audio from YouTube. Similarly, if you want to switch the sound from your YouTube video from HDMI to a USB sound card, you can’t do it while the video is playing; it won’t change until the sound stops. These aren’t massive problems, but most modern operating systems do handle audio in a more flexible fashion.
More significant is that ALSA doesn’t handle Bluetooth audio at all, so various other extensions and additional bits of software are required to even get audio into and out of Bluetooth devices on an ALSA-based system. We’ve used a third-party library called bluez-alsa for a few years now, but it’s an additional piece of code to maintain and update, so this isn’t ideal.
PulseAudio deals with all of this. It’s a piece of software that sits as a layer between all the audio hardware and all the applications that send and receive audio, and it automatically routes everything to the right places. It can mix the audio from multiple applications together, so you can hear VLC at the same time as YouTube, and it allows the output to be moved around between different devices while it is playing. It knows how to talk to Bluetooth devices, and it greatly simplifies the job of managing default input and output devices, so it makes it much easier to make sure audio ends up where it is supposed to be!
One area where it is particularly helpful is in managing audio input and output streams to web browsers like Chromium; in our testing, the use of PulseAudio made setting up video conferencing sessions much easier and more reliable, particularly with Bluetooth headsets and webcam audio.
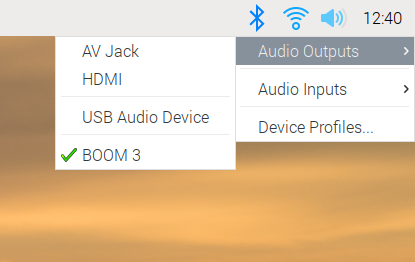
The good news for Raspberry Pi users is that, if we’ve got it right, you shouldn’t even notice the change. PulseAudio now runs by default, and while the volume control and audio input/output selector on the taskbar looks almost identical to the one in previous releases of the OS, it is now controlling PulseAudio rather than ALSA. You can use it just as before: select your output and input devices, adjust the volume, and you’re good to go.
There is one small change to the input/output selector, which is the menu option at the bottom for Device Profiles. In PulseAudio, any audio device has one or more profiles, which select which outputs and inputs are used on any device with multiple connections. (For example, some audio HATs and USB sound cards have both analogue and digital outputs — there will usually be a profile for each output to select where the audio actually comes out.)
Profiles are more important for Bluetooth devices. If a Bluetooth device has both an input and an output (such as a headset with both a microphone and an earphone), it usually supports two different profiles. One of these is called HSP (HeadSet Profile), and this allows you to use both the microphone and the earphone, but with relatively low sound quality — equivalent to that you hear on a mobile phone call, so fine for speech but not great for music. The other profile is called A2DP (Advanced Audio Distribution Profile), which gives much better sound quality, but is output-only: it does not allow you to use the microphone. So if you are making a call, you want your Bluetooth device to use HSP, but if you are listening to music, you want it to use A2DP.
We’ve automated some of this, so if you select a Bluetooth device as the default input, then that device is automatically switched to HSP. If you want to switch a device which is in HSP back to A2DP, just reselect it from the output menu. Its microphone will then be deactivated, and it will switch to A2DP. But sometimes you might want to take control of profiles manually, and the Device Profiles dialog allows you to do that.
(Note that if you are only using the Raspberry Pi’s internal sound outputs, you don’t need to worry about profiles at all, as there is only one, and it’s automatically selected for you.)
Some people who have had experience of PulseAudio in the past may be a little concerned by this change, because PulseAudio hasn’t always been the most reliable piece of software, but it has now reached the point where it solves far more problems than it creates, which is why many other Linux distributions, such as Ubuntu, now use it by default. Most users shouldn’t even notice the change; there may be occasional issues with some older applications such as Sonic Pi, but the developers of these applications will hopefully address any issues in the near future.
Printing
One thing which has always been missing from Raspberry Pi OS is an easy way to connect to and configure printers. There is a Linux tool for this, called CUPS, the Common Unix Printing System. (It’s actually owned by Apple and is the underlying printing system used by macOS X, but it is still free software and available for use by Linux distributions.)
CUPS has always been available in apt, so could be installed on any Raspberry Pi, but the standard web-based interface is a bit unfriendly. Various third-party front-end tools have been written to make CUPS a bit easier to use, and we have decided to use one called system-config-printer. (Like PulseAudio, this is also used as standard by Ubuntu.)
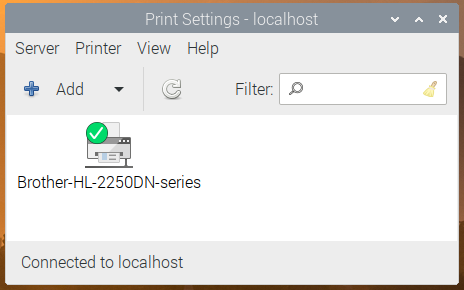
So both CUPS and system-config-printer are now installed as part of Raspberry Pi OS. If you are a glutton for punishment, you can access the CUPS web interface by opening the Chromium browser and going to http://localhost:631, but instead of doing that, we suggest just going into the Preferences section in the main menu and opening Print Settings.
This shows the system-config-printer dialog, from which you can add new printers, remove old ones, set one as the default, and access the print queue for each printer, just as you should be familiar with from other operating systems.
Like most things in Linux, this relies on user contributions, so not every printer is supported. We’ve found that most networked printers work fine, but USB printers are a bit hit-and-miss as to whether there is a suitable driver; in general, the older your printer is, the more likely it is to have a CUPS driver available. The best thing to do is to try it and see, and perhaps ask for help on our forums if your particular printer doesn’t seem to work.
This fills in one of the last things missing in making Raspberry Pi a complete desktop computer, by making it easy to set up a printer and print from applications such as LibreOffice.
Accessibility
One of the areas we have tried to improve in the Desktop this year is to make it more accessible to those with visual impairments. We added support for the Orca screen reader at the start of the year, and the display magnifier plugin over the summer.
While there are no completely new accessibility features this time, we have made some improvements to Orca support in applications like Raspberry Pi Configuration and Appearance Settings, to make them read what they are doing in a more helpful fashion; we’ve also worked with the maintainers of Orca to raise and fix a few bugs. It’s still not perfect, but we’re doing our best!
One of the benefits of switching to PulseAudio is that it now means that screen reader audio can be played through Bluetooth devices; this was not possible using the old ALSA system, so visually-impaired users who wish to use the screen reader with a Bluetooth headset or external speaker can now do so.
One feature we have added is an easy way to install Orca; it is still available through Recommended Software as before, but given that is not easy to navigate for a visually-impaired person, there is now a keyboard shortcut: just hold down ctrl and alt and press the space bar to automatically install Orca. A dialog box will be shown on the screen, and voice prompts will let you know when the install has started and finished.
And if you can’t remember that shortcut, when you first boot a new image, if you don’t do anything for thirty seconds or so, the startup wizard will now speak to you to remind you how to do it…
Finally, we had hoped to be able to say that Chromium was now compatible with Orca; screen reader support was being added to versions 8x. Unfortunately, for now this seems to only have been added for Windows and Mac versions, not the Linux build we use. Hopefully Google will address this in a future release, but for now if you need a web browser compatible with Orca, you’ll need to install Firefox from apt.
New hardware options
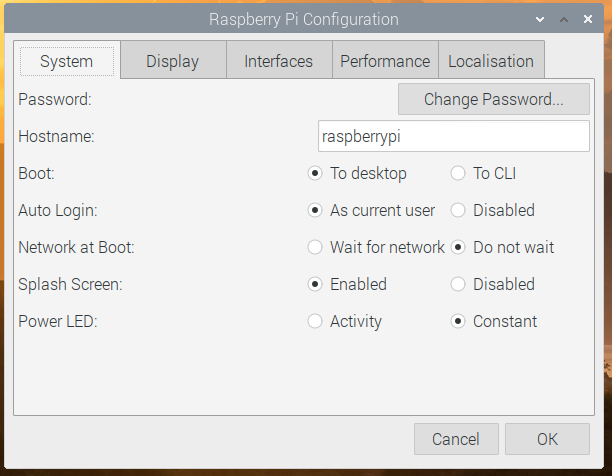
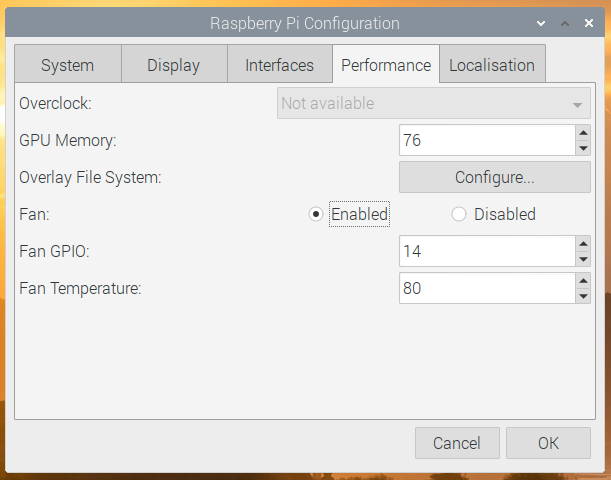
We’ve added a couple of options to the Raspberry Pi Configuration tool.
On the System tab, if you are running on Raspberry Pi with a single status LED (i.e. a Raspberry Pi Zero or the new Raspberry Pi 400), there is now an option to select whether the LED just shows that the power is on, or if it flickers off to show drive activity.
On the Performance tab, there are options to allow you to control the new Raspberry Pi Case Fan: you can select the GPIO pin to which it is connected and set the temperature at which it turns on and off.
To swap over the volume and input selector on the taskbar from ALSA to PulseAudio, after your Raspberry Pi has restarted, right-click a blank area on the taskbar and choose Add / Remove Panel Items. Find the plugin labelled Volume Control (ALSA/BT) in the list, select it and click Remove; then click the Add button, find the plugin labelled Volume Control (PulseAudio) and click Add. Alternatively, just open the Appearance Settings application from the Preferences section of the Main Menu, go to the Defaults tab and press one of the Set Defaults buttons.
As ever, do let us know what you think in the comments.