We are happy to announce the general availability of Fedora Asahi Remix 43. This release brings Fedora Linux 43 to Apple Silicon Macs. Fedora Asahi Remix is developed in close collaboration with the Fedora Asahi SIG and the Asahi Linux project. This release incorporates all the exciting improvements brought by Fedora Linux 43. Notably, package management is significantly upgraded with RPM 6.0 […]
Satellite Images Reveal Mega-Leaks of Potent Greenhouse Gas
UCLA’s Stop Methane Project ranked the 25 oil and gas sites with the largest methane emissions rates worldwide.
Nike, Beats And LeBron Team Up On Powerbeats Pro 2 Launch With 45-Hr Battery Life

Nike and Beats have merged their performance DNA to launch the Powerbeats Pro 2 Nike Special Edition, a hook-style workout earphone that marks the first time a Nike Swoosh has ever been on a Beats product. For extra draw power, Nike and Beats enlisted help from some dude named LeBron James.
The special edition Pro 2 sports a striking Volt
AMD Taps Samsung As Primary HBM4 Partner For Instinct MI455X AI GPUs

Samsung and AMD have signed a memorandum of understanding to expand their strategic collaboration on next-generation AI memory, including cutting-edge high bandwidth memory for AMD’s not-yet-released Instinct MI455X accelerator that was shown off at CES. The announcement comes a month after AMD threw cold water on MI455X delay rumors, calling
Pokémon Pokopia Gets Tiniest Patch Imaginable As Fans Beg For Bigger Fixes

The game is less than two weeks old, so the update focuses on some smaller issues
AMD Rumored To Boost Clocks And TDPs With Ryzen 7 9750X And Ryzen 5 9650X

AMD saw Intel refresh its Arrow Lake processors with faster clock speeds, a new optimization trick, and claims of giving gaming a boost and may have said, ‘Hold my beer’. According to a popular leaker on X with a positive track record, AMD is getting ready to release two new Zen 5 processor models, the Ryzen 7 9750X and Ryzen 5 9650X.
Nothing
This Samsung Smart Monitor Is $300 Off Right Now
We may earn a commission from links on this page. Deal pricing and availability subject to change after time of publication.
Samsung’s 32-inch Smart Monitor M9 (M90SF) is down to $1,299.99 on Amazon, a drop from $1,599.99 and its lowest price so far, according to price trackers. It is still expensive for a 32-inch display, but this is not a typical monitor. Samsung is positioning it somewhere between a premium display, a smart TV, and a casual gaming setup. PCMag rated it “excellent,” noting how well it balances work and play.
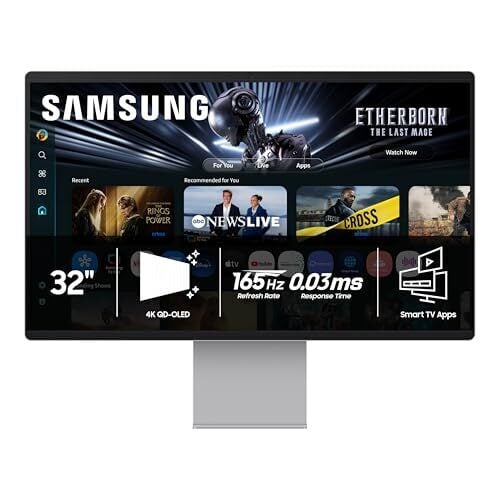
The 32-inch 4K QD-OLED panel is the main draw here. Colors look rich without oversaturation, and contrast is strong enough that darker scenes don’t wash out. And with a pixel density of about 138 ppi, text looks crisp for spreadsheets or design work.
It’s also flexible physically. You can raise, tilt, and rotate it into portrait mode, though you’ll need to extend it fully to pivot. That said, it is not the brightest screen on paper at 250 nits, but in a typical indoor setup, it still looks vivid, and the matte coating helps keep reflections under control. If you play games, the 165Hz refresh rate and near-instant response time keep motion smooth, and support for FreeSync Premium Pro and G-Sync means fewer visual hiccups. You can also stream games directly through Samsung’s Gaming Hub or Xbox Game Pass with just a controller, which is useful if you do not own a console.
This monitor runs Samsung’s Tizen operating system, so it works as a standalone TV. You get Samsung TV Plus, Netflix, YouTube, Prime Video, and more, all controlled by a slim remote that charges via a built-in solar panel. There is also SmartThings support for controlling compatible smart-home devices, and access to Microsoft 365 apps. A 4K webcam adds convenience for video calls, and the built-in speakers are usable for casual watching, though there is no headphone jack (wireless headphones recommended). On the downside, port selection is limited for a monitor at this price. You get one HDMI, one DisplayPort, one USB-C with 90W charging, and two USB-A ports, which can feel restrictive if you run multiple devices.
For someone who wants a single screen that can handle work during the day and replace a TV or console setup at night, the OLED M9 makes a strong case, especially now that it’s discounted to its best price yet.
Our Best Editor-Vetted Tech Deals Right Now
Deals are selected by our commerce team
It’s time for Game Freak to finally give Pokémon some proper voice acting
Ever since making the jump to the Nintendo Switch, there’s something that’s bugged me about practically every modern Pokémon game, a feeling that has only intensified after spending countless hours in Pokopia. For titles based in big, open worlds and filled with adorable polygonal characters and lovely music, why is nearly every pokémon still saddled with a call that sounds like a dial-up internet connection?
As someone who played Pokémon Red and Blue at launch, I’m very aware that the origin of these sounds is tied directly back to those original titles on Game Boy, which was powered by an 8-bit SM83 processor from Sharp. Back then, it was a herculean challenge to fit the entire game into a single 512KB cartridge. So as a way to save space, the voice (or cry as they are more commonly known) of each of the original 151 Pokémon came from just 38 base cries, which then had their pitch or duration modified to create more unique sounds.
Naturally, this tradition of lo-fi cries continued throughout Pokémon’s run on the Game Boy and Game Boy Advance and onto the Nintendo DS and 3DS. And despite the higher-res graphics we got in subsequent titles, the use of sprite-based icons and other nostalgic touches made those bitcrushed calls sound right at home. However, when the series moved to the Switch and Switch 2 and embraced larger 3D worlds, those cries began to feel disconnected, especially for newer players without years of nostalgia to draw from.
The first issue is one of identifiability. They all kind of sound the same, especially in earlier titles like Red and Blue or Gold and Silver, where around one hundred new Pokémon are represented by just 30 base cries. Ideally, a monster’s voice would be just as recognizable as its silhouette. Unfortunately, the current lo-fi cries just don’t fit the bill.
The second problem is that the continued use of the old-school cries feels out of place in the grand scheme of Pokémon. When you watch the Pokémon anime, monsters don’t use the same crunchy screams. Same goes for the movies, including big theatrical releases like Detective Pikachu. At this point, pretty much every new piece of Pokémon media except the games (and the TCG for obvious reasons) features proper voice acting, which sort of brings us to the biggest reasons to ditch the audio clips from the Game Boy era: Pokémon that actually say their name is just super fun and easy to understand.
Sure, it’s a bit of a gimmick, but it works. Plus, it kind of resonates with the philosophy that many vexillologists hold that says flags should be simple enough for a child to draw. Kids can say “Charmander,” “Greninja” and even “Alomolola.” But there ain’t no way they are pronouncing this. For a game that’s intended to be played by younger audiences, having the reinforcement of hearing a pokémon say its name while also seeing it written out in text isn’t just easier to comprehend, it can also be a learning exercise. Also, just ask yourself, when you think of Squirtle, what do you hear in your head: this or this?
Now, there are several reasons why Game Freak hasn’t made this leap already. The first is obviously money. Granted, localization costs only make up a fraction of the budget for a Pokémon game, but it’s still a lot of work to translate things for various regions across the world, especially with modern titles available in at least nine different languages. This includes adjusting the names of specific monsters to better suit a specific market. For example, in Japanese, Hitmonchan and Hitmonlee are named Ebiwalar and Sawamular as a tribute to some of the country’s most famous boxers. So when you consider the need to get different voice actors across the world to perform all of these variations, things get expensive.
Furthermore, there’s an argument that creating a canonical voice for a main character like Victor or Gloria from Sword and Shield takes away from players’ ability to imagine their own. Pokémon is an RPG after all. However, I don’t think that reasoning flies when it comes to each monster’s individual cry, even though many of them have been upgraded or refined in recent years. Same goes for the idea that a Pokémon that says its name sounds less natural than whatever this is. At the end of the day, these monster calls are iconic, and the Pokémon devs know this, because they’ve given proper cries to characters like Pikachu and Eevee in certain situations.
Regardless, for a franchise that’s one of, if not the most valuable media property on the planet, I really hope that one day we can get proper vocal performances in Pokémon games, even if it costs Game Freak and Nintendo a little extra money. To be clear, I don’t hate the old 8-bit cries and I don’t think Game Freak needs to delete them entirely. They can simply be an alternate choice for anyone who prefers them over their actual voices. I just feel like after recently celebrating its 30th birthday, it’s time for Pokémon to move on and celebrate some of the voice acting that helped make the franchise so popular in the first place.
This article originally appeared on Engadget at https://www.engadget.com/gaming/nintendo/its-time-for-game-freak-to-finally-give-pokemon-some-proper-voice-acting-130000851.html?src=rss
Linux MGLRU Improvements Net A 30% Increase For MongoDB, More Than 100% On HDDs
It’s been a while since having any improvements to talk about for the MGLRU multi-gen LRU functionality for the Linux kernel to optimize page reclamation and help with system performance especially when enduring memory pressure. But this week a Tencent engineer posted some very promising patches for further enhancing this kernel feature…
BMW’s i3 is reborn as a sporty 440 mile range EV sedan
After letting us drive a prototype around in the snow earlier this month, BMW has fully unveiled its all-new i3 electric vehicle. It’s a far cry from the original funky hatch launched way back in 2013, offering more of everything including power, range and space. It also looks like you’d hope a 3-series EV would: a sporty sedan, minus the polarizing grille on the gas-powered M3.
The i3 uses BMW’s Neue Klasse platform and indeed borrows inspiration from the company’s Vision Neue Klasse concept unveiled in 2023. With motors on the front and rear in the 50 xDrive configuration, along with the 800-volt electrical system, it delivers a combined 463 HP and 476 lb-ft of torque, just a touch less than BMW’s G80 M3.
BMW
That will make the BMW quick (the automaker didn’t say how quick yet), but it will also be efficient. BMW estimates that the i3 will go 440 miles on a charge according to EPA guidelines and offer quick energy replenishment as well via DC charging speeds up to 400kW — up to 30 percent faster than its previous Gen5 tech. The battery pack will also be directly integrated into the chassis to reduce weight and increase torsional rigidity, while allowing bidirectional charging so you’ll be able to use it as a battery on wheels to power your home in a blackout.
Styling-wise, the i3 is much simpler up front with the grille and headlights incorporated as a single unit. A recess down the center of the hood draws your eye to the badge, while giving the EV muscle car allure. The side intakes add to that impression, as do the bulgy fenders, “Le Catellet Blue” metallic paint and optional lighting animations (Relaxed, Excited and Balanced).
Fabian Kirchbauer Photography
On the tech side, the i3 supports BMW’s Digital Key Plus so you can open the doors or trunk with a smartphone or smartwatch. The interior, meanwhile, looks as futuristic as I’ve seen in any recent EV thanks to the 17.9-inch Panoramic Vision display that’s angled toward the driver, along with an optional 3D heads-up display. The system features a self-learning voice assistant with Amazon Alexa+ AI and supports customizable themes, colors and background images. It also includes a wireless charging pad for your smartphone or other devices.
Inside, you can choose between multifunction and M Sport seats trimmed in different themes, including imitation leather in Agave Green, Digital White, Castanea or Black, or an M Design World theme in Black Veganza with M Performtex material. Alternatively, you can go for the BMW Individual scheme with real black Merino leather. For controls, BMW is using a hybrid system with physical buttons for the hazard lights and parking brake and “Shy Tech” buttons on the steering wheel that activate only when required.
BMW will start i3 production in August 2026 and deliveries later in the fall, with pricing set to be revealed around that time. From what we’ve seen so far it’s going to offer outstanding performance and range, but don’t expect it to be cheap.
Fabian Kirchbauer Photography
This article originally appeared on Engadget at https://www.engadget.com/transportation/evs/bmws-i3-is-reborn-as-a-sporty-440-mile-range-ev-sedan-124614369.html?src=rss
Spider-Man: Brand New Day Trailer Shows Peter In A World That’s Forgotten Him

We also see Scorpion, Punisher, Bruce Banner, and possibly Sadie Sink’s villain
This Motorola Razr+ Is on Sale for $400 Right Now
We may earn a commission from links on this page. Deal pricing and availability subject to change after time of publication.
The unlocked Motorola Razr+ (2025, 256GB) is currently down to $399.99 on Woot, a notable drop from its usual $699.99 price on Amazon and below its previous low of $599.99, according to price trackers. This is a limited-time offer running for three days or until stock runs out. Prime members get free shipping, while others pay $6. At this price, what you’re getting here is a mid-tier foldable from Motorola’s 2025 lineup, slotting between the base Razr and the pricier Ultra.

The outer display is the main reason to consider this phone. It’s a four-inch pOLED panel with a fast refresh rate and enough brightness to stay usable outdoors. More importantly, it runs full apps. You can reply to messages, scroll through social media, or even play games like Genshin Impact without flipping the phone open, notes this PCMag review. Inside, performance is steady thanks to the Snapdragon 8s Gen 3 and 12GB of RAM. Apps open quickly, multitasking is smooth, and Android 15 feels clean without much bloat. Battery life comes in under 13 hours, which is fine for a day but not much beyond that. Charging helps fill the gap with 45W wired and 15W wireless support.
The build feels solid as well, with an aluminum frame, a titanium hinge rated for 200,000 folds, and an IP48 rating that adds some peace of mind around dust and water. Rounding it out is the connectivity with Wi-Fi 7, Bluetooth 5.4, NFC, and support for sub-6GHz 5G. Motorola also adds a handful of AI tools like transcription and notification summaries, though you’ll need a Moto account to use them.
Cameras are where things level out. The 50MP main sensor captures decent shots in good light with natural colors, but details soften when you zoom in, even with the 50MP telephoto lens. Low-light performance is average. This is a phone for casual photos, not for someone who cares about consistent image quality. Software support is also shorter than some competitors, with three years of Android updates and four years of security patches. Still, for $399.99, the Razr+ (2025) is less about having the best specs and more about whether you want a foldable without paying flagship prices.
Our Best Editor-Vetted Tech Deals Right Now
Deals are selected by our commerce team
Samba 4.24 Released With Remote Password Management Support, Other Improvements
Samba continues strong in 2026 for this leading open-source SMB protocol re-implementation for Microsoft Windows file and print services interoperability. Samba 4.24 brings more features, including remote password management support…
The Defense Department reportedly plans to train AI models on classified military data
The Pentagon is making plans to have AI companies train versions of their models specifically for military use on classified information, according to the MIT Technology Review. If true, it wouldn’t come as a surprise, seeing as the US is aiming to become an “AI-first” warfighting force, based on the statement [PDF] released by Secretary of Defense Pete Hegseth earlier this year.
The department is already using AI models in the military: For instance, the US reportedly used Anthropic’s Claude to help with the capture of Venezuelan President Nicolás Maduro and with its attack on Iran, even after President Trump ordered federal agencies to ban its technology. But models trained on actual classified data could give more accurate and detailed responses, say, for situations similar to what happened in the past that aren’t public information.
MIT Tech Review says the department is looking to conduct the training in a secure data center that’s allowed to host classified government projects. The Pentagon would train copies of AI models, but it would remain the only owner of any data used for training. In rare cases, someone from the AI company could be granted the appropriate security clearance to see classified information.
Aalok Mehta, who previously led AI policy efforts at Google and OpenAI, told the publication that training models on classified data carries certain risks. It’s not that the information could go public, since the the models trained would be versions made specifically for military purposes. However, if the same model is used across the whole Defense Department, for instance, personnel without the correct clearance level could end up getting information that they weren’t supposed to have access to.
If the initiative pushes through, the department would likely be training models from OpenAI and xAI, which recently signed agreements with the agency. Anthropic, which has long worked with the government, might not be part of this project. The company refused to allow its technology to be used for mass surveillance and the development of autonomous weapons, and Trump ordered all federal offices to ban it as a result.
This article originally appeared on Engadget at https://www.engadget.com/ai/the-defense-department-reportedly-plans-to-train-ai-models-on-classified-military-data-120332113.html?src=rss
Systemd 260 Drops SysV Init Support in Major Cleanup Update
Systemd 260 drops SysV scripts, raises kernel and dependency requirements, and brings key internal changes across the stack.
Apple Studio Display XDR review: Expensive, but there’s no monitor like it
It’s hard for most people to justify spending $3,299 on a monitor, but creative pros will gladly do so if it makes their jobs easier. Apple’s 27-inch 5K Studio Display XDR is aimed straight at those folks and it costs considerably less than the company’s previous high-end monitor, the 6K Pro Display XDR.
Thanks to the Mini LED IPS panel, the Studio Display XDR has higher brightness and color accuracy than nearly any other monitor on the market. It also has tech that boosts contrast to outperform similar displays. With its unique combination of features, the Studio Display XDR isn’t as overpriced as you might think, and it has high appeal for me as a video editor. I do, however, wish it was bigger.
Design and features
If you’re familiar with Apple’s previous Studio Display, you’ll have a good idea of the Studio Display XDR’s design. The body has a high-quality brushed aluminum finish, with small holes across the top and bottom designed to vent heat from the built-in, nearly silent fan.
It has enough internal hardware to be a standalone computer, as it’s equipped with an A19 Pro processor and 12GB (!) of RAM — more than Apple’s new MacBook Neo laptop. That extra horsepower is required for all of the image processing, dimming algorithms, webcam operation and HDR tone-mapping.
Steve Dent for Engadget
A tilt- and height-adjustable stand was a cool $1,000 option on the more expensive Pro Display XDR, but it’s thankfully included with this new model. The stand’s motion is delightfully smooth, with just a slight amount of pressure required to move it up and down. However, it only offers four inches of height adjustment and no ability to swivel the screen. You can also get this monitor with a VESA mount instead at the same base price, in case you want to mount it on your own stand or a wall.
The Studio Display XDR comes with two high-speed 120Gbps Thunderbolt ports to connect your Mac, storage or another display, along with two 10Gbps USB-C inputs, but there’s no HDMI port in sight. One of the Thunderbolt ports supports 140W charging, which can replenish a 16-inch MacBook Pro at the maximum possible speed. Apple has also thrown in a Thunderbolt 5 cable that is thicker than any USB-C cable I’ve seen. The power cable also looks nice, but is not removable.
Up front, the monitor has surprisingly thick bezels (0.75 inches) that detract from the otherwise sleek design. In comparison, my ASUS ProArt PA32UCX display’s bezels are just a quarter of an inch thin. Built into the top bezel is a 12-megapixel camera with Apple’s Center Stage feature that keeps your face front and center during Zoom calls. Note that if you prefer less glare, you can get nano-texturing on the display for an extra $300.
The Studio Display XDR is designed mainly for use with Macs, and recent ones at that. Mac models with M1, M1 Pro, M1 Max, M1 Ultra, M2 and M3 chips only support this monitor at up to 60Hz — not the maximum 120Hz. Apple doesn’t mention support for Intel Macs or Windows PCs, but I tested the monitor on both and it worked fine at the 60Hz limit.
Image quality
Steve Dent for Engadget
Apple has largely stuck with Mini LED and quantum dot technology for its MacBook Pro laptop screens and monitors because of the higher brightness levels and lack of “burn in” compared to OLED displays. The tradeoff for that is lower contrast, as I explained here. Mini LED displays also show a phenomenon called “blooming” not present in OLED panels, which is caused by light bleed from neighboring pixels.
However, Apple has largely solved those issues on the Studio Display XDR by boosting the number of local dimming zones (individual LED backlights) to 2,304, four times as many as the XDR Display Pro. That allows not only more brightness, but higher contrast and minimal blooming.
This model doesn’t offer 6K like the Pro Display XDR, but its 5K resolution is still higher than most rivals. That’s a big benefit for designers, animators, photographers and others who want the sharpest image possible. The higher 120Hz refresh rate is also easier on the eyes and better for gaming. However, creators used to screens that are 32 inches or larger may be turned off by the Studio Display XDR’s smaller size.
Brightness is where this monitor really shines; XDR stands for “extended dynamic range,” after all. Apple promises a peak level of 1,000 nits in SDR and 2,000 nits in HDR mode. I was able to verify those claims: I measured 1,991 nits on a Calibrite colorimeter in a 25 percent window and 988 nits at full screen — making this the brightest monitor I’ve ever tested. When I watched HDR material on YouTube and Netflix graded for brightness levels over 1,000 nits, I didn’t see any of the highlight clipping that occurs on my 1,400-nit ASUS ProArt display.
What’s more, the Studio Display XDR’s 1,000,000:1 contrast ratio is among the highest of any non-OLED display (though not infinite like OLED displays). On top of that, I saw virtually no blooming with bright light points against black. Finally, this monitor has the best off-axis performance I’ve seen with very little drop in gamma even at fairly sharp viewing angles.
Steve Dent for Engadget
Color accuracy is also a strong point. Apple promises a Delta E of less than one, and my measurements (around 0.8) bore that out. And like the Pro Display XDR, this model has a true 10-bit IPS panel, which means you get one billion colors total. Apple notes that the Studio Display XDR is the first Apple monitor to include both the P3 wide color Adobe RGB primaries, unlocking “deeper greens and cyans than P3 alone,” it said in a white paper. For HDR work, it covers 81 percent of the challenging BT.2020 color gamut, which is excellent though a bit below some OLED monitors.
The Studio Display XDR can handle a variety of work thanks to the huge number of color profiles included with the display, which total 16 in all. Those include HDR profiles, P3 Digital Cinema, Photography, HDR photography, Design and Print and even Medical Imaging. To verify that, I tested it with several apps including Lightroom Classic and DaVinci Resolve, and was astounded by the color accuracy and brightness. Unlike some rivals, most notably ASUS, it doesn’t support Dolby Vision, however.
On top of being an excellent content creation monitor, the Studio Display XDR is solid for entertainment and gaming. I watched scenes from movies and TV shows including Spider-Man No Way Home, Game of Thrones and Tenet, and enjoyed the extra brightness, high color accuracy and contrast ratio that allowed me to see what the heck was going on in the Night King battle in GoT. For gaming I tried Cyberpunk 2077 for Mac, and the 120Hz refresh rate (it also supports Adaptive Sync 47-120Hz refresh rates), along with the brightness and color accuracy, makes it Apple’s best display yet for gaming.
Camera and speakers
Though it has the same name, the 12MP Center Stage webcam is much improved from the previous Studio Display. The resolution may be the same, but the new camera provides a much brighter and sharper image in dim conditions. However, to use the Desk View feature I needed to tilt the screen forward more than I’d like.
The built-in six speaker sound system is surprisingly good too, offering what is easily the best sound I’ve ever heard coming from a monitor. It supports Spatial Audio and Dolby Atmos sound as before, but now offers deeper bass. It still can’t match a dedicated soundbar or separate speakers, of course, but the audio on this display is clear and surprisingly loud.
Wrap-up
Steve Dent for Engadget
As I said at the outset of this review, Apple’s Studio Display XDR is overpriced, but not by a lot. It’s the brightest monitor I’ve measured and has among the highest number of dimming zones for a Mini LED display for maximum contrast. At the same time, it offers superb color accuracy out of the box, supports up to 5K 120Hz resolution and oozes quality. Few monitors in any category and price range, whether Mini LED or OLED, can boast all of that.
There are cheaper options that can do some of those things. If you prefer OLED, the ASUS ProArt PA27 4K model offers 1,000 nits of max brightness and similar color performance, with better contrast and double the refresh rate for $1,299. And if you want a bigger display that’s nearly as bright as the Studio Display XDR, ASUS also makes the $3,199 PA32UCG-K Mini LED 32-inch monitor with 1,600 nits peak brightness, albeit with half the number of dimming zones.
However, if you require the best image quality possible and don’t mind a 27-inch display, Apple’s Studio Display is the best choice. It will never be a mainstream product, but thanks to its versatility and better value than the Pro Display XDR, I think it will be a surprisingly popular option.
This article originally appeared on Engadget at https://www.engadget.com/computing/accessories/apple-studio-display-xdr-review-expensive-but-theres-no-monitor-like-it-120018426.html?src=rss
Power Zone Workouts Are My Favorite Thing About the Peloton Bike
We may earn a commission from links on this page.
Peloton bikes are best known for their video classes, which feature a social leaderboard, chatty instructors, and handpicked music. But from a fitness perspective, my favorite feature is “power zone” training, which works with specific classes or you can enable the power zone bar for any workout.
Let me tell you why I love it, and how you can get started with it, too.
What is power zone training?
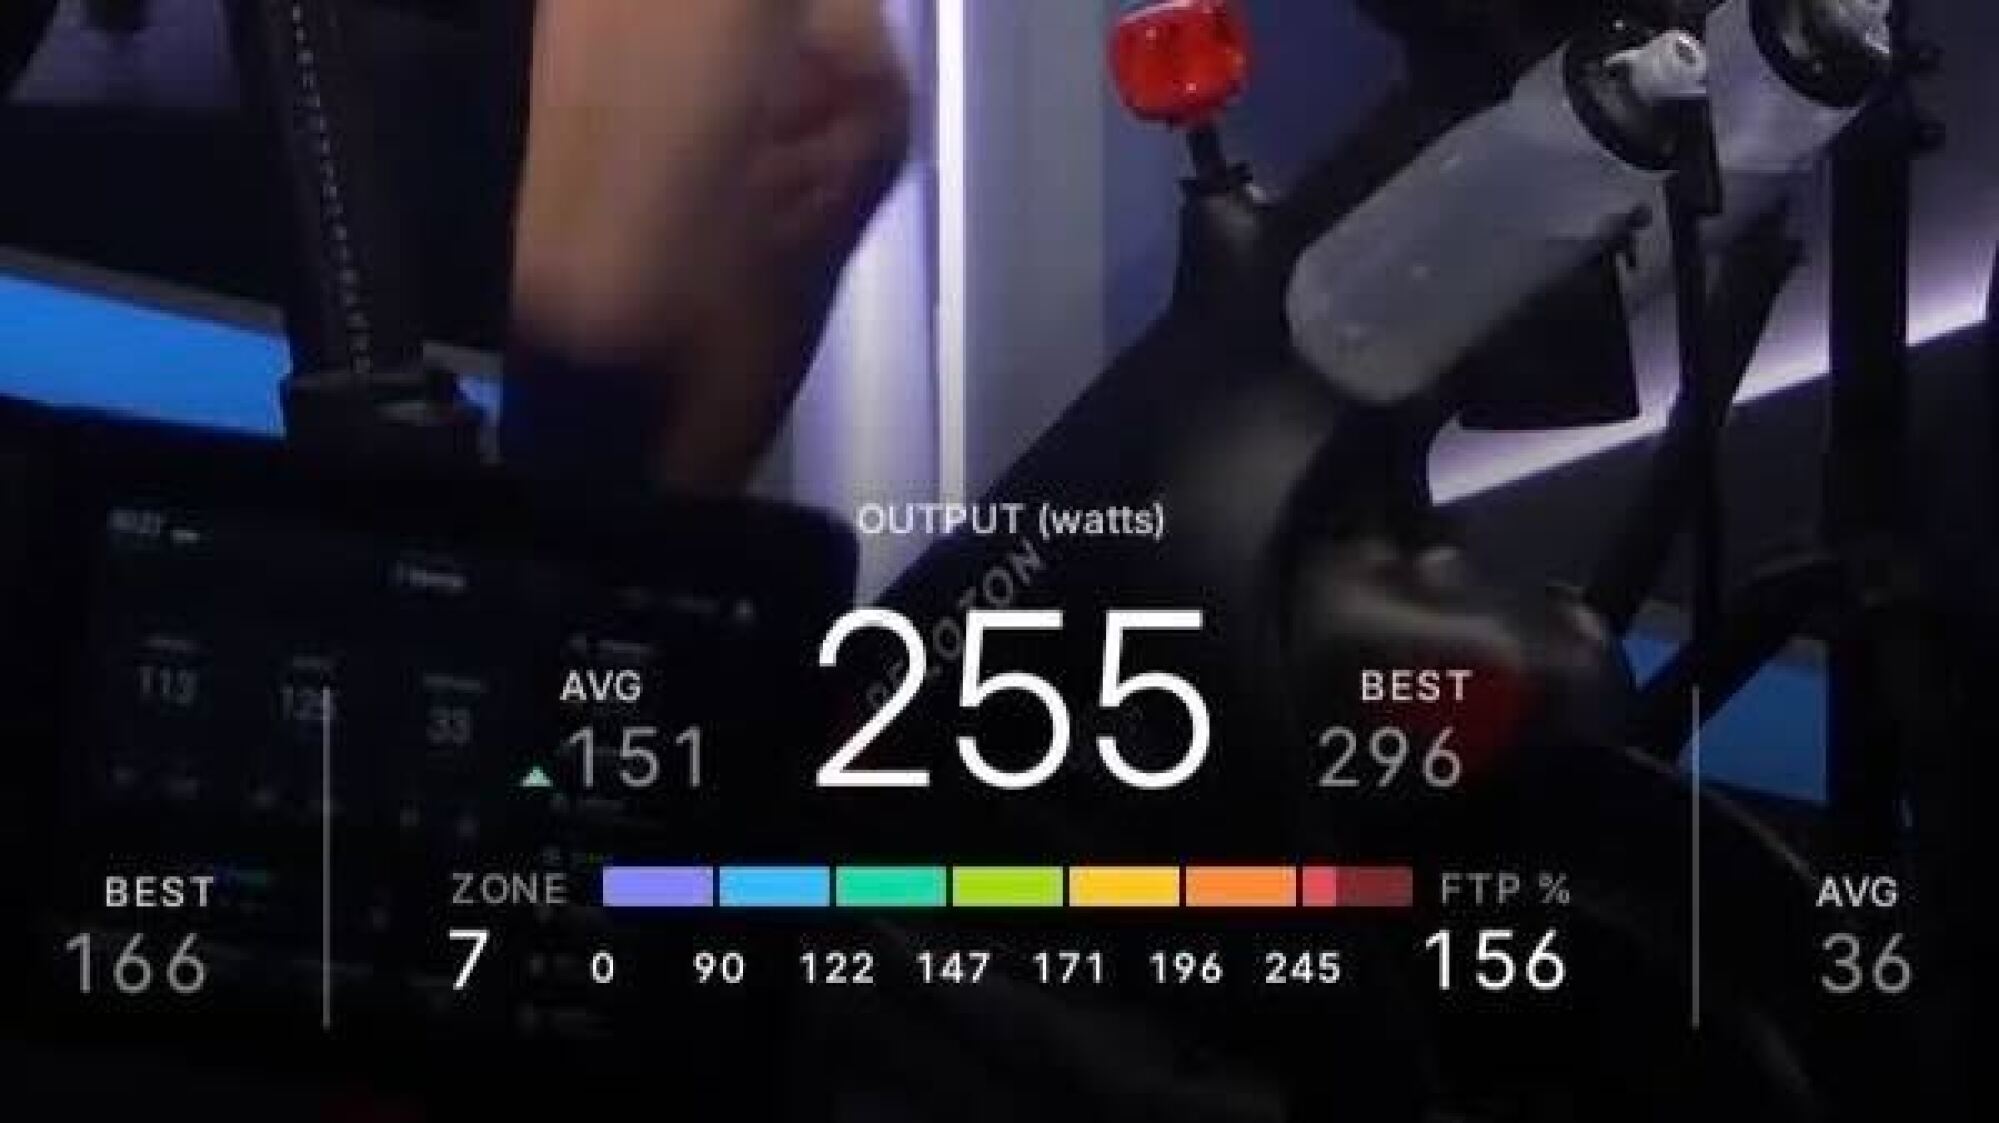
Cyclists measure their effort in terms of power: how much energy you transmit through the pedals in a given length of time. It’s often measured in watts. On an outdoor bike, you need a power meter to measure this; on Peloton, this measurement is built in. On Peloton, you’re probably familiar with your “output,” the number in the center of the display that goes up when you increase your resistance, your cadence, or both. This is the same as power.
Just as heart rate can be divided into zones for training, so can power. There are seven zones in Peloton’s system, with higher output numbers falling into higher zones. To know what zone you’re in, you’ll have to turn on your Power Zone bar in Settings, and tell the system what your “FTP” is, the number that the zones are based on. Peloton can estimate an FTP for you, but you should really take an FTP test to know for sure—more on that below.
A power zone workout (or “ride,” as Peloton calls them) will tell you when to go into each zone. Unlike other Peloton classes, instructors leading power zone rides won’t tell you what resistance to use, and they may recommend a cadence, but you’re never required to hit it. So if you’re in zone 1 and the instructor tells you it’s time to pedal in zone 3, you can choose to increase your resistance, your cadence, or both—whatever gets you there. To be totally clear, power zones are nothing to do with heart rate zones. We’ll talk about the difference a little bit later.
Why are power zone rides special?
Since power zones are calibrated to your personal abilities, you always have a scale that tells you how hard you’re working, relative to what you are capable of. I like power zone rides because I know what kind of training effect to expect from them.
While the non-power zone workouts could be almost anything—a “classic rock ride” could be hard, easy, or anywhere in between—I know that a “power zone endurance” ride is going to keep me in zones 2 and 3 for most of the workout, training my stamina without making me too fatigued. On the other hand, a “power zone max” ride will have me working hard, like a HIIT workout. The difference is that I know from the power zone bar on my screen exactly when I’m hitting the ideal output for the workout that I’m doing—not too hard and not too easy.
In short, other rides are great for having fun or for letting yourself be surprised. Power zone rides are for training. If you want to get faster and better on the bike, these are structured workouts that will make that happen, and give you ways to measure your improvement.
What is a power zone ride like?
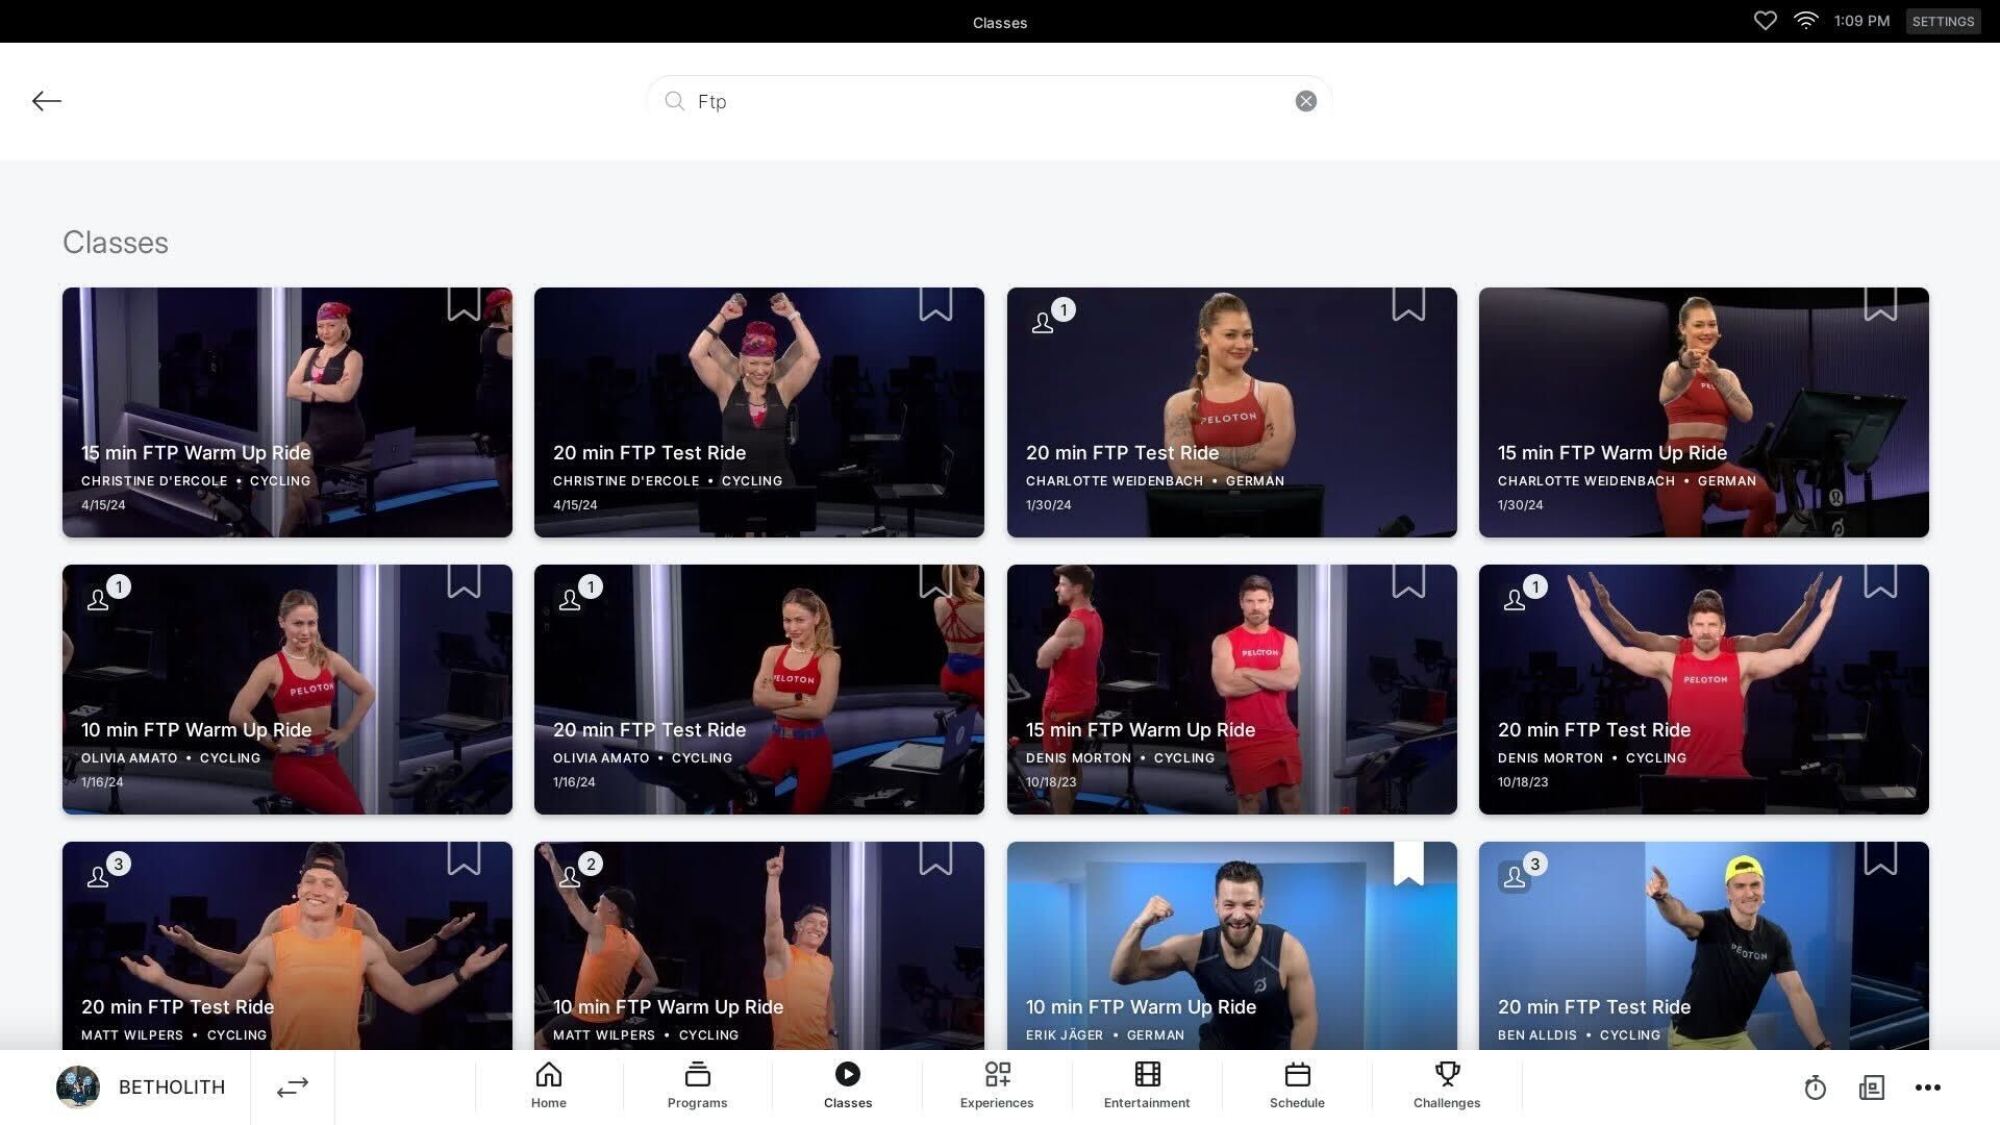
When you want to do a power zone ride, your first job is to decide which kind. You can filter classes by “power zone” as a type, but within that you’ll see three types of classes:
-
Power zone (PZ): With these you’ll spend most of your working time in zones 3, 4, and 5, with recoveries in zone 1 or 2 in between efforts. These tend to be pretty hard workouts, but they’re usually not too intense.
-
Power zone max (PZM): These rides will take you into the higher zones (6 and 7) with easy recoveries, usually in zone 1.
-
Power zone endurance (PZE): These rides almost always keep you in zones 2 and 3 the whole time. Your effort will be moderate but steady.
The shortest power zone rides are usually 30 minutes (there may be a few 20-minute rides in the catalog). The 45-minute rides are probably the most popular, but there are plenty of 60-minute rides and a few 75- and 90-minute PZE rides.
Credit: Peloton
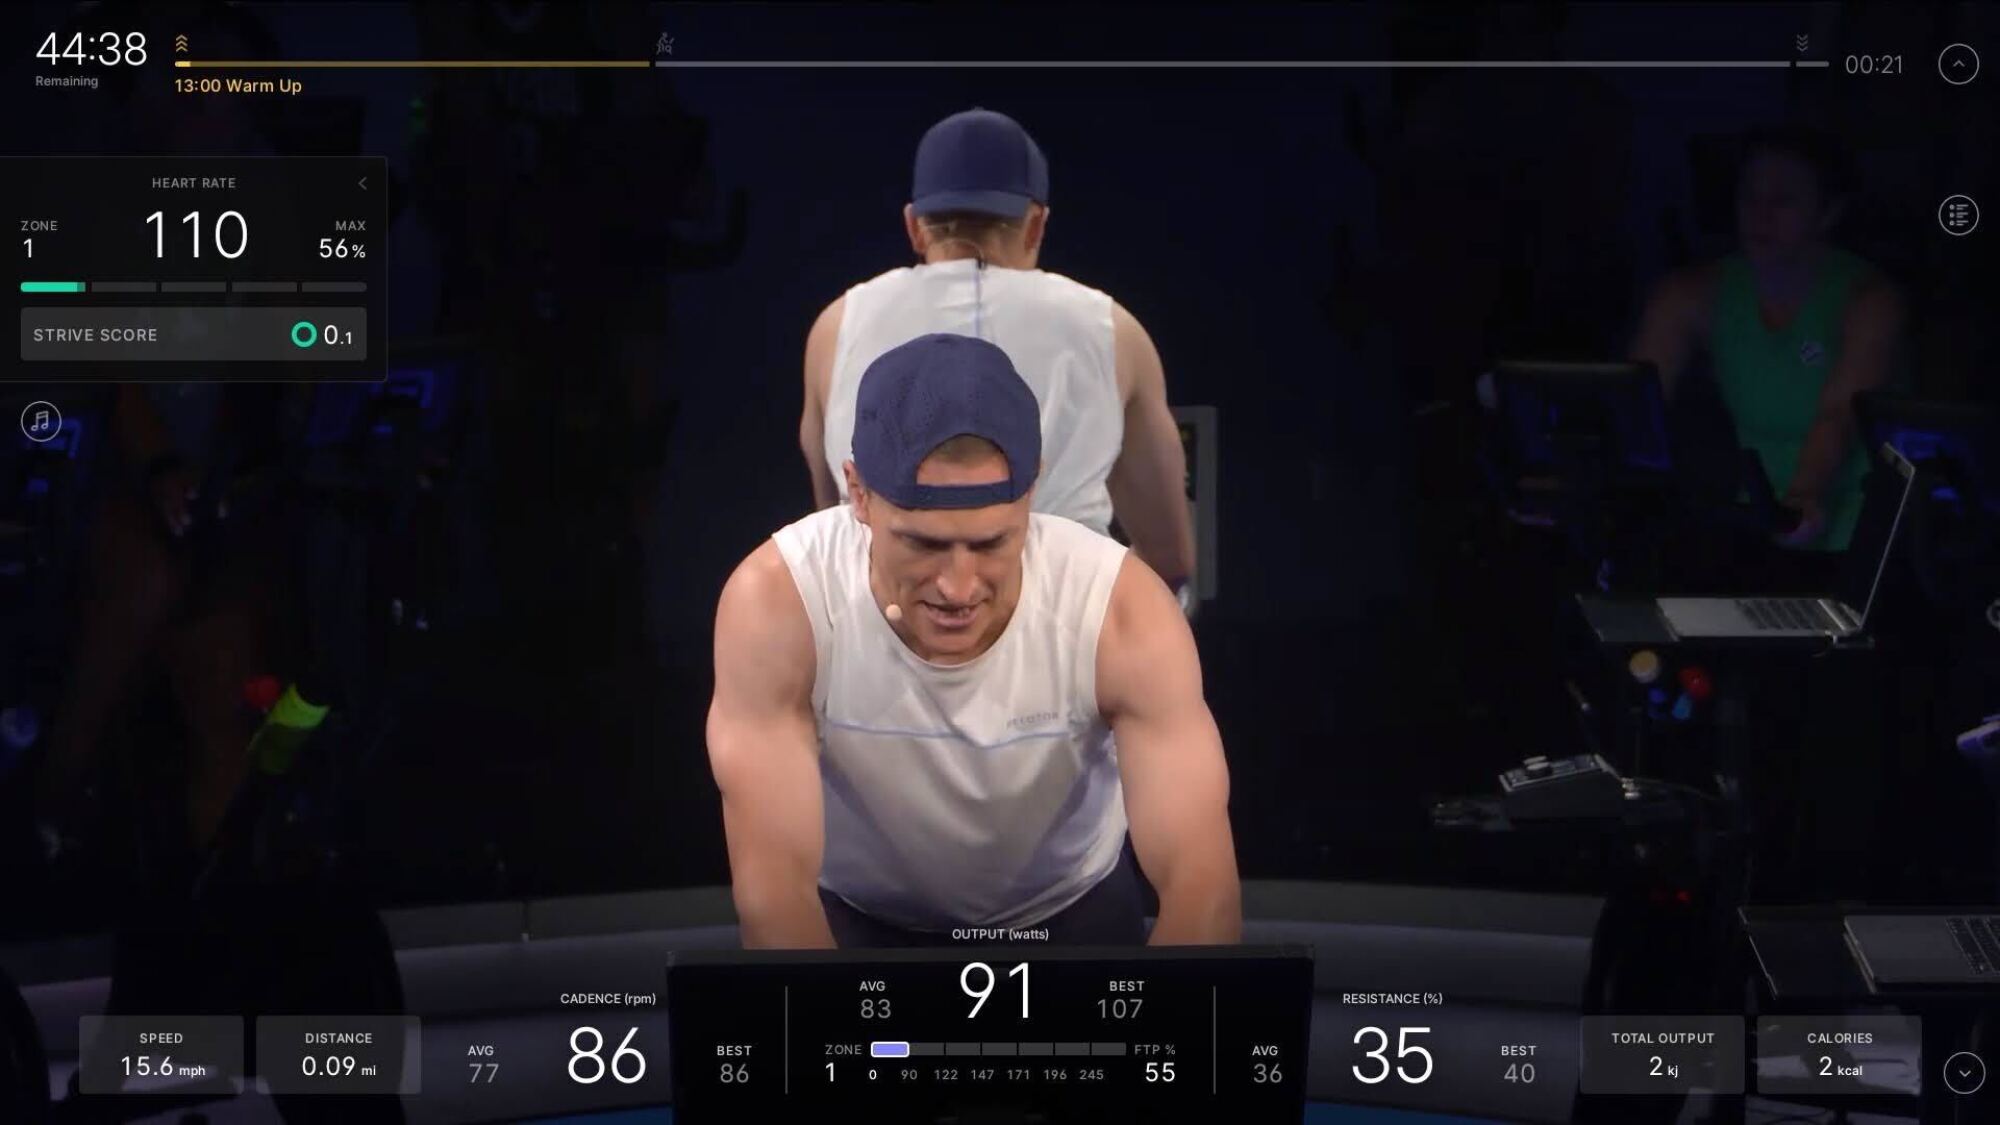
All power zone rides start with a warmup that is usually between 10 and 13 minutes. A typical one goes like this:
-
A few minutes (usually one song’s worth) of pedaling in zone 1 to let your legs start to warm up.
-
Spin-ups, where you move your legs as fast as you comfortably can, for maybe 30 seconds at a time. Your exact zone doesn’t matter here. In between the spin-ups, you’ll pedal in zone 1 to recover. After three to five spin-ups, with maybe 30 seconds or a minute in between, it will be time for the next phase.
-
A “build” with 30 to 90 seconds in each of the zones you’ll be using in the workout. For a PZE that might be 90 seconds in zone 2 and 90 seconds in zone 3. For a PZM, you might get 30 seconds each in zones 3, 4, 5, and 6.
-
A short recovery (usually 1 minute) of zone 1 pedaling before the main workout begins.
Instructors will get creative with the details, but will always keep the structure of a zone 1 segment, a few spin-ups, and a build. During the warmup, they will usually explain the structure of the workout to come.
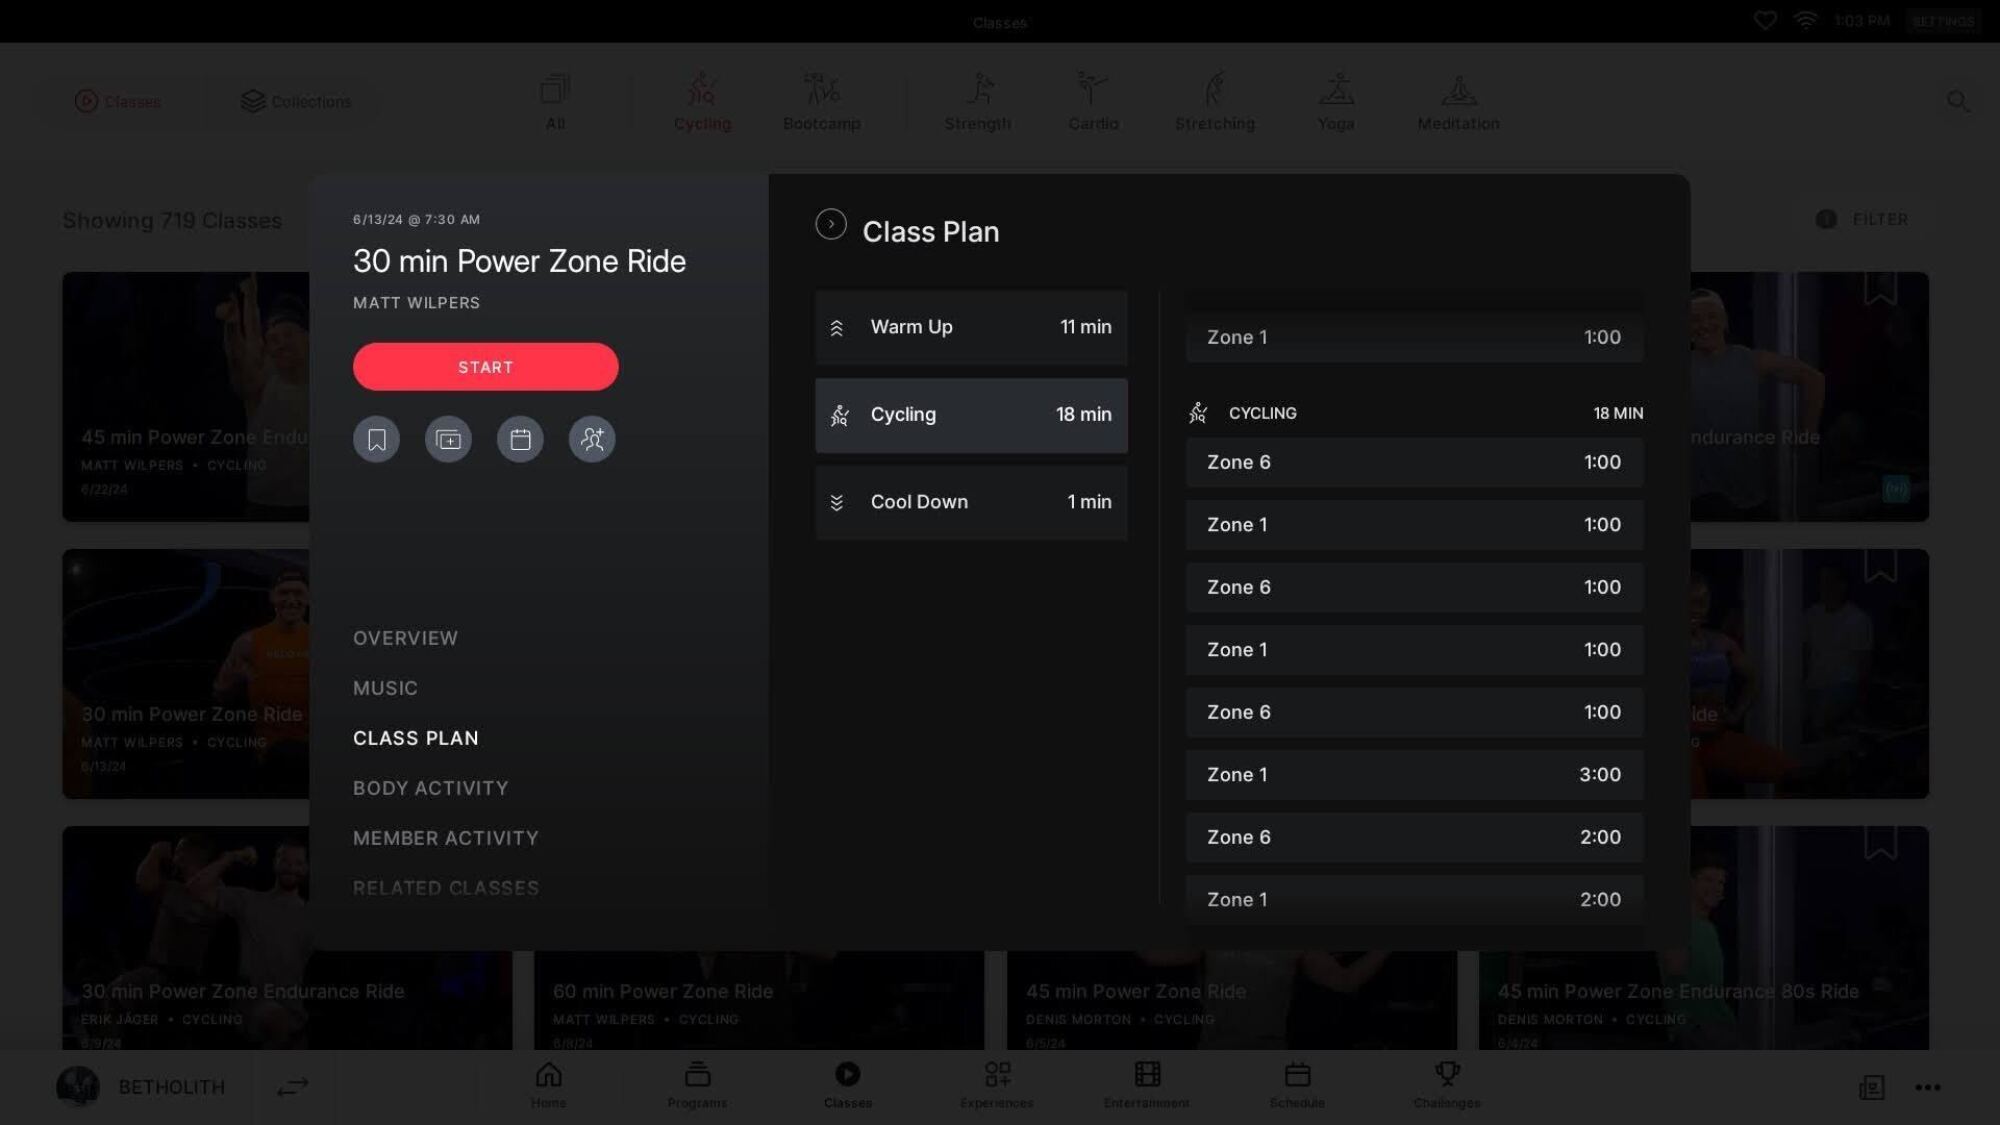
To see the structure of the workout before you start the class, you can tap Class plan in the ride description, then View details, and you’ll be able to see the full breakdown. (Some older classes may not have this information, but anything from the past few years will always have it.) The plan will show you what zone each interval is in, and how many minutes you’ll spend there. In the example here, you’ll spend 3, 5, 7, and then 5 minutes in zone 3, with shorter recoveries in zone 2. This is pretty typical for a PZE class.
Why you’ll love the power zone bar
Credit: Beth Skwarecki/Peloton
Anybody can take a power zone class at any time, but if you haven’t set up your power zone bar, you won’t know exactly when you’re in the right zone. (Go ahead and take the class anyway, though. During the build, the instructor will explain what each zone should feel like. You can do your first ride or two by feel.)
The power zone bar is a color-coded line at the bottom of your screen underneath your output. The zones will fill in with color according to your output, so that when you’re in zone 1, you’ll just see the leftmost blue chunk lit up, and when you’re in zone 7, you’ll see the whole rainbow, with zone 7 in red to let you know that’s where you are. Power zone classes released after November of 2022 have an indicator outline around the zone you’re supposed to be in, so even if you missed the instructor calling out the zone, you’ll see on your screen what zone you should be in.
When you set up your power zone bar—more on that in a sec—you’ll get the option to show it all the time, instead of just in power zone classes. I highly recommend doing this. With the power zone bar, you can use the idea of power zone training when you’re doing a scenic ride, and you can see how traditional style classes compare to your own zones. If I want to take a music ride for fun, but stick to easy training, I’ll just make sure my output stays in zone 2 or 3. With the power zone bar enabled, it’s easy to do that.
How to set up your power zones on Peloton
Credit: Beth Skwarecki/Peloton
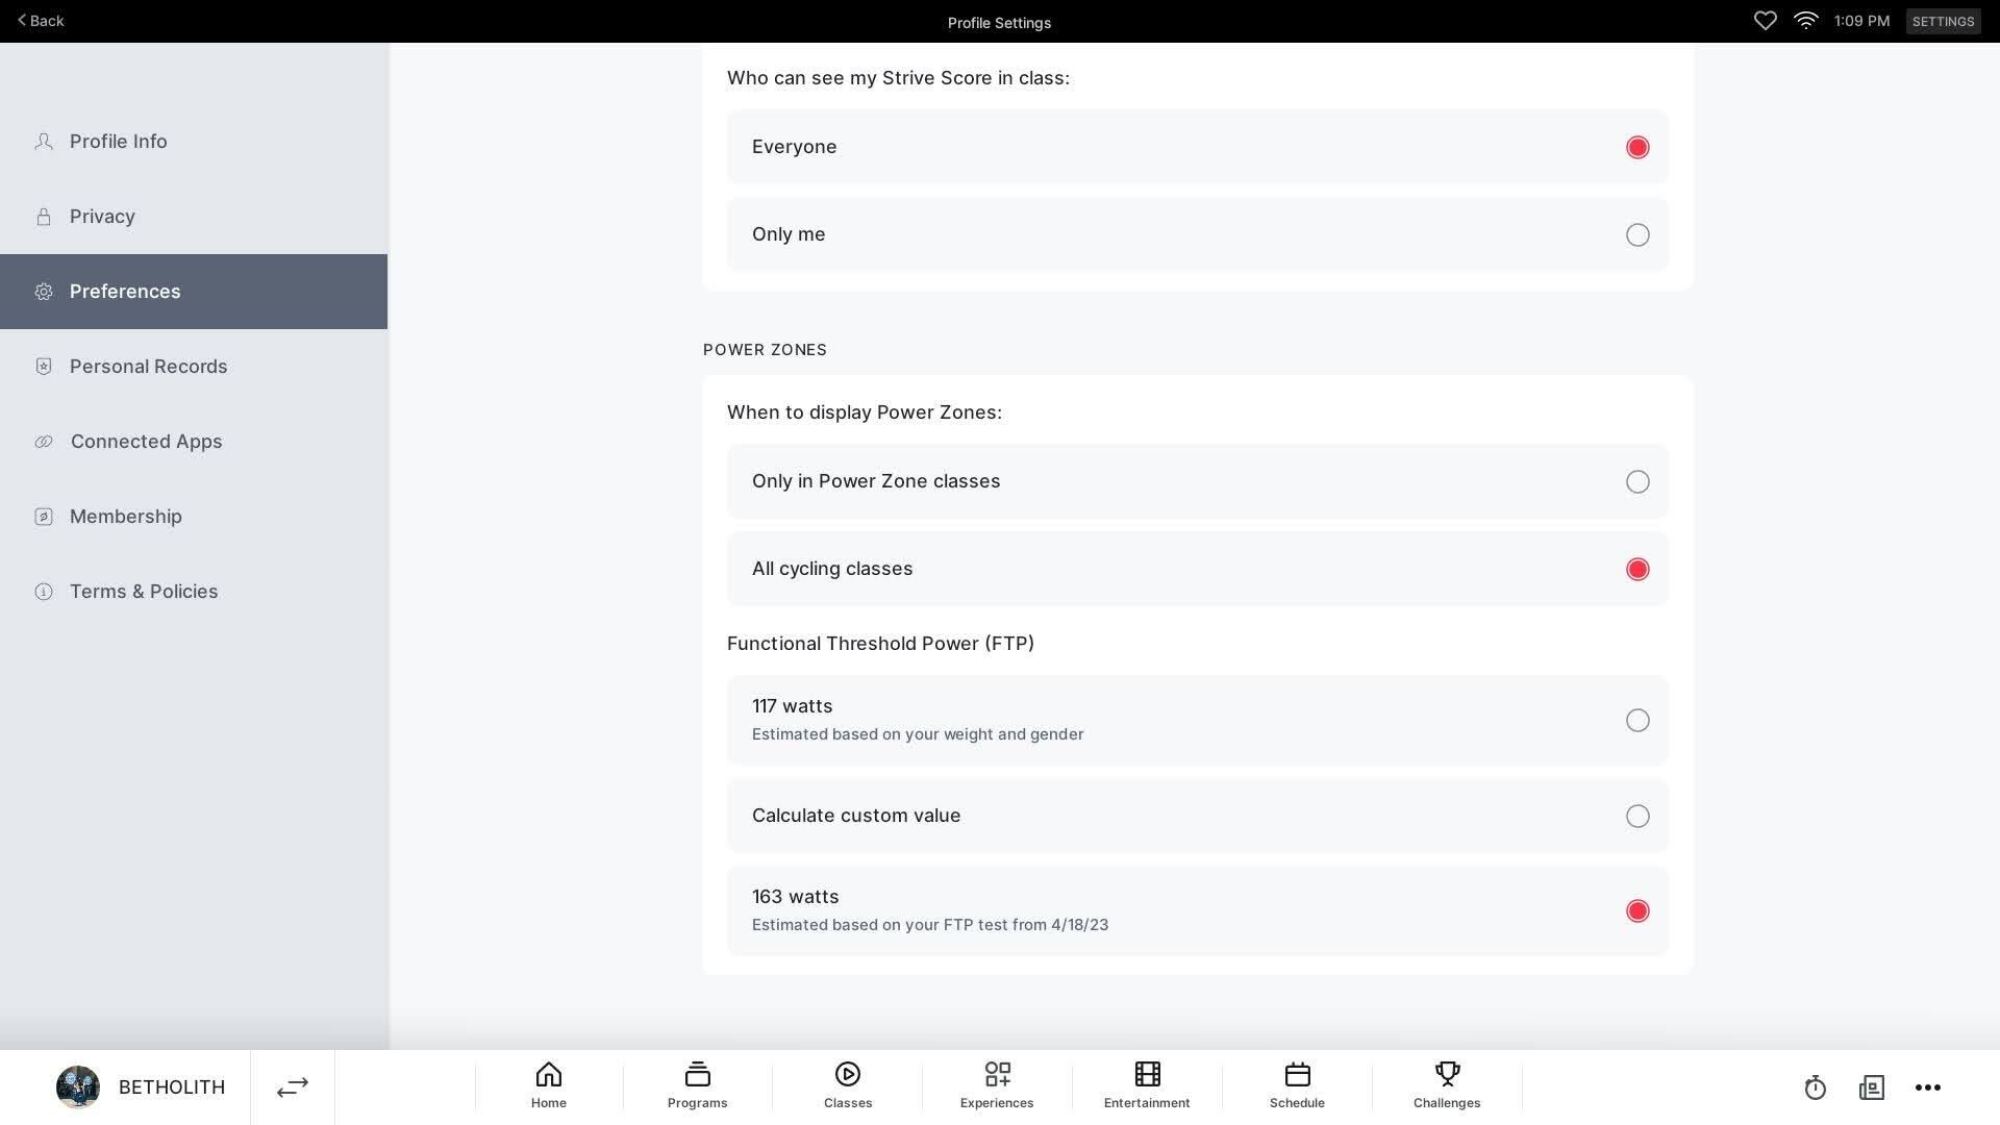
If you know what the term “FTP” means (hello, cyclists), you can go into your settings right now and turn on the power zone bar. It’s in your profile, under Preferences. At the bottom of the screen, find the FTP section, and tap “calculate custom value.” You can enter your FTP number there. For the rest of us, though, you’ll want to take an FTP test. Well, you might not want to, but you kind of need to, to calibrate everything properly.
How to take an FTP test
Credit: Beth Skwarecki/Peloton
FTP stands for Functional Threshold Power, and it’s a measure of how high an output you can sustain over time. There are specific Peloton rides that are designed to measure your FTP. After you do one, you’ll get a prompt asking if you’d like to update your FTP in settings. (Say yes.)
The FTP test takes 20 minutes, but I like to budget an hour. That gives you 10 to 20 minutes for a warmup, 20 minutes for the test, 5 to 15 minutes for a cooldown, and then plenty of time to lie on the floor afterward. (Pro tip: Have someone bring you a fresh, cold bottle of water when you finish.)
People get nervous about the FTP, but it’s really just a benchmark of where your fitness stands at the moment. If you do it right, you’ll be exhausted at the end, but then you’ll know your FTP—which means you can take easy rides and know they will be easy, because they’ll be calibrated to you.
I’ve taken a few FTP tests. Here are my tips:
-
Schedule a time, and when the time comes, hop on the bike and do it. If you are the type of person to get nervous when a test is on your calendar for a future date, just do it now. I’m serious, turn on your bike right this second and get it over with. You can read the rest of this article when you’re done.
-
Do an FTP warmup ride. Some are 10 minutes, some are 15. I find that longer is better; sometimes I’ll do a 10 minute warmup twice. Pick your favorite, most encouraging instructor for the warmup.
-
After the warmup, take a quick minute for a water break if you need it, and then go right into the FTP test. It does not matter who the instructor is; you’ll barely notice them. Mute the screen and play your own music if the music matters to you.
-
Start at a strong, steady pace, something you’re confident you could keep up for 20+ minutes. Every five minutes, ask yourself if you could kick up the intensity a notch and still be able to hang on. If you have a 20-minute PR already in the system (whether a previous FTP test or another ride), filter the leaderboard to “just me” and try to beat yourself.
-
Anytime you feel like you can’t possibly continue, slow down a little but do not stop. Use this as your new steady pace, and get back to asking yourself every few minutes whether you could increase your output or if you need to stay where you are. Better to go out too fast, slow down, and then continue to the finish, than to quit halfway through and…then what? Do it all over again? No way.
-
No matter your fitness level, there is some amount of power that you can log in a 20-minute test. If you don’t like the number you get, you can retest in a couple weeks. But you won’t know what number that is until the end. So don’t quit. Keep pedaling. You can absolutely do this.
-
Whatever minute you’re in, don’t focus on how many minutes there are left. Just focus on making it through this minute.
Before you know it, you’ll be in your final sprint to the finish. The ride will end, and at this point I usually snap a photo with my phone of my output on the leaderboard. When you leave the ride to do a cooldown (please do a cooldown, your body will thank you), Peloton will ask if you’d like to update your FTP. Say yes. By the way: It’s recommended to take a new FTP test every 4 to 6 weeks.
Heart rate zones vs. power zones
I need to make something very clear: When you’re training with power zones, those are to be used instead of heart rate zones. Not in addition.
Now, you can still wear a heart rate monitor. That’s fine. You’re just not using it to guide your workout. You’ll see the power zone bar at the bottom of your screen, and a heart rate zone indicator at the top left. Either ignore or hide the heart rate zone indicator. You can tap the little sideways arrow and it will disappear, but your heart rate data will still be logged so you can look at it later.
Note the heart rate zones in the top left, and power zones at the bottom. At the moment, both are in zone 1.
Credit: Beth Skwarecki/Peloton
Credit: Beth Skwarecki/Peloton
People often wonder how heart rate zones match up with power zones, but there is no consistent way to convert them. In general, heart rate zone 2 matches power zones 2-3. But your heart rate drifts upward the longer you work out, and your heart rate also takes longer to change when you shift gears. If you’re moving into power zone 5, your bike will be at zone 5 immediately. Your heart might take 30 seconds to catch up. Don’t ever worry if your heart rate zones and power zones aren’t matched, OK? You can only train with one at a time, and we’re here to train with power zones.
What kind of power zone workouts should I do?
When you first start, the easiest way to learn your way around power zone workouts is to do the Discover Your Power Zones program (available from the “Programs” section on your bike’s screen). It will guide you through doing an FTP test at the beginning and at the end of the four-week program, and in between you’ll get a sampler of all the different power zone workout types. The instructors know they’re talking to power zone beginners, so they’ll spend plenty of time explaining how everything works and giving you tips on making the most of it.
When you’re done with that program, you may want to take Build Your Power Zones to continue working in that same vein, but it’s also fine to just start taking whichever power zone classes you think you’ll enjoy. Eventually you may want to take Peak Your Power Zones, a more advanced program that is geared toward improving your FTP. (Your FTP will improve no matter which program you take, but the “Peaking” program is laser-focused on making that number go up rather than delivering a well-rounded fitness program.)
Besides those three built-in programs, you can also find program suggestions online. Some popular options include a free #RedditPZ group that runs nine-week programs and a paid Power Zone Pack that runs challenges for subscribers.
But if you’re on your own, you can build your own routine just by knowing what to expect from each type of power zone workout. For most people, it would work to do:
-
0 or 1 Power Zone Max ride(s) per week
-
1 or 2 Power Zone ride(s) per week
-
Power Zone Endurance rides for the rest of your available time (or do other rides while staying in zone 2-3 on the power zone bar)
So if you ride three times each week, you might do one PZ and two PZE. If you’re a monster who rides every day, you might do one PZM, two PZ’s, and four PZEs, with one or two of those PZE rides being all zone 2 (instead of following the callouts to switch between zones 2 and 3). Adjust as needed to your own fitness level, and choose the lengths of workouts that work for your schedule.
When choosing your own workouts, the Power Zone Tool from homefitnessbuddy.com is incredibly useful. You can filter and sort by instructor, length of workout, and a cool metric called TSS (training stress score). The higher the TSS, the harder the workout will be to recover from. (For example, you can search for “Christine PZE” and sort by TSS, lowest first. You’ll immediately see that she has several rides that are 30 minutes long and that are entirely in zone 2—great for a recovery ride.)
You can also get a preview of the zones as a visual chart, which I find easier to read than the way Peloton presents them in the class plan. Be aware that the very newest rides won’t be on this tool yet, but also that some older rides will be on there as well that may not have the power zone indicator. But fortunately all the statistics are right there in each entry, so you can choose exactly which rides you’d like to take.
One Million Meters: Inside the Year Mads Matt Rewrote the Rules of Zwift Climbing
Zwift is full of challenges for those seeking something to chase. There are riders on Zwift who chase badges. Riders who chase jerseys. Riders who chase that one perfect KOM attempt where the stars align and the watts land exactly where they need to.
And then there’s Matt Ladd, aka “Mads Matt”, who spent 2025 chasing something very few Zwifters, or cyclists for that matter, will ever attempt, let alone complete: one million vertical meters of climbing in a single year.
That number sits somewhere between ridiculous and mythic. It’s the kind of number that you throw out when you want to be sure the absurdity is evident. But across long nights, early mornings, and relentless virtual ascents, Matt turned mythic absurdity into routine.
What makes the story even more remarkable is how unremarkably it began.
The Initial Goal: Beat Last Year
Coming into 2025, Matt wasn’t chasing a headline. The goal was simply to beat his 2024 total of just over 700,000 meters. Through the first three months of the year, he rode with structure and restraint, averaging roughly 60k meters each month. Big numbers for most riders, but nowhere near the 2,740 meters per day required to reach a million. It was on pace with his goal.
Then May arrived, and the tone shifted.
A New Achievement Stretches the Goal
During the Flamme Rouge Racing Charity Day Ride, Matt took on one of Zwift’s most iconic challenges and refused to stop. He climbed Alpe du Zwift 19 times in a single ride, covering 481 kilometers and logging 20,000 meters of elevation in just under 26 hours.
That’s more than a double vEveresting in one session. For context, many riders plan months to complete a single Everesting and treat it as a once‑in‑a‑lifetime achievement. Matt essentially completed two, mid‑season, and logged more elevation than the Giro d’Italia accumulates in its opening week.
Realizing he was capable of amassing elevation gain like that in a single session, he reconsidered his goal. He had been climbing at a relentless pace. What was he actually capable of? 800k? A Million?
And yet, the math wasn’t friendly.
By early June, Matt found himself 78,000 meters behind million‑meter pace. For most riders, that’s the point where a stretch goal quietly disappears.
Instead, it became the turning point.
Building Momentum Up Ventoux
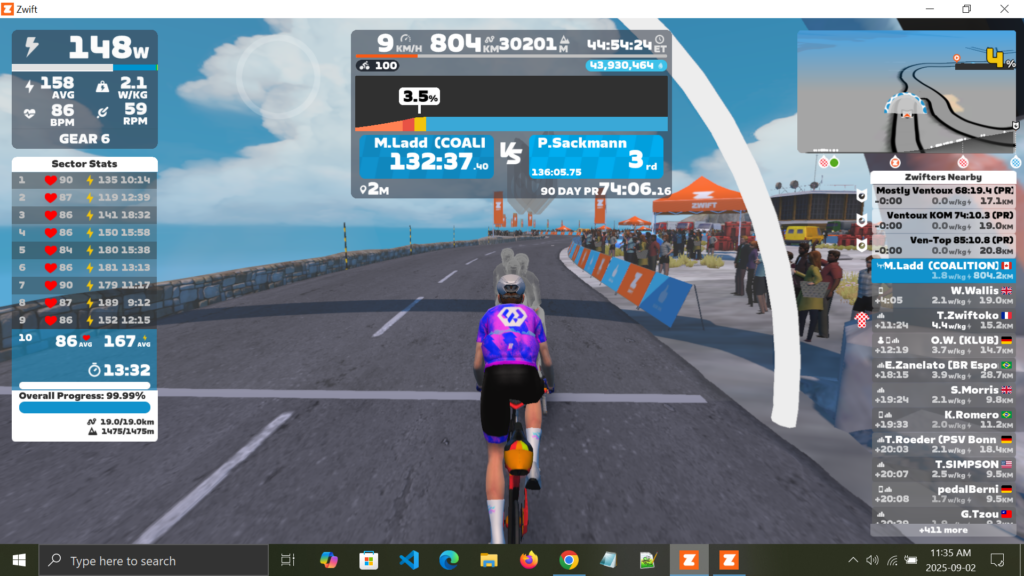
In late June, Matt launched what may have been the most ambitious block of his year: a multi‑day effort centered around Ventop, Zwift’s virtual take on Mont Ventoux. Between June 26 and June 29, with breaks only for sleep and recovery, he climbed Ventop 18 times, riding 728 kilometers and accumulating 27,112 meters of elevation.
That’s a triple vEverest. Yes, Triple.
For many riders, that would stand as a career highlight. For Matt, it was momentum.
Two months later, he returned to Ventop and went even bigger. From August 29 to September 2, he climbed the mountain 20 times in one continuous effort, totaling 30,206 meters of elevation—creeping into the rarefied air of near‑quadruple Everesting territory.
Those monster rides didn’t exist in isolation. They were layered into months that were already pushing the limits of what seemed possible.
July: Chasing Tourmalets and Le Tour
July became its own chapter. Matt called it “Chasing Tourmalets.” Over the course of the month, he climbed Zwift’s Col du Tourmalet 60 times (at 125% no less), finishing July with 101,618 meters of total elevation gain.
One ride stood out even among that chaos: 352 kilometers, 10 Tourmalets, and 15,555 meters of climbing over roughly 21 hours, broken only by a brief two‑hour nap.
Then came the Tour de France.
As the professional peloton battled across France, Matt decided to replicate—and surpass—the race’s climbing totals on Zwift. By the time he finished, he had ridden 2,077 kilometers and climbed 89,263 meters, nearly double the Tour’s actual elevation gain. He completed the challenge a full week before the real race ended.
August pushed the year into another dimension.

A Restless August
In 31 days, Matt climbed 130,026 meters, exceeding his previous monthly best by nearly 50,000 meters. Somewhere inside that relentless block, the numbers quietly flipped. The deficit disappeared. By early September, Matt was no longer chasing the million meter pace.
Another detail makes the project even harder to comprehend: there were no rest days. There simply isn’t time for rest when each day you’re off the bike leaves you 2,740 meters you need to tack on to other days.
Matt’s Strava may suggest occasional days off, but those were artifacts of multi‑day Everesting efforts logged as single activities. In reality, Matt was active every day. The very few that were on the bike were when he was running—often commuting 9 to 15 kilometers with a 20‑liter pack, frequently at paces faster than 4:30 per kilometer.
His last true rest day was December 20, 2024.
Achievement Unlocked
As autumn turned into winter, milestones and meters continued to stack up. In October, Matt logged 35,200 meters in just nine days during FRR’s Matt Ladd Challenge. On December 16, he crossed 2.5 million lifetime meters of climbing on Zwift. Nearly one-third had come in 2025!
And then, on December 26, during yet another climb—because of course it was on a climb—it finally happened.
Mads Matt passed one million vertical meters for the year.
By New Year’s Eve, the final total stood at 1,020,002 meters for good measure. He finished the year with 10 official Everestings on everesting.com’s Hall of Fame, nine of them earned during 2025 alone. That total ranks second all‑time globally for annual climbing on Zwift, behind only Keith Roy and ahead of ultra‑endurance standout Jack Thompson.
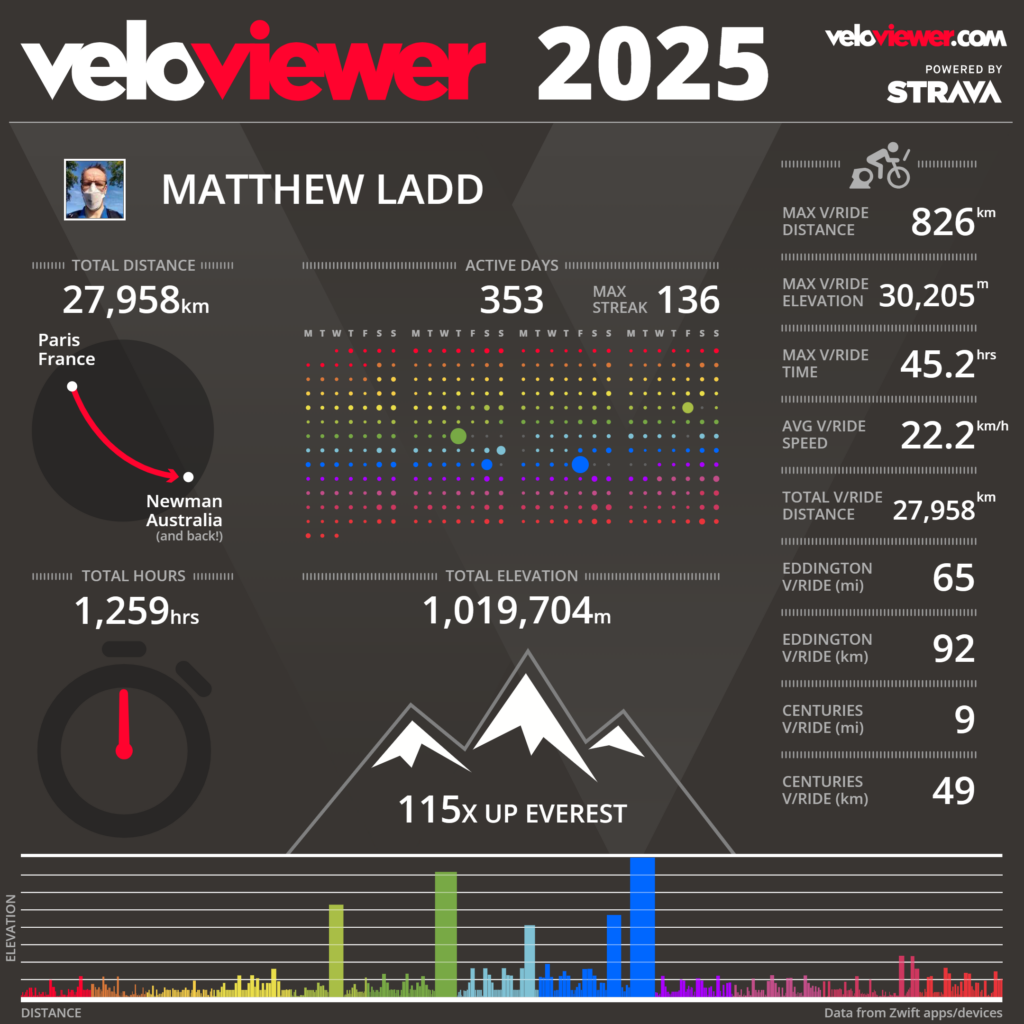
For most riders, a year like that would mark the end of the story. For Matt, it’s simply a waypoint. Since April 2024, he has climbed more than 1.5 million meters, and the next target is already set: three million total meters on Zwift by June 2026. Along the way, he credits the Coalition and FRR communities for helping keep motivation high through the biggest days and the hardest climbs.
A million meters in a year isn’t something many riders will ever attempt, let alone complete. But on a platform built around ambitious challenges—route badges, virtual competitions, and endurance epics—it’s a reminder of what’s possible when someone keeps showing up.
One climb at a time.
After Discord fiasco, age-check tech promises privacy by running locally. Does it work?
Last month, Discord quickly backpedaled after it announced that an age-verification system would roll out globally.
Discord’s reversal followed a widespread user backlash, which also intensified scrutiny of the platform’s age-check partners. Suddenly, these often-overlooked players in the “age-assurance” ecosystem had to defend their tech or risk losing major contracts.
The whole saga shone a harsh spotlight on the current problems with age-verification tech—and on the technical solutions aiming to make the whole process both secure and private.
Your [Checks Notes] PlayStation 3 Just Got An Update

Sony just rolled out its annual patch for the 2006 console, to both support and break games preservation