It’s the worst feeling in the world: waking up and realising you forgot to put your electric car on charge overnight. What do you do now? Dig a bike out of the shed? Wait four hours until there’s enough juice in the battery to get you where you need to be? Neither option works if you’re running late. If only there were a way to automate the process, so that when you park up, the charger find its way to the charging port on its own. That would make life so much easier.
This is quite the build
Of course, this is all conjecture, because I drive a car made in the same year I started university. Not even the windows go up and down automatically. But I can dream, and I still love this automatic Tesla charger built with Raspberry Pi.
Wait, don’t Tesla make those already?
Back in 2015 Tesla released a video of their own prototype which can automatically charge their cars. But things have gone quiet, and nothing seems to be coming to market any time soon – nothing directly from Tesla, anyway. And while we like the slightly odd snake-charmer vibes the Tesla prototype gives off, we really like Pat’s commitment to spending hours tinkering in order to automate a 20-second manual job. It’s how we do things around here.
This video makes me feel weird
Electric vehicle enthusiast Andrew Erickson has been keeping up with the prototype’s whereabouts, and discussed it on YouTube in 2020.
How did Pat build his home-made charger?
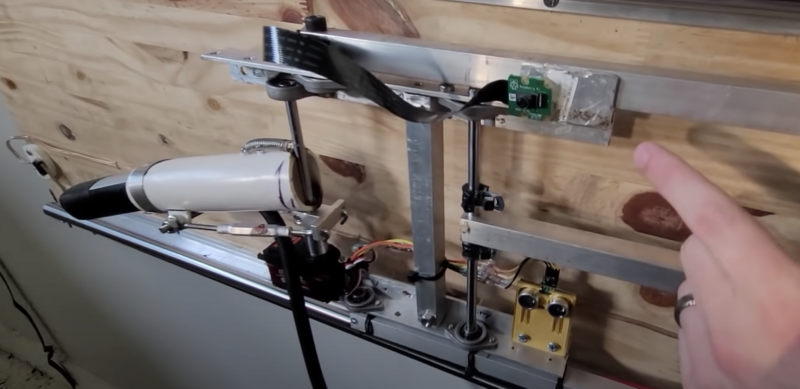
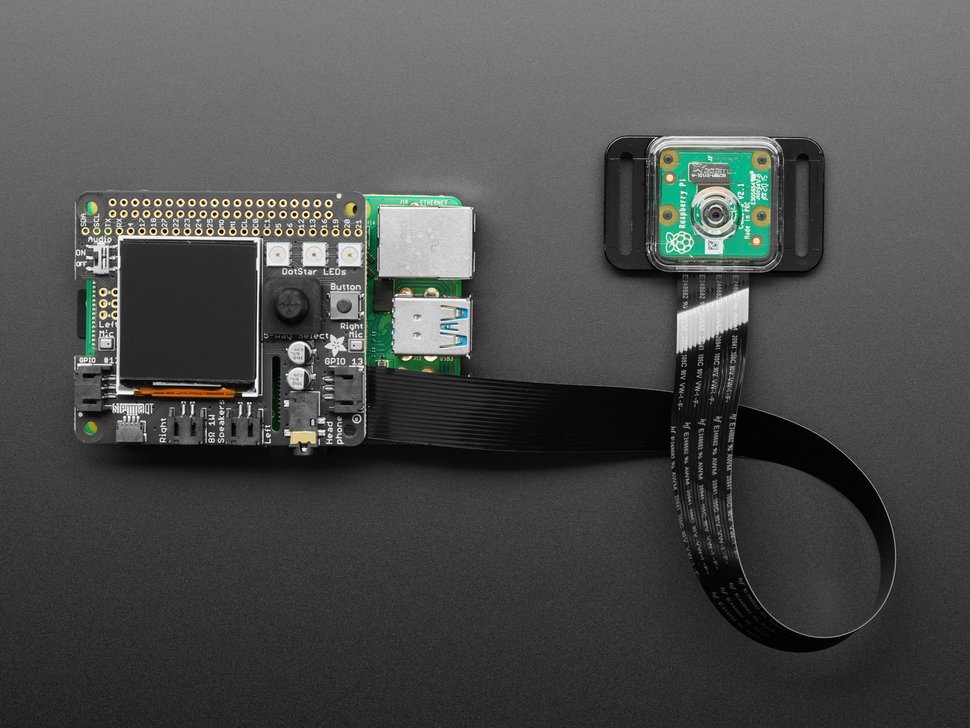
Tired of waiting on Tesla, Pat took matters into his own hands and developed a home-made solution with Raspberry Pi 4. Our tiny computer is the “brains of everything”, and is mounted to a carriage on Pat’s garage wall.
The entire rig mounted to Pat’s garage wall
There’s a big servo at the end of the carriage, which rotates the charging arm out when it’s needed. And an ultrasonic distance sensor ensures none of the home-made apparatus hits the car.
Big white thing on the left is the charging arm. Pat pointing to the little green Raspberry Pi camera module up top. And the yellow box at the bottom is the distance sensor
How does the charger find the charging port?
A Raspberry Pi Camera Module takes photos and sends them back to a machine learning model (Pat used TensorFlow Lite) running on his Raspberry Pi 4. This is how the charging arm finds its way to the port. You can watch the model in action from this point in the build video.
“Marco!” “Polo!” “Marco!” “Polo!”
Top stuff, Pat. Now I just need to acquire a Tesla from somewhere so I can build one for my own garage. Wait, I don’t have a garage either…
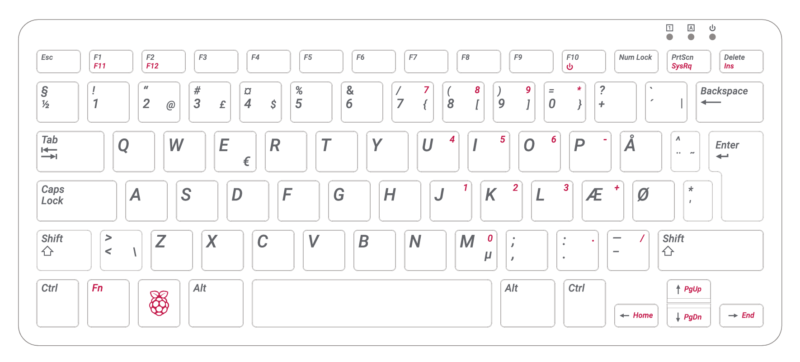
Raspberry Pi 400 hasn’t even celebrated its first birthday yet (remember the launch in November?), but at only 249 days old, it already has ten variants to choose from.
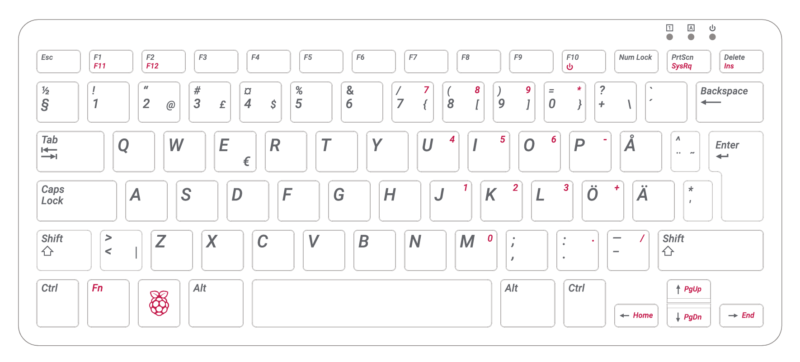
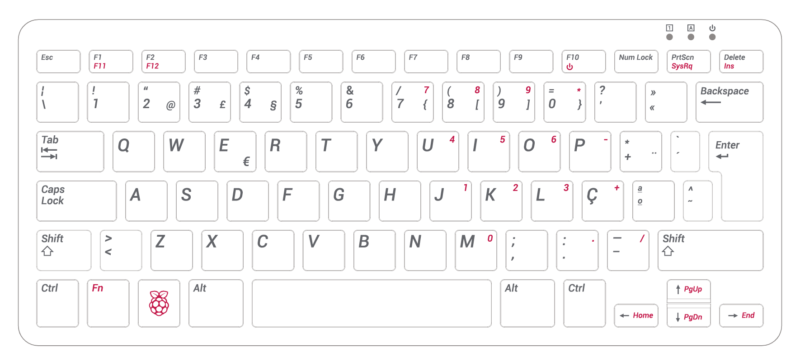
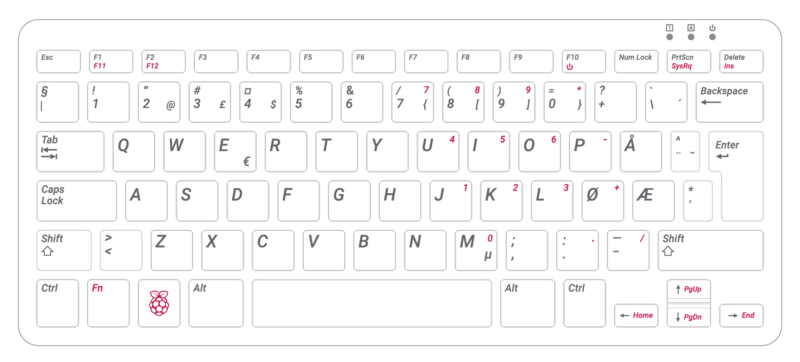
At launch, users could choose between English (UK and US), French, Italian, German, and Spanish keyboard layouts, and the new variants support Portuguese, Danish, Swedish and Norwegian. With a variant for Japan coming soon, Raspberry Pi 400 will soon be available with the same range of layouts as our official keyboard.
The nail varnish that shook the internet
Can we see?
Here are the keyboard layouts of the four new variants, so you can take a closer look.
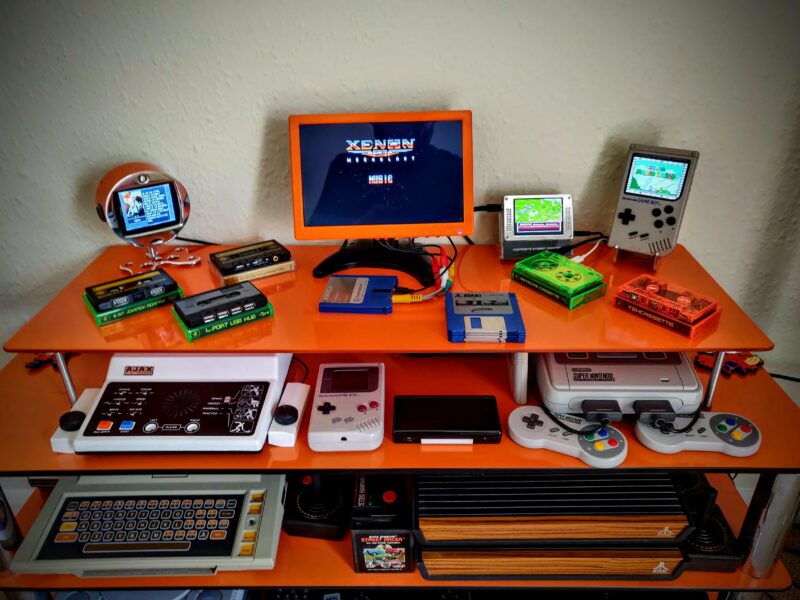
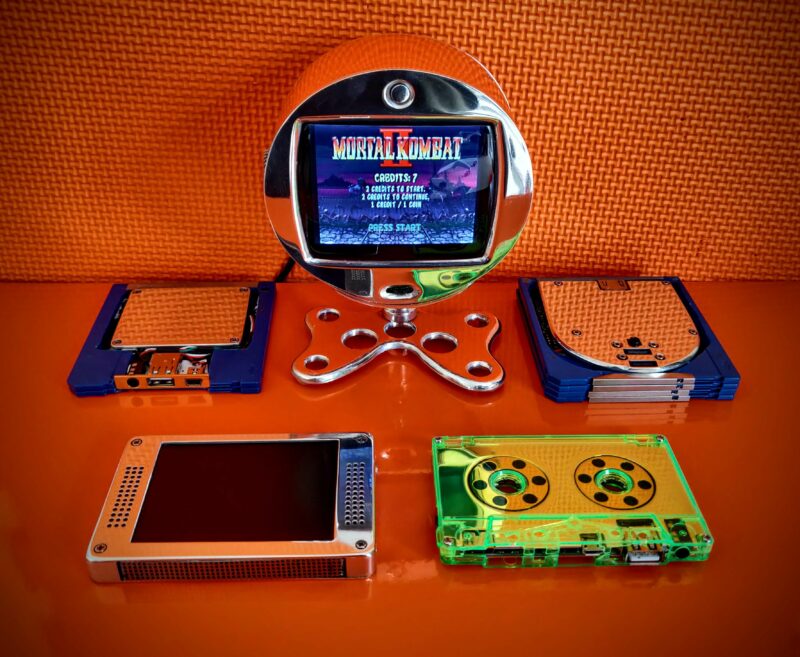
During lockdown, Stuart (aka JamHamster) wanted to keep busy whilst between jobs, and ended up building a mini empire of rescued retro systems. Cassette tapes, Game Boys, and floppy disks were all among the treasures he reclaimed.
Stuart calls this the “shelf of deceit” – where nothing is what it appears to be
Cassette tape starter
Stuart got started by fitting a TZXDuino tape loader into a cassette tape shell. Remember those? This allows him to load software onto a ZX Spectrum by inserting a tape into the tape deck, just as Nature intended. He has since improved the design (check out V2 on YouTube) and carefully documented it on GitHub, so people can build their own.
Here’s how the cassette tape project went down
With that first project in the bag and getting attention on a Facebook group (Spectrum for Everyone), Stuart went forth and sourced more retro tech to revive with tiny pieces of new technology.
Twitter lit up for Stuart’s retrofit cassette tape
Enter Raspberry Pi
Then Stuart discovered our tiny computer and realised there was heaps of scope for hiding them inside older tech. Although we can’t quite officially endorse Stuart’s method of “carefully” removing a port on his Raspberry Pi – it’ll void your warranty – we will say that we like people who go about intentionally voiding their warranties. It’s a cool video.
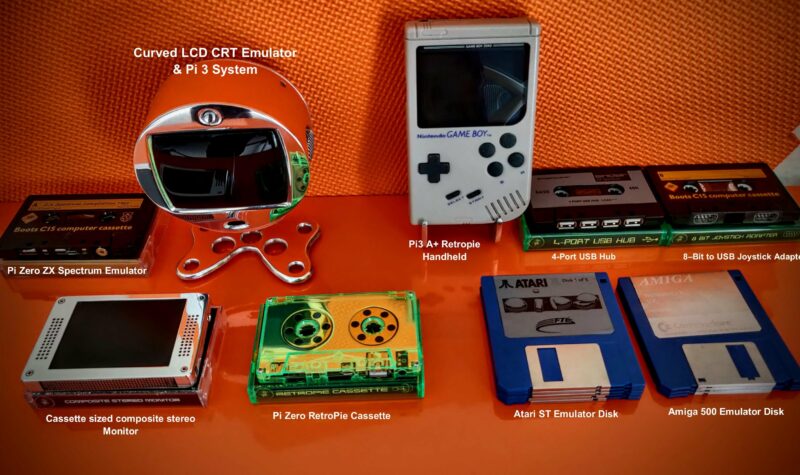
You can see all the modern devices labelled alongside the retro tech they’re encased in
He has since created loads of retrofit projects with Raspberry Pi. Let’s take a quick look at a few of them.
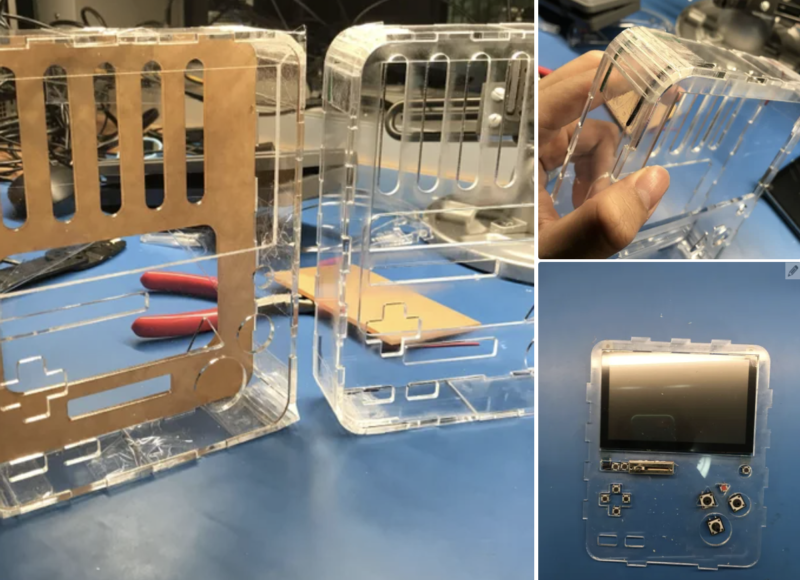
First up is a Game Boy build with a Raspberry Pi 3 Model A+. Stuart built an aluminium chassis from scrap, and this sandwiches the Raspberry Pi to hold it in place inside the Game Boy enclosure, as well as acting as a heatsink. There’s a grille in the cartridge and he also added four rear buttons. The hardest part of this build, apparently, was soldering the custom HDMI cable.
Better-than-real CRT screen
Stuart liked the look of an old-fashioned CRT (cathode-ray tube) screen for playing retro games on, but they chew through energy and aren’t that portable. So he had the idea to make a space-efficient LCD system that sits on a desktop and just looks like a retro TV.
Wait for the heroes in half-shells at the end
This project features a 3.5-inch screen of the type that’s usually found on a car dashboard to help the driver to reverse. Stuart converted it to 5V, and added a cut-down Raspberry Pi 3 and a custom-machined chassis. A custom-ground curved lens makes it look like a real CRT, and he added ports on the back for two Atari joysticks, as well as an external composite input and USB.
This Raspberry Pi-powered “CRT” display has two onboard Atari joystick ports and plenty of connectors for other machines
Stuart’s sister gave him her Game Gear to fix, but the batteries leaked and killed it so he converted it to a Raspberry Pi 3B portable gaming system. And because it was for his sister, he went all out, spending six weeks refining it.
He also ended up rewriting elements of the Arduino Joystick library for responsiveness and ease of configuration. Here’s the Github link for those interested in that part of the build.
Check out the carnage that Stuart rescued with Raspberry Pi 3B
RetroPie cassette
Stuart’s latest cassette build features a Raspberry Pi Zero running RetroPie. He wanted to make one with a transparent case, so he encased the Raspberry Pi in a heatsink sandwich to hide the wiring. He added a full-size USB port and a 3.5 mm media connector for sound and visuals. Here are some shots of the inside.
I love the 80s green
Try new things, expect failure, enjoy the process
There were far too many cracking retro builds for us to list here, so follow Stuart on Twitter @RealJamHamster and subscribe to JamHamster on YouTube to properly check everything out.
They need hefty heatsinks, but Stuart likes working with metal and had fun with some of the designs
Makers, tinkerers, and crafters don’t always have a practical reason for embarking on projects, and Stuart is no different. Here’s what he had to say about why projects like this make him happy:
“I will be happy to admit that I have no clue what I’m doing most of the time, and I am by no means an expert, but I believe everyone should try new things as you never know what you’ll be good at. 9 out of 10 of my ideas don’t work but that tenth one is generally pretty good. I’ve been between roles during lockdown so I am building these out of scrap metal and whatever I have lying around, which is an extra challenge. My philosophy is to try new things, expect failure, learn to enjoy the process and that it’ll be done when it’s done.”
Has your fitness suffered during locked down? Have you been able to keep up diligently with your usual running routine? Maybe you found it easy to recreate you regular gym classes in your lounge with YouTube coaches. Or maybe, like a lot of us, you’ve not felt able to do very much at all, and needed a really big push to keep moving.
Maker James Wong took to Raspberry Pi to develop something that would hold him accountable for his daily HIIT workouts, and hopefully keep his workouts on track while alone in lockdown.
What is a HIIT workout?
HIIT is the best kind of exercise, in that it doesn’t last long and it’s effective. You do short bursts of high-intensity physical movement between short, regular rest periods. HIIT stands for High Intensity Interval Training.
James’s model can detect how well you perform a burpee, as well as many other exercise movements
James was attracted to HIIT during lockdown as it didn’t require any gym visits or expensive exercise equipment. He had access to endless online training sessions, but felt he needed that extra level of accountability to make sure he kept up with his at-home fitness regime. Hence, HIIT Pi.
So what does HIIT Pi actually do?
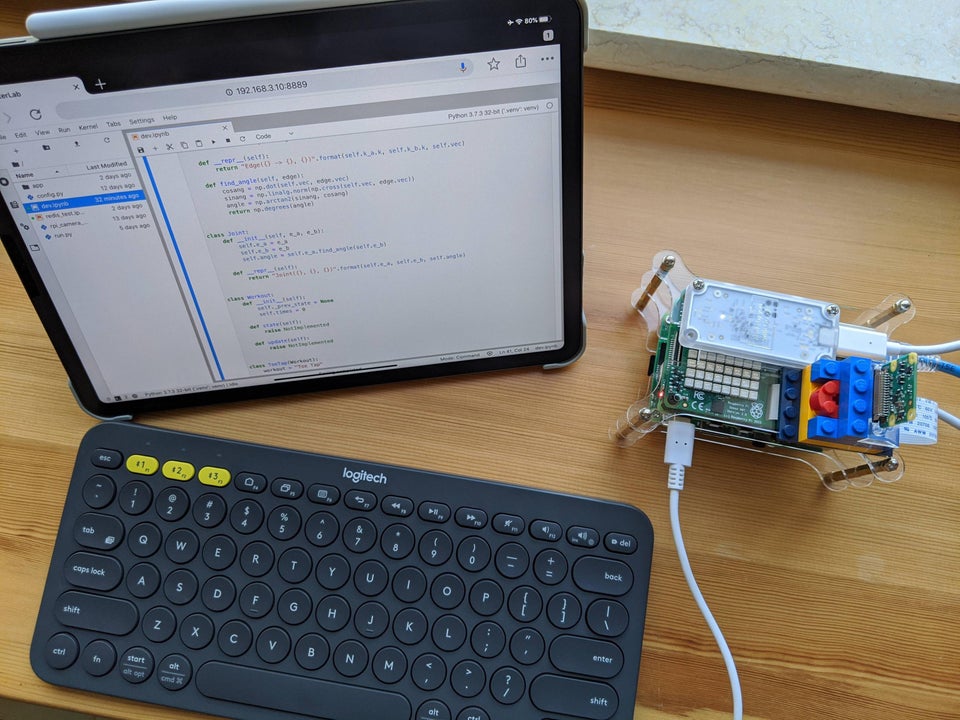
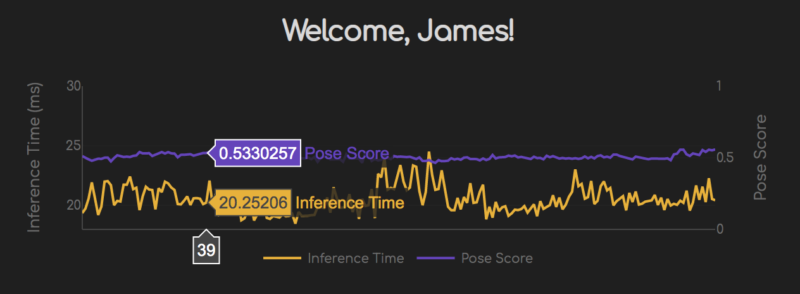
HIIT Pi is a web app that uses machine learning on Raspberry Pi to help track your workout in real time. Users can interact with the app via any web browser running on the same local network as the Raspberry Pi, be that on a laptop, tablet, or smartphone.
An iPad accessing a remote server running on James’s Raspberry Pi
HIIT Pi is simple in that it only does two things:
Uses computer vision to automatically capture and track detected poses and movement
Scores them according to a set of rules and standards
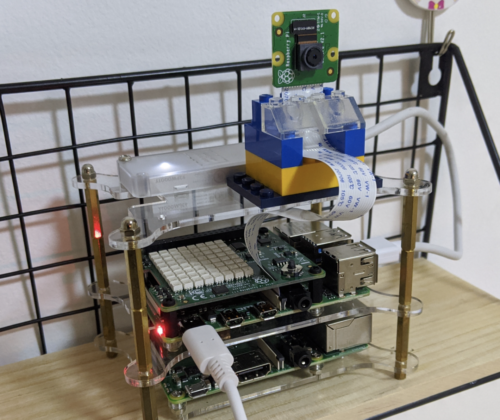
HIIT Pi is watching you via a Raspberry Pi camera module (top right)
So, essentially, you’ve got a digital personal trainer in the room monitoring your movements and letting you know whether they’re up to standard and whether you’re likely to achieve your fitness goals.
James calls HIIT Pi an “electronic referee”, and we agree that if we had one of those in the room while muddling through a Yoga With Adriene session on YouTube, we would try a LOT harder.
How does it work?
A Raspberry Pi camera module streams raw image data from the sensor roughly at 30 frames per second. James devised a custom recording stream handler that works off this pose estimation model and takes frames from the video stream, spitting out pose confidence scores using pre-set keypoint position coordinates.
HIIT Pi uses Dash, a laudable open source tool from the Plotly team
James’s original project post details the inner workings. You can also grab the code needed to create your own at-home Raspberry Pi personal trainer.
If you loved the film Finding Dory, you might just enjoy the original story of these underwater robots, fresh out of the latest issue of The MagPi Magazine.
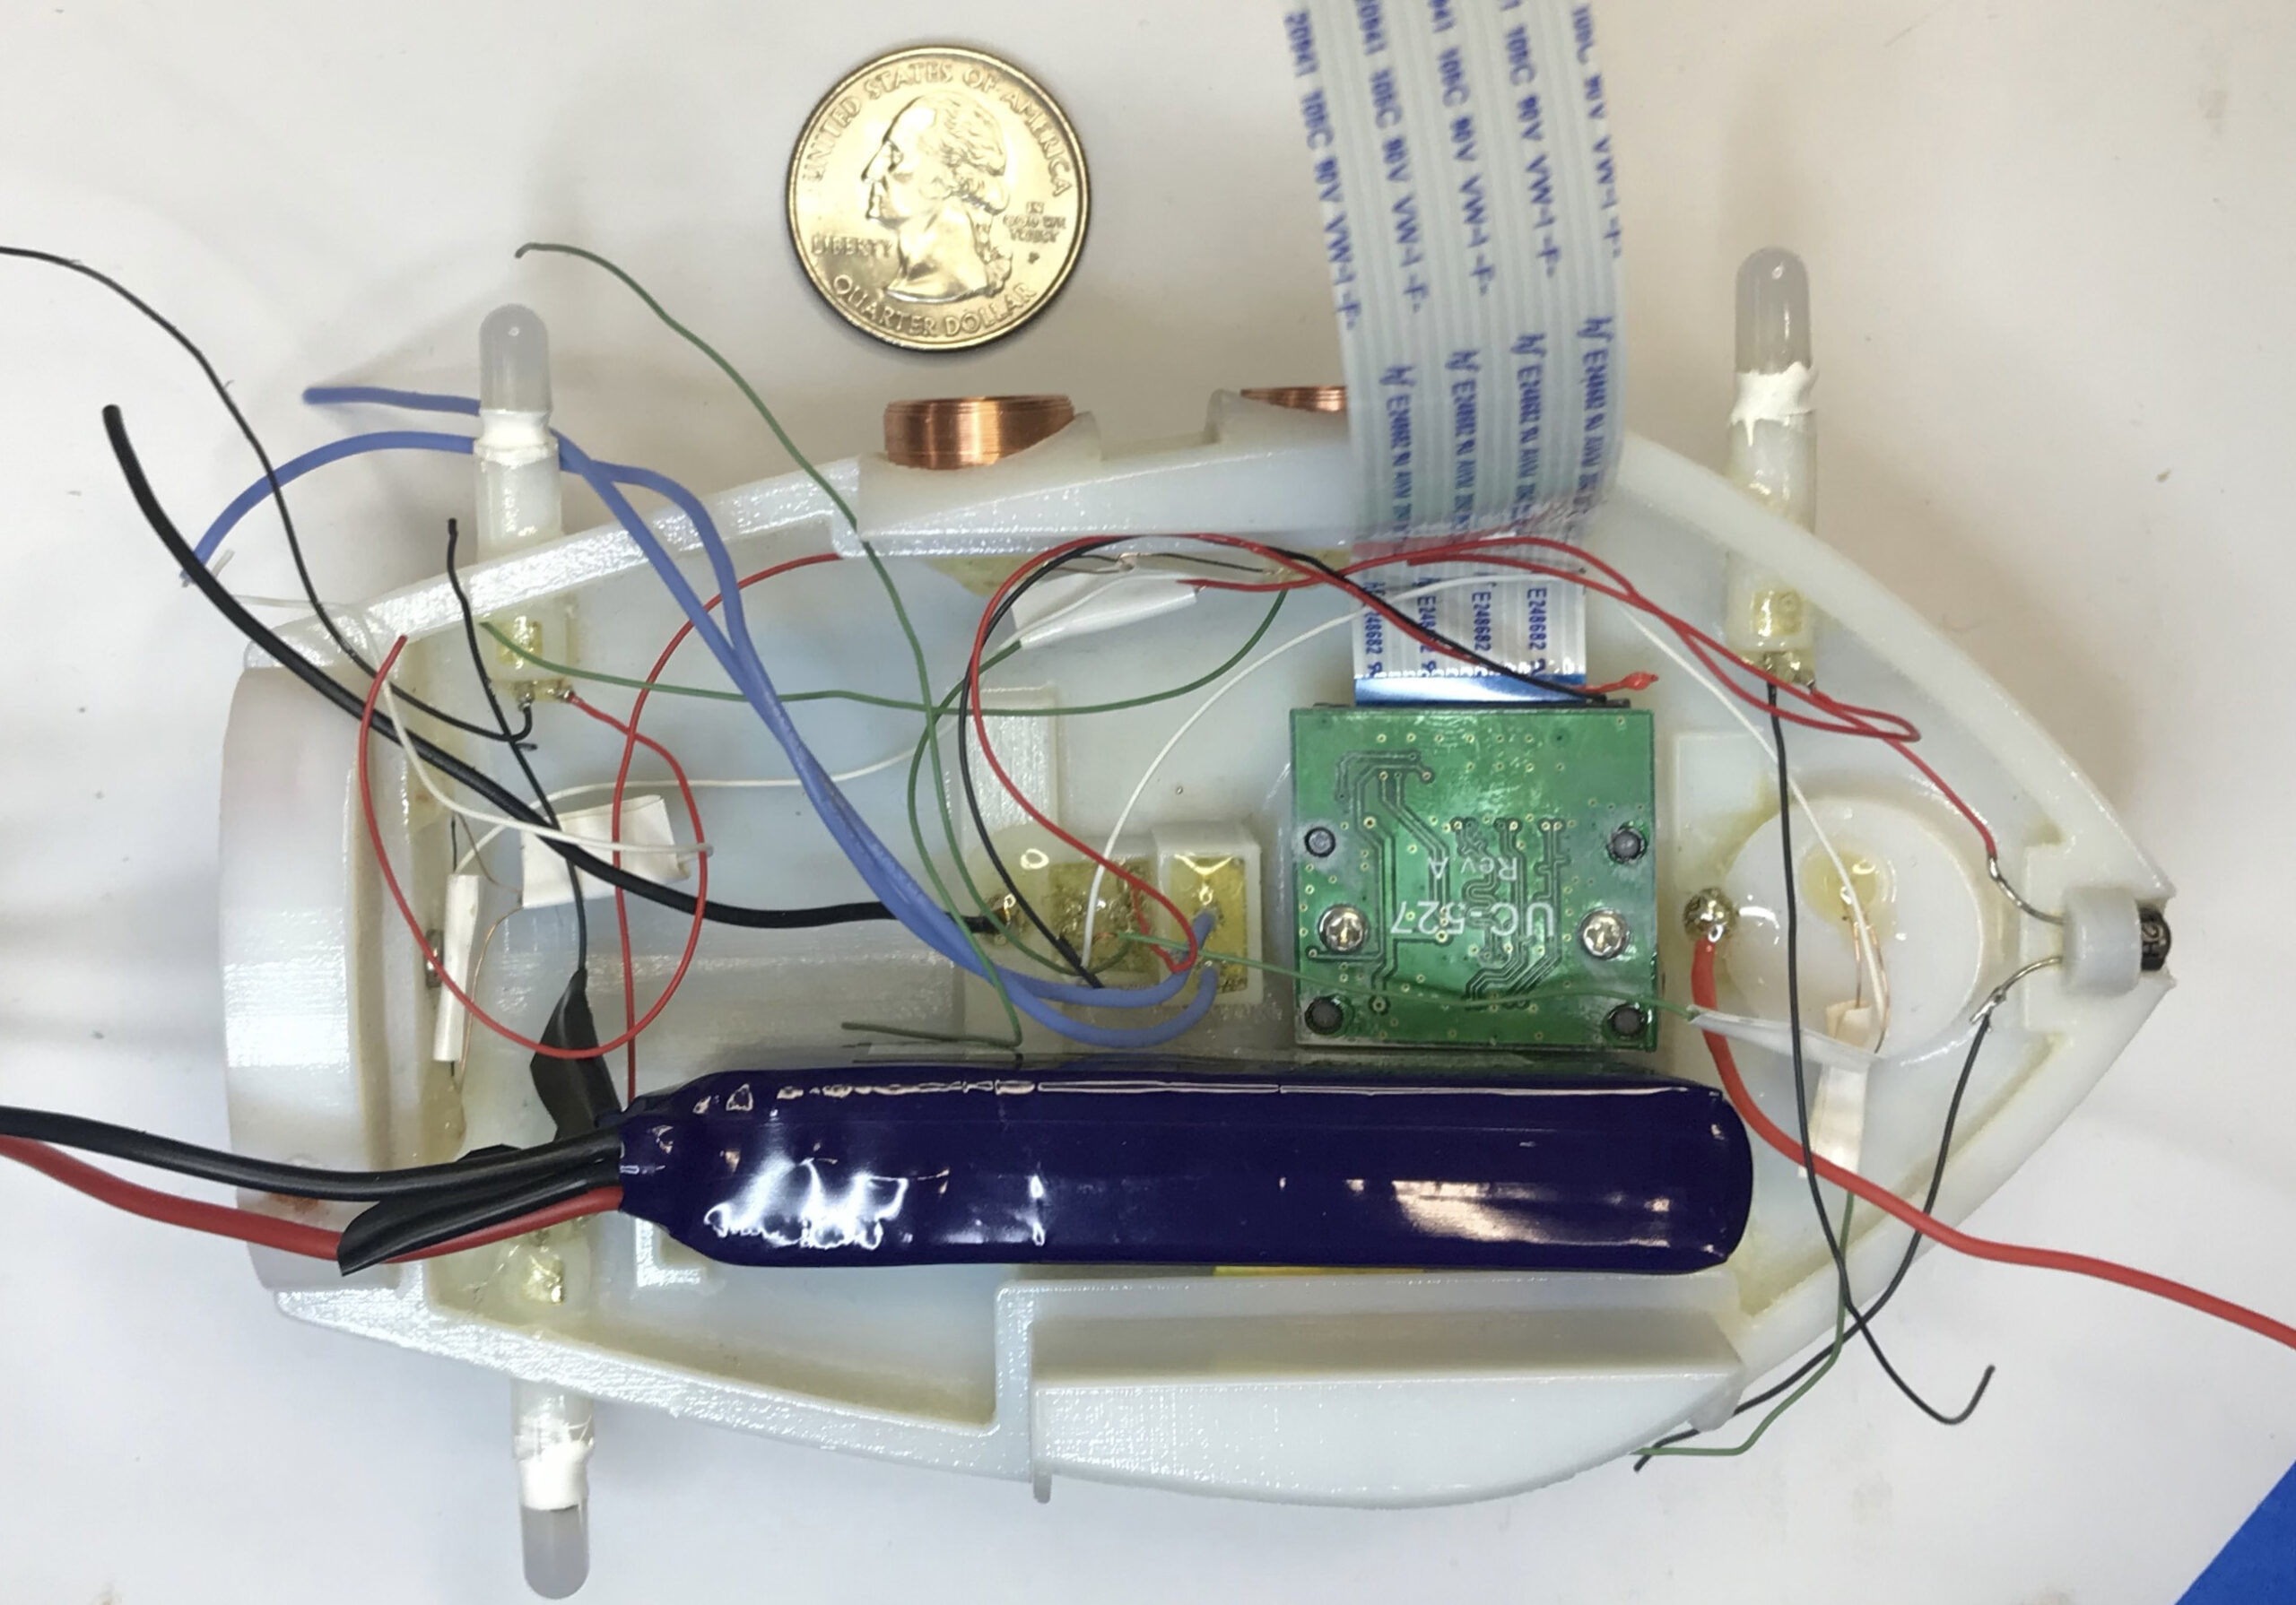
It’s no coincidence that the shoal of robot fish in this Raspberry Pi Zero W project look more than a little like Dory from Pixar’s movie. As with the film character, the Bluebot robot fish are based on the blue tang or surgeonfish. Unlike Dory, however, these robot fish are designed to be anything but loners. They behave collectively, which is the focus of the Blueswarm research project that began in 2016 at Harvard University.
The Blueswarm team designed a PCB and wrote custom Python code for their subterranean Raspberry Pi experiments
Florian Berlinger and his PhD research project colleagues Radhika Nagpal, Melvin Gauci, Jeff Dusek, and Paula Wulko set out to investigate the behaviour of a synchronised group of underwater robots and how groups of such robot fish are co‑ordinated by observing each other’s movements. In the wild, birds, fish, and some animals co-ordinate in this way when migrating, looking for food and as a means of detecting and collectively avoiding predators. Simulations of such swarm behaviour exist, but Blueswarm has the additional challenge of operating underwater. Raspberry Pi Zero W works well here because multiple Bluebot robots can be accessed remotely over a secure wireless connection, and Raspberry Pi Zero W is physically small and light enough to fit inside a palm-sized robot.
Mimicking movements
The team designed the fish-inspired, 3D-printed robot body as well as the fin-like actuators and the on-board printed circuit board which connects to all the electronics and communicates with Raspberry Pi Zero W. Designing the robot fish took the team four years, from working out how each robot fish would move and adding sensing capabilities, to refining the design and implementing collective behaviours, coded using Python 3.
The Blueswarm team designed a PCB and wrote custom Python code for their subterranean Raspberry Pi experiments
They used as many off-the-shelf electronics as possible to keep the robots simple, but adapted existing software algorithms for the purposes of their investigations, “with several clever twists on existing algorithms to make them run fast on Raspberry Pi,” adds Florian.
On-board cameras that offer “an amazing 360-degree field of view” are one of the project’s real triumphs. These cameras are connected to Raspberry Pi via a duplexer board (so two cameras can operate as one) the project team co-designed with Arducam. Each Raspberry Pi Zero W inside follows the camera images and instructs the fins to move accordingly. The team developed custom algorithms for synchronisation, flocking, milling, and search behaviours to simulate how real fish move individually and as a group. As a result, says Florian, “Blueswarm can be used to study inter-robot co-ordination in the laboratory and to learn more about collective intelligence in nature.” He suggests other robot-based projects could make use of a similar setup.
Imitation of life
Each robot fish cost around $250 and took approximately six hours to make. To make your own, you’d need a 3D printer, Raspberry Pi Zero W, a soldering station – and a suitably large tank for your robot shoal! Although the team hasn’t made the code available, the Blueswarm project paper has recently been published in Science Robotics and by the IEEE Robots and Automation Society. Several biology researchers have also been using the Bluebot shoal as ‘fish surrogates’ in their studies of swimming and schooling.
It may look cute, but Bluebot has a serious purpose
The MagPi #107 out NOW!
You can grab the brand-new issue right now from the Raspberry Pi Press store, the Raspberry Pi Store, Cambridge, or via our app on Android or iOS. You can also pick it up from supermarkets and newsagents. There’s also a free PDF you can download.
Our friends over at RealVNC are having a whale of a time with Raspberry Pi, so they decided to write this guest blog for us. Here’s what they had to say about what their VNC Connect software can do, and how Raspberry Pi can be integrated into industry. Plus, hear about a real-life commercial example.
What is VNC Connect?
RealVNC’s VNC Connect is a secure way for you to control your Raspberry Pi from anywhere, as if you were sat in front of it. This is particularly useful for Raspberry Pis which are running ‘headless’ without monitor connected. The desktop can instead be presented in the VNC Connect Viewer app on, say, a wirelessly-connected iPad, from which you have full graphical control of the Raspberry Pi. The two devices do not even have to be on the same local network, so you can take remote control over the Internet. Which is great for roaming robots.
You can read more about RealVNC for Raspberry Pi here. It’s free to get started for non-commercial use.
Commercial potential
RealVNC have seen an increase in the use of Raspberry Pi in business, not just at home and in education. Raspberry Pi, combined with VNC Connect, is helping businesses both to charge for a service that they couldn’t previously provide, and to improve/automate a service they already offer.
We’ll get to the solar panels next… (this photo makes sense, honestly)
For example, Raspberry Pi is a useful, as well as a cost effective, “edge device” in complex hardware environments that require monitoring – a real IoT use case! Add VNC Connect, and the businesses which perform these hardware installations can provide monitoring and support services on a subscription basis to customers, building repeat revenue and adding value.
With VNC Connect being offered at an affordable price (less than the price of a cup of coffee per month for a single device), it doesn’t take these businesses long to make a healthy return.
A commercial example: monitoring solar panels
Centurion Solar provides monitoring software for home solar panels. Each installation is hooked up via USB to a Raspberry Pi-powered monitoring system, and access is provided both to the customer and to Centurion Solar, who run a paid monitoring and support service.
Monitoring solar panels online with Centurion Solar
Having every new system leave the factory pre-installed with VNC Connect allows Centurion Solar to provide assistance quickly and easily for customers, no matter where they are, or how tech-savvy they are (or aren’t).
The software is currently being used in over 15,000 systems across 27 countries, with more new users every week.
“We’ve gone from being in limp mode to overdrive in one easy step, using RealVNC as the driving force to get us there.”
There are many more industry sectors which could be considering Raspberry Pi as a lightweight and convenient monitoring/edge compute solution, just like Centurion Solar do. For example:
Energy
Manufacturing
Healthcare
Transport
Agriculture
Critical National Infrastructure
Remember this blog about how Raspberry Pi is a versatile tool for biological sciences?
The possibilities are only limited by imagination, and the folks down the road at RealVNC are happy to discuss how using Raspberry Pi in your environment could be transformative. You can reach us here.
From the engineers to the CEO, we’re all Raspberry Pi enthusiasts who love nothing more than sharing our experience and solving problems (our CEO, Adam, even publishes a popular bare-metal Raspberry Pi operating system tutorial on Github).
I speak English. Super well. And I can read the rough, overall vibe of writing in French. I can also order beer and taxis in Spanish. Alas, my dog can do none of these things, and we are left in communication limbo. I try asking them (in English) why they’re so mean to that one Cockapoo who lives across the road, or why they don’t understand the importance of the eyedrops the vet insists I have to hold their eyelids open to administer. They just respond with a variety of noises that I cannot translate. We need to fix this, and thankfully NerdStroke has harnessed Raspberry Pi to build a solution.
NerdStroke’s YouTube channel is new, but good. Subscribe to it! (Video features some bleeped-out strong language, as well as one unbleeped mild swear)
How does it work?
The dog wears a harness with a microphone that picks up its barks. The barks get processed through a device that determines what the dog is saying and then outputs it through speakers.
Raspberry Pi Zero is the affordable brain powering NerdStroke’s solution to this age-old human-and-pup problem. But writing code that could translate the multitude of frequencies coming out of a dog’s mouth when it barks was a trickier problem. NerdStroke tried to work it through on Twitch with fellow hobbyists, but alas, the original dream had to be modified.
The kit worked fine – it was the coding challenge that changed the course of this project
Spoiler alert: fast Fourier transforms did not work. You would need a clear, pure tone for that to work in a project like this, but as we said above, dogs bark in a rainbow of tones, pitches, and all the rest.
So what’s the solution?
Because of this, a time-based model was devised to predict what a dog is likely to be barking about at any given time of day. For example, if it’s early morning, they probably want to go out to pee. But if it’s mid-morning, they’re probably letting you know the postman has arrived and is trying to challenge your territory by pushing thin paper squares through the flap in your front door. It’s a dangerous world out there, and dogs just want to protect us.
Nerdstroke had his good friend record some appropriate soundbites to go with each bark, depending on what time of day it happened. And now, Nugget the dog can tell you “I want to cuddle” or “Why aren’t you feeding me?”
Same, Nugget, same
While the final project couldn’t quite translate the actual thoughts of a dog, we love the humour behind this halfway solution. And we reckon the product name, Holler Collar, would definitely sell.
Follow NerdStroke’s future projects
NerdStroke is all over the socials, so follow them on your platform of choice:
Code an homage to Konami’s classic shoot-’em-up, Gradius. Mark Vanstone has the code in the new edition of Wireframe magazine, available now.
Released by Konami in 1985, Gradius – also known as Nemesis outside Japan – brought a new breed of power-up system to arcades. One of the keys to its success was the way the player could customise their Vic Viper fighter craft by gathering capsules, which could then be ‘spent’ on weapons, speed-ups, and shields from a bar at the bottom of the screen.
The Gradius volcanoes spew rocks at the player just before the end-of-level boss ship arrives.
Flying rocks
A seminal side-scrolling shooter, Gradius was particularly striking thanks to the variety of its levels: a wide range of hazards were thrown at the player, including waves of aliens, natural phenomena, and boss ships with engine cores that had to be destroyed in order to progress. One of the first stage’s biggest obstacles was a pair of volcanoes that spewed deadly rocks into the air: the rocks could be shot for extra points or just avoided to get through to the next section. In this month’s Source Code, we’re going to have a look at how to recreate the volcano-style flying rock obstacle from the game.
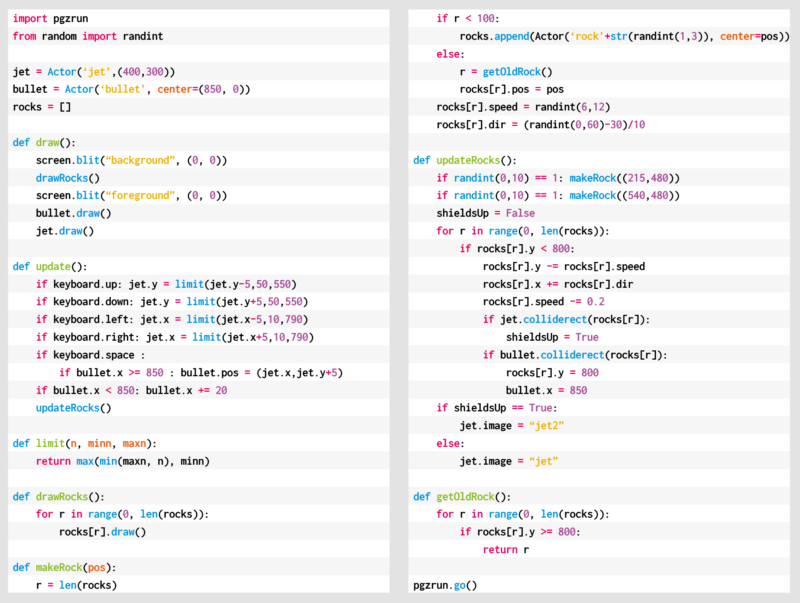
Our sample uses Pygame Zero and the randint function from the random module to provide the variations of trajectory that we need our rocks to have. We’ll need an actor created for our spaceship and a list to hold our rock Actors. We can also make a bullet Actor so we can make the ship fire lasers and shoot the rocks. We build up the scene in layers in our draw() function with a star-speckled background, then our rocks, followed by the foreground of volcanoes, and finally the spaceship and bullets.
Dodge and shoot the rocks in our homage to the classic Gradius.
Get the ship moving
In the update() function, we need to handle moving the ship around with the cursor keys. We can use a limit() function to make sure it doesn’t go off the screen, and the SPACE bar to trigger the bullet to be fired. After that, we need to update our rocks. At the start of the game our list of rocks will be empty, so we’ll get a random number generated, and if the number is 1, we make a new rock and add it to the list. If we have more than 100 rocks in our list, some of them will have moved off the screen, so we may as well reuse them instead of making more new rocks. During each update cycle, we’ll need to run through our list of rocks and update their position. When we make a rock, we give it a speed and direction, then when it’s updated, we move the rock upwards by its speed and then reduce the speed by 0.2. This will make it fly into the air, slow down, and then fall to the ground.
Collision detection
From this code, we can make rocks appear just behind both of the volcanoes, and they’ll fly in a random direction upwards at a random speed. We can increase or decrease the number of rocks flying about by changing the random numbers that spawn them. We should be able to fly in and out of the rocks, but we could add some collision detection to check whether the rocks hit the ship – we may also want to destroy the ship if it’s hit by a rock. In our sample, we have an alternative, ‘shielded’ state to indicate that a collision has occurred. We can also check for collisions with the bullets: if a collision’s detected, we can make the rock and the bullet disappear by moving them off-screen, at which point they’re ready to be reused.
That’s about it for this month’s sample, but there are many more elements from the original game that you could add yourself: extra weapons, more enemies, or even an area boss.
Here’s Mark’s volcanic code. To get it working on your system, you’ll need to install Pygame Zero. And to download the full code and assets, head here.
Get your copy of Wireframe issue 52
You can read more features like this one in Wireframe issue 52, available directly from Raspberry Pi Press — we deliver worldwide.
And if you’d like a handy digital version of the magazine, you can also download issue 52 for free in PDF format.
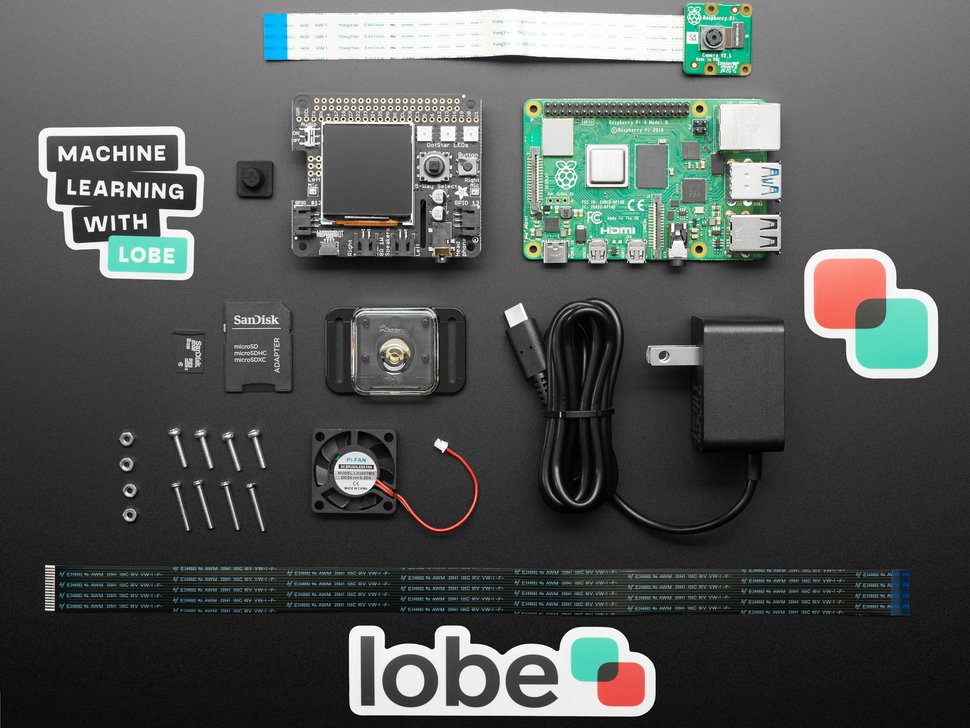
Machine learning can sound daunting even for experienced Raspberry Pi hobbyists, but Microsoft and Adafruit Industries are determined to make it easier for everyone to have a go. Microsoft’s Lobe tool takes the stress out of training machine learning models, and Adafruit have developed an entire kit around their BrainCraft HAT, featuring Raspberry Pi 4 and a Raspberry Pi Camera, to get your own machine learning project off to a flying start.
Adafruit developed this kit especially for the BrainCraft HAT to be used with Microsoft Lobe on Raspberry Pi
Adafruit’s BrainCraft HAT
Adafruit’s BrainCraft HAT fits on top of Raspberry Pi 4 and makes it really easy to connect hardware and debug machine learning projects. The 240 x 240 colour display screen also lets you see what the camera sees. Two microphones allow for audio input, and access to the GPIO means you can connect things likes relays and servos, depending on your project.
Adafruit’s BrainCraft HAT in action detecting a coffee mug
Microsoft Lobe
Microsoft Lobe is a free tool for creating and training machine learning models that you can deploy almost anywhere. The hardest part of machine learning is arguably creating and training a new model, so this tool is a great way for newbies to get stuck in, as well as being a fantastic time-saver for people who have more experience.
Get started with one of three easy, medium, and hard tutorials featured on the lobe-adafruit-kit GitHub.
This is just a quick snippet of Microsoft’s full Lobe tutorial video. Look how quickly the tool takes enough photos to train a machine learning model
‘Bakery’ identifies and prices different pastries
Lady Ada demonstrated Bakery: a machine learning model that uses an Adafruit BrainCraft HAT, a Raspberry Pi camera, and Microsoft Lobe. Watch how easy it is to train a new machine learning model in Microsoft Lobe from this point in the Microsoft Build Keynote video.
Bakery identifies different baked goods based on images taken by the Raspberry Pi camera, then automatically identifies and prices them, in the absence of barcodes or price tags. You can’t stick a price tag on a croissant. There’d be flakes everywhere.
Extra functionality
Running this project on Raspberry Pi means that Lady Ada was able to hook up lots of other useful tools. In addition to the Raspberry Pi camera and the HAT, she is using:
Three LEDs that glow green when an object is detected
A speaker and some text-to-speech code that announces which object is detected
A receipt printer that prints out the product name and the price
All of this running on Raspberry Pi, and made super easy with Microsoft Lobe and Adafruit’s BrainCraft HAT. Adafruit’s Microsoft Machine Learning Kit for Lobe contains everything you need to get started.
The full Microsoft Machine Learning Kit for Lobe with Raspberry Pi 4 kit
Watch the Microsoft Build keynote
And finally, watch Microsoft CTO Kevin Scott introduce Limor Fried, aka Lady Ada, owner of Adafruit Industries. Lady Ada joins remotely from the Adafruit factory in Manhattan, NY, to show how the BrainCraft HAT and Lobe work to make machine learning accessible.
Today we are launching an exciting series of impact stories from the community, to shine a spotlight on some of the young people who are learning and creating with technology through our educational initiatives.
Zaahra and Eesa have been learning to create technology through attending Code Club and taking part in Coolest Projects!
These stories get to the heart of our mission: to put the power of computing and digital making into the hands of people all over the world.
Designed in close collaboration with families across the world, our new series of short inspirational films showcases some of the wonderful things that young people are empowered to do when they learn to use technology to address the issues that matter to them.
We are incredibly proud to be a part of these young people’s journeys — and to see the positive impact of engaging with our free programmes, coding clubs, and resources. We can’t wait to share their unique experiences and achievements with you as we roll out the series over the next few months.
And we invite you to celebrate these young people by liking and sharing their stories on social media!
Meet Zaahra and Eesa
The first story takes you to a place not far from our home: London, UK.
Help us celebrate Zaahra and Eesa by liking and sharing their story on Twitter, Linkedin, or Facebook!
Zaahra (12) and Eesa (8) are a sister and brother coding team and live in East London. For the last four years they’ve been learning about computing and digital making by attending regular sessions at their local Code Club. Zaahra and Eesa love working as a team and using technology to solve problems around them. When they found it difficult to communicate with their grandparents in their first language, Sylheti, the siblings decided to code a language learning app called ‘Easy Sylheti’. Eesa says, “We wanted to create something that was helpful to us, but also to our family and the community.”
When Zaahra and Eesa decided to take part in the Coolest Projects online tech showcase with their app, they never expected that it would be picked as a favourite by Coolest Projects special judge Eben Upton, CEO and co-inventor of Raspberry Pi!
“I’ve discovered that I’m capable of a lot more than I thought.”
Zaahra
Describing the effect of learning to create with technology and seeing the success of their app, Zaahra declares, “I’ve discovered that I’m capable of a lot more than I thought.” And she’s using her new-found confidence to continue helping her community: Zaahra has recently taken up a role as youth member on the Newham Youth Empowerment Fund Panel.
Help us celebrate Zaahra and Eesa by liking and sharing their story on Twitter, Linkedin, or Facebook!
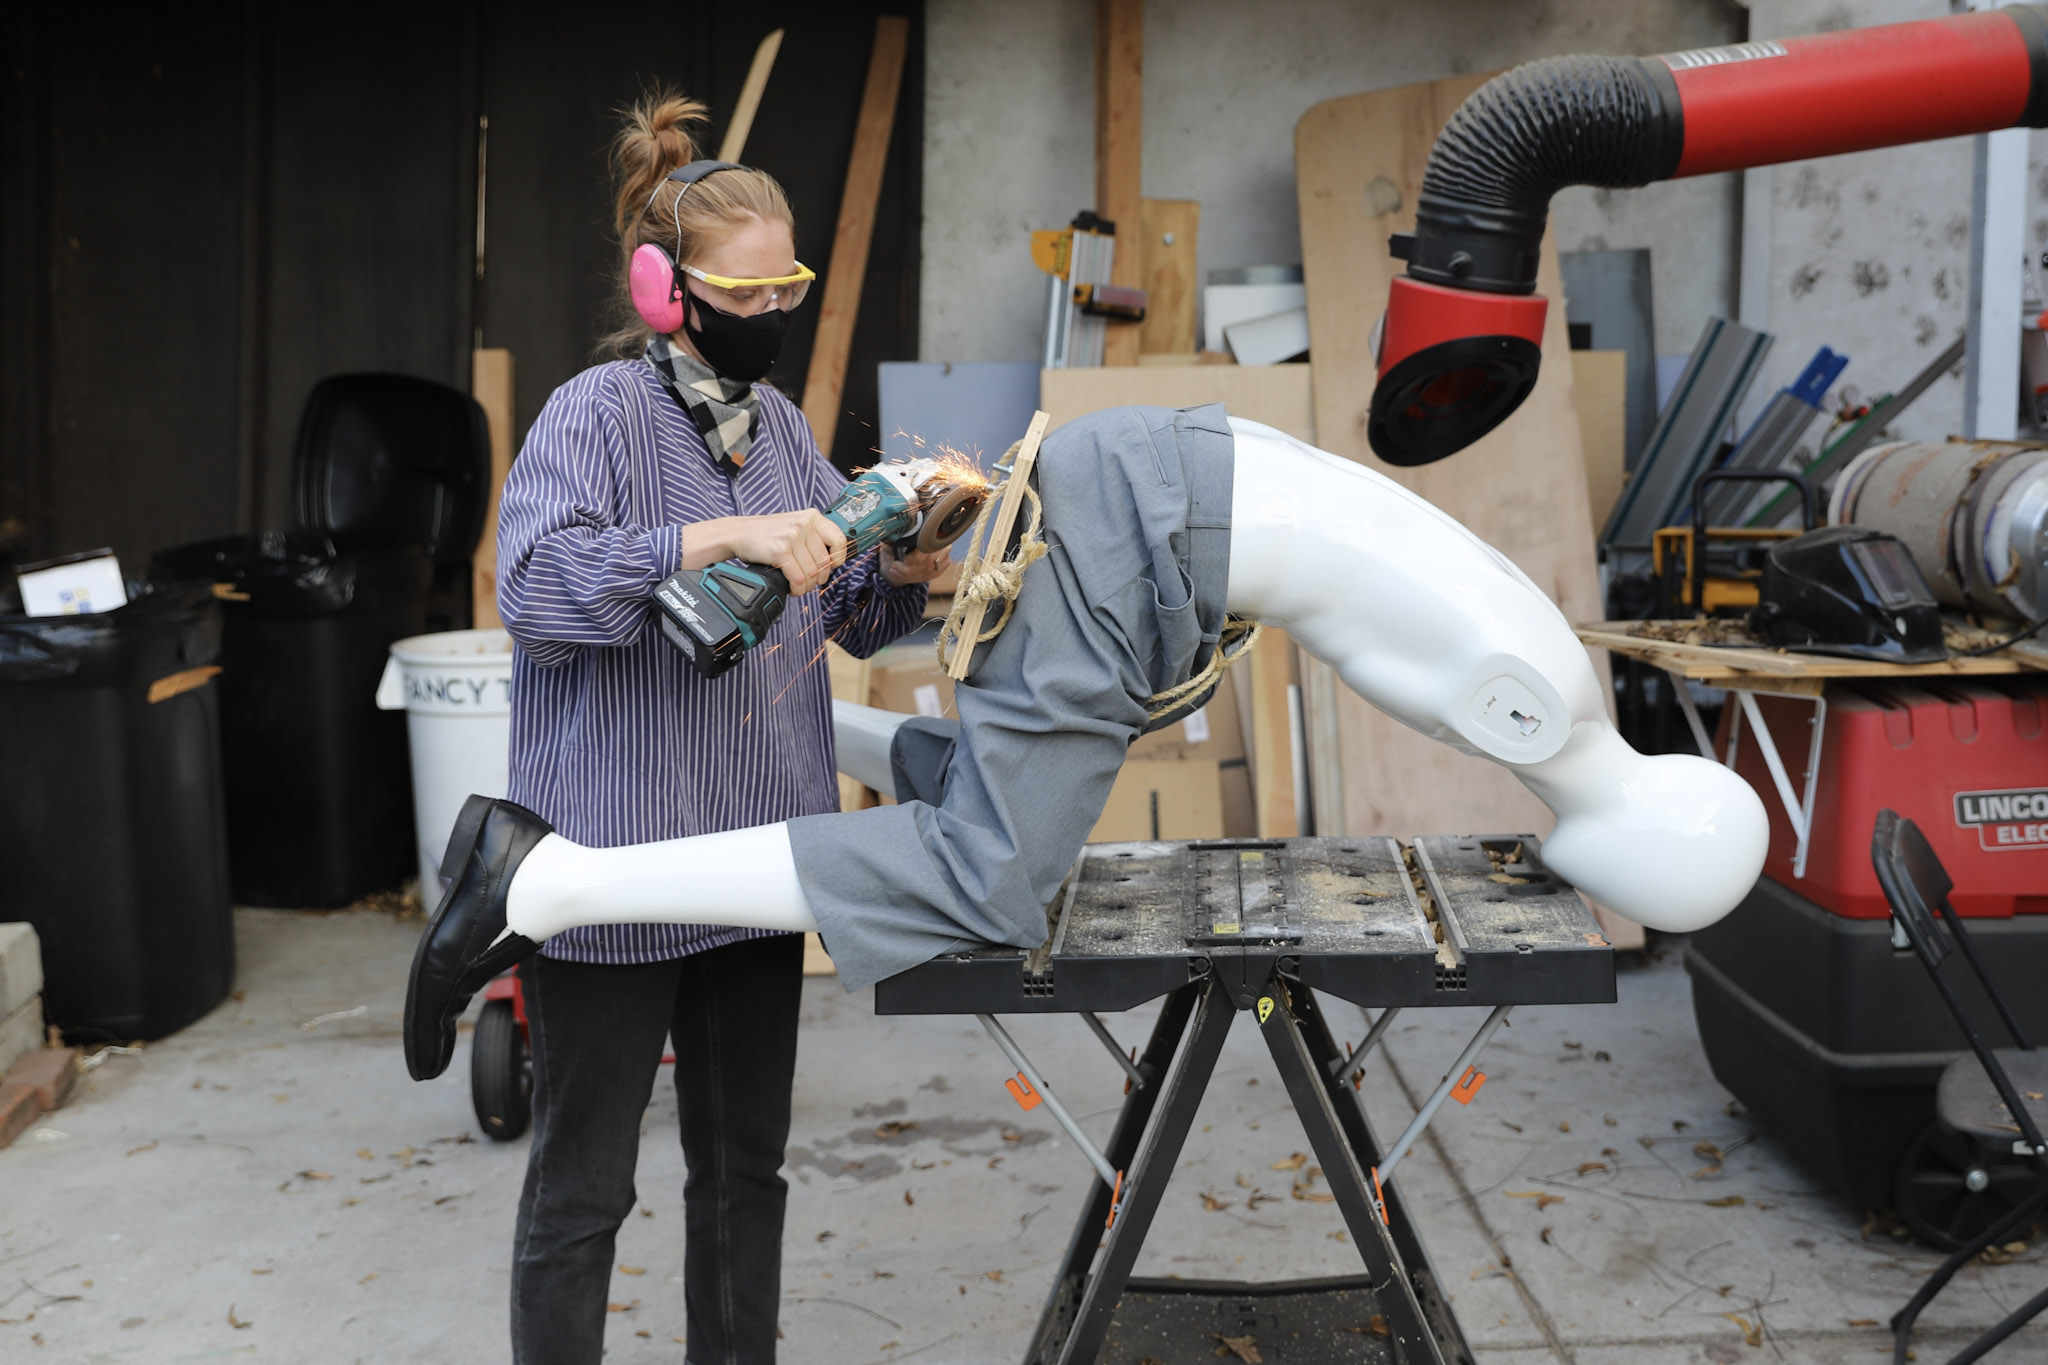
Even if you don’t follow Simone Giertz on social media or YouTube, there’s a good chance you know of her work. Originally hailed as the Queen of Shitty Robots, Simone’s early videos of questionable contraptions, such as the Toothbrush Machine and Hair Washing Robot, quickly went viral, birthing a variety of GIFs and shareable content that quickly took over the internet. But, nowadays, she’s shelved her bots and focuses her attention on more reliable projects, such as her highly successful crowdfunding campaign for The Every Day Calendar, and the impressive Truckla, a Tesla pickup truck that beat Elon Musk’s Cybertruck to the post when shared online in June 2019.
Looks like it works fine to me
Alex Bate caught up with Simone Giertz (pronounced Yetch, not Gerts) to discuss how she went from unreliable robots and GIF stardom to bunk-beds made of leaves and office chair sidecars for needy pets, and why her openly discussed brain tumour helped to realign her business model.
A career of two halves
HS To me, as a viewer, it feels like your YouTube career is split into two halves. There’s Simone, the Queen of Shitty Robots, and then there’s everything post-surgery, like Truckla and The Every Day Calendar. Do you see it too?
SG The difficult part about YouTube, and also the good side of it, is that if you have a really long career, you grow up during that career, and you change and your interests change. And I don’t want to just play a role, I want to be genuinely excited about the things I do – you get sick of things, and you want to explore new things. So, in order to do that, I’ve really tried to be ‘theme agnostic’ for my YouTube channel.
And that was something that was really hard with Shitty Robots, because it was something that I knew that people really liked, and that I had a level of success with. But I was just not that excited about it anymore. And I think the brain tumour became a really good page turner for me, because I had such limited energy capital, you know, and I really just wanted to spend my time and my very limited energy on doing things that I was super-pumped about.
I think the projects I build now still have some elements of the stuff I did in my early days, but they’re definitely less GIF-compatible.
In the beginning, all I was thinking about for every project was a GIF. That was the main deliverable that I had in my head, and the main piece of content that I focused on, and then I kind of built a YouTube video around it, and around the process of creating this GIF. And I let go of that. Not every project needs to have a punchline. It can be fine. It can be a little bit more dull.
But, I still feel guilty about it.
HS Really?
SG Yeah. People are very sweet about it, but I still get comments with people being like, ’Oh, I miss the Shitty Robots.’ But, at the same time, you have to think, ’It’s my life, and I really want to do the things I want to do.’ And I’m also so drawn to my product business and wanting to focus on that. And the way that my YouTube channel can co-exist with that is for me to explore different products and make videos about them. And it’s actually becoming a pretty good tag team.
Kickstarter success
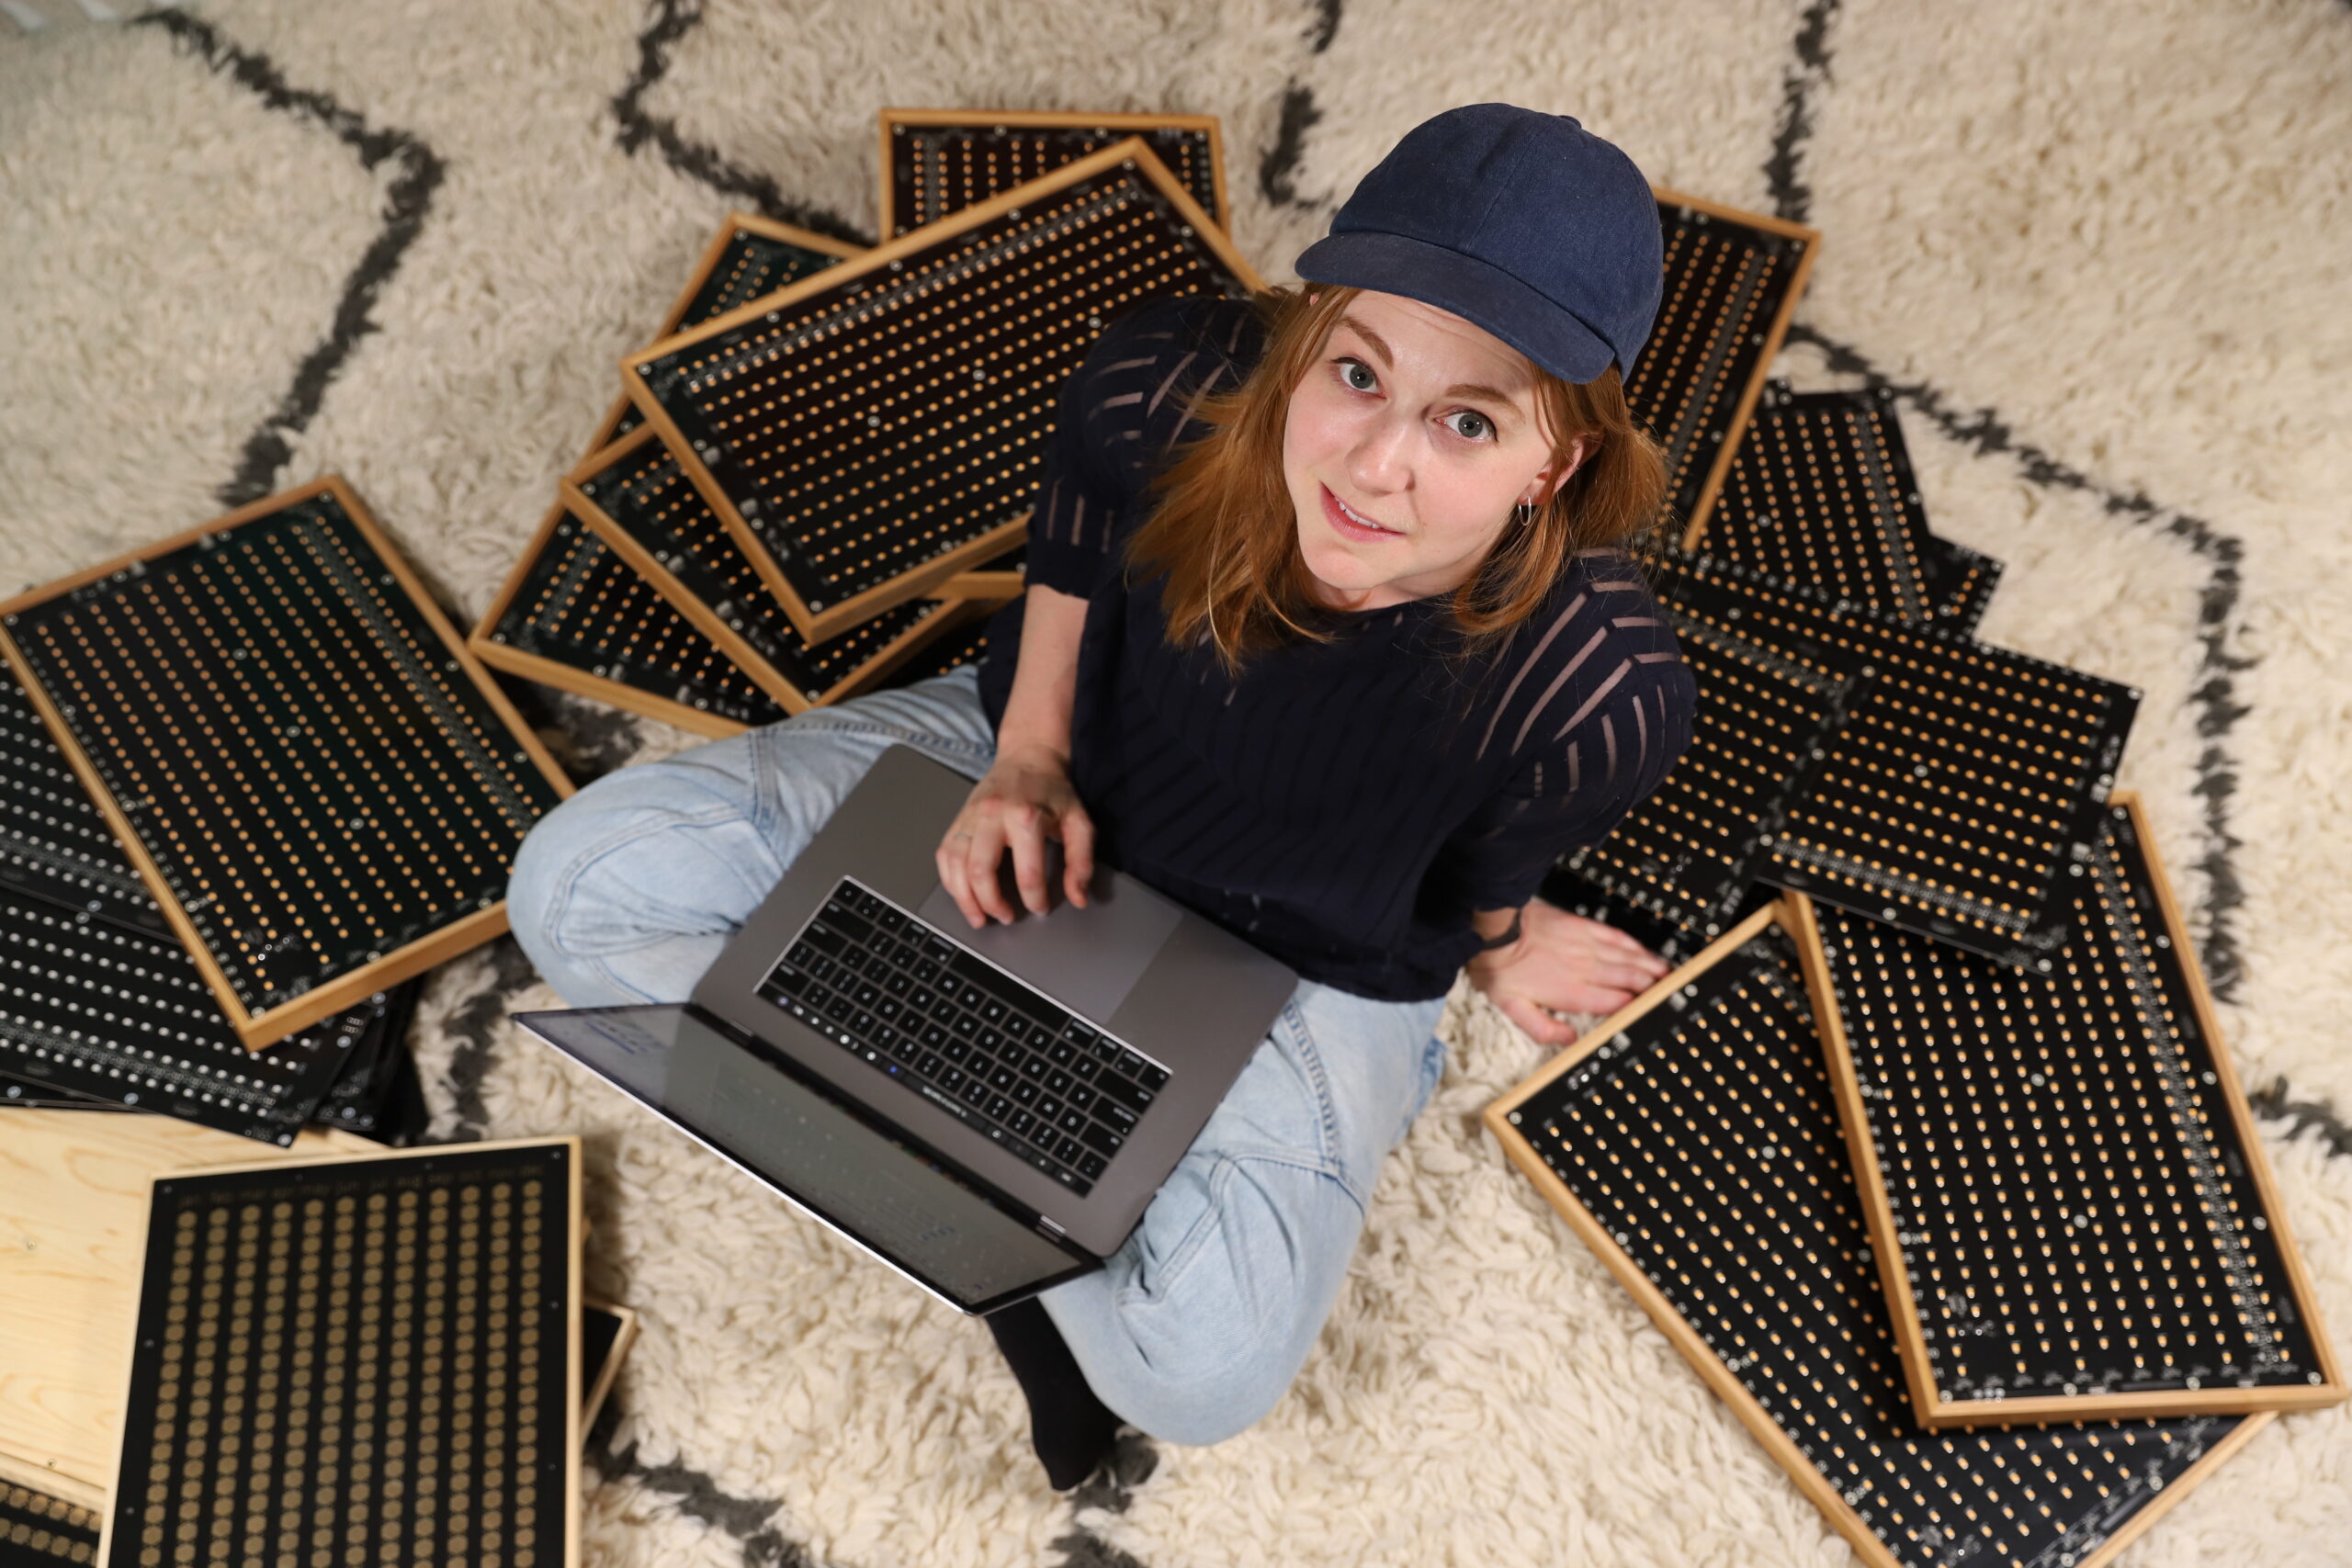
HS Talking about your product business, the biggest one to date was obviously The Every Day Calendar. 2300-odd backers, and over half a million dollars raised. How did you feel when your first Kickstarter just soared like that?
SG It was fun and scary. Because, as somebody who’s terrified of disappointing people, crowdfunding campaigns are kind of like the worst position to put yourself in because you really risk disappointing people. But, I don’t think we did. I mean, we were late, but I really just wanted to deliver a good product because it was expensive. And, yes, we raised over half a million dollars, but it’s not until now that we’ve actually broken even.
HS Wow.
Simone surrounded by The Every Day Calendar
SG It’s so expensive. And so much of that is in product development. When it comes down to it, and you’re actually putting something out in the world, it’s just crazy how much it costs. And I mean, we probably didn’t do it in the most efficient way we could, because we were rookies. But, it was definitely very humbling and terrifying.
HS Would you do further products with Kickstarter? Or do you think you’re now at a point where you would just create a product and sell it, and not have to rely on crowdfunding?
SG We’re hopefully launching our store this summer, and we’re going to have four different products in it. And, I’m hoping that any easier products can be self-funded. And, if there’s something more complicated, like the Companion Chair, which is definitely going to be a bigger project, it might end up being crowdfunded because with funding, you also get market testing. You can get a lot out of it. But, that said, after I did The Every Day Calendar, I remember saying I’d never do it again. Every night at 3 am, I would just wake up and be like, ’Oh my god, what if we send out the calendars and then, in two years, all of them stop working! People are going to be really angry.’ I’m scared of that. But, I guess that also, even if customers are buying your product off the shelf, you are always going to live with that fear over your head.
The early days
HS It’s really interesting to go back and watch your earliest videos, particularly the first one in Swedish, and see how far you’ve come. Was it always the aim to start the business? To have staff and be opening an online store and selling your products?
SG I mean, no, I would definitely be lying if I said that this is some sort of master plan. There was no scheming where I had the large whiteboard – ’This is the trajectory of how I’m going to become known as the Queen of Shitty Robots. And then I’m going to pivot that into running a product business.’ I’m definitely not that smart.
But, I had an inkling of what I was interested in. And I mean, I really liked making videos. And I think that everything kind of happened in a very fortunate way. Because I had this job where I was a Maker in Residence at a US company called Punch Through Design. And my job was just to build different things. And right when my job there was ending, I posted the Toothbrush Helmet, and that started getting some traction. I was moving back to Sweden because my visa expired, and I just had this year of living with my mom again, and having very few expenses and I was like, ’OK, I’m gonna just make sure I work enough to get by, but then the rest of the time, I’m just gonna spend it on building these machines that I want to build.’
So I was very fortunate in the way that I could structure things so I was able to spend time on my YouTube channel in the early days.
But, it’s also so easy to look back and be like, ’Of course, all these things led me to where I am today.’ But when you’re in the middle of it, you’re just flailing. And my flailing, fortunately, landed me in a position that I’m very happy with today.
Commander Scraps the canine sidekick
[It’s at this point of the conversation that Simone’s three-legged canine sidekick, Commander Scraps, decides to join us. Those who have seen Simone’s build video for the Companion Chair or Lego-based Dog Selfie Booth will already know of Scraps. Those who haven’t, well, Scraps is adorable, so you should definitely check them out.]
Scraps is first and foremost a dog, but he’s also the brains behind Simone’s Companion Chair
Creative freedom
HS Some online content creators are often stuck within a theme – wood working, electronics, 3D printing, and so on. But, for you, it seems that you’re the theme, you’re the brand, and you can get away with creating whatever content you want. Do you see that when you interact with your community? That freedom?
SG It’s something that I thought a lot about in the early days, like, how much is the channel about me and my life? And how much is it about the things that I build? And I think what I struggled with is that I’m not that interested in my life. Like, I really want to make videos that I myself would want to watch. I’m not really interested in vlogs, so I decided early on that while it’s about my life to an extent, it’s still centred around these projects I’m building.
In some ways, I’m pretty private on the internet, but also very open, like when it comes to brain tumour stuff. I was really open about it, and I wanted to tell everyone about it because it was a way for me to process what was happening. I remember having to tell myself that I had to stop telling waiters or Uber drivers that I had a brain tumour. ’Hi sweetie, how are you today? Well, I have a brain tumour, but other than that, I’m pretty good.’
When it came to talking about it online, it was a no-brainer. Haha.
But then there’s other stuff that I don’t talk about, like, I don’t really document my life. I don’t talk about my friends really, or my relationship status, or anything like that. Because you have to draw the line somewhere. And I always felt like documenting my life was just too intrusive.
Don’t ask
Queen of Shitty Robots
HS When you look at your most popular videos on your channel, even though you’re known as the Queen of Shitty Robots, those videos aren’t actually in the Top 5. Instead, it’s the video of you in the zero gravity simulations, and Truckla, and locking yourself in your bathroom for 48 hours. It’s interesting that the thing you’re most known for isn’t the thing your audience is most interacting with.
SG Those Shitty Robot videos mostly did really well on other platforms, like Twitter and Reddit. Not so much on YouTube because it has its own metrics and algorithms.
The thing that is really useful for other creators who are getting started is to figure out what is your hook, or what is the very simple version of what you’re doing. Like, Queen of Shitty Robots kind of became the headline. And it was this very clear message, and it was something that was really easy for journalists to write about. It was a spearhead for branding.
This was not something I was thinking about at the time, but looking back, my fear then was to make sure I didn’t get pigeonholed, and that I could never move on from it, because that’s the problem when people only know you for one thing – you can’t really move on beyond that. It’s really nice to have that spearhead, and then you can broaden it, and that’s how you have longevity.
I didn’t want this to be over in a year. I wanted to be able to keep on doing it because I was really enjoying it. And now, I want to make sure that I have more legs to stand on, because when you’re going through health problems, you realise that if you can’t be in front of a camera, everything grinds to a halt. If you’re not well enough to work, or if YouTube changes its algorithm, it becomes such a fragile business structure. So, that was one of the reasons why I decided I needed to go into products.
HS I guess you can’t really be known as the Queen of Shitty Robots where everything you make doesn’t really do what it’s meant to do, and then expect people to buy serious products from you and trust they’ll work.
SG That’s definitely one of the things when we launched The Every Day Calendar – I was wondering how are people going to be able to take this seriously? But, I think that’s what’s really nice, that my audience has been around long enough and they’ve seen that there’s more to it than that – there’s actually, ironically, a lot of work that goes into making Shitty Robots.
Collaborative community
HS I remember the first time I saw your work was when you collaborated with Adam Savage to make an automated popcorn machine in 2016. It’s a great video that really highlights how great collaborative work can be when two people focus on what they’re really interested in to make a final product. And you’ve worked on other videos with creators such as Laura Kampf. Is there anyone else you’d like to work with?
SG I’m really interested in people who are kind of beyond the community that I’m currently in. It would be really fun to do stuff with musical artists; I’d love to collaborate with OK Go. Or venture beyond that and work with people who make art, and fashion designers. People who are outside the world where I’m creating. And there are people that I just love and would always want to work with, like Laura. She’s the sweetest, most talented, down-to-earth and funny person. I really love working with her. I should really think of who’s on my bucket list.
Something I’ve really missed during the pandemic is just getting to spend time with people who are excited about what they’re doing, and having that excitement rub off on me. There’s nothing more inspiring than someone being pumped about something, even if you don’t understand what it is. In some ways, lockdown has been great for creating as I’ve had more time to loiter in the shop, but I definitely miss that input and just being able to talk to people.
A surprisingly interesting video, despite the title
Secret new ideas…
HS And are there any projects you’d like to build that you just haven’t gotten around to doing yet?
SG Honestly, I just want to build stuff for my house right now, which I know isn’t the most interesting answer. I still have the CEO Bouncy Chair on my list – I want to make this kids’ bouncy chair, the type where you’re almost in some sort of plastic diaper. But I want it to look like a mahogany desk with a Rolodex and it’s for grown-ups. And make some spoof commercial for it when it’s marketed as an exercise device, but there’s just some balding white guy in it. I think that’s the only one that I’m still eager to build. Let me look at my notes…
[Simone proceeds to pull out her phone and list project ideas from the notes app. Should I tell you what they are or should I leave them as a surprise? With great power comes great responsibility!]
HS Those are definitely some interesting ideas…
[I’m very responsible].
Check out Simone’s TED Talk
HS Going back to your audience, you seem to have been somewhat spared a lot of the negativity people receive in comments, and online in general. Why do you think that is?
SG I’m just always so scared. Haha. I’ve been spared from the trolls and the hate, and I’m just terrified of ruining whatever equilibrium is happening right now. That’s one of the reasons I post so seldomly. I was looking the other day and thought, ’Oh, it’s been 45 days since I last posted on Instagram!’, and I notice I keep getting DMs from people asking if I’m OK. I’m just always scared to overstep, or do something that would upset people, or cause me to fall from some sort of pedestal. I just never want to post something that doesn’t work for other people, you know?
Simone gives a great interview here
Inspirational YouTubers
HS I get it. The comments section of YouTube alone can be an awful place sometimes. Speaking of YouTube, are there any other makers at the moment who are inspiring you?
SG I love 3×3 Custom. She’s my happy place because she’s at a level of making that I’m just not at. Her jig work is just wild, and the quality she puts out. And I love Nicole McLaughlin. She does these really fun and weird fashion contraptions, like shoes made out of tennis balls. She’s very cool. She’s a level of coolness that I aspire to and never expect to get to.
But, one of the most inspiring things for me is time. And I know that if I run out of ideas, it’s because I’m overworked and I haven’t had enough downtime and time to just loiter in the shop. I try to enforce this on Fridays, where me and my teammates just work on whatever project, and it doesn’t have to be work-related. And some of my best ideas have come from that type of work, where I don’t know what my end goal with this is, but I’m just going to tinker with it for a little bit.
Simone was on The Late Show with Stephen Colbert!
You can follow Simone on Instagram for behind-the-scenes photos of her project, and subscribe to her YouTube channel for new content. Also, because why wouldn’t you, you can follow Scraps on Instagram too!
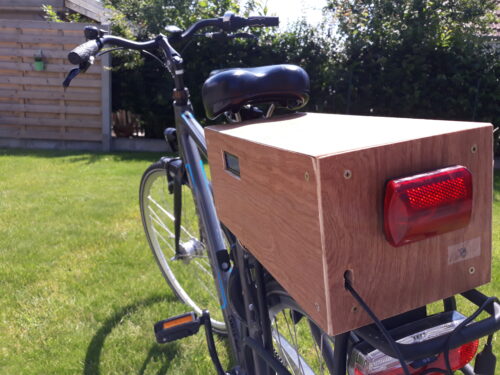
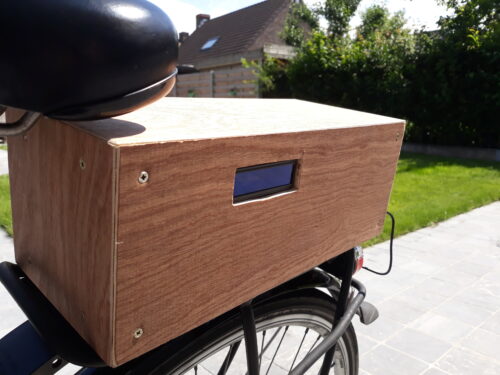
Maker keanuDav was always forgetting to turn on his bike lights when riding out in the dark. He also never knew how fast he was going, or how long his rides were. So he created a shareable smart bike that automatically turns the lights on or off and keeps track of where you’ve ridden. The project uses a RFID scanner so somebody else can use the bike without messing with Keanu’s personal ride data.
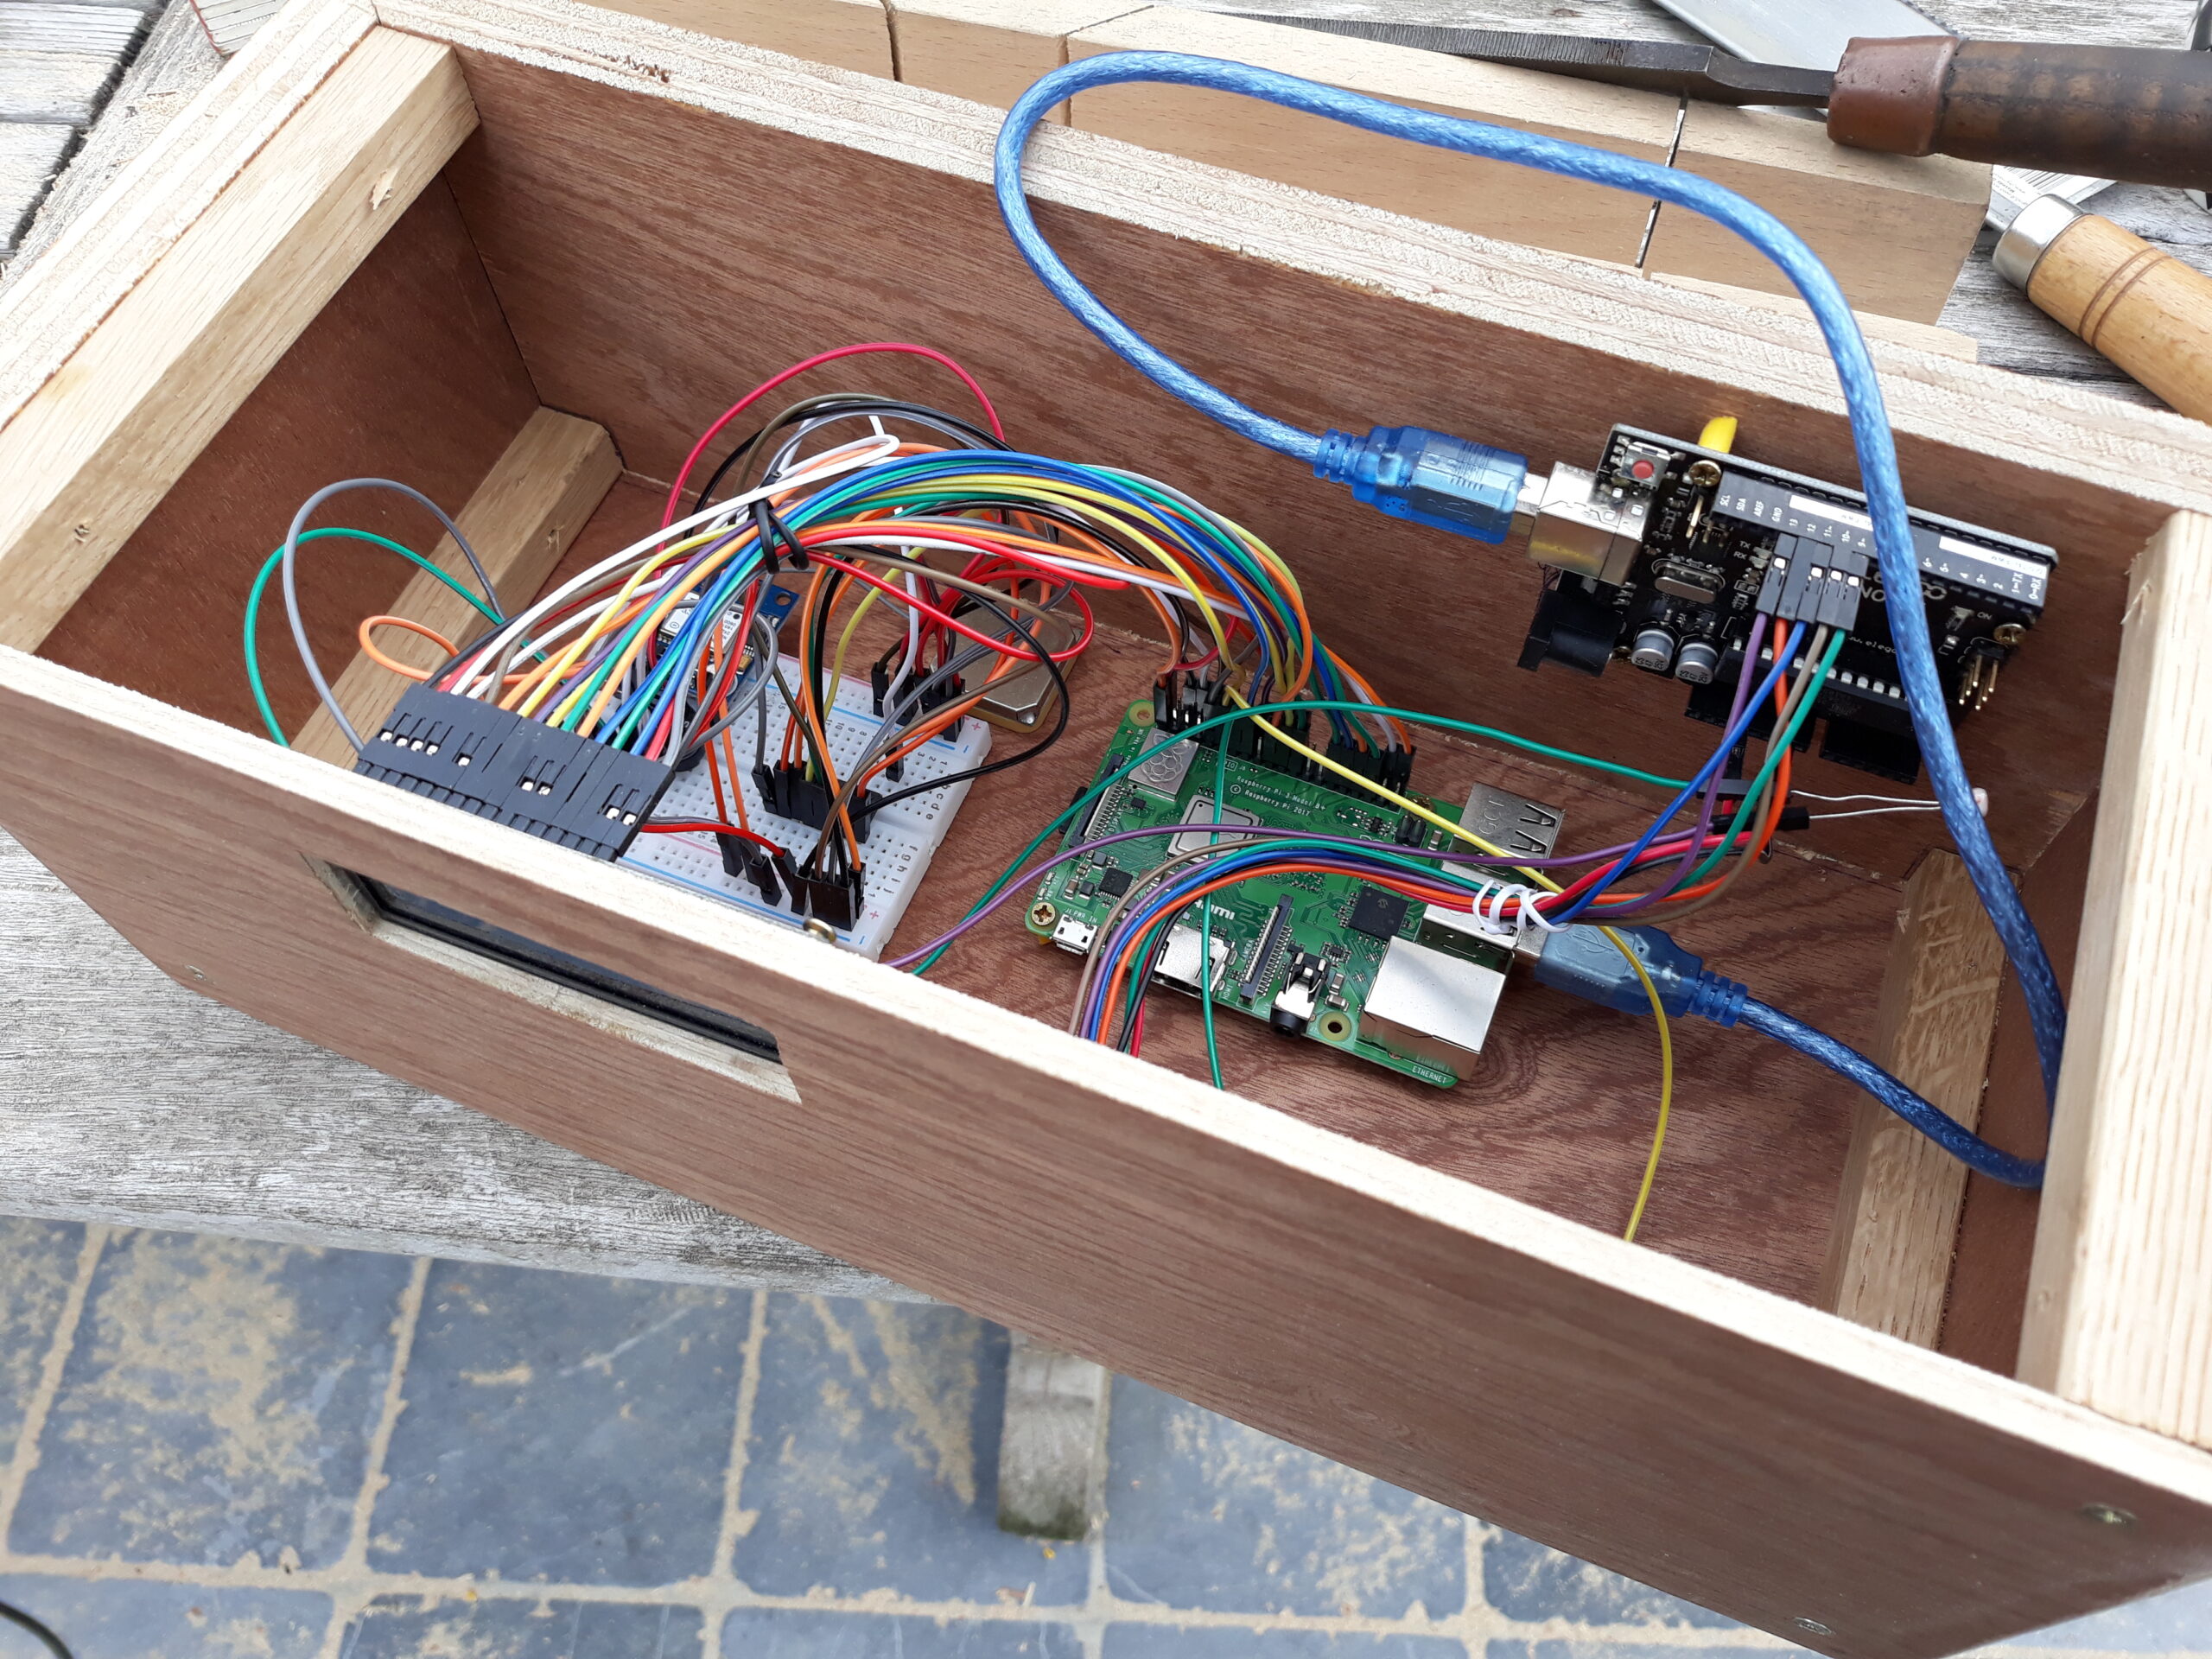
Keanu’s creation sits neatly on the bike’s rear rack
Here in Cambridge, if you forget to take your clip-on lights off your bike when you lock it up, chances are they won’t be there when you go back. We reckon this Raspberry Pi-powered solution could work for us here in the UK’s leading cycling city too, since there’s nothing to easily unclip and walk away with.
Keanu totted up the total price of the build, including wood and the light, at around €145.
How does it all fit together?
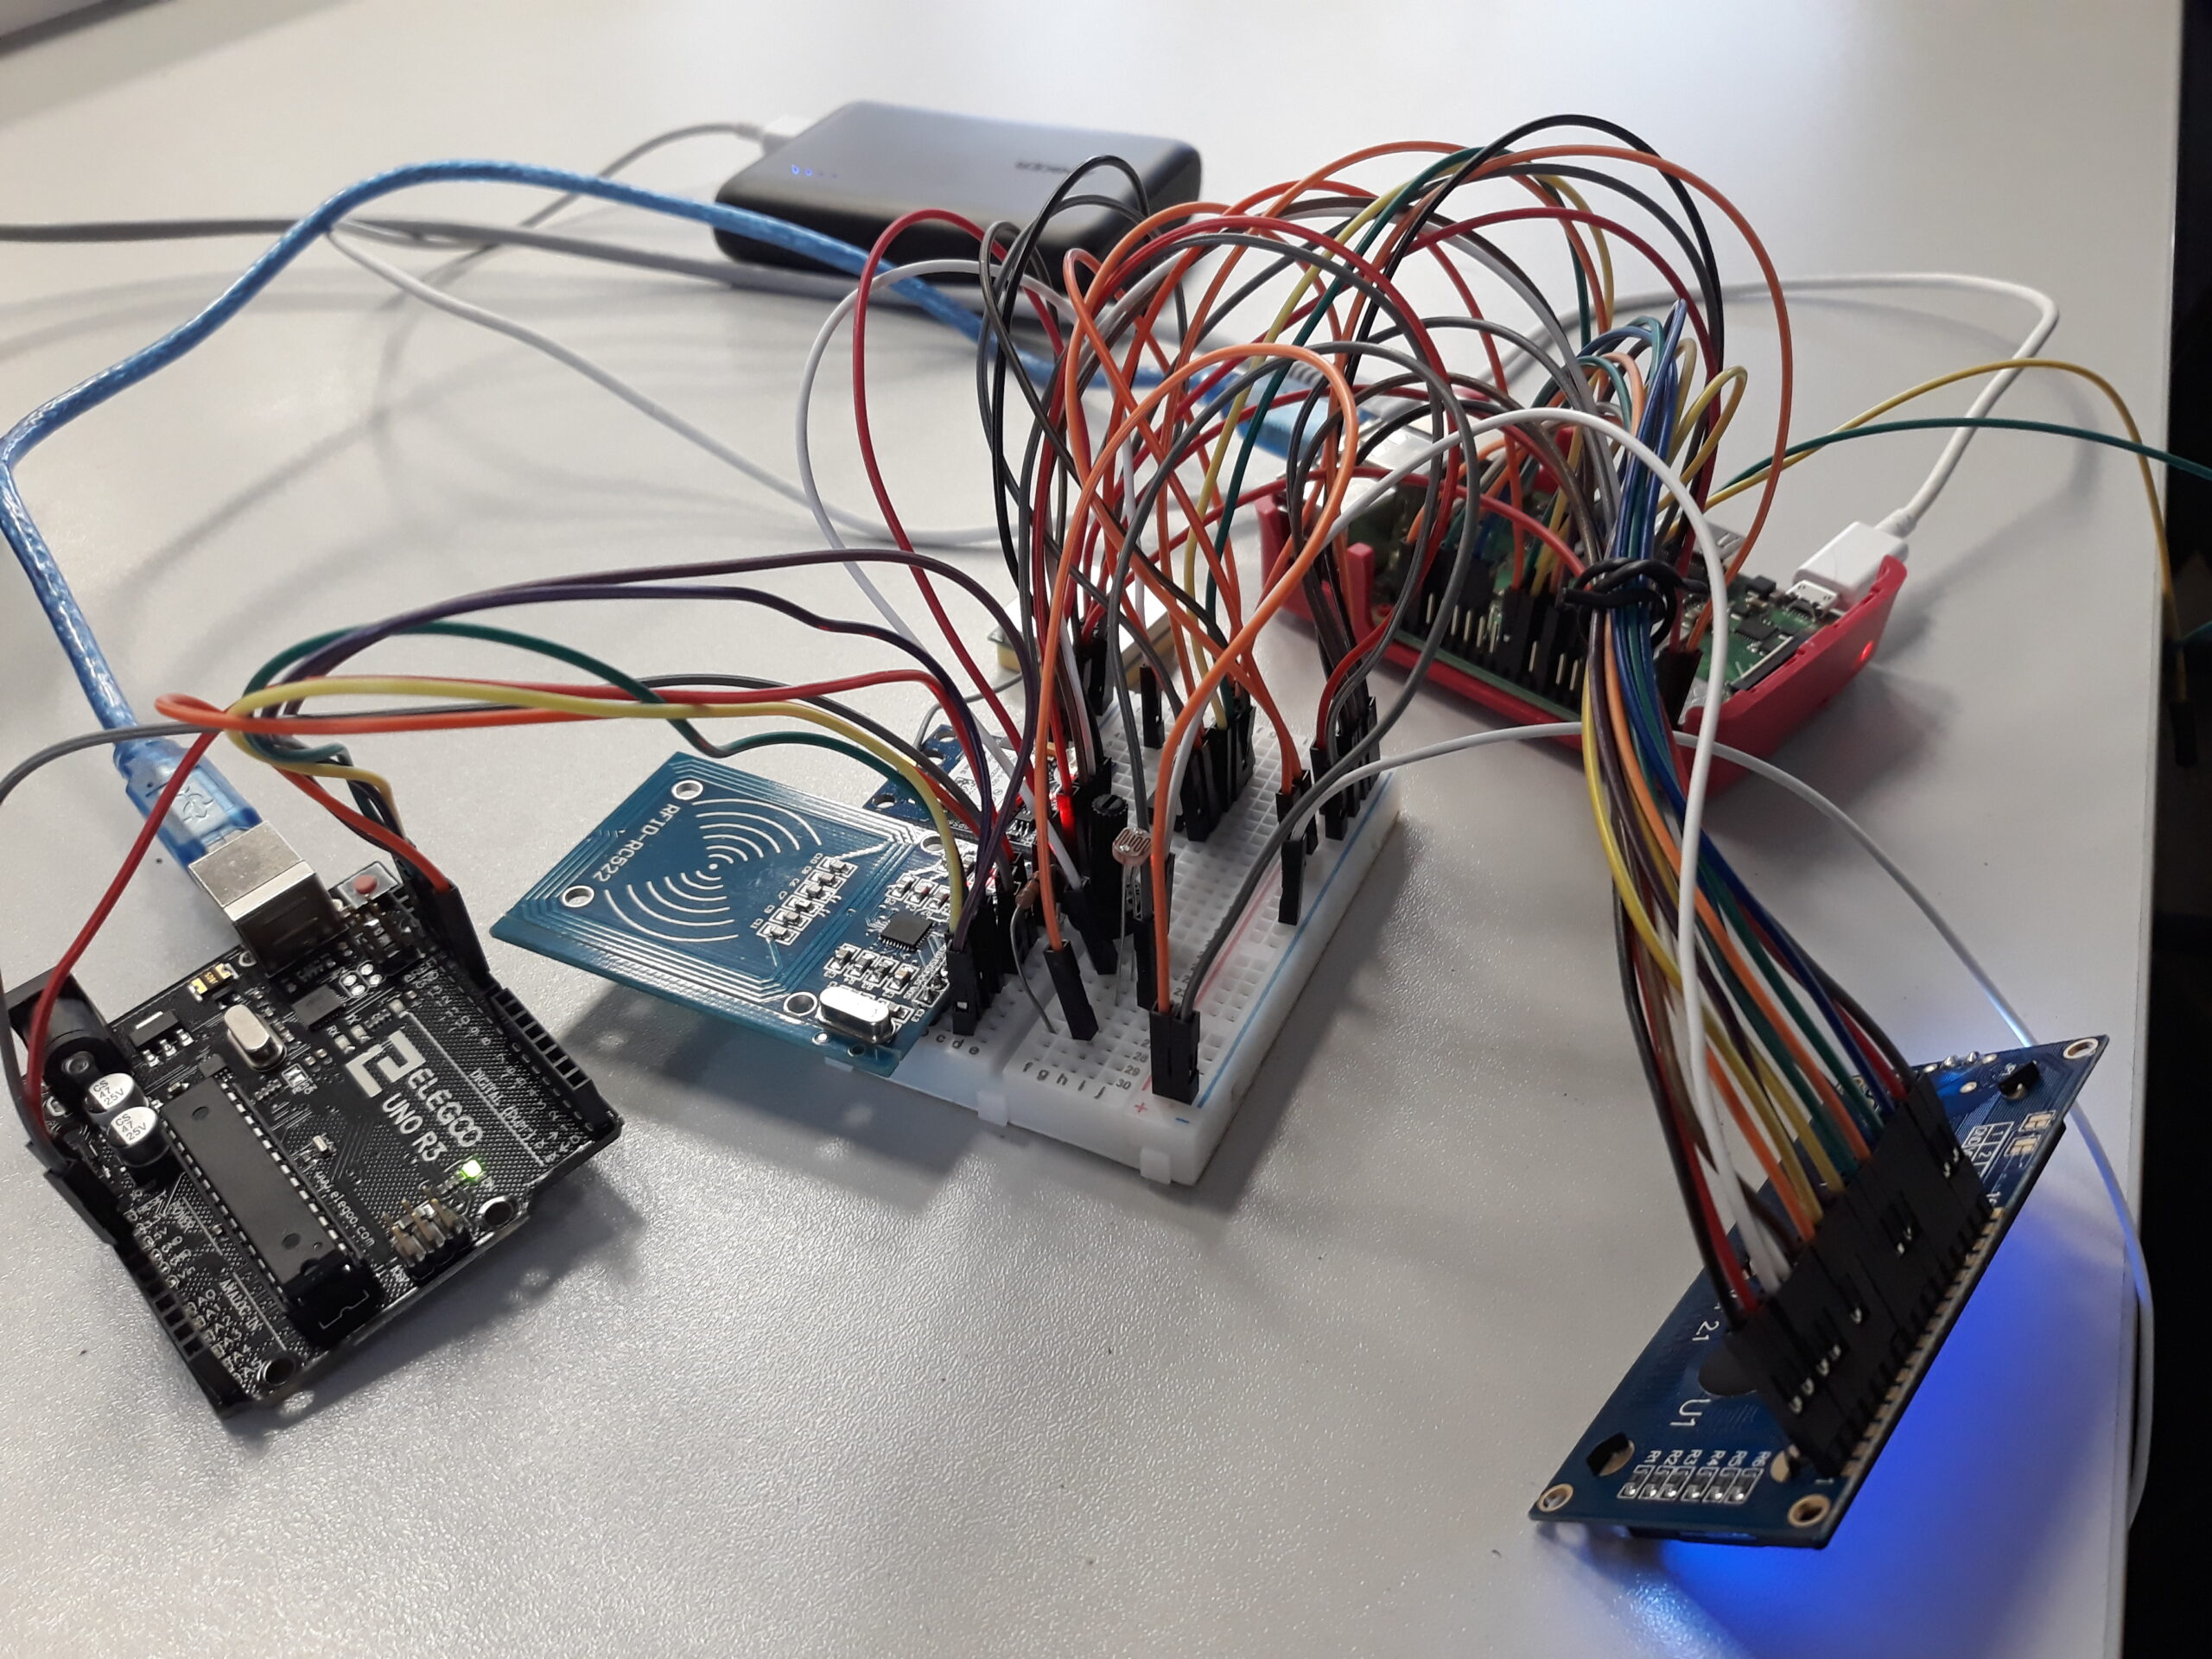
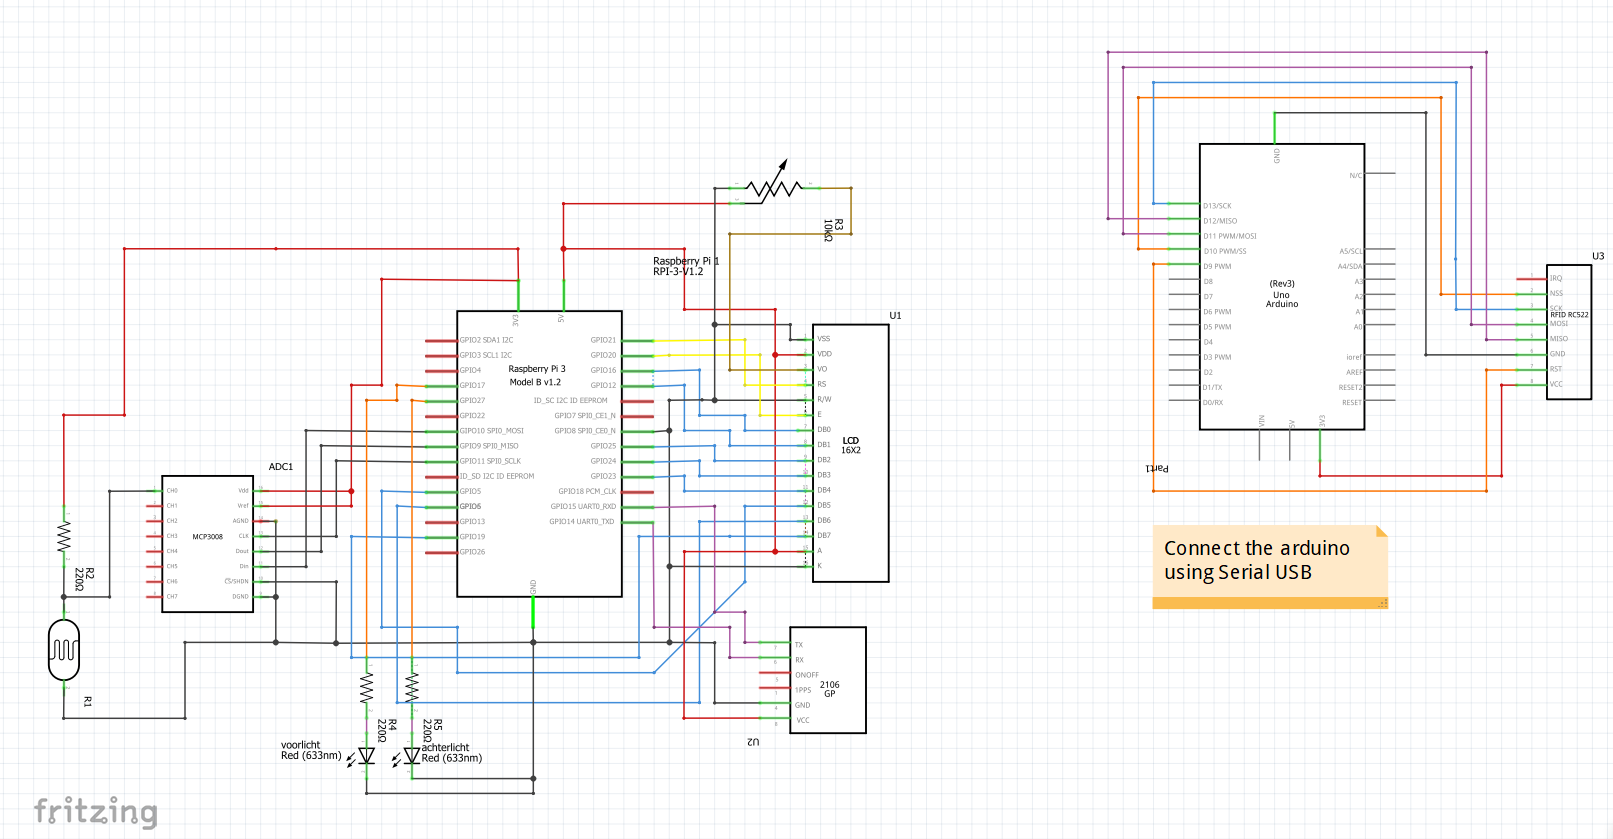
We’re not going to lie: the smart bike looks tricky to recreate. I mean, that is a lot of wires. And several bits of hardware. But it does perform multiple functions for the rider, so we can put up with a little fiddliness.
So many wires. *Rocks back and forth* So many wires.
And don’t worry, Keanu is a hero and shared this Fritzing diagram on his instructable, which is handily set out in a twelve-step format so you can follow along easily.
See, it’s all simple once you know how
How do you collect all the data?
Keanu explains:
“The RFID scanner is used with the arduino. I read out the data from the scanner with the arduino and send it to the Raspberry Pi with Serial USB.
The GPS module is also using serial communication. The data the GPS sends to the Raspberry Pi is not that well formatted, so I used a library to parse the data and make it a lot easier to use.
The analog values from the LDR are converted using the mcp3008 (an adc), then I transform the value to a percentage.”
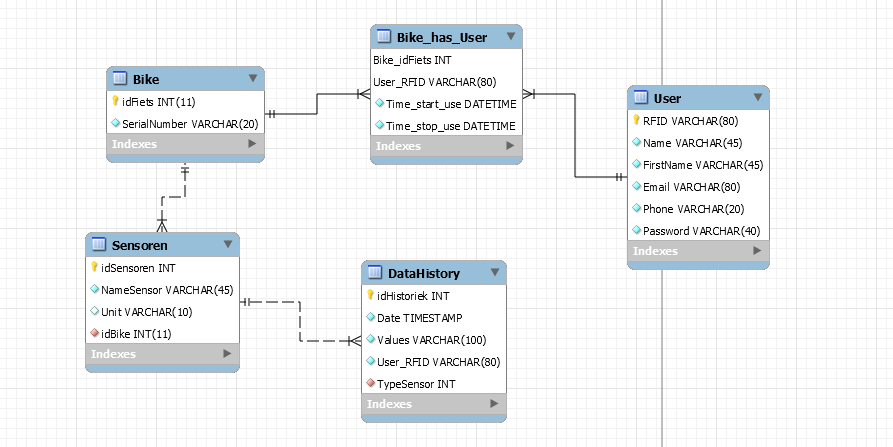
Keanu stores the data in a relational database in mySQL. Then the database and a python script run together on the Raspberry Pi. Here’s everything you need on GitHub.
Take a ride
On top of the impressive coding and electrical skills, Keanu is a dab hand at woodwork. You could use a pre-made box in another material if that’s not your thing. It just needs a hole for the LCD screen to show through.
Make sure to check out maker Keanu’s step-by-step tutorial explaining how he made the smart bike.
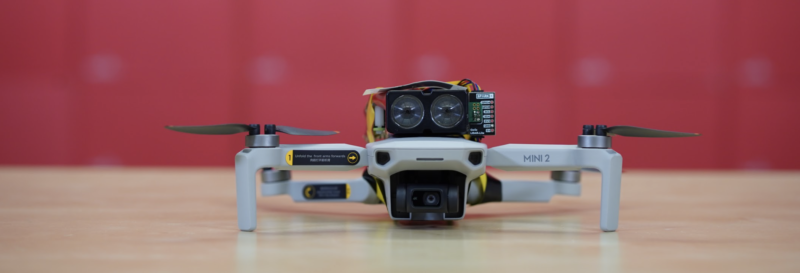
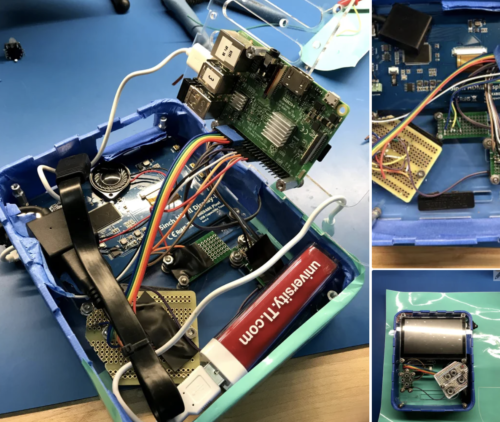
Inspired by NASA’s attempt to launch a helicopter on Mars, one maker made an Earth-bound one of her own. And she tells Rosie Hattersley all about it in the latest issue of The MagPi Magazine, out now.
To avoid being swiped by the drone’s rotors, the Raspberry Pi 4, which uses NASA’s especially written F Prime code for telemetry, had to be positioned very carefully
Like millions of us, in April Avra Saslow watched with bated breath as NASA’s Perseverance rover touched down on the surface of Mars.
Like most of us, Avra knew all about the other ground-breaking feat being trialled alongside Perseverance: a helicopter launch called Ingenuity, that was to be the first flight on another planet – “a fairly lofty goal”, says Avra, since “the atmosphere on Mars is 60 times less dense than Earth’s.”
With experience of Raspberry Pi-based creations, Avra was keen to emulate Ingenuity back here on earth.
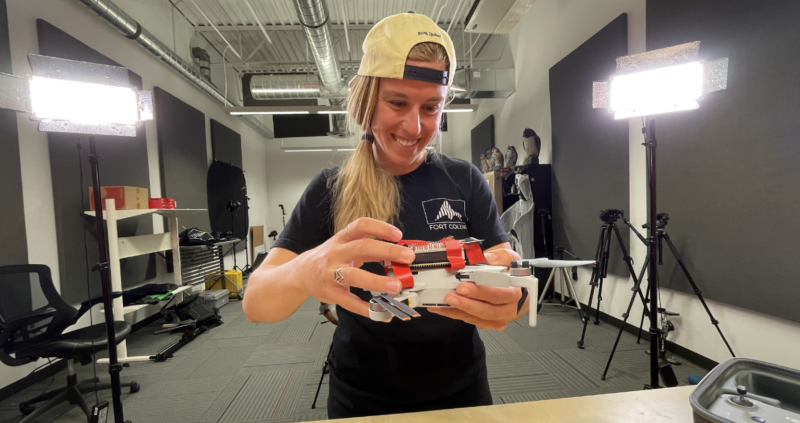
Avra’s videographer colleague lent her the drone that enables Epigone to achieve lift-off
NASA chose to use open-source products and use commercially available parts for its helicopter build. It just so happened that Avra had recently begun working at SparkFun, a Colorado-based reseller that sells the very same Garmin LIDAR-Lite v3 laser altimeter that NASA’s helicopter is based on. “It’s a compact optical distance measurement sensor that gives the helicopter ‘eyes’ to see how far it hovers above ground,” Avra explains.
NASA posted the Ingenuity helicopter’s open-source autonomous space-flight software, written specifically for use with Raspberry Pi, on GitHub. Avra took all this as a sign she “just had to experiment with the same technology they sent to Mars.”
F Prime and shine
Her plan was to see whether she could get GPS and lidar working within NASA’s framework, “and then take the sensors up on a drone and see how it all performed in the air.” Helpfully, NASA’s GitHub post included a detailed F Prime tutorial based around Raspberry Pi. Avra says understanding and using F Prime (F´) was the hardest part of her Epigone drone project. “It’s a beast to take on from an electronics enthusiast standpoint,” she says. Even so, she emphatically encourages others to explore F´ and the opportunity to make use of NASA’s code.
NASA recognises that Raspberry Pi offers a way to “dip your toe in embedded systems,” says Avra, and “encourages the idea that Linux can run on two planets in the solar system”
Raspberry Pi 4 brain
The Epigone Drone is built around Raspberry Pi 4 Model B; Garmin’s LIDAR-Lite v4, which connects to a Qwiic breakout board and has a laser rather than an LED; a battery pack; and a DJI Mini 2 drone borrowed from a videographer colleague. Having seen how small the drone was, Avra realised 3D-printing an enclosure case would make everything far too heavy. As it was, positioning the Epigone onto its host drone was challenging enough: the drone’s rotors passed worryingly close to the project’s Raspberry Pi, even when precisely positioned in the centre of the drone’s back. The drone has its own sensors to allow for controlled navigation, which meant Avra’s design had to diverge from NASA’s and have its lidar ‘eyes’ on its side rather than underneath.
Although her version piggybacks on an existing drone, Avra was amazed when her Epigone creation took flight:
“I honestly thought [it] would be too heavy to achieve lift, but what do ya know, it flew! It went up maybe 30 ft and we were able to check the sensors by moving it close and far from the SparkFun HQ [where she works].”
While the drone’s battery depleted in “a matter of minutes” due to its additional load, the Epigone worked well and could be deployed to map small areas of land such as elevation changes in a garden, Avra suggests.
The MagPi #107 out NOW!
You can grab the brand-new issue right now from the Raspberry Pi Press store, or via our app on Android or iOS. You can also pick it up from supermarkets and newsagents. There’s also a free PDF you can download.
When maker Stéphane (aka HalStar) set about building this self-playing xylophone, their goal was to learn more about robotics, and to get hands-on with some mechanical parts they had never used before, in this case solenoids.
They also wanted to experiment with Raspberry Pi to build something that reflected their love of music. This automated instrument, capable of playing hundreds of MIDI files, fits the brief.
Let me introduce you to Stéphane’s self-playing xylophone
Two factors constrained the design: Stéphane wanted to be able to do it all using parts from the local DIY store, and to use as many regular modules as possible. So, no breadboard or wires everywhere, and no custom PCB. Just something simple to assemble and neat.
This extra video goes into more detail about the build process
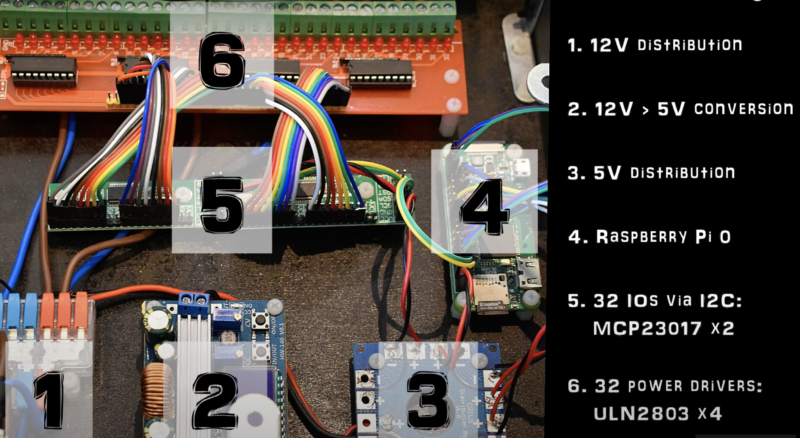
Hardware
Raspberry Pi Zero WH is the teeny tiny brain of the self-playing xylophone. And its maker’s build details video very helpfully labels all the parts, where they sit, and what’s connected to what.
There we are (#4) working away to make the xylophone play
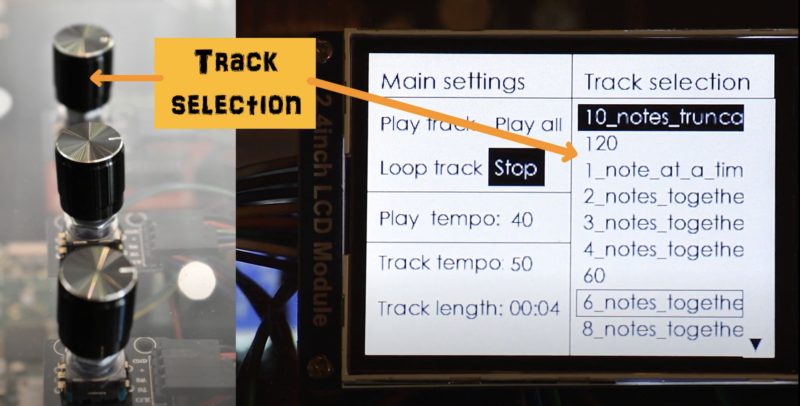
These three buttons select the tracks, set the tempo, and set the mode. Choose between playing all loaded tracks or just one. You can also decide whether you want all tracks to play on repeat in a loop, or stop after your selections have played through. A two-inch LCD screen shows you what’s going on.
Twist and click to choose your settings
The right notes
While there are thousands of MIDI files freely available online, very few of them could actually be played by the xylophone. With only 32 notes, the instrument is limited in what it can play without losing any notes. Also, even when a MIDI file uses just 32 consecutive notes, they might not be the same range of 32 notes as the xylophone has, so you need to transpose. Stéphane developed a tool in Python to filter out 32-note tunes from thousands of MIDI files and automatically transpose them so the xylophone can play them. And, yes, everything you need to copy this filtering and transposing function is on GitHub.
In all its glory
Now, Stéphane says that whenever friends or family visit their home, they’re curious and impressed to see this strange instrument play by itself. Sadly, we are not among Stéphane’s family or friends; fortunately, though, this project has an entire YouTube playlist, so we can still have a look and a listen to see it in action up close.
Wait, isn’t that a glockenspiel?
We know it’s technically a glockenspiel. Stéphane acknowledges it is technically a glockenspiel. But we are firm fans of their going down the xylophone route, because way more people know what one of those is. If you’re interested, the difference between a xylophone and the glockenspiel is the material used for the bars. A xylophone has wooden bars, whereas glockenspiel bars are metal.
Digital technology is developing at pace, impacting us all. Most of us use screens and all kinds of computers much more than we did five years ago. The total number of apps downloaded globally each quarter has doubled since 2015, reflecting both increased smartphone penetration and the increasingly prominent role of apps in our lives. However, access to digital technology and the internet is not yet equal: there is still a ‘digital divide’, i.e. some people do not have as much access to digital technologies as others, if any at all.
This month we welcomed Dr Hayley Leonard and Thom Kunkeler at our research seminar series, to present findings on ‘Why the digital divide does not stop at access: understanding the complex interactions between socioeconomic disadvantage and computing education’. Both Hayley and Thom work as researchers at the Raspberry Pi Foundation, where we have a focus on increasing our understanding of computing education for all. They shared some results of a research project they’d carried out with a group of young people who benefitted from our Learn at Home campaign.
Digital inequality: beyond the dichotomy of access
Hayley introduced some of the existing research and thinking around digital inequality, and Thom presented the results of their research project. Setting the scene, Hayley explained that the term ‘digital divide’ can create a dichotomous have/have-not view of the world, as can the concept of a ‘gap’. However, the research presents a more nuanced picture. Rather than describing digital inequality as purely centred on access to technology, some researchers characterise three levels of the digital divide:
Level 1: Access
Level 2: Skills (digital skills, internet skills) and uses (what you do once you have access)
Level 3: Outcomes (what you achieve)
This characterisation is useful because it enables us to look beyond access and also towards what happens once people have access to technology. This is where our Learn At Home campaign came in.
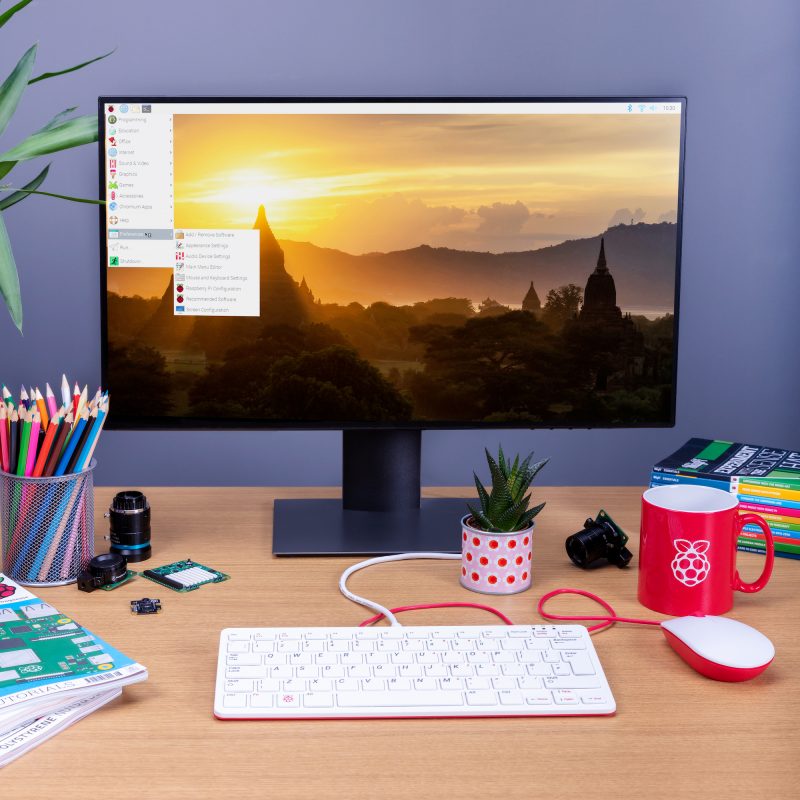
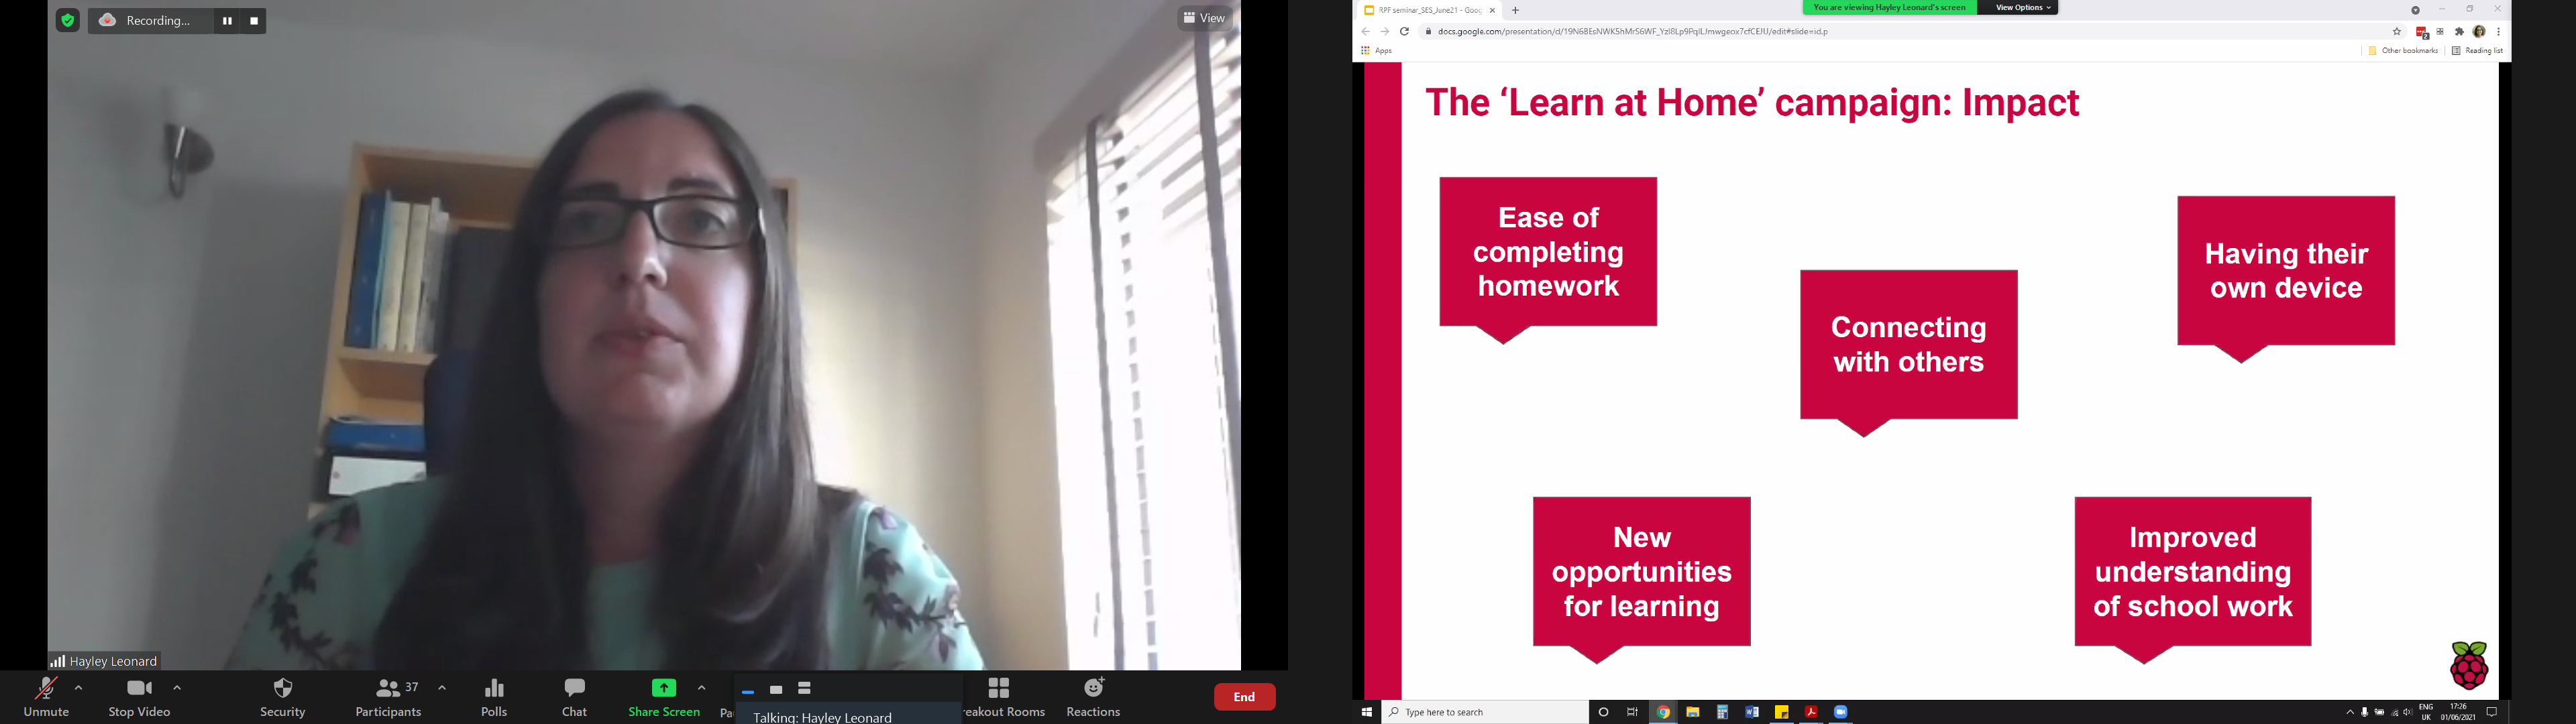
The presenters gave a brief overview of the impact of the campaign, in which the Raspberry Pi Foundation has partnered with 80 youth and community organisations and to date, thanks to generous donors, has given 5100 Raspberry Pi desktop computer kits (including monitors, headphones, etc.) to young people in the UK who didn’t have the resources to buy their own computers.
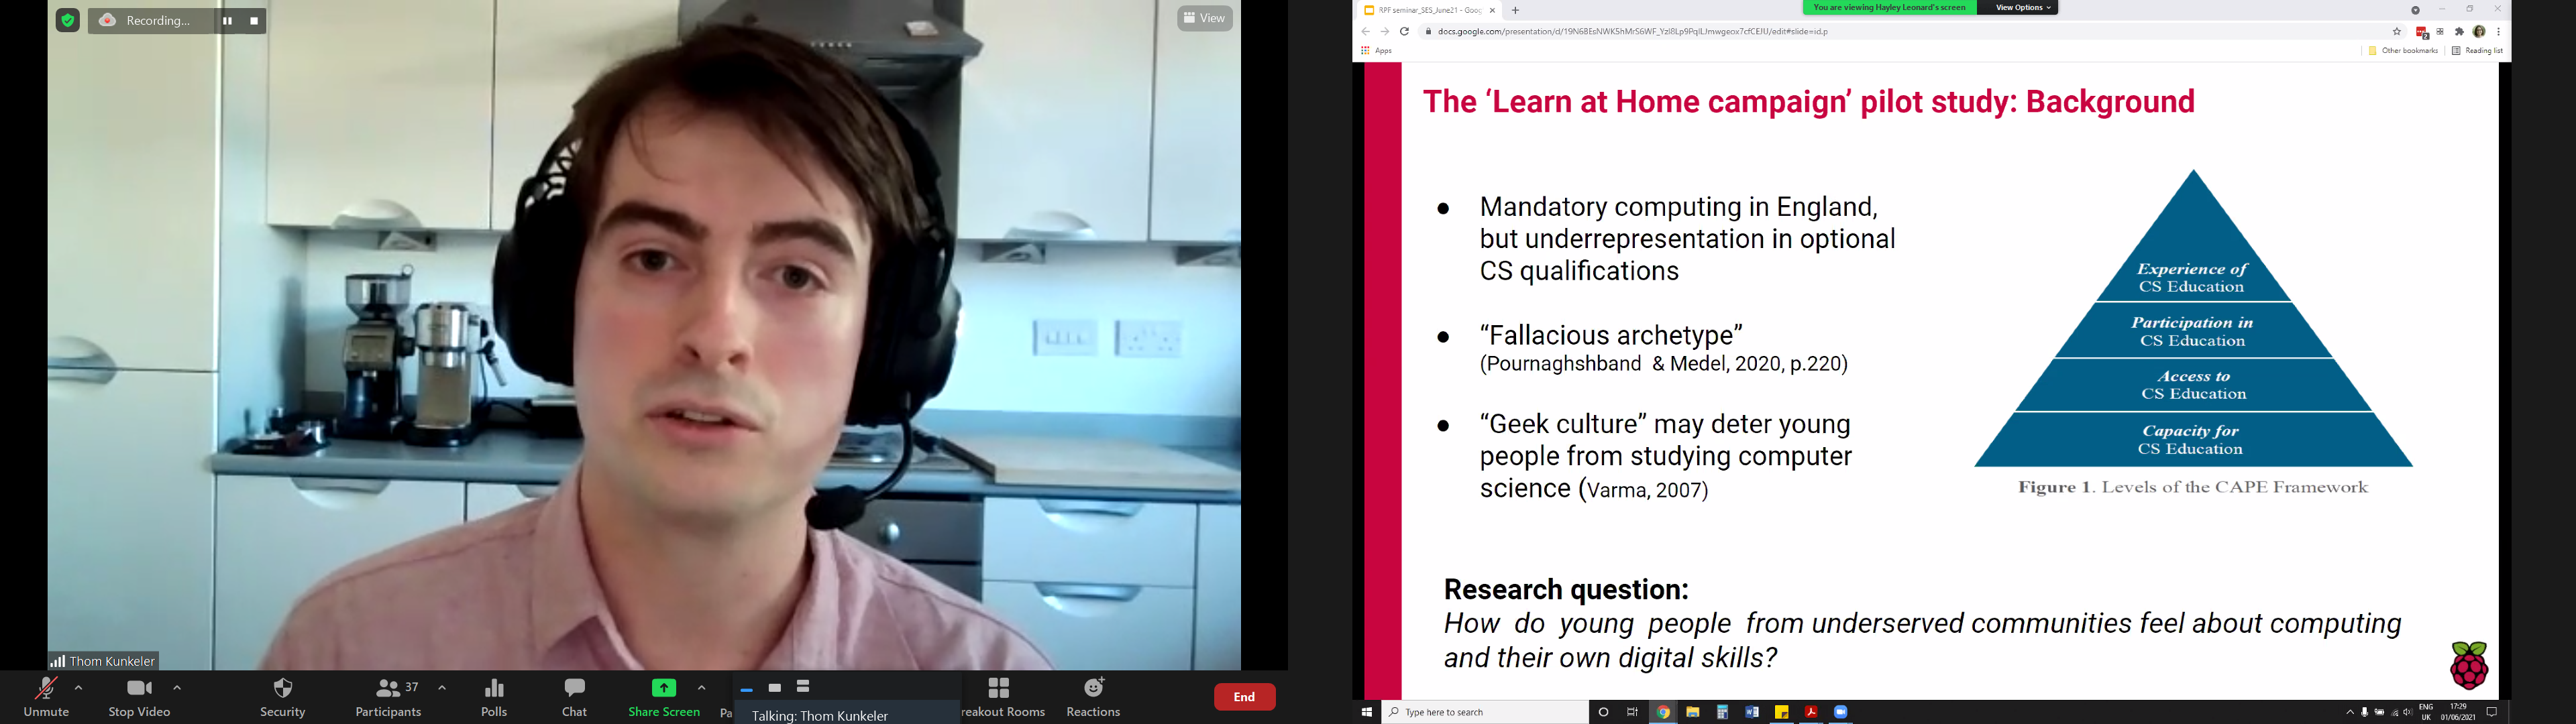
As part of the Learn At Home campaign, Hayley and Thom conducted a pilot study of how young people from underserved communities feel about computing and their own digital skills. They interviewed and analysed responses of fifteen young people, who had received hardware through Learn At Home, about computing as a subject, their confidence with computing, stereotypes, and their future aspirations.
Click on the image to enlarge it.
The notion of a ‘computer person’ was used in the interview questions, following work conducted by Billy Wong at the University of Reading, which found that young people experienced a difference between being a ‘computer person’ and ‘doing computing’. The study carried out by Hayley and Thom largely supports this finding. Thom described two major themes that emerged from their analysis: a mismatch between computing and interviewees’ own identities, and low self-indicated self-efficacy.
Showing that stereotypes still persist of what a ‘computer person’ is like, a 13-year-old female interviewee described them as “a bit smart. Very, very logical, because computers are very logical. Things like smart, clever, intelligent because computers are quite hard.” Four of the interviewees were also more likely to associate a ‘computer person’ with being male.
The young people interviewed associated a ‘computing person’ with the following characteristics: smart, clever, intelligent, nerdy/geeky, problem-solving ability. Click on the image to enlarge it.
The majority of the young people in the study said that they could be this ’computer person’. Even for those who did not see themselves working with computers in the future, being a ’computer person’ was still a possibility: One interviewee said, “I feel like maybe I’m quite good at using a computer. I know my way around. Yes, you never know. I could be, eventually.”
Five of the young people indicated relatively low self-efficacy in computing, and thought there were more barriers to becoming a computer person, for example needing to be better at mathematics.
In terms of future career goals, only two (White male) participants in the study considered computing as a career, with one (White female) interviewee understanding that choosing computing as a qualification might be important for her future career. This aligns with research into computer science (CS) qualification choice at age 14 in England, explored in a previous seminar, which highlighted the interaction between income, gender, and ethnicity: White girls from lower-income families were more likely to choose a CS qualification than White girls more from more affluent families, while very few Asian, Black, and Chinese girls from low-income backgrounds chose a CS qualification.
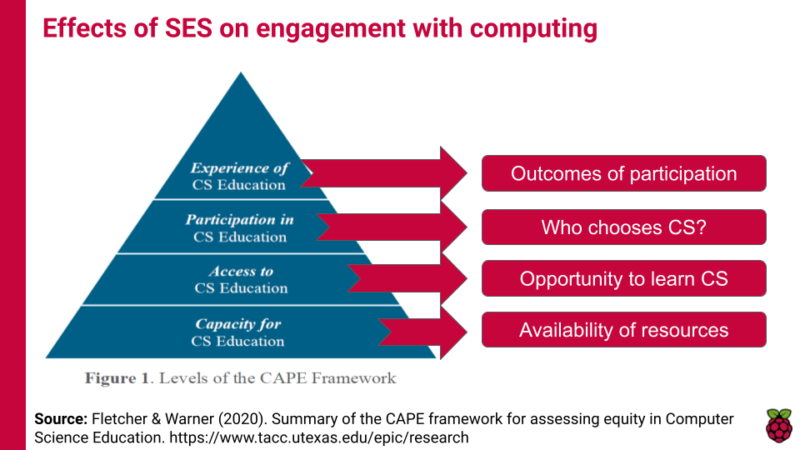
Evaluating computing education opportunities using the CAPE framework
An interesting aspect of this seminar was how Hayley and Thom situated their work in the relatively new CAPE framework, which describes different levels at which to evaluate computer science education opportunities. The CAPE framework highlights that capacity and access to computing (C and A in the framework) are only part of the challenge of making computer science education equitable; students’ participation (P) in and experience (E) of computing are key factors in keeping them engaged longer-term.
Socioeconomic status (SES) can affect learner engagement with computing education at four levels set out in the CAPE framework.
As we develop computing education in the curriculum, we can use the CAPE framework to evaluate our provision. For example, where I’m writing from in England, we have the capacityto teach computing through the availability of professional development training for teachers, fully developed curriculum materials such as the Teach Computing Curriculum, and community support for teachers through organisations such as Computing at School and the National Centre for Computing Education. In terms of access we have an established national curriculum in the subject, but access to it has been interrupted for many due to the coronavirus pandemic. In terms of participation we know that gender and economic status can impact whether young people choose computer science as an elective subject post-14, and taking an intersectional view reveals that the issue of participation is more complex than that. Finally, according to our seminar speakers, young people’s experienceof computing education can be impacted by their digital or technological capital, by their self-efficacy, and by the relevance of the subject to their career aspirations and goals. This analysis really enhances our understanding of digital inequality, as it moves us away from the have/have-not language of the digital divide and starts to unpack the complexity of the impacting factors.
Although this was not covered in this month’s seminar, I also want to draw out that the CAPE framework also supports our understanding of global computing education: we may need to focus on capacity building in order to create a foundation for the other levels. Lots to think about!
If you missed the seminar, you can find the presentation slides on our seminars page and watch the recording of the researchers’ talk:
Join our next seminar
The next seminar will be the final one in the current series focused diversity and inclusion, which we’re co-hosting with the Royal Academy of Engineering. It will take place on Tuesday 13 July at 17:00–18:30 BST / 12:00–13:30 EDT / 9:00–10:30 PDT / 18:00–19:30 CEST, and we’ll welcome Prof Ron Eglash, a prominent researcher in the area of ethnocomputing. The title of Ron’s seminar is Computing for generative justice: decolonizing the circular economy.
To join this free event, click below and sign up with your name and email address:
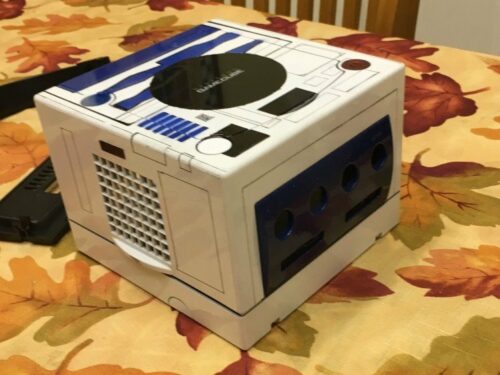
Diehard Nintendo and Star Wars fan electrouser301 is behind this customised R2D2 Raspberry Pi-powered console. Raspberry Pi 3 Model B is its brain, and a Nintendo GameCube was customised with spray paint and hand-cut stencils.
“When I saw what people were doing with Raspberry Pi and emulation it opened up a new world to me. If you would have shown kid-me that I could play the whole libraries of NES, N64, Arcade games, Genesis, SNES, etc. all on one console that you create yourself, to your own specifications, my mind would have been blown. That’s what this whole project was about, bringing back my inner child. I wanted to create and own something that no one else has.”
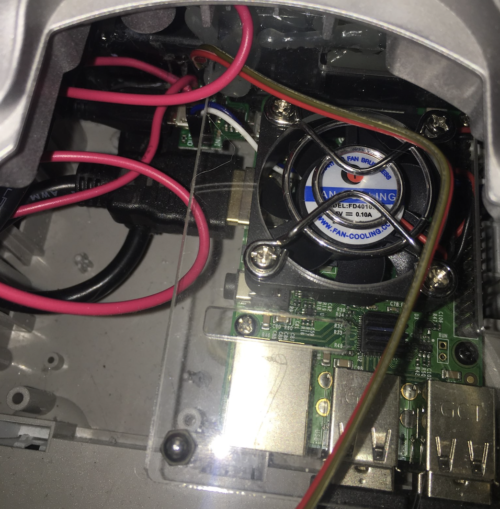
Inner workings of R2D2 Cube
Of course, you could just deck out a GameCube case with decals or paint and keep the internals the same if you don’t want to swap a Raspberry Pi in for emulation. But where’s the fun in that?
See the machine’s power circuit plugged into the Raspberry Pi’s micro USB power slot below. The red and green wires are LED wires, and the power switch wires are pink.
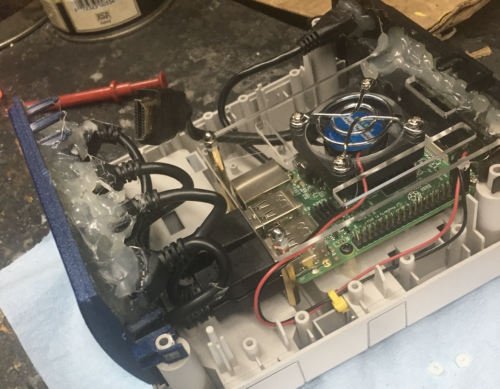
And here’s a side view of the guts of the project:
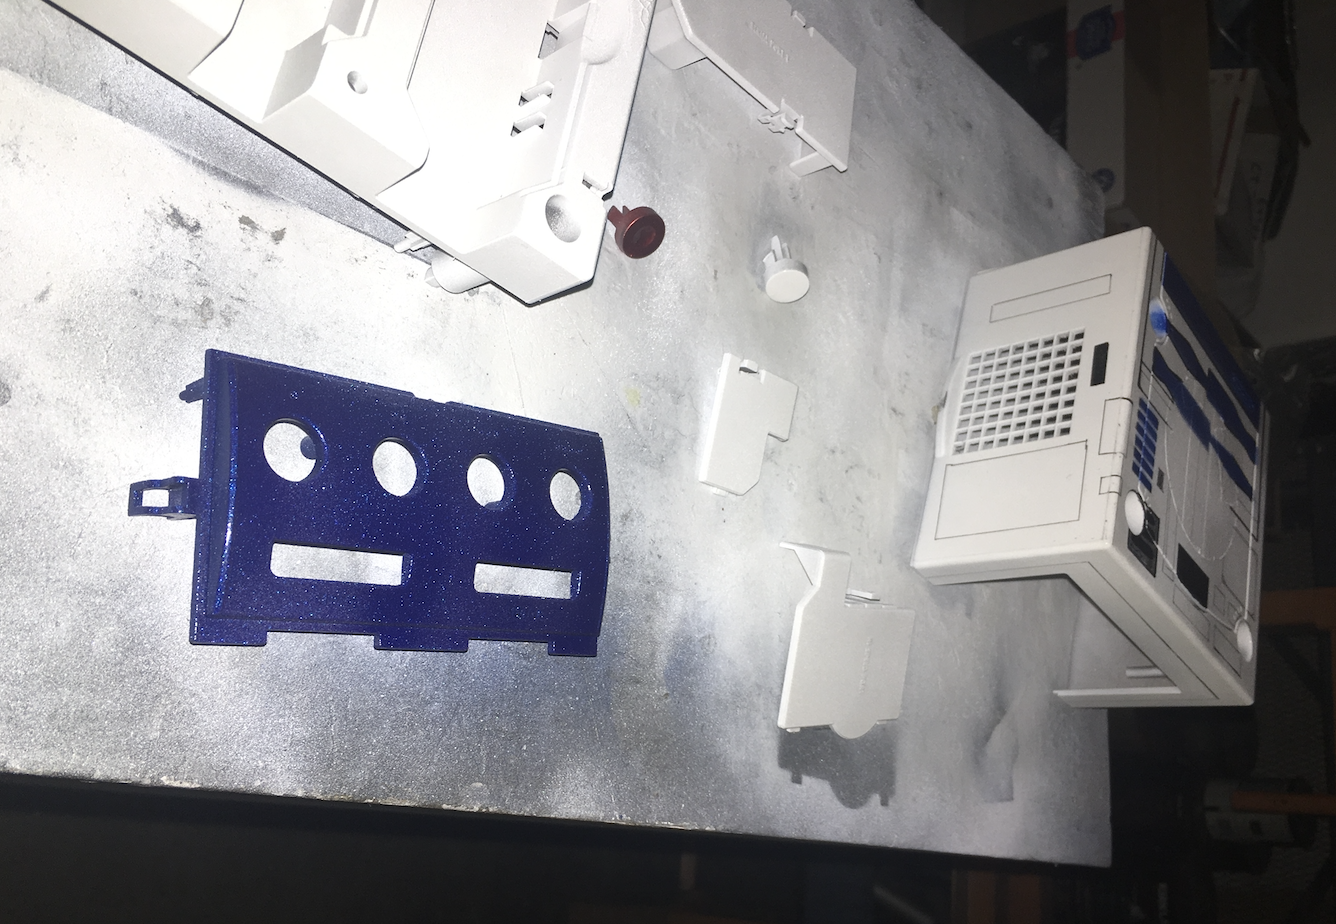
R2D2 makeover
Hand-cut R2D2-inspired paper stencils spray-painted onto the GameCube give it its instantly recognisable style. A unique retro device now adorns electrouser301’s gaming space, and new life has been breathed into one of Nintendo’s finest creations.
R2D2-approved blue and white colour scheme
Top Star Wars maker projects
Take a look at electromaker’s list of Best Star Wars Maker Projects – it’s where we came across this R2D2 GameCube mashup. Naturally, the list features a fair few homemade lightsabers, so check it out if you’re in the market for an upgrade; however, we wanted to share a few Star Wars-themed builds we hadn’t seen before.
First up, an animated Star Wars: The Force Awakens movie poster made with NeoPixel LEDs and an Arduino Mega. Steve from Making at Home coded a built-in motion sensor and customisable brightness settings. Check it out below, because this isn’t just any old poster with a few LEDs taped in the back, oh no.
Pimp my poster
You know we love wearable tech around here, so this DIY Boba Fett helmet with a built-in LED chaser was definitely going to be a favourite. This is a fairly affordable build too, consisting of a few cheap components like LEDs and resistors, while the helmet itself is made from crafty stuff found around the house. Crazy Couple created this project and you should check out their tutorial-packed YouTube channel.
“I am Boba Fett. The ship you seek is nearby.”
BB8 occupies a special place in our hearts, so we love this 3D-printed robot, which is controlled by an Arduino Uno over a Bluetooth connection from your smartphone. Watch maker Lewis’s video below and share in his love for this spherical droid.
Drop some links in the comments to show off your Star Wars-themed builds so we can share in your intergalactic wisdom. Then go be friends with Electromaker on YouTube. Because subscribers of them you should be.
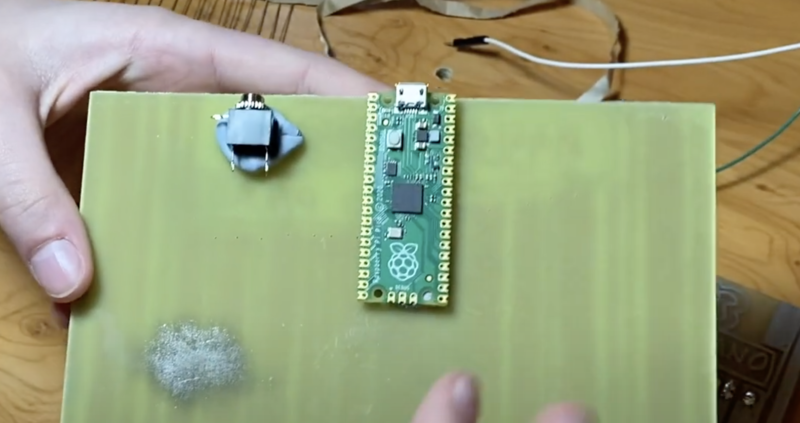
We have a special blog today from one of our own design engineers, Simon Martin. He’s the designer of Raspberry Pi 400 and our High Quality Camera and spends his free time tinkering with electronic music.
This video is a classic. Settle in…
Simon has wanted to make his own electronic musical instrument with Raspberry Pi for some time. He designed a circuit board for the project a year ago, but it lay around in a drawer in his desk while he finished Raspberry Pi 400. Finally, the winter months gave him the incentive to get it working.
Simon’s electronic musical journey
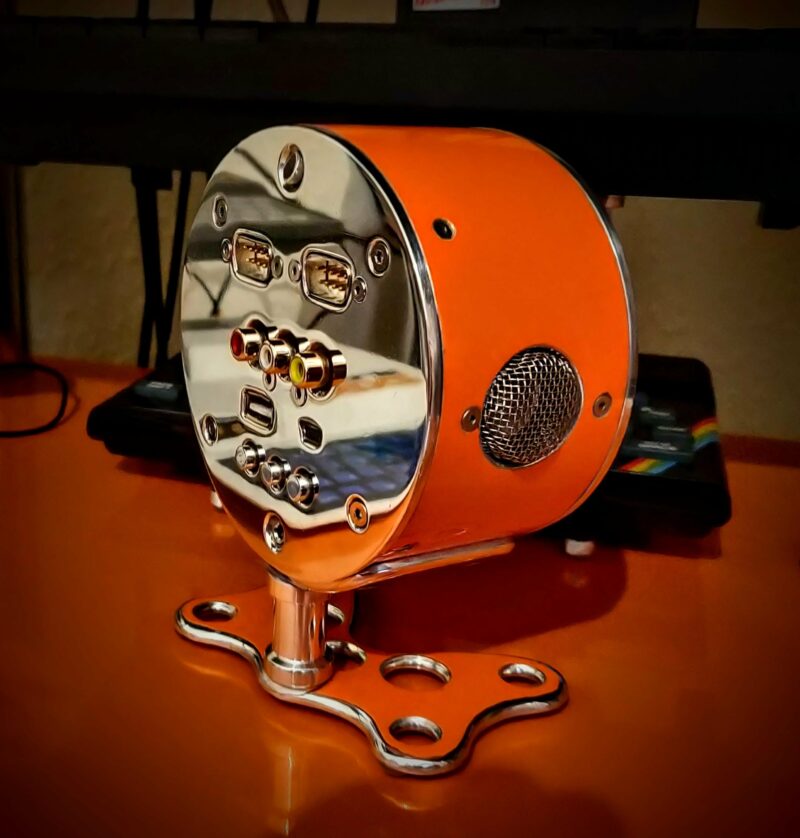
Simon: The Synth6581 device doesn’t look much like an electronic musical instrument, but just like circuit boards stacked on top of a Raspberry Pi 4. You have to plug a musical keyboard into a USB port and a pair of speakers into the audio jack on the bottom board to make it work.
Hefty stack ready to play some electronic music
The code is written almost entirely in Python, with a little bit of C to speed up the communications to the chips. I designed and laid out the circuit boards, which were ordered online. The first six boards cost only £20, but the components were another £100. I spent more than a day soldering the components on the boards by hand. It took much more time to check every chip and connection worked, a common problem with hand-soldering new boards.
Synth6581 — no ordinary sounding instrument
The 1982 Commodore 64 – works like Raspberry Pi 400, only slower
And Synth6581 is no ordinary sounding musical instrument. It’s based on the music chip inside a vintage computer: the Commodore 64. The microchips are almost forty years old and they have a quirky sound that kids in the 1980s loved and parents hated. By the way, did you know that the Commodore 64 was the inspiration for Raspberry Pi 400?
The SID chip sound
The MOS6581 SID chip — just a little smaller than a Raspberry Pi Pico board
I was one of many hobby programmers in the 1980s that used to attempt to program Commodore 64s. Much like people today dabble with programming on Raspberry Pi 400s, kids and adults were dabbling with the BASIC programming language on their Commodore 64s back then. Nowadays, Raspberry Pis have video, graphics, and audio readily available, but back in the 1980s, the hardware registers had to be ‘poked’ one by one into the console window. You had to get quite technical just to get the computer to make a musical sound. Those sounds came from the MOS6581 or ‘SID’ chip. It had such a famous sound character that it formed the basis of the chiptune music genre, and people are still writing music on Commodore 64s today.
Using BASIC POKE commands to control SID chips on a Commodore 64. Not the easiest thing to read.
Poking SID chips
By borrowing a few chips from broken Commodore 64s, including one or two lying around Raspberry Pi Towers, I made those 1980s ping noises into a polyphonic synthesiser controlled in Python on Raspberry Pi. The registers in the SID chips are simply being ‘poked’ by Raspberry Pi instead of Commodore 64. I also reverse-engineered the music from old games and made the sound effects and instruments work across the keyboard.
Simon with his electronic music creation
One of a kind electronic musical device
This device is unique: only one of these will ever be built, so please don’t wait for a launch date. There were over 10 million chips manufactured for Commodore 64, but production of the chips ended nearly 30 years ago. The Commodore 64s and spare parts for them are still in high demand, which is pushing up second hand prices. Nonetheless, the code and schematics are available online on GitHub, and I invite other Raspberry Pi users to use them to make musical instruments out of other games consoles. I reckon Sega Megadrive has a lot of potential for a Raspberry Pi port…
A few of the demos of the electronic instrument on Simon’s YouTube channel
In the latest issue of HackSpace magazine, Ben Everard shows us how to create a framework for building audio devices using Raspberry Pi Pico, called PicoPicoSynth.
Raspberry Pi Pico combines processing power with the ability to shuffle data in and out quickly. This makes it a good fit for a lot of different things, but the one we’ll be looking at today is sound synthesis.
There are a huge number of ways you can make sound on a programmable electronic device, but there’s always space for one more way, isn’t there? We set about trying to create a framework for building audio devices using Raspberry Pi Pico that we’ve called PicoPicoSynth, because it’s a small synth for Pico.
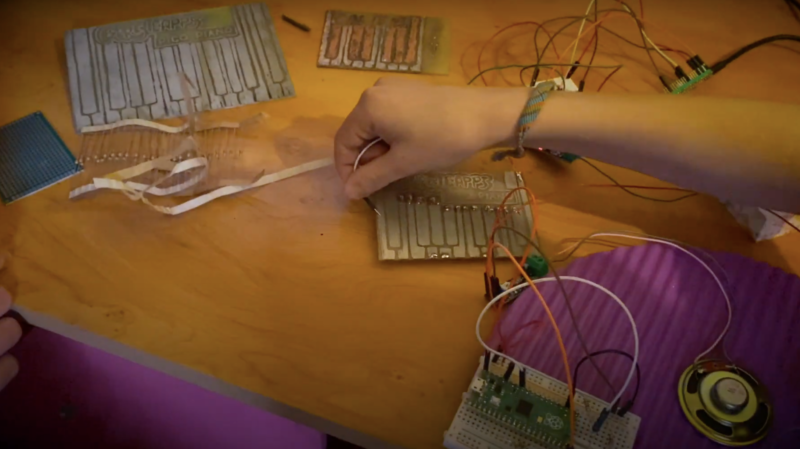
We’re working on a DIY audio board to accompany this software. Hopefully, we’ll be able to show it off in a future issue
Sequencer magic
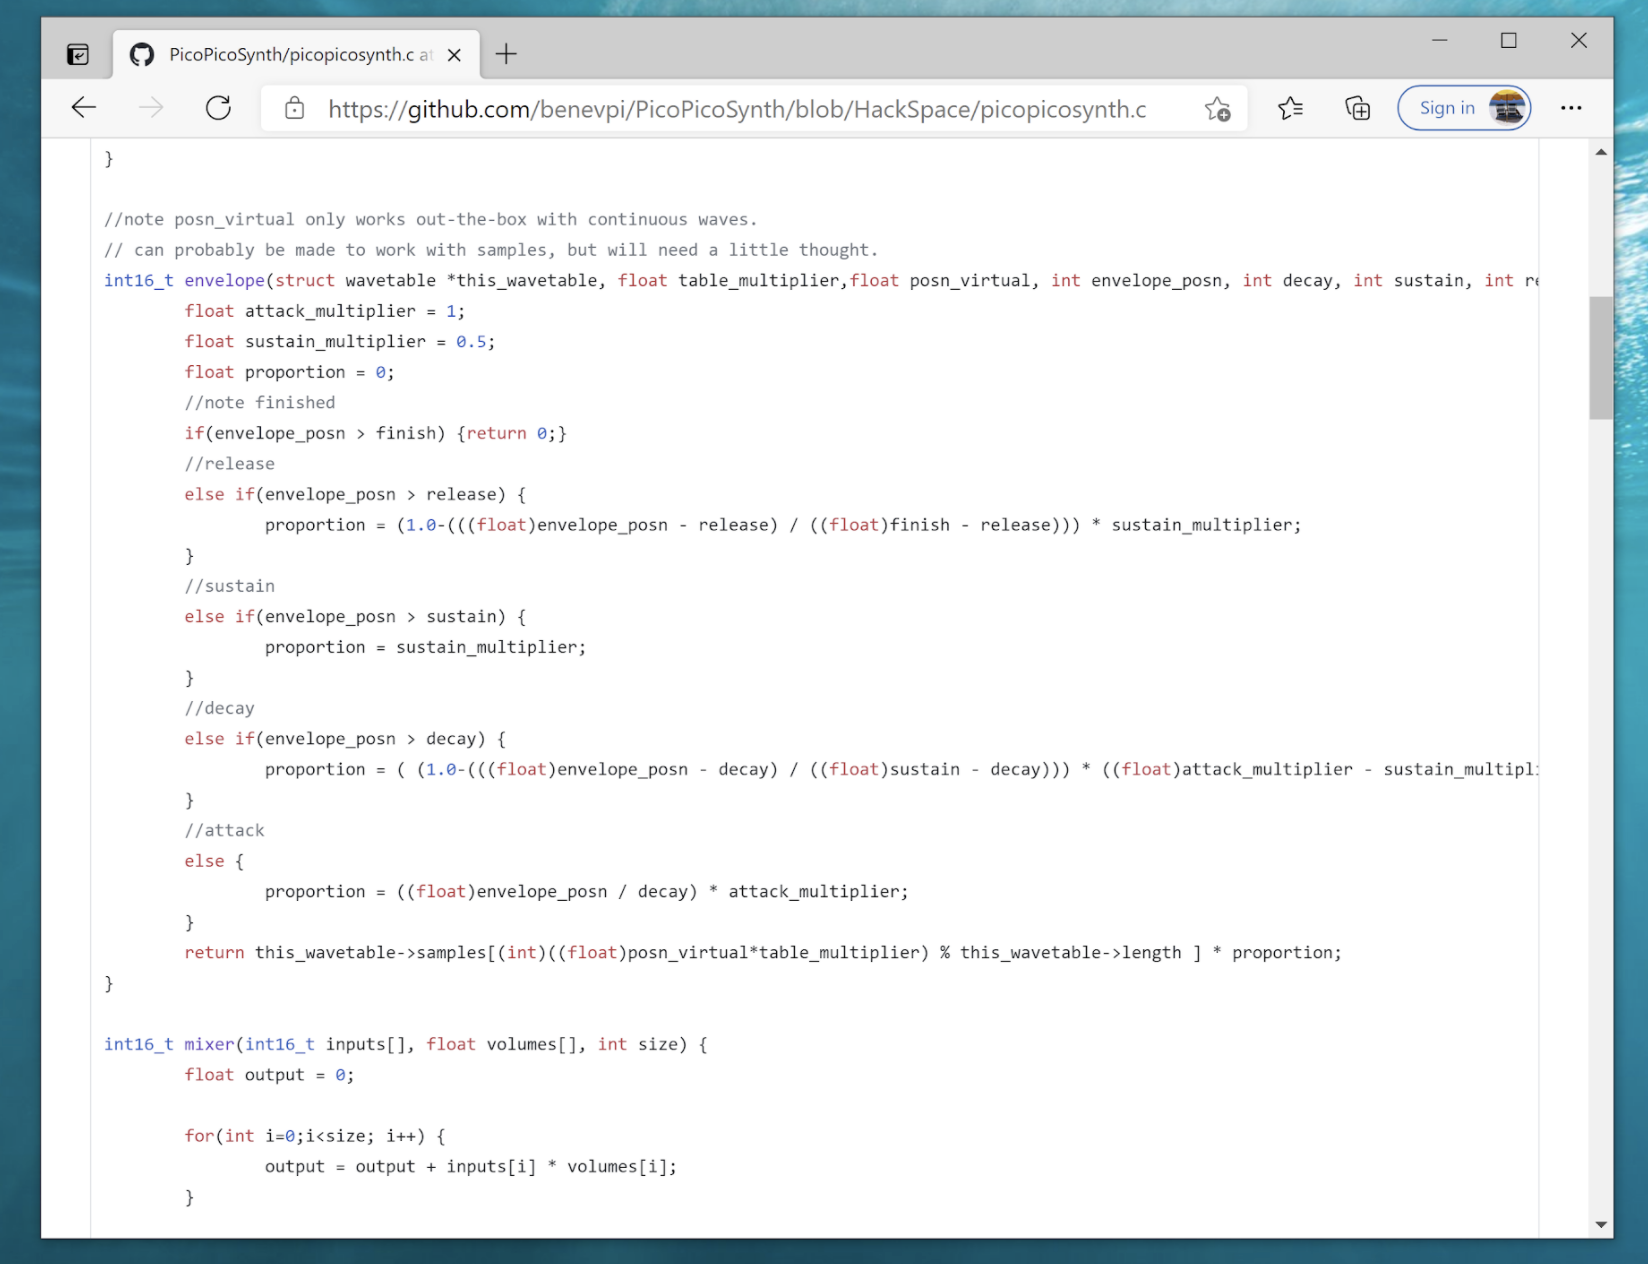
The program is powered by a sequencer. This is a structure that contains (among other things) a sequence of notes that it plays on a loop. Actually, it contains several sequences of notes – one for each type of noise you want it to play. Each sequence is a series of numbers. A -1 tells the sequencer not to play that note; a 0 or higher means play the note. For every point in time (by default, 24,000 times a second), the sequencer calls a function for each type of noise with the note to play and the time since the note first sounded. From these inputs, the callback function can create the position of the sound wave at this point, and pass this back to the sequencer. All the sounds are then mixed and passed on to the Pico audio system, which plays them.
Manipulating waveforms
This setup lets us focus on the interesting bit (OK, the bit this author happens to find interesting – other people may disagree) of making music. That is playing with how manipulating waveforms affects the sound.
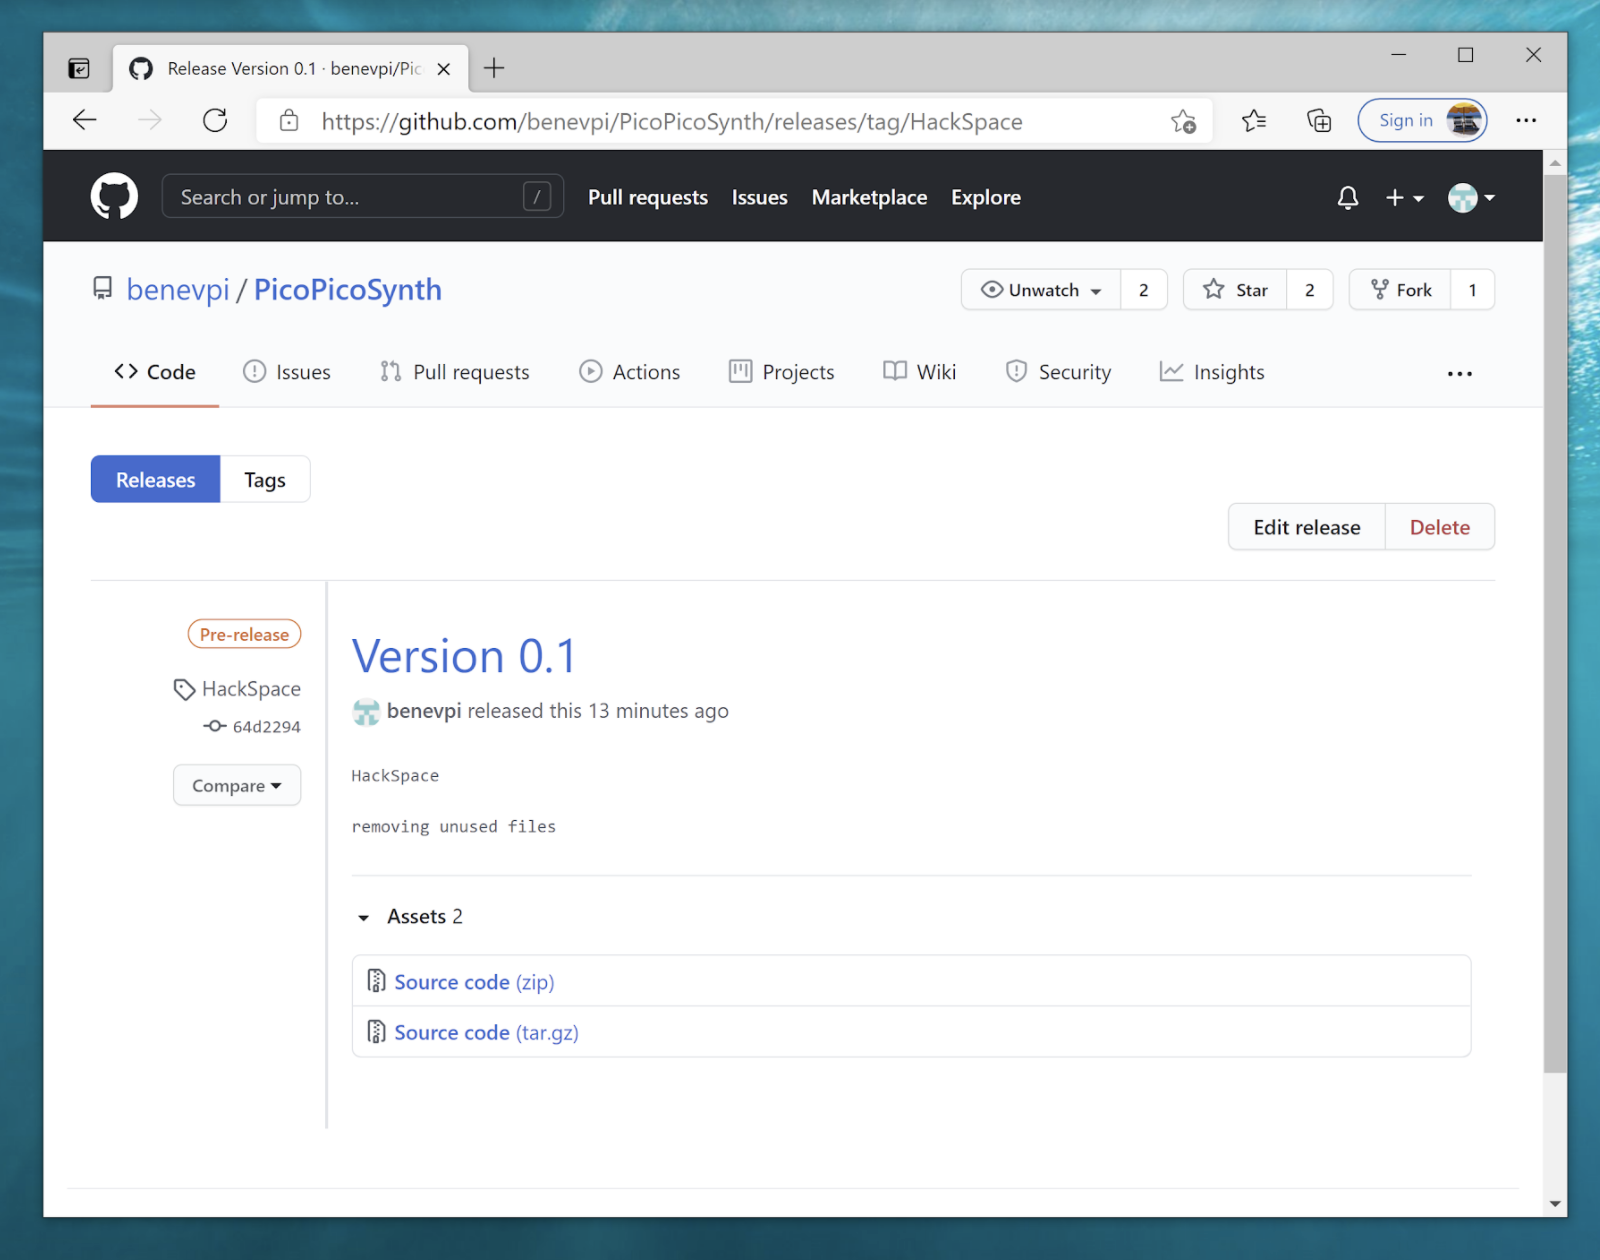
You can find the whole PicoPicoSynth project at hsmag.cc/GitHubPPSynth. While this project is ongoing, we’ve frozen the version used in this article in release 0.1, which you can download from hsmag.cc/PPSythV1. Let’s take a look at the example_synth file, which shows off some of the features.
You can grab the latest version of this code from GitHub
You can create the sound values for PicoPicoSynth however you like, but we set it up with wavetables in mind. This means that you pre-calculate values for the sound waves. Doing this means you can do the computationally heavy work at the start, and not have to do it while running (when you have to keep data flowing fast enough that you can keep generating sound).
The wavetables for our example are loaded with:
low_sine_0 = get_sinewave_table(50, 24000); low_sine_1 = get_sinewave_table(100, 24000); bongo_table = create_wavetable(9054); for (int i = 0; i < BONGOSAMPLES; i++) { bongo_table->samples[i] = bongoSamples[i] * 256; }
The first two create sine waves of different frequencies. Since sine waves are useful, we’ve created a helper function to automatically generate the wavetable for a given frequency.
The third wavetable is loaded with some data that’s included in a header file. We created it by loading a bongo WAV file into hsmag.cc/WavetableEd, which converts the WAV file into a C header file. We just have to scale it up from 8 bits to 16 by multiplying it by 256. There’s no helper function to do the job here, so we have to load in the samples ourselves.
Callback functions
That’s the data – the other thing we need are the callback functions that return the values we want to play. These take two parameters: the first is the number of samples since the note was started, and the second is the note that’s played.
The note is 0 or higher – it corresponds to the number in the sequence, and you can use this however you like in your program. As you can see, both of our functions play sounds on notes 0 and 1.
The library includes a few functions to help you work with wavetables, the main two being no_envelope and envelope. The no_envelope function also takes a multiplier – it’s 1 in the first instance and 0.5 in the second. This lets us speed up or slow down a sample, depending on what we want to play.
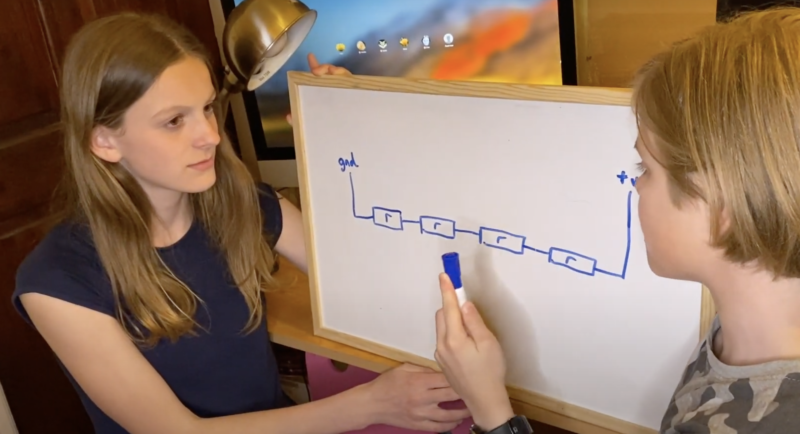
An envelope may be familiar to you if you’ve worked with synths before, and it’s used to convert a constant tone into something that sounds a bit like an instrument being played. You supply four values – the attack, decay, sustain, and release times. During the attack phase, the volume ramps up. During the decay phase, it partially drops to a level that it holds during the sustain phase, and finally it drops to 0 during the release phase. This gives a much more natural sound than simply starting or stopping the sample.
The envelope function also has a multiplier, so we could use the same wavetable for both, but it’s more accurate to generate a specific wavetable for each note if you’ve got the space to store it.
There are also a few sound effects in the synth library that you can apply – BitCrunch, for example. This compresses the sample bit depth down to give the sine wave a distorted sound.
These callbacks don’t have to be sound. You could equally use them to co-ordinate a lighting effect, control physical hardware, or do almost anything else.
Last coding stretch
Now we’ve got the sounds set up, it’s time to link them all together. This is done with the code below.
//add up to 32 different sequences here add_sequence(&main_sequencer, 0, bongo_ sequence, bongos, 0.5); add_sequence(&main_sequencer, 1, low_ sine_sequence, low_sine, 0.5);
Sequences are stored as int arrays that have to be the same length as the sequencer (stored in the BEATNUM macro). This can be any integer up to 32. The numbers in here can be anything you like, as they’re just passed back to the callback functions defined above. The sole limitation being that only numbers 0 or greater are played. We also pass the BEATFREQ value which contains the number of samples per beat.
The final step in setting up the sound is to add up to 32 different sequences to your sequencer.
With everything set up, you can set the music playing with:
while (true) {
//do any processing you want here give_audio_buffer(ap, fill_next_ buffer(&main_sequencer, ap, SAMPLES_PER_BUFFER)); }
Each time this loops, it calculates the next 256 (as stored in the SAMPLES_PER_BUFFER macro) and passes them to the audio system. You can do any other processing you like in the loop, provided it can run fast enough to not interrupt the sound playing.
The envelope function creates a donk, bong, bing, or other sound from a note with a constant volume
That’s all there is to it. Set this code running on a Pico that’s plugged into a Pimoroni Audio Pack (you should be able to make it work with other audio systems – see the ‘Audio output’ box, overleaf) and you’ll hear some strange bumps and wobbles.
Of course, it’s unlikely that you’ll want to listen to exactly this strange combination of distorted sine waves and low bitrate bongos. You can take this base and build your own code on top of it. The callback functions can do anything you like, provided they run quickly enough and return a 16-bit integer. How you use this is up to you.
Did you catch the very cool Raspberry Pi Pico piano project shared on the latest Digital Making at Home livestream? The sibling maker group from the GurgleApps family, Amelie, Caleb, and Ziva, chatted about how they got into coding before inviting us into miniature musical mayhem.
Watch the siblings on the latest Digital Making at Home livestream
What do you need to make a Raspberry Pi Pico piano?
The siblings trialled lots of different materials to find the best keyboard
Multiple coding options
The siblings made two separate keyboards: one coded in MicroPython and another coded in Circuit Python. The Circuit Python-coded board also has MIDI functionality! Watch the video below to learn more about the exploration process.
The original build video on YouTube walks you through the electronics part of the project
Power of resistors
So how do the resistors power this project? Four resistors are connected from ground to power in series, with the highest voltage in the far right-hand resistor (see image below). The voltage drops as we move along the series to the far left-hand resistor. Analog pins sit between each resistor and act as the ‘notes’ on the piano.
Resistor series lesson in session
Perf finish
You don’t even need a board like the kids made, you can just twist or solder a series of resistors together to make the base of your piano and then ‘play’ it by pressing an analog pin against the wires. With a board, the piano looks much cooler though.
A perf board would also work for this project if you don’t want to go to the trouble of making your own piano board but still want something that looks a little more ‘piano-like’ than a bunch of resistors.
Appearances matter
To make the snazzy board you see in the video, the kids grabbed a copper-plated board and drew out designs on sticky paper (their printer was broken so this was a homely, if more time-consuming, option). Stick the paper designs to the copper board, put that board in etching solution, and you’ve got a homemade piano keyboard. They also tried using a Sharpie to draw designs straight onto the board, but the sticker designs look a lot more slick.
Sharpie-drawn designs are finished in a ferric chloride solution
Then tin solution gives the board a silvery finish
Resistor placement perfection and coding
Resistor placement took some time to perfect: the siblings tried out a few cheap copper boards before they got it right. The video below shows you how to code your Pico piano.
This video show you how to code your piano with Raspberry Pi Pico
If you’re a fan of the animated TV series Adventure Time, you’re already excited and scrolling to see how you can build your own Be MOre (BMO) console. And if you’re not: BMO is Adventure Time main characters Finn’s and Jake’s sentient video game system-cum-roomate.
See, you recognise it now, don’t you?
OK, but what does BMO do?
DIY enthusiast Lazuardi Rinaldi, an Electrical & Computer Engineering student at the Georgia Institute of Technology, is behind this retrogaming build. Lazuardi notes that this build is for people with experience of working with electronic projects. You can recreate this project with whatever parts you have to hand, as the build-guide is open-ended, but Lazuardi lovingly built his using Raspberry Pi.
BMO is full of teeny boards and buttons
The ‘real’ BMO can do pretty much anything from making toast to playing detective, but this one was built especially to play RetroPie games on Raspberry Pi. So it’s even better than the original. Maybe.
Laser-cut acrylic plexiglass sheets beautifully house the electronics. Everything had to be perfectly measured to fit Lazuardi’s custom-built controller; the buttons were individually soldered to the perfboard through the already-cut plexiglass.
Precision cutting gives BMO its professional finish
And the carefully-applied sticker sheets made the whole thing look just like the real BMO.
Who’s a pretty Beemo then?
Level-up
Lazuardi plans to add some speakers so they can hear the game music as they play. We reckon making BMO’s legs robotic so it can come and find you when you haven’t played in a while would be a cool addition. Creepy, but cool.
By the way, all the brilliant images and GIFs you see here are from Lazuardi’s original instructable, and I loved them so I borrowed them. This is my fave…