This TikTok Garland Hack Really Works, Folks

The newest holiday decorating hack this year is so simple, you’ll be surprised you haven’t been doing it your whole life: use a shower curtain rod to hang festive garlands. The tip has been all over Instagram and TikTok for the past few weeks, so we gave it a try at my house, and transformed a boring, gray kitchen window into an expression of Christmas cheer—and we didn’t have to put any holes in the wall to do it.

Despite the commentary from the Instagrammer above, it didn’t take 3 and a half hours or cost over $50, but we were going for a more casual vibe. We made ours in about 45 minutes for an estimated cost of $13 for the shower curtain rod; the rest of the decorations were things we had hanging around in the decoration box.

Here’s the before picture:

A window

Credit: Stephen Johnson

And the after:

A window decorated for Christmas

Credit: Stephen Johnson

I’ve watched a few online tutorials about this, and I differ with them on a major point: they generally say you should decorate your Christmas pole and then screw it into the doorway. I say hang the rod first, then decorate. Cheap shower curtain rods aren’t too reliable, and if it crashes down once you put it up, you’ll be sad, plus twisting one into place while fully decorated would be difficult. So make sure it’s sturdy, then decorate on top of it.

The process of how to do it is really simple.

  1. Get a tension shower curtain rod. We went with white instead of silver as it’s less conspicuous.

  2. Decide where to put it. We chose the window above the kitchen sink, but wide doorways and archways work really well too.

  3. Install the shower curtain rod.

  4. Decide on a theme. This is a very “just see what works” kind of project, but for best results, decide on a rough theme before you start. I’m very much in the “limitations add to creativity” school of thought, so we looked at what we already had in our decoration box instead of going to the store and being overwhelmed with options. We ended with classic Christmas “red, white, and green.”

  5. Decide on the order of ornament placement. The order you put decorations on the Yule-rod depends on what decorations you’re using. Be logical about it, though. Usually it goes garland-lights-ornaments, but not always. We first tied the dangling Christmas ornaments to the rod, not the garland, then hung the garland, wrapped the white lights around it, added the bow, and then stuck some Christmas tchotchkes on the window sill.

  6. Use zip ties: Zip ties are better than string, tape, or any other method for affixing the garland to the rod. Zip ties are easy, fast, and sturdy. You might be able to get away with just twisting the garland around the rod, but a zip-tie means you’re sure.

  7. Choose the right ribbon: Get the ribbon with the wire in it and save yourself a ton of trouble.

Below are some links to garlands and shower curtain rods, but you may have almost all of these decorations already.


Suggested products

Zenna Home Curtain Adjustable Tension Shower Rod

Clear Christmas String Lights

KINGLAKE GARDEN Green Zip Ties

National Tree Company Pre-Lit Artificial Christmas Garland

VATIN Christmas Ribbon,Wired Holiday Party Ribbons


Source: LifeHacker – This TikTok Garland Hack Really Works, Folks

The Best and Worst Times to Travel Over the Holidays, According to AAA

After surviving very busy roads and airports over Thanksgiving, Americans traveling during the winter holidays can expect a lot more of the same: congestion and crowds. If you’re driving or flying, you’ll want to have a strategy to minimize the impact.

The American Automobile Association (AAA) estimates that nearly 104 million people will drive at least 50 miles from home over the winter holidays—1.8% more than in 2022 and the second-highest number since the group started forecasting in 2000. Meanwhile, 7.5 million people will fly during the same period (a 4.7% bump over last year), making it the busiest year for air travel on record.

For its forecast, AAA considers the “year-end holiday travel period” to span the 10 days from Dec. 23 to Jan. 1.

The best and worst times to drive over the holidays in 2024

AAA says to expect the worst traffic on Saturday, Dec. 23, and Thursday, Dec. 28, as well as some congestion on Saturday, Dec. 30. Minimal impacts are predicted for Dec. 24–25 as well as Dec. 31–Jan. 1 (Sundays and Mondays).

Saturday, December 23

  • Best time: before 10 a.m.

  • Worst time: 11 a.m. to 7 p.m.

Tuesday, December 26

  • Best time: before 12 p.m.

  • Worst time: 1 p.m. to 5 p.m.

Wednesday, December 27

  • Best time: before 12 p.m.

  • Worst time: 1 p.m. to 7 p.m.

Thursday, December 28

  • Best time: before 12 p.m.

  • Worst time: 2 p.m. to 8 p.m.

Friday, December 29

  • Best time: before 12 p.m.

  • Worst time: 2 p.m. to 8 p.m.

Saturday, December 30

  • Best time: before 12 p.m.

  • Worst time: 5 p.m. to 7 p.m.

AAA also predicts peak congestion windows for major metro areas, though the worst days, times, and specific stretches of road vary widely. For example, I-80 from San Francisco to Sacramento is expected to see a 73% increase in traffic on the evening of Saturday, Dec. 23, while I-25 from Fort Collins to Denver will hit its peak (67% over normal) on the afternoon of Friday, Dec. 29.

The best and worst times to fly over the holidays in 2024

If you’re flying, you can also expect airports to be busier on certain high-volume days. This may be less avoidable than road traffic, especially if you’ve already booked your tickets, but you can at least be prepared for the crowds and the chaos.

Note that airport traffic and flight delays can be harder to predict because of variables like the weather and technical meltdowns, as well as changing schedules across different days of the week. The Points Guy reports that the busiest air travel days last season were Thursday, Dec. 21; Friday, Dec. 30; and Monday, Jan. 2 according to TSA data.

Meanwhile, industry group Airlines for America predicts that the busiest days this year will be Dec. 21–22 and Dec. 26–29, while the quietest will be the holidays themselves: Christmas Eve, Christmas Day, New Year’s Eve, and New Year’s Day.


Source: LifeHacker – The Best and Worst Times to Travel Over the Holidays, According to AAA

How to Reset Your Google Home Mini Before You Sell It

A Google Home Mini can be exceptionally useful little smart device. But when it comes time to upgrade and you want to sell it, or when the speaker starts giving you issues and you can’t fix it any other way, a factory reset may be in order. This type of reset is great for severing any connections to your account before you send it off to a new owner, as well as for clearing up possible operating issues.

There are currently two available types of Google Home Mini. The first generation is the Home Mini name, while the second is called the Google Nest Mini, to signify Google’s move towards labeling most of its smart home tech under the Nest moniker. We’ll break down steps for both generations below.

Of course, you’ll first want to know which Google Home Mini you have. To determine which generation your smart speaker is, simply turn the device over. If it doesn’t have a wall-mount screw slot, then you’re using a Google Home Mini. If there is a screw slot, you have a Google Nest Mini.


Products to consider:

Looking for an updated smart speaker to replace your Google Home Mini? Here are a few good bets.


How to reset a Google Home Mini

If you’re sporting the older Google Home Mini, reseting it to factory settings is really easy—but note that you cannot reset the Google Home Mini from the Google Home app. Instead, you will need direct access to the speaker.

To start the reset process, locate the reset button, which is beneath the power cord on the bottom of the device. Press and hold the reset button for 15 seconds to begin the factory reset. From there, all you need to do is wait for the device to chirp, signifying that the wipe is complete.

How to reset a Google Nest Mini

Like the original Google Home Mini, reseting the Google Nest Mini will also require direct access to the speaker. To get started, turn the device on its side and locate the microphone on/off switch, which normally allows you to easily mute the microphone when you don’t want Google Assistant to be listening for your commands.

Once you have located the switch, flip it to the off position, and then press down and hold the top of the speaker where the LED lights appear. After around five seconds, your device should begin the factory reset process. Keep holding the top of the speaker for another 10 seconds, until you should hear a chirp or chime that tells you the process is complete.


Source: LifeHacker – How to Reset Your Google Home Mini Before You Sell It

When You Have to Use an Insurance Check for Repairs (and When You Can Keep It)

Insurance is something you probably don’t think about much until you need to use it. That can make an insurance payout—whether for a car accident or damage to your home—feel like money dropping from the sky. When you need that money to repair your car or your property to make them usable again, it’s a foregone conclusion what you’re going to use that money for. But what if you don’t strictly need to make those repairs, whether you can handle them yourself or the damage is cosmetic and you don’t care about it? Can you just keep that insurance settlement?

Maybe. If the damage doesn’t make the vehicle unsafe to operate or the house unsafe to occupy, or you’re qualified to fix things yourself, there are a few scenarios where you can just drop that check into your account and use it on whatever you want. But before you start treating that insurance check like a lottery win, make sure you understand the situation.

When you can keep an insurance check

Whether we’re talking about a piece of property or a vehicle, you can usually do repairs yourself and keep an insurance check provided:

  1. You own the property outright, without a loan or mortgage. If you have a loan associated with it, your lender has a say in what happens, and will probably require you to make the necessary repairs. The check might even need to be endorsed by the lender.

  2. Your policy doesn’t contain any language requiring repairs be made. Some insurance policies will specify that payments for repairs have to be used for their specified purpose. Before you keep that check for yourself, review your policy.

  3. Your insurer doesn’t make the check out to a specific repair entity. Many car insurance companies have repair shops they work with, and they may require you to use one of them and pay the shop directly.

  4. Your state doesn’t have regulations requiring that you use insurance money for repairs. Your insurer can advise you on this if you’re not sure, or you can contact the appropriate agency in your state to find out.

If your situation checks those three boxes, you can keep that sweet payout money and handle the damage to your stuff any way you see fit.

What can happen if you keep the check and skip the repairs

Just because you can keep the insurance money doesn’t mean you should. There are a few negative consequences that can result from not using that money to make repairs:

  1. Compromising future claims. If you don’t repair the damage and your car or property suffers future damage, you might run into trouble. If your insurer considers the new damage to have been compounded or made worse due to the lack of previous repairs, they may deny future claims.

  2. Loss of coverage. Your insurer may also drop coverage if you don’t make repairs to your property or vehicle. A damaged vehicle or house is more vulnerable to future damage, which may affect your property’s insurability.

  3. Safety. If you’re not qualified to do the repairs, or decide not to do them at all, you might be putting your safety at risk. Cars involved in accidents may have hidden damage or weakened components that may fail, and failure to repair roofs, electrical wiring, or other components of a house properly can lead to more problems. If you’ve already spent the money on something else and then realize you actually do need to make those repairs, you’ll have to reach into your own pocket to do so.

The decision to keep an insurance check depends on several factors: The language of your insurance policy, you local laws, and your own judgment. In many cases, if you need that cash for other things and you own the insured property outright, you can probably keep the money—but whether you can do so safely isn’t so easily determined.


Source: LifeHacker – When You Have to Use an Insurance Check for Repairs (and When You Can Keep It)

These Are All the New Features in watchOS 10.2

While watchOS 10 added some great new features, it also, for some reason, removed the ability to swipe on your screen to change watch faces. This move was controversial among Apple Watch users, who swiped at their watch screens left and right in vain. Fortunately it looks like the feedback reached Apple, as the company reversed the change with watchOS 10.2. Along with this welcome change, there are a handful of other useful additions in this latest watchOS update.

Swipe to change the watch face

It’s time to celebrate: you can once again quickly change watch faces on your Apple Watch. If you prefer to swipe the screen of the watch to change its face, you can go to the Watch app on your iPhone and head over to Clock and enable Swipe to Watch Face. WatchOS 10.2 also fixes a bug where watch faces wouldn’t appear on the device.

Add a confirmation before ending workouts

If you tend to accidentally end your workouts on your watch, you can force watchOS to show a confirmation dialog before wrapping things up. To do so, go to the Watch app on your iPhone, navigate to Workout, and enable End Workout Confirmation.

Siri is more useful

In watchOS 10, you have access to on-device Siri that works even when you’re offline. The 10.2 update brings more features to Siri. You can ask Siri to log and read back health data from your Health app. That includes metrics like how much you weigh, what your step count is, what medications you take and when, and other questions about your health. This option is only available on Apple Watch Series 9 and Ultra 2.

Prioritize music or trainer’s voices in Apple Fitness+

Those who use Apple Fitness+ will be able to choose if they want to focus on the music or on the trainer’s voice. You can increase the volume of the trainer’s voice or the music, depending on what you find more helpful.

Automatically view Now Playing information near your HomePod

As long as you have an Apple Watch Series 6 or newer, you will be able to quickly check what’s playing on your HomePod mini or HomePod (2nd Gen). If you’re near your HomePod and check the Now Playing widget on your Apple Watch, you’ll see what’s playing on the Music or Podcasts apps.


Source: LifeHacker – These Are All the New Features in watchOS 10.2

The Best Gifts for Kids Who Love to Read (That Aren’t Books)

I don’t care if they’re reading Captain Underpants or unofficial Minecraft fan fiction—I’m just happy my boys love books. I want them to keep up their interest, so I’m always on the lookout for gifts that will nurture their interest in the written word. If you want to cultivate a young reader, too, here are some items that can help right in time for the holidays. 

Lantern book night light

My boys received book night lights last year because they love reading into the night, but my youngest son got a little too rough with his and broke it within a week of receiving it. The durability of this lantern, along with its soft sunset mode, makes it an attractive replacement for the one he mangled. 

Moonlite storytime mini projector

Give your bedtime stories a visual element with these reels that project words and images using the flashlight from your smartphone, allowing you and your kids to read along. There’s even an app that adds sound effects to the experience. This package has four stories based on Pixar movies, but you can also pick up tried and true classics like Goodnight Moon and The Very Hungry Caterpillar

Mo Willems book tote bag

Making my way from my local library to my car is an exercise in dexterity as I usually carry a multitude of books of varying shapes and sizes that my sons checked out. I won’t have to worry about that with this fabulous tote bag featuring a trio of beloved characters created by author and illustrator Mo Willems, sure to make the holder the cool parent in any social situation.

Dog Man plush

If you know anyone under 9, you’re undoubtedly aware that author Dav Pilkey’s Dog Man graphic novel series, a spin-off from his Captain Underpants books, is beloved by young readers. (It’s rumored there’s even a movie in the works.) Now your kids can bring the adventures of the part canine, part man police officer to life with this adorable plush.

Pete the Cat: The Missing Cupcakes board game

Your preschoolers don’t have to be readers to play this board game based on one of the many books by Kimberly and James Dean featuring the titular blue cat. Players have to sing, match items, and perform activities to locate the delectable deserts Grumpy Toad stole. The game changes each time, making it the perfect addition for your family game night.

StoryCaptain subscription service

Not sure of what to read to your little bookworm? Let StoryCaptain help you find your child’s new favorite story. Each month, you receive two to three picture books curated by parents and teachers, an activity guide, and other fun freebies revolving around a theme suited for your child’s age, filling their shelf with an eclectic library of stories.

Rainbow Scratch bookmarks

Work both sides of your child’s brain with this set of bookmarks they can craft themselves. All they have to do is use the wooden stylus to reveal the rainbow colors underneath and design it however they choose. Adult readers can use these as party favors for their book club’s holiday party. 

Wonderbly

We’ve all gotten lost in a story on occasion, but when you open a Wonderbly book, you’ll have to find yourself. It’s a personalized Where’s Waldo where your child’s name is on the cover, and their avatar is the missing character. Let the search begin! 

Highlights magazine subscription

Kids don’t have to wait for their next visit to the pediatrician to read Highlights. Each issue has incredible articles about the world, plus cool craft ideas, puzzles, and coloring pages to keep them occupied for hours.

Reading Rainbow T-shirt

Maybe the way to get our kids excited to read is to share what got us into books. Many parents found their love of reading through the beloved LeVar Burton-hosted PBS show, so getting this shirt for yourself might also foster a love of reading in your child. Just tell yourself that when you add it to your cart. 

Reading socks

When your kids slip these socks on, you’ll get the message loud and clear: They’re reading, so now is not the time to do chores.

Book page holder

This item is one of those simple but convenient items you wish were around when you cracked open that copy of The Lion, The Witch, and the Wardrobe for the first time. For that segment of readers who like to read with one hand, you place this on your thumb, and it keeps the book wide open. It also comes in handy for parents when they want to show the illustrations to children as they read or when older kids are trying to follow the lines in chapter books. 

Reading journal

Your little reader can keep track of the books they’ve read, create their book wish list, write down their favorite literary quotes, review what they’ve read, or keep track of their library loans with this colorful journal. There are also editions for teens and parents.

Reading pillow

No one will want to read if it gives them a crick in the neck. This comfortably cushioned bed wedge will give your young reader the support they need anywhere they want to crack open the latest Wings of Fire book, whether it’s on the couch or the living room floor. It also comes in various colors and designs, so your kid is bound to find something that suits them.

Best gifts for young readers:

Lantern Book Night Light: $19.97

Moonlite Storybook Reels: $33.60

Mo Willems Book Tote Bag: $22

Dog Man Plush: $18.73

Pete the Cat: The Missing Cupcakes Boardgame: $15.99

StoryCaptain Subscription Service: Yearly Subscriptions start at $19.95 a month

Rainbow Scratch Bookmarks$8.95

Wonderbly$39.99

Highlights Magazine Subscription: $6.99

Reading Rainbow T-shirt: $11.34-$20.55

Reading Socks: $7.99

Book Page Holder: $5.95

Reading Journal: $12.99

Reading Pillow: $30.99-$45.99


Source: LifeHacker – The Best Gifts for Kids Who Love to Read (That Aren’t Books)

Here's When Fixing Your Dryer Makes More Sense

Although dryers typically have a lifespan of between 10 and 13 years, they don’t always last that long. If yours stops working, you have to choose between paying to have it fixed, or shelling out for a new appliance. Here’s what to consider when making that decision.

Should you repair or replace your dryer?

First, if your dryer is relatively new, check to see whether it’s still under warranty. If it’s not, experts at Consumer Reports suggest looking up your dryer’s model number to see if the problem you’re experiencing prompted a recall—in which case, the manufacturer would cover repairing or replacing the appliance.

In the event that neither of the situations above apply, you’ll have to determine whether it makes more sense for you to fix your dryer, or purchase a new one.

Consumer Reports recommend considering the following factors:

  • How much you paid for your dryer

  • How many years you have owned it

  • Repair costs

  • Whether it’s electric or gas

To make the calculations easier, you can enter some basic information into this interactive tool, using the slider tool to adjust the numbers.

How much does it cost to repair a dryer?

In a Consumer Reports survey, 69% of participants opted to fix their dryer when it stopped working instead of buying a new one. In some cases, repairs can be simple enough to do yourself, like clearing a lint blockage. Other problems aren’t as straightforward, and require a professional technician. So, what will that set you back? Here are the median repair costs for different types of dryers:

  • Low-priced electric dryers (under $800): $133

  • Mid- or higher-priced electric dryers (over $800): $173

  • Low-priced gas dryers (under $800): $149

  • Mid- or higher-priced gas dryers (over $800): $192

The full report contains even more information on dryers, including how to identify the problem, and how pick out a dryer that will last longer.


Source: LifeHacker – Here’s When Fixing Your Dryer Makes More Sense

You Can Finally Disable Read Receipts on Facebook Messenger

Meta is adding new features to Facebook Messenger—and never mind that are arguably years too late in coming. The service recently implemented end-to-end encryption as the default for one-to-one chats, and with the same update, there’s finally an option to disable read receipts. (No more will you need to turn on Airplane mode every time you want to sneak a peek at a message.) Plus, you can finally edit your messages too.

How to disable read receipts in Facebook Messenger 

Let’s talk about the big one first: The ability to disable read receipts is a huge win for your privacy. You can now finally use the Messenger app to talk to people without the added pressure of them knowing you’ve seen their message, which can be an inconvenience or, in the case of online abuse, a real problem.

You can now disable read receipts for individual chats, or all your contacts at once. This means the other person won’t know when you’ve opened or read their message. On the downside, when you disable the feature on your account, you won’t know when they’ve read a message you’ve sent either. I think most of us can stomach that sacrifice to finally disable read receipts, though.

To disable read receipts for all contacts, go to Settings > Privacy & Safety > Read Receipts and turn off Show Read Receipts. To disable receipts only for a particular conversation, tap on the contacts name from the top of the thread, go to Read Receipts, and disable Show Read Receipts

How to edit messages in Facebook Messenger

Messenger has also taken a page straight out of the iPhone Messages app and WhatsApp; you can now edit any message for up to 15 minutes after you’ve sent it. You’re free to edit the message as many times as you want in that 15-minute window, and there’s no visible edit history, so no one will be able to see what you changed.

This works both on the app and on the web. To edit on the app, tap and hold the message and choose the Edit button. On the web version, click the three dots next to he message you want to update and choose edit.

After you make your changes, the message will display an “Edited” tag, but the other person won’t have a way to see what it said before. And note that Meta will keep a copy of the message on its servers, so if someone uses this as a form of abuse, you’ll still have the tools to properly report them. 


Source: LifeHacker – You Can Finally Disable Read Receipts on Facebook Messenger

The Best E-bikes for Every Type of Rider

We’re in the middle of an international e-bike surge. With so many companies churning out battery-assisted bikes of all types—from the reputable names in “analog” bikes like Trek and Cannondale, to countless fly-by-night companies offering mail-order rip-off rides—it can be difficult to know where to start. So start here.

The bikes listed below have either been positively reviewed by Lifehacker’s staff or come with high praise from reputable sources. Our focus is on affordable, general-interest electric bicycles; we’re saving the $10,000 super-bikes for another time. Whether you’re buying for yourself or a lucky someone on your list, there will be something here that fits the bill.

Best overall

Aventon Pace 500.3 (currently $1,599)

The Aventon Pace 500.3 e-bike

Credit: Stephen Johnson

No e-bike can be all things to all people, but the Pace 500.3 comes close. It’s affordable, well-designed, and it’s a class 3, so it’s powerful enough to keep up with any e-bike on the bike path. This zippy commuter hits the bullseye between “high performance” and “beginner friendly.”

Read my full review of the Aventon Pace 500.3.

Where to buy an Aventon Pace 500.3

Best budget e-bike

Propella 7S (currently $899)

Propella 7S e-bike on the beach with rider

Credit: Stephen Johnson

The Propella 7S is a lightweight, stylish bike that’s fun to ride even without the extra kick from the motor. If you want to pay less than a grand for a riding-around-town e-bike that performs well and looks snazzy, this is the bike for you. 

Read my full review of the Propella 7S

Where to buy a Propella 7S

Runner-up: JackRabbit OG ($999)

This tiny, pedal-less “micro e-bike” stretches the definition of the word “bicycle.” It weighs only 24 pounds, travels at 20 mph, and costs less than $1,000. As Eletrek put it: “for an urban dweller or a college student trying to get around campus, the JackRabbit is an ideal vehicle.”

Where to buy a JackRabbit OG

Best folding e-bike

Ride1Up Portola ($995)

Ride1Up Portola folding e-bike

Credit: Ride1UP

Lifehacker’s Daniel Oropeza reports that the Portola from Ride1Up “fits in my Toyota Corolla, which is surprising and very practical. It’s easy to fold and fits in my living room squared away neatly. It’s great for people who like to take it places with them like road trips or those who have small apartments.”  

Where to buy a Ride1Up Portola

Runner-up: Montague M-E1

A full-size bicycle with 28” wheels that easily folds up small enough to store under your bed, Wired said the Montague M-E1 “comes pretty darn close to perfection.”

Where to buy a Montague M-E1

Best utility e-bike

RadRunner 3 Plus ($2299)

Radrunner 3 Plus e-bike

Credit: Stephen Johnson

The RadRunner 3 Plus is the SUV of e-bikes. It will happily eat up suburban streets, gravel roads, and everything in-between. Powerful, easy to use, ridiculously customizable, and fun to ride, the RadRunner 3 plus is a best-in-class utility e-bike.

Read my full review of the Radrunner 3 Plus

Where to buy a RadRunner 3 Plus

Runner-up: Co-op Cycles Generation e1.1 (currently $898.93)

CNN said REI’s Generation e1.1 is “a near-perfect utility bike for the first-time e-bike rider or anyone electric-curious and looking for an affordable new ride.” Plus, you can pick one up at your local REI.

Where to buy a Co-op Cycles Generation e1.1 Electric Bike

Best cruiser e-bike

Electra Loft Go! 7D e-bike

Credit: REI

Electra Loft Go! 7D EQ ($2,000.00)

According to Wired, the Electra Loft Go! 7D EQ is the perfect all-around cruiser for beginners: “If you want to bike around the beach or your neighborhood, but you’re afraid of electric bikes—or even of bikes in general, what the hey—this is a great place to start.”

Where to buy an Electra Loft Go! 7D EQ

Runner-up: Ride1Up Cafe Cruiser (currently $1,195)

A comfy, cushiony cruiser that can easily be pedaled to nearly 30 mph, Ride 1Up’s Cafe Cruiser is not for beginners. But once you get used to the serious punch under the hood, the Cafe Cruiser is a cool-looking ride that is as at-home at the local coffee shop as it is on a long roadtrip.

Read my full review of the Ride1Up Cafe Cruiser

Where to buy a Ride1Up Cafe Cruiser

Best commuter bike

Aventon Pace 500.3 (currently $1,599)

Aventon Pace 500.3

Credit: Stephen Johnson

If you want the most commuter e-bike possible for your cash, I haven’t seen anything better than Aventon’s entry-level class 3 e-bike. The Pace 500.3 goes up to 28mph, but it looks and rides like a friendly step-through, pleasing new riders and experienced ones alike. Highly recommended. 

Read my full review of the Aventon Pace 500.3

Where to buy an Aventon Pace 500.3

Runner-up: Heybike Cityscape ($679.99)

Popular Mechanics gave Heybike’s Cityscape a 4.6/5 rating, lauding its step-through frame, swept-back handlebars, smooth shifting courtesy of its seven-speed Shimano drivetrain, and its built-in rear cargo rack.

Where to buy a Heybike Cityscape e-bike


Source: LifeHacker – The Best E-bikes for Every Type of Rider

How to Make Your Solar Panels Last Longer Than 25 Years

Solar panels are expensive, even after a tax credit. But the good news is that they last for a really long time. (We’re talking about decades here.) It’s not uncommon for a solar panel to last around 25 years. If you’re planning to get a solar power system installed, or you already have one, you might be wondering, “How can I make sure these things go the distance?”

How long can solar panels last?

Thanks to recent developments, solar panels can last a really long time. New systems can come with a 25-year warranty. But the materials used in the panel, glass, and aluminum, are durable enough that they can sometimes last 30, 40, or even 50 years. 

What fails is the electrical components, and many times it’s the fault of the power inverter—the one that converts DC power to AC power. But this can be replaced without even detaching the panel itself. The solar panel itself is modular, so you can replace individual electronic components that have gone bad. You keep doing this and the panel itself can last for decades to come. (But is it the same solar panel you originally bought, asks Plutarch?)

The elements inside the solar panel degrade quite slowly. Most panels have a degradation rate of around 0.5% a year, and if the degradation is faster, the warranty will cover it. Most panels don’t degrade that quickly. Even at the median rate, your panel should still be producing 90% of its original output after 20 years. The world’s first modern solar panel was still producing energy at the age of 60, at least back in 2010

How to make your solar panels last longer

Here are a couple of steps you can take to make sure that your solar panels work well past the 25-year mark.

Use a trustworthy installer

There aren’t many choices when it comes to solar panels. There’s no magic “Pro Max” version of solar cells that’s going to be better for you. Solar panels are all mostly the same.

Instead, you should focus on finding a trustworthy installer. Ask around for a personal recommendation, or look for the best option in your local area. And don’t be afraid to ask questions to figure out if they know what they’re talking about. Consider asking things like:

  • How long have you been in business?

  • What components are covered in warranty and for how long?

  • What happens if a part of my system breaks?

  • Can you break down the total cost of my system?

  • How can I track my solar panel performance?

During installation, make sure the panels are installed at the correct angle for optimum electricity generation. Choose an angle that will receive the most amount of sunlight across the year. 

Clean it regularly

A layer of dust will reduce the efficiency of your panels, and over time, it might end up damaging the components as well. Make sure to clean the panels regularly. You can’t walk on the panels, but it’s okay to hose them down. You can also use a push broom to brush away debris—just make sure you don’t apply too much pressure. 

Monitor regularly 

To know how the panels are working, you should monitor their power generation from time to time. Solar power systems are passive, and they also have a safety, auto-shut-off switch. This can get tripped during power surges, or your kids might end up doing it accidentally. 

It’s better to keep an eye on the telemetric display, to see that the power system is enabled and that it’s generating electricity at a proper, and constant rate. If not, it’s time for a checkup. 

Regular maintenance will go a long way

While a solar panel will last for 25 years or more, it might not make it if you plan to just leave it on its own for 25 years. The technology associated with the panel, like wires and electrical components, will require care and replacement now and then, so you should sign up for regular inspections of the solar panel system. 


Source: LifeHacker – How to Make Your Solar Panels Last Longer Than 25 Years

Change These Seven Settings on Your New Samsung Galaxy Z Fold 5

If you’ve taken the plunge on a Samsung Galaxy Z Fold 5 then you’re no doubt eager to take advantage of the benefits of a foldable phone over a traditional handset: The new device you’ve got in your pocket operates like a standard phone, but can also open out its main screen to a mini-tablet size, making it much more versatile.

It also means different settings and options are required that you won’t find on other phones—settings that control how the software interface responds to the dual screen setup (and the fact that one screen can be folded in half). These are some key settings that matter on the Galaxy Z Fold 5, and what you can do with them.

Extend flex mode

Samsung Galaxy Z Fold 5 settings

Credit: Lifehacker

Flex mode is where you have your Galaxy Z Fold 5 partially folded over in a landscape orientation, almost like a tiny laptop, and the display splits accordingly. One app that takes advantage of this is YouTube, which puts your videos on the top half of the display, and playback controls on the bottom.

For apps that don’t have a special flex mode configuration, you can get a touchpad on the lower half of the display, plus shortcuts to split-screen mode and other settings. To make sure this layout also appears, head to Settings, then pick Advanced features, Labs, and Flex mode panel. The next screen lets you enable or disable flex mode, and bring up the touchpad in flex mode for apps that don’t specifically support it.

Always show the multi window menu

Samsung Galaxy Z Fold 5 settings

Credit: Lifehacker

Part of the appeal of the Galaxy Z Fold 5 is you can run apps side by side on the main screen, or even in one quarter of the screen space. This can be managed in a variety of ways, including via the multi window menu—the small horizontal line that shows up at the top of apps when you have more than one app on screen at once.

For even more convenience, you can display this menu even with only one app on screen. For a start, it makes it easier to add a second window if you need to, or shrink down the current one. To make sure this menu is always at your disposal, open Settings, choose Advanced features, then enable Show multi window menu with 1 window.

Enable multi window for all apps

Samsung Galaxy Z Fold 5 settings

Credit: Lifehacker

I’ve already mentioned the flexibility that multiple windows can offer you on the main screen, but not every app has been designed to show up on half of the screen or a pop-up window. You can still force apps to be used in this way by opening Settings, then picking Advanced features and Labs, and enabling Multi window for all apps. (Just be prepared for results of varying quality.)

Switch apps between displays

Samsung Galaxy Z Fold 5 settings

Credit: Lifehacker

By default, if you’re using an app on the main display of the Galaxy Z Fold 5 and then close the phone, the same app won’t then show up on the smaller cover display on the outside of the device.

You can change this if you want, though: From Settings, pick Display, and then Continue apps on cover screen. You can then pick specific apps that will flow from the main screen to the cover screen, or set them all to behave like this. If you’re going in the other direction—using an app on the outer display and then opening up the phone—the app will always jump to the larger screen automatically. There’s no way to change this behavior.

Keep your home screens in sync

Samsung Galaxy Z Fold 5 settings

Credit: Lifehacker

Out of the box, the Galaxy Z Fold 5 will keep the home screens for the inner display and the outer display separate, so changes you make (in terms of widgets or shortcuts) will be kept separate, depending on the screen you’re using.

You can get a more consistent and seamless experience by mirroring the home screens across these two displays. Launch Settings, then choose Home screen and select Cover screen mirroring to turn it on. The cover screen is of course smaller than the main display, so you’ll have to swipe across to see everything. (The main display home screen won’t be squashed to fit.)

Tweak the taskbar

Samsung Galaxy Z Fold 5 settings

Credit: Lifehacker

The Galaxy Z Fold 5 has a Windows-style taskbar on its main display to make it easier to jump between apps and to bring them up alongside each other. If you pick Display and then Taskbar from Settings, you can toggle this taskbar on or off, as well as choose how many recent apps (two, three or four) are shown on it.

Force apps to go full screen

Samsung Galaxy Z Fold 5 settings

Credit: Lifehacker

In a perfect world, every Android app would be optimized to run on a large, 1812 x 2176 pixel display like the Galaxy Z Fold 5 has. But we don’t live in a perfect world. As a result, certain apps may look a little odd on the main display, with black bars down the sides.

To force apps to fill the available space, choose Display from Settings, and then Full screen apps. From here you can select installed apps, and force them to run full screen. If an app doesn’t look right, you can also limit it to a more standard 16:9 or 4:3 aspect ratio.


You can pick up a Galaxy Z Fold 5 for 22% off on Amazon as of this article:


Source: LifeHacker – Change These Seven Settings on Your New Samsung Galaxy Z Fold 5

This QLED Samsung Gaming Monitor Just Dropped to Its Lowest Price Yet

Gamers don’t need 49 inches of QLED screen or 240 Hz of refresh rate to play their games, but it sure does make gaming more fun. And if you’re looking for a great gaming experience, consider Samsung’s Odyssey G9 for $849.99 ($1,399.99), which is matching its lowest price yet, according to Camelcamelcamel’s price history.

Big, sharp, and curvy

The Samsung Odyssey G9 gaming monitor is not for regular gamers; it’s for gamers who need to be extra. Curved monitors like this one mean your peripherals will be catching the edges of the screen (if you position the monitor correctly on your desk), giving you an immersive experience that only these monitors can deliver. And if you work from home and want to use the monitor for work, you can essentially use it as two separate screens by using two display port cables like in the video below. It’s also adjustable to match your preferred height and angle.

The monitor measures 49 inches from corner to corner, with an aspect ratio of 32:9, 240 Hz of refresh rate, and an Nvidia G-Sync with adaptive sync. It has a 5120 by 1440 resolution on a QLED screen with 1,000 nits of luminance, and a peak brightness of 193 candelas per square meter. (It’s very bright.) You get two USB ports, an HDMI display port, a headphone jack, and an ethernet port for faster internet connection. The Samsung Odyssey G9 is much cheaper than it was during its 2020 release date, mainly because of the Odyssey Neo G9, which, as the name implies, it’s the newer version. However, the Samsung Odyssey G9 is still a great gaming monitor for about half the price. You can read the full “excellent” review from PCMag here.


Source: LifeHacker – This QLED Samsung Gaming Monitor Just Dropped to Its Lowest Price Yet

Don't Put Essential Oils in Your Vacuum, No Matter What Instagram Tells You

A cleaning hack that enables you to do two things at once always seems like a good idea, so it’s no surprise that a new social media trend is catching on for its claim that you can make your home smell better while you vacuum. The problem is, the method suggested in the videos could actually damage your vacuum. Here’s what not to do if you want a clean, nice-smelling home. 

Why the essential oil vacuum hack sucks

The people in the videos mean well—who doesn’t want their home to smell good?—but the methods espoused in videos like this one, from Instagram Reels, are a bad idea. Basically, these cleaning influencers are telling you to moisten some cotton balls with essential oils, then put them in your vacuum bag or canister. In theory, when you use the vacuum, the scent of the oils will permeate the room as warm air rushes through the machine. While this trick does likely generate a nice smell, it’s not worth trying. Peruse the comments and you’ll see that some who have tried it report the oils have caused their vacuums to crack. That’s because essential oils are corrosive to plastic. Essential oil companies even recommend not storing oils in plastic containers for this reason—so you definitely don’t want any touching your expensive vacuum.

To be sure, I reached out to Dyson to ask about the trend. Monika Stuczen, a research scientist with the company, agrees that oils shouldn’t be put into any vacuums—but for more reasons than just their potential to damage the device: “As tempting as it may be to use scented sprays or essential oils to tackle odors from our carpet, we do not recommend introducing liquids unnecessarily, as [dampness provides the] potential for mold and bacteria to grow, causing it to develop odors over time.” Yes, this hack could ultimately make your house stinkier.

To stop odors from forming, Stuczen instead recommends the following: 

  1. Use a vacuum with powerful suction and make sure to go slow, giving the brushes time to penetrate deeply. 

  2. Go over the same spot multiple times (though more than two or three passes is overdoing it, according to Dyson’s lab research). 

  3. Tackle stains right away instead of waiting for them to dry, as they could attract bacteria that will smell. 

  4. Wipe down and dry your pets when entering the home to stop any of their dirt or moisture from embedding into your carpet. 


Products to consider:

If you’re looking for a new vacuum to get your carpets looking and smelling fresher, here are some great options.


How to make a room smell fresh

Those are great tips on preventing odors, but if you were considering the essential oil hack, you’re looking for ways to make a room smell good. Instead, try the following:


Source: LifeHacker – Don’t Put Essential Oils in Your Vacuum, No Matter What Instagram Tells You

19 Gifts Gardeners Will Really Dig

My neighbors and friends have nailed the perfect gift for me that’s good for any occasion year-round: a gift certificate to the local garden center. I’m an adult who knows what I want, and a gift certificate means I get to go on a shopping spree at the place all my money goes anyways. If you’re shopping for a gardener and want to really dazzle them, let me, a lifelong gardener, give you some guidance.

Get them a garden hod

Vegetable gardeners, flower gardeners, everyone loves a hod—a fancy name for a type of basket—and if they already have one, they’d certainly love a second one. Better than the regular baskets, boxes, or bowls gardeners sometimes wander around the garden with to collect things, a hod is made specifically for that purpose. Sturdy, weather and water resistant, these garden carriers are always handy and beautiful.

Gorgeous gardening books

Every year, tons of new gardening books hit the shelves: Books on better ways to garden, how to make money at it, and more artistic books that focus on the color, intention, and the zen of gardening. Like eye candy for people who love to dig, these books are great this time of year to inspire us as we suffer through the cold, garden-less months. Here are some of the best from 2023. Also consider audiobooks for those gardeners who prefer to listen as they putter about the yard.

Get them a gift certificate

Don’t overthink this. If you know your recipient’s favorite seed house, bulb house, or local nursery, just get them the gift that lets them choose on their own. If you don’t know their favorite spots, consider these.

Havens for pollinators

Not all gardeners are bird nuts, but every single gardener loves a pollinator, so the gift of mason bees is almost always going to be appreciated. These aren’t full bee hives; mason bees are an essential part of every single garden and don’t require much care from the gardener. Consider these gift sets from Crown Bees, my favorite outpost for responsible solitary bees. The actual gift you’ll give this time of year is the bee house itself, but that includes free mason bees that are delivered later, in the spring. Be sure to only buy bee houses from reputable places; there are tons of low end versions that can be harmful to solitary bees. 

A pair of Felco pruners

Felco pruners are the Manolos of gardening. Expensive (for a pair of shears) and beautiful, they come in many models. Most gardeners know the number of their favorite model, likely after having tried it out at their local garden center. If you know your recipient’s model, this is a gorgeous gift idea. If not, consider a gift certificate so they can get the one they want—or choose one of these models, which are always welcome. 

What I don’t recommend

In addition to all of the lovely gift ideas above, I think it’s important to flag a few potentially problematic gift ideas you might be considering. The intention is surely admirable, but let me explain why the following ideas are worth a skip.

Garden decor

You wouldn’t buy an interior decorator a roll of wallpaper, and gardeners similarly have very specific ideas about how their yard should look. Unless you know your recipient really well, skip the gnomes and funny garden ephemera. If, however, you know your recipient loves garden spheres or chimes, then your addition to their collection will likely be well-received.

Seeds

Wildflower seed mixes or packets of seeds might make sense as a gift giver, but unless your recipient is a very new gardener or one who has specifically noted they want seeds, this is not a great idea. If you save your own seeds from a plant you’ve grown or one you see out in the world and want to share those, however, that would be a very touching gift. 

Birdhouses

Birdhouses can often attract squirrels and other garden creatures that can cause garden havoc. Unless you know the very specific kind your gardening friend likes, let them buy their own.


Source: LifeHacker – 19 Gifts Gardeners Will Really Dig

The Meater 2 Wireless Thermometer Could Use a Signal Boost

When I first heard about Meater, a smart thermometer, the idea of a wireless probe piqued my interest. I am, above all things, inherently lazy, and a great wireless thermometer means less time running to the stove or grill and more time on the couch.

While there are some things to like about the new Meater 2, including its stylish design and aspirational app, these upsides were tarnished by its refusal to stay connected under seemingly easy conditions.

We just couldn’t stay connected

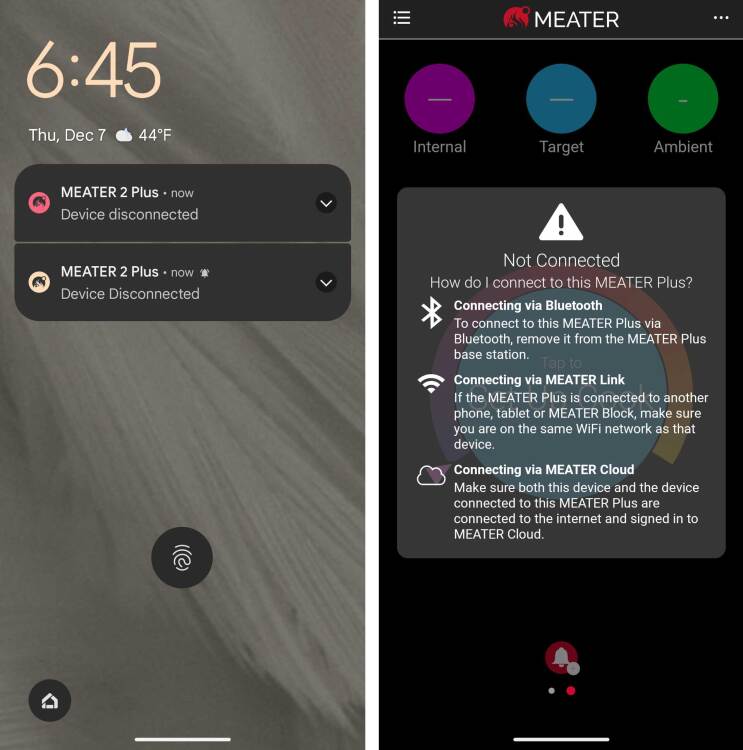
I conducted eight tests with the Meater 2 and a couple other wireless probes side-by-side over a variety of cooking environments and proteins. In the first round of five tests, the Meater would very often disconnect, which meant endless notifications to the phone and, more importantly, a loss of temperature reading. This happened in almost every single environment I tried, often within 20 feet of the probe and transmitter. Under other circumstances, it would be reasonable to chalk that up to my home (perhaps there are hidden RF signals that are interfering with the Meater 2) but in all cases, other probes like the Combustion had no problems within the same range. I run plenty of connections throughout the day with my various Bluetooth devices and have had no trouble connecting with devices further away.

The problem was so bad on those initial five tests that I contacted Meater and they sent a second probe they had tested internally before it arrived. I ran three more tests with the second probe and continued to have the same problems. I’ve read multiple other reviews and many reviewers have had no problem with the Meater 2’s connectivity. The folks at Meater suggested this was because the probe had trouble with my oven or the pot I was sous viding in or the metal of my barbecue. These are all valid points, but also, where else would I be cooking? If a thermometer can’t handle those environments, then it should get another job. 

Meater 2 disconnection notifications
I constantly got disconnection notifications
Credit: Meater app

I’d be remiss if I didn’t mention an option that I did not engage, which is to set up a wifi connection for the Meater 2, but this requires using two wireless devices, like tablets or phones. One near the probe to broadcast and one near me to receive. While this may have been successful (I prefer wifi connections to Bluetooth, generally), it would require equipment not included or offered by Meater and it means surrendering a device for the entirety of the cook. It also wouldn’t solve the Bluetooth problem; it would just be a workaround.

Sleek design to the probe and charger

Putting all of that aside, let me go over what I liked about the Meater 2. The latest version of this thermometer is much smaller than its predecessor. It is sleek and metal and comes in a wood charger that also acts as a receiver. I really liked the wood block, which has magnets so it can stick to an oven, fridge, or barbecue. I did not love that it was battery powered rather than USB-C rechargeable, however.

A beautiful app experience, but you have to work for it

The Meater app doesn’t trust the user to just get going. I was forced to go through multiple information screens and videos of how to do everything before I could actually use the probe. If you don’t want to watch the videos, you can “watch them later” as a button prompts, but the app doesn’t tell you that you can’t proceed until you’ve watched them, so I kept thinking I was in the wrong setup screen. Worse still, you have to do this each time you add a new probe. The app doesn’t remember you already read and watched everything. Really, the app is so simple that it shouldn’t really require any in depth how-tos, just a few help prompts along the way.

Once I had my probe registered in the app, I was able to start a “cook.” The nice thing about Meater is you can tell the app what you’re cooking and it will suggest temperature ranges. It recommended USDA “safe” temperature ranges for those meats, which tends to cook meat to well done. As most chefs tend to err on the lower side, I opted to pick my own temperatures.. 

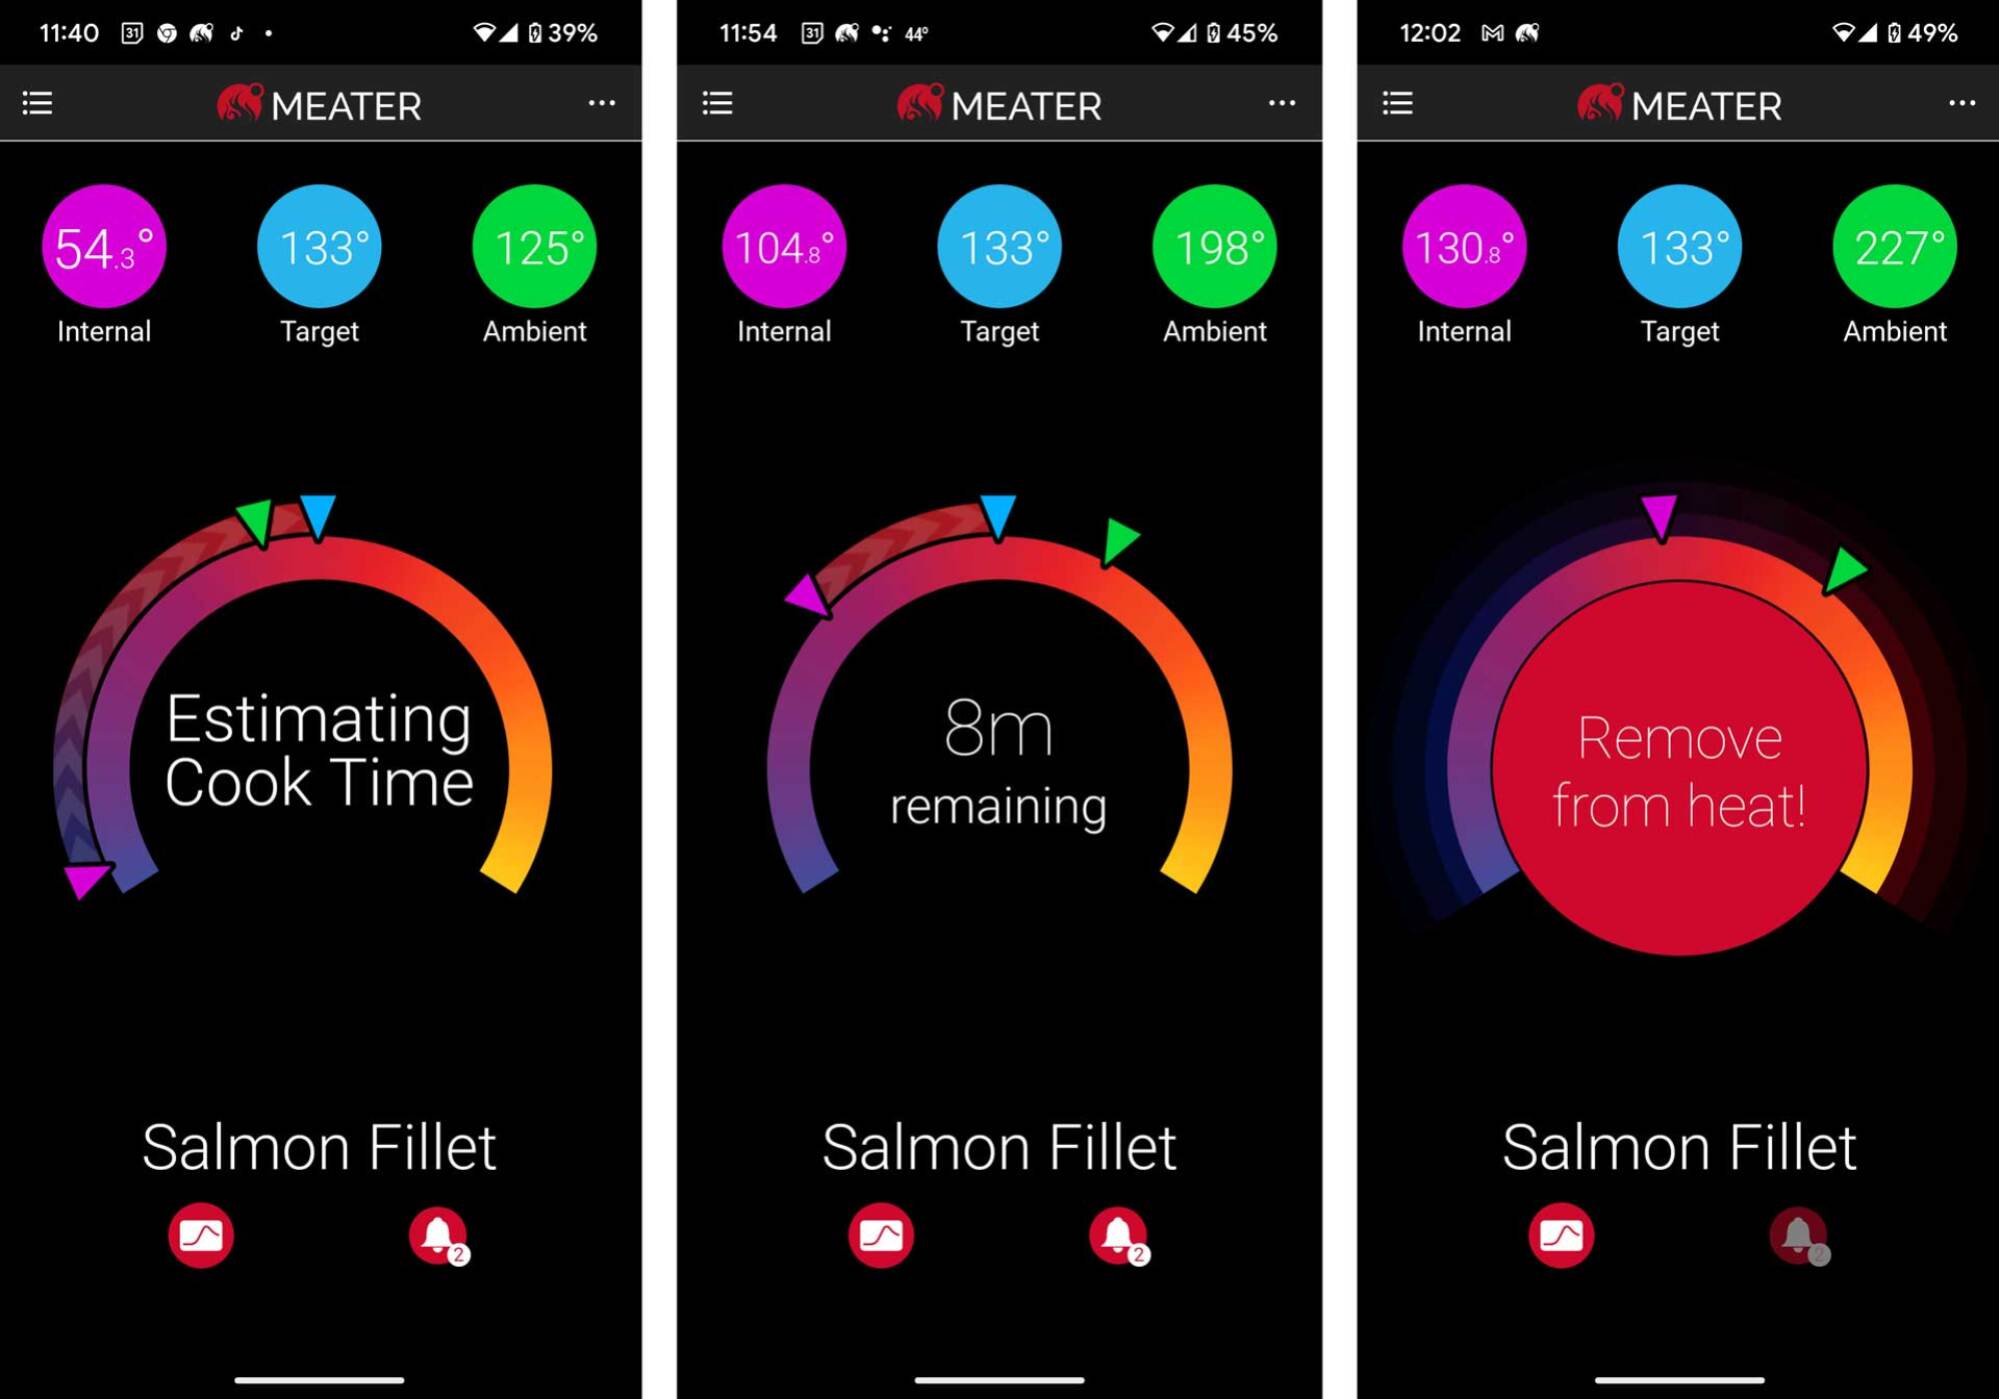
Once the cook is going, Meater displays the internal temperature, the target you’ve set, and the ambient temperature. By touching the internal temperature icon, I could see the breakout of the temperatures for each of the six probes. One of Meater’s competitors, the Combustion, also indicates the surface temperature—a helpful but ultimately unnecessary metric to have. 

That all said, the graph for an existing cook is graphic, colorful, and simple to interpret.

screenshots from the Meater app
The app predicts the cooking time, and accuracy gets better as it approaches the goal temperature.
Credit: Meater app

Lack of communication leads to misunderstanding

Like Combustion, the Meater 2 will try to tell you when your food is going to be done based on your target temperature, and like the Combustion, it was not great at doing so. It becomes more accurate as you approach the goal temperature, which isn’t predicting so much as math-ing with increasing accuracy.

To its credit, Meater does something I really like, which is to tell you your food is done 10 degrees before your target temperature, as food temperature actually rises another 10 degrees out of the oven. However, Meater doesn’t tell you why it’s saying your cook is done at 120ºF when your goal is 130ºF, so you’re left to guess or get annoyed if, like me, you set the target temperature for when you want to remove it, not when it’s “done.”  This led me to mistrust and defy the predictor, which is likely not what Meater wants. I watched the predictor count down, suggesting that my roast, currently at 117ºF, would somehow reach its goal of 130ºF in two minutes, which could not possibly be true. Thus, I discounted the predictor.

The Meater app comes with notification alerts, but it felt like a hard choice. Of course, I want to know when the thermometer disconnected, when there’s a prediction of my food being done, or when the food is done. That resulted in a boatload of alerts constantly haranguing me as the Meater disconnected, reconnected, and then created a prediction. Overall, the Combustion offered a far more pleasant, functional app experience.

Also worth mentioning is that Meater has an integration with MasterClass in the app, so if you want to learn how to cook a specific dish, it sets you up for success as you follow along. If you’re a beginner cook and you can get Meater to remain connected, this could be a great idea. But as an experienced cook, I’d prefer the thermometer just do the thing I hired it to do well.

Bottom line: Meater 2 needs better connectivity and some app improvements

All products have their pros and cons, and it brings me no pleasure to be negative here. The team at Meater was pleasant to talk to and I was ready to assume the connection errors were due to a faulty unit or something amiss about my home. But for whatever reason, other wireless probes performed perfectly under the same conditions and remained connected—which, as features go, is number one. 

For all the communications Meater has, from videos on how the app works to notification options, it failed to communicate few key things like, “Your food will continue to cook 10 degrees after you remove it,” “Knowing that, is this still the temperature goal you want to set?” While the Meater 2 is cheaper than the Combustion ($119 for the Meater 2, vs. $149 for the Combustion), I still can’t recommend picking the Meater 2 up because of the connection issues. If you have a Meater 2 and have had better luck, I’d love to hear about it in the comments. 


Source: LifeHacker – The Meater 2 Wireless Thermometer Could Use a Signal Boost

Your Hairbrush Is Grosser Than You Realize

As beauty tools go, your hairbrush gets really gross, really fast. Humans shed an average of 50–100 hairs per day, many of which get stuck in your brush along with a build-up of hair care products, dead skin cells, and dust (a ripe environment for bacterial and fungal growth). If you don’t keep your brush clean, this grime can end up back in your hair, which not only makes your hair dirty and increases the risk of tangling and damage but can also exacerbate scalp issues like dandruff or seborrheic dermatitis.

If your brush looks like it needs to be cleaned, it definitely does. You should remove the hair from your brush as it accumulates (every day or so) and do a thorough clean once a week if you use any styling products, such as gel or hairspray (or every two to three weeks if you don’t).

How to clean your hairbrush

First things first: Pull the hair out of your brush’s bristles. Start by using your fingers, but if there are clumps that get stuck you can dig them out with a pointy object such as a chopstick, toothpick, or sharp comb end or cut with scissors. Again, do this regularly to prevent build-up.

Next, you need to wash the brush:

  1. Fill a stopped sink, bin, or bowl with warm, soapy water. You can use dish soap or gentle shampoo to wash synthetic (plastic and rubber) brushes, but if your brush is natural (made of wood or boar bristles), go with a sulfate-free shampoo. You can also add one to two teaspoons of baking soda.

  2. Soak your synthetic brush, including the bristles, for 10 minutes. For natural brushes and brushes with padding, dip the bristles into the water but do not submerge. This softens all of the gross bits to make them easier to remove.

  3. Remove the brush, shake it off, and re-soak if a lot of build-up remains.

  4. Use your fingers to pull any grime off of individual bristles.

  5. Use a clean, spare toothbrush dipped in the soapy water to scrub around the base of and up the bristles. Scrub anywhere else that there’s build-up.

  6. Rinse your brush in cool running water, squeeze or shake out any excess, and place it face-down to dry.

Regularly cleaning your hairbrush will lengthen its life, but there will come a time when it’s best to replace it, such as when there are broken, bent, or missing bristles as well as cracks. Inspect your brush regularly.


Source: LifeHacker – Your Hairbrush Is Grosser Than You Realize

Today’s Wordle Hints (and Answer) for Wednesday, December 13, 2023

If you’re looking for the Wordle answer for December 13, 2023, read on. We’ll share some clues, tips, and strategies, and finally the solution. Today’s puzzle took me four guesses; I’d say it’s medium difficulty. Beware, there are spoilers below for December 13, Wordle #907! Keep scrolling if you want some hints (and then the answer) to today’s Wordle game.

How to play Wordle

Wordle lives here on the New York Times website. A new puzzle goes live every day at midnight, your local time.

Start by guessing a five-letter word. The letters of the word will turn green if they’re correct, yellow if you have the right letter in the wrong place, or gray if the letter isn’t in the day’s secret word at all. For more, check out our guide to playing Wordle here, and my strategy guide here for more advanced tips. (We also have more information at the bottom of this post, after the hints and answers.)

Ready for the hints? Let’s go!


Does today’s Wordle have any unusual letters?

We’ll define common letters as those that appear in the old typesetters’ phrase ETAOIN SHRDLU. (Memorize this! Pronounce it “Edwin Shirdloo,” like a name, and pretend he’s a friend of yours.)

Four of the letters are in our list, and there’s one more that’s middlingly common. Nothing too unusual today. 

Can you give me a hint for today’s Wordle?

Think of how you feel after a hard effort, like running a race or surviving a stressful day at work. You are exhausted, gassed, tired, ____. 

Does today’s Wordle have any double or repeated letters?

Nope, today’s word has five different letters.

How many vowels are in today’s Wordle?

Just one vowel today.

What letter does today’s Wordle start with?

Today’s word begins with S.

What letter does today’s Wordle end with?

Today’s word ends with T.

What is the solution to today’s Wordle?

Ready? Today’s word is SPENT.

How I solved today’s Wordle

ARISE gave me a yellow S and E; TOUCH gave me a yellow T. I figured I’d go for an ST word with two E’s, so I guessed STEEL next. That told me the T isn’t in that second spot, and that we only have one E. 

So the second letter would have to be something like a K or a P… and I’d probably want to work an N in there somewhere. SPENT was my next guess, and it was a hit.

Wordle 907 4/6

⬜⬜⬜🟨🟨
🟨⬜⬜⬜⬜
🟩🟨🟩⬜⬜
🟩🟩🟩🟩🟩

A primer on Wordle basics

The idea of Wordle is to guess the day’s secret word. When you first open the Wordle game, you’ll see an empty grid of letters. It’s up to you to make the first move: type in any five-letter word. 

Now, you can use the colors that are revealed to get clues about the word: 

  • Green means you correctly guessed a letter, and it’s in the correct position. (For example, if you guess PARTY, and the word is actually PURSE, the P and R will be green.)

  • Yellow means the letter is somewhere in the word, but not in the position you guessed it. (For example, if you guessed PARTY, but the word is actually ROAST, the R, A and T will all be yellow.)

  • Gray means the letter is not in the solution word at all. (If you guessed PARTY and everything is gray, then the solution cannot be PURSE or ROAST.)

With all that in mind, guess another word, and then another, trying to land on the correct word before you run out of chances. You get six guesses, and then it’s game over.

The best starter words for Wordle

What should you play for that first guess? The best starters tend to contain common letters, to increase the chances of getting yellow and green squares to guide your guessing. (And if you get all grays when guessing common letters, that’s still excellent information to help you rule out possibilities.) There isn’t a single “best” starting word, but the New York Times’s Wordle analysis bot has suggested starting with one of these:

  • CRANE

  • TRACE

  • SLANT

  • CRATE

  • CARTE

Meanwhile, an MIT analysis found that you’ll eliminate the most possibilities in the first round by starting with one of these:

  • SALET

  • REAST

  • TRACE

  • CRATE

  • SLATE

Other good picks might be ARISE or ROUND. Words like ADIEU and AUDIO get more vowels in play, but you could argue that it’s better to start with an emphasis on consonants, using a starter like RENTS or CLAMP. Choose your strategy, and see how it plays out.

How to win at Wordle

We have a few guides to Wordle strategy, which you might like to read over if you’re a serious student of the game. This one covers how to use consonants to your advantage, while this one focuses on a strategy that uses the most common letters. In this advanced guide, we detail a three-pronged approach for fishing for hints while maximizing your chances of winning quickly.

The biggest thing that separates Wordle winners from Wordle losers is that winners use their guesses to gather information about what letters are in the word. If you know that the word must end in -OUND, don’t waste four guesses on MOUND, ROUND, SOUND, and HOUND; combine those consonants and guess MARSH. If the H lights up in yellow, you know the solution.

One more note on strategy: the original Wordle used a list of about 2,300 solution words, but after the game was bought by the NYT, the game now has an editor who hand-picks the solutions. Sometimes they are slightly tricky words that wouldn’t have made the original list, and sometimes they are topical. For example, FEAST was the solution one Thanksgiving. So keep in mind that there may be a theme.

Wordle alternatives

If you can’t get enough of five-letter guessing games and their kin, the best Wordle alternatives, ranked by difficulty, include:


Source: LifeHacker – Today’s Wordle Hints (and Answer) for Wednesday, December 13, 2023

Today's NYT Connections Hints (and Answer) for Wednesday, December 13, 2023

Today’s puzzle isn’t that TOUGH, if you keep your wits about you! If you’re looking for the Connections answer for Wednesday, December 13, 2023, read on—I’ll share some clues, tips, and strategies, and finally the solutions to all four categories. Along the way, I’ll explain the meanings of the trickier words and we’ll learn how everything fits together. Beware, there are spoilers below for December 13, NYT Connections #185! Read on if you want some hints (and then the answer) to today’s Connections game. 

If you want an easy way to come back to our Connections hints every day, bookmark this page. You can also find our past hints there as well, in case you want to know what you missed in a previous puzzle.

Below, I’ll give you some oblique hints at today’s Connections answers. And farther down the page, I’ll reveal the themes and the answers. Scroll slowly and take just the hints you need!

NYT Connections board for December 13, 2023: TOUGH, STOP, ROUGH, BLUE, GREEN, DOUGH, COARSE, ENOUGH, COUGH, UNCLE, BOUGH, BAWDY, BUNKER, RISQUE, MERCY, FAIRWAY.

Credit: Connections/NYT


Does today’s Connections game require any special knowledge?

If you can read all the words out loud, you’ll do fine. Knowing some sports terms will help a bit, too. 

Hints for the themes in today’s Connections puzzle

Here are some spoiler-free hints for the groupings in today’s Connections:

  • Yellow category – Hit the links.

  • Green category – What you might say if you’re getting a noogie.

  • Blue category – Something a little naughty or spicy.

  • Purple category – Words that make kids and English language learners go “are you serious?!”

Does today’s Connections game involve any wordplay?

The purple category involves something special about the spelling and pronunciation of these words. 

Ready to hear the answers? Keep scrolling if you want a little more help.


BEWARE: Spoilers follow for today’s Connections puzzle!

We’re about to give away some of the answers. Scroll slowly if you don’t want the whole thing spoiled. (The full solution is a bit further down.)

What are the ambiguous words in today’s Connections?

  • BLUE and GREEN aren’t just colors today. BLUE language refers to swear words; BLUE movies would be pornographic ones. A GREEN, as a noun, can refer to any of a variety of fields or lawns (as in a town GREEN or a putting GREEN). 

  • ROUGH and TOUGH seem like they might go together, but I promise they do not today. Neither do ROUGH and COARSE.

  • A BOUGH is a tree branch (“deck the halls with BOUGHs of holly”). It may look like it should rhyme with TOUGH, but it doesn’t.

What are the categories in today’s Connections?

  • Yellow: GOLF COURSE PARTS

  • Green: ”I GIVE!”

  • Blue: INDECENT

  • Purple: “-OUGH” WORDS THAT DON’T RHYME

DOUBLE BEWARE: THE SOLUTION IS BELOW

Ready to learn the answers to today’s Connections puzzle? I give them all away below.

What are the yellow words in today’s Connections?

The yellow grouping is considered to be the most straightforward. The theme for today’s yellow group is GOLF COURSE PARTS and the words are: BUNKER, FAIRWAY, GREEN, ROUGH.

What are the green words in today’s Connections?

The green grouping is supposed to be the second-easiest. The theme for today’s green category is ”I GIVE!” and the words are: ENOUGH, MERCY, STOP, UNCLE.

What are the blue words in today’s Connections?

The blue grouping is the second-hardest. The theme for today’s blue category is INDECENT and the words are: BAWDY, BLUE, COARSE, RISQUE.

What are the purple words in today’s Connections?

The purple grouping is considered to be the hardest. The theme for today’s purple category is “-OUGH” WORDS THAT DON’T RHYME and the words are: BOUGH, COUGH, DOUGH, TOUGH.

How I solved today’s Connections

RISQUE, pronounced as two syllables, is a word you use to describe something sexy when you want to kind of distance yourself from it. BAWDY would fit; so would BLUE, and my next best guess was COARSE (as in, vulgar). That was a hit. 🟦

UNCLE and MERCY are words you say when you want somebody to stop hurting you; STOP and ENOUGH work, too. 🟩

With just eight words left, the golf terms jump out: GREEN, FAIRWAY, ROUGH, and BUNKER are all parts of a golf course. 🟨 That leaves four of our original six -GH words: DOUGH, TOUGH, BOUGH, COUGH. They are all spelled identically after the initial letter, but are all pronounced differently. Thanks, English. 🟪

Connections 
Puzzle #185
🟦🟦🟦🟦
🟩🟩🟩🟩
🟨🟨🟨🟨
🟪🟪🟪🟪

How to play Connections

I have a full guide to playing Connections, but here’s a refresher on the rules:

First, find the Connections game either on the New York Times website or in their Crossword app. You’ll see a game board with 16 tiles, each with one word or phrase. Your job is to select a group of four tiles that have something in common. Often they are all the same type of thing (for example: RAIN, SLEET, HAIL, and SNOW are all types of wet weather) but sometimes there is wordplay involved (for example, BUCKET, GUEST, TOP TEN, and WISH are all types of lists: bucket list, guest list, and so on).

Select four items and hit the Submit button. If you guessed correctly, the category and color will be revealed. (Yellow is easiest, followed by green, then blue, then purple.) If your guess was incorrect, you’ll get a chance to try again.

You win when you’ve correctly identified all four groups. But if you make four mistakes before you finish, the game ends and the answers are revealed.

How to win Connections

The most important thing to know to win Connections is that the groupings are designed to be tricky. Expect to see overlapping groups. For example, one puzzle seemed to include six breakfast foods: BACON, EGG, PANCAKE, OMELET, WAFFLE, and CEREAL. But BACON turned out to be part of a group of painters along with CLOSE, MUNCH, and WHISTLER, and EGG was in a group of things that come by the dozen (along with JUROR, ROSE, and MONTH). So don’t hit “submit” until you’ve confirmed that your group of four contains only those four things.

If you’re stuck, another strategy is to look at the words that seem to have no connection to the others. If all that comes to mind when you see WHISTLER is the painting nicknamed “Whistler’s Mother,” you might be on to something. When I solved that one, I ended up googling whether there was a painter named Close, because Close didn’t fit any of the obvious themes, either.

Another way to win when you’re stuck is, obviously, to read a few helpful hints–which is why we share these pointers every day. Check back tomorrow for the next puzzle!


Source: LifeHacker – Today’s NYT Connections Hints (and Answer) for Wednesday, December 13, 2023

How Much You Need to Read for Kindle Unlimited to be Worth the Cost

With the advent of BookTok and the continued rise of Amazon’s Kindle e-readers, a subscription service like Kindle Unlimited might seem like a home run. After all, it gives you unlimited access to over 4 million digital titles for just a small monthly price. But is it really worth it?

How much does Kindle Unlimited cost?

Kindle Unlimited is available for a monthly subscription of $11.99 USD. However, you can often find deals available for the service. (Some users who subscribe right now may find themselves eligible for a 3-month deal that only costs $.99, though it isn’t clear how widely available this deal is.)

At $11.99 a month, access to over 4 million books, audiobooks, magazines, and more sounds like a great deal. And honestly, for some people it will be. However, there are some caveats to take into account before you sign up for Kindle Unlimited, most notably the limit to how many books you can check out at a time.

It’s unlimited… but with limits

One of the biggest caveats you will find with Kindle Unlimited is that you can only check out a total of 20 books at one time. This means you’ll need to return books anytime you’re done with them. This isn’t that big of a deal, but if you often find new books you might want to read and like to add them to your library, you may find yourself resorting to noting them down in your phone or a notebook instead. I have at least 50 books on my Kindle right now that I plan to read at some point, but other books have come up that have grabbed me instead. With Kindle Unlimited, you can’t endlessly add books to your library, so that’s something to keep in mind.

Do you read enough for it to be worth it?

Another question to ask yourself if you’re thinking about picking up Kindle Unlimited is whether you actually read enough to justify that $11.99 price tag. Many books on Kindle are already heavily discounted, costing anywhere from $5 to $9.99. If you only read one book a month, then paying for a monthly subscription might not be worth it.

However, if you’re someone that often reads three to four titles a month, then paying $11.99 instead of purchasing each book individually can be a great way to take advantage of Amazon’s subscription service. Before subscribing, think about how much you’re likely to read each month and then decide if the subscription is really worth it for you.

Kindle Unlimited is a mess to navigate

As a person that loves to just browse through the books that are available, Kindle Unlimited can be quite a mess to navigate. Sure, you can search books specifically to see if they are available in Kindle Unlimited. But if you enjoy just going through and browsing the digital shelves like you would at a library, then you’re likely to find yourself a bit lost with all the options thrown at you.

Furthermore, there’s a lot of genres on Kindle Unlimited that might not be exactly what you’re into. The subscription service is chock full of adult romance books, so if that isn’t something you enjoy, it’s probably best to browse for books in a different way. This isn’t necessarily a reason to forego the service altogether (after all, the Kindle Store experience has always left something to be desired) but it is important to keep that in mind going into a Kindle Unlimited subscription.

If you think the price fits what you’re looking for, though, you can find a lot of great books on Kindle Unlimited, including some really heavy hitters from famous authors. There are also a ton of lesser known hits on the digital shelves that are available on Kindle Unlimited, making it a really cool way to check out new authors you might not have heard of before without having to justify buying the book outright.


Source: LifeHacker – How Much You Need to Read for Kindle Unlimited to be Worth the Cost

These Cute Christmas Candies Are Easy Enough to Make at Home

December is the time for “giving,” and all that stuff, but more importantly, it’s the only time of year you’re fully entitled to enjoy sweets with delirious abandon. Cookies, pies, cakes, cheesecakes, eggnog, cider, fudge, and chocolates of all varieties are all on the menu during the holidays. One of the cutest chocolate confections to cross my path is the nonpareil. A chocolate bite, bespeckled with a frenzy of colorful sprinkles—it’s exactly the sort of thing you can send as a sweet Christmas tiding, or pile into a bowl on the coffee table for lucky passers-by. Here’s how you can make them at home.

What is a nonpareil?

Nonpareil translates to mean “incomparable,” or “nothing quite like it.” (Perhaps, not parallel? Whatever helps you remember it, sure.) As far as holiday treats are concerned, it’s a tiny drop of chocolate with dozens of crunchy, round sprinkles stuck to the bottom, and it really is quite special. Pop one of these in your mouth and you’re immediately introduced to a textural phenomenon and itty-bitty sugar rush. The bittersweet chocolate becomes velvety as it melts in your mouth, and the sprinkles crackle between your molars. Nonpareils are small, colorful, and tasty, so you’ll want to make extra. 

How do you make nonpareils at home?

It’s the sort of thing that seems like only a machine could make it, but it’s incredibly easy to duplicate in your home kitchen. You only need some semisweet or dark chocolate to melt, and a bottle of round sprinkles. I like the rainbow assortment, but you can buy all white, or a festive mix of red, white, and green. 

Melt a quarter cup of chocolate chips in the microwave. Be sure to stir the chocolate every ten seconds or so, especially as it begins to melt. Pour the chocolate into a small piping bag, or into a zip-top bag. Seal or tie-off the bag you’re using.

Depending on how many nonpareils you’re making, pour the sprinkles into a dish, an overturned lid, or a baking sheet with a rim. I used an upside down cookie tin lid. You want to make a layer of sprinkles that’s deep enough where you can’t see the vessel underneath. You should be able to press your finger into the sprinkles lightly and leave a little indent.

Piping bag making chocolate circles in a dish of sprinkles.

Credit: Allie Chanthorn Reinmann

Cut the corner off of the chocolate bag so the opening is only a couple millimeters wide. You can always cut it bigger, but you can’t go back. Start small so you’re not pouring chocolate everywhere. Twist the top of the bag to create some pressure, and holding the bag perpendicular to the surface of the sprinkles, pipe out small discs directly onto the sheet of sprinkles. Pipe out as many candies as you want. You’ll be able to do a second or third round once this batch cools. Put the entire sheet or plate of nonpareils into the refrigerator to solidify, about 20 minutes, depending on how large or small they are.

Nonpareils on a table with ribbons

Credit: Allie Chanthorn Reinmann

Once cool, you can pick up the chocolates out of the field of sprinkles. The melted chocolate clings to the sprinkles when you pipe out the candies and when the chocolate cools, the sprinkles are stuck. While little circles are the easiest and most common shape, you can pipe out any shapes you want. I made little candy canes, and I liked them very much. You could pipe out Christmas trees, angels, or letters too. Just remember to flip the letter when you write them if you intend on reading the sprinkle side.

Scatter these into the cookie tins you made for the neighbors, or keep them in a jar on the counter so you can have a nibble whenever you want. The way I see it, January’s cold reminder of responsibilities will come no matter what, so there’s no need to pace yourself. Eat the chocolate. 


Source: LifeHacker – These Cute Christmas Candies Are Easy Enough to Make at Home