Tweetponic lavender: nourishing nature with the Twitter API

In a Manhattan gallery, there is an art installation that uses a Raspberry Pi to control the lights, nourishing an underground field of lavender. The twist: the Pi syncs the intensity of the lights to the activity of a dozen or so Twitter accounts belonging to media personalities and members of the US government.

In May 2017 I cultivated a piece of land in Midtown Manhattan nurtured by tweets.

204 Likes, 5 Comments – Martin Roth (@martinroth02) on Instagram: “In May 2017 I cultivated a piece of land in Midtown Manhattan nurtured by tweets.”

Turning tweets into cellulose

Artist Martin Roth has used the Raspberry Pi to access the accounts via the Twitter API, and to track their behaviour. This information is then relayed to the lights in real time. The more tweets, retweets, and likes there are on these accounts at a given moment, the brighter the lights become, and the better the lavender plants grow. Thus Twitter storms are converted into plant food, and ultimately into a pleasant lavender scent.

Until June 21st @ ACF (11 East 52nd Street)

39 Likes, 1 Comments – Martin Roth (@martinroth02) on Instagram: “Until June 21st @ ACF (11 East 52nd Street)”

Regarding his motivation to create the art installation, Martin Roth says:

[The] Twitter storm is something to be resisted. But I am using it in my exhibition as a force to create growth.

The piece, descriptively titled In May 2017 I cultivated a piece of land in Midtown Manhattan nurtured by tweets, is on show at the Austrian Cultural Forum, New York.

Using the Twitter API as part of digital making

We’ve seen a number of cool makes using the Twitter API. These often involve the posting of tweets in response to real-world inputs. Some of our favourites are the tweeting cat flap Flappy McFlapface, the tweeting dog Oliver Twitch, and of course Pi Towers resident Bert the plant. It’s interesting to see the concept turned on its head.

If you feel inspired by these projects, head on over to our resource introducing the Twitter API using Python. Or do you already have a project, in progress or finished, that uses the API? Let us know about it in the comments!

The post Tweetponic lavender: nourishing nature with the Twitter API appeared first on Raspberry Pi.


Source: Raspberry Pi – Tweetponic lavender: nourishing nature with the Twitter API

Storm Glass: simulate the weather at your desk

Inspired by the tempescope, The Modern Inventor’s Storm Glass is a weather-simulating lamp that can recreate the weather of any location in the world, all thanks to the help of a Raspberry Pi Zero W.

The Modern Inventors Storm Glass

Image c/o The Modern Inventor

The lamp uses the Weather Underground API, which allows the Raspberry Pi to access current and predicted weather conditions across the globe. Some may argue “Why do I need a recreation of the weather if I can look out my window?”, but I think the idea of observing tomorrow’s weather today, or keeping an eye on conditions in another location, say your favourite holiday destination, is pretty sweet.

Building a Storm Glass

The Modern Inventor, whose name I haven’t found out yet so I’ll call him TMI, designed and 3D printed the base and cap for the lamp. The glass bottle that sits between the two is one of those fancy mineral water bottles you’ve seen in the supermarket but never could justify buying before.

The base holds the Pi, as well as a speaker, a microphone, and various other components such as a Speaker Bonnet and NeoPixel Ring from Adafruit.

The Modern Inventors Storm Glass

Image c/o The Modern Inventor

“The rain maker is a tiny 5V centrifuge pump I got online, which pumps water along some glass tubing and into the lid where the rain falls from”, TMI explains on his Instructables project page. “The cloud generator is a USB-powered ultrasonic diffuser/humidifier. I just pulled out the guts and got rid of the rest. Make sure to keep the electronics which create the ultrasonic signal that drives the diffuser.”

The Modern Inventor's Storm Glass

Image c/o The Modern Inventor

With the tech in place, TMI (yes, I do appreciate the irony of using TMI as a designator for someone about whom I lack information) used hot glue like his life depended on it, bringing the whole build together into one slick-looking lamp.

Coding the storm

TMI set up the Storm Glass to pull data about weather conditions in a designated location via the Weather Underground API and recreate these within the lamp. He also installed Alexa Voice Service in it, giving the lamp a secondary function as a home automation device.

The Modern Inventor's Storm Glass

Image c/o The Modern Inventor

Code for the Storm Glass, alongside a far more detailed explanation of the build process, can be found on TMI’s project page. He says the total cost of this make comes to less than $80.

Create your own weather device

If you’d like to start using weather APIs to track conditions at home or abroad, we have a whole host of free Raspberry Pi resources for you to try your hand on: begin by learning how to fetch weather data using the RESTful API or using Scratch and the OpenWeatherMap to create visual representations of weather across the globe. You could even create a ‘Dress for the weather’ indicator so you’re never caught without a coat, an umbrella, or sunscreen again!

However you use the weather in your digital making projects, we’d love to see what you’ve been up to in the comments below.

The post Storm Glass: simulate the weather at your desk appeared first on Raspberry Pi.


Source: Raspberry Pi – Storm Glass: simulate the weather at your desk

Raspberry Pi Looper-Synth-Drum…thing

To replace his iPad for live performance, Colorado-based musician Toby Hendricks built a looper, complete with an impressive internal sound library, all running on a Raspberry Pi.

Raspberry Pi Looper/synth/drum thing

Check out the guts here: https://youtu.be/mCOHFyI3Eoo My first venture into raspberry pi stuff. Running a custom pure data patch I’ve been working on for a couple years on a Raspberry Pi 3. This project took a couple months and I’m still tweaking stuff here and there but it’s pretty much complete, it even survived it’s first live show!

Toby’s build is a pretty mean piece of kit, as this video attests. Not only does it have a multitude of uses, but the final build is beautiful. Do make sure to watch to the end of the video for a wonderful demonstration of the kit.

Inside the Raspberry Pi looper

Alongside the Raspberry Pi and Behringer U-Control sound card, Toby used Pure Data, a multimedia visual programming language, and a Teensy 3.6 processor to complete the build. Together, these allow for playback of a plethora of sounds, which can either be internally stored, or externally introduced via audio connectors along the back.

This guy is finally taking shape. DIY looper/fx box/sample player/synth. #teensy #arduino #raspberrypi #puredata

98 Likes, 6 Comments – otem rellik (@otem_rellik) on Instagram: “This guy is finally taking shape. DIY looper/fx box/sample player/synth. #teensy #arduino…”

Delay, reverb, distortion, and more are controlled by sliders along one side, while pre-installed effects are selected and played via some rather beautiful SparkFun buttons on the other. Loop buttons, volume controls, and a repurposed Nintendo DS screen complete the interface.

Raspberry Pi Looper Guts

Thought I’d do a quick overview of the guts of my pi project. Seems like many folks have been interested in seeing what the internals look like.

Code for the looper can be found on Toby’s GitHub here. Make sure to continue to follow him via YouTube and Instagram for updates on the build, including these fancy new buttons.

Casting my own urethane knobs and drum pads from 3D printed molds! #3dprinted #urethanecasting #diy

61 Likes, 4 Comments – otem rellik (@otem_rellik) on Instagram: “Casting my own urethane knobs and drum pads from 3D printed molds! #3dprinted #urethanecasting #diy”

I got the music in me

If you want to get musical with a Raspberry Pi, but the thought of recreating Toby’s build is a little daunting, never fear! Our free GPIO Music Box resource will help get you started. And projects such as Mike Horne’s fabulous Raspberry Pi music box should help inspire you to take your build further.

Raspberry Pi Looper post image of Mike Horne's music box

Mike’s music box boasts wonderful flashy buttons and turny knobs for ultimate musical satisfaction!

If you use a Raspberry Pi in any sort of musical adventure, be sure to share your project in the comments below!


The post Raspberry Pi Looper-Synth-Drum…thing appeared first on Raspberry Pi.


Source: Raspberry Pi – Raspberry Pi Looper-Synth-Drum…thing

“Only a year? It’s felt like forever”: a twelve-month retrospective

This weekend saw my first anniversary at Raspberry Pi, and this blog marks my 100th post written for the company. It would have been easy to let one milestone or the other slide had they not come along hand in hand, begging for some sort of acknowledgement.

Alex, Matt, and Courtney in a punt on the Cam

The day Liz decided to keep me

So here it is!

Joining the crew

Prior to my position in the Comms team as Social Media Editor, my employment history was largely made up of retail sales roles and, before that, bit parts in theatrical backstage crews. I never thought I would work for the Raspberry Pi Foundation, despite its firm position on my Top Five Awesome Places I’d Love to Work list. How could I work for a tech company when my knowledge of tech stretched as far as dismantling my Game Boy when I was a kid to see how the insides worked, or being the one friend everyone went to when their phone didn’t do what it was meant to do? I never thought about the other side of the Foundation coin, or how I could find my place within the hidden workings that turned the cogs that brought everything together.

… when suddenly, as if out of nowhere, a new job with a dream company. #raspberrypi #positive #change #dosomething

12 Likes, 1 Comments – Alex J’rassic (@thealexjrassic) on Instagram: “… when suddenly, as if out of nowhere, a new job with a dream company. #raspberrypi #positive…”

A little luck, a well-written though humorous resumé, and a meeting with Liz and Helen later, I found myself the newest member of the growing team at Pi Towers.

Ticking items off the Bucket List

I thought it would be fun to point out some of the chances I’ve had over the last twelve months and explain how they fit within the world of Raspberry Pi. After all, we’re about more than just a $35 credit card-sized computer. We’re a charitable Foundation made up of some wonderful and exciting projects, people, and goals.

High altitude ballooning (HAB)

Skycademy offers educators in the UK the chance to come to Pi Towers Cambridge to learn how to plan a balloon launch, build a payload with onboard Raspberry Pi and Camera Module, and provide teachers with the skills needed to take their students on an adventure to near space, with photographic evidence to prove it.

All the screens you need to hunt balloons. . We have our landing point and are now rushing to Therford to find the payload in a field. . #HAB #RasppberryPi

332 Likes, 5 Comments – Raspberry Pi (@raspberrypifoundation) on Instagram: “All the screens you need to hunt balloons. . We have our landing point and are now rushing to…”

I was fortunate enough to join Sky Captain James, along with Dan Fisher, Dave Akerman, and Steve Randell on a test launch back in August last year. Testing out new kit that James had still been tinkering with that morning, we headed to a field in Elsworth, near Cambridge, and provided Facebook Live footage of the process from payload build to launch…to the moment when our balloon landed in an RAF shooting range some hours later.

RAF firing range sign

“Can we have our balloon back, please, mister?”

Having enjoyed watching Blue Peter presenters send up a HAB when I was a child, I marked off the event on my bucket list with a bold tick, and I continue to show off the photographs from our Raspberry Pi as it reached near space.

Spend the day launching/chasing a high-altitude balloon. Look how high it went!!! #HAB #ballooning #space #wellspacekinda #ish #photography #uk #highaltitude

13 Likes, 2 Comments – Alex J’rassic (@thealexjrassic) on Instagram: “Spend the day launching/chasing a high-altitude balloon. Look how high it went!!! #HAB #ballooning…”

You can find more information on Skycademy here, plus more detail about our test launch day in Dan’s blog post here.

Dear Raspberry Pi Friends…

My desk is slowly filling with stuff: notes, mementoes, and trinkets that find their way to me from members of the community, both established and new to the life of Pi. There are thank you notes, updates, and more from people I’ve chatted to online as they explore their way around the world of Pi.

Letter of thanks to Raspberry Pi from a young fan

*heart melts*

By plugging myself into social media on a daily basis, I often find hidden treasures that go unnoticed due to the high volume of tags we receive on Facebook, Twitter, Instagram, and so on. Kids jumping off chairs in delight as they complete their first Scratch project, newcomers to the Raspberry Pi shedding a tear as they make an LED blink on their kitchen table, and seasoned makers turning their hobby into something positive to aid others.

It’s wonderful to join in the excitement of people discovering a new skill and exploring the community of Raspberry Pi makers: I’ve been known to shed a tear as a result.

Meeting educators at Bett, chatting to teen makers at makerspaces, and sharing a cupcake or three at the birthday party have been incredible opportunities to get to know you all.

You’re all brilliant.

The Queens of Robots, both shoddy and otherwise

Last year we welcomed the Queen of Shoddy Robots, Simone Giertz to Pi Towers, where we chatted about making, charity, and space while wandering the colleges of Cambridge and hanging out with flat Tim Peake.

Queen of Robots @simonegiertz came to visit #PiTowers today. We hung out with cardboard @astro_timpeake and ate chelsea buns at @fitzbillies #Cambridge. . We also had a great talk about the educational projects of the #RaspberryPi team, #AstroPi and how not enough people realise we’re a #charity. . If you’d like to learn more about the Raspberry Pi Foundation and the work we do with #teachers and #education, check out our website – www.raspberrypi.org. . How was your day? Get up to anything fun?

597 Likes, 3 Comments – Raspberry Pi (@raspberrypifoundation) on Instagram: “Queen of Robots @simonegiertz came to visit #PiTowers today. We hung out with cardboard…”

And last month, the wonderful Estefannie ‘Explains it All’ de La Garza came to hang out, make things, and discuss our educational projects.

Estefannie on Twitter

Ahhhh!!! I still can’t believe I got to hang out and make stuff at the @Raspberry_Pi towers!! Thank you thank you!!

Meeting such wonderful, exciting, and innovative YouTubers was a fantastic inspiration to work on my own projects and to try to do more to help others discover ways to connect with tech through their own interests.

Those ‘wow’ moments

Every Raspberry Pi project I see on a daily basis is awesome. The moment someone takes an idea and does something with it is, in my book, always worthy of awe and appreciation. Whether it be the aforementioned flashing LED, or sending Raspberry Pis to the International Space Station, if you have turned your idea into reality, I applaud you.

Some of my favourite projects over the last twelve months have not only made me say “Wow!”, they’ve also inspired me to want to do more with myself, my time, and my growing maker skill.

Museum in a Box on Twitter

Great to meet @alexjrassic today and nerd out about @Raspberry_Pi and weather balloons and @Space_Station and all things #edtech 🎈⛅?📚?

Projects such as Museum in a Box, a wonderful hands-on learning aid that brings the world to the hands of children across the globe, honestly made me tear up as I placed a miniaturised 3D-printed Virginia Woolf onto a wooden box and gasped as she started to speak to me.

Jill Ogle’s Let’s Robot project had me in awe as Twitch-controlled Pi robots tackled mazes, attempted to cut birthday cake, or swung to slap Jill in the face over webcam.

Jillian Ogle on Twitter

@SryAbtYourCats @tekn0rebel @Beam Lol speaking of faces… https://t.co/1tqFlMNS31

Every day I discover new, wonderful builds that both make me wish I’d thought of them first, and leave me wondering how they manage to make them work in the first place.
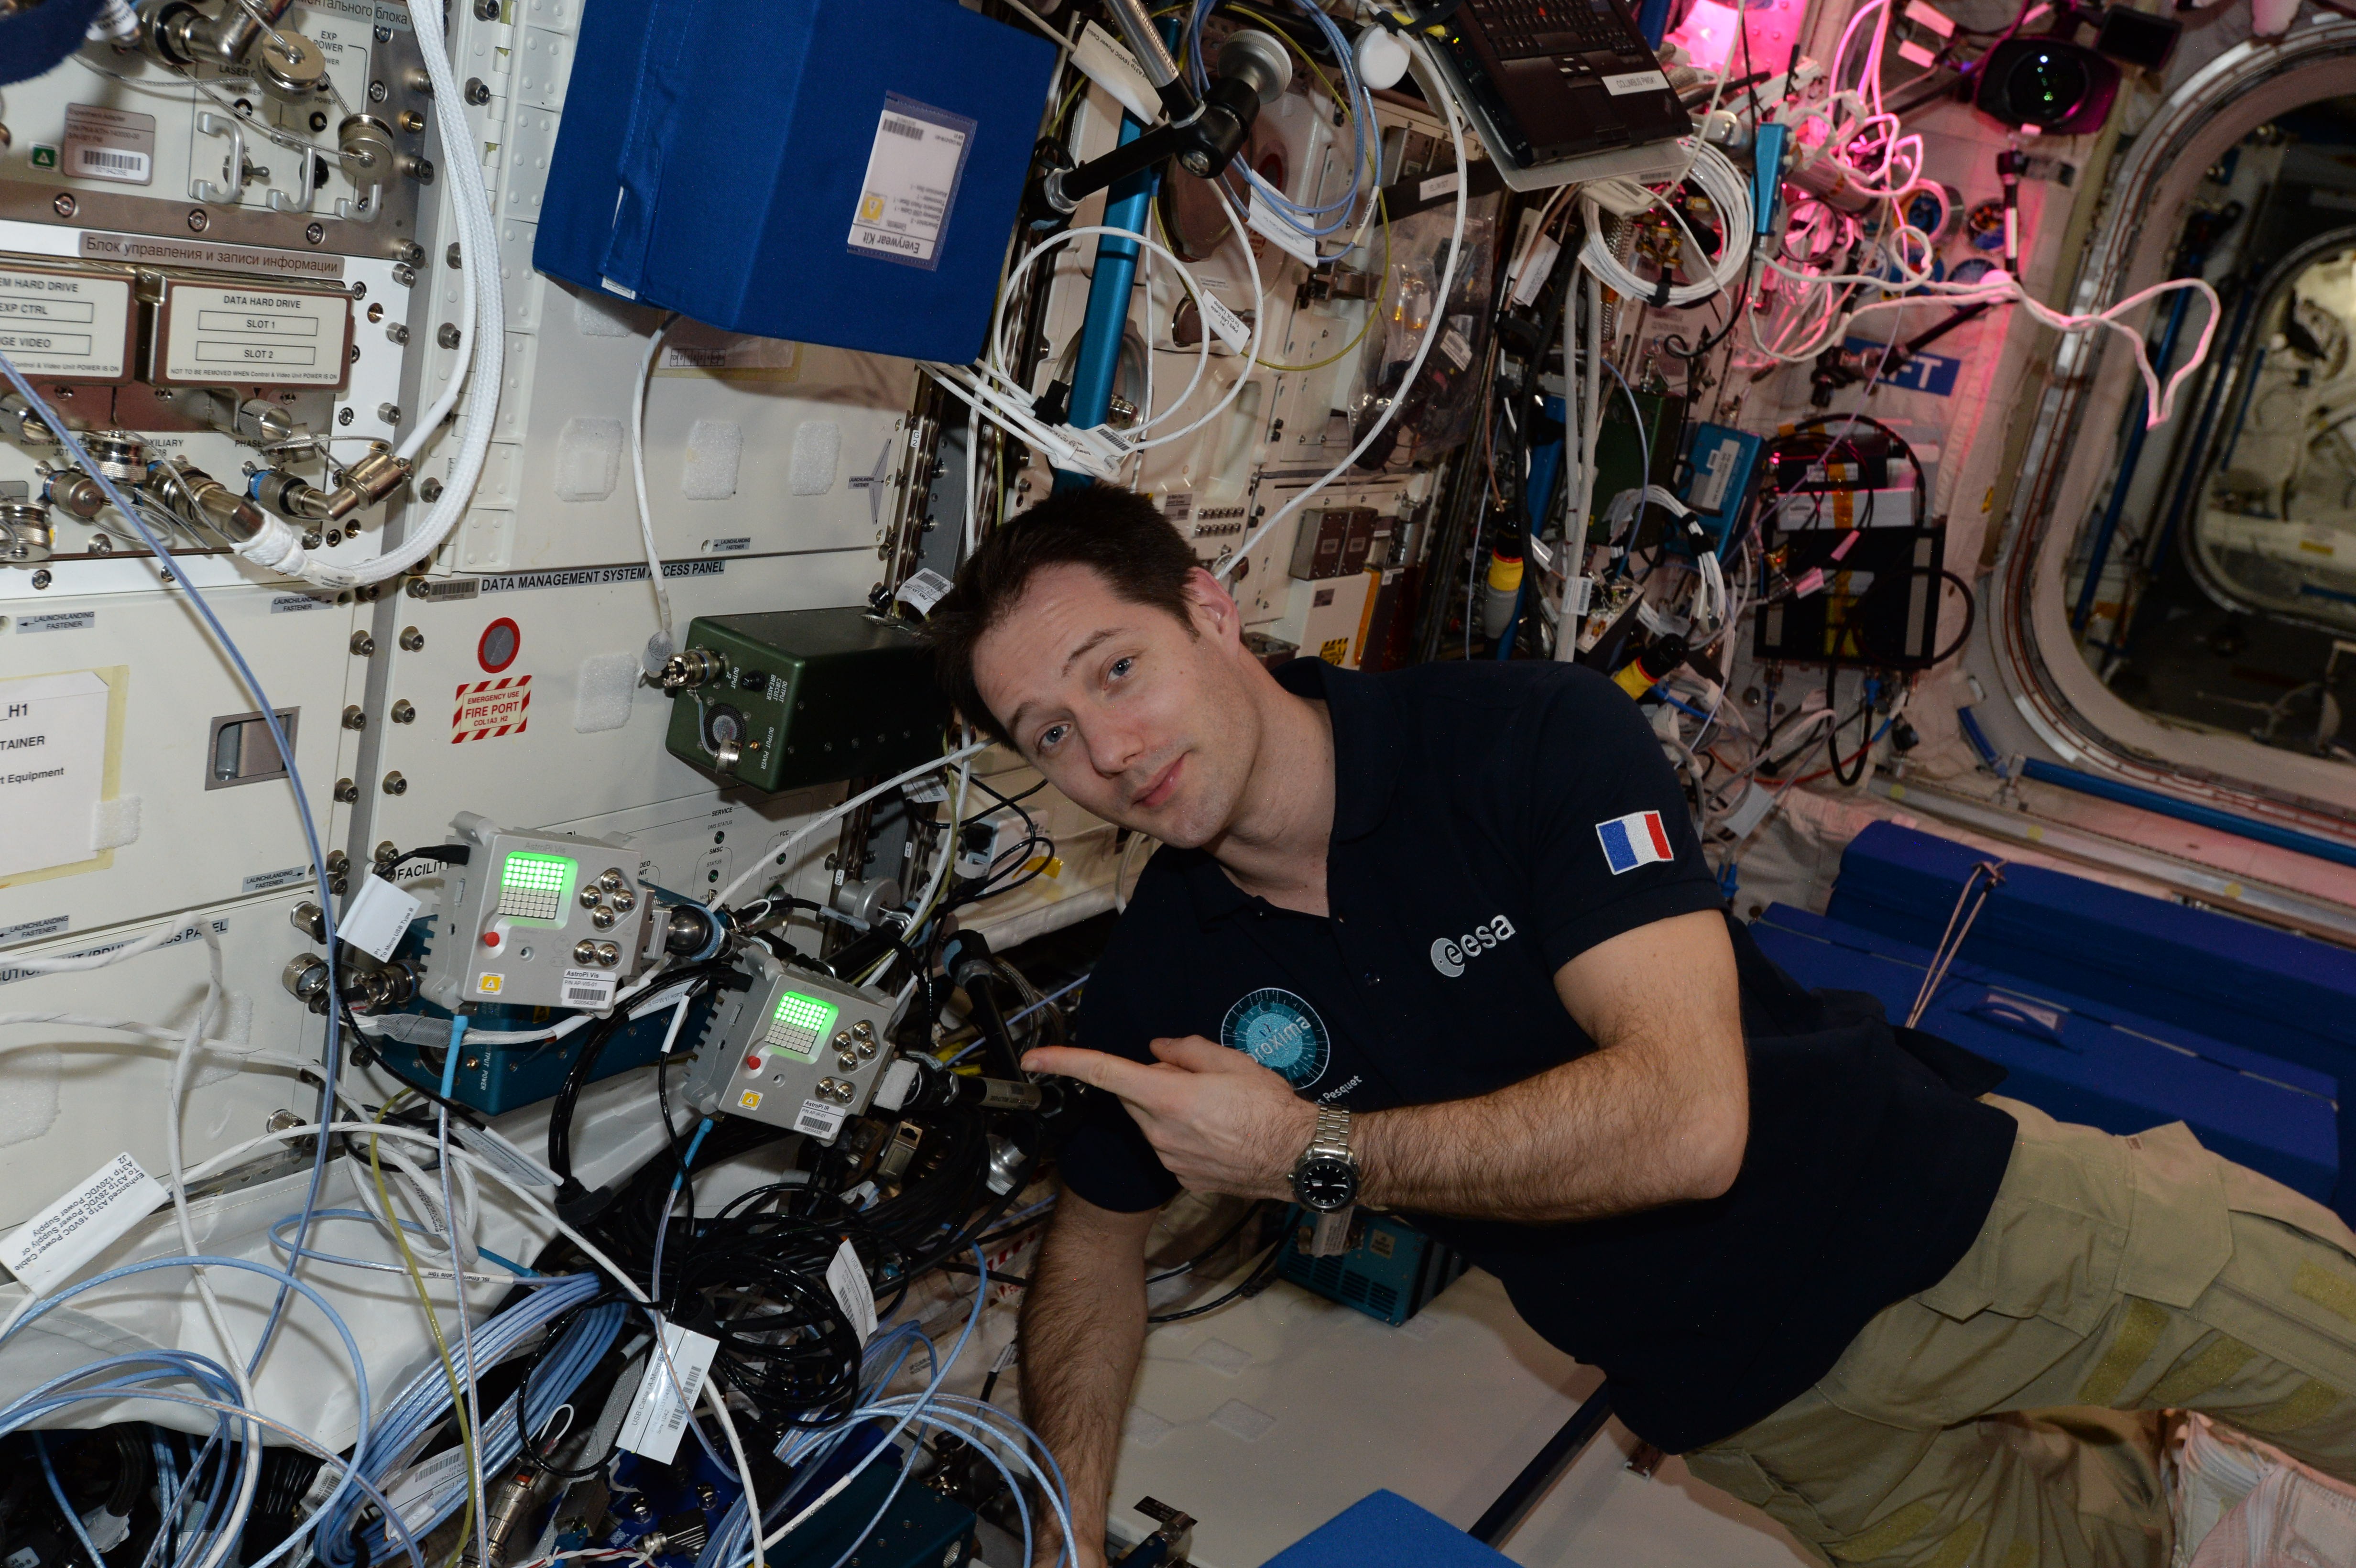
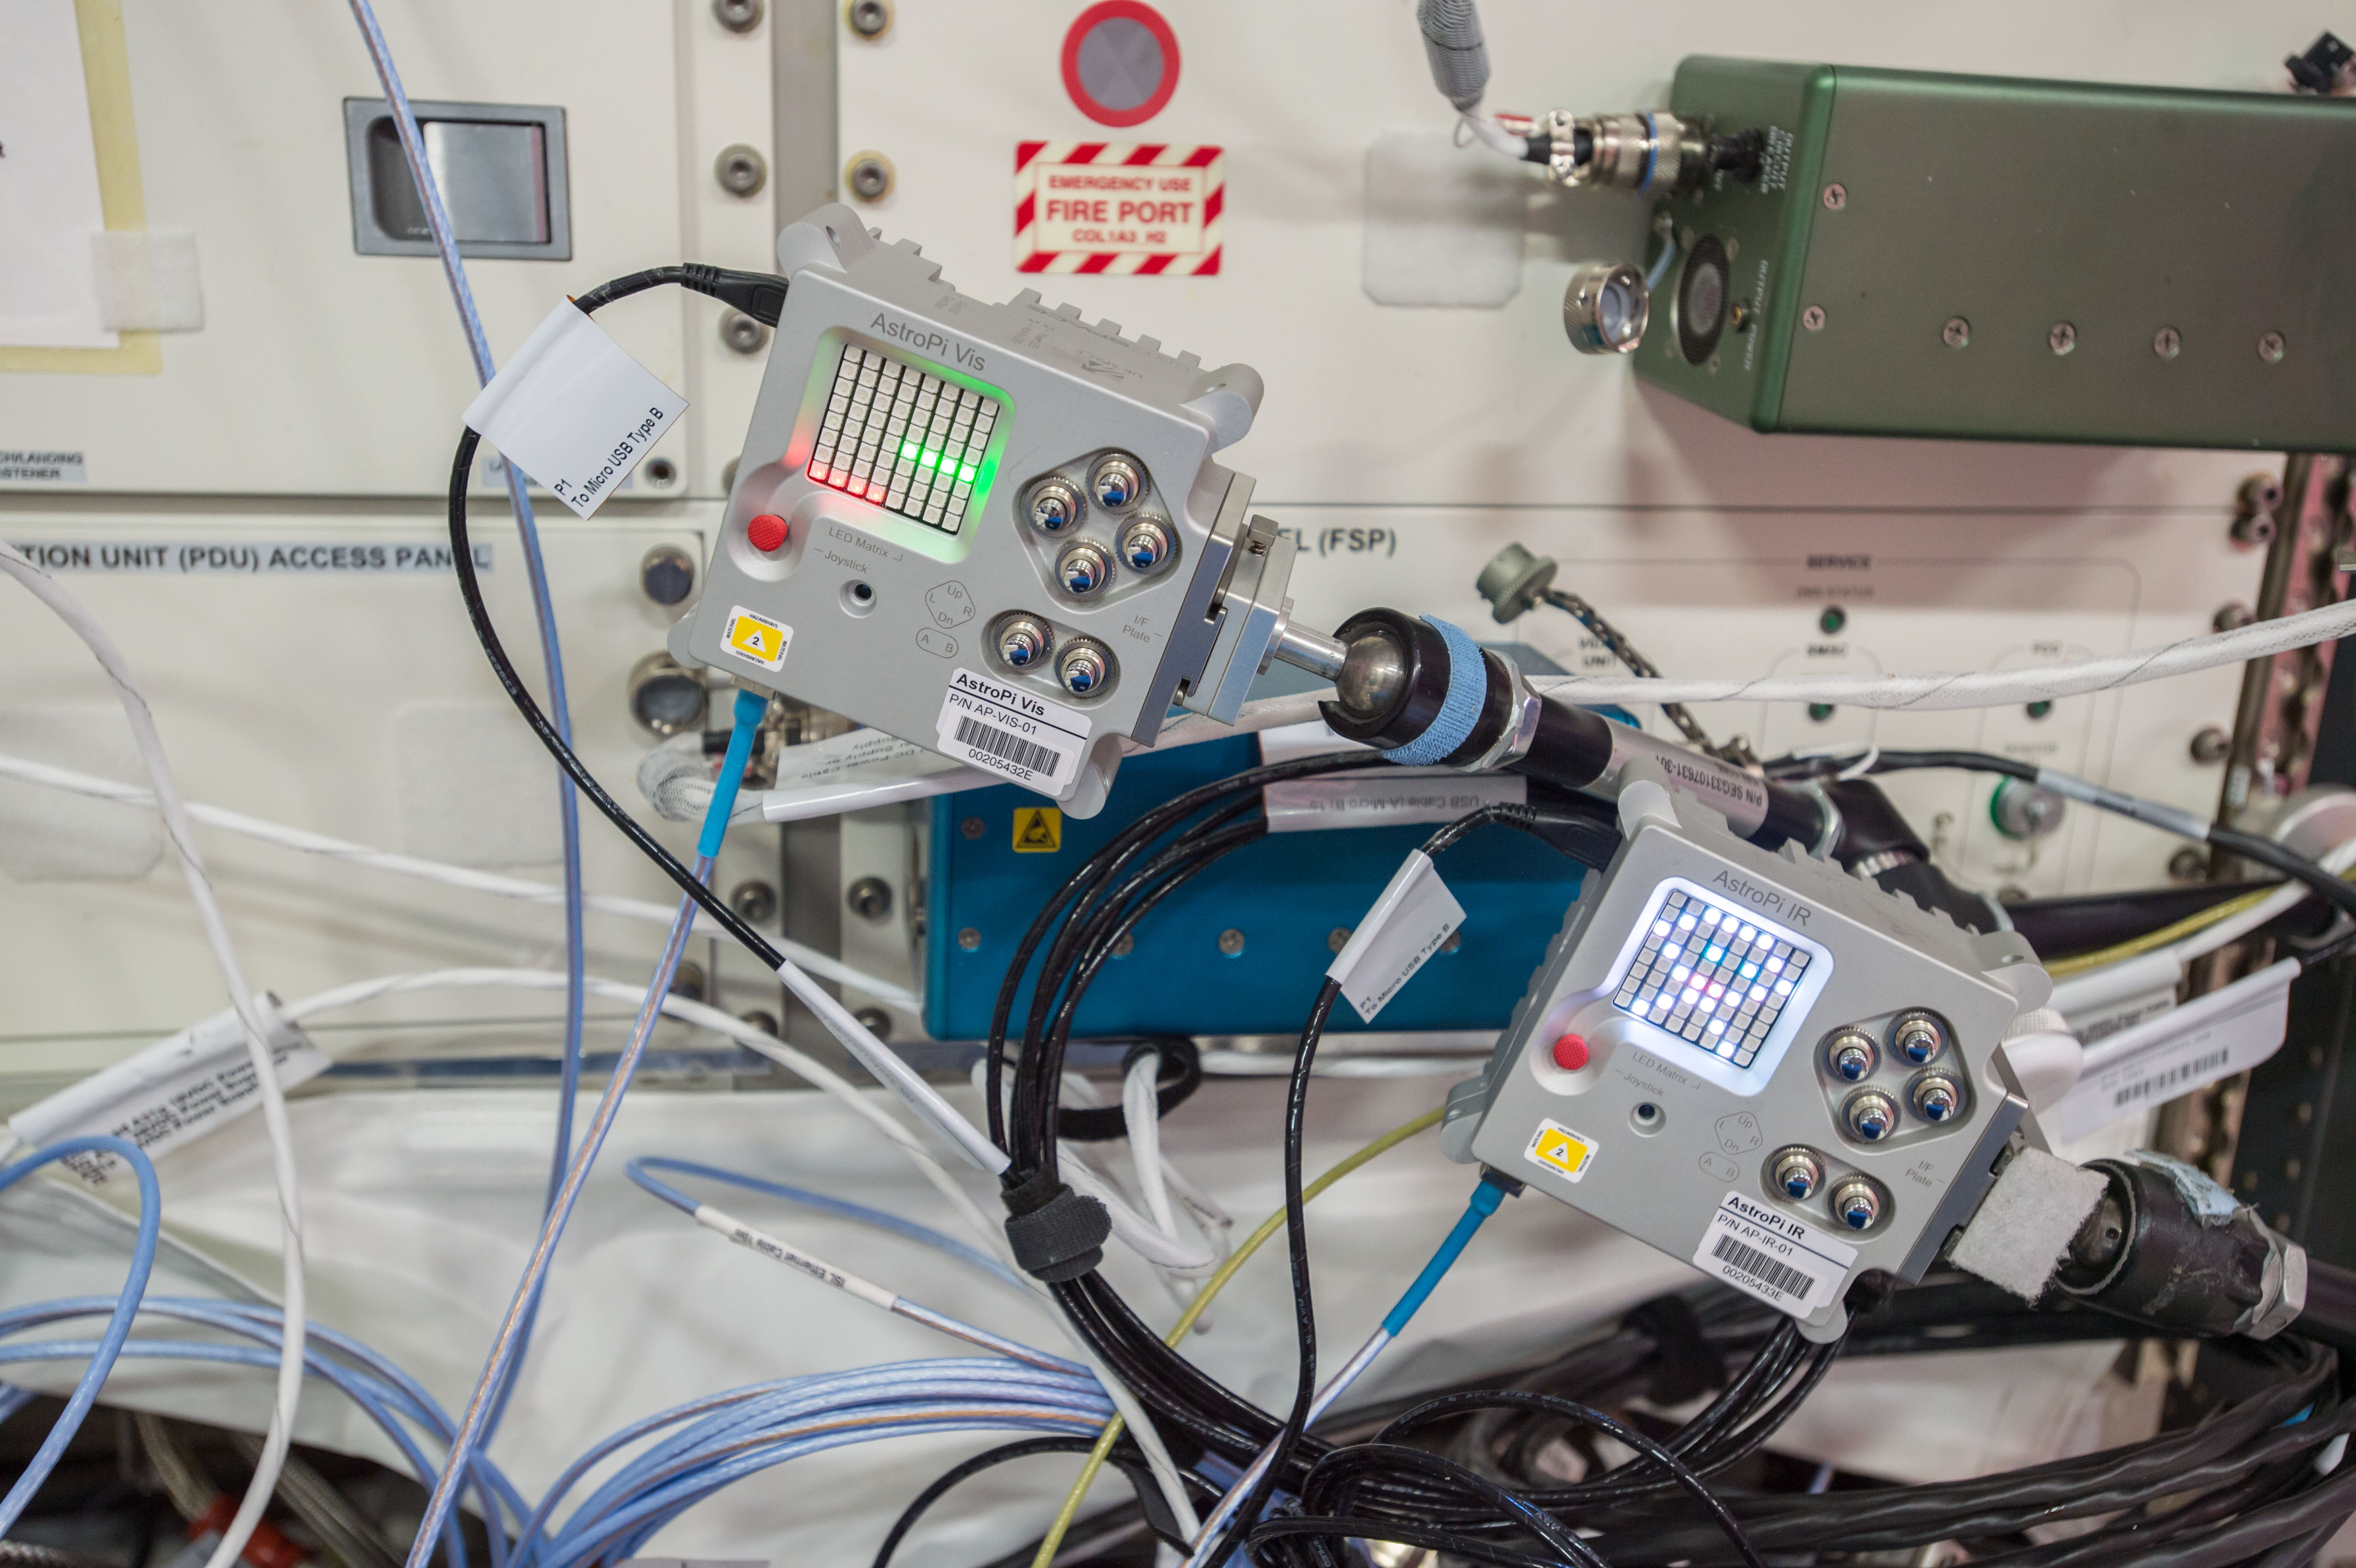
Space

We have Raspberry Pis in space. SPACE. Actually space.

Raspberry Pi on Twitter

New post: Mission accomplished for the European @astro_pi challenge and @esa @Thom_astro is on his way home 🚀 https://t.co/ycTSDR1h1Q

Twelve months later, this still blows my mind.

And let’s not forget…

  • The chance to visit both the Houses of Parliment and St James’s Palace

Raspberry Pi team at the Houses of Parliament

  • Going to a Doctor Who pre-screening and meeting Peter Capaldi, thanks to Clare Sutcliffe

There’s no need to smile when you’re #DoctorWho.

13 Likes, 2 Comments – Alex J’rassic (@thealexjrassic) on Instagram: “There’s no need to smile when you’re #DoctorWho.”

We’re here. Where are you? . . . . . #raspberrypi #vidconeu #vidcon #pizero #zerow #travel #explore #adventure #youtube

1,944 Likes, 30 Comments – Raspberry Pi (@raspberrypifoundation) on Instagram: “We’re here. Where are you? . . . . . #raspberrypi #vidconeu #vidcon #pizero #zerow #travel #explore…”

  • Making a GIF Cam and other builds, and sharing them with you all via the blog

Made a Gif Cam using a Raspberry Pi, Pi camera, button and a couple LEDs. . When you press the button, it takes 8 images and stitches them into a gif file. The files then appear on my MacBook. . Check out our Twitter feed (Raspberry_Pi) for examples! . Next step is to fit it inside a better camera body. . #DigitalMaking #Photography #Making #Camera #Gif #MakersGonnaMake #LED #Creating #PhotosofInstagram #RaspberryPi

19 Likes, 1 Comments – Alex J’rassic (@thealexjrassic) on Instagram: “Made a Gif Cam using a Raspberry Pi, Pi camera, button and a couple LEDs. . When you press the…”

The next twelve months

Despite Eben jokingly firing me near-weekly across Twitter, or Philip giving me the ‘Dad glare’ when I pull wires and buttons out of a box under my desk to start yet another project, I don’t plan on going anywhere. Over the next twelve months, I hope to continue discovering awesome Pi builds, expanding on my own skills, and curating some wonderful projects for you via the Raspberry Pi blog, the Raspberry Pi Weekly newsletter, my submissions to The MagPi Magazine, and the occasional video interview or two.

It’s been a pleasure. Thank you for joining me on the ride!

The post “Only a year? It’s felt like forever”: a twelve-month retrospective appeared first on Raspberry Pi.


Source: Raspberry Pi – “Only a year? It’s felt like forever”: a twelve-month retrospective

European Astro Pi: Mission complete

In October last year, with the European Space Agency and CNES, we launched the first ever European Astro Pi challenge. We asked students from all across Europe to write code for the flight of French ESA astronaut Thomas Pesquet to the International Space Station (ISS) as part of the Proxima mission.

The winners were announced back in March, and since then their code has been uploaded to the ISS and run in space!

Thomas Pesquet aboard the ISS with the Astro Pi units

French ESA astronaut Thomas Pesquet with the Astro Pi units. Image credit ESA.

Code from 64 student teams ran between 28 April and 10 May, supervised by Thomas, in the European Columbus module.

Astro Pi on Twitter

We can confirm student programs are finished, results are downloaded from @Space_Station and teams will receive their​ data by next week ?️📡

On 10 May the results, data, and log files were downloaded to the ground, and the following week they were emailed back to the student teams for analysis.

Ecole St-André d’E on Twitter

On vient de recevoir les données enregistrées par nos codes #python depuis l’ #iss @CNES @astro_pi @Thom_astro . Reste à analyser tout ça!

We’ve looked at the results, and we can see that many of the teams have been successful in their missions: congratulations to all of you! We look forward to reading your write-ups and blogs.

In pictures

In a surprise turn of events, we learnt that Thomas set up a camera to take regular pictures of the Astro Pi units for one afternoon. This was entirely voluntary on his part and was not scheduled as part of the mission. Thank you so much, Thomas!

Some lucky teams have some very nice souvenirs from the ISS. Here are a couple of them:

Astro Pi units on the ISS photographed by Thomas Pesquet

Juvara team – Italy (left) and South London Raspberry Jam – UK (right). Image credit ESA.

Astro Pi units on the ISS photographed by Thomas Pesquet

Astro Team – Italy (left) and AstroShot – Greece (right). Image credit ESA.

Until next time…

This brings the 2016/17 European Astro Pi challenge to a close. We would like to thank all the students and teachers who participated; the ESA Education, Integration and Implementation, Ground Systems, and Flight Control teams; BioTesc (ESA’s user operations control centre for Astro Pi); and especially Thomas Pesquet himself.

Thomas and Russian Soyuz commander Oleg Novitskiy return to Earth today, concluding their six-month stay on the ISS. After a three-hour journey in their Soyuz spacecraft, they will land in the Kazakh steppe at approximately 15:09 this afternoon. You can watch coverage of the departure, re-entry, and landing on NASA TV.

Astro Pi has been a hugely enjoyable project to work on, and we hope to be back in the new school year (2017-18) with brand-new challenges for teachers and students.


The post European Astro Pi: Mission complete appeared first on Raspberry Pi.


Source: Raspberry Pi – European Astro Pi: Mission complete

Getting started with soldering

In our newest resource video, Content and Curriculum Manager Laura Sach introduces viewers to the basics of soldering.

Getting started with soldering

Learn the basics of how to solder components together, and the safety precautions you need to take. Find a transcript of this video in our accompanying learning resource: raspberrypi.org/learning/getting-started-with-soldering/

So sit down, grab your Raspberry Pi Zero, and prepare to be schooled in the best (and warned about the worst) practices in the realm of soldering.

Do I have to?!

Yes. Yes, you do.

If you are planning to use a Raspberry Pi Zero or Zero W, or to build something magnificent using wires, buttons, lights, and more, you’ll want to practice your soldering technique. Those of us inexperienced in soldering have been jumping for joy since the release of the Pimoroni solderless header. However, if you want to your project to progress from the ‘prototyping with a breadboard’ stage to a durable final build, soldering is the best option for connecting all its components together.

soldering raspberry pi gif

Hot glue just won’t cut it this time. Sorry.

I promise it’s not hard to do, and the final result will give you a warm feeling of accomplishment…made warmer still if, like me, you burn yourself due to your inability to pay attention to instructions. (Please pay attention to the instructions.)

Soldering 101

As Laura explains in the video, there are two types of solder to choose from for your project: the lead-free kind that requires a slightly higher temperature to melt, and the lead-containing kind that – surprise, surprise – has lead in it. Although you’ll find other types of solder, one of these two is what you want for tinkering.

soldering raspberry pi

The decision…is yours.

In order to heat your solder and apply it to your project, you’ll need either Kryptonian heat vision* or, on this planet at least, a soldering iron. There is a variety of soldering irons available on the market, and as your making skills improve you will probably upgrade. But for now, try not to break the bank and choose an iron that’s within your budget. You may also want to ask around, as someone you know might be able to lend you theirs and help you out with your first soldering attempt.

Safety first!

Make sure you always solder in a well-ventilated area. Before you start, remove any small people, four-legged friends, and other trip hazards from the space and check you have everything you need close at hand.

soldering raspberry pi

The lab at Pi Towers is well ventilated thanks to this handy ventilation pipe…thingy.

And never forget, things get hot when you heat them! Always allow a moment for cooling before you handle your wonderful soldering efforts. I remember the first time I tried soldering a button to a Raspberry Pi and…let’s just say that I still bear the scars incured because I didn’t follow my own safety advice.

Let’s do this!

Now you’re geared up and ready to solder, follow along with Laura and fit a header to your Raspberry Pi Zero! You can also read a complete transcript of the video in our free Getting started with soldering  resource.

If you use Laura’s video to help you complete a soldering project, make sure to share your final piece with us via social media using the hashtag #ThanksLauraSach.


*spoiler alert!

The post Getting started with soldering appeared first on Raspberry Pi.


Source: Raspberry Pi – Getting started with soldering

Bicycle-powered Menabrea beer dispenser

Cycle. Beat the on-screen pace. Receive free Menabrea beer. All on a system controlled by a Raspberry Pi.

Honestly, what’s not to like?

Menabrea UK

If you’re wondering what it takes to win an ice cold pint at one of our Race to Biella events, this clip will give you more of an idea. It’s no mean feat!! Do you think you have the pedal power? Join us tonight at The Avonbridge Hotel for sunshine, cycling and, of course, a refreshing pint or two.

Glasgow-based creative content agency Bright Signals were contacted by Wire with a brief for a pretty tasty project: create something for Menabrea that ties in with the Giro d’Italia cycle race passing close to the brewery in Biella, Northern Italy.

Cycle race, was it? Menabrea brewery, you say?

The team at Bright Signals came up with the superb idea of a bicycle-powered Menabrea beer dispenser.

It must be noted that when I said the words ‘bicycle-powered beer dispenser’ aloud in the Raspberry Pi office, many heads turned and Director of Software Engineering Gordon Hollingworth dropped everything he was doing in order to learn more.

The final build took a fortnight to pull together, with Bright Signals working on the Raspberry Pi-controlled machine and Wire in charge of its graphic design.

Menabrea Beer Bike Raspberry Pi

Cheer for beer!
Image c/o Grant Gibson and Menabrea

Reuse, reduce, return to the bar

“This was probably one of the most enjoyable builds I’ve worked on,” says Bright Signal’s Deputy Managing Director, Grant Gibson. “We had a really clear idea of what we were doing from the start, and we managed to reuse loads of parts from the donor bicycle as we simplified the bike and built the pouring system.” The team integrated the bottle cage of the donor bike into the main dispensing mechanism, and the bike’s brake levers now cradle a pint glass at the perfect angle for pouring.

A Raspberry Pi powers the 24″ screen atop the beer dispenser, as well as the buttons, pouring motors, and lights.

Menabrea Beer Bike Raspberry Pi

Perfect size for the Raspberry Pi lobby!
Image c/o Grant Gibson

Giro di Scozia

Fancy trying Menabrea’s bicycle-powered beer dispenser for yourself? The final stop of its 4-week tour will be the Beer Cafe in Glasgow this Friday 2nd June. If you make it to the event, be sure to share your photos and video with us in the comments below, or via our social media channels such as Twitter, Facebook, and Instagram. And if you end up building your own beer-dispensing cycle, definitely write up a tutorial for the project! We know at least one person who is keenly interested…

Menabrea on Twitter

Another successful racer wins a pint of Menabrea in the #racetobiella. The bike’s at The Fox and Hound, Houston today…

The post Bicycle-powered Menabrea beer dispenser appeared first on Raspberry Pi.


Source: Raspberry Pi – Bicycle-powered Menabrea beer dispenser

YouTube live-streaming made easy

Looking to share your day, event, or the observations of your nature box live on the internet via a Raspberry Pi? Then look no further, for Alex Ellis has all you need to get started with YouTube live-streaming from your Pi.

YouTube live-streaming Docker Raspberry Pi

The YouTube live dashboard. Image c/o Alex Ellis

If you spend any time on social media, be it Facebook, Instagram, YouTube, or Twitter, chances are you’ve been notified of someone ‘going live’.

Live-streaming video on social platforms has become almost ubiquitous, whether it’s content by brands, celebrities, or your cousin or nan – everyone is doing it.

Even us!

Live from Pi Towers – Welcome

Carrie Anne and Alex offer up a quick tour of the Pi Towers lobby while trying to figure out how Facebook Live video works.

YouTube live-streaming with Alex Ellis and Docker

In his tutorial, Alex demonstrates an easy, straightforward approach to live-streaming via a Raspberry Pi with the help of a Docker image of FFmpeg he has built. He says that with the image, instead of “having to go through lots of manual steps, we can type in a handful of commands and get started immediately.”

Why is the Docker image so helpful?

As Alex explains on his blog, if you want to manually configure your Raspberry Pi Zero for YouTube live-streaming, you need to dedicate more than a few hours of your day.

Normally this would have involved typing in many manual CLI commands and waiting up to 9 hours for some video encoding software (ffmpeg) to compile itself.

Get anything wrong (like Alex did the first time) and you have to face another nine hours of compilation time before you’re ready to start streaming – not ideal if your project is time-sensitive.

Alex Ellis on Twitter

See you in 8-12 hours? Building ffmpeg on a my @Raspberry_Pi #pizero with @docker

Using the Docker image

In his tutorial, Alex uses a Raspberry Pi Zero and advises that the project will work with either Raspbian Jessie Lite or PIXEL. Once you’ve installed Docker, you can pull the FFmpeg image he has created directly to your Pi from the Docker Hub. (We advise that while doing so, you should feel grateful to Alex for making the image available and saving you so much time.)

It goes without saying that you’ll need a YouTube account in order to live-stream to YouTube; go to the YouTube live streaming dashboard to obtain a streaming key.

Alex Ellis on Twitter

Get live streaming to @YouTube with this new weekend project and guide using your @Raspberry_Pi and @docker. https://t.co/soqZ9D9jbS

For a comprehensive breakdown of how to stream to YouTube via a Raspberry Pi, head to Alex’s blog. You’ll also find plenty of other Raspberry Pi projects there to try out.

Why live-stream from a Raspberry Pi?

We see more and more of our community members build Raspberry Pi projects that involve video capture. The minute dimensions of the Raspberry Pi Zero and Zero W make them ideal for fitting into robots, nature boxes, dash cams, and more. What better way to get people excited about your video than to share it with them live?

If you have used a Raspberry Pi to capture or stream footage, make sure to link to your project in the comments below. And if you give Alex’s Docker image a go, do let us know how you get on.

The post YouTube live-streaming made easy appeared first on Raspberry Pi.


Source: Raspberry Pi – YouTube live-streaming made easy

The Fleischer 100: Pi-powered sound effects

If there’s one thing we like more than a project video, it’s a project video that has style. And that’s exactly what we got for the Fleischer 100, a Raspberry Pi-powered cartoon sound effects typewriter created by James McCullen.

The Fleischer 100 | Cartoon Sound Effects Toy

The goal of this practical project was to design and make a hardware device that could play numerous sound effects by pressing buttons and tweaking knobs and dials. Taking inspiration from old cartoons of the 1930s in particular – the sound effects would be in the form of mostly conventional musical instruments that were often used to create sound effects in this period of animation history.

The golden age of Foley

Long before the days of the drag-and-drop sound effects of modern video editing software, there were Foley artists. These artists would create sound effects for cartoons, films, and even live performances, often using everyday objects. Here are Orson Welles and the King of Cool himself, Dean Martin, with a demonstration:

Dean Martin & Orson Welles – Early Radio/Sound Effects

Uploaded by dino4ever on 2014-05-26.

The Fleischer 100

“The goal of this practical project was to design and make a hardware device that could be used to play numerous sound effects by pressing buttons and tweaking knobs and dials,” James says, and explains that he has been “taking inspiration from old cartoons of the 1930s in particular”.

The Fleischer 100

Images on the buttons complete the ‘classic cartoon era’ look

With the Fleischer 100, James has captured that era’s look and feel. Having recorded the majority of the sound effects using a Rode NT2-A microphone, he copied the sound files to a Raspberry Pi. The physical computing side of building the typewriter involved connecting the Pi to multiple buttons and switches via a breadboard. The buttons are used to play back the files, and both a toggle and a rotary switch control access to the sound effects – there are one hundred in total! James also made the costumized housing to achieve an appearance in line with the period of early cartoon animation.

The Fleischer 100

Turning the typewriter roller selects a new collection of sound effects

Regarding the design of his device, James was particularly inspired by the typewriter in the 1930s Looney Tunes short Hold Anything – and to our delight, he decided to style the final project video to match its look.

Hold Anything – Looney Tunes (HD)

Release date 1930 Directed by Hugh Harman Rudolf Ising Produced by Hugh Harman Rudolf Ising Leon Schlesinger(Associate Producer) Voices by Carman Maxwell Rochelle Hudson (both uncredited) Music by Frank Marsales Animation by Isadore Freleng Norm Blackburn Distributed by Warner Bros.

We wish we had a Fleischer 100 hidden under a desk at Pi Towers with which to score office goings-on…

The post The Fleischer 100: Pi-powered sound effects appeared first on Raspberry Pi.


Source: Raspberry Pi – The Fleischer 100: Pi-powered sound effects

Raspberry Pi and CoderDojo join forces

We’ve got some great news to share today: the Raspberry Pi Foundation is joining forces with the CoderDojo Foundation, in a merger that will give many more young people all over the world new opportunities to learn how to be creative with technology.

CoderDojo is a global network of coding clubs for kids from seven to 17. The first CoderDojo took place in July 2011 when James Whelton and Bill Liao decided to share their passion for computing by setting up a club at the National Software Centre in Cork. The idea was simple: provide a safe and social place for young people to acquire programming skills, learning from each other and supported by mentors.

Photo: a mentor helps a child at a CoderDojo

Since then, James and Bill have helped turn that idea into a movement that reaches across the whole world, with over 1,250 CoderDojos in 69 countries, regularly attended by over 35,000 young Ninjas.

Raspberry Pi and CoderDojo have each accomplished amazing things over the last six years. Now, we see an opportunity to do even more by joining forces. Bringing together Raspberry Pi, Code Club, and CoderDojo will create the largest global effort to get young people involved in computing and digital making. We have set ourselves an ambitious goal: to quadruple the number of CoderDojos worldwide, to 5,000, by the end of 2020.

Photo: children and teenagers work on laptops at a CoderDojo, while adults help

The enormous impact that CoderDojo has had so far is down to the CoderDojo Foundation team, and to the community of volunteers, businesses, and foundations who have contributed expertise, time, venues, and financial resources. We want to deepen those relationships and grow that community as we bring CoderDojo to more young people in future.

The CoderDojo Foundation will continue as an independent charity, based in Ireland. Nothing about CoderDojo’s brand or ethos is changing as a result of this merger. CoderDojos will continue to be platform-neutral, using whatever kit they need to help young people learn.

Photo: children concentrate intently on coding activities at a CoderDojo event

In technical terms, the Raspberry Pi Foundation is becoming a corporate member of the CoderDojo Foundation (which is a bit like being a shareholder, but without any financial interest). I will also join the board of the CoderDojo Foundation as a director. The merger is subject to approval by Irish regulators.

How will this work in practice? The two organisations will work together to advance our shared goals, using our respective assets and capabilities to get many more adults and young people involved in the CoderDojo movement. The Raspberry Pi Foundation will also provide practical, financial, and back-office support to the CoderDojo Foundation.

Last June, I attended the CoderDojo Coolest Projects event in Dublin, and was blown away by the amazing projects made by CoderDojo Ninjas from all over the world. From eight-year-olds who had written their first programs in Scratch to the teenagers who built a Raspberry Pi-powered hovercraft, it was clear that CoderDojo is already making a huge difference.

Photo: two girls wearing CoderDojo t-shirts present their Raspberry Pi-based hovercraft at CoderDojo Coolest Projects 2016

I am thrilled that we’re going to be working closely with the brilliant CoderDojo team, and I can’t wait to visit Coolest Projects again next month to meet all of the Ninjas and mentors who make CoderDojo possible.

If you want to find out more about CoderDojo and how you can get involved in helping the movement grow, go here.

The post Raspberry Pi and CoderDojo join forces appeared first on Raspberry Pi.


Source: Raspberry Pi – Raspberry Pi and CoderDojo join forces

Make with Minecraft Pi in The MagPi 58

Hey folks, Rob here! What a busy month it’s been at The MagPi HQ. While we’ve been replying to your tweets, answering questions on YouTube and fiddling with our AIY Voice Project kits, we’ve managed to put together a whole new magazine for you, with issue 58 of the official Raspberry Pi magazine out in stores today.

The front cover of The MagPi 58

The MagPi 58 features our latest Minecraft Pi hacks!

Minecraft Pi

The MagPi 58 is all about making with Minecraft Pi. We’ve got cool projects and hacks that let you take a selfie and display it in the Minecraft world, play music with Steve jumping on a giant piano, and use special cards to switch skins in an instant. It’s the perfect supplement to our Hacking and Making in Minecraft book!

AIY Voice Projects

It’s been great to see everyone getting excited over the last issue of the magazine, and we love seeing your pictures and videos of your AIY Voice projects. In this issue we’ve included loads of ideas to keep you going with the AIY Projects kit. Don’t forget to send us what you’ve made on Twitter!

Issue 57 of The MagPi, showing the Google AIY Voice Projects Kit

Show us what you’ve made with your AIY Voice Projects Kit

The best of the rest in The MagPi 58

We’ve also got our usual selection of reviews, tutorials, and projects. This includes guides to making file servers and electronic instruments, along with our review of Adafruit’s Joy Bonnet handheld gaming kit.

A page from The MagPi 58 showing information on 'Getting Started with GUIs'

You can get started with GUIs in The MagPi 58

You can grab the latest issue in stores in the UK right now, from WHSmith, Sainsburys, Asda, and Tesco. Copies will be arriving very soon in US stores, including Barnes & Noble and Micro Center. You can also get a copy online from our store, or digitally via our Android or iOS app. Don’t forget, there’s always the free PDF as well.

We hope you enjoy the issue! Now if you’ll excuse us, we need a nap after all the excitement!

The post Make with Minecraft Pi in The MagPi 58 appeared first on Raspberry Pi.


Source: Raspberry Pi – Make with Minecraft Pi in The MagPi 58

The Pi Who Loved Me

Fancy yourself as James Bond? In honour of English treasure Roger Moore, we think it’s high time we all became a little more MI5 and a little less MIDoneYet?

James Bond GIF

It’s been a while and M is worried you’re a little…rusty. Best head back to training: go see Q. He has everything you need to get back in shape, both physically and mentally, for the challenges ahead!

Training Camp

Q here, good to have you back.

James Bond Q

First thing’s first: we need to work on your skills and get you ready for your next assignment. Let’s start with your reaction times. This skill is critical in getting you prepared for stealthy situations and averting detection.

Head into my office and grab a Raspberry Pi, LED, and a button to build your own Python Quick Reaction Game. Not only will it help you brush up on your quick thinking, it’ll also teach you how to wire a circuit, use variables, and gather information. This could be key in getting you out of some sticky situations further down the line if you find yourself without one of my gadgets.

James Bond Q

Though speaking of…have you seen our See Like a Bat echolocation device? I’m rather proud of it, even if I do say so myself. Now, even in the darkest of times, you can find your way through any building or maze.

Gathering Intel

We’ll need you to gather some important information for us. But what can you do to make sure no one steals your secret intel? We need you to build a Secret Agent Chat Generator to encrypt information. Once you have completed it, send the information to M via this Morse Code Visual Radio.

Do do this, you’ll need a Morse Code Key. You can find them online or at your local war museum, though they may not care for your taking theirs. But we’re spies. And spies are experts in taking forbidden artefacts. After all, this is what your Laser Tripwire training was for. Oh, you haven’t completed it yet?

James Bond GIF

Well, get to it. Time’s a-wasting!

Locks and Detection

You’re done? Good. Back to the intel.

Until you can find a Morse Code Key, why not hide the information in this Sense HAT Puzzle Box. It’s a wonderful tool to help you learn how to create loops and use conditional statements and functions to create ‘locks’.

You’ll also need to…wait…did you hear that? Someone is listening in, I’m sure of it. Check the Parent Detector to see who is trying to spy on us.

Surveillance

James Bond GIF

Are they gone? Good. Phew, that was a close one. We can’t be so careless in the future. Let’s set up a Raspberry Pi Zero Time-Lapse Camera for constant surveillance of the training camp. You could also attach the camera to your glasses. No one will notice, and you’ll be able to record images of your missions – vital for debriefing.

James Bond seal of approval

Right. That’s all from me. Report back to M for your mission. And remember, this blog post will self-destruct in five…wait, wrong franchise.

Good luck!

Roger Moore GIF

Puns

Other Raspberry Pi/James Bond puns include:

  • Live and Let Pi
  • MoonBaker
  • GoldenPi – Starring Pi-s Brosnan
  • Pifall
  • You Only Live Pi-ce
  • Tomorrow Never Pis
  • Pi Another Day
  • Pi-monds Are Forever
  • For Your Pis Only

Any more?

The post The Pi Who Loved Me appeared first on Raspberry Pi.


Source: Raspberry Pi – The Pi Who Loved Me

Hello World issue 2: celebrating ten years of Scratch

We are very excited to announce that issue 2 of Hello World is out today! Hello World is our magazine about computing and digital making, written by educators, for educators. It  is a collaboration between the Raspberry Pi Foundation and Computing at School, part of the British Computing Society.

We’ve been extremely fortunate to be granted an exclusive interview with Mitch Resnick, Leader of the Scratch Team at MIT, and it’s in the latest issue. All around the world, educators and enthusiasts are celebrating ten years of Scratch, MIT’s block-based programming language. Scratch has helped millions of people to learn the building blocks of computer programming through play, and is our go-to tool at Code Clubs everywhere.

Cover of issue 2 of hello world magazine

A magazine by educators, for educators.

This packed edition of Hello World also includes news, features, lesson activities, research and opinions from Computing At School Master Teachers, Raspberry Pi Certified Educators, academics, informal learning leaders and brilliant classroom teachers. Highlights (for me) include:

  • A round-up of digital making research from Oliver Quinlan
  • Safeguarding children online by Penny Patterson
  • Embracing chaos inside and outside the classroom with Code Club’s Rik Cross, Raspberry Jam-maker-in-chief Ben Nuttall, Raspberry Pi Certified Educator Sway Grantham, and CPD trainer Alan O’Donohoe
  • How MicroPython on the Micro:bit is inspiring a generation, by Nicholas Tollervey
  • Incredibly useful lesson activities on programming graphical user interfaces (GUI) with guizero, simulating logic gates in Minecraft, and introducing variables through story telling.
  • Exploring computing and gender through Girls Who Code, Cyber First Girls, the BCSLovelace Colloqium, and Computing At School’s #include initiative
  • A review of browser based IDEs

Get your copy

Hello World is available as a free Creative Commons download for anyone around the world who is interested in Computer Science and digital making education. Grab the latest issue straight from the Hello World website.

Thanks to the very generous support of our sponsors BT, we are able to offer a free printed version of the magazine to serving educators in the UK. It’s for teachers, Code Club volunteers, teaching assistants, teacher trainers, and others who help children and young people learn about computing and digital making. Remember to subscribe to receive your free copy, posted directly to your home.

Get involved

Are you an educator? Then Hello World needs you! As a magazine for educators by educators, we want to hear about your experiences in teaching technology. If you hear a little niggling voice in your head say “I’m just a teacher, why would my contributions be useful to anyone else?” stop immediately. We want to hear from you, because you are amazing!

Get in touch: contact@helloworld.cc with your ideas, and we can help get them published.


The post Hello World issue 2: celebrating ten years of Scratch appeared first on Raspberry Pi.


Source: Raspberry Pi – Hello World issue 2: celebrating ten years of Scratch

Fail your way to perfection

As educators and makers at Raspberry Pi, we think a lot about failure and how to deal with it constructively. Much has been written about the importance of failure to design and engineering projects. It is undoubtedly true that you can learn a lot from your mistakes, like getting the wrong size of part, mistyping your code, or not measuring when doing your DIY. The importance of failure has even become a bit of a common trope: just think of those slightly annoying inspirational quotes attributed to famous historical figures which you find all over social media.

I-have-not-failed—Edison

I have not failed. I’ve just found 10,000 ways that won’t work. Thomas Edison.

Failure can be good!

But, as with many a cliché, there is an underlying truth that it is worth revisiting. Designing, engineering, and creating all involve making mistakes along the way. Even though failures feel bad, by reaching out when something goes wrong, you can call on the expertise of your community, learn, and make the final result better.

However, we often think failing also makes us look bad, so we don’t talk about it as an essential part of the process that got us to the end stage. We make things shiny and glossy to big-up our success, putting all the focus on the result. This tendency is, however, not necessarily helpful if we want to help educate others. As Jonathan Sanderson of NUSTEM puts it:

Jonathan Sanderson on Twitter

stem educators: worth noting: confessions of rank stupidity in digital making get responses, sympathy, offers of help on Twitter. (1/2)

Jonathan Sanderson on Twitter

yet our write-ups only feature the things we did right. Mis-steps and recovery from failure are key parts of process. (2/2)

The NUSTEM team truly believes in this: when sharing their builds, they include a section on what they would do differently next time. By highlighting the journey, and the mistakes made along the way, they are not only helping those that also want to go on that journey, they are also demystifying the process a bit.

Celebrate your fails

Because failure feels bad, we don’t routinely celebrate it. But there are niches where failure is celebrated: Simone Giertz’s (slightly sweary) ‘Queen of Sh*tty Robots’ YouTube videos are a great example. And then there is Hebocon, the Japanese competition for cruddy robots. In fact, the organisers of Hebocon make a great point: crafts that do not go as intended are interesting.

This is as much true when working with young people as it is in the wider world. In Pioneers, we also want to do our bit to celebrate failure. Our judges don’t just watch the teams’ videos to see how they overcame what went wrong along the way, they also have an award category that celebrates wrong turns and dead ends: ‘We appreciate what you’re trying to do’. Our first challenge‘s winning entry in this category was PiCymru’s We Shall Overcomb:

PiCymru : Make us Laugh Challenge

The video of the PiCymru teams Pioneer challenge entry! The team wasn’t able to get things to work the way they hoped, but wanted to share the joy of failure 🙂

The category name was suggested by our lovely judge from the first cycle, stand-up comedian Bec Hill: it’s one of the accepted heckles the audience can shout out at her stand-up scratch nights. Scratch nights are preview events at which a comedian tests new material, and they are allowed to fail on stage. We may not often think of comedy as embracing failure, but comedians do scratch nights specifically to learn from their mistakes, and to make the final product all the better for it. Interestingly, scratch nights are hugely popular with audiences.

So, if you’re working with a group of young people, what can you do to encourage learning from failure and not let them give up?

Helping you to fail better

In our book Ideas start here, for Pioneers mentors, we’ve given a few tips and phrases that can come in useful. For example, if someone says, “It isn’t working!”, you could respond with “Why not? Have you read the error log?” RTFM is a real thing, and an important skill for digital life.

We agree with engineer Prof Danielle George, who believes in being honest about your failures and highlighting their importance to where you’ve got now. “I fail a lot,” she says. “The trick is to embrace these failures; we don’t have to succeed the first time. We learn from our mistakes and move forwards.”

If, as a mentor, you’re not sure how to encourage and support those not used to failing, this article also has some more tips.

If nothing else helps, but you need to feel inspired, think about what someone said to Karen, who sucks at surfing:

Karen, you are actually pretty good at surfing. Keep in mind that billions of other humans wouldn’t dare even try.

How about you? If you have a story of what you learned from failure in one of your projects, share it in the comments!

Mistakes GIF – Find & Share on GIPHY

Discover & Share this Mistakes GIF with everyone you know. GIPHY is how you search, share, discover, and create GIFs.

The post Fail your way to perfection appeared first on Raspberry Pi.


Source: Raspberry Pi – Fail your way to perfection

Weaponising a teddy bear

At primary school, I loved my Tamagotchi: it moved, it beeped, it was almost like I could talk to it! Nowadays, kids can actually have conversations with their toys, and some toys are IoT devices, capable of accessing online services or of interacting with people via the Internet. And so to one of this week’s news stories: using a Raspberry Pi, an eleven-year-old has demonstrated how to weaponise a teddy bear. This has garnered lots of attention, because he did it at a cybersecurity conference in The Hague, and he used the Bluetooth devices of the assembled experts to do it.

AFP news agency on Twitter

Eleven-year-old “cyber ninja” stuns security experts by hacking into their bluetooth devices to manipulate teddy bear #InternetofThings https://t.co/bx9kTbNUcT

Reuben Paul, from Texas, used a Raspberry Pi together with his laptop to download the numbers of audience members’ smartphones. He then proceeded to use a Python program to manipulate his bear, Bob, using one of the numbers he’d accessed, making him blink one of his lights and record an audio message from the audience.

Reuben has quite of bit of digital making experience, and he’s very concerned about the safety risks of IoT devices. “IoT home appliances, things that can be used in our everyday lives, our cars, lights, refrigerators, everything like this that is connected can be used and weaponised to spy on us or harm us,” he told AFP.

Apparently even his father, software security expert Mano Paul, was unaware of just how unsafe IoT toys can be until Reuben “shocked” him by hacking a toy car.

Reuben is using his computer skills for good: he has already founded an organisation to educate children and adults about cybersecurity. Considering that he is also the youngest Shaolin Kung Fu black belt in the US and reportedly has excellent gymnastics skills, I’m getting serious superhero vibes from this kid!

No Title

No Description

And to think that the toys that were around when I was Reuben’s age could be used for nothing more devious than distracting me from class…

The post Weaponising a teddy bear appeared first on Raspberry Pi.


Source: Raspberry Pi – Weaponising a teddy bear

Crash Course Computer Science with Carrie Anne Philbin

Get your teeth into the history of computer science with our Director of Education, Carrie Anne Philbin, and the team at YouTube’s incredible Crash Course channel.

Crash Course Computer Science Preview

Starting February 22nd, Carrie Anne Philbin will be hosting Crash Course Computer Science! In this series, we’re going to trace the origins of our modern computers, take a closer look at the ideas that gave us our current hardware and software, discuss how and why our smart devices just keep getting smarter, and even look towards the future!

The brainchild of Hank and John Green (the latter of whom is responsible for books such as The Fault in Our Stars and all of my resultant heartbroken tears), Crash Course is an educational YouTube channel specialising in courses for school-age tuition support.

As part of the YouTube Orginal Channel Initiative, and with their partners PBS Digital Studios, the team has completed courses in subjects such as physics, hosted by Dr. Shini Somara, astronomy with Phil Plait, and sociology with Nicole Sweeney.

Raspberry Pi Carrie Anne Philbin Crash Course

Oh, and they’ve recently released a new series on computer science with Carrie Anne Philbin , whom you may know as Raspberry Pi’s Director of Education and the host of YouTube’s Geek Gurl Diaries.

Computer Science with Carrie Anne

Covering topics such as RAM, Boolean logic, CPU design , and binary, the course is currently up to episode twelve of its run. Episodes are released every Tuesday, and there are lots more to come.

Crash Course Carrie Anne Philbin Raspberry Pi

Following the fast-paced, visual style of the Crash Course brand, Carrie Anne takes her viewers on a journey from early computing with Lovelace and Babbage through to the modern-day electronics that power our favourite gadgets such as tablets, mobile phones, and small single-board microcomputers…

The response so far

A few members of the Raspberry Pi team recently attended VidCon Europe in Amsterdam to learn more about making video content for our community – and also so I could exist in the same space as the Holy Trinity, albeit briefly.

At VidCon, Carrie Anne took part in an engaging and successful Women in Science panel with Sally Le Page, Viviane Lalande, Hana Shoib, Maddie Moate, and fellow Crash Course presenter Dr. Shini Somara. I could see that Crash Course Computer Science was going down well from the number of people who approached Carrie Anne to thank her for the course, from those who were learning for the first time to people who were rediscovering the subject.

Crash Course Carrie Anne Philbin Raspberry Pi

Take part in the conversation

Join in the conversation! Head over to YouTube, watch Crash Course Computer Science, and join the discussion in the comments.

Crash Course Carrie Anne Philbin Raspberry Pi

You can also follow Crash Course on Twitter for release updates, and subscribe on YouTube to get notifications of new content.

Oh, and who can spot the sneaky Raspberry Pi in the video introduction?

“Cheers!”

Crash Course Computer Science Outtakes

In which Carrie Anne presents a new sing-a-long format and faces her greatest challenge yet – signing off an episode. Want to find Crash Course elsewhere on the internet? Facebook – http://www.facebook.com/YouTubeCrashCourse Twitter – http://www.twitter.com/TheCrashCourse Tumblr – http://thecrashcourse.tumblr.com Support Crash Course on Patreon: http://patreon.com/crashcourse CC Kids: http://www.youtube.com/crashcoursekids Produced in collaboration with PBS Digital Studios: http://youtube.com/pbsdigitalstudios The Latest from PBS Digital Studios: https://www.youtube.com/playlist?list=PL1mtdjDVOoOqJzeaJAV15Tq0tZ1vKj7ZV We’ve got merch!

The post Crash Course Computer Science with Carrie Anne Philbin appeared first on Raspberry Pi.


Source: Raspberry Pi – Crash Course Computer Science with Carrie Anne Philbin

Open source energy monitoring using Raspberry Pi

OpenEnergyMonitor, who make open-source tools for energy monitoring, have been using Raspberry Pi since we launched in 2012. Like Raspberry Pi, they manufacture their hardware in Wales and send it to people all over the world. We invited co-founder Glyn Hudson to tell us why they do what they do, and how Raspberry Pi helps.

Hi, I’m Glyn from OpenEnergyMonitor. The OpenEnergyMonitor project was founded out of a desire for open-source tools to help people understand and relate to their use of energy, their energy systems, and the challenge of sustainable energy.

Photo: an emonPi energy monitoring unit in an aluminium case with an aerial and an LCD display, a mobile phone showing daily energy use as a histogram, and a bunch of daffodils in a glass bottle

The next 20 years will see a revolution in our energy systems, as we switch away from fossil fuels towards a zero-carbon energy supply.

By using energy monitoring, modelling, and assessment tools, we can take an informed approach to determine the best energy-saving measures to apply. We can then check to ensure solutions achieve their expected performance over time.

We started the OpenEnergyMonitor project in 2009, and the first versions of our energy monitoring system used an Arduino with Ethernet Shield, and later a Nanode RF with an embedded Ethernet controller. These early versions were limited by a very basic TCP/IP stack; running any sort of web application locally was totally out of the question!

I can remember my excitement at getting hold of the very first version of the Raspberry Pi in early 2012. Within a few hours of tearing open the padded envelope, we had Emoncms (our open-source web logging, graphing, and visualisation application) up and running locally on the Raspberry Pi. The Pi quickly became our web-connected base station of choice (emonBase). The following year, 2013, we launched the RFM12Pi receiver board (now updated to RFM69Pi). This allowed the Raspberry Pi to receive data via low-power RF 433Mhz from our emonTx energy monitoring unit, and later from our emonTH remote temperature and humidity monitoring node.

Diagram: communication between OpenEnergyMonitor monitoring units, base station and web interface

In 2015 we went all-in with Raspberry Pi when we launched the emonPi, an all-in-one Raspberry Pi energy monitoring unit, via Kickstarter. Thanks to the hard work of the Raspberry Pi Foundation, the emonPi has enjoyed several upgrades: extra processing power from the Raspberry Pi 2, then even more power and integrated wireless LAN thanks to the Raspberry Pi 3. With all this extra processing power, we have been able to build an open software stack including Emoncms, MQTT, Node-RED, and openHAB, allowing the emonPi to function as a powerful home automation hub.

Screenshot: Emoncms Apps interface to emonPi home automation hub, with histogram of daily electricity use

Emoncms Apps interface to emonPi home automation hub

Inspired by the Raspberry Pi Foundation, we manufacture and assemble our hardware in Wales, UK, and ship worldwide via our online store.

All of our work is fully open source. We believe this is a better way of doing things: we can learn from and build upon each other’s work, creating better solutions to the challenges we face. Using Raspberry Pi has allowed us to draw on the expertise and work of many other projects. With lots of help from our fantastic community, we have built an online learning resource section of our website to help others get started: it covers things like basic AC power theory, Arduino, and the bigger picture of sustainable energy.

To learn more about OpenEnergyMonitor systems, take a look at our Getting Started User Guide. We hope you’ll join our community.

The post Open source energy monitoring using Raspberry Pi appeared first on Raspberry Pi.


Source: Raspberry Pi – Open source energy monitoring using Raspberry Pi

#CharityTuesday: Code Club for libraries

Code Clubs aren’t just for the schoolroom, as today’s blog post shows. With the third video in our #CharityTuesday coverage, we shed some light on running a Code Club in a library environment. To offer a little more information on the themes of each video, we’ll be releasing #CharityTuesday blog posts for each of our new Code Club videos.

Code Club for libraries

We visited Tile Hill Library to find out more about their Code Club, and how easy it can be for libraries to start their own Code Clubs.

The potential of Code Clubs in libraries

There are growing numbers of Code Clubs being set up in public venues such as libraries. We visited Tile Hill Library to find out more about their Code Club, and how easy it can be for libraries to start their own Code Clubs.

Across the world, more and more Code Clubs are running in venues like libraries, offering a great space for children from all local schools to come together. The library setting helps the children to meet new people and expand their experiences with peers from different communities. Furthermore, it offers a wider scope for club times, as many public libraries are also open at weekends.

Code Club Library

At Tile Hill Library, they run an after school Code Club for one hour each week with the help of volunteers from the local area.

This out-of-school environment comes with its own unique challenges and rewards. “The greatest challenge for our Code Club is also our greatest triumph,” explains Charmain Osborne, Assistant Library Manager at Ipswich County Library. “The club has been more popular than I imagined. The waiting list continues to grow faster than we can create spaces in our club!”

Code Club Library Robot graphic

Increase volunteer opportunities

By running a Code Club outside of school hours, you also increase your opportunity for volunteers. “In the first instance, the Code Club website is a good resource for finding a local volunteer. I’d definitely recommend Saturday as the day to run the club. Many more IT professionals will be free on that day,” advises Paul Sinnett, who runs a Code Club in the Croydon Central Library.

Get involved in Code Club!

Code Club is a nationwide network of volunteer-led after-school coding clubs for children. It offers a great place for children of all abilities to learn and build upon their skills amongst like-minded peers.

There are currently over 10,000 active Code Clubs across the world and official Code Club communities in ten countries. If you want to find out more, visit the Code Club UK website. Check out Code Club International if you are outside of the UK.

The post #CharityTuesday: Code Club for libraries appeared first on Raspberry Pi.


Source: Raspberry Pi – #CharityTuesday: Code Club for libraries

Product or Project?

This column is from The MagPi issue 57. You can download a PDF of the full issue for free, or subscribe to receive the print edition in your mailbox or the digital edition on your tablet. All proceeds from the print and digital editions help the Raspberry Pi Foundation achieve its charitable goals.

Image of MagPi magazine and AIY Project Kit

Taking inspiration from a widely known inspirational phrase, I like to tell people, “make the thing you wish to see in the world.” In other words, you don’t have to wait for a company to create the exact product you want. You can be a maker as well as a consumer! Prototyping with hardware has become easier and more affordable, empowering people to make products that suit their needs perfectly. And the people making these things aren’t necessarily electrical engineers, computer scientists, or product designers. They’re not even necessarily adults. They’re often self-taught hobbyists who are empowered by maker-friendly technology.

It’s a subject I’ve been very interested in, and I have written about it before. Here’s what I’ve noticed: the flow between maker project and consumer product moves in both directions. In other words, consumer products can start off as maker projects. Just take a look at the story behind many of the crowdfunded products on sites such as Kickstarter. Conversely, consumer products can evolve into maker products as well. The cover story for the latest issue of The MagPi is a perfect example of that. Google has given you the resources you need to build your own dedicated Google Assistant device. How cool is that?

David Pride on Twitter

@Raspberry_Pi @TheMagP1 Oh this is going to be a ridiculous amount of fun. 😊 #AIYProjects #woodchuck https://t.co/2sWYmpi6T1

But consumer products becoming hackable hardware isn’t always an intentional move by the product’s maker. In the 2000s, TiVo set-top DVRs were a hot product and their most enthusiastic fans figured out how to hack the product to customise it to meet their needs without any kind of support from TiVo.

Embracing change

But since then, things have changed. For example, when Microsoft’s Kinect for the Xbox 360 was released in 2010, makers were immediately enticed by its capabilities. It not only acted as a camera, but it could also sense depth, a feature that would be useful for identifying the position of objects in a space. At first, there was no hacker support from Microsoft, so Adafruit Industries announced a $3,000 bounty to create open-source drivers so that anyone could access the features of Kinect for their own projects. Since then, Microsoft has embraced the use of Kinect for these purposes.

The Create 2 from iRobot

iRobot’s Create 2, a hackable version of the Roomba

Consumer product companies even make versions of their products that are specifically meant for hacking, making, and learning. Belkin’s WeMo home automation product line includes the WeMo Maker, a device that can act as a remote relay or sensor and hook into your home automation system. And iRobot offers Create 2, a hackable version of its Roomba floor-cleaning robot. While iRobot aimed the robot at STEM educators, you could use it for personal projects too. Electronic instrument maker Korg takes its maker-friendly approach to the next level by releasing the schematics for some of its analogue synthesiser products.

Why would a company want to do this? There are a few possible reasons. For one, it’s a way of encouraging consumers to create a community around a product. It could be a way for innovation with the product to continue, unchecked by the firm’s own limits on resources. For certain, it’s an awesome feel-good way for a company to empower their own users. Whatever the reason these products exist, it’s the digital maker who comes out ahead. They have more affordable tools, materials, and resources to create their own customised products and possibly learn a thing or two along the way.

With maker-friendly, hackable products, being a creator and a consumer aren’t mutually exclusive. In fact, you’re probably getting the best of both worlds: great products and great opportunities to make the thing you wish to see in the world.

The post Product or Project? appeared first on Raspberry Pi.


Source: Raspberry Pi – Product or Project?

Julia language for Raspberry Pi

Julia is a free and open-source general purpose programming language made specifically for scientific computing. It combines the ease of writing in high-level languages like Python and Ruby with the technical power of MATLAB and Mathematica and the speed of C. Julia is ideal for university-level scientific programming and it’s used in research.

Julia language logo

Some time ago Viral Shah, one of the language’s co-creators, got in touch with us at the Raspberry Pi Foundation to say his team was working on a port of Julia to the ARM platform, specifically for the Raspberry Pi. Since then, they’ve done sterling work to add support for ARM. We’re happy to announce that we’ve now added Julia to the Raspbian repository, and that all Raspberry Pi models are supported!

Not only did the Julia team port the language itself to the Pi, but they also added support for GPIO, the Sense HAT and Minecraft. What I find really interesting is that when they came to visit and show us a demo, they took a completely different approach to the Sense HAT than I’d seen before: Simon, one of the Julia developers, started by loading the Julia logo into a matrix within the Jupyter notebook and then displayed it on the Sense HAT LED matrix. He then did some matrix transformations and the Sense HAT showed the effect of these manipulations.

Viral says:

The combination of Julia’s performance and Pi’s hardware unlocks new possibilities. Julia on the Pi will attract new communities and drive applications in universities, research labs and compute modules. Instead of shipping the data elsewhere for advanced analytics, it can simply be processed on the Pi itself in Julia.

Our port to ARM took a while, since we started at a time when LLVM on ARM was not fully mature. We had a bunch of people contributing to it – chipping away for a long time. Yichao did a bunch of the hard work, since he was using it for his experiments. The folks at the Berkeley Race car project also put Julia and JUMP on their self-driving cars, giving a pretty compelling application. We think we will see many more applications.

I organised an Intro to Julia session for the Cambridge Python user group earlier this week, and rather than everyone having to install Julia, Jupyter and all the additional modules on their own laptops, we just set up a room full of Raspberry Pis and prepared an SD card image. This was much easier and also meant we could use the Sense HAT to display output.

Intro to Julia language session at Raspberry Pi Foundation
Getting started with Julia language on Raspbian
Julia language logo on the Sense HAT LED array

Simon kindly led the session, and before long we were using Julia to generate the Mandelbrot fractal and display it on the Sense HAT:

Ben Nuttall on Twitter

@richwareham’s Sense HAT Mandelbrot fractal with @JuliaLanguage at @campython https://t.co/8FK7Vrpwwf

Naturally, one of the attendees, Rich Wareham, progressed to the Julia set – find his code here: gist.github.com/bennuttall/…

Last year at JuliaCon, there were two talks about Julia on the Pi. You can watch them on YouTube:

Install Julia on your Raspberry Pi with:

[[code]]czo0MzpcInN1ZG8gYXB0IHVwZGF0ZSYjMTM7CnN1ZG8gYXB0IGluc3RhbGwganVsaWFcIjt7WyYqJl19[[/code]]

You can install the Jupyter notebook for Julia with:

[[code]]czoxMTI6XCJzdWRvIGFwdCBpbnN0YWxsIGp1bGlhIGxpYnptcTMtZGV2IHB5dGhvbjMtem1xJiMxMzsKc3VkbyBwaXAzIGluc3RhbGx7WyYqJl19IGp1cHl0ZXImIzEzOwpqdWxpYSAtZSBcJ1BrZy5hZGQoXCJJSnVsaWFcIik7XCdcIjt7WyYqJl19[[/code]]

And you can easily install extra packages from the Julia console:

[[code]]czo0MzpcIlBrZy5hZGQoXCI8c3BhbiBjbGFzcz1cImlsXCI+U2Vuc2VIYXQ8L3NwYW4+XCIpXCI7e1smKiZdfQ==[[/code]]

The Julia team have also created a resources website for getting started with Julia on the Pi: juliaberry.github.io

Julia team visiting Pi Towers

There never was a story of more joy / Than this of Julia and her Raspberry Pi

Many thanks to Viral Shah, Yichao Yu, Tim Besard, Valentin Churavy, Jameson Nash, Tony Kelman, Avik Sengupta and Simon Byrne for their work on the port. We’re all really excited to see what people do with Julia on Raspberry Pi, and we look forward to welcoming Julia programmers to the Raspberry Pi community.

The post Julia language for Raspberry Pi appeared first on Raspberry Pi.


Source: Raspberry Pi – Julia language for Raspberry Pi