IoT community sprinkler system using Raspberry Pi | The MagPi issue 83

Saving water, several thousand lawns at a time: The MagPi magazine takes a look at the award-winning IoT sprinkler system of Coolest Projects USA participant Adarsh Ambati.

At any Coolest Projects event, you’re bound to see incredible things built by young makers. At Coolest Projects USA, we had the chance to talk to Adarsh Ambati about his community sprinkler and we were, frankly, amazed.

“The extreme, record-breaking drought in California inspired me to think of innovative ways to save water,” Adarsh tells us. “While going to school in the rain one day, I saw one of my neighbours with their sprinklers on, creating run-offs. Through research, I found that 25% of the water used in an average American household is wasted each day due to overwatering and inefficient watering methods. Thus, I developed a sprinkler system that is compliant with water regulations, to cost-effectively save water for entire neighbourhoods using a Raspberry Pi, moisture sensors, PyOWM (weather database), and by utilising free social media networks like Twitter.”

Efficient watering

In California, it’s very hot year round, so if you want a lush, green lawn you need to keep the grass watered. The record-breaking drought Adarsh was referring to resulted in extreme limitations on how much you could water your grass. The problem is, unless you have a very expensive sprinkler system, it’s easy to water the grass when it doesn’t need to be.

“The goal of my project is to save water wasted during general-purpose landscape irrigation of an entire neighbourhood by building a moisture sensor-based smart sprinkler system that integrates real-time weather forecast data to provide only optimum levels of water required,” Adarsh explains. “It will also have Twitter capabilities that will be able to publish information about when and how long to turn on the sprinklers, through the social networks. The residents in the community will subscribe to this information by following an account on Twitter, and utilise it to prevent water wasted during general-purpose landscaping and stay compliant with water regulations imposed in each area.”

Using the Raspberry Pi, Adarsh was able to build a prototype for about $50 — a lot cheaper than smart sprinklers you can currently buy on the market.

“I piloted it with ten homes, so the cost per home is around $5,” he reveals. “But since it has the potential to serve an entire community, the cost per home can be a few cents. For example, there are about 37000 residents in Almaden Valley, San Jose (where I live). If there is an average of two to four residents per home, there should be 9250 to 18500 homes. If I strategically place ten such prototypes, the cost per house would be five cents or less.”

Massive saving

Adarsh continues, “Based on two months of data, 83% of the water used for outdoor landscape watering can be saved. The average household in northern California uses 100 gallons of water for outdoor landscaping on a daily basis. The ten homes in my pilot had the potential to save roughly 50000 gallons over a two-month period, or 2500 gallons per month per home. At $0.007 per gallon, the savings equate to $209 per year, per home. For Almaden Valley alone, we have the potential to save around $2m to $4m per year!”

The results from Adarsh’s test were presented to the San Jose City Council, and they were so impressed they’re now considering putting similar systems in their public grass areas. Oh, and he also won the Hardware project category at Coolest Projects USA.

The MagPi magazine #83

This article is from today’s brand-new issue of The MagPi, the official Raspberry Pi magazine. Buy it from all good newsagents, subscribe to pay less per issue and support our work, or download the free PDF to give it a try first.

The post IoT community sprinkler system using Raspberry Pi | The MagPi issue 83 appeared first on Raspberry Pi.


Source: Raspberry Pi – IoT community sprinkler system using Raspberry Pi | The MagPi issue 83

Raspberry Pi 4: 48 hours later

“We’ve never felt more betrayed and excited at the same time,” admitted YouTubers 8 Bits and a Byte when I told them Raspberry Pi 4 would be out in June, going against rumours of the release happening at some point in 2020. Fortunately, everything worked in our favour, and we were able to get our new product out ahead of schedule.

So, while we calm down from the hype of Monday, here’s some great third-party content for you to get your teeth into.

YouTubers

A select few online content creators were allowed to get their hands on Raspberry Pi 4 before its release date, and they published some rather wonderful videos on the big day.

Office favourite Explaining Computers provided viewers with a brilliant explanation of the ins and outs of Raspberry Pi 4, and even broke their usually Sunday-only release schedule to get the video out to fans for launch day. Thanks, Chris!

Raspberry Pi 4 Model B

Raspberry Pi 4B review, including the hardware specs of this new single board computer, and a demo running the latest version of Raspbian. With thanks to the Raspberry Pi Foundation for supplying the board featured in this video.

Blitz City DIY offered viewers a great benchmark test breakdown, delving deeper into the numbers and what they mean, to show the power increase compared to Raspberry Pi 3B+.

A Wild Raspberry Pi 4 Appears: Hardware Specs, Benchmarks & First Impressions

The Raspberry Pi 4 B has been released into the wild much earlier than anticipated. I was able to receive a review sample so here are the hardware specs, some benchmarks comparing it to the Pi 3 B and Pi 3 B+ and finally some first impressions.

Curious about how these creators were able to get their hands on Raspberry Pi 4 prior to its release? This is legitimately how Estefannie bagged herself the computer pre-launch. Honest.

HOW I GOT A RASPBERRY PI 4 BEFORE ITS RELEASE

I needed a new Raspberry Pi. FIND ME HERE: * http://www.estefannie.com * http://instagram.com/estefanniegg * http://www.twitter.com/estefanniegg * https://github.com/estefanniegg * https://facebook.com/estefanniegg

For their launch day video, Dane and Nicole, AKA 8 Bits and a Byte, built a pi-calculating pie that prints pies using a Raspberry Pi 4. Delicious.

The new Raspberry Pi 4 – Highlights & Celebration Project!

There’s a new Raspberry Pi, the Raspberry Pi 4! We give you a quick overview and build a project to welcome the Raspberry Pi 4 to the world!

Alex from Low Spec Gamer took his Raspberry Pi 4 home with him after visiting the office to talk to Eben. Annoyingly, I was away on vacation and didn’t get to meet him 🙁

Raspberry Pi 4 Hands-on. I got an early unit!

Watch the best documentaries on Curiosity Stream: https://curiositystream.com/lowspecgamer #RaspberryPi4 #HandsOn #Preview A new Raspberry Pi joins the fray. I got an early Raspberry Pi 4 and decided to explore some of its differences with Eben Upton, founder of Raspberry Pi. All benchmarks run on an early version of the new raspbian.

The MagPi magazine managed to collar Raspberry Pi Trading’s COO James Adams for their video, filmed at the Raspberry Pi Store in Cambridge.

Introducing Raspberry Pi 4! + interview with a Raspberry Pi engineer

The brand new Raspberry Pi 4 is here! With up to 4GB of RAM, 4K HDMI video, Gigabit Ethernet, USB 3.0, and USB C, it is the ultimate Raspberry Pi. We talk to Raspberry Pi hardware lead James Adams about its amazing performance.

Some rather lovely articles

If you’re looking to read more about Raspberry Pi 4 and don’t know where to start, here are a few tasty treats to get you going:

Raspberry Pi 4 isn’t the only new thing to arrive this week. Raspbian Buster is now available for Raspberry Pi, and you can read more about it here.

Join the Raspberry Pi 4 conversation by using #RaspberryPi4 across all social platforms, and let us know what you plan to do with your new Raspberry Pi.

The post Raspberry Pi 4: 48 hours later appeared first on Raspberry Pi.


Source: Raspberry Pi – Raspberry Pi 4: 48 hours later

Buster – the new version of Raspbian

Amid all the furore about the release of a certain new piece of hardware, some people may have missed that we have also released a new version of Raspbian. While this is required for Raspberry Pi 4, we’ve always tried to maintain software backwards-compatibility with older hardware, and so the standard Raspbian image for all models of Raspberry Pi is now based on Buster, the latest version of Debian Linux.

Why Buster?

The first thing to mention about Buster (who was the actual dog in Pixar’s “Toy Story” films, as opposed to the toy one made out of a Slinky…) is that we are actually releasing it slightly in advance of the official Debian release date. The reason for this is that one of the important new features of Raspberry Pi 4 is that the open-source OpenGL video driver is now being used by default, and this was developed using the most recent version of Debian. It would have been a lot of work to port everything required for it back on to Raspbian Stretch, so we decided that we would launch on Raspbian Buster – the only question was whether Buster would be ready before the hardware was!

As it turns out, it wasn’t – not quite. The official launch date for Buster is July 7, so we are a couple of weeks ahead. That said, Buster has been in a “frozen” state for a couple of months now, with only minor changes being made to it, so the version we are releasing is pretty much identical to that which will be officially released by Debian on July 7.

We started using Buster internally in January this year, so it has had a lot of testing on Pi – while we may be releasing it a bit early, you need have no concerns about using it; it’s stable and robust, and you can use apt to update with any changes that do happen between now and July 7 without needing to reinstall everything.

What’s new?

There are no huge differences between Debian Stretch and Debian Buster. In a sad reflection of the way the world is nowadays, most of the differences are security changes designed to make Buster harder to hack. Any other differences are mostly small incremental changes that most people won’t notice, and this got us thinking…

When we moved from Jessie to Stretch, many people commented that they couldn’t actually see any difference between the two – as most of the changes were “under the hood”, the desktop and applications all looked the same. So we told people “you’ve now got Stretch!” and they said “so what?”

The overall appearance of the desktop hasn’t changed significantly for a few years, and was starting to look a bit dated, so we thought it would be nice to give the appearance a mild refresh for Buster. Then people would at least be able to see that their shiny new operating system looked different from the old one!

The new appearance

There has been a definite trend, in the design of most computer graphical user interfaces over recent years, to simplify and declutter; to reduce the amount of decoration, so that a button becomes a plain box rather than something that resembles a physical button. You can see this in both desktop OSes like Windows, and in mobile OSes like iOS – so we decided it was time to do something similar.

The overall appearance of most of the interface elements has been simplified; we’ve reduced things like the curvature of corners and the shading gradients which were used to give a pseudo-3D effect to things like buttons. This “flatter” design looks cleaner and more modern, but it’s a bit of a juggling act; it’s very easy to go too far and to make things look totally flat and boring, so we’ve tried to avoid that. Eben and I have had a mild tussle over this – he wanted as much flatness as possible, and I wanted to retain at least a bit of curvature, so we’ve met somewhere in the middle and produced something we both like!

We’ve also changed the default desktop for a new one of Greg Annandale’s gorgeous photographs, and we’ve moved to a grey highlight colour.

(If you really don’t like the new appearance, it is easy enough to restore the former appearance – the old desktop picture is still installed, as is the old UI theme.)

Other changes

We’ve been including the excellent Thonny Python development environment in Raspbian for some time now. In this release, it’s now our default Python editor, and to that end, we are no longer including IDLE by default. IDLE has always felt dated and not very pleasant to use, and Thonny is so much nicer that we’d strongly recommend moving to it, if you haven’t already!

(If you’d like an alternative to Thonny, the Mu Python IDE is also still available in Recommended Software.)

We’ve made some small tweaks to the taskbar. The ‘eject’ icon for removing USB devices is now only shown if you have devices to eject; it’s hidden the rest of the time. Similarly, if you are using one of the earlier Pis without Bluetooth support, the Bluetooth icon is now hidden rather than being greyed out. Also, the CPU activity gauge is no longer shown on the taskbar by default, because this has become less necessary on the more powerful recent Raspberry Pi models. If you’d still like to use it, you can add it back – right-click the taskbar and choose ‘Add / Remove Panel Items’. Press the ‘Add’ button and you’ll find it listed as ‘CPU Usage Monitor’. While you are in there, you’ll also find the new ‘CPU Temperature Monitor’, which you can add if you’re interested in knowing more about what the CPU is up to.

One program which is currently missing from Buster is Mathematica. Don’t worry – this is only a temporary removal! Wolfram are working on getting Mathematica to work properly with Buster, and as soon as it is ready, it’ll be available for installation from Recommended Software.

A few features of the old non-OpenGL video driver (such as pixel doubling and underscan) are not currently supported by the new OpenGL driver, so the settings for these are hidden in Raspberry Pi Configuration if the GL driver is in use. (The GL driver is the default on Raspberry Pi 4 – older Pis will still use the non-GL driver by default. Also, if using a Raspberry Pi 4 headless, we recommend switching back to the non-GL driver – choose ‘Legacy’ under the ‘GL Driver’ setting in ‘Advanced Options’ in raspi-config.)

If the GL driver is in use, there’s a new ‘Screen Configuration’ tool – this enables you to set up the arrangement of multiple monitors on a Raspberry Pi 4. It can also be used to set custom monitor resolutions, which can be used to simulate the effect of pixel doubling.

Finally, there are a couple of new buttons in ‘Raspberry Pi Configuration’ which control video output options for Raspberry Pi 4. (These are not shown when running on earlier models of Raspberry Pi.) It is not possible on the Raspberry Pi 4 to have both analogue composite video (over the 3.5mm jack) and HDMI output simultaneously, so the analogue video output is disabled by default. 4Kp60 resolution over HDMI is also disabled by default, as this requires faster clock speeds resulting in a higher operating temperature and greater power consumption. The new buttons enable either of these options to be enabled as desired.

How do I get it?

As ever with major version changes, our recommendation is that you download a new clean image from the usual place on our site – this will ensure that you are starting from a clean, working Buster system.

We do not recommend upgrading an existing Stretch (or earlier) system to Buster – we can’t know what changes everyone has made to their system, and so have no idea what may break when you move to Buster. However, we have tested the following procedure for upgrading, and it works on a clean version of the last Stretch image we released. That does not guarantee it will work on your system, and we cannot provide support (or be held responsible) for any problems that arise if you try it. You have been warned – make a backup!

1. In the files /etc/apt/sources.list and /etc/apt/sources.list.d/raspi.list, change every use of the word “stretch” to “buster”.
2. In a terminal,

sudo apt update

and then

sudo apt dist-upgrade

3. Wait for the upgrade to complete, answering ‘yes’ to any prompt. There may also be a point at which the install pauses while a page of information is shown on the screen – hold the ‘space’ key to scroll through all of this and then hit ‘q’ to continue.
4. The update will take anywhere from half an hour to several hours, depending on your network speed. When it completes, reboot your Raspberry Pi.
5. When the Pi has rebooted, launch ‘Appearance Settings’ from the main menu, go to the ‘Defaults’ tab, and press whichever ‘Set Defaults’ button is appropriate for your screen size in order to load the new UI theme.
6. Buster will have installed several new applications which we do not support. To remove these, open a terminal window and

sudo apt purge timidity lxmusic gnome-disk-utility deluge-gtk evince wicd wicd-gtk clipit usermode gucharmap gnome-system-tools pavucontrol

We hope that Buster gives a little hint of shiny newness for those of you who aren’t able to get your hands on a Raspberry Pi 4 immediately! As ever, your feedback is welcome – please leave your comments below.

The post Buster – the new version of Raspbian appeared first on Raspberry Pi.


Source: Raspberry Pi – Buster – the new version of Raspbian

Raspberry Pi 4 on sale now from $35

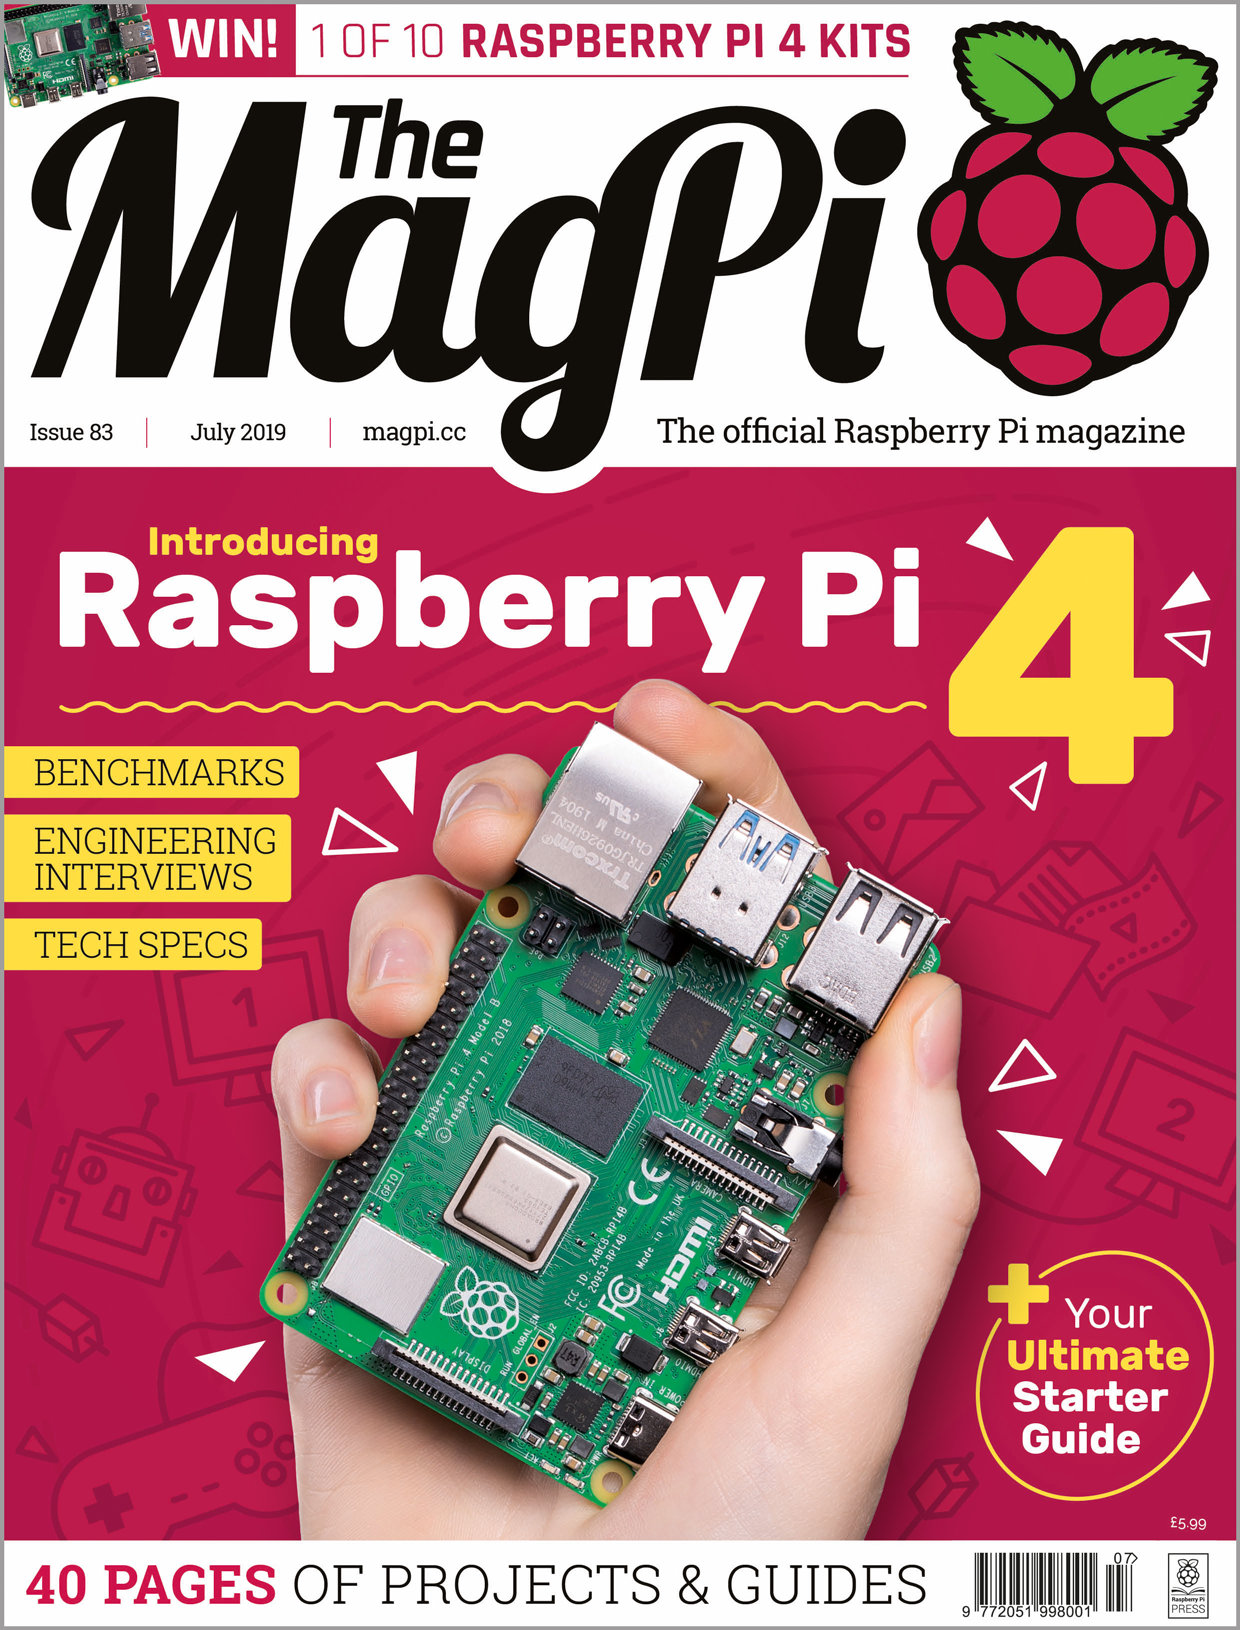
We have a surprise for you today: Raspberry Pi 4 is now on sale, starting at $35. This is a comprehensive upgrade, touching almost every element of the platform. For the first time we provide a PC-like level of performance for most users, while retaining the interfacing capabilities and hackability of the classic Raspberry Pi line.

Raspberry Pi 4: your new $35 computer

Get your Raspberry Pi 4 now: http://rpf.io/ytraspberrypi4 #RaspberryPi4 Subscribe to our YouTube channel: http://rpf.io/ytsub Help us reach a wider audience by translating our video content: http://rpf.io/yttranslate Buy a Raspberry Pi from one of our Approved Resellers: http://rpf.io/ytproducts Find out more about the #RaspberryPi Foundation: Raspberry Pi http://rpf.io/ytrpi Code Club UK http://rpf.io/ytccuk Code Club International http://rpf.io/ytcci CoderDojo http://rpf.io/ytcd Check out our free online training courses: http://rpf.io/ytfl Find your local Raspberry Jam event: http://rpf.io/ytjam Work through our free online projects: http://rpf.io/ytprojects Do you have a question about your Raspberry Pi?

Get yours today from our Approved Resellers, or from the Raspberry Pi Store in Cambridge, open today 8am–8pm!

Raspberry Pi 4 Model B

Here are the highlights:

  • A 1.5GHz quad-core 64-bit ARM Cortex-A72 CPU (~3× performance)
  • 1GB, 2GB, or 4GB of LPDDR4 SDRAM
  • Full-throughput Gigabit Ethernet
  • Dual-band 802.11ac wireless networking
  • Bluetooth 5.0
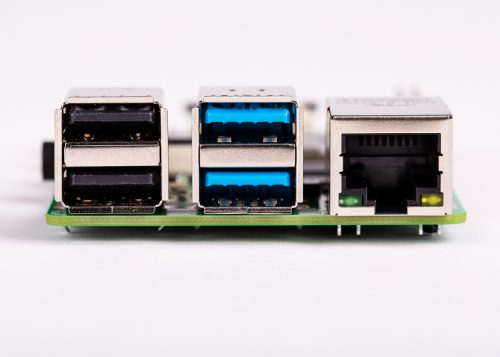
  • Two USB 3.0 and two USB 2.0 ports
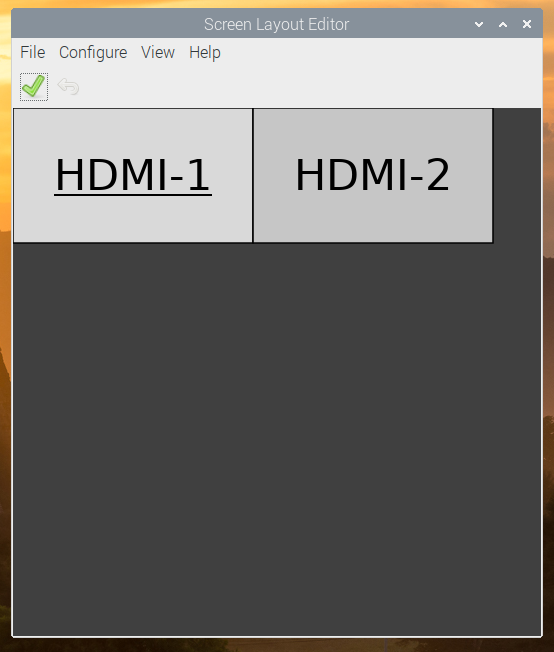
  • Dual monitor support, at resolutions up to 4K
  • VideoCore VI graphics, supporting OpenGL ES 3.x
  • 4Kp60 hardware decode of HEVC video
  • Complete compatibility with earlier Raspberry Pi products

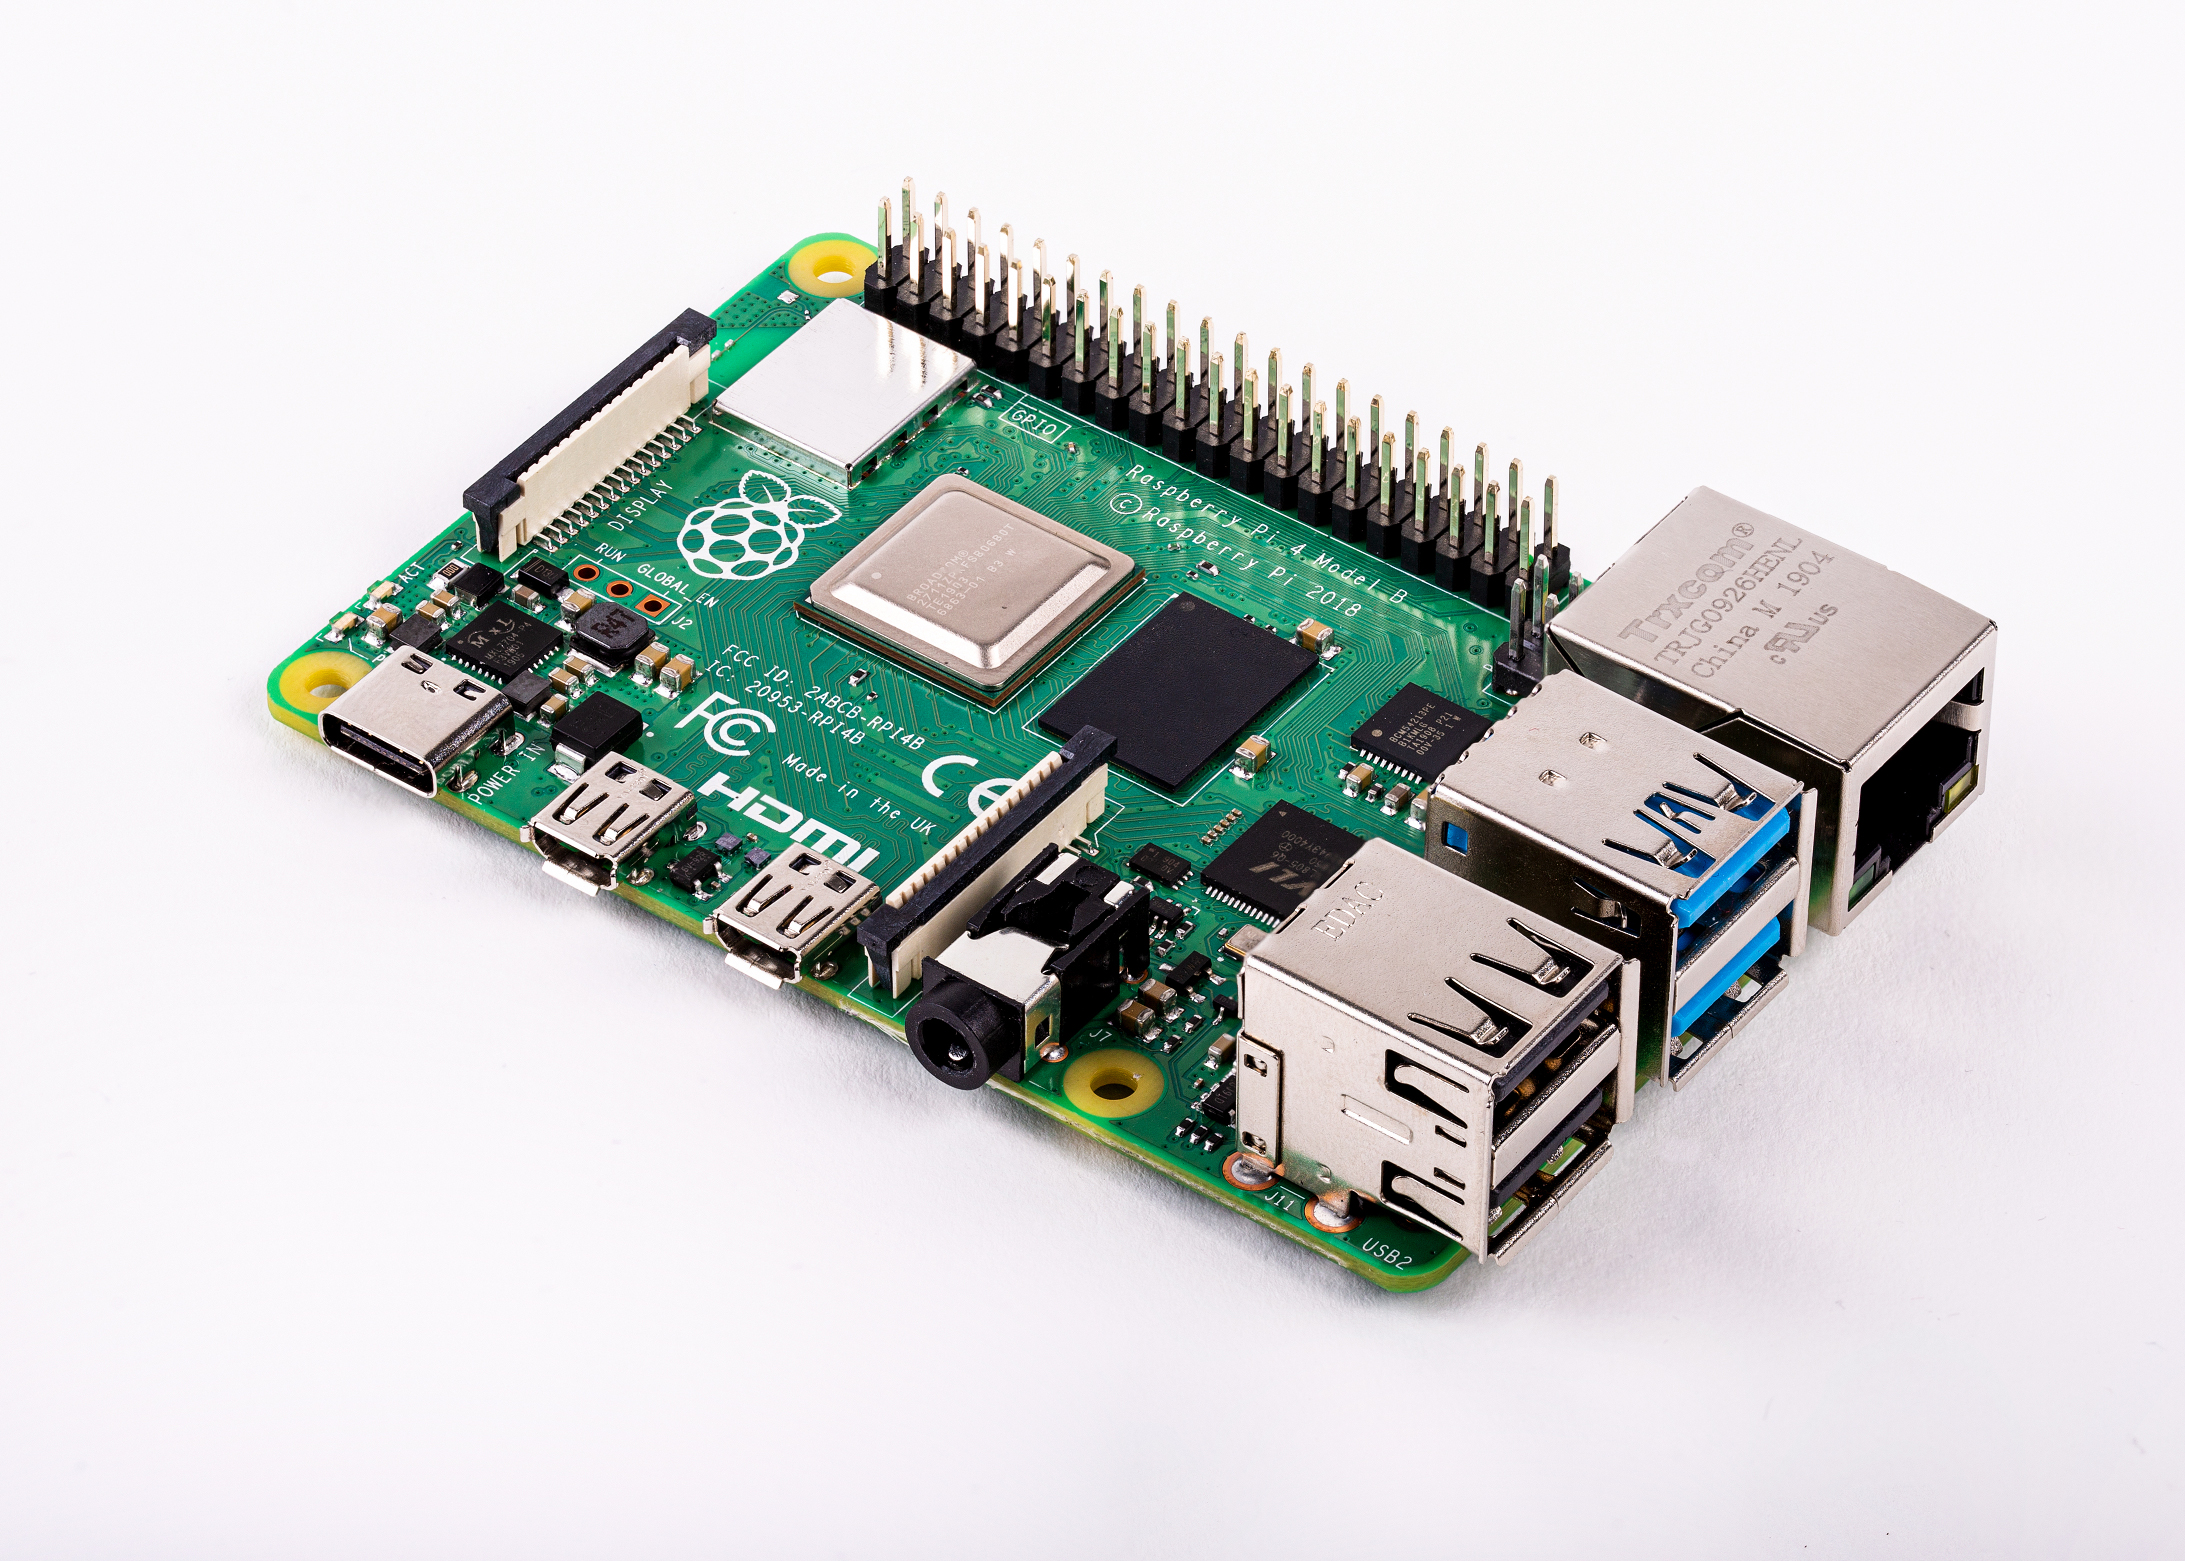
And here it is in the flesh:

Still a handsome devil

Raspberry Pi 4 memory options

This is the first time we’re offering a choice of memory capacities. We’ve gone for the following price structure, retaining our signature $35 price for the entry-level model:

RAM Retail price
1GB $35
2GB $45
4GB $55

As always these prices exclude sales tax, import duty (where appropriate), and shipping. All three variants are launching today: we have initially built more of the 2GB variant than of the others, and will adjust the mix over time as we discover which one is most popular.

New Raspberry Pi 4, new features

At first glance, the Raspberry Pi 4 board looks very similar to our previous $35 products, all the way back to 2014’s Raspberry Pi 1B+. James worked hard to keep it this way, but for the first time he has made a small number of essential tweaks to the form factor to accommodate new features.

Power

We’ve moved from USB micro-B to USB-C for our power connector. This supports an extra 500mA of current, ensuring we have a full 1.2A for downstream USB devices, even under heavy CPU load.

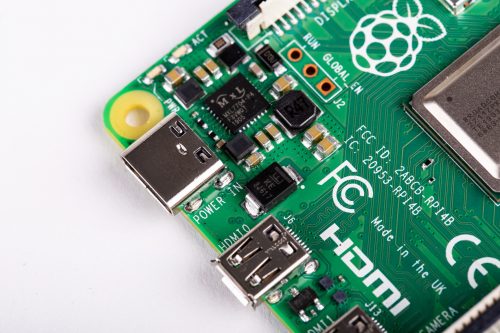
An extra half amp, and USB OTG to boot
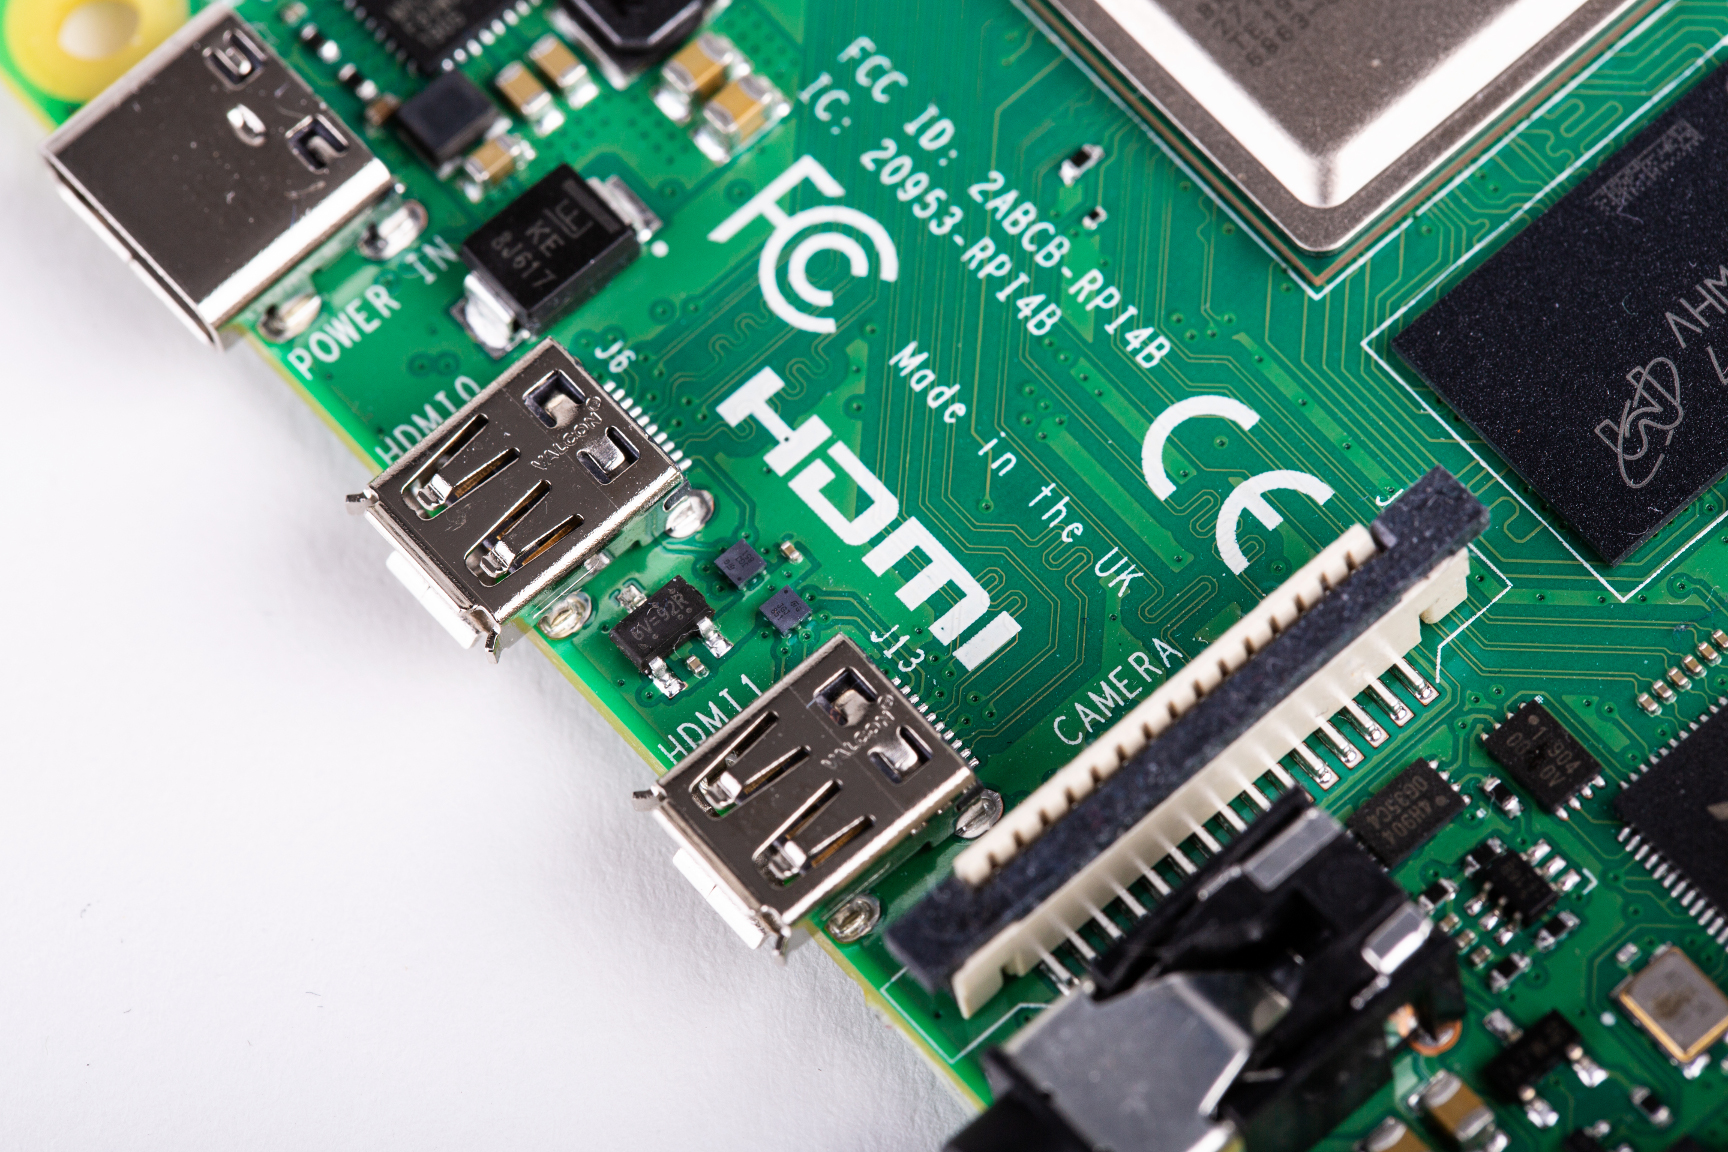
Video

To accommodate dual display output within the existing board footprint, we’ve replaced the type-A (full-size) HDMI connector with a pair of type-D (micro) HDMI connectors.
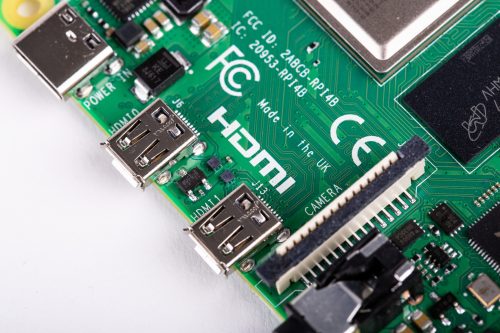
Seeing double

Ethernet and USB

Our Gigabit Ethernet magjack has moved to the top right of the board, from the bottom right, greatly simplifying PCB routing. The 4-pin Power-over-Ethernet (PoE) connector remains in the same location, so Raspberry Pi 4 remains compatible with the PoE HAT.

Through the looking glass

The Ethernet controller on the main SoC is connected to an external Broadcom PHY over a dedicated RGMII link, providing full throughput. USB is provided via an external VLI controller, connected over a single PCI Express Gen 2 lane, and providing a total of 4Gbps of bandwidth, shared between the four ports.

All three connectors on the right-hand side of the board overhang the edge by an additional millimetre, with the aim of simplifying case design. In all other respects, the connector and mounting hole layout remains the same, ensuring compatibility with existing HATs and other accessories.

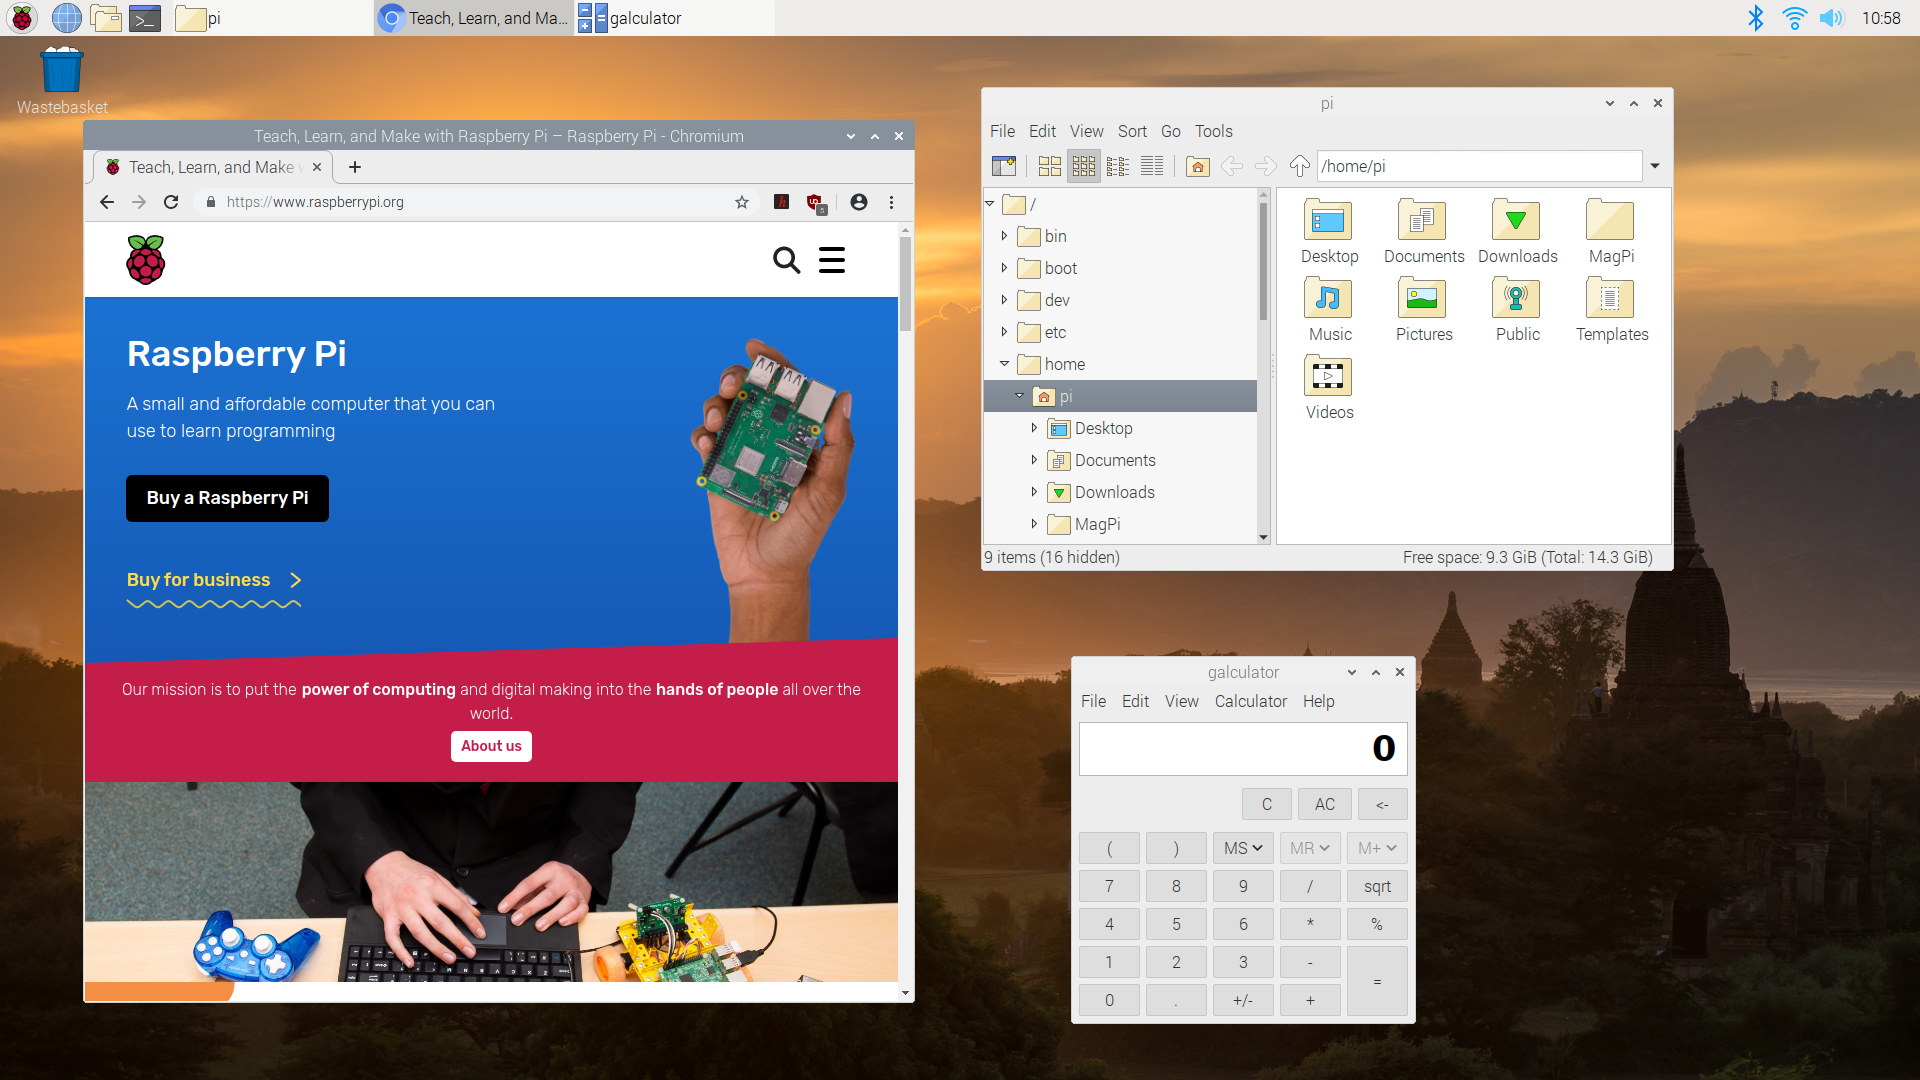
New Raspbian software

To support Raspberry Pi 4, we are shipping a radically overhauled operating system, based on the forthcoming Debian 10 Buster release. This brings numerous behind-the-scenes technical improvements, along with an extensively modernised user interface, and updated applications including the Chromium 74 web browser. Simon will take an in-depth look at the changes in tomorrow’s blog post, but for now, here’s a screenshot of it in action.

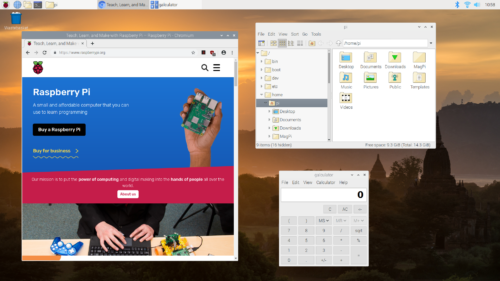
Raspbian Buster desktop

Some advice for those who are keen to get going with Raspbian Buster right away: we strongly recommend you download a new image, rather than upgrading an existing card. This ensures that you’re starting with a clean, working Buster system. If you really, really want to try upgrading, make a backup first.

One notable step forward is that for Raspberry Pi 4, we are retiring the legacy graphics driver stack used on previous models. Instead, we’re using the Mesa “V3D” driver developed by Eric Anholt at Broadcom over the last five years. This offers many benefits, including OpenGL-accelerated web browsing and desktop composition, and the ability to run 3D applications in a window under X. It also eliminates roughly half of the lines of closed-source code in the platform.

New Raspberry Pi 4 accessories

Connector and form-factor changes bring with them a requirement for new accessories. We’re sensitive to the fact that we’re requiring people to buy these: Mike and Austin have worked hard to source good-quality, cost-effective products for our reseller and licensee partners, and to find low-cost alternatives where possible.
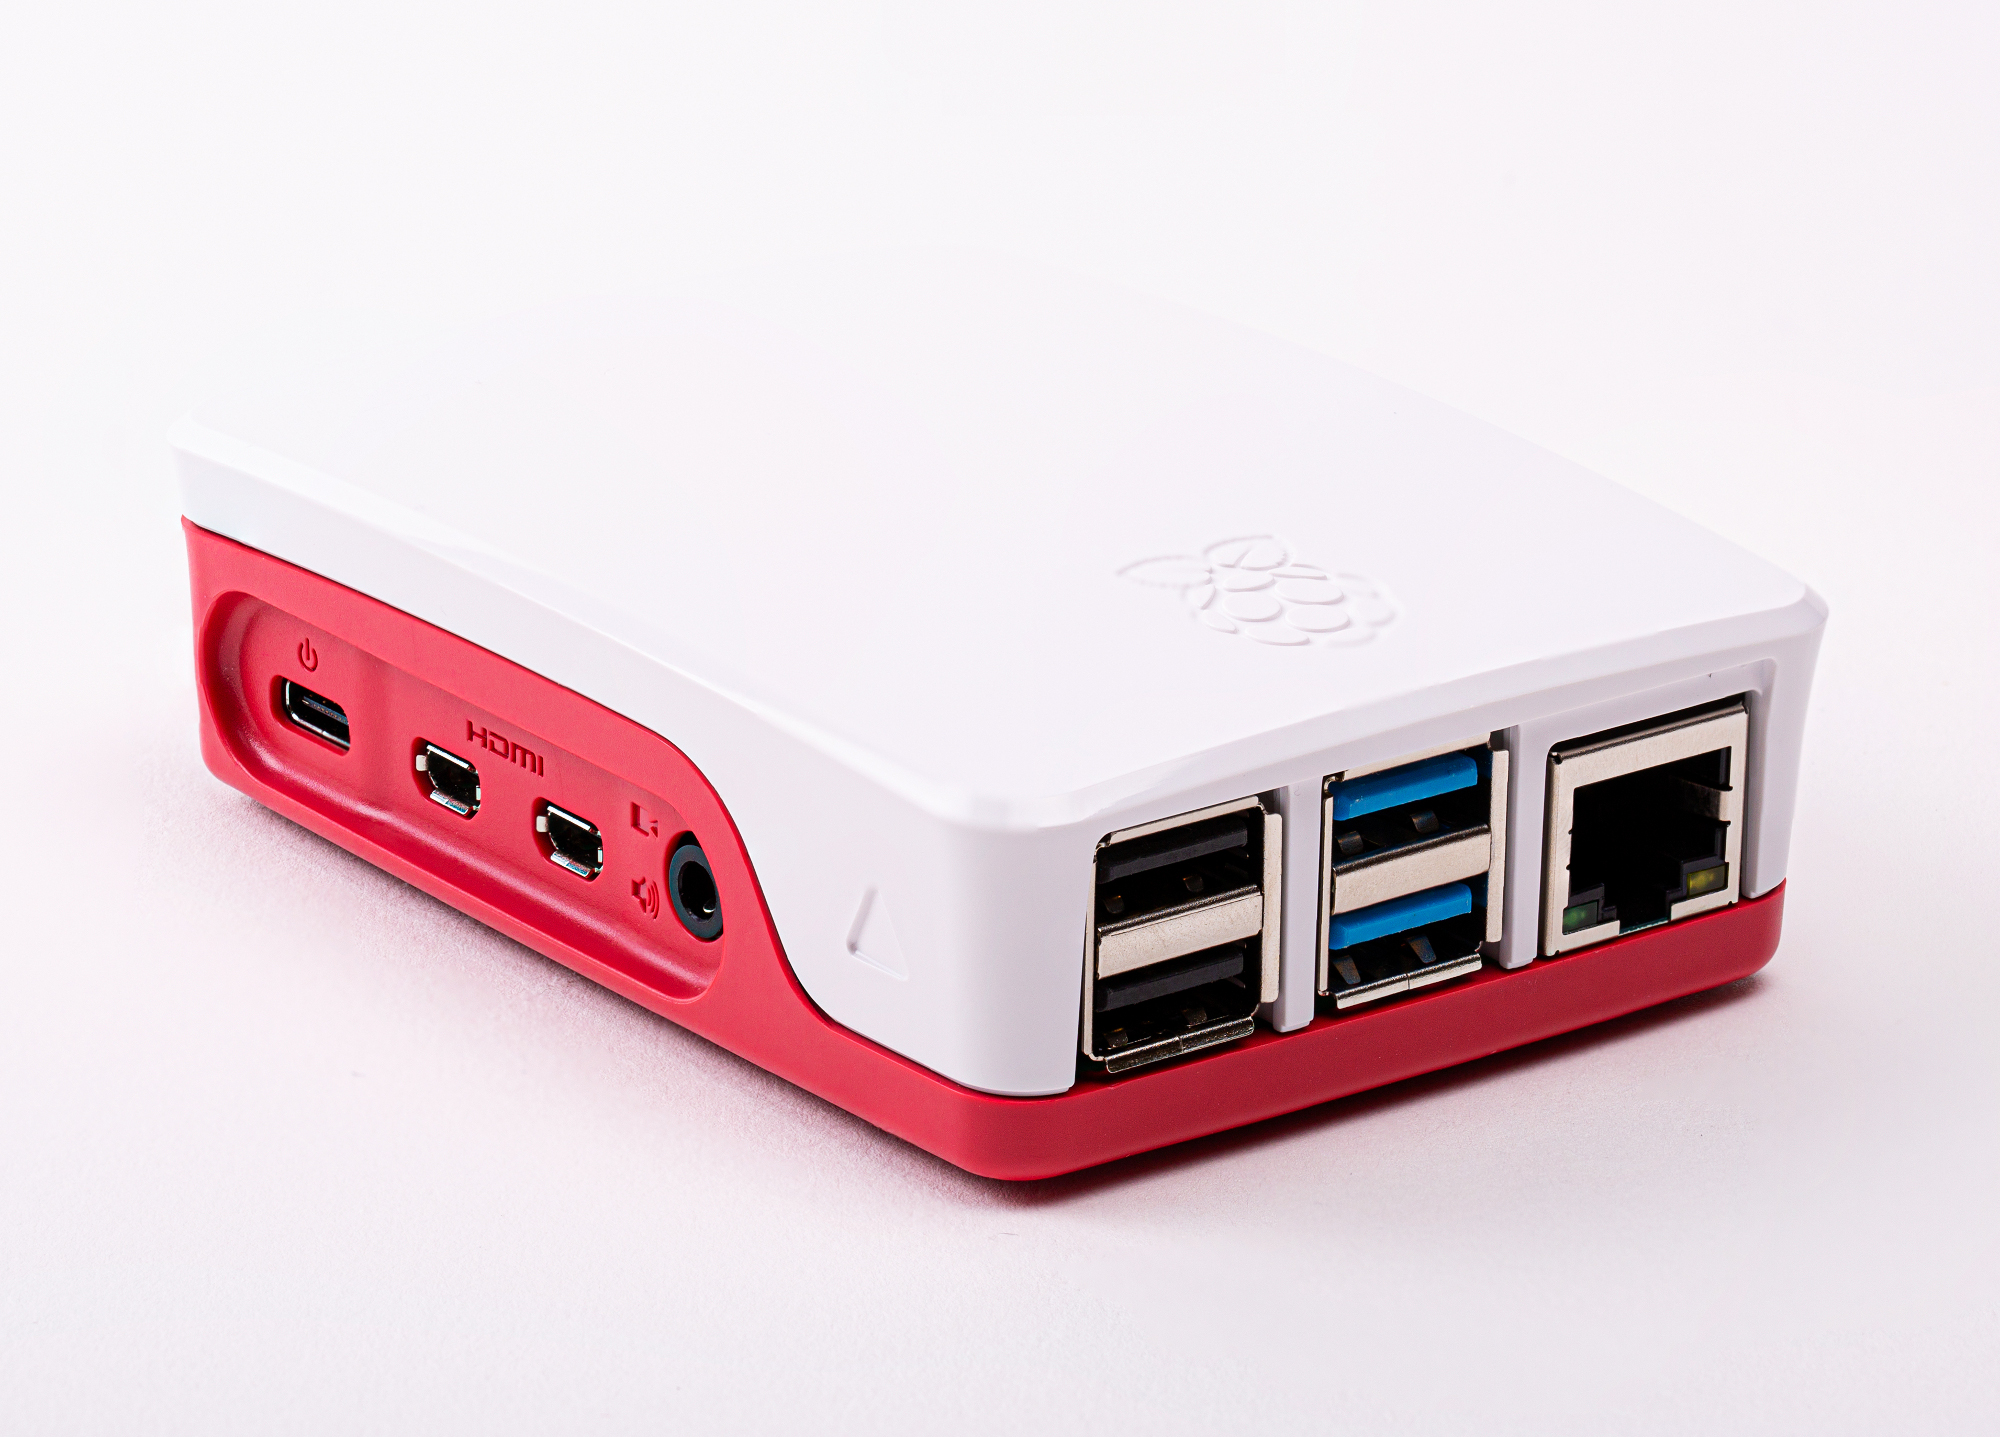
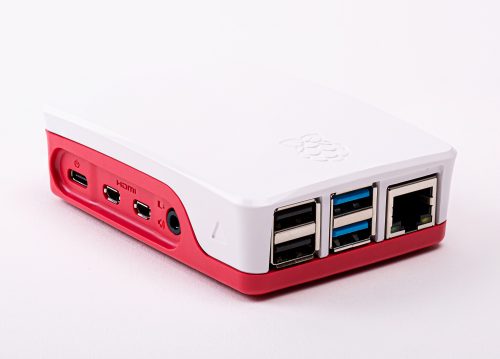
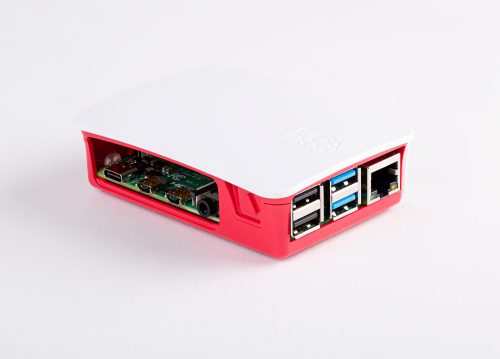
Raspberry Pi 4 Case

Gordon has been working with our design partners Kinneir Dufort and manufacturers T-Zero to develop an all-new two-part case, priced at $5.

New toy, new toy box

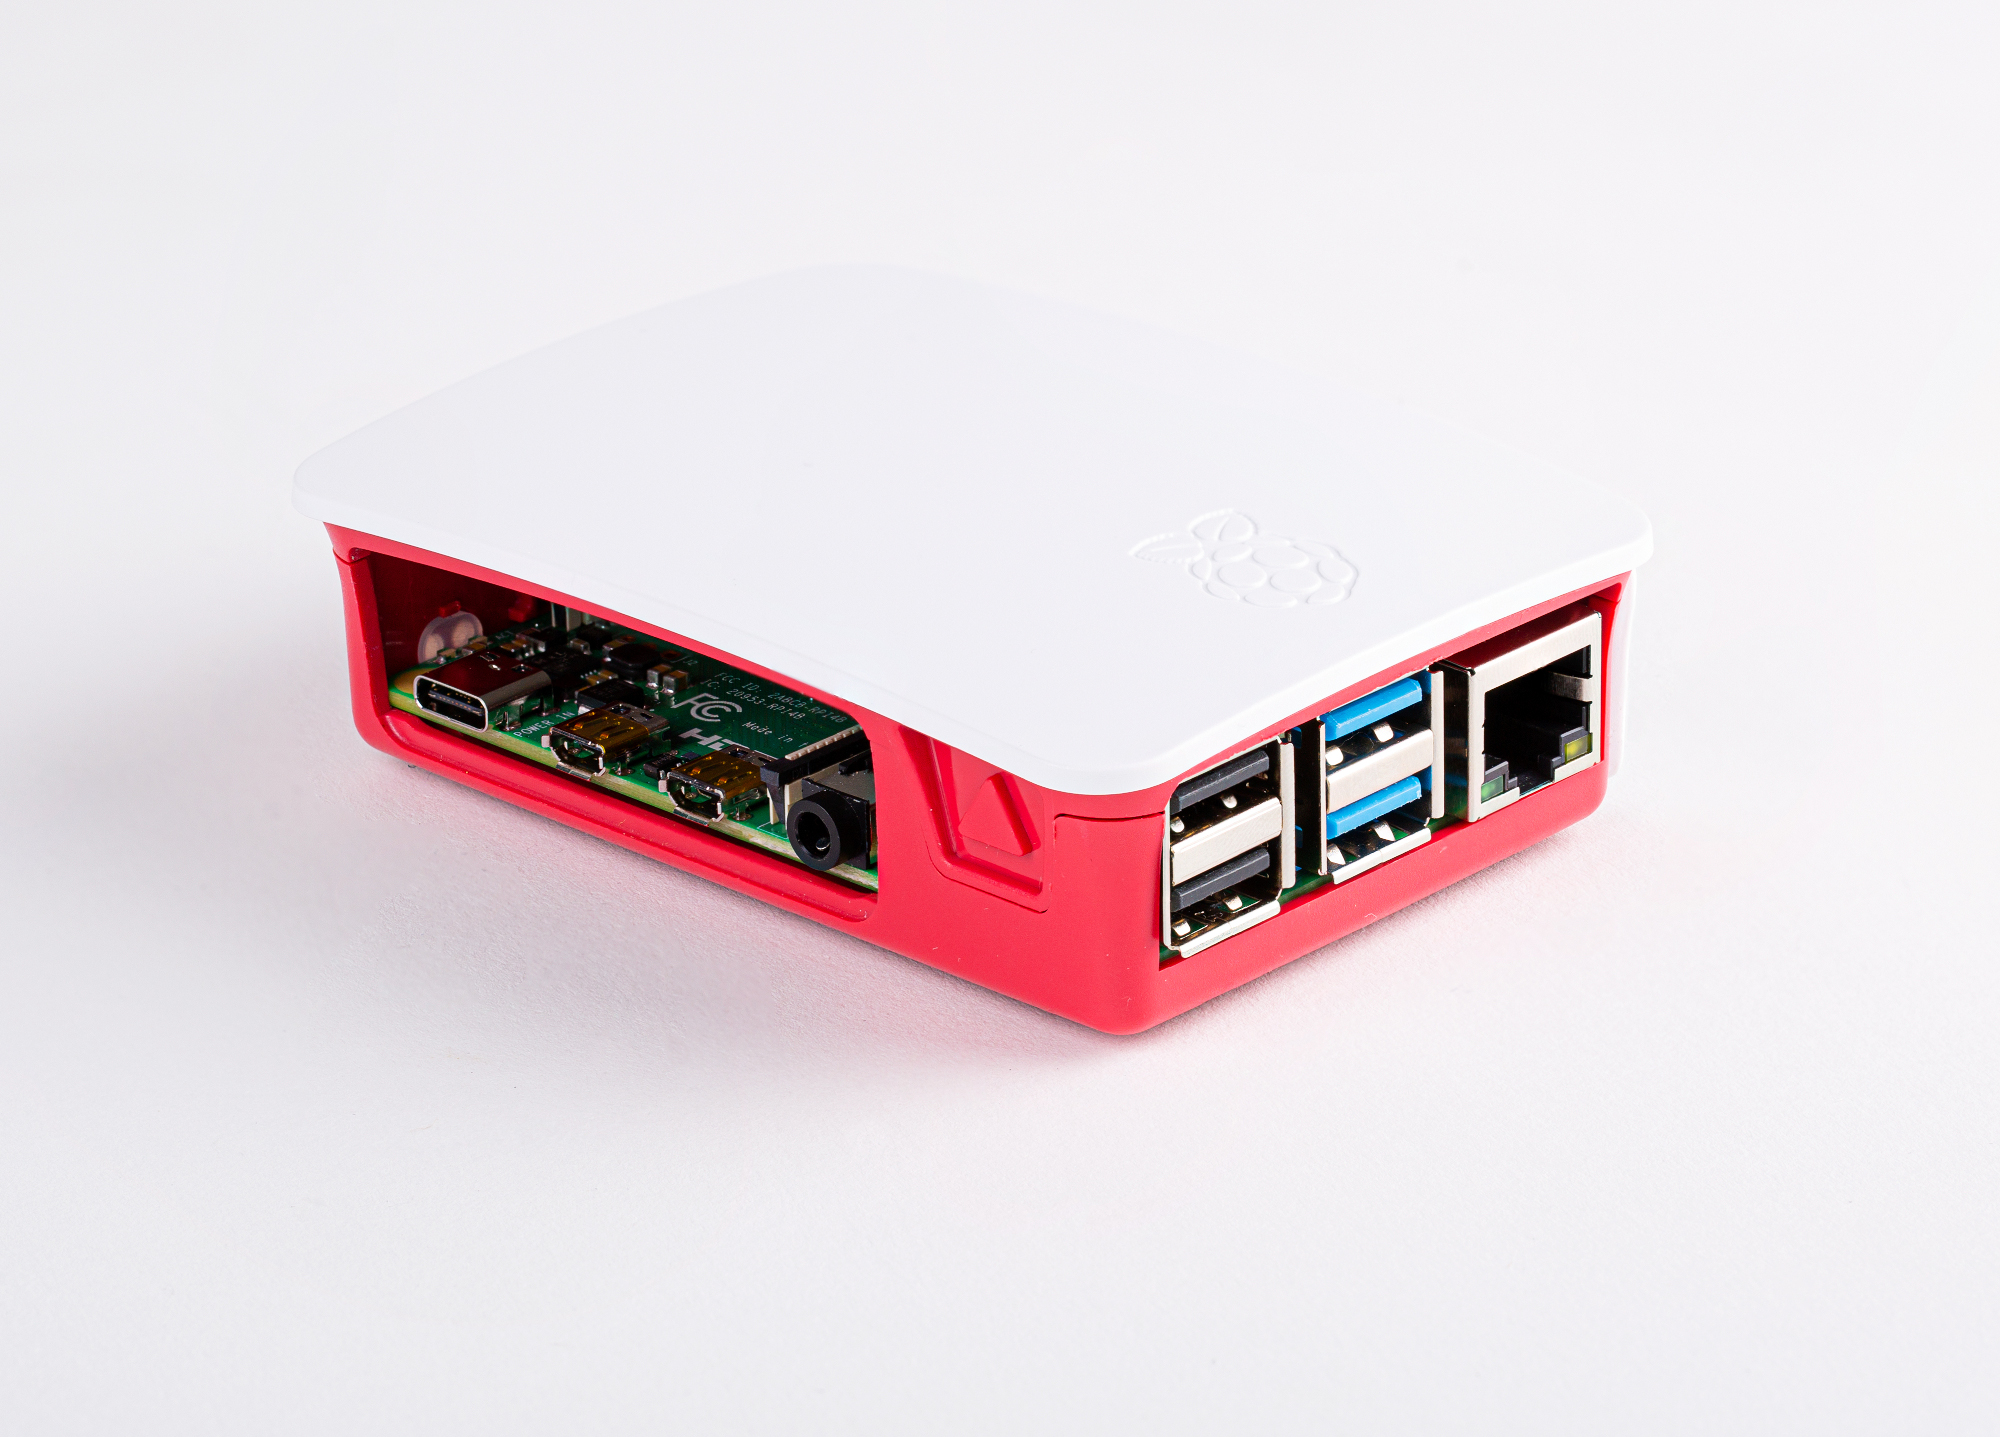
We’re very pleased with how this has turned out, but if you’d like to re-use one of our existing cases, you can simply cut away the plastic fins on the right-hand side and omit one of the side panels as shown below.

Quick work with a Dremel

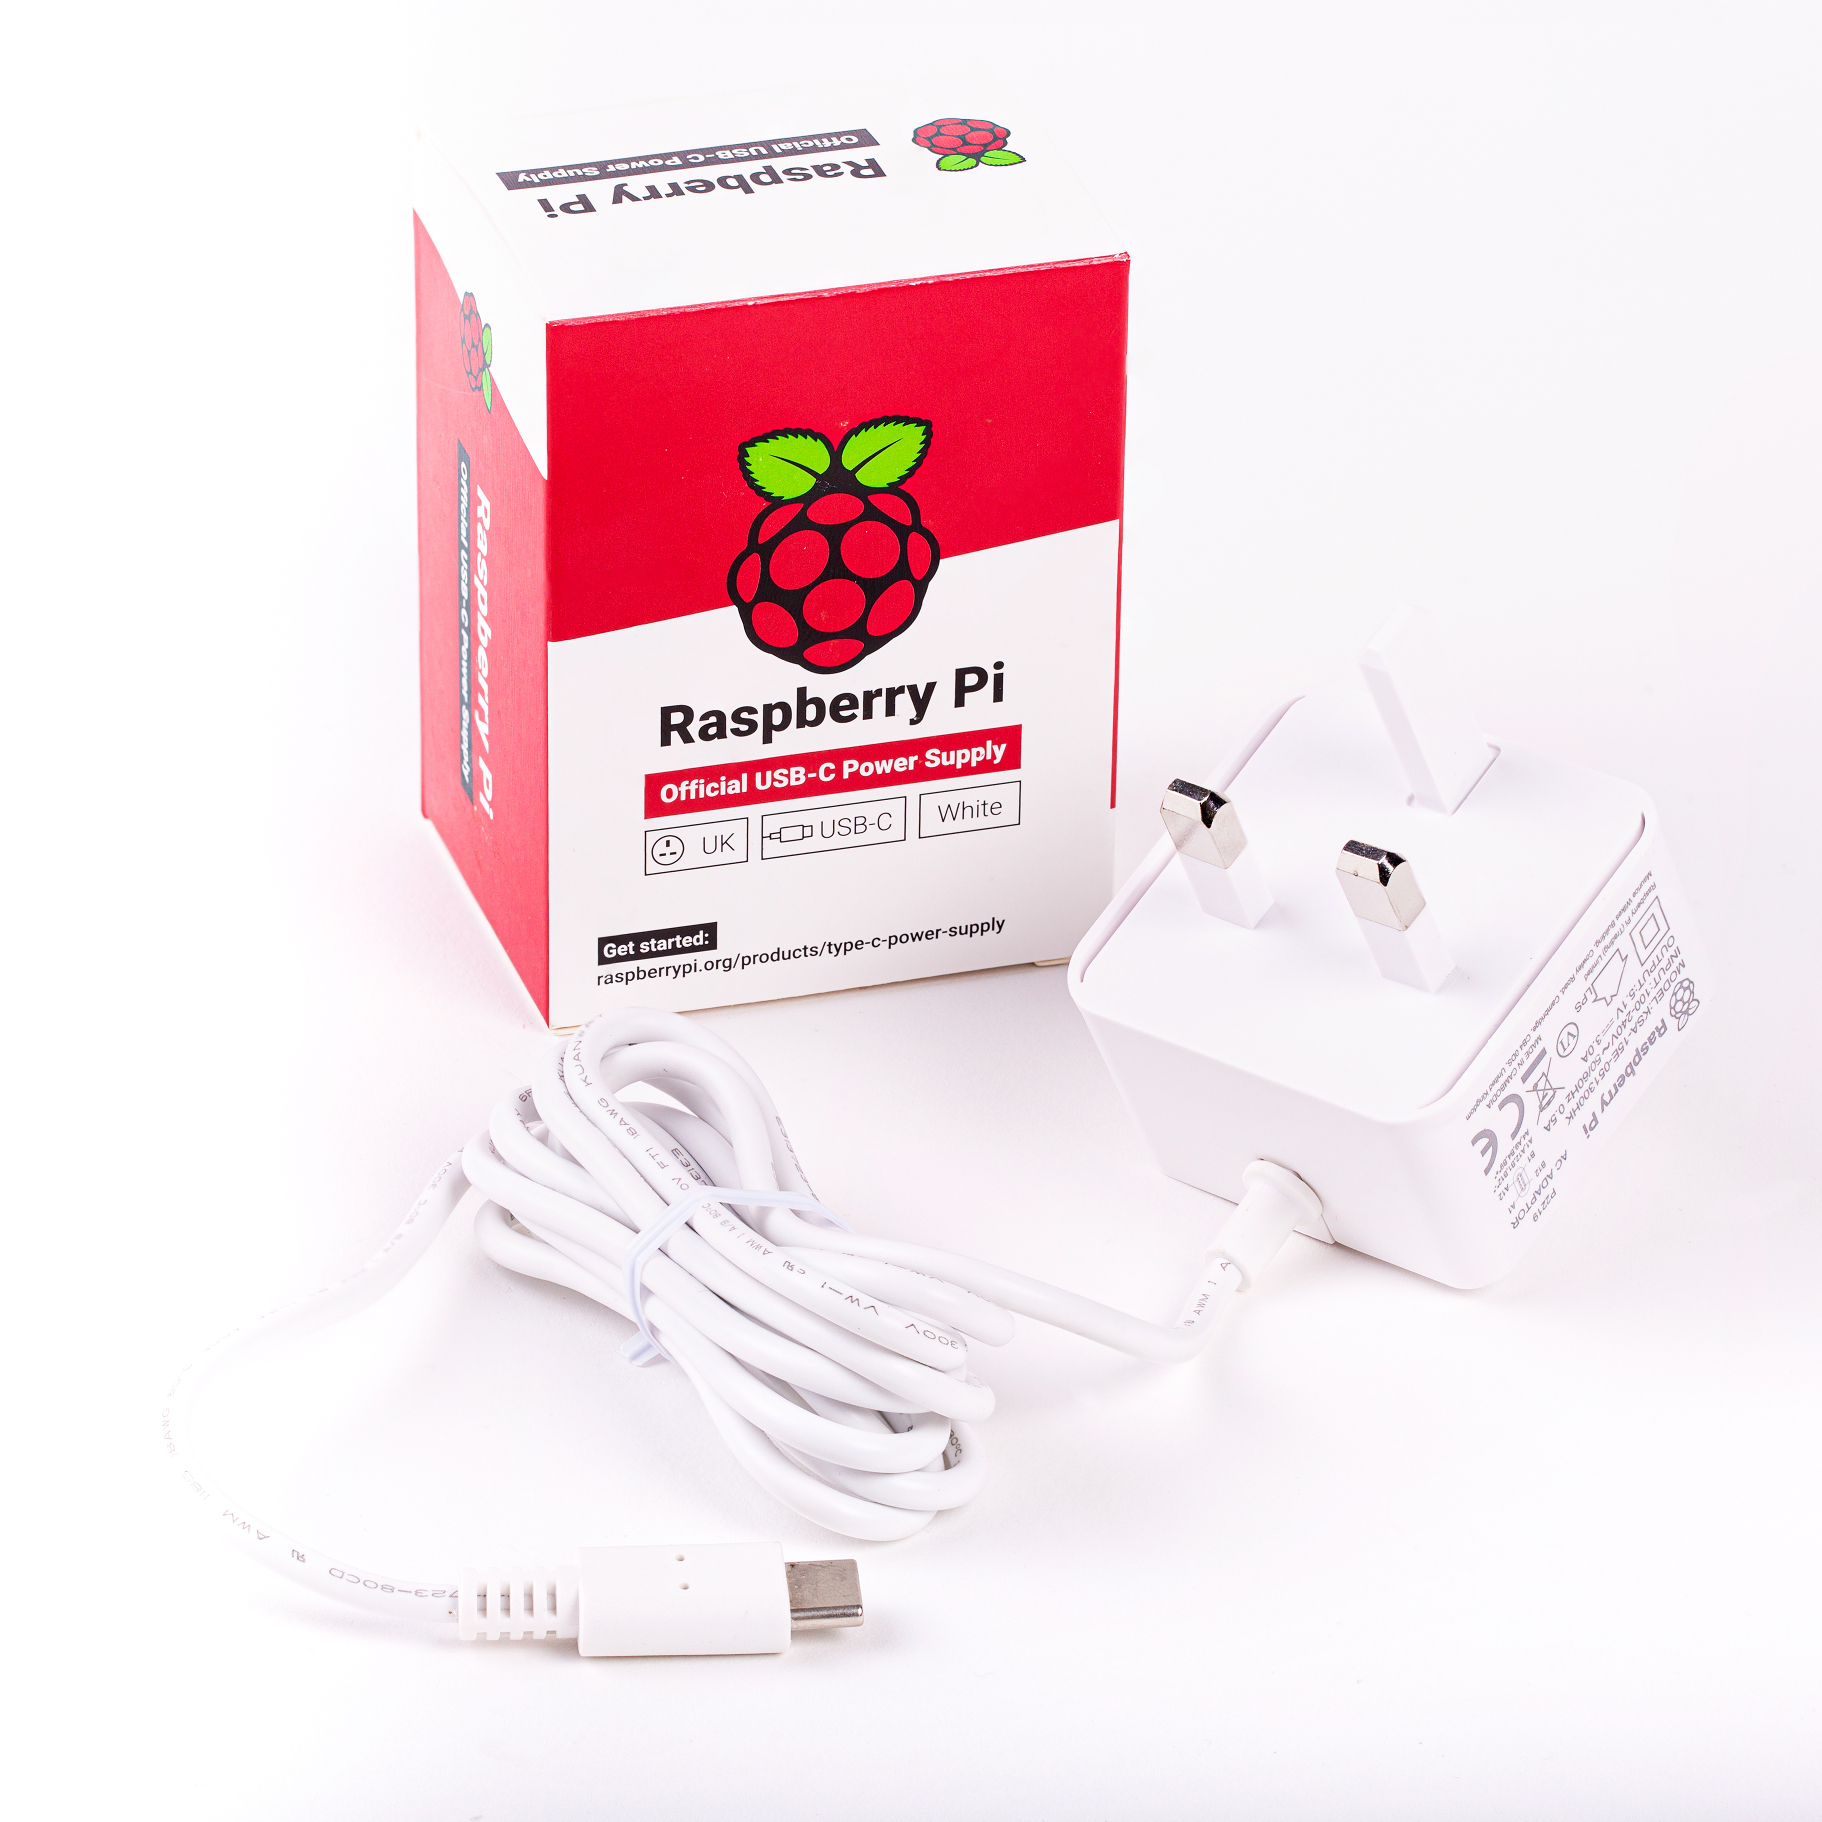
Raspberry Pi 4 Power Supply

Good, low-cost USB-C power supplies (and USB-C cables) are surprisingly hard to find, as we discovered when sending out prototype units to alpha testers. So we worked with Ktec to develop a suitable 5V/3A power supply; this is priced at $8, and is available in UK (type G), European (type C), North American (type A) and Australian (type I) plug formats.

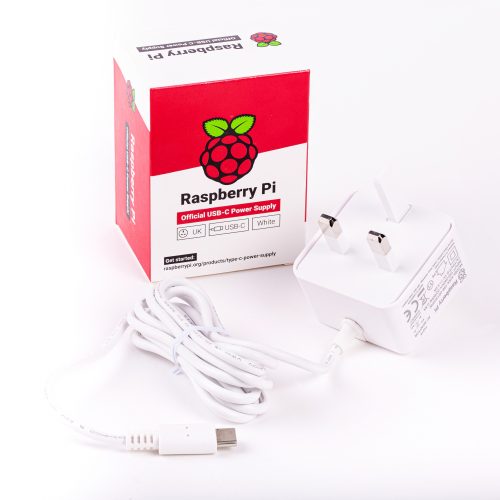
Behold the marvel that is BS 1363

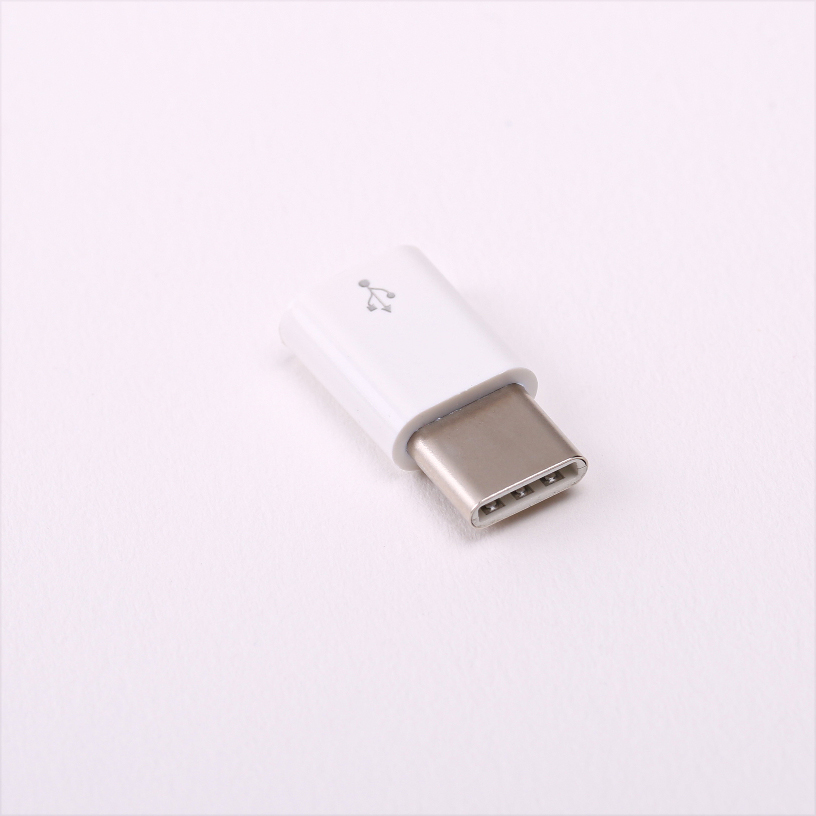
If you’d like to re-use a Raspberry Pi 3 Official Power Supply, our resellers are offering a $1 adapter which converts from USB micro-B to USB-C. The thick wires and good load-step response of the old official supply make this a surprisingly competitive solution if you don’t need a full 3 amps.

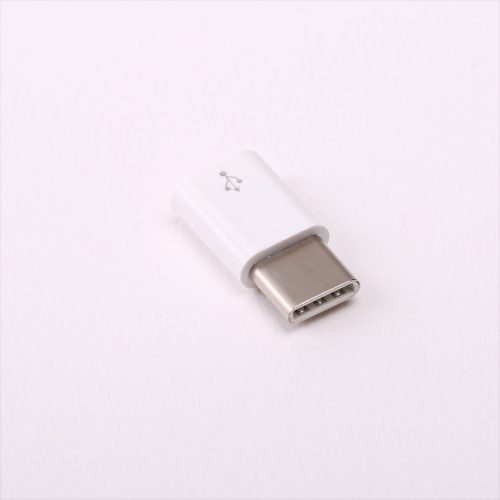
Somewhat less marvellous, but still good

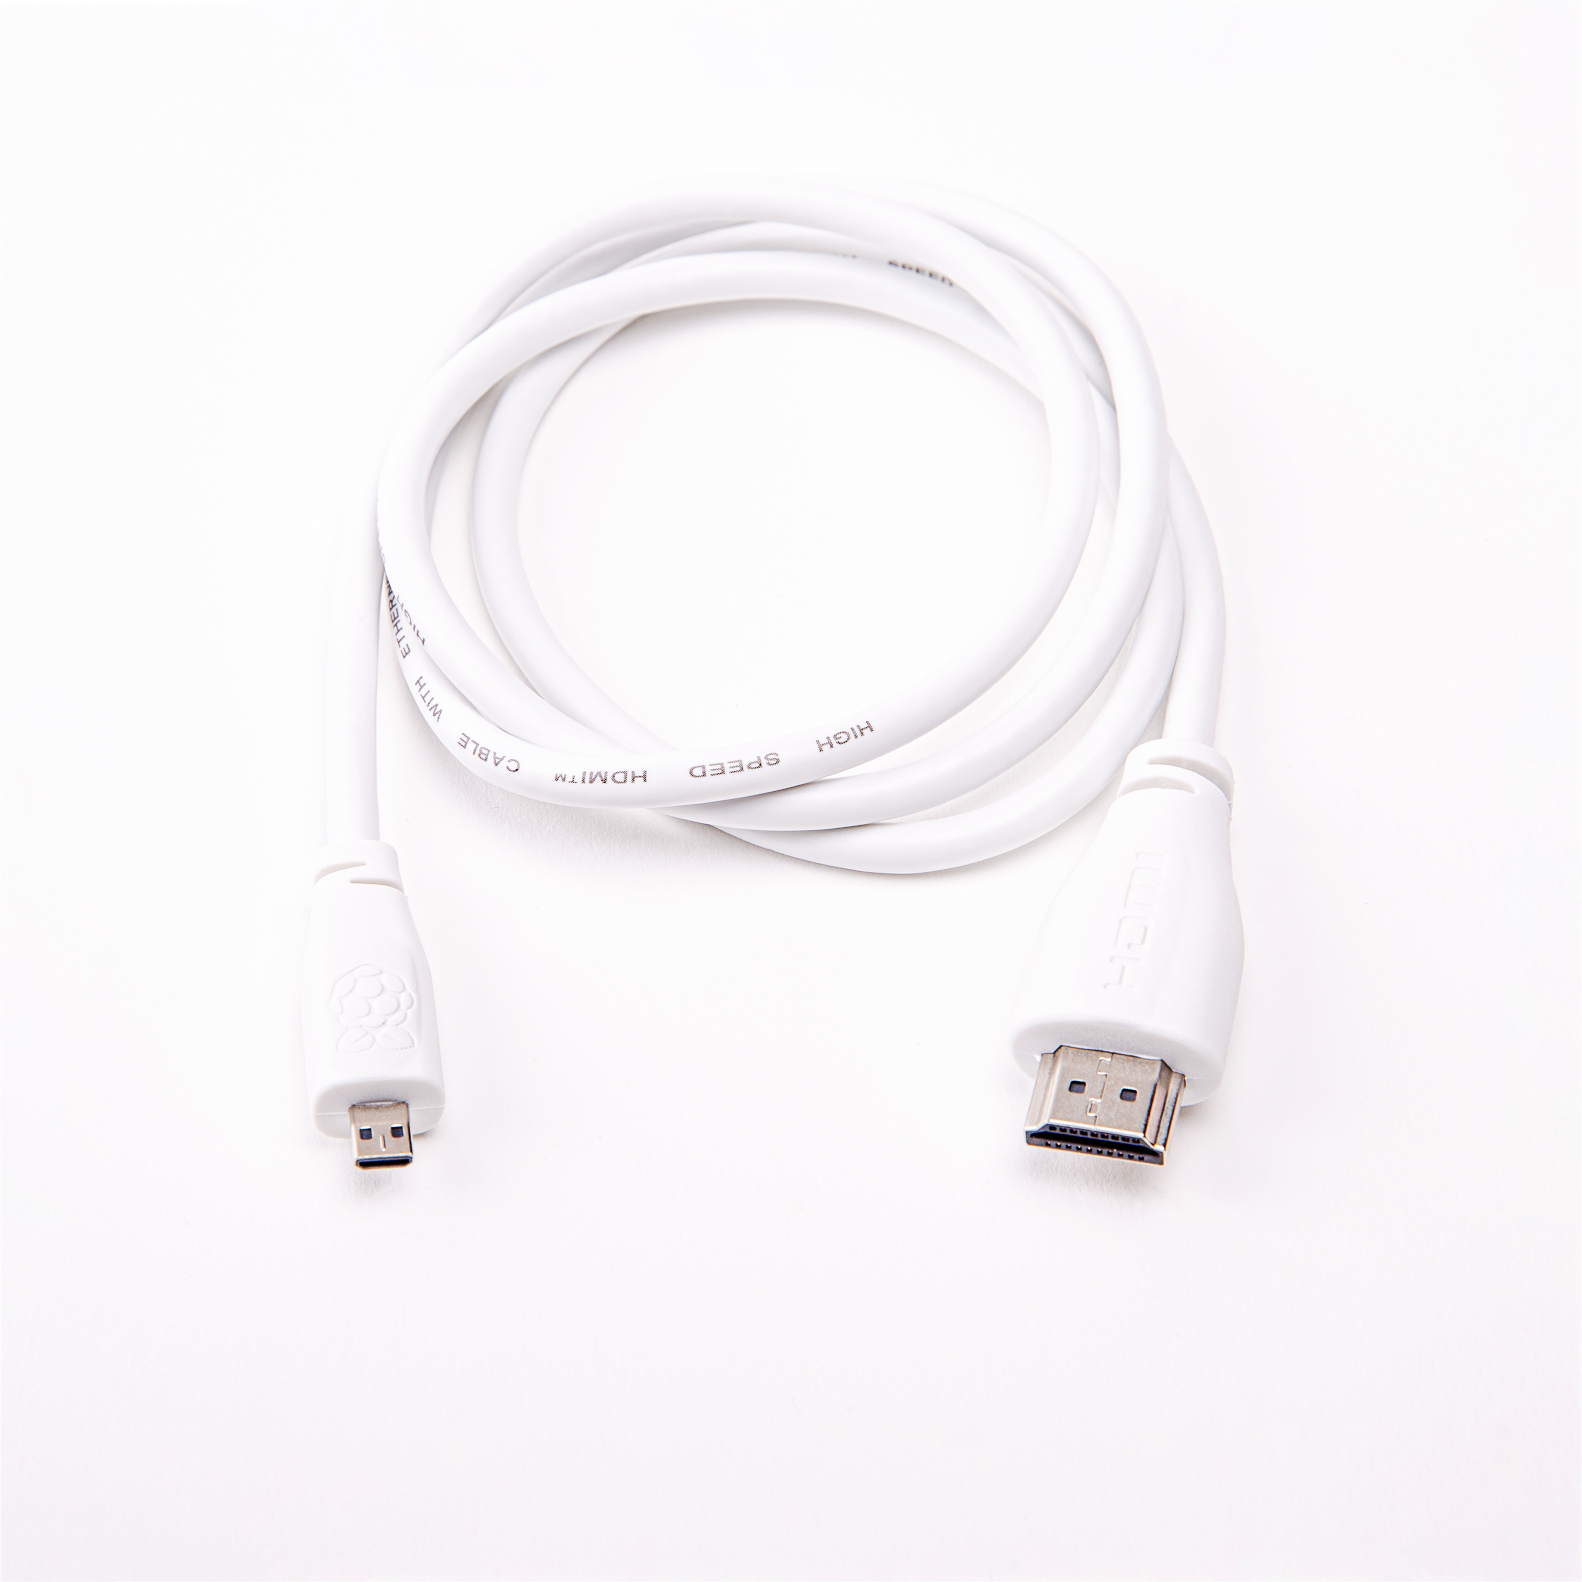
Raspberry Pi 4 micro HDMI Cables

Again, low-cost micro HDMI cables which reliably support the 6Gbps data rate needed for 4Kp60 video can be hard to find. We like the Amazon Basics cable, but we’ve also sourced a 1m cable, which will be available from our resellers for $5.

Official micro HDMI to HDMI cable

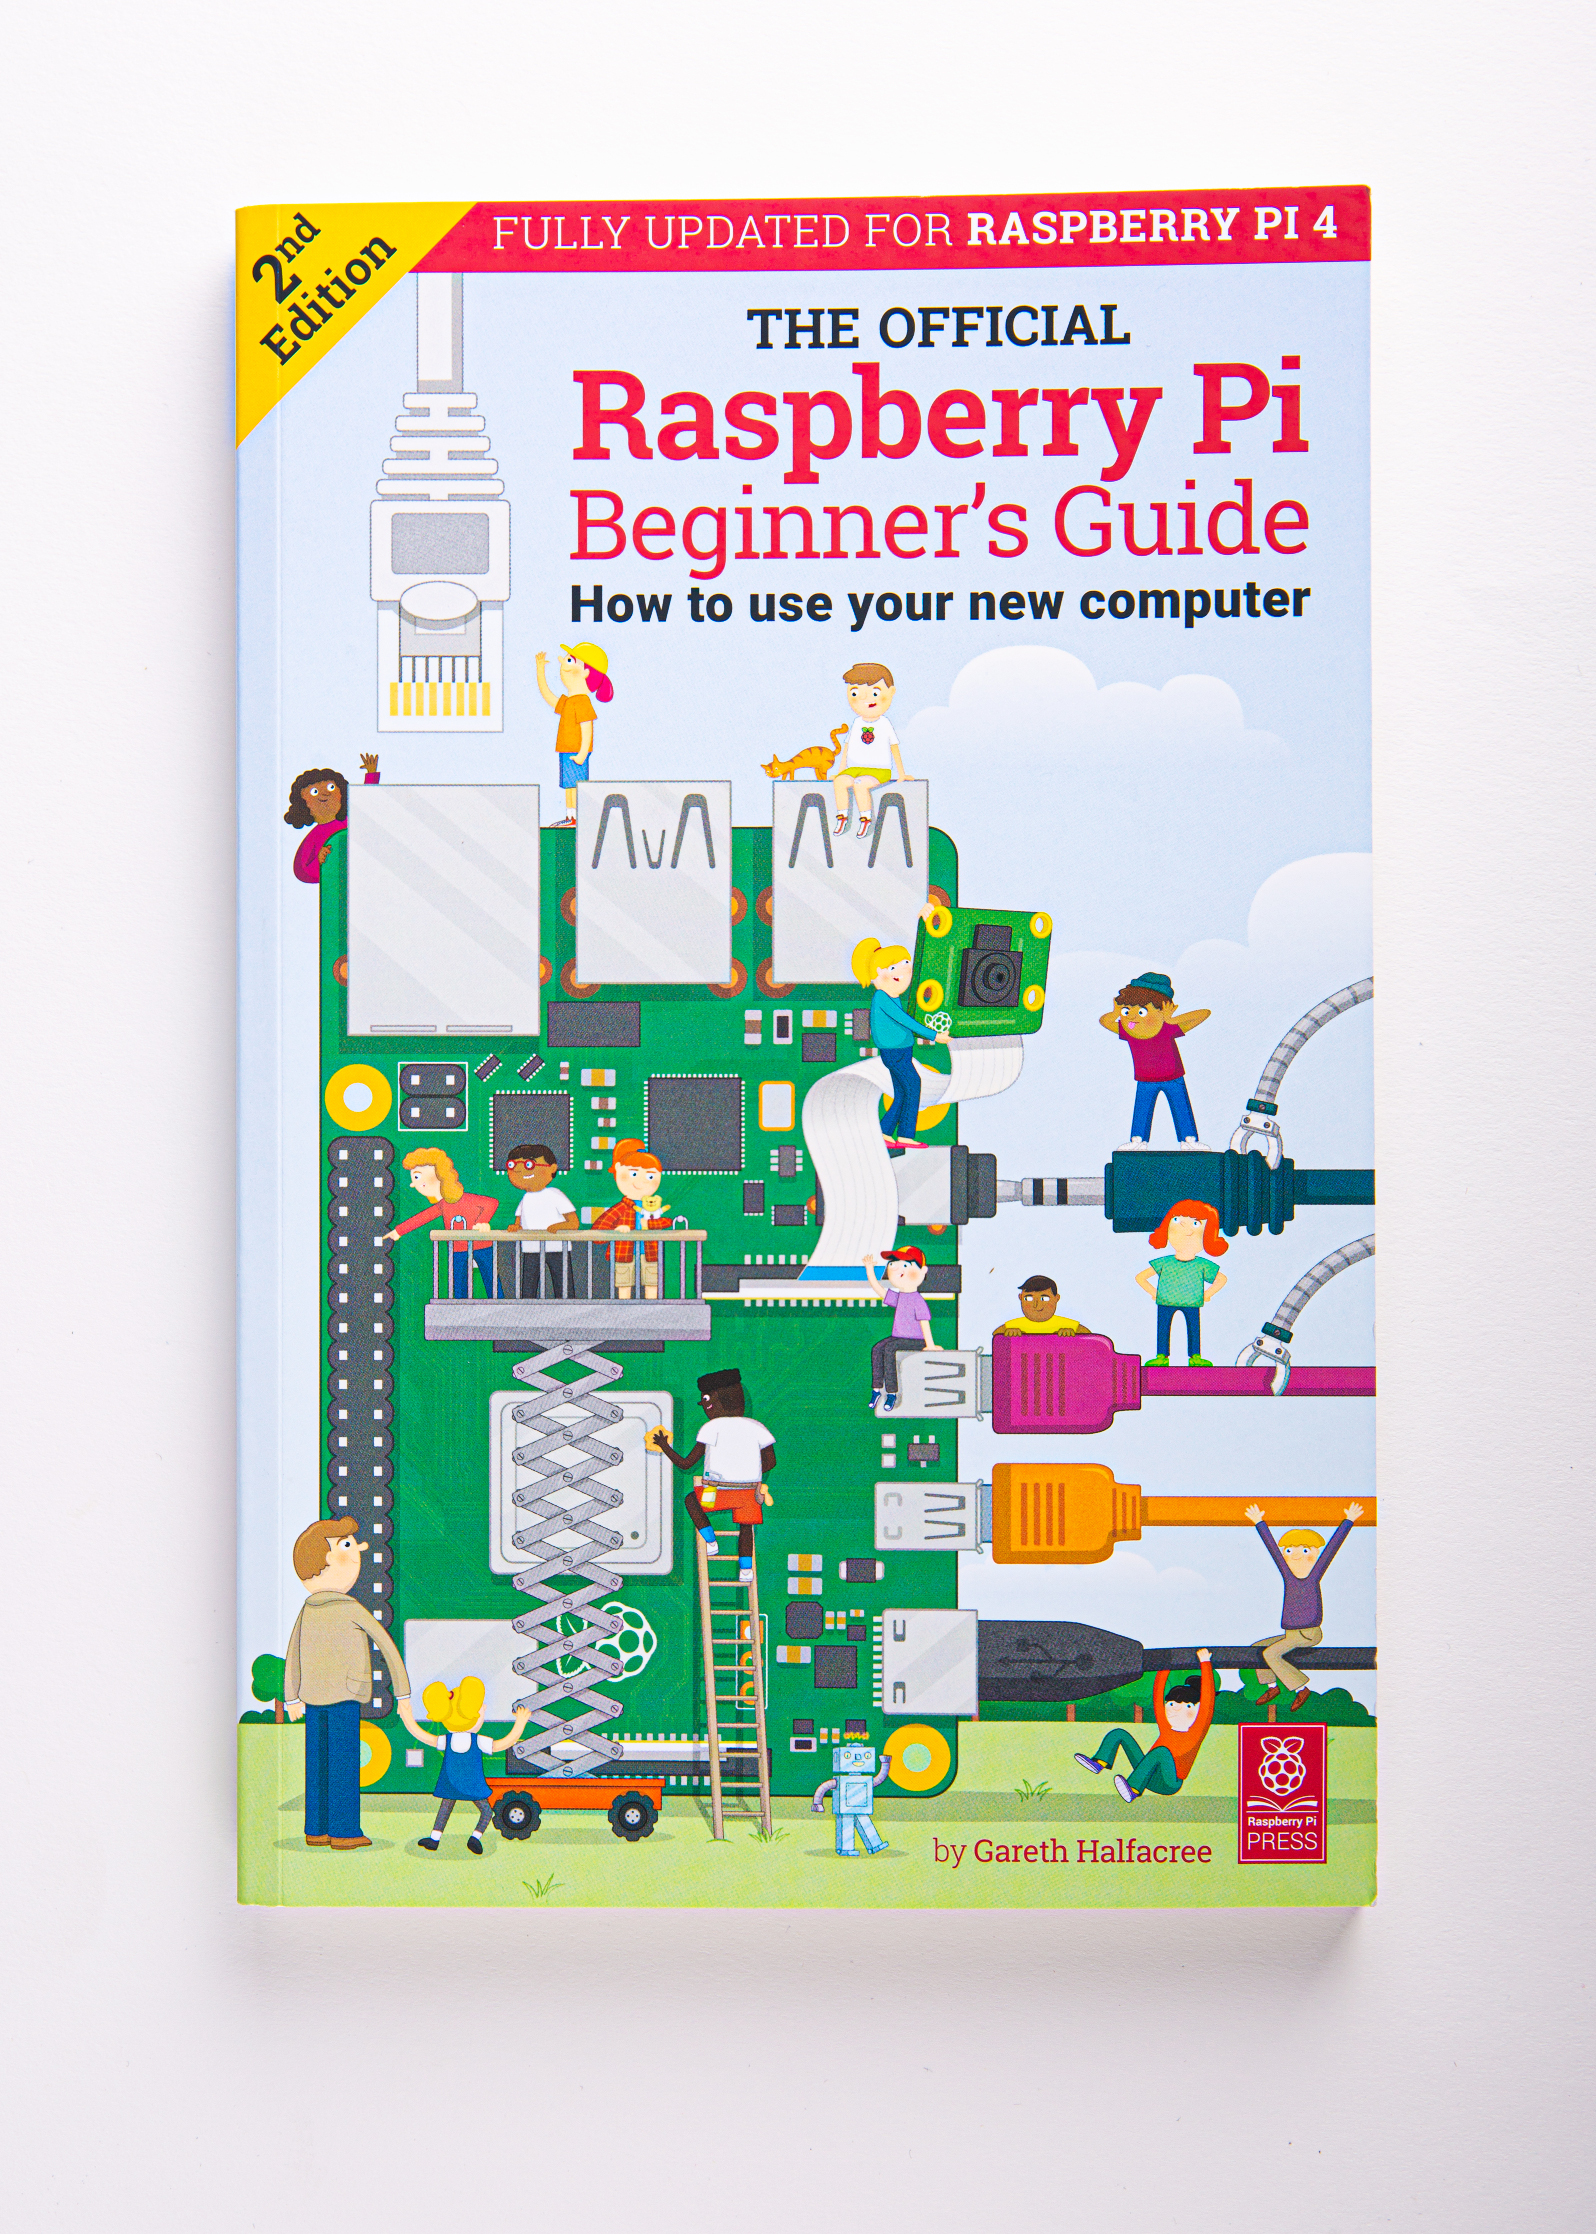
Updated Raspberry Pi Beginner’s Guide

At the end of last year, Raspberry Pi Press released the Official Raspberry Pi Beginner’s Guide. Gareth Halfacree has produced an updated version, covering the new features of Raspberry Pi 4 and our updated operating system.

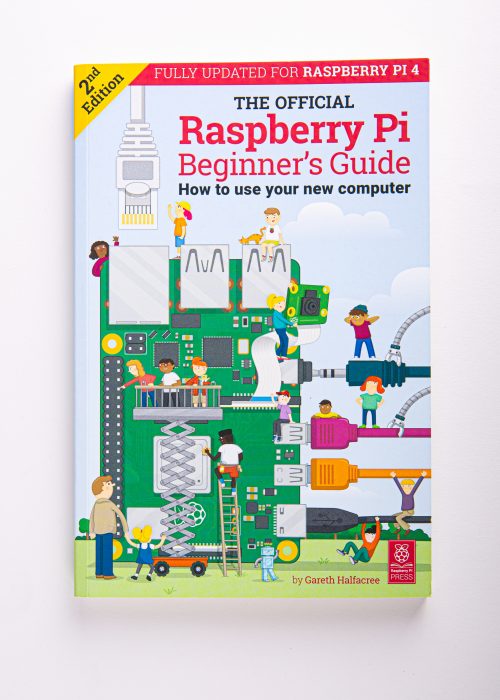
Little computer people

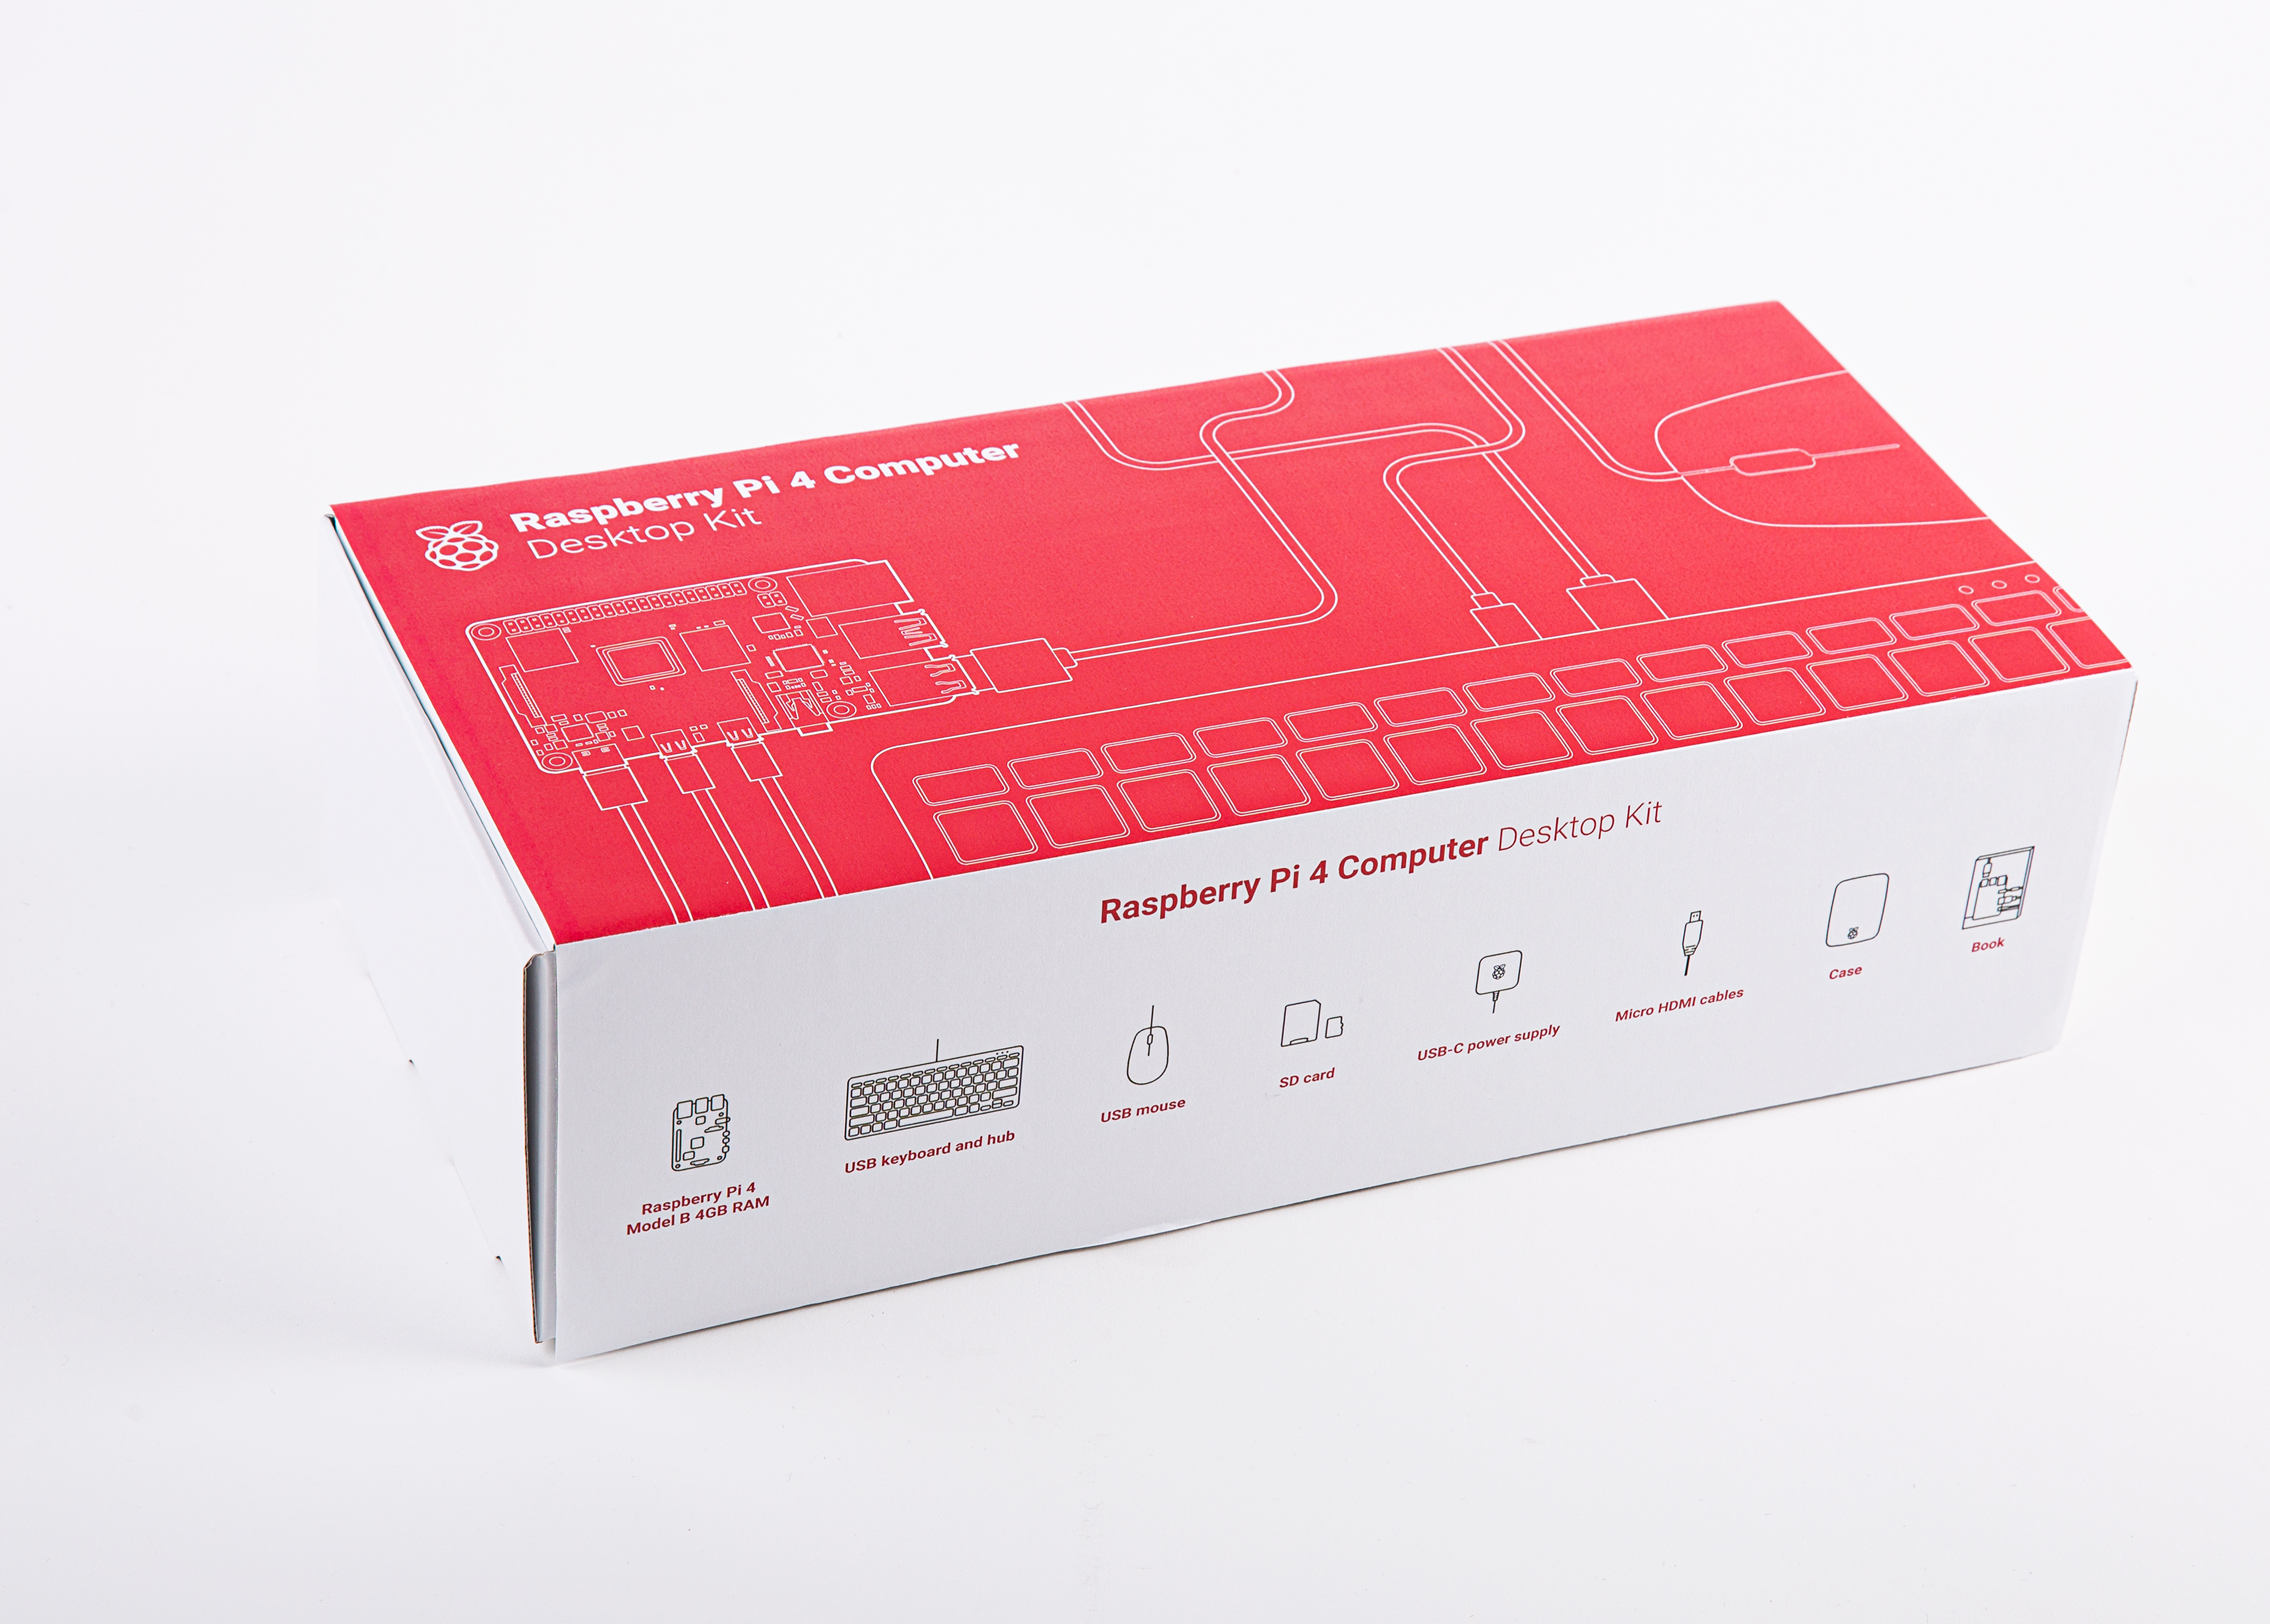
Raspberry Pi 4 Desktop Kit

Bringing all of this together, we’re offering a complete Desktop Kit. This is priced at $120, and comprises:

  • A 4GB Raspberry Pi 4
  • An official case
  • An official PSU
  • An official mouse and keyboard
  • A pair of HDMI cables
  • A copy of the updated Beginner’s Guide
  • A pre-installed 32GB microSD card

Raspberry Pi Desktop Kit

Raspberry Pi Store

This is the first product launch following the opening of our store in Cambridge, UK. For the first time, you can come and buy Raspberry Pi 4 directly from us, today. We’ll be open from 8am to 8pm, with units set up for you to play with and a couple of thousand on hand for you to buy. We even have some exclusive launch-day swag.

The Raspberry Pi Store sign

Form an orderly line

If you’re in the bottom right-hand corner of the UK, come on over and check it out!

New Raspberry Pi silicon

Since we launched the original Raspberry Pi in 2012, all our products have been based on 40nm silicon, with performance improvements delivered by adding progressively larger in-order cores (Cortex-A7, Cortex-A53) to the original ARM11-based BCM2835 design. With BCM2837B0 for Raspberry Pi 3B+ we reached the end of that particular road: we could no longer afford to toggle more transistors within our power budget.

Raspberry Pi 4 is built around BCM2711, a complete re-implementation of BCM283X on 28nm. The power savings delivered by the smaller process geometry have allowed us to replace Cortex-A53 with the much more powerful, out-of-order, Cortex-A72 core; this can execute more instructions per clock, yielding performance increases over Raspberry Pi 3B+ of between two and four times, depending on the benchmark.

We’ve taken advantage of the process change to overhaul many other elements of the design. We moved to a more modern memory technology, LPDDR4, tripling available bandwidth; we upgraded the entire display pipeline, including video decode, 3D graphics and display output to support 4Kp60 (or dual 4Kp30) throughput; and we addressed the non-multimedia I/O limitations of previous devices by adding on-board Gigabit Ethernet and PCI Express controllers.

Raspberry Pi 4 FAQs

We’ll keep updating this list over the next couple of days, but here are a few to get you started.

Wait, is it 2020 yet?

In the past, we’ve indicated 2020 as a likely introduction date for Raspberry Pi 4. We budgeted time for four silicon revisions of BCM2711 (A0, B0, C0, and C1); in comparison, we ship BCM2835C2 (the fifth revision of that design) on Raspberry Pi 1 and Zero.

Fortunately, 2711B0 has turned out to be production-ready, which has taken roughly 9–12 months out of the schedule.

Are you discontinuing earlier Raspberry Pi models?

No. We have a lot of industrial customers who will want to stick with the existing products for the time being. We’ll keep building these models for as long as there’s demand. Raspberry Pi 1B+, 2B, 3B, and 3B+ will continue to sell for $25, $35, $35, and $35 respectively.

What about a Model A version?

Historically, we’ve produced cut-down, lower-cost, versions of some of our $35 products, including Model 1A+ in 2014, and Model 3A+ at the end of last year. At present we haven’t identified a sensible set of changes to allow us to do a “Model 4A” product at significantly less than $35. We’ll keep looking though.

What about the Compute Module?

CM1, CM3, and CM3+ will continue to be available. We are evaluating options for producing a Compute Module product based on the Raspberry Pi 4 chipset.

Are you still using VideoCore?

Yes. VideoCore 3D is the only publicly documented 3D graphics core for ARM‑based SoCs, and we want to make Raspberry Pi more open over time, not less.

Credits

A project like Raspberry Pi 4 is the work of many hundreds of people, and we always try to acknowledge some of those people here.

This time round, particular credit is due to James Adams, who designed the board itself (you’ll find his signature under the USB 3.0 socket); to Mike Buffham, who ran the commercial operation, working with suppliers, licensees, and resellers to bring our most complicated product yet to market; and to all those at Raspberry Pi and Broadcom who have worked tirelessly to make this product a reality over the last few years.

A partial list of others who made major direct contributions to the BCM2711 chip program, CYW43455, VL805, and MxL7704 integrations, DRAM qualification, and Raspberry Pi 4 itself follows:

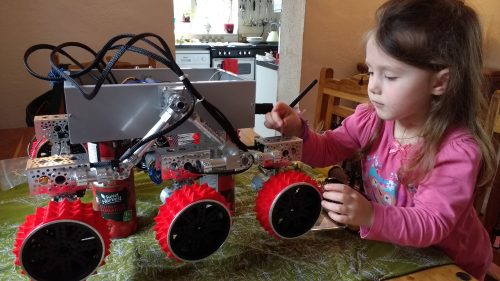
James Adams, Cyrus Afghahi, Snehil Agrawal, Sam Alder, Kiarash Amiri, Andrew Anderson, Eng Lim Ang, Eric Anholt, Greg Annandale, Satheesh Appukuttan, Amy Au, Ben Avison, Matt Bace, Neil Bailey, Jock Baird, Scott Baker, Alix Ball, Giles Ballard, Paul Barnes, Russell Barnes, Fiona Batchelor, Alex Bate, Kris Baxter, Paul Beech, Michael Belhazy, Jonathan Bell, John Bellairs, Oguz Benderli, Doug Berger, Ron Berthiaume, Raj Bharadwaj, Geoff Blackman, Ed Bleich, Debbie Brandenburg, David Brewer, Daniel Brierton, Adam Brown, Mike Buffham, Dan Caley, Mark Calleja, Rob Canaway, Cindy Cao, Victor Carmon, Ian Carter, Alex Carter, Amy Carter, Mark Castruita, KK Chan, Louis Chan, Nick Chase, Sherman Chen, Henry Chen, Yuliang Cheng, Chun Fai Cheung, Ravi Chhabra, Scott Clark, Tim Clifford, Nigel Clift, Dom Cobley, Steve Cole, Philip Colligan, Stephen Cook, Sheena Coote, Sherry Coutu, John Cowan-Hughes, John Cox, Peter Coyle, Jon Cronk, Darryl Cross, Steve Dalton, Neil Davies, Russell Davis, Tom De Vall, Jason Demas, Todd DeRego, Ellie Dobson, David Doyle, Alex Eames, Nicola Early, Jeff Echtenkamp, Andrew Edwards, Kevin Edwards, Phil Elwell, Dave Emett, Jiin Taur Eng, Gabrielle England, YG Eom, Peggy Escobedo, Andy Evans, Mark Evans, Florian Fainelli, David Ferguson, Ilan Finkelstein, Nick Francis, Liam Fraser, Ian Furlong, David Gammon, Jan Gaterman, Eric Gavami, Doug Giles, Andrew Goros, Tim Gover, Trevor Gowen, Peter Green, Simon Greening, Tracey Gregory, Efim Gukovsky, Gareth Halfacree, Mark Harris, Lucy Hattersley, James Hay, Richard Hayler, Gordon Henderson, Leon Hesch, Albert Hickey, Kevin Hill, Stefan Ho, Andrew Hoare, Lewis Hodder, William Hollingworth, Gordon Hollingworth, Michael Horne, Wanchen Hsu, David Hsu, Kevin YC Huang, Pei Huang, Peter Huang, Scofield Huang, James Hughes, Andy Hulbert, Carl Hunt, Rami Husni, Steven Hwang, Incognitum, Bruno Izern, Olivier Jacquemart, Mini Jain, Anurag Jain, Anand Jain, Geraint James, Dinesh Jayabharathi, Vinit Jayaraj, Nick Jeffery, Mengjie Jiang, David John, Alison Johnston, Lily Jones, Richard Jones, Tony Jones, Gareth Jones, Gary Kao, Gary Keall, Gerald Kelly, Ian Kersley, Gerard Khoo, Dani Kidouchim, Phil King, Andreas Knobloch, Bahar Kordi-Borojeni, Claire Kuo, Nicole Kuo, Wayne Kusumo, Koen Lampaert, Wyn Landon, Trever Latham, William Lee, Joon Lee, William Lee, Dave Lee, Simon Lewis, David Lewsey, Sherman Li, Xizhe Li, Jay Li, John CH Lin, Johan Lin, Jonic Linley, Chris Liou, Lestin Liu, Simon Long, Roy Longbottom, Patrick Loo, James Lougheed, Janice Lu, Fu Luo-Larson, Jeff Lussier, Helen Lynn, Terence Mackown, Neil MacLeod, Kevin Malone, Shahin Maloyan, Tim Mamtora, Stuart Martin, Simon Martin, Daniel Mason, Karen Matulis, Andrea Mauri, Scott McGregor, Steven Mcninch, Ben Mercer, Kamal Merchant, James Mills, Vassil Mitov, Brendan Moran, Alan Morgan, Giorgia Muirhead, Fiacre Muller, Aram Nahidipour, Siew Ling Ng, Thinh Nguyen, Lee Nguyen, Steve Noh, Paul Noonan, Keri Norris, Rhian Norris, Ben Nuttall, Brian O’Halloran, Martin O’Hanlon, Yong Oh, Simon Oliver, Mandy Oliver, Emma Ormond, Shiji Pan, Christopher Pasqualino, Max Passell, Naush Patuck, Eric Phiri, Dominic Plunkett, Karthik Rajendran, Ashwin Rao, Nick Raptopoulos, Chaitanya Ray, Justin Rees, Hias Reichl, Lorraine Richards, David Richardson, Tim Richardson, Dan Riiff, Peter de Rivaz, Josh Rix, Alwyn Roberts, Andrew Robinson, Kevin Robinson, Paul Rolfe, Marcelo Romero, Jonathan Rosenfeld, Sarah Roth, Matt Rowley, Matthew Rowley, Dave Saarinen, Ali Salem, Suzie Sanders, Graham Sanderson, Aniruddha Sane, Marion Scheuermann, Serge Schneider, Graham Scott, Marc Scott, Saran Kumar Seethapathi, Shawn Shadburn, Abdul Shaik, Mark Skala, Graham Smith, Michael Smith, Martin Sperl, Ajay Srivastava, Nick Steele, Ben Stephens, Dave Stevenson, Mike Stimson, Chee Siong Su, Austin Su, Prem Swaroop, Grant Taylor, Daniel Thompsett, Stuart Thomson, Eddie Thorn, Roger Thornton, Chris Tomlinson, Stephen Toomey, Mohamed Toubella, Frankie Tsai, Richard Tuck, Mike Unwin, Liz Upton, Manoj Vajhallya, Sandeep Venkatadas, Divya Vittal, John Wadsworth, Stefan Wahren, Irene Wang, Jeremy Wang, Rich Wells, Simon West, Joe Whaley, Craig Wightman, Oli Wilkin, Richard Wilkins, Sarah Williams, Jack Willis, Rob Wilson, Luke Wren, Romona Wu, Zheng Xu, Paul Yang, Pawel Zackiewicz, Ling Zhang, Jean Zhou, Ulf Ziemann, Rob Zwetsloot.

If you’re not on this list and think you should be, please let me know, and accept my apologies.

The post Raspberry Pi 4 on sale now from $35 appeared first on Raspberry Pi.


Source: Raspberry Pi – Raspberry Pi 4 on sale now from

Steampunk-inspired Raspberry Pi enclosure | HackSpace magazine #20

Who doesn’t like a good-looking case for their Raspberry Pi?

Exactly.

We’ve seen many homemade cases over the years, from 3D-printed enclosures to LEGO, Altoid tins and gravity-defying Zelda-themed wonderments. We love them all as much as we love own — our own case being this one if you fancy one — and always look forward to seeing more.

Cue this rather fancy steampunk-inspired enclosure made by Erich Styger, as featured in the latest issue of HackSpace magazine.

The magazine states:

This steampunk enclosure for the Raspberry Pi by Erich Styger was laser-cut out of 4 mm birch plywood, and stained to make it look a bit more 1890s. It’s built to fit a Raspberry Pi with an NXP tinyK22 board and a battery backup, and there are ports artfully crafted into it so that the system is fully functional even when the box is closed.

Those gears aren’t just for show: turn the central wheel on the front of the box to open the enclosure and get access to the electronics inside.


Cool, right?

What cases have you made for your Raspberry Pi? Let us know in the comments, or by tagging @Raspberry_Pi and @HackSpaceMag on Twitter.

HackSpace magazine is out now

You can read the rest of this feature in HackSpace magazine issue 20, out today in Tesco, WHSmith, and all good independent UK newsagents.

Or you can buy HackSpace mag directly from us — worldwide delivery is available. And if you’d like to own a handy digital version of the magazine, you can also download a free PDF.

The post Steampunk-inspired Raspberry Pi enclosure | HackSpace magazine #20 appeared first on Raspberry Pi.


Source: Raspberry Pi – Steampunk-inspired Raspberry Pi enclosure | HackSpace magazine #20

Recreate the sprite-following Options from Gradius using Python | Wireframe issue 16

Learn how to create game objects that follow the path of the main player sprite. Raspberry Pi’s own Rik Cross explains all.

Options first appeared in 1985’s Gradius, but became a mainstay of numerous sequels and spin-offs, including the Salamander and Parodius series of games.

Gradius

First released by Konami in 1985, Gradius pushed the boundaries of the shoot-’em-up genre with its varied level design, dramatic boss fights, and innovative power-up system.

One of the most memorable of its power-ups was the Option — a small, drone-like blob that followed the player’s ship and effectively doubled its firepower.

By collecting more power-ups, it was possible to gather a cluster of death-dealing Options, which obediently moved wherever the player moved.

Recreate sprite-following in Python

There are a few different ways of recreating Gradius’ sprite-following, but in this article, I’ll show you a simple implementation that uses the player’s ‘position history’ to place other following items on the screen. As always, I’ll be using Python and Pygame to recreate this effect, and I’ll be making use of a spaceship image created by ‘pitrizzo’ from opengameart.org.

The first thing to do is to create a spaceship and a list of ‘power-up’ objects. Storing the power-ups in a list allows us to perform a simple calculation on a power-up to determine its position, as you’ll see later. As we’ll be iterating through the power-ups stored in a list, there’s no need to create a separate variable for each. Instead, we can use list comprehension to create the power-ups:

powerups = [Actor(‘powerup’) for p in range(3)]

The player’s position history will be a list of previous positions, stored as a list of (x,y) tuples. Each time the player’s position changes, the new position is added to the front of the list (as the new first element). We only need to know the spaceship’s recent position history, so the list is also truncated to only contain the 100 most recent positions. Although not necessary, the following code can be added to allow you to see a selection (in this case every fifth) of these previous positions:

for p in previouspositions[::5]:

screen.draw.filled_circle(p, 2, (255,0,0))

Plotting the spaceship’s position history.

Each frame of the game, this position list is used to place each of the power-ups. In our Gradius-like example, we need each of these objects to follow the player’s spaceship in a line, as if moving together in a single-file queue. To achieve this effect, a power-up’s position is determined by its position in the power-ups list, with the first power-up in the list taking up a position nearest to the player. In Python, using enumerate when iterating through a list allows us to get the power-up’s position in the list, which can then be used to determine which position in the player’s position history to use.

newposition = previouspositions[(i+1)*20]

So, the first power-up in the list (element 0 in the list) is placed at the coordinates of the twentieth ((0+1)*20) position in the spaceship’s history, the second power-up at the fourtieth position, and so on. Using this simple calculation, elements are equally spaced along the spaceship’s previous path. The only thing to be careful of here is that you have enough items in the position history for the number of items you want to follow the player!

Power-ups following a player sprite, using the player’s position history.

This leaves one more question to answer; where do we place these power-ups initially, when the spaceship has no position history? There are a few different ways of solving this problem, but the simplest is just to generate a fictitious position history at the beginning of the game. As I want power-ups to be lined up behind the spaceship initially, I again used list comprehension

to generate a list of 100 positions with ever-decreasing x-coordinates.

previouspositions = [(spaceship.x - i*spaceship.speed,spaceship.y) for i in range(100)]

With an initial spaceship position of (400,400) and a spaceship.speed of 4, this means the list will initially contain the following coordinates:

previouspositions = [(400,400),(396,400),(392,400),(388,400),...]

Storing our player’s previous position history has allowed us to create path-following power-ups with very little code. The idea of storing an object’s history can have very powerful applications. For example, a paint program could store previous commands that have been executed, and include an ‘undo’ button that can work backwards through the commands.

Here’s Rik’s code, which recreates those sprite-following Options in Python. To get it running on your system, you’ll first need to install Pygame Zero. And to download the full code, go here.

Get your copy of Wireframe issue 16

You can read more features like this one in Wireframe issue 16, available now at Tesco, WHSmith, and all good independent UK newsagents.

Or you can buy Wireframe directly from Raspberry Pi Press — delivery is available worldwide. And if you’d like a handy digital version of the magazine, you can also download issue 16 for free in PDF format.

Make sure to follow Wireframe on Twitter and Facebook for updates and exclusive offers and giveaways. Subscribe on the Wireframe website to save up to 49% compared to newsstand pricing!

The post Recreate the sprite-following Options from Gradius using Python | Wireframe issue 16 appeared first on Raspberry Pi.


Source: Raspberry Pi – Recreate the sprite-following Options from Gradius using Python | Wireframe issue 16

European Astro Pi Challenge: Mission Space Lab winners 2018–2019!

This is your periodic reminder that there are two Raspberry Pi computers in space! That’s right — our Astro Pi units Ed and Izzy have called the International Space Station home since 2016, and we are proud to work with ESA Education to run the European Astro Pi Challenge, which allows students to conduct scientific investigations in space, by writing computer programs.

Astro PI IR on ISS

An Astro Pi takes photos of the earth from the window of the International Space Station

The Challenge has two missions: Mission Zero and Mission Space Lab. The more advanced one, Mission Space Lab, invites teams of students and young people under 19 years of age to enter by submitting an idea for a scientific experiment to be run on the Astro Pi units.

ESA and the Raspberry Pi Foundation would like to congratulate all the teams that participated in the European Astro Pi Challenge this year. A record-breaking number of more than 15000 people, from all 22 ESA Member States as well as Canada, Slovenia, and Malta, took part in this year’s challenge across both Mission Space Lab and Mission Zero!

Eleven teams have won Mission Space Lab 2018–2019

After designing their own scientific investigations and having their programs run aboard the International Space Station, the Mission Space Lab teams spent their time analysed the data they received back from the ISS. To complete the challenge, they had to submit a short scientific report discuss their results and highlight the conclusions of their experiments. We were very impressed by the quality of the reports, which showed a high level of scientific merit.

We are delighted to announce that, while it was a difficult task, the Astro Pi jury has now selected eleven winning teams, as well as highly commending four additional teams. The eleven winning teams won the chance to join an exclusive video call with ESA astronaut Frank De Winne. He is the head of the European Astronaut Centre in Germany, where astronauts train for their missions. Each team had the once-in-a-lifetime chance to ask Frank about his life as an astronaut.

And the winners are…

Firewatchers from Post CERN HSSIP Group, Portugal, used a machine learning method on their images to identify areas that had recently suffered from wildfires.

Go, 3.141592…, Go! from IES Tomás Navarro Tomás, Spain, took pictures of the Yosemite and Lost River forests and analysed them to study the effects of global drought stress. They did this by using indexes of vegetation and moisture to assess whether forests are healthy and well-preserved.

Les Robotiseurs from Ecole Primaire Publique de Saint-André d’Embrun, France, investigated variations in Earth’s magnetic field between the North and South hemispheres, and between day and night.

TheHappy.Pi from I Liceum Ogólnokształcące im. Bolesława Krzywoustego w Słupsku, Poland, successfully processed their images to measure the relative chlorophyll concentrations of vegetation on Earth.

AstroRussell from Liceo Bertrand Russell, Italy, developed a clever image processing algorithm to classify images into sea, cloud, ice, and land categories.

Les Puissants 2.0 from Lycee International de Londres Winston Churchill, United Kingdom, used the Astro Pi’s accelerometer to study the motion of the ISS itself under conditions of normal flight and course correction/reboost maneuvers.

Torricelli from ITIS “E.Torricelli”, Italy, recorded images and took sensor measurements to calculate the orbital period and flight speed of the ISS followed by the mass of the Earth using Newton’s universal law of gravitation.

ApplePi from I Liceum Ogólnokształcące im. Króla Stanisława Leszczyńskiego w Jaśle, Poland, compared their images from Astro Pi Izzy to historical images from 35 years ago and could show that coastlines have changed slightly due to erosion or human impact.

Spacethon from Saint Joseph La Salle Pruillé Le Chétif, France, tested their image-processing algorithm to identify solid, liquid, and gaseous features of exoplanets.

Stithians Rocket Code Club from Stithians CP School, United Kingdom, performed an experiment comparing the temperature aboard the ISS to the average temperature of the nearest country the space station was flying over.

Vytina Aerospace from Primary School of Vytina, Greece, recorded images of reservoirs and lakes on Earth to compare them with historical images from the last 30 years in order to investigate climate change.

Highly commended teams

We also selected four teams to be highly commended, and they will receive a selection of goodies from ESA Education and the Raspberry Pi Foundation:

Aguere Team from IES Marina Cebrián, Spain, investigated variations in the Earth’s magnetic field due to solar activity and a particular disturbance due to a solar coronal hole.

Astroraga from CoderDojo Trento, Italy, measured the magnetic field to investigate whether astronauts can still use a compass, just like on Earth, to orient themselves on the ISS.

Betlemites from Escoles Betlem, Spain, recorded the temperature on the ISS to find out if the pattern of a convection cell is different in microgravity.

Rovel In The Space from Scuola secondaria I grado A.Rosmini ROVELLO PORRO(Como), Italy, executed a program that monitored the pressure and would warn astronauts in case space debris or micrometeoroids collided with the ISS.

The next edition is not far off!

ESA and the Raspberry Pi Foundation would like to invite all school teachers, students, and young people to join the next edition of the challenge. Make sure to follow updates on the Astro Pi website and Astro Pi Twitter account to look out for the announcement of next year’s Astro Pi Challenge!

The post European Astro Pi Challenge: Mission Space Lab winners 2018–2019! appeared first on Raspberry Pi.


Source: Raspberry Pi – European Astro Pi Challenge: Mission Space Lab winners 2018–2019!

Chat to Ada Lovelace via a Raspberry Pi

Our friends, 8 Bits and a Byte, have built a Historic Voicebot, allowing users to chat to their favourite historical figures.

It’s rather marvellous.

The Historic Voicebot

Have a chat with your favourite person from the past with the Historic Voicebot! With this interactive installation, you can talk to a historical figure through both chat and voice. Made using Dialogflow, Node.js, HTML Canvas, an AIY Voice Kit, a Raspberry Pi and a vintage phone.

All the skills

Coding? Check. Woodwork? Check. Tearing apart a Google AIY Kit in order to retrofit it into a vintage telephone while ensuring it can still pick up voice via the handset? Check, check, check – this project has it all.

The concept consists of two parts:

  • A touchscreen with animations of a historical figure. The touchscreen also displays the dialog and has buttons so people can ask an FAQ.
  • A physical phone that captures speech and gives audio output, so it can be used to ask questions and listen to the answer.

While Nicole doesn’t go into full detail in the video, the Ada animation uses Dialogflow, Node.js, and HTML Canvas to work, and pairs up with the existing tech in the Google AIY Kit.

And, if you don’t have an AIY Kit to hand, don’t worry; you can have the same functionality using a standard USB speaker and microphone, and Google Home running on a Raspberry Pi.

You can find a tutorial for the whole project on hackster.io.

Follow 8 Bits and a Byte

There are a lot of YouTube channels out there that don’t have the follow count we reckon they deserve, and 8 Bits and a Byte is one of them. So, head to their channel and click that subscribe button, and be sure to check out their other videos for some more Raspberry Pi goodness.

The post Chat to Ada Lovelace via a Raspberry Pi appeared first on Raspberry Pi.


Source: Raspberry Pi – Chat to Ada Lovelace via a Raspberry Pi

An in-flight entertainment system that isn’t terrible

No Alex today; she’s tragically germ-ridden and sighing weakly beneath a heap of duvets on her sofa. But, in spite of it all, she’s managed to communicate that I should share Kyle‘s Raspberry Pi in-flight entertainment system with you.

I made my own IN-FLIGHT entertainment system! ft. Raspberry Pi

Corsair Ironclaw RGB Gaming Mouse: http://bit.ly/2vFwYw5 From poor A/V quality to lackluster content selection, in-flight entertainment centers are full of compromises. Let’s create our own using a Raspberry Pi 3 B+!

Kyle is far from impressed with the in-flight entertainment on most planes: the audio is terrible, the touchscreens are annoyingly temperamental, and the movie selection is often frustratingly limited. So, the night before a morning flight to visit family (congrats on becoming an uncle, Kyle! We trust you’ll use your powers only for good!), he hit upon the idea of building his own in-flight entertainment system, using stuff he already had lying around.

Yes, we know, he could just have taken a tablet with him. But we agree with him that his solution is way funner. It’s way more customisable too. Kyle’s current rushed prototype features a Raspberry Pi 3B+ neatly cable-tied into a drilled Altoids tin lid, which is fixed flush to the back of a 13.3-inch portable monitor with adhesive Velcro. He’s using VLC Media Player, which comes with Raspbian and supports a lot of media control functions straight out of the box; this made using his mouse and mini keyboard a fairly seamless experience. And a handy magnetic/suction bracket lets him put the screen in the back of the seat in front to the best possible use: as a mounting surface.

As Kyle says, “Is it ridiculous? I mean, yes, obviously it’s ridiculous, but would you ever consider doing something like this?”

The post An in-flight entertainment system that isn’t terrible appeared first on Raspberry Pi.


Source: Raspberry Pi – An in-flight entertainment system that isn’t terrible

Remembering Andy Baker

We are immensely sad to learn of the death, on 1 June, of Andy Baker, joint founder and organiser of the brilliant Cotswold Raspberry Jam. Andy had been suffering from brain cancer.

andy baker pistuffing

Together with co-founder Andrew Oakley, Andy worked incredibly hard to make the Cotswold Jam one of the most exciting Jams of all, with over 150 people of all ages attending its most popular events. He started working with Raspberry Pis back in 2012, and developed a seriously impressive degree of technical expertise: among his projects were a series of Pi-powered quadcopters, no less, including an autonomous drone. Many of us will forever associate Andy with a memorably fiery incident at the Raspberry Pi Big Birthday Weekend in 2016, which he handled with grace and good humour that eludes most of us:

Raspberry Pi Party Autonomous drone demo + fire

At the Raspberry Pi IV party and there is a great demo of an Autonomous drone which is very impressive with only using a Pi. However it caught on fire. But i believe it does actually work.

Andy maintained his involvement with the Raspberry Pi community, and especially the Cotswold Jam, for several years while living with a brain tumour, and shared his skills and enthusiasm with hundreds of others. He was at the heart of the Raspberry Pi community. When our patron, His Royal Highness the Duke of York, kindly hosted a reception at St. James’s Palace in October 2016 to recognise the Raspberry Pi community, Andy joined us to celebrate in style:

Cotswold Jam on Twitter

@ben_nuttall @DougGore @PiStuffing @rjam_chat Cheers, Ben! Fab photo of Prince Andrew being ignored by @davejavupride & Andy Baker @PiStuffing who are too busy drinking… “It’s what he would have wanted…” 🙂 https://t.co/FK7sk1CoDs

Andy suggested that, if people would like to make a donation in his name, they support his local school’s IT department, somewhere else he used to volunteer. The department isn’t able to accept online donations, but cheques in pounds sterling can be made out to “Gloucestershire County Council” and posted to a local funeral director who will collect and forward them:

Andy Baker memorial fund
c/o Blackwells of Cricklade
Thames House
Thames Lane
Cricklade
SN6 6BH

We owe Andy immense gratitude for all his work to help people learn and have a great time with Raspberry Pi. We were very lucky indeed to have him as part of our community. We will miss him.

The post Remembering Andy Baker appeared first on Raspberry Pi.


Source: Raspberry Pi – Remembering Andy Baker

Playback your favourite records with Plynth

Use album artwork to trigger playback of your favourite music with Plynth, the Raspberry Pi–powered, camera-enhanced record stand.

Plynth Demo

This is “Plynth Demo” by Plynth on Vimeo, the home for high quality videos and the people who love them.

Record playback with Plynth

Plynth uses a Raspberry Pi and Pi Camera Module to identify cover artwork and play the respective album on your sound system, via your preferred streaming service or digital library.

As the project’s website explains, using Plynth is pretty simple. Just:

  • Place a n LP, CD, tape, VHS, DVD, piece of artwork – anything, really – onto Plynth
  • Plynth uses its built-in camera to scan and identify the work
  • Plynth starts streaming your music on your connected speakers or home stereo system

As for Plynth’s innards? The stand houses a Raspberry Pi 3B+ and Camera Module, and relies on “a combination of the Google Vision API and OpenCV, which is great because there’s a lot of documentation online for both of them”, states the project creator, sp_cecamp, on Reddit.

Other uses

Some of you may wonder why you wouldn’t have your records with your record player and, as such, use that record player to play those records. If you are one of these people, then consider, for example, the beautiful Damien Rice LP I own that tragically broke during a recent house move. While I can no longer play the LP, its artwork is still worthy of a place on my record shelf, and with Plynth I can still play the album as well.

In addition, instead of album artwork to play an album, you could use photographs, doodles, or type to play curated playlists, or, as mentioned on the website, DVDs to play the movies soundtrack, or CDs to correctly select the right disc in a disc changer.

Convinced or not, I think what we can all agree on is that Plynth is a good-looking bit of kit, and at Pi Towers look forward to seeing where they project leads.

The post Playback your favourite records with Plynth appeared first on Raspberry Pi.


Source: Raspberry Pi – Playback your favourite records with Plynth

Ghost hunting in schools with Raspberry Pi | Hello World #9

In Hello World issue 9, out today, Elliott Hall and Tom Bowtell discuss The Digital Ghost Hunt: an immersive theatre and augmented reality experience that takes a narrative-driven approach in order to make digital education accessible.The Digital Ghost Hunt - Raspberry Pi Hello World

The Digital Ghost Hunt combines coding education, augmented reality, and live performance to create an immersive storytelling experience. It begins when a normal school assembly is disrupted by the unscheduled arrival of Deputy Undersecretary Quill of the Ministry of Real Paranormal Hygiene, there to recruit students into the Department’s Ghost Removal Section. She explains that the Ministry needs the students’ help because children have the unique ability to see and interact with ghostly spirits.

The Digital Ghost Hunt - Raspberry Pi Hello World

Under the tutelage of Deputy Undersecretary Quill and Professor Bray (the Ministry’s chief scientist), the young ghost-hunters learn how to program and use their own paranormal detectors. These allow students to discover ghostly traces, translate Morse code using flickering lights, and find messages left in ultraviolet ectoplasm. Meanwhile, the ghost communicates through a mixture of traditional theatrical effects and the poltergeist potential of smart home technology. Together, students uncover the ghost’s identity, discover her reason for haunting the building, unmask a dastardly villain, find a stolen necklace, clear the ghost’s name, right an old wrong, and finally set the ghost free.

The Digital Ghost Hunt - Raspberry Pi Hello World

The project conducted two successful test performances at the Battersea Arts Centre in South London in November 2018, funded by a grant from AHRC’s New Immersive Experiences Programme, led by Mary Krell of Sussex University. Its next outing will be at York Theatre Royal in August.

Adventures in learning

The Digital Ghost Hunt arose out of a shared interest in putting experimentation and play at the centre for learners. We felt that the creative, tinkering spirit of earlier computing — learning how to program BASIC on an Atari 800XL to create a game, for example — was being supplanted by a didactic and prescriptive approach to digital learning. KIT Theatre’s practice — creating classroom adventures that cast pupils as heroes in missions — is also driven by a less trammelled, more experiment-led approach to learning.

We believe that the current Computer Science curriculum isn’t engaging enough for students. We wanted to shift the context of how computer science is perceived, from ‘something techy and boyish’ back to the tool of the imagination that it should be. We did this by de-emphasising the technology itself and, instead, placing it in the larger context of a ghost story. The technology becomes a tool to navigate the narrative world — a means to an end rather than an end in itself. This helps create a more welcoming space for students who are bored or intimidated by the computer lab: a space of performance, experiment, and play.

Ghosts and machines

The device we built for the students was the SEEK Ghost Detector, made from a Raspberry Pi and a micro:bit, which Elliot stapled together. The micro:bit was the device’s interface, which students programmed using the block-based language MakeCode. The Raspberry Pi handled the heavier technical requirements of the show, and communicated them to the micro:bit in a form students could use. The detector had no screen, only the micro:bit’s LEDs. This meant that students’ attention was focused on the environment and what the detector could tell them about it, rather than having their attention pulled to a screen to the exclusion of the ‘real’ world around them.

In addition to the detector, we used a Raspberry Pi to make ordinary smart home technology into our poltergeist. It communicated with the students using effects such as smart bulbs that flashed in Morse code, which the students could then decode on their devices.

To program their detectors, students took part in a series of four lessons at school, focused on thinking like a programmer and the logic of computing. Two of the lessons featured significant time spent programming the micro:bit. The first focused on reading code on paper, and students were asked to look out for any bugs. The second had students thinking about what the detector will do, and acting out the steps together, effectively ‘performing’ the algorithm.

We based the process on KIT Theatre’s Adventures in Learning model, and its Theory of Change:

  • Disruption: an unexpected event grabs attention, creating a new learning space
  • Mission: a character directly asks pupils for their help in completing a mission
  • Achievement: pupils receive training and are given agency to successfully complete the mission

The Ghost Hunt

During these lessons, Deputy Undersecretary Quill kept in touch with the students via email, and the chief scientist sent them instructional videos. Their work culminated in their first official assignment: a ghost haunting the Battersea Arts Centre — a 120-year-old former town hall. After arriving, students were split into four teams, working together. Two teams analysed evidence at headquarters, while the others went out into places in the building where we’d hidden ghostly traces that their detectors would discover. The students pooled their findings to learn the ghost’s story, and then the teams swapped roles. The detectors were therefore only one method of exploring the narrative world. But the fact that they’d learned some of the code gave students a confidence in using the detectors — a sense of ownership. During one performance, one of the students pointed to a detector and said: “I made that.”

Future of the project

The project is now adapting the experience into a family show, in partnership with Pilot Theatre, premiering in York in summer 2019. We aim for it to become the core of an ecosystem of lessons, ideas, and activities — to engage audiences in the imaginative possibilities of digital technology.

You can find out more about the Digital Ghost Hunt on their website, which also includes rather lovely videos that Vimeo won’t let me embed here.

Hello World issue 9

The brand-new issue of Hello World is out today, and available right now as a free PDF download from the Hello World website.

Hello World issu 9

UK-based educators can also sign up to receive Hello World as printed magazine FOR FREE, direct to their door, by signing up here. And those outside the UK, educator or not, can subscribe to receive new issues of Hello World in their inbox on the day of release.

The post Ghost hunting in schools with Raspberry Pi | Hello World #9 appeared first on Raspberry Pi.


Source: Raspberry Pi – Ghost hunting in schools with Raspberry Pi | Hello World #9

Driverless cars run by Raspberry Pi

Could the future of driverless cars be shaped by Raspberry Pi? For undergraduate researchers at the University of Cambridge, the answer is a resounding yes!

Can cars talk to each other?

A fleet of driverless cars working together to keep traffic moving smoothly can improve overall traffic flow by at least 35 percent, researchers have shown. The researchers, from the University of Cambridge, programmed a small fleet of miniature robotic cars to drive on a multi-lane track and observed how the traffic flow changed when one of the cars stopped.

So long, traffic!

By using Raspberry Pis and onboard sensors to program scale-model versions of commercially available cars, undergraduate researchers have built a fleet of driverless cars that ‘talk to each other’. They did this because they are studying how driverless technology can help reduce traffic incidents on our roads.

Cambridge University Driverless cars using Raspberry Pi

The researchers investigated how a car stalled on a multi-lane track affects the buildup of traffic, and how communication between driverless cars can prevent these buildups.

Cambridge University Driverless cars using Raspberry Pi

When the cars acted independently of each other, a stalled car caused other vehicles in the same lane to slow or stop in order to merge into the adjacent lane. This soon led to queues forming along the track. But when the cars communicated via Raspberry Pis, they could tell each other about obstacles on the track, and this allowed cars to shift lanes with the cooperation of other road users.

The researchers recently presented their paper on the subject at the International Conference on Robotics and Automation (ICRA 2019) in Montréal, Canada. You can find links to their results, plus more information, on the University of Cambridge blog.

The post Driverless cars run by Raspberry Pi appeared first on Raspberry Pi.


Source: Raspberry Pi – Driverless cars run by Raspberry Pi

Retrofit a handheld Casio portable TV with a Raspberry Pi

What do we say to the god of outdated tech? Not today! Revive an old portable television with a Raspberry Pi 3!

Pocket televisions

In the late 1980s, when I was a gadget-savvy kid, my mother bought me a pocket TV as a joint Christmas and birthday present. The TV’s image clarity was questionable, its sound tinny, and its aerial so long that I often poked myself and others in the eye while trying to find a signal. Despite all this, it was one of the coolest, most futuristic things I’d ever seen, and I treasured it. But, as most tech of its day, the pocket TV no longer needed: I can watch TV in high definition on my phone — a device half the size, with a screen thrice as large, and no insatiable hunger for AA batteries.

So what do we do with this old tech to save it from the tip?

We put a Raspberry Pi in it, of course!

JaguarWong’s Raspberry Pi 3 pocket TV!

“I picked up a broken Casio TV-400 for the princely sum of ‘free’ a few weeks back. And I knew immediately what I wanted to do with it,” imgur user JaguarWong states in the introduction for the project.

I got the Pi for Christmas a couple of years back and have never really had any plans for it. Not long after I got it, I picked up the little screen from eBay to play with but again, with no real purpose in mind — but when I got the pocket TV everything fell into place.

Isn’t it wonderful when things fall so perfectly into place?

Thanks to an online pinout guide, JW was able to determine how to  connect the screen and the Raspberry Pi; fortunately, only a few jumper wires were needed — “which was handy given the limits on space.”

With slots cut into the base of the TV for the USB and Ethernet ports, the whole project fit together like a dream, with little need for modification of the original housing.

The final result is wonderful. And while JW describes the project as “fun, if mostly pointless”, we think it’s great — another brilliant example of retrofitting old tech with Raspberry Pi!

10/10 would recommend to a friend.

The post Retrofit a handheld Casio portable TV with a Raspberry Pi appeared first on Raspberry Pi.


Source: Raspberry Pi – Retrofit a handheld Casio portable TV with a Raspberry Pi

An opportunity to reach thousands with the Raspberry Pi

Dr Bob Brown is a former professor who taught at Kennesaw State University and Southern Polytechnic State University. He holds a doctorate in computer information systems. Bob is also a Raspberry Pi Certified Educator, and continues to provide exceptional classroom experiences for K-12 students. The moment his students have that “Aha!” feeling is something he truly values, and he continues to enjoy that experience in his K-12 classroom visits.

After retiring from teaching computing in 2017, Bob continued his school visits, first on an informal basis, and later as an official representative of KSU’s College of Computing and Software Engineering (CCSE). Keen to learn more about K-12 Computing, Bob applied to the Raspberry Pi Foundation’s Picademy program, and attended Picademy Atlanta in 2018. Here’s his story of how he has since gone on to lead several Raspberry Pi Teachers’ Workshops, inspiring educators and students alike.

“I couldn’t have done this if I had not attended Picademy” — Bob Brown

“I was amazed at the excitement and creativity that Picademy and the Raspberry Pi created among the teachers who attended,” Bob says. “After reading about the number of applicants for limited Picademy positions, I realized there was unmet demand. I began to wonder whether we could do something similar at the CCSE.”

Bob spent over a hundred hours developing instructional material, and raised over $2,000 from Southern Polytechnic alumni. With the money he raised, Bob conducted a pilot workshop for half a dozen teachers in the autumn of 2018. The workshop was free for participants, and covered material similar to Picademy, but in a one-day format. Participants were also given a Raspberry Pi 3B+ and a parts pack. Bob says, “I couldn’t have done this if I had not attended Picademy and been able to start with the Picademy material from the Raspberry Pi Foundation.”

“[The CCSE] helps improve access, awareness, and sustainability to middle and high school students and teachers.” — Jon Preston

The Dean of CCSE at KSU, Dr Jon Preston, was so impressed with the results of the pilot workshop that he authorised a formal fundraising program and two additional workshops in the spring of 2019. Four more workshops have also been scheduled for the summer.

“The College of Computing and Software Engineering at KSU STEM+Computing project helps improve access, awareness, and sustainability to middle and high school students and teachers. CCSE faculty and undergraduate students build learning materials and deliver these materials on-site to schools in an effort to increase the number of students who are energized by computing and want to study computing to help improve their careers and the world. Given the price and power of the Raspberry Pi computers, these devices are a perfect match for our project in the local schools,” says Preston.

The teachers really enjoyed the workshop, and left incredibly inspired.

Teachers came from all over Georgia and from as far away as Mississippi to attend the workshops. For some of the teachers, it was their first time exploring the concept of physical computing, and the hands-on approach to the workshop helped them set their own pace. The teachers really enjoyed the workshop, and left incredibly inspired. “Teacher workshops have a multiplier effect,” says Brown. “If I teach 30 students, I’ve reached 30 students; if I teach 30 teachers, I potentially reach thousands of students over a period of years.”

Another great contribution to the program was the addition of college student facilitators, who provided individual support to the teachers throughout the day, making it easier for everyone to have the assistance they needed.

By the end of the summer, more than 150 K-12 teachers will have participated in a CCSE Raspberry Pi Teachers’ Workshop.

The Raspberry Pi Teachers’ Workshops have become a regular part of the outreach efforts of the CCSE. Grants from State Farm Insurance, 3M Corporation, and a few very generous individual gifts keep the workshops free for K-12 teachers, who also take home a Raspberry Pi and extra components and parts. Participants are also invited to join an online forum where they can exchange ideas and support each other. By the end of the summer, more than 150 K-12 teachers will have participated in a CCSE Raspberry Pi Teachers’ Workshop. You can find more information about the workshops here.

The post An opportunity to reach thousands with the Raspberry Pi appeared first on Raspberry Pi.


Source: Raspberry Pi – An opportunity to reach thousands with the Raspberry Pi

Coding an isometric game map | Wireframe issue 15

Isometric graphics give 2D games the illusion of depth. Mark Vanstone explains how to make an isometric game map of your own.

Published by Quicksilva in 1983, Ant Attack was one of the earliest games to use isometric graphics. And you threw grenades at giant ants. It was brilliant.

Isometric projection

Most early arcade games were 2D, but in 1982, a new dimension emerged: isometric projection. The first isometric game to hit arcades was Sega’s pseudo-3D shooter, Zaxxon. The eye-catching format soon caught on, and other isometric titles followed: Q*bert came out the same year, and in 1983 the first isometric game for home computers was published: Ant Attack, written by Sandy White.

Ant Attack

Ant Attack was first released on the ZX Spectrum, and the aim of the game was for the player to find and rescue a hostage in a city infested with giant ants. The isometric map has since been used by countless titles, including Ultimate Play The Game’s classics Knight Lore and Alien 8, and my own educational history series ArcVenture.

Let’s look at how an isometric display is created, and code a simple example of how this can be done in Pygame Zero — so let’s start with the basics. The isometric view displays objects as if you’re looking down at 45 degrees onto them, so the top of a cube looks like a diamond shape. The scene is made by drawing cubes on a diagonal grid so that the cubes overlap and create solid-looking structures. Additional layers can be used above them to create the illusion of height.

Blocks are drawn from the back forward, one line at a time and then one layer on top of another until the whole map is drawn.

The cubes are actually two-dimensional bitmaps, which we start printing at the top of the display and move along a diagonal line, drawing cubes as we go. The map is defined by a three-dimensional list (or array). The list is the width of the map by the height of the map, and has as many layers as we want to represent in the upward direction. In our example, we’ll represent the floor as the value 0 and a block as value 1. We’ll make a border around the map and create some arches and pyramids, but you could use any method you like — such as a map editor — to create the map data.

To make things a bit easier on the processor, we only need to draw cubes that are visible in the window, so we can do a check of the coordinates before we draw each cube. Once we’ve looped over the x, y, and z axes of the data list, we should have a 3D map displayed. The whole map doesn’t fit in the window, and in a full game, the map is likely to be many times the size of the screen. To see more of the map, we can add some keyboard controls.

Here’s Mark’s isometric map, coded in Python. To get it running on your system, you’ll first need to install Pygame Zero. And to download the full code, visit our Github repository here.

If we detect keyboard presses in the update() function, all we need to do to move the map is change the coordinates we start drawing the map from. If we start drawing further to the left, the right-hand side of the map emerges, and if we draw the map higher, the lower part of the map can be seen.

We now have a basic map made of cubes that we can move around the window. If we want to make this into a game, we can expand the way the data represents the display. We could add differently shaped blocks represented by different numbers in the data, and we could include a player block which gets drawn in the draw() function and can be moved around the map. We could also have some enemies moving around — and before we know it, we’ll have a game a bit like Ant Attack.

Tiled

When writing games with large isometric maps, an editor will come in handy. You can write your own, but there are several out there that you can use. One very good one is called Tiled and can be downloaded free from mapeditor.org. Tiled allows you to define your own tilesets and export the data in various formats, including JSON, which can be easily read into Python.

Get your copy of Wireframe issue 15

You can read more features like this one in Wireframe issue 15, available now at Tesco, WHSmith, and all good independent UK newsagents.

Or you can buy Wireframe directly from Raspberry Pi Press — delivery is available worldwide. And if you’d like a handy digital version of the magazine, you can also download issue 15 for free in PDF format.

Make sure to follow Wireframe on Twitter and Facebook for updates and exclusive offers and giveaways. Subscribe on the Wireframe website to save up to 49% compared to newsstand pricing!

The post Coding an isometric game map | Wireframe issue 15 appeared first on Raspberry Pi.


Source: Raspberry Pi – Coding an isometric game map | Wireframe issue 15

Quick Fix — a vending machine for likes and followers

Sometimes we come across a project that just scores a perfect 10 on all fronts. This is one of them: an art installation using Raspberry Pi that has something interesting to say, does it elegantly, and is implemented beautifully (nothing presses our buttons like a make that’s got a professionally glossy finish like this).

Quick Fix is a vending machine (and art installation) that sells social media likes and followers. Drop in a coin, enter your social media account name, and an army of fake accounts will like or follow you. I’ll leave the social commentary to you. Here’s a video from the maker, Dries Depoorter:

Quick Fix – the vending machine selling likes and followers

Quick Fix in an interactive installation by Dries Depoorter. The artwork makes it possible to buy followers or likes in just a few seconds. For a few euros you already have 200 of likes on Instagram. “Quick Fix “is easy to use. Choose your product, pay and fill in your social media username.

There’s a Raspberry Pi 3B+ in there, along with an Arduino, powering a coin acceptor and some I2C LCD screens. Then there’s a stainless steel heavy-duty keyboard, which we’re lusting after (a spot of Googling unearthed this, which appears to be the same thing, if you’re in the market for a panel-mounted beast of a keyboard).

This piece was commissioned by Pixelache, a cultural association from Helsinki, whose work looks absolutely fascinating if you’ve got a few minutes to browse. Thanks to them and to Dries Depoorter — I have a feeling this won’t be the last of his projects we’re going to feature here.

The post Quick Fix — a vending machine for likes and followers appeared first on Raspberry Pi.


Source: Raspberry Pi – Quick Fix — a vending machine for likes and followers

HeaterMeter, the open-source barbecue controller

We spent the weekend knee-deep in marinade. (Top tip: if you’re brining something big, like a particularly plump chicken, buy a cheap kitchen bin. The depth makes it much easier than juggling near-overflowing buckets. And when you’re finished, you have a spare bin.)

meat

If you’re a serious barbecue jockey, you’ll want to know about Bryan Mayland’s HeaterMeter, a rather nifty open-source controller for your barbecue, built around a Raspberry Pi. Controlling the heat of your setup is key in low, slow cooking and smoking; you can get glorious results very inexpensively (an off-the-shelf equivalent will set you back a few hundred pounds) and have the satisfaction of knowing you built your equipment yourself. Bryan says:

Temperature data read from a standard thermistor (ThermoWorks, Maverick) or thermocouple probe is used to adjust the speed of a blower fan motor mounted to the BBQ grill to maintain a specific set temperature point (setpoint). A servo-operated damper may optionally be employed. Additional thermistor probes are used to monitor food and/or ambient temperatures, and these are displayed on a 16×2 LCD attached to the unit. Buttons or serial commands can be used to adjust configuration of the device, including adjustment of the setpoint or manually regulating fan speeds.

The Raspberry Pi adds a web interface, with graphing, archives, and SMS/email support for alarm notification, which means you can go and splash around in the kids’ paddling pool with a beer rather than spending the day standing over the grill with a temperature probe.

Heatermeter graph output

You can buy a HeaterMeter online, in kit form or pre-assembled. There’s an incredibly comprehensive wiki available to get you going with the HeaterMeter, and a very straightforward Instructable if you’re just looking for a quick setup. If you’re the type who prefers to learn by watching, Bryan also has a few videos on YouTube where he puts the kit together. To start with, see how to assemble the LCD/button board here and the base board here.

We’re hungry.

The post HeaterMeter, the open-source barbecue controller appeared first on Raspberry Pi.


Source: Raspberry Pi – HeaterMeter, the open-source barbecue controller

Toilet Tracker: automated poo-spotting, no cameras

It might be that I am unusually particular here, but there is nothing (absolutely NOTHING) that upsets me more than dirty toilets. Yes, I know this is the epitome of a pampered-person’s phobia. But I have nightmares — honest, actual, recurring nightmares — about horrible toilets, and I’ll plan my day around avoiding public toilets which are likely to be dirty. So this project appealed to me enormously.

Obi-Wan and the Worst Toilet in Scotland

Automating spotting that things are awry in a toilet cubicle without breaching privacy is really tricky. You can’t use a camera, for obvious reasons. Over at Hackster.io, Mohammad Khairul Alam has come up with a solution: he uses a Raspberry Pi hooked up to Walabot, a 3D imaging sensor (the same sort of thing you might use to find pipes behind studwork if you’re doing DIY) to detect one thing: whether there are any…objects in the toilet cubicle which weren’t there earlier.

From a privacy point of view, this is perfect. The sensor isn’t a camera, and it doesn’t know exactly what it’s looking at: just that there’s a thing where there shouldn’t be.

The Walabot is programmed to understand when the toilet is occupied by sensing above seat level; it’s also looking closer to the floor when the cubicle is empty, for seat-smudges, full bowls, and nasty stuff on the floor. (Writing this post is making me all shuddery. Like I said, I really, really have a problem with this.) Here’s a nice back-of-an-envelope explanation of the logic:

There’s a simple Android app to accompany the setup so you can roll out your own if you have an office with an upsetting toilet.

Learn (much) more over at Hackster — thanks to Md. Khairul Alam for the build!

The post Toilet Tracker: automated poo-spotting, no cameras appeared first on Raspberry Pi.


Source: Raspberry Pi – Toilet Tracker: automated poo-spotting, no cameras

Yuri 3 rover | The MagPi #82

In honour of the 50th anniversary of the Apollo moon landing, this year’s Pi Wars was space-themed. Visitors to the two-day event — held at the University of Cambridge in March — were lucky enough to witness a number of competitors and demonstration space-themed robots in action.

Yuri 3 rover

Among the most impressive was the Yuri 3 mini Mars rover, which was designed, lovingly crafted, and operated by Airbus engineer John Chinner. Fascinated by Yuri 3’s accuracy, we got John to give us the inside scoop.

Airbus ambassador

John is on the STEM Ambassador team at Airbus and has previously demonstrated its prototype ExoMars rover, Bridget (you can drool over images of this here: magpi.cc/btQnEw), including at the BBC Stargazing Live event in Leicester. Realising the impressive robot’s practical limitations in terms of taking it out and about to schools, John embarked on a smaller but highly faithful, easily transportable Mars rover. His robot-building experience began in his teens with a six-legged robot he took along to his technical engineering apprenticeship interview and had walk along the desk. Job deftly bagged, he’s been building robots ever since.

Inside the Yuri 3 Mars rover

Yuri is a combination of an Actobotics chassis based on one created by Beatty Robotics plus 3D-printed wheels and six 12 V DC brushed gears. Six Hitec servo motors operate the steering, while the entire rover has an original Raspberry Pi B+ at its heart.

Yuri 3 usually runs in ‘tank steer’ mode. Cannily, the positioning of four of its six wheels at the corners means Yuri 3’s wheels can each be turned so that it spins on the spot. It can also ‘crab’ to the side due to its individually steerable wheels.

Servo motors

The part more challenging for home users is the ‘gold thermal blanket’. The blanket ensures that the rover can maintain working temperature in the extreme conditions found on Mars. “I was very fortunate to have a bespoke blanket made by the team who make them for satellites,” says John. “They used it as a training exercise for the apprentices.”

John has made some bookmarks from the leftover thermal material which he gives away to schools to use as prizes.

Yuri 3 rover thermal blanket samples

Rover design

While designing Yuri 3, it probably helped that John was able to sneak peeks of Airbus’s ExoMars prototypes being tested at the firm’s Mars Yard. (He once snuck Yuri 3 onto the yard and gave it a test run, but that’s supposed to be a secret!) Also, says John, “I get to see the actual flight rover in its interplanetary bio clean room”.

A young girl inspects the Yuri 3 Mars rover

His involvement with all things Raspberry Pi came about when he was part of the Astro Pi programme, in which students send code to two Raspberry Pi devices aboard the International Space Station every year. “I did the shock, vibration, and EMC testing on the actual Astro Pi units in Airbus, Portsmouth,” John proudly tells us.

A very British rover

As part of the European Space Agency mission ExoMars, Airbus is building and integrating the rover in Stevenage. “What a fantastic opportunity for exciting outreach,” says John. “After all the fun with Tim Peake’s Principia mission, why not make the next British astronaut a Mars rover? … It is exciting to be able to go and visit Stevenage and see the prototype rovers testing on the Mars Yard.”

The Yuri 3 Mars rover

John also mentions that he’d love to see Yuri 3 put in an appearance at the Raspberry Pi Store; in the meantime, drooling punters will have to build their own Mars rover from similar kit. Or, we’ll just enjoy John’s footage of Yuri 3 in action and perhaps ask very nicely if he’ll bring Yuri along for a demonstration at an event or school near us.

John wrote about the first year of his experience building Yuri 3 on his blog. And you can follow the adventures of Yuri 3 over on Twitter: @Yuri_3_Rover.

Read the new issue of The MagPi

This article is from today’s brand-new issue of The MagPi, the official Raspberry Pi magazine. Buy it from all good newsagents, subscribe to pay less per issue and support our work, or download the free PDF to give it a try first.

Cover of The MagPi issue 82

The post Yuri 3 rover | The MagPi #82 appeared first on Raspberry Pi.


Source: Raspberry Pi – Yuri 3 rover | The MagPi #82