It’s GCSE results day!

Today is GCSE results day, and with it comes the usual amount of excitement and trepidation as thousands of young people in the UK find out whether they got the grades they wanted. So here’s a massive CONGRATULATIONS from everyone at the Raspberry Pi Foundation to all the students out there who have worked so hard to get their GCSEs, A levels, B-Techs, IBs, and a host of other qualifications.

We also want to highlight the efforts of the amazing teachers who have spent countless hours thinking up new ways to bring their subjects to life and inspire the next generation.

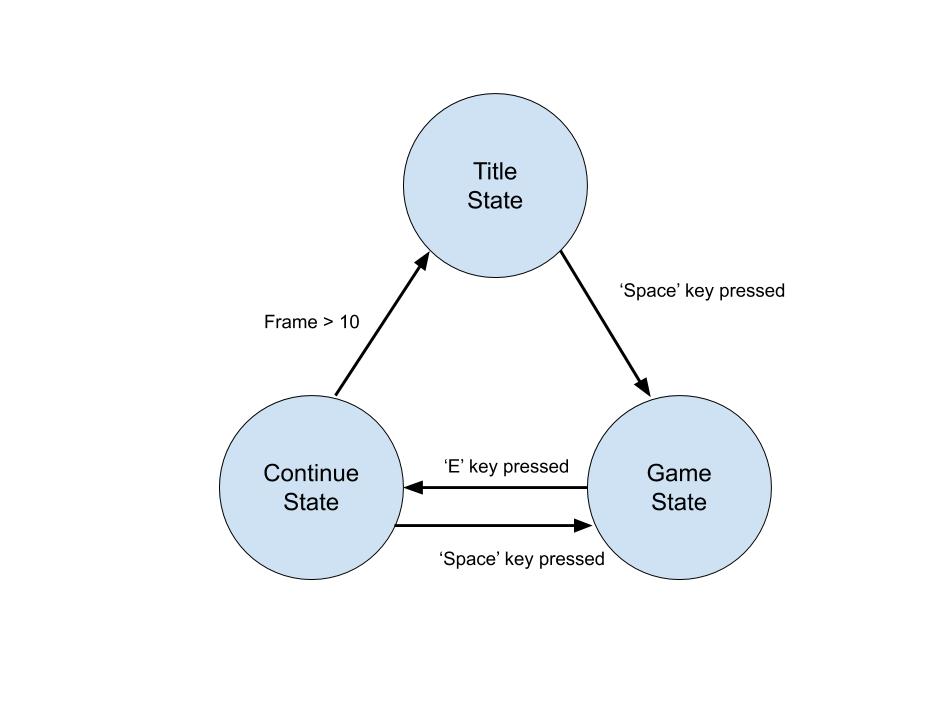
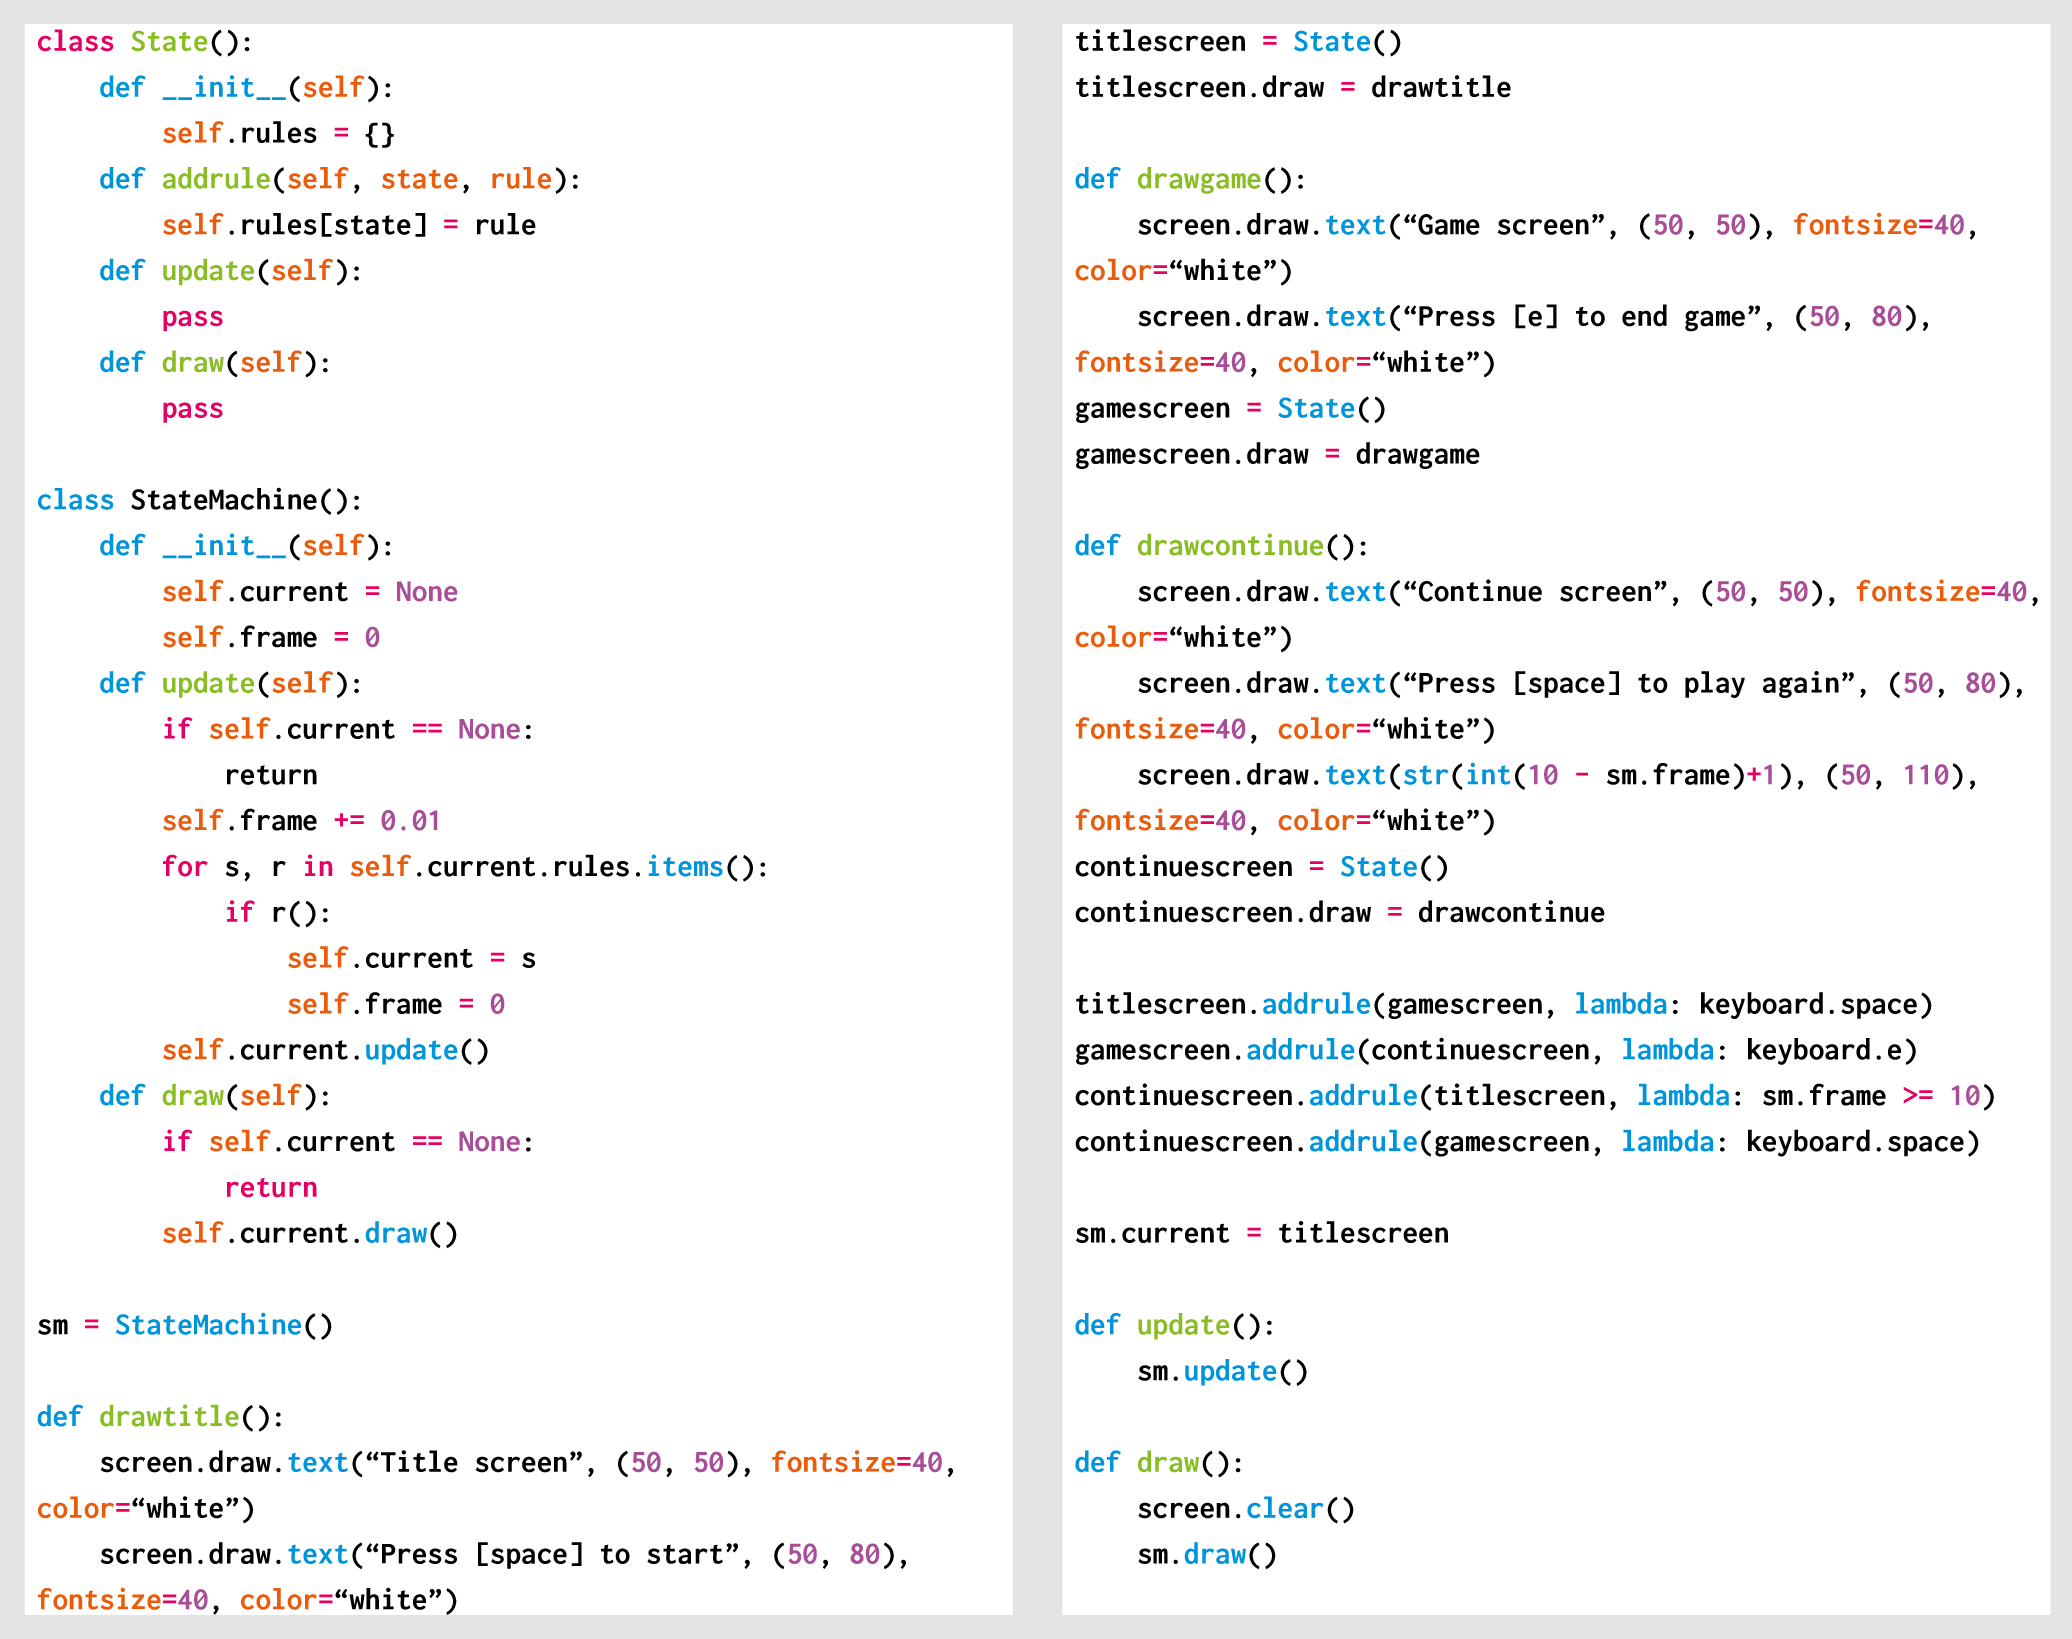
Looking at the initial data from the Department for Education, it’s clear that:

  • The number of students entering the Computer Science GCSE has gone up by 7.6%, so this is the sixth year running that the subject has gained popularity — great news!
  • The number of girls entering the Computer Science GCSE has grown by 14.5% compared to last year!
  • The proportion of Computer Science GCSE students achieving top grades (9 to 7) has gone up, and there’s been an even bigger increase in the proportion achieving a good pass (9 to 4) — amazing!

Views from teachers

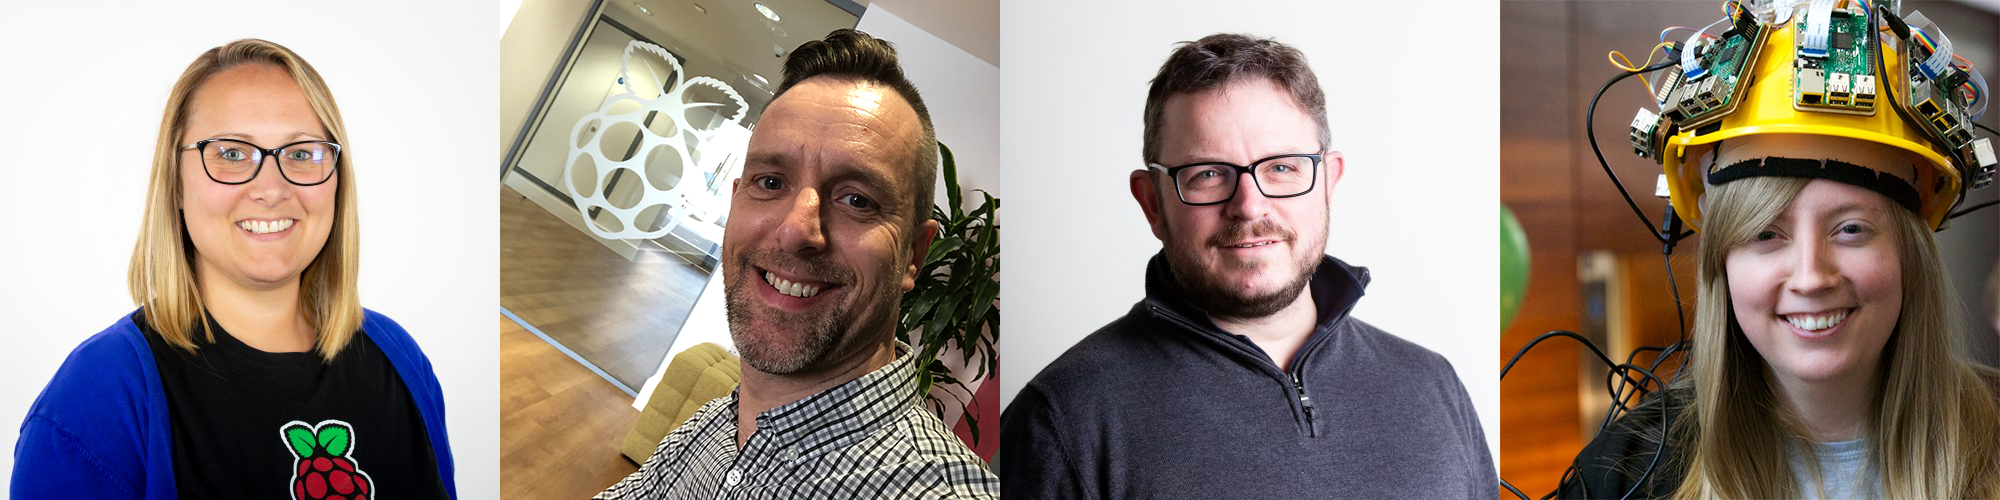
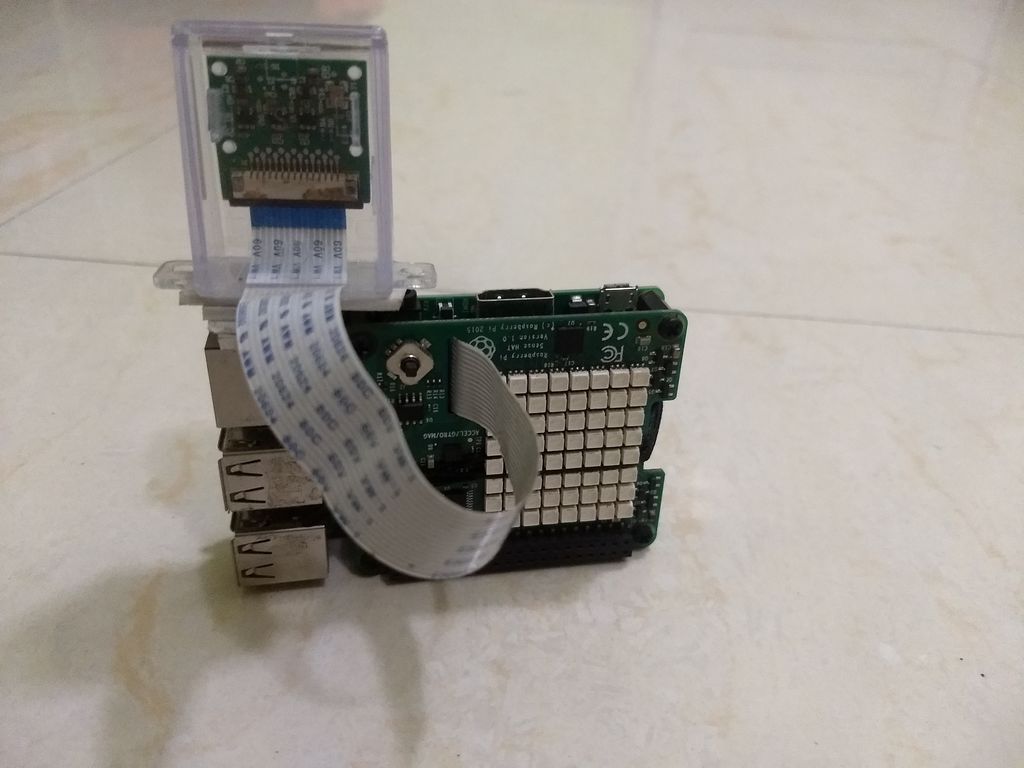
From L to R: Rebecca Franks, Allen Heard, Ben Hall, Carrie Anne Philbin

I caught up with four former teachers on our team to reflect on these findings and their own experiences of results days…

What thoughts and emotions are going through your head as a teacher on results day?

Ben: It’s certainly a nerve-wracking time! You hope that your students have reached the potential that you know that they are capable of. You log onto the computer the second you wake up to see if you’ve got access to the exam boards results page yet. It was always great being there to see their faces, to give them a high five, and to support them with working out their options going forward.

Rebecca: I think that head teachers want you to be worried about targets and whether you’ve met them, but as a teacher, when you look at each individual students’ results, you see their journey, and you know how much effort they’ve put in. You are just really proud of how well they have done, and it’s lovely to have those post-results conversations and celebrate with them. It makes it all worth it.

Allen: I liken the feeling to that of an expectant father! You have done as much as you can to make sure things run smoothly, you’ve tried to keep all those involved calm, and now the moment is here and you just want everything to be OK.

Carrie Anne: As a teacher, I always felt both nerves and excitement for results day, probably more so than my students did. Sleepless nights in the run-up to the big day were common! But I always enjoyed seeing my students, who I’d worked with since they were youngsters, see the culmination of their hard work into something useful. I always felt proud of them for how far they’d come.

There has been an increased uptake of students taking computing-related subjects at GCSE since last year. What do you think about this?

Ben: It’s great news and shows that schools are realising how important the subject is to prepare our young people for the future workplace.

Carrie Anne: It’s a sign that our message — that all students should have access to a Computing qualification of rigour, and that there is a willing and ready audience hungry for the opportunity to study Computing at a deeper level — is making traction. My hope is to see this number increase as teachers take part in the free National Centre for Computing Education professional development and certification over the coming years.

Rebecca: I think it’s a step in the right direction, but we definitely have a long way to go. We must make sure that computing is at the forefront of any curriculum model in our secondary schools, which is why the National Centre for Computing Education is so important. In particular, we must support schools in ensuring that KS3 computing is given the time it needs to give students the grounding for GCSE.

Allen: I agree with Rebecca: more needs to be done about teacher training and helping schools see the overall benefit to students in undertaking such subjects. Schools that are investing time in nurturing these subjects in their curriculum provision are seeing them become more popular and enjoying success. Patience is the key for senior leadership teams, and teachers need support and to have confidence in their ability to continue to deliver the subject.

Why is it important that more students learn about computing?

Rebecca: Computing feeds into so much of our everyday lives, and we must prepare our young people for a world that doesn’t exist yet. Computing teaches you logical thinking and problem-solving. These skills are transferable and can be used in all sorts of situations. Computing also teaches you essential digital literacy skills that can help you keep safe whilst using online tools.

Ben: For me, it’s really important that young people pick this subject to help them understand the world around them. They’ll hopefully then be able to see the potential of computing as a power for good and harness it, rather than becoming passive consumers of technology.

Carrie Anne: Following on from what Ben said, I also think it’s important that technology developed in the future reflects the people and industries using it. The tech industry needs to become more diverse in its workforce, and non-technical fields will begin to use more technology in the coming years. If we equip young people with a grounding in computing, they will be equipped to enter these fields and find solutions to technical solutions without relying on a small technical elite.

Imagine I’m a GCSE student who has just passed my Computer Science exams. What resources should I look at if I want to learn more about computing with the Raspberry Pi Foundation for free?

Rebecca: Isaac Computer Science would be the best place to start, because it supports students through their A level Computer Science. If you wanted to experiment and try some physical computing, then you could take a look at the Projects page of the Raspberry Pi Foundation website. You can filter this page by ‘Software type: Python’ and find some ideas to keep you occupied!

Allen: First and foremost, I would advise you to keep your hard-earned coding skills on point, as moving on to the next level of complexity can be a shock. Now is the time to start building on your already sound knowledge and get prepared for A level Computer Science in September. Isaac Computer Science would be a great place to start to undertake some further learning over the summer and prime yourself for further study.

Ben: Same as Rebecca and Allen, I’d be telling you to get started with Isaac Computer Science too. The resources that are being provided for free are second to none, and will really help you get a good feel for what A level Computer Science is all about.

Carrie Anne: Beyond the Raspberry Pi projects site and Isaac Computer Science, I’d recommend getting some face-to-face experience. Every year the Python community holds a conference that’s open to everyone. It’s a great opportunity to meet new people and learn new skills. PyConUK 2019 is taking place in September and has bursaries to support people in full-time education to attend.

We’ve been working on providing support for secondary and GCSE teachers as part of the National Centre for Computing Education this year. Could you talk about the support we’ve got available?

Allen: We’re producing resources to cover the whole range of topics that appear in all the Computing/Computer Science specifications. The aim of these resources is to provide teachers — both experienced and new to the subject — with the support they need to deliver quality, engaging lessons. Founded on sound pedagogical principles and created by a number of well-established teachers, these resources will help reduce workload and increase productivity for teachers, and increase engagement of students. This will ultimately result in some fantastic out-turns for schools, as well as developing confident computing teachers along the way.

Rebecca: As Allen explained, we are busy creating new, free teaching resources for KS3 and GCSE. The units will cover the national curriculum and beyond, and the lessons will be fully resourced. They will be accessible to teachers with varying levels of experience, and there will be lots of support along the way through online courses and face-to-face training if teachers want to know more. Teachers can already take our ‘CS Accelerator’ programme, which is extremely popular and has excellent reviews.

Thanks for your time, everyone!

How was your GCSE results day? Are your students, or young people you know, receiving their results today? Tell us about it in the comments below.

The post It’s GCSE results day! appeared first on Raspberry Pi.


Source: Raspberry Pi – It’s GCSE results day!

Retrofit a vintage camera flash with a Raspberry Pi Camera Module

Wanting to break from the standard practice of updating old analogue cameras with digital technology, Alan Wang decided to retrofit a broken vintage camera flash with a Raspberry Pi Zero W to produce a video-capturing action cam.

Raspberry Pi Zero Flash Cam Video Test

Full story of this project: https://www.hackster.io/alankrantas/raspberry-pi-zero-flash-cam-359875

By hacking a somewhat gnarly hole into the body of the broken flash unit, Alan fit in the Raspberry Pi Zero W and Camera Module, along with a few other components. He powers the whole unit via a USB power bank.

At every touch of the onboard touchpad, the retrofit camera films 12 seconds of footage and saves it as an MP4 file on the onboard SD card or an optional USB flash drive.

While the project didn’t technically bring the flash unit back to life — as the flash function is still broken — it’s a nice example of upcycling old tech, and it looks pretty sweet. Plus, you can attach it to your existing film camera to produce some cool side-by-side comparison imagery, as seen in the setup above.

For a full breakdown of the build, including the code needed to run the camera, check out the project’s Hackster.io page.

The post Retrofit a vintage camera flash with a Raspberry Pi Camera Module appeared first on Raspberry Pi.


Source: Raspberry Pi – Retrofit a vintage camera flash with a Raspberry Pi Camera Module

Raspberry Pi summer projects with The MagPi magazine

Take your Raspberry Pi outside for some fun outdoor making with The MagPi magazine’s summer projects feature, available to read now. Right now. Right this second. Go read it…but read the rest of this blog post first. Thanks. #analytics

Digital making outdoors

Sure, there may be a few obstacles in your way whenever you try to complete a digital making project outside. Poor WiFi connections are always a problem, the sun will most certainly glare off your screen, and don’t even get me started on the lack of power supplies. But that’s where The MagPi magazine comes in, providing you with every tip and trick you need to move your making into the fresh air of the great outdoors.

Visit The MagPi magazine’s website, where you’ll be able to download the PDF for free, saving money, time, and trees! Woohoo!

The post Raspberry Pi summer projects with The MagPi magazine appeared first on Raspberry Pi.


Source: Raspberry Pi – Raspberry Pi summer projects with The MagPi magazine

Build your own Raspberry Pi night vision camera

A Raspberry Pi Zero W, Pimoroni HyperPixel screen, and Raspberry Pi IR Camera Module are all you need to build this homemade night vision camera.

How to build a night vision camera

How to build a night vision camera, video showing the process and problems that I came across when building this camera

Raspberry Pi night vison camera

Built into the body of an old camera flash, Dan’s Raspberry Pi night vision camera is a homage to a childhood spent sneaking around the levels of Splinter Cell. Says Dan:

The iconic image from the game is the night vision goggles that Sam Fisher wears. I have always been fascinated by the idea that you can see in the dark and this formed the foundation of my idea to build a portable hand-held night vision piece of equipment.

The camera, running on Raspbian, boasts several handy functions, including touchscreen controls courtesy of the Pimoroni HyperPixel, realtime video and image capture, and a viewing distance of two to five metres.

It’s okay to FAIL

Embracing the FAIL (First Attempt In Learning) principle, Dan goes into detail about the issues he had to overcome while building the camera, which is another reason why we really enjoyed this project. It’s okay to fail when trying your hand at digital making, because you learn from your mistakes! Dan’s explanations of the struggles he faced and how he overcame them are 👌.

For a full rundown of the project and tips on building your own, check out its Hackster.io page.

The post Build your own Raspberry Pi night vision camera appeared first on Raspberry Pi.


Source: Raspberry Pi – Build your own Raspberry Pi night vision camera

Scratch 3 Desktop for Raspbian on Raspberry Pi

You can now install and use Scratch 3 Desktop for Raspbian on your Raspberry Pi!

Scratch 3

Scratch 3 was released in January this year, and since then we and the Scratch team have put lots of work into creating an offline version for Raspberry Pi.

The new version of Scratch has a significantly improved interface and better functionality compared to previous versions. These improvements come at the cost of needing more processing power to run. Luckily, Raspberry Pi 4 has delivered just that, and with the software improvements in the newest version of Raspbian, Buster, we can now deliver a reliable Scratch 3 experience on our computer.

Which Raspberry Pi can I use?

Scratch 3 needs at least 1GB of RAM to run, and we recommend a Raspberry Pi 4 with at least 2GB RAM. While you can run Scratch 3 on a Raspberry Pi 2, 3, 3B+, or a Raspberry 4 with 1GB RAM, performance on these models is reduced, and depending on what other software you run at the same time, Scratch 3 may fail to start due to lack of memory.

The Scratch team is working to reduce the memory requirements of Scratch 3, so we will hopefully see improvements to this soon.

How to install Scratch 3

You can only install Scratch 3 on Raspbian Buster.

First, update Raspbian!

  • If you’ve yet to upgrade to Raspbian Buster, we recommend installing a fresh version of Buster onto your SD card instead of upgrading from your current version of Raspbian.
  • If you’re already using Raspbian Buster, but you’re not sure your running the latest version, update Buster by following this tutorial:

How to update Raspbian on your Raspberry Pi

How to update to the latest version of Raspbian on your Raspberry Pi.

Once you’re running the latest version of Buster, you can install Scratch 3 either using the Recommended Software application or apt on the terminal.

How to install Scratch 3 using the Recommended Software app

Open up the menu, click on Preferences > Recommended Software, and then select Scratch 3 and click on OK.

How to install Scratch 3 using the terminal

Open a terminal window, and type in and run the following commands:

sudo apt-get update
sudo apt-get install scratch3

What can I do with Scratch 3 and Raspberry Pi?

Scratch 3 Desktop for Raspbian comes with new extensions to allow you to control the GPIO pins and Sense HAT with Scratch code!

GPIO extension

GPIO extension is a replacement for the existing extension in Scratch 2. Its layout and functionality is very similar, so you can use it as a drop-in replacement.

The GPIO extension gives you the flexibility to connect and control a whole host of electronic devices.

Simple Electronics extension

If you are looking to add something simple, like an LED or button controller for a game, you should find the new Simple Electronics extension easier to use than the GPIO extension. The Simple Electronics extension is the first version of a beginner-friendly extension for interacting with Raspberry Pi’s GPIO pins. Taking lessons from the implementation of gpiozero for Python, this new extension provides a simpler way of using electronic components: currently buttons and LEDs.

In this example, an LED connected to GPIO pin 17 is controlled by a button connected between pin 2 and GND.

Sense HAT extension

We’ve improved the Sense HAT extension to take advantage of new features in Scratch 3, and the updated version of the extension also introduces a number of new blocks to allow you to:

  • Sense tilting, shaking, and orientation
  • Use the joystick
  • Measure temperature, pressure, and humidity
  • Display text, characters, and patterns on the LED matrix

micro:bit and LEGO extensions

The micro:bit and LEGO extensions will become available later on Scratch 3 Desktop. This is because Scratch Link, the software which allows Scratch to talk to Bluetooth devices, is not yet available for Linux-type operating systems like Raspbian. A version of Scratch Link for Raspbian is part of our plans but, as yet, we don’t have a release date.

A round of thanks

It has been a long ambition of both the Scratch and Raspberry Pi teams to have Scratch 3 running on Raspberry Pi, and it’s amazing to see it released!

A big thank you to Raspberry Pi engineer Simon Long for building and packaging Scratch 3, and to the Scratch team for their support in getting over some of the problems we faced along the way.

The post Scratch 3 Desktop for Raspbian on Raspberry Pi appeared first on Raspberry Pi.


Source: Raspberry Pi – Scratch 3 Desktop for Raspbian on Raspberry Pi

Code your own 2D shooting gallery in Python | Wireframe issue 20

Raspberry Pi’s own Rik Cross shows you how to hit enemies with your mouse pointer as they move around the screen.

Duck Hunt made effective use of the NES Zapper, and made a star of its sniggering dog, who’d pop up to heckle you between stages.

Clicky Clicky Bang Bang

Shooting galleries have always been a part of gaming, from the Seeburg Ray-O-Lite in the 1930s to the light gun video games of the past 40 years. Nintendo’s Duck Hunt — played with the NES Zapper — was a popular console shooting game in the early eighties, while titles such as Time Crisis and The House of the Dead kept the genre alive in the 1990s and 2000s.

Here, I’ll show you how to use a mouse to fire bullets at moving targets. Code written to instead make use of a light gun and a CRT TV (as with Duck Hunt) would look very different. In these games, pressing the light gun’s trigger would cause the entire screen to go black and an enemy sprite to become bright white. A light sensor at the end of the gun would then check whether the gun is pointed at the white sprite, and if so, would register a hit. If more than one enemy was on the screen when the trigger was pressed, each enemy would flash white for one frame in turn, so that the gun would know which enemy had been hit.

Our simple shooting gallery in Python. You could try adding randomly spawning ducks, a scoreboard, and more.

Pygame Zero

I’ve used two Pygame Zero event hooks for dealing with mouse input. Firstly, the on_mouse_move() function updates the position of the crosshair sprite whenever the mouse is moved. The on_mouse_down() function reacts to mouse button presses, with the left button being pressed to fire a bullet (if numberofbullets > 0) and the right button to reload (setting numberofbullets to MAXBULLETS).

Each time a bullet is fired, a check is made to see whether any enemy sprites are colliding with the crosshair — a collision means that an enemy has been hit. Luckily, Pygame Zero has a colliderect() function to tell us whether the rectangular boundary around two sprites intersects.

If this helper function wasn’t available, we’d instead need to use sprites’ x and y coordinates, along with width and height data (w and h below) to check whether the two sprites intersect both horizontally and vertically. This is achieved by coding the following algorithm:

  • Is the left-hand edge of sprite 1 further left than the right-hand edge of sprite 2 (x1 < x2+w2)?
  • Is the right-hand edge of sprite 1 further right than the left-hand edge of sprite 2 (x1+w1 > x2)?
  • Is the top edge of sprite 1 higher up than the bottom edge of sprite 2 (y1 < y2+h2)?
  • Is the bottom edge of sprite 1 lower down than the top edge of sprite 2 (y1+h1 > y2)?

If the answer to the four questions above is True, then the two sprites intersect (see Figure 1). To give visual feedback, hit enemies briefly remain on the screen (in this case, 50 frames). This is achieved by setting a hit variable to True, and then decrementing a timer once this variable has been set. The enemy’s deleted when the timer reaches 0.

Figure 1: A visual representation of a collision algorithm, which checks whether two sprites intersect.

As well as showing an enemy for a short time after being hit, successful shots are also shown. A problem that needs to be overcome is how to modify an enemy sprite to show bullet holes. A hits list for each enemy stores bullet sprites, which are then drawn over enemy sprites.

Storing hits against an enemy allows us to easily stop drawing these hits once the enemy is removed. In the example code, an enemy stops moving once it has been hit.

If you don’t want this behaviour, then you’ll also need to update the position of the bullets in an enemy’s hits list to match the enemy movement pattern.

When decrementing the number of bullets, the max() function is used to ensure that the bullet count never falls below 0. The max() function returns the highest of the numbers passed to it, and as the maximum of 0 and any negative number is 0, the number of bullets always stays within range.

There are a couple of ways in which the example code could be improved. Currently, a hit is registered when the crosshair intersects with an enemy — even if they are barely touching. This means that often part of the bullet is drawn outside of the enemy sprite boundary. This could be solved by creating a clipping mask around an enemy before drawing a bullet. More visual feedback could also be given by drawing missed shots, stored in a separate list.

Here’s Rik’s code, which lets you hit enemies with your mouse pointer. To get it running on your system, you’ll first need to install Pygame Zero. And to download the full code, go here.

Get your copy of Wireframe issue 20

You can read more features like this one in Wireframe issue 20, available now at Tesco, WHSmith, and all good independent UK newsagents.

Or you can buy Wireframe directly from Raspberry Pi Press — delivery is available worldwide. And if you’d like a handy digital version of the magazine, you can also download issue 20 for free in PDF format.

Make sure to follow Wireframe on Twitter and Facebook for updates and exclusive offers and giveaways. Subscribe on the Wireframe website to save up to 49% compared to newsstand pricing!

The post Code your own 2D shooting gallery in Python | Wireframe issue 20 appeared first on Raspberry Pi.


Source: Raspberry Pi – Code your own 2D shooting gallery in Python | Wireframe issue 20

10,000 sticker pack giveaway

Would you like a Raspberry Pi sticker pack? We’re giving away a whopping 10,000 sticker packs to the first 10,000 people who fill in the form at the bottom of this post.

But before you do that, please read the following guidelines.

Giveaway guidelines

Please:

  • Only fill in the form once, to give as many people as possible the chance to get their hands on a sticker pack. We will ignore duplicate entries.
  • Fill in all the boxes, otherwise we may not be able to get your sticker pack to you.
  • Include your email address so we can follow up with you if we encounter issues with postage. We won’t use your email address for any other reason.
  • Include a postal address you will have access to for at least the next two months, since it may take up to two months for the sticker pack to reach you.
  • All entries must be submitted by 1 September 2019.

We’ll only use your details for this giveaway. All data you enter into the form will be permanently deleted after two months.

It may take until 15 October for your sticker pack to reach you. Please do not contact us before that date to enquire about your stickers.

  • MrMrsMissMsMx.DrProf.Rev.


  • AfghanistanÅland IslandsAlbaniaAlgeriaAmerican SamoaAndorraAngolaAnguillaAntarcticaAntigua and BarbudaArgentinaArmeniaArubaAustraliaAustriaAzerbaijanBahamasBahrainBangladeshBarbadosBelarusBelgiumBelizeBeninBermudaBhutanBoliviaBonaire, Sint Eustatius and SabaBosnia and HerzegovinaBotswanaBouvet IslandBrazilBritish Indian Ocean TerritoryBrunei DarrussalamBulgariaBurkina FasoBurundiCambodiaCameroonCanadaCape VerdeCayman IslandsCentral African RepublicChadChileChinaChristmas IslandCocos IslandsColombiaComorosCongo, Democratic Republic of theCongo, Republic of theCook IslandsCosta RicaCôte d’IvoireCroatiaCubaCuraçaoCyprusCzech RepublicDenmarkDjiboutiDominicaDominican RepublicEcuadorEgyptEl SalvadorEquatorial GuineaEritreaEstoniaEswatini (Swaziland)EthiopiaFalkland IslandsFaroe IslandsFijiFinlandFranceFrench GuianaFrench PolynesiaFrench Southern TerritoriesGabonGambiaGeorgiaGermanyGhanaGibraltarGreeceGreenlandGrenadaGuadeloupeGuamGuatemalaGuernseyGuineaGuinea-BissauGuyanaHaitiHeard and McDonald IslandsHoly SeeHondurasHong KongHungaryIcelandIndiaIndonesiaIranIraqIrelandIsle of ManIsraelItalyJamaicaJapanJerseyJordanKazakhstanKenyaKiribatiKuwaitKyrgyzstanLao People’s Democratic RepublicLatviaLebanonLesothoLiberiaLibyaLiechtensteinLithuaniaLuxembourgMacauMacedoniaMadagascarMalawiMalaysiaMaldivesMaliMaltaMarshall IslandsMartiniqueMauritaniaMauritiusMayotteMexicoMicronesiaMoldovaMonacoMongoliaMontenegroMontserratMoroccoMozambiqueMyanmarNamibiaNauruNepalNetherlandsNew CaledoniaNew ZealandNicaraguaNigerNigeriaNiueNorfolk IslandNorth KoreaNorthern Mariana IslandsNorwayOmanPakistanPalauPalestine, State ofPanamaPapua New GuineaParaguayPeruPhilippinesPitcairnPolandPortugalPuerto RicoQatarRéunionRomaniaRussiaRwandaSaint BarthélemySaint HelenaSaint Kitts and NevisSaint LuciaSaint MartinSaint Pierre and MiquelonSaint Vincent and the GrenadinesSamoaSan MarinoSao Tome and PrincipeSaudi ArabiaSenegalSerbiaSeychellesSierra LeoneSingaporeSint MaartenSlovakiaSloveniaSolomon IslandsSomaliaSouth AfricaSouth GeorgiaSouth KoreaSouth SudanSpainSri LankaSudanSurinameSvalbard and Jan Mayen IslandsSwedenSwitzerlandSyriaTaiwanTajikistanTanzaniaThailandTimor-LesteTogoTokelauTongaTrinidad and TobagoTunisiaTurkeyTurkmenistanTurks and Caicos IslandsTuvaluUgandaUkraineUnited Arab EmiratesUnited KingdomUnited StatesUruguayUS Minor Outlying IslandsUzbekistanVanuatuVenezuelaVietnamVirgin Islands, BritishVirgin Islands, U.S.Wallis and FutunaWestern SaharaYemenZambiaZimbabwe

jQuery(document).bind(‘gform_post_render’, function(event, formId, currentPage){if(formId == 69) {} } );jQuery(document).bind(‘gform_post_conditional_logic’, function(event, formId, fields, isInit){} ); jQuery(document).ready(function(){jQuery(document).trigger(‘gform_post_render’, [69, 1]) } );

The post 10,000 sticker pack giveaway appeared first on Raspberry Pi.


Source: Raspberry Pi – 10,000 sticker pack giveaway

Build a Raspberry Pi music box with Sally Le Page

Connecting buttons to the GPIO pins of your Raspberry Pi instantly opens up your digital making to the world of clicky funtimes.

Sally Le Page

Our Music Box project teaches you how to connect several buttons to your Raspberry Pi and write code to make them trigger cool sound effects.

It’s fun. It’s easy. And we roped Sally Le Page into helping us show you how you can do it yourself, in your own home!

Here Sally is, and here’s the link to the updated online project for you to get stuck into.

Build a Raspberry Pi music box ft. Dr Sally Le Page

Subscribe to our YouTube channel: http://rpf.io/ytsub Help us reach a wider audience by translating our video content: http://rpf.io/yttranslate Buy a Raspberry Pi from one of our Approved Resellers: http://rpf.io/ytproducts Find out more about the #RaspberryPi Foundation: Raspberry Pi http://rpf.io/ytrpi Code Club UK http://rpf.io/ytccuk Code Club International http://rpf.io/ytcci CoderDojo http://rpf.io/ytcd Check out our free online training courses: http://rpf.io/ytfl Find your local Raspberry Jam event: http://rpf.io/ytjam Work through our free online projects: http://rpf.io/ytprojects Do you have a question about your Raspberry Pi?

The post Build a Raspberry Pi music box with Sally Le Page appeared first on Raspberry Pi.


Source: Raspberry Pi – Build a Raspberry Pi music box with Sally Le Page

Real-time train station departure board

All across the UK, you’ll find train departure boards on station platforms that look like this:

They’ve looked this way for as long as I can remember (before they were digital dot-matrix displays, they were made from those flappy bits of plastic with letters of the alphabet and numbers printed on them, which whirled round like a Rolodex; they still look very similar). If you’re a frequent train traveller in the UK, you probably have a weird emotional response to seeing one of these. Mine is largely one of panic about being late.

Some people have a more…benign relationship with trains than I do, like Chris Crocker-White, who has adapted a build tweeted by Chris Hutchinson to make a miniature departure board for his desk. Here’s the tweet that started it all:

Chris Hutchinson on Twitter

Pretty hyped about my most recent @Raspberry_Pi project – a realistic, real-time, train departure board I’ve open sourced the software over at: https://t.co/vGQzagsSpi Next step: find a case and make it a permanent fixture! https://t.co/HEXgzdH8TS

Chris C-W’s build is similar, but has a couple of very neat upgrades, including some back-end software work (his build runs in Docker on balenaCloud, to make configuration easier), and some work on the display, which he’s tweaked to use 1:1 pixel mapping of the fonts and avoid any scaling, so the tiny board looks more like the dot-matrix LED displays you’ll see when you visit the station. You can see the difference in the image below:


Chris seems to be using his board as a piece of desktop furniture, where it looks terrific, but model train or narrow-gauge enthusiasts should be all over this project too; it’s a lovely way to inject some realism into a miniature setup. You can find a very complete guide to making your own here.

Now, if you’ll excuse me, I have a train to catch.


The post Real-time train station departure board appeared first on Raspberry Pi.


Source: Raspberry Pi – Real-time train station departure board

Use PlayStation Buzz! controllers with a Raspberry Pi

Buzz! was a favourite amongst my university housemates and me. With popular culture questions asked by an animated Jason Donovan, answered using real-life quiz controllers with a big red button, what’s not to like?

But, as with most of the tech available in the early 2000s, my Buzz! controllers now sit in a box somewhere, dusty and forgotten.

That’s why it is so goshdarn delightful to see PiMyLifeUp breathe new life into these awesome-looking games controllers.

Bringing Buzz! back

The tutorial uses the hidapi library to communicate with the controllers, allowing them to control functions through the Raspberry Pi, and the Raspberry Pi to control the LED within the big red button.

By the end of this tutorial, you will have learned how to read information about all your USB devices, learned how to read data that the devices are sending back and also how to write a library that will act as a simple wrapper to dealing with the device.

Aside from the Buzz! controllers, available on eBay or similar for a few pounds, you only need a Raspberry Pi and its essential peripherals to get started, as the controllers connect directly via USB — thanks, Buzz!

PiMyLifeUp’s tutorial is wonderfully detailed, explaining the hows and whys of the lines of code needed to turn your old Buzz! controllers into a quiz game written in Python that uses the coloured buttons to answer multiple-choice questions.

Guitar Hero, dance mats, Donkey Kong Bongos — what other gaming peripherals would you like to bring back to life?

The post Use PlayStation Buzz! controllers with a Raspberry Pi appeared first on Raspberry Pi.


Source: Raspberry Pi – Use PlayStation Buzz! controllers with a Raspberry Pi

We asked our engineers your Raspberry Pi 4 questions…

We collected some of the most common Raspberry Pi 4 questions asked by you, our community, and sat down with Eben Upton, James Adams, and Gordon Hollingworth to get some answers.

Raspberry Pi 4 Q&A

We grilled our engineers with your Raspberry Pi 4 questions Subscribe to our YouTube channel: http://rpf.io/ytsub Help us reach a wider audience by translating our video content: http://rpf.io/yttranslate Buy a Raspberry Pi from one of our Approved Resellers: http://rpf.io/ytproducts Find out more about the #RaspberryPi Foundation: Raspberry Pi http://rpf.io/ytrpi Code Club UK http://rpf.io/ytccuk Code Club International http://rpf.io/ytcci CoderDojo http://rpf.io/ytcd Check out our free online training courses: http://rpf.io/ytfl Find your local Raspberry Jam event: http://rpf.io/ytjam Work through our free online projects: http://rpf.io/ytprojects Do you have a question about your Raspberry Pi?

Do you have more questions about our new board or accessories? Leave them in the comments of our YouTube video, or in the comments below, and we’ll collect some of the most commonly asked questions together for another Q&A session further down the line.

The post We asked our engineers your Raspberry Pi 4 questions… appeared first on Raspberry Pi.


Source: Raspberry Pi – We asked our engineers your Raspberry Pi 4 questions…

Pulling shower thoughts from Reddit for a Raspberry Pi e-paper display

The Reddit users among you may already be aware of the Shower Thoughts subreddit. For those of you who aren’t, Shower Thoughts is where people go to post the random epiphanies they’ve had about life, the universe, and everything. For example:

YouTuber ACROBOTIC is a fan of the Shower Thoughts subreddit. So much so that they decided to program their Raspberry Pi to update an e-paper HAT with the subreddit’s top posts from the last hour.

Raspberry Pi 4 Scrape JSON Data w/ Python And Display It On e-Paper | reddit /r/showerthoughts

$2 for PCB prototype (any color): https://jlcpcb.com/ ========== * Your support helps me post videos more frequently: https://www.patreon.com/acrobotic https://www.paypal.me/acrobotic https://buymeacoff.ee/acrobotic BTC: 1ZpLvgETofMuzCaKoq5XJZKSwe5UNkwLM ========== * Find me on: https://twitter.com/acrobotic https://facebook.com/acrobotic https://instagram.com/acrobotic ========== * Parts & supplies: https://acrobotic.com/shop https://amazon.com/shops/acrobotic ========== In another video we setup a Raspberry Pi to control an e-Paper/e-Ink HAT and running demo code.

For their build, they used a three-colour e-paper display, but you can use any e-paper add-on for Raspberry Pi to recreate the project. They also used Raspberry Pi 4, but again, this project will work with other models — even Raspberry Pi Zero W.

ACROBOTIC created an image to frame the Shower Thoughts posts, which they uploaded to their Raspberry Pi as a .bmp file. They altered prewritten code for using the e-paper display to display this frame image and the various posts.

Adding .json to the URL of the appropriate Shower Thoughts page allows access to the posts in JSON format. Then a request can be set up to pull the data from this URL.

ACROBOTIC goes into far more detail in their video, and it’s a great resource if you’re looking to try out working with JSON files or to learn how to pull data from Reddit.

Find more projects using e-paper displays for you to recreate in our handy guide.

The post Pulling shower thoughts from Reddit for a Raspberry Pi e-paper display appeared first on Raspberry Pi.


Source: Raspberry Pi – Pulling shower thoughts from Reddit for a Raspberry Pi e-paper display

Raspberry Pi Sense HAT impact recorder for your car

Let the accelerometer and gyroscope of your Raspberry Pi Sense HAT measure and record impact sustained in a car collision.

Raspberry Pi Sense HAT

The Raspberry Pi Sense HAT was originally designed for the European Astro Pi Challenge, inviting schoolchildren to code their own experiments for two Raspberry Pi units currently orbiting the Earth upon the International Space Station.

The Sense HAT is kitted out with an 8×8 RGB LED matrix and a five-button joystick, and it houses an array of useful sensors, including an accelerometer and gyroscope.

And it’s these two sensors that Instructables user Ashu_d has used for their Impact Recorder for Vehicles.

Impact Recorder for Vehicles

“Impact Recorder is designed to record impact sustained to a vehicle while driving or stationary,” Ashu_d explains. Alongside the Raspberry Pi and Sense HAT, the build also uses a Raspberry Pi Camera Module to record footage, saving video and/or picture files to the SD card for you to examine after a collision. “The impacts are stored in the database in the form of readings as well as video/picture.”

By following Ashu_d’s Instructables tutorial, you’re essentially building yourself a black box for your car, recording impact data as the Sense HAT records outside the standard parameters of your daily commute.

“Upon impact, remote users can be verified in real time,” they continue, “and remote users can then watch the saved video or take remote access to the Pi Camera Module and watch events accordingly.”

Ashu_d goes into great detail on how to use Node-RED and MQTT to complete the project, how you can view video in real time using VLC, and how each element works to create the final build over at Instructables.

The post Raspberry Pi Sense HAT impact recorder for your car appeared first on Raspberry Pi.


Source: Raspberry Pi – Raspberry Pi Sense HAT impact recorder for your car

Playing Snake on a Raspberry Pi word clock

I have a soft spot for Raspberry Pi word clocks. True, they may not be as helpful as your standard clock face if you need to tell the time super quickly, but at least they’re easier to read than this binary clock built by engineerish.

“But Alex,” I hear you cry, “word clocks are so done. We’re over them. They’re so 2018. What’s so special about a word clock that you feel it to be worthy of a blog post?”

And the answer, dear reader, is Snake, the best gosh darn game to ever grace the screen of a mobile phone, ever — sorry, Candy Crush.

If you’re looking to build a word clock using your Raspberry Pi, here’s a great tutorial from Benedikt Künzel. And, if you’re looking to upgrade said word clock to another level and introduce it to Snake, well, actually, there isn’t a tutorial for that, yet, but there’s a whole conversation going on about it on Reddit, so you should check that out.

There is, however, a tutorial for coding your own game of Snake Slug on the Raspberry Pi Sense HAT here. So give that a whirl!

Until tomorrow, fair reader, adieu.

The post Playing Snake on a Raspberry Pi word clock appeared first on Raspberry Pi.


Source: Raspberry Pi – Playing Snake on a Raspberry Pi word clock

Rather lovely Raspberry Pi time lapses

Having just sat and watched this gorgeous time lapse of a Finnish lake, we thought it would be nice to finish off the working week with a collection of lovely Raspberry Pi Camera Module time lapses.

Summer over a Finnish lake

Summer time lapse over a Finnish lake.

Time lapse over a Finnish lake from July 2019. Shot with a DIY all-weather HDR time-lapse camera built from ZWO ASI 224MC and Raspberry Pi 3. The camera was built to function as an all-sky camera for recording the night sky year round but since in July the stars were not visible in Finland I decided to test it aimed horizontally over a lake and was positively surprised about the results.

Time-lapse over a Finnish lake from July 2019. Shot with a DIY all-weather HDR time-lapse camera built from ZWO ASI 224MC and Raspberry Pi 3.

Six days of cress growth

Cress Seeds Growing Raspberry Pi Time Lapse Video

Filmed over 6 days using a Raspberry Pi Zero W and Raspberry Pi Camera. Once photo taken every 5 minutes and then played back at 24 fps. I removed the night time photos and then the images were stitched together using the ‘Stop Motion’ app on an iPhone.

Filmed over 6 days using a Raspberry Pi Zero W and Raspberry Pi Camera. Once photo taken every 5 minutes and then played back at 24 fps.

Growing salad

Salad Growth | Timelapse | Raspberry Pi Camera | PiMeetsPlants

Timelapse about salad growth. Period of Picture Making: 03-04 to 02-05-2016 Camera has shot 2087 pictures in a distance of 20 minutes. Camera: Raspberry Pi Camera Module Music: Valesco – Stay With Me: http://soundcloud.com/valesco_official/stay-with-me Valesco on Soundcloud: http://soundcloud.com/valesco_official My Links: Website: https://pimeetsplants.com Twitter: https://twitter.com/PiMeetsPlants Google+: https://plus.google.com/+Pimeetsplants

I think I have a thing for time-lapse videos of plant growth. They’re just so friggin’ cool!

Skyline time lapse

Skyline Timelapse: Day to Night l SainSmart FOV160° Raspberry Pi Camera

More info : https://www.sainsmart.com/products/wide-angle-fov160-5-megapixel-camera-module-for-raspberry-pi FOLLOW US Twitter: https://twitter.com/Sain_Smart Facebook: https://www.facebook.com/SainSmart/ Instagram: https://www.instagram.com/sainsmart/

A time lapse of slime

PHYSARUM MACHINE

Summer Project 2018 – Computational Arts MA, Goldsmiths University London. Time-lapse footage of Physarum Polycephalum captured with Raspberry Pi and IR camera, slit-scan program in Open Frameworks.

Summer Project 2018 – Computational Arts MA, Goldsmiths University London. Time-lapse footage of Physarum Polycephalum captured with Raspberry Pi and IR camera, slit-scan program in Open Frameworks.

Setting up the Raspberry Pi Store, Cambridge

Setting up the Raspberry Pi Shop, Cambridge

Given that we had access to a bunch of Raspberry Pis, we thought that we should use some of them to get some timelapse footage of the shop being set up. Read more about the Raspberry Pi shop on our blog: http://rpf.io/ytstoreblog

We couldn’t help ourselves. When the time came to set up the Raspberry Pi retail store in Cambridge, we just had to install a time-lapse camera in the corner.

Technically…

While this time lapse wasn’t taken with a Raspberry Pi Camera Module, the slider moving the camera was controlled using Raspberry Pi. That counts, right?

The Burren

The Burren is a karst landscape region in north-west Co. Clare in Ireland. It is one of the largest karst regions in Europe. I have been photographing The Burren over the last 5 years, and recently got into time lapse photography. The Burren was an obvious place for me to do this first video.

The Burren is a karst landscape region in north-west Co. Clare in Ireland. It is one of the largest karst regions in Europe. I have been photographing The Burren over the last 5 years, and recently got into time-lapse photography. The Burren was an obvious place for me to do this first video.

Your turn

Want to set up your own Raspberry Pi time-lapse camera? Our handy guide shows you how.

Do you have a time-lapse video you’d like to share with us? Then please post your link in the comments below.

The post Rather lovely Raspberry Pi time lapses appeared first on Raspberry Pi.


Source: Raspberry Pi – Rather lovely Raspberry Pi time lapses

Create your own arcade-style continue screen | Wireframe #19

Raspberry Pi’s Rik Cross shows you how to create game states, and rules for moving between them.

Ninja Gaiden’s dramatic continue screen. Who would be cruel enough to walk away?

The continue screen, while much less common now, was a staple feature of arcade games, providing an opportunity (for a small fee) to reanimate the game’s hero and to pick up where they left off.

Continue Screens

Games such as Tecmo’s Ninja Gaiden coin-op (known in some regions as Shadow Warriors) added jeopardy to their continue screen, in an effort to convince us to part with our money.

Often, a continue screen is one of many screens that a player may find themselves on; other possibilities being a title screen or an instruction screen. I’ll show you how you can add multiple screens to a game in a structured way, avoiding a tangle of if…else statements and variables.

A simple way of addressing this problem is to create separate update and draw functions for each of these screens, and then switch between these functions as required. Functions are ‘first-class citizens’ of the Python language, which means that they can be stored and manipulated just like any other object, such as numbers, text, and class instances. They can be stored in variables and other data types such as lists and dictionaries, and passed as parameters to (or returned from) other functions.

the continue screen of SNK’s Fantasy

SNK’s Fantasy, released in 1981, was the first arcade game to feature a continue screen.

We can take advantage of the first-class nature of Python functions by storing the functions for the current screen in variables, and then calling them in the main update() and draw() functions. In the following example, notice the difference between storing a function in a variable (by using the function name without parentheses) and calling the function (by including parentheses).

[Ed. comment: We have to use an image here because WordPress doesn’t seem to allow code indentation. We know that’s annoying because you can’t copy and paste the code, so if you know a better solution, please leave us a comment.]

The example code above calls currentupdatefunction() and currentdrawfunction(), which each store a reference to separate update() and draw() functions for the continue screen. These continue screen functions could then also include logic for changing which function is called, by updating the function reference stored in currentupdatefunction and currentdrawfunction.

This way of structuring code can be taken a step further by making use of state machines. In a state machine, a system can be in one of a (finite) number of predefined states, and rules determine the conditions under which a system can transition from one state into another.

Rules define conditions that need to be satisfied in order to move between states.

A state machine (in this case a very simplified version) can be implemented by first creating a core State() class. Each game state has its own update() and draw() methods, and a rules dictionary containing state:rule pairs – references to other state objects linked to functions for testing game conditions. As an example, the continuescreen state has two rules:

  • Transition to the gamescreen state if the SPACE key is pressed;
  • Transition to the titlescreen state if the frame timer reaches 10.

This is pulled together with a StateMachine() class, which keeps track of the current state. The state machine calls the update() and draw() methods for the current state, and checks the rules for transitioning between states. Each rule in the current state’s rules list is executed, with the state machine updating the reference to its current state if the rule function returns True. I’ve also added a frame counter that is incremented by the state machine’s update() function each time it is run. While not a necessary part of the state machine, it does allow the continue screen to count down from 10, and could have a number of other uses, such as for animating sprites.

Something else to point out is the use of lambda functions when adding rules to states. Lambda functions are small, single-expression anonymous functions that return the result of evaluating its expression when called. Lambda functions have been used in this example simply to make the code a little more concise, as there’s no benefit to naming the functions passed to addrule().

State machines have lots of other potential uses, including the modelling of player states. It’s also possible to extend the state machine in this example by adding onenter() and onexit() functions that can be called when transitioning between states.

Here’s Rik’s code, which gets a simple continue screen up and running in Python. To get it working on your system, you’ll need to install Pygame Zero. And to download the full code, visit our Github repository here.

Get your copy of Wireframe issue 19

You can read more features like this one in Wireframe issue 19, available now at Tesco, WHSmith, and all good independent UK newsagents.

Or you can buy Wireframe directly from Raspberry Pi Press — delivery is available worldwide. And if you’d like a handy digital version of the magazine, you can also download issue 19 for free in PDF format.

Make sure to follow Wireframe on Twitter and Facebook for updates and exclusive offers and giveaways. Subscribe on the Wireframe website to save up to 49% compared to newsstand pricing!

The post Create your own arcade-style continue screen | Wireframe #19 appeared first on Raspberry Pi.


Source: Raspberry Pi – Create your own arcade-style continue screen | Wireframe #19

Build Demolition Man’s verbal morality ticketing machine

In the 1993 action movie Demolition Man, Sylvester Stallone stars as a 1990s cop transported to the near-future. Technology plays a central role in the film, often bemusing the lead character. In a memorable scene, he is repeatedly punished by a ticketing machine for using bad language (a violation of the verbal morality statute).

In the future of Demolition Man, an always-listening government machine detects every banned word and issues a fine in the form of a receipt from a wall-mounted printer. This tutorial shows you how to build your own version using Raspberry Pi, the Google Voice API, and a thermal printer. Not only can it replicate detecting banned words, but it also doubles as a handy voice-to-paper stenographer (if you want a more serious use).

Prepare the hardware

We built a full ‘boxed’ project, but you can keep it simple if you wish. Your Raspberry Pi needs a method for listening, speaking, and printing. The easiest solution is to use USB for all three.

After prototyping using Raspberry Pi 4 and various USB devices, we settled on Raspberry Pi Zero W with a small USB mic and Pimoroni Speaker pHAT to save space. A Pico HAT Hacker allowed the connection of both the printer and Speaker pHAT, as they don’t share GPIO pins. This bit of space-saving means we could install the full assembly inside the 3D-printed case along with the printer.

Connect the printer

To issue our receipts we used a thermal printer, the kind found in supermarket tills. This particular model is surprisingly versatile, handling text and graphics.

It takes standard 2.25-inch (57mm) receipt paper, available in rolls of 15 metres. When printing, it does draw a lot of current, so we advise using a separate power supply. Do not attempt to power it from your Raspberry Pi. You may need to fit a barrel connector and source a 5V/1.5A power supply. The printer uses a UART/TTL serial connection, which neatly fits on to the GPIO. Although the printer’s connection is listed as being 5V, it is in fact 3.3V, so it can be directly connected to the ground, TX, and RX pins (physical pins 6, 8, 10) on the GPIO.

Install and configure Raspbian

Get yourself a copy of Raspbian Buster Lite and burn it to a microSD card using a tool like Etcher. You can use the full version of Buster if you wish. Perform the usual steps of getting a wireless connection and then updating to the latest version using sudo apt update && sudo apt -y upgrade. From a command prompt, run sudo raspi-config and go to ‘Interfacing options’, then ‘Enable serial’. When asked if you would like the login shell to be accessible, respond ‘No’. To the next question, ‘Would you like the serial port hardware to be enabled?’, reply ‘Yes’. Now reboot your Raspberry Pi.

Test the printer

Make sure the printer is up and running. Double-check you’ve connected the header to the GPIO correctly and power up the printer. The LED on the printer should flash every few seconds. Load in the paper and make sure it’s feeding correctly. We can talk to the printer directly, but the Python ‘thermalprinter‘ library makes coding for it so much easier. To install the library:

sudo apt install python3-pip
pip3 install thermalprinter

Create a file called printer.py and enter in the code in the relevant listing. Run the code using:

python3 printer.py

If you got a nice welcoming message, your printer is all set to go.

Test the microphone

Once your microphone is connected to Raspberry Pi, check the settings by running:

alsamixer

This utility configures your various sound devices. Press F4 to enter ‘capture’ mode (microphones), then press F6 and select your device from the list. Make sure the microphone is not muted (M key) and the levels are high, but not in the red zone.

Back at the command line, run this command:

arecord -l

This shows a list of available recording devices, one of which will be your microphone. Make a note of the card number and subdevice number.

To make a test recording, enter:

arecord --device=hw:1,0 --format S16_LE --rate 44100 -c1 test.wav

If your card and subdevice numbers were not ‘0,1’, you’ll need to change the device parameter in the above command.

Say a few words, then use CTRL+C to stop recording. Check the playback with:

aplay test.wav

Choose your STT provider

STT means speech to text and refers to the code that can take an audio recording and return recognised speech as plain text. Many solutions are available and can be used in this project. For the greatest accuracy, we’re going to use Google Voice API. Rather than doing the complex processing locally, a compressed version of the sound file is uploaded to Google Cloud and the text returned. However, this does mean Google gets a copy of everything ‘heard’ by the project. If this isn’t for you, take a look at Jasper, an open-source alternative that supports local processing.

Create your Google project

To use the Google Cloud API, you’ll need a Google account. Log in to the API Console at console.developers.google.com. We need to create a project here. Next to ‘Google APIs’, click the drop-down menu, then ‘New Project’. Give it a name. You’ll be prompted to enable APIs for the project. Click the link, then search for ‘speech’. Click on ‘Cloud Speech-to-Text API’, then ‘Enable’. At this point you may be prompted for billing information. Don’t worry, you can have up to 60 minutes of audio transcribed for free each month.

Get your credentials

Once the Speech API is enabled, the screen will refresh and you’ll be prompted to create credentials. This is the info our code needs to be granted access to the speech-to-text API. Click on ‘Create Credentials’ and on the next screen select ‘Cloud Speech-to-text API’. You’re asked if you’re planning to use the Compute Engine; select ‘no’. Now create a ‘service account’. Give it a different name from the one used earlier, change the role to ‘Project Owner’, leave the type of file as ‘JSON’, and click ‘Continue’. A file will be downloaded to your computer; transfer this to your Raspberry Pi.

Test Google recognition

When you’re happy with the recording levels, record a short piece of speech and save it as test.wav. We’ll send this to Google and check our access to the API is working. Install the Google Speech-To-Text Python library:

sudo apt install python3-pyaudio
pip3 install google-cloud-speech

Now set an environment variable that the libraries will use to locate your credentials JSON:

export GOOGLE_APPLICATION_CREDENTIALS="/home/pi/[FILE_NAME].json"

(Don’t forget to replace [FILE_NAME] with the actual name of the JSON file).

Using a text editor, create a file called speech_to_text.py and enter the code from the relevant listing. Then run it:

python3 speech_to_text.py

If everything is working correctly, you’ll get a text transcript back within a few seconds.

Live transcription

Amazingly, Google’s speech-to-text service can also support streaming recognition, so rather than capture-then-process, the audio can be sent as a stream, and a HTTP stream of the recognised text comes back. When there is a pause in the speech, the results are finalised, so then we can send the results to the printer. If all the code you’ve entered so far is running correctly, all you need to do is download the stenographer.py script and start it using:

python3 stenographer.py

You are limited on how long you can record for, but this could be coupled with a ‘push to talk’ button so you can make notes using only your voice!

Banned word game

Back to Demolition Man. We need to make an alarm sound, so install a speaker (a passive one that connects to the 3.5mm jack is ideal; we used a Pimoroni Speaker pHAT). Download the banned.py code and edit it in your favourite text editor. At the top is a list of words. You can change this to anything you like (but don’t offend anyone!). In our list, the system is listening for a few mild naughty words. In the event anyone mentions one, a buzzer will sound and a fine will be printed.

Make up your list and start the game by running:

python3 banned.py

Now try one of your banned words.

Package it up

Whatever you decide to use this project for, why not finish it up with a 3D-printed case so you package up the printer and Raspberry Pi with the recording and playback devices and create a portable unit? Ideal for pranking friends or taking notes on the move!

See if you can invent any other games using voice recognition, or investigate the graphics capability of the printer. Add a Raspberry Pi Camera Module for retro black and white photos. Combine it with facial recognition to print out an ID badge just using someone’s face. Over to you.

The MagPi magazine issue 84

This project was created by PJ Evans for The MagPi magazine issue 84, available now online, from your local newsagents, or as a free download from The MagPi magazine website.

The post Build Demolition Man’s verbal morality ticketing machine appeared first on Raspberry Pi.


Source: Raspberry Pi – Build Demolition Man’s verbal morality ticketing machine

Raspberry Pi internet kill switch

Control the internet in your home with this handy Raspberry Pi Zero W internet kill switch.

Internet Kill Switch!

It’s every teenager’s worst nightmare… no WIFI! I built a standalone wireless Internet Kill Switch that lets me turn the Internet off whenever I want. A Raspberry Pi Zero W monitors the switch and sends an alert via SSH over WIFI to my firewall where another script watches for the alert and turns the external interface off or on.

Internet in my home wasn’t really a thing until I was in my late teens, and even then, there wasn’t that much online fun to be had. Not like there is now, with social media and online gaming and the YouTubes.

If I’d had access to the internet of today in my teens, I’m pretty sure I’d have never been off the thing. And that’s where a button like this would have been a godsend for my mother.

Shared by Nick Donaldson on his YouTube account, the Internet Kill Switch is a Raspberry Pi Zero W–powered emergency button that turns off all internet access in the house — perfect for keeping online activities to a reasonable level. Nick explains:

It’s every teenager’s worst nightmare… no WiFi! I built a standalone wireless Internet Kill Switch that lets me turn the internet off whenever I want. A Raspberry Pi Zero W monitors the switch and sends an alert via SSH over WiFi to my firewall, where another script watches for the alert and turns the external interface off or on. I have challenged the boys to hack it…

The Raspberry Pi Zero W sits snug within the button casing and is powered by a battery. And so that the battery can be continuously recharged, the device sits on a wireless charging pad. Hence, the button is juiced up and ready to go at any time.

I can pick it up, walk around at any time, threaten the teenagers, and shut down the internet whenever I want, hahaha!

While internet service providers are starting to roll out smartphone apps that offer similar functionality, we like the physicality of this button.

Great job, Nick! Please don’t turn off our internet.

The post Raspberry Pi internet kill switch appeared first on Raspberry Pi.


Source: Raspberry Pi – Raspberry Pi internet kill switch

Take a virtual reality tour of the Raspberry Pi Store

Some months back, we received an email from Rob Chinery, explaining that he’d created a virtual reality (VR) tour of the Raspberry Pi Store, Cambridge.

When I heard about the new Raspberry Pi store in Cambridge, I was immediately impressed by the design and aesthetic of the store. I thought it would be a great project to add to my portfolio, so I put together a quick virtual experience based around the store.

Here’s a video for those without VR headsets:

Raspberry Pi Store VR Tour With Narration

A narrated VR tour of the Raspberry Pi Store in Cambridge, U.K.

Cool, right?

Based in New York, Rob hadn’t visited the store at the time and created the walk-through using images and video content that he’d found online.

I had to rely on a few press images from the opening to make the model (which did make things a bit difficult). One of the reasons I decided to build the app is to allow us Pi fans on other continents to virtually experience the store.

Since our initial communications in April, Rob has now managed to visit the store in the flesh, as he explained on Reddit.

Rob has built the tour specifically for mobile VR platforms, and it is available for free on Oculus Go and Gear VR. You can also view it via Testflight on Android and iOS using a cardboard viewer. You can try the Raspberry Pi Store VR tour here. And, if you’re in need of a mobile VR experience for your architectural projects, Rob’s your guy!

In the words of Liz, colour us impressed.

The post Take a virtual reality tour of the Raspberry Pi Store appeared first on Raspberry Pi.


Source: Raspberry Pi – Take a virtual reality tour of the Raspberry Pi Store

Raspberry Pi Zero white noise night light

Many members of the Raspberry Pi team have small children. As such, many members of the Raspberry Pi team are constantly tired and walking around like zombies — loving, productive zombies humming Baby Shark while scrubbing food stains off their clothing.

Whenever a Raspberry Pi project appears on social media that aids parents do the simple things in life — such as getting sleep or finding time to eat, breathe, shower, etc. — it’s an instant hit around the office.

White noise night light for unrelenting children

This is why, while setting up my desk this morning, I heard an “Oooo, white noise nightlight!” cheer from behind me and turned to find Liz checking out this new project from Instructables maker Cary Ciavolella.

This is a project I made for my 1-year-old for Christmas. Honestly, though, it was a sanity present for me and my wife. It’s a white noise machine that can play multiple different sounds selected through a web interface, and also incorporates lights that change color based on the time (red lights mean be in bed, yellow mean you can play in your room, and green means it’s ok to come out). Since my son is too young to tell time, a color-based night light seemed like a really good idea.

As Cary has kindly provided all the code for the project, it’s a fairly easy build to replicate at home and looks like it’ll do the trick.

The device uses a Raspberry Pi Zero W, Blinkt, and Speaker pHAT from Pimoroni, and a handful of wires. Building it requires some basic soldering skills. If you’re unsure about your soldering skills, our handy video guide is all you need to get started.

How to solder your Raspberry Pi header pins

Learn the basics of how to solder components together, and the safety precautions you need to take.

The white noise files are selectable via a flask webserver hosted on the Raspberry Pi that parents can control via their smart device. Cary’s write-up for the project is so wonderfully detailed that any parent looking to build their own device can easily replace the white noise files with any MP3s of their choice.

Here’s the Instructables tutorial to help you get started on your own.

Remix your own

What’s so wonderful about this project is that it’s a great example of a build that is easily hackable to fit your own requirements. If you don’t have a child, it’s still a great notification device for your day-to-day routine, or a nice tool to remind a relative to take medication based on a colour system. There’s so much you can do using Cary’s build as the bare bones, which is why we think it’s awesome, and you should too.

The post Raspberry Pi Zero white noise night light appeared first on Raspberry Pi.


Source: Raspberry Pi – Raspberry Pi Zero white noise night light