We love a good pen plotter

BrachioGraph touts itself as the cheapest, simplest possible pen plotter, so, obviously, we were keen to find out more. Because, if there’s one thing we like about our community, it’s your ability to recreate large, expensive pieces of tech with a few cheap components and, of course, a Raspberry Pi.

So, does BrachioGraph have what it takes? Let’s find out.

Raspberry Pi pen plotter

The project ingredients list calls for two sticks or pieces of stiff card and, right off the bat, we’re already impressed with the household item ingenuity that had gone into building BrachioGraph. It’s always fun to see Popsicle sticks used in tech projects, and we reckon that a couple of emery boards would also do the job  although a robot with add-on nail files sounds a little too Simone Giertz, if you ask us. Simone, if you’re reading this…

You’ll also need a pencil or ballpoint pen, a peg, three servomotors, and a $5 Raspberry Pi Zero. That’s it. They weren’t joking when they said this plotter was simple.

The plotter runs on a Python script, and all the code for the project has been supplied for free. You can find it all on the BrachioGraph website, here.

We’ll be trying out the plotter for ourselves here at Pi Towers, and we’d love to see if any of you give it a go, so let us know in the comments.


The post We love a good pen plotter appeared first on Raspberry Pi.


Source: Raspberry Pi – We love a good pen plotter

Designing distinctive Raspberry Pi products

If you have one of our official cases, keyboards or mice, or if you’ve visited the Raspberry Pi Store in Cambridge, UK, then you know the work of Kinneir Dufort. Their design has become a part of our brand that’s recognised the world over. Here’s an account from the team there of their work with us.

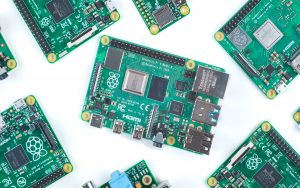
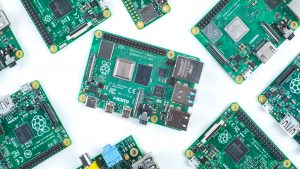
Over the last six years, our team at Kinneir Dufort have been privileged to support Raspberry Pi in the design and development of many of their products and accessories. 2019 has been another landmark year in the incredible Raspberry Pi story, with the opening of the Raspberry Pi store in February, the launch of the official keyboard and mouse in April, followed by the launch of Raspberry Pi 4 in June.


We first met Eben, Gordon and James in 2013 when we were invited to propose design concepts for an official case for Raspberry Pi Model B. For the KD team, this represented a tremendously exciting opportunity: here was an organisation with a clear purpose, who had already started making waves in the computing and education market, and who saw how design could be a potent ingredient in the presentation and communication of the Raspberry Pi proposition.

Alongside specific design requirements for the Model B case, the early design work also considered the more holistic view of what the 3D design language of Raspberry Pi should be. Working closely with the team, we started to define some key design principles which have remained as foundations for all the products since:

  • Visibility of the board as the “hero” of the product
  • Accessibility to the board, quickly and simply, without tools
  • Adaptability for different uses, including encouragement to “hack” the case
  • Value expressed through low cost and high quality
  • Simplicity of form and detailing
  • Boldness to be unique and distinctively “Raspberry Pi”

Whilst maintaining a core of consistency in the product look and feel, these principles have been applied with different emphases to suit each product’s needs and functions. The Zero case, which started as a provocative “shall we do this?” sketch visual sent to the team by our Senior Designer John Cowan-Hughes after the original case had started to deliver a return on investment, was all about maximum simplicity combined with adaptability via its interchangeable lids.

Photo of three Raspberry Pi Zero cases from three different angles, showing the lid of a closed case, the base of a closed case, and an open case with an apparently floating lid and a Raspberry Pi Zero visible inside.

The ‘levitating lid’ version of the Zero case is not yet publically available

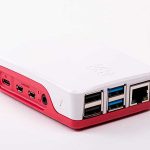
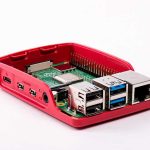
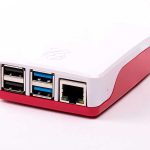
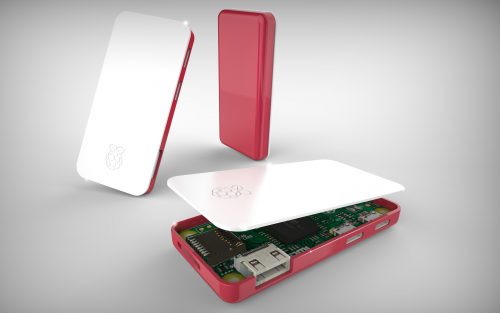
Later, with the 3A+ case, we started with the two-part case simplicity of the Zero case and applied careful detailing to ensure that we could accommodate access to all the connectors without overcomplicating the injection mould tooling. On Raspberry Pi 4, we retained the two-part simplicity in the case, but introduced new details, such as the gloss chamfer around the edge of the case, and additional material thickness and weight to enhance the quality and value for use with Raspberry Pi’s flagship product.

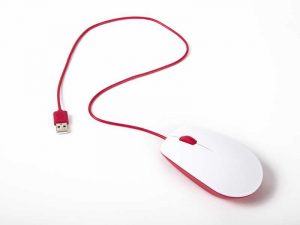
After the success of the KD design work on Raspberry Pi cases, the KD team were asked to develop the official keyboard and mouse. Working closely with the Raspberry Pi team, we explored the potential for adding unique features but, rightly, chose to do the simple things well and to use design to help deliver the quality, value and distinctiveness now integrally associated with Raspberry Pi products. This consistency of visual language, when combined with the Raspberry Pi 4 and its case, has seen the creation of a Raspberry Pi as a new type of deconstructed desktop computer which, in line with Raspberry Pi’s mission, changes the way we think about, and engage with, computers.


The launch of the Cambridge store in February – another bold Raspberry Pi move which we were also delighted to support in the early planning and design stages – provides a comprehensive view of how all the design elements work together to support the communication of the Raspberry Pi message. Great credit should go to the in-house Raspberry Pi design team for their work in the development and implementation of the visual language of the brand, so beautifully evident in the store.

Small tabletop model of the side walls, rear walls, front windows, and floor of the Raspberry Pi Store. The model is annotated with handwritten Post-It notes in a variety of colours.

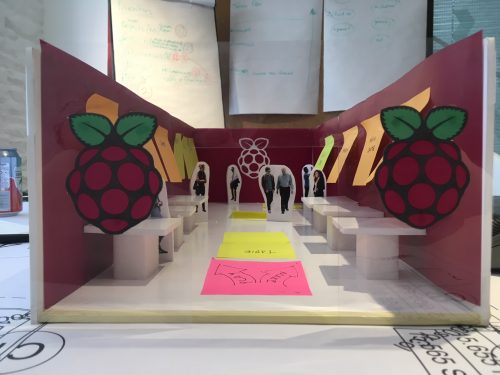
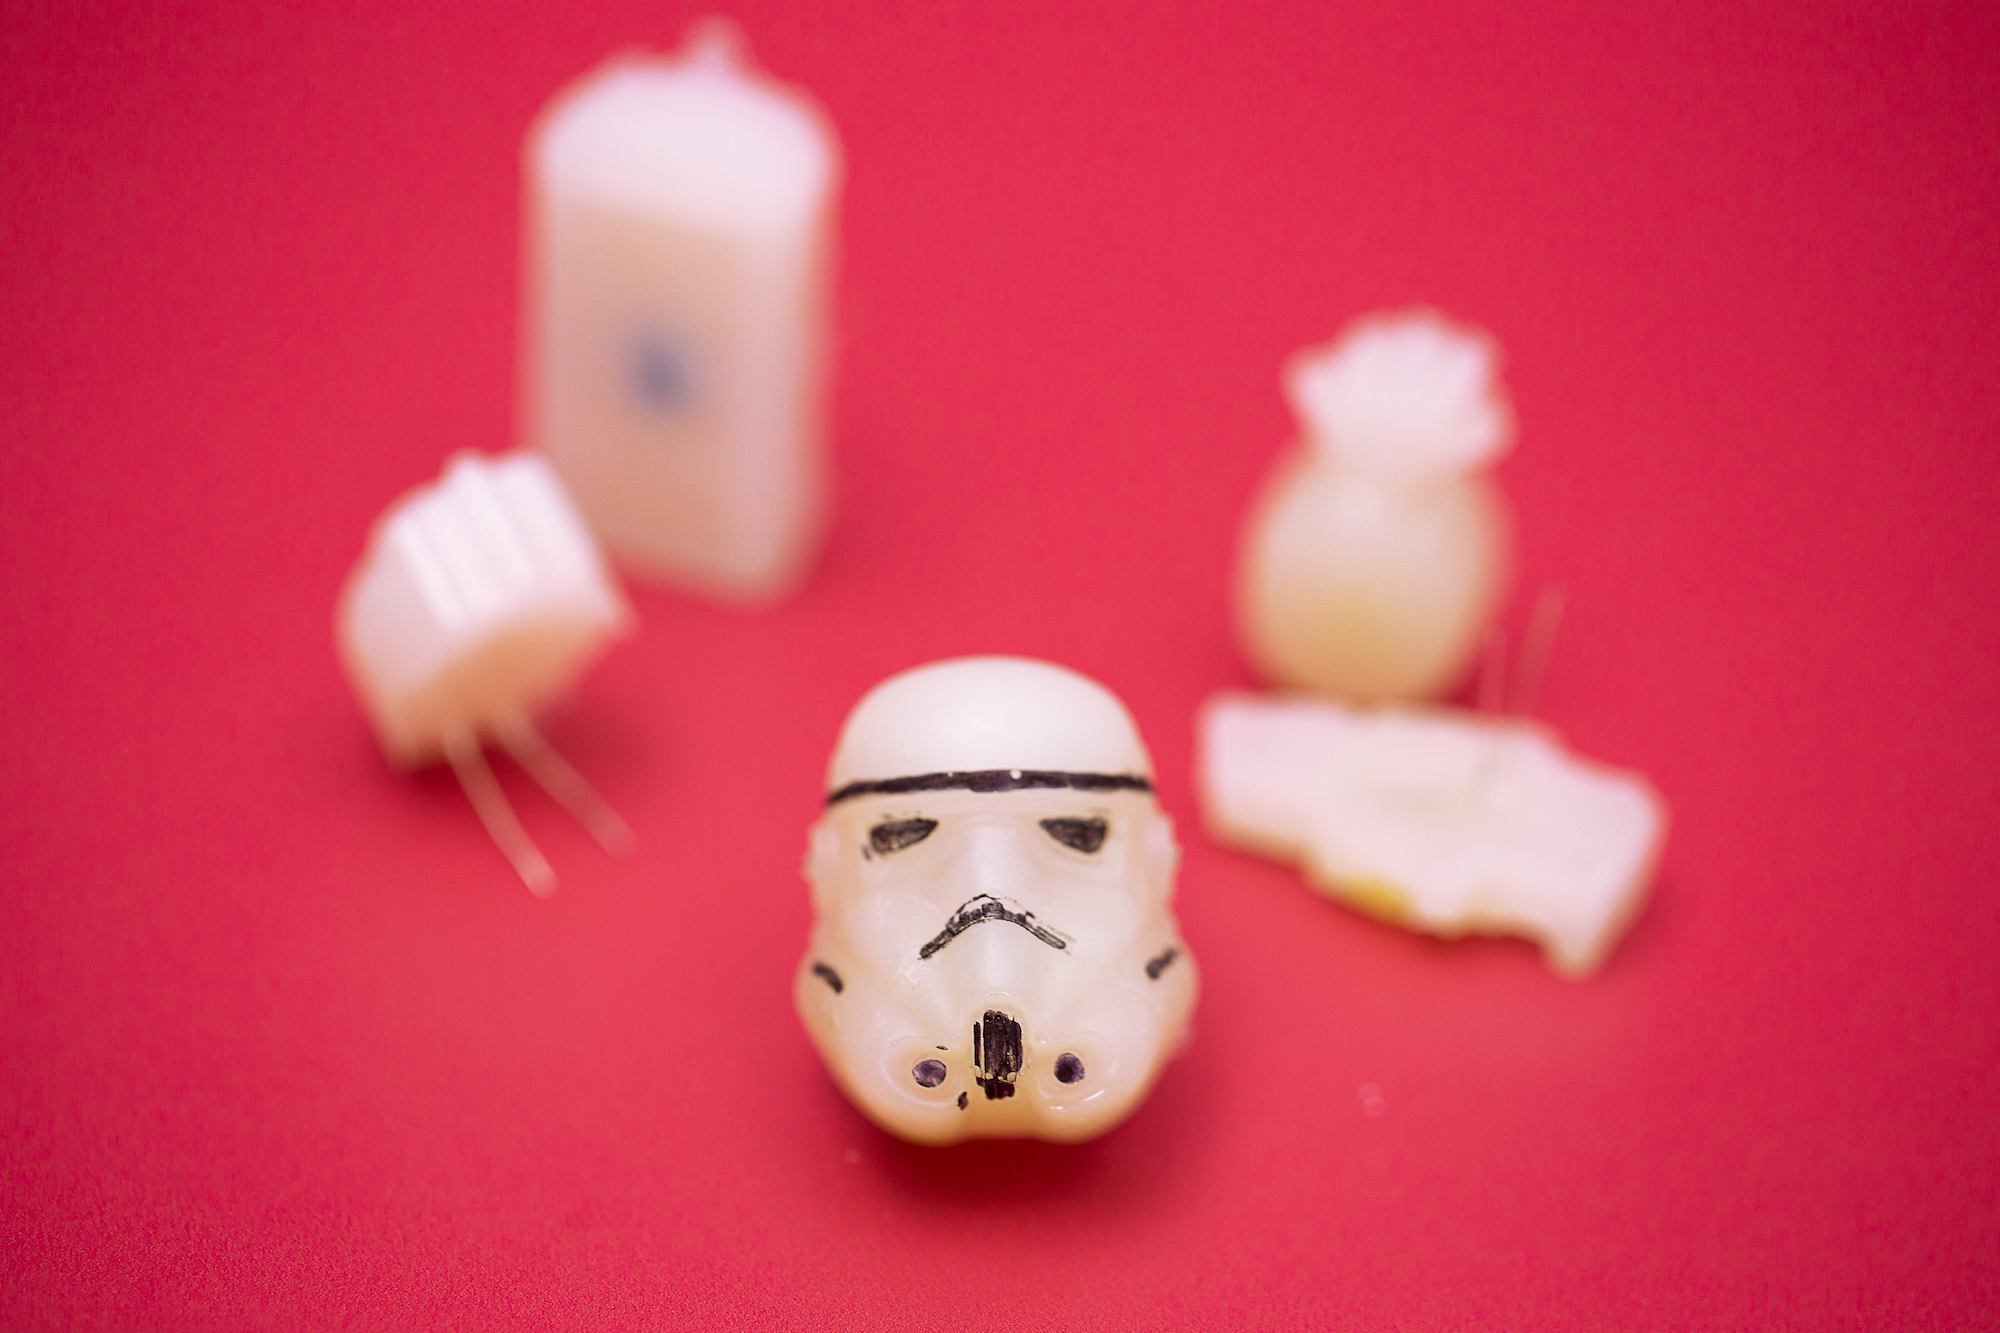
An early sketch model of the Raspberry Pi Store

In terms of process, at KD we start with a brief – typically discussed verbally with the Raspberry Pi team – which we translate into key objectives and required features. From there, we generally start to explore ideas with sketches and basic mock-ups, progressively reviewing, testing and iterating the concepts.

Top-down photo of a desk covered with white paper on which are a couple of Raspberry Pis and several cases. The hands of someone sketching red and white cases on the paper are visible. Also visible are the hands of someone measuring something with digital calipers, beside a laptop on the screen of which is a CAD model of a Raspberry Pi case.

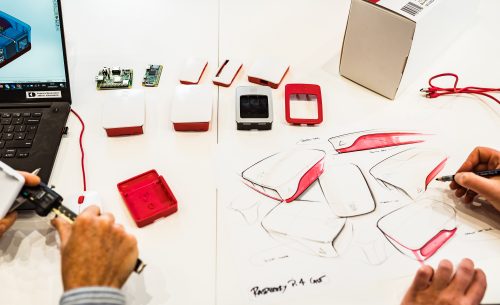
Sketching and modelling and reviewing

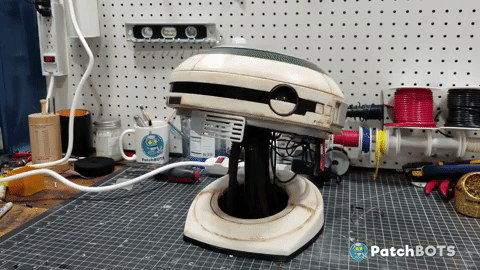
For evaluating designs for products such as the cases, keyboard and mouse, we make considerable use of our in-house 3D printing resources and prototyping team. These often provide a great opportunity for the Raspberry Pi team to get hands on with the design – most notably when Eben took a hacksaw to one of our lovingly prepared 3D-printed prototypes!
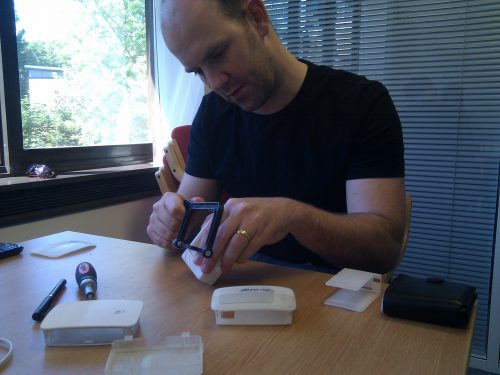
Phone photo of Eben sitting at a desk and hacksawing a white 3D-printed prototype Raspberry Pi case

EBEN YOUR FINGERS

Sometimes, despite hours of reviewing sketches and drawings, and decades of experience, it’s not until you get hands-on with the design that you can see further improvements, or you suddenly spot a new approach – what if we do this? And that’s the great thing about how our two teams work together: always seeking to share and exchange ideas, ultimately to produce better products.

Photo of three people sitting at a table in an office handling and discussing 3D-printed Raspberry Pi case prototypes

There’s no substitute for getting hands-on

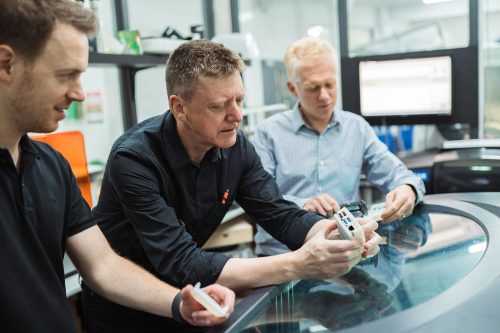
Back to the prototype! Once the prototype design is agreed, we work with 3D CAD tools and progress the design towards a manufacturable solution, collaborating closely with injection moulding manufacturing partners T-Zero to optimise the design for production efficiency and quality of detailing.

One important aspect that underpins all our design work is that we always start with consideration for the people we are designing for – whether that’s a home user setting up a media centre, an IT professional using Raspberry Pi as a web server, a group of schoolchildren building a weather station, or a parent looking to encourage their kid to code.

Engagement with the informed, proactive and enthusiastic online Raspberry Pi community is a tremendous asset. The instant feedback, comments, ideas and scrutiny posted on Raspberry Pi forums is powerful and healthy; we listen and learn from this, taking the insight we gain into each new product that we develop. Of course, with such a wide and diverse community, it’s not easy to please everyone all of the time, but that won’t stop us trying – keep your thoughts and feedback coming to PRifeedback@kinneirdufort.com!

If you’d like to know more about KD, or the projects we work on, check out our blog posts and podcasts at www.kinneirdufort.com.

The post Designing distinctive Raspberry Pi products appeared first on Raspberry Pi.


Source: Raspberry Pi – Designing distinctive Raspberry Pi products

Tim Peake and Astro Pi winners meet at Rooke Award ceremony

Engineering has always been important, but never more so than now, as we face global challenges and need more brilliant young minds to solve them. Tim Peake, ESA astronaut and one of our Trustees, knows this well, and is a big advocate of engineering, and of STEM more broadly.

Tim Peake giving a talk at the Science Museum

That’s why during his time aboard the International Space Station for the Principia mission, Tim was involved in the deployment of two Astro Pis, special Raspberry Pi computers that have been living on the ISS ever since, making it possible for us to run our annual European Astro Pi Challenge.

Tim Peake talking about the Astro Pi Challenge at an event at the Science Museum

Tim spoke about the European Astro Pi Challenge at today’s award ceremony

Thank you, Major Tim

Tim played a huge part in the first Astro Pi Challenge, and he has helped us spread the word about Astro Pi and the work of the Raspberry Pi Foundation ever since.

Tim Peake and a moderator in a Q&A at the Science Museum

Earlier this year, Tim was awarded the 2019 Royal Academy of Engineering Rooke Award for his work promoting engineering to the public, following a nomination by Raspberry Pi co-founder and Fellow of the Academy Pete Lomas. Pete says:

“As part of Tim Peake’s Principia mission, he personally spearheaded the largest education and outreach initiative ever undertaken by an ESA astronaut. Tim actively connects space exploration with the requirement for space engineering.

As a founder of Raspberry Pi, I was thrilled that Tim acted as a personal ambassador for the Astro Pi programme. This gives young people across Europe the opportunity to develop their computing skills by writing computer programs that run on the specially adapted Raspberry Pi computers onboard the ISS.” – Pete Lomas

Today, Tim received the Rooke Award in person, at a celebratory event held at the Science Museum in London.

Royal Academy of Engineering CEO Dr Hayaatun Sillem presents Tim with the 2019 Rooke Award for public engagement with engineering, in recognition of his nationwide promotion of engineering and space.

Royal Academy of Engineering CEO Dr Hayaatun Sillem presents Tim with the 2019 Rooke Award for public engagement with engineering, in recognition of his nationwide promotion of engineering and space

Four hundred young people got to attend the event with him, including two winning Astro Pi teams. Congratulations to Tim, and congratulations to those Astro Pi winners who got to meet a real-life astronaut!

Tim Peake observes a girl writing code that will run in space

Astro Pi is going from strength to strength

Since Tim’s mission on the ISS, the Astro Pi Challenge has evolved, and in collaboration with ESA Education, we now offer it in the form of two missions for young people every year:

  • Mission Zero, which allows young people to write a short Python programme to display a message to the astronauts aboard the ISS. This mission can be completed in an afternoon, all eligible entries are guaranteed to run in space, and you can submit entries until 20 March 2020. More about Astro Pi: Mission Zero
  • Mission Space Lab, which challenges teams of young people to design and create code to run a scientific experiment aboard the ISS using the Astro Pis’ sensors. This mission is competitive and runs over eight months, and you need to send in your team’s experiment idea by 25 October 2019. More about Astro Pi: Mission Space Lab

If you’re thinking “I wish this sort of thing had been around when I was young…”

…then help the young people in your life participate! Mission Zero is really simple and requires no prior coding knowledge, neither from you, nor from the young people in your team. Or your team could take part in Mission Space Lab — you’ve still got 10 days to send us your team’s experiment idea! And then, who knows, maybe your team will get to meet Tim Peake one day… or even become astronauts themselves!

Tim Peake observes two boys writing code that will run in space as part of the European Astro Pi Challenge

The post Tim Peake and Astro Pi winners meet at Rooke Award ceremony appeared first on Raspberry Pi.


Source: Raspberry Pi – Tim Peake and Astro Pi winners meet at Rooke Award ceremony

Musically synced car windscreen wipers using Raspberry Pi

Hey there! I’ve just come back from a two-week vacation, Liz and Helen are both off sick, and I’m not 100% sure I remember how to do my job.

So, while I figure out how to social media and word write, here’s this absolutely wonderful video from Ian Charnas, showing how he hacked his car windscreen wipers to sync with his stereo.

FINALLY! Wipers Sync to Music

In this video, I modify my car so the windshield wipers sync to the beat of whatever music I’m listening to. You can own this idea!

Ian will be auctioning off the intellectual property rights to his dancing wipers on eBay, will all proceeds going to a charity supporting young makers.

The post Musically synced car windscreen wipers using Raspberry Pi appeared first on Raspberry Pi.


Source: Raspberry Pi – Musically synced car windscreen wipers using Raspberry Pi

Plague at Pi Towers

Alex, Helen and I are all in our respective beds today with the plague. So your usual blog fodder won’t get served up today because none of us can look at a monitor for more than thirty seconds at a trot: instead I’m going to ask you to come up with some content for us. Let us know in the comments what you think we should be blogging about next, and also if you have any top sinus remedies.

The post Plague at Pi Towers appeared first on Raspberry Pi.


Source: Raspberry Pi – Plague at Pi Towers

VC4 and V3D OpenGL drivers for Raspberry Pi: an update

Here’s an update from Iago Toral of Igalia on development of the open source VC4 and V3D OpenGL drivers used by Raspberry Pi.

Some of you may already know that Eric Anholt, the original developer of the open source VC4 and V3D OpenGL drivers used by Raspberry Pi, is no longer actively developing these drivers and a team from Igalia has stepped in to continue his work. My name is Iago Toral (itoral), and together with my colleagues Alejandro Piñeiro (apinheiro) and José Casanova (chema), we have been hard at work learning about the V3D GPU hardware and Eric’s driver design over the past few months.

Learning a new GPU is a lot of work, but I think we have been making good progress and in this post we would like to share with the community some of our recent contributions to the driver and some of the plans we have for the future.

But before we go into the technical details of what we have been up to, I would like to give some context about the GPU hardware and current driver status for Raspberry Pi 4, which is where we have been focusing our efforts.

The GPU bundled with Raspberry Pi 4 is a VideoCore VI capable of OpenGL ES 3.2, a significant step above the VideoCore IV present in Raspberry Pi 3 which could only do OpenGL ES 2.0. Despite the fact that both GPU models belong in Broadcom’s VideoCore family, they have quite significant architectural differences, so we also have two separate OpenGL driver implementations. Unfortunately, as you may have guessed, this also means that driver work on one GPU won’t be directly useful for the other, and that any new feature development that we do for the Raspberry Pi 4 driver stack won’t naturally transport to Raspberry Pi 3.

The driver code for both GPU models is available in the Mesa upstream repository. The codename for the VideoCore IV driver is VC4, and the codename for the VideoCore VI driver is V3D. There are no downstream repositories – all development happens directly upstream, which has a number of benefits for end users:

  1. It is relatively easy for the more adventurous users to experiment with development builds of the driver.
  2. It is fairly simple to follow development activities by tracking merge requests with the V3D and VC4 labels.

At present, the V3D driver exposes OpenGL ES 3.0 and OpenGL 2.1. As I mentioned above, the VideoCore VI GPU can do OpenGL ES 3.2, but it can’t do OpenGL 3.0, so future feature work will focus on OpenGL ES.

Okay, so with that introduction out of the way, let’s now go into the nitty-gritty of what we have been working on as we ramped up over the last few months:

Disclaimer: I won’t detail here everything we have been doing because then this would become a long and boring changelog list; instead I will try to summarize the areas where we put more effort and the benefits that the work should bring. For those interested in the full list of changes, you can always go to the upstream Mesa repository and scan it for commits with Igalia authorship and the v3d tag.

First we have the shader compiler, where we implemented a bunch of optimizations that should be producing better (faster) code for many shader workloads. This involved work at the NIR level, the lower-level IR specific to V3D, and the assembly instruction scheduler. The shader-db graph below shows how the shader compiler has evolved over the last few months. It should be noted here that one of the benefits of working within the Mesa ecosystem is that we get a lot of shader optimization work done by other Mesa contributors, since some parts of the compiler stack are shared across multiple drivers.

Bar chart with y-axis range from -12.00% to +2.00%. It is annotated, "Lower is better except for Threads". There are four bars: Instructions (about -4.75%); Threads (about 0.25%); Uniforms (about -11.00%); and Splits (about 0.50%).

Evolution of the shader compiler (June vs present)

Another area where we have done significant work is transform feedback. Here, we fixed some relevant flushing bugs that could cause transform feedback results to not be visible to applications after rendering. We also optimized the transform feedback process to better use the hardware for in-pipeline synchronization of transform feedback workloads without having to always resort to external job flushing, which should be better for performance. Finally, we also provided a better implementation for transform feedback primitive count queries that makes better use of the GPU (the previous implementation handled all this on the CPU side), which is also correct at handling overflow of the transform feedback buffers (there was no overflow handling previously).

We also implemented support for OpenGL Logic Operations, an OpenGL 2.0 feature that was somehow missing in the V3D driver. This was responsible for this bug, since, as it turns out, the default LibreOffice theme in Raspbian was triggering a path in Glamor that relied on this feature to render the cursor. Although Raspbian has since been updated to use a different theme, we made sure to implement this feature and verify that the bug is now fixed for the original theme as well.

Fixing Piglit and CTS test failures has been another focus of our work in these initial months, trying to get us closer to driver conformance. You can check the graph below showcasing Piglit test results to have a quick view at how things have evolved over the last few months. This work includes a relevant bug fix for a rather annoying bug in the way the kernel driver was handling L2 cache invalidation that could lead to GPU hangs. If you have observed any messages from the kernel warning about write violations (maybe accompanied by GPU hangs), those should now be fixed in the kernel driver. This fix goes along with a user-space fix to go that should be merged soon in the upstream V3D driver.

A bar chart with y-axis ranging from 0 to 16000. There are three groups of bars: "June (master)"; "Present (master)"; Present (GLES 3.1)". Each group has three bars: Pass; Fail; Skip. Passes are higher in the "Present (master)" and "Present (GLES 3.1)" groups of bars than in the "June (master)" group, and skips and fails are lower.

Evolution of Piglit test results (June vs present)

A a curiosity, here is a picture of our own little continuous integration system that we use to run regression tests both regularly and before submitting code for review.

Ten Raspberry Pis with small black fans, most of them in colourful Pimoroni Pibow open cases, in a nest of cables and labels

Our continuous integration system

The other big piece of work we have been tackling, and that we are very excited about, is OpenGL ES 3.1, which will bring Compute Shaders to Raspberry Pi 4! Credit for this goes to Eric Anholt, who did all the implementation work before leaving – he just never got to the point where it was ready to be merged, so we have picked up Eric’s original work, rebased it, and worked on bug fixes to have a fully conformant implementation. We are currently hard at work squashing the last few bugs exposed by the Khronos Conformance Test Suite and we hope to be ready to merge this functionality in the next major Mesa release, so look forward to it!

Compute Shaders is a really cool feature but it won’t be the last. I’d like to end this post with a small note on another important large feature that is currently in early stages of development: Geometry Shaders, which will bring the V3D driver one step closer to exposing a full programmable 3D pipeline – so look forward to that as well!

The post VC4 and V3D OpenGL drivers for Raspberry Pi: an update appeared first on Raspberry Pi.


Source: Raspberry Pi – VC4 and V3D OpenGL drivers for Raspberry Pi: an update

Code your own Donkey Kong barrels | Wireframe issue 24

Replicate the physics of barrel rolling – straight out of the classic Donkey Kong. Mark Vanstone shows you how.

Released in 1981, Donkey Kong was one of the most important games in Nintendo’s history.

Nintendo’s Donkey Kong

Donkey Kong first appeared in arcades in 1981, and starred not only the titular angry ape, but also a bouncing, climbing character called Jumpman – who later went on to star in Nintendo’s little-known series of Super Mario games. Donkey Kong featured four screens per level, and the goal in each was to avoid obstacles and guide Mario (sorry, Jumpman) to the top of the screen to rescue the hapless Pauline. Partly because the game was so ferociously difficult from the beginning, Donkey Kong’s first screen is arguably the most recognisable today: Kong lobs an endless stream of barrels, which roll down a network of crooked girders and threaten to knock Jumpman flat.

Barrels in Pygame Zero

Donkey Kong may have been a relentlessly tough game, but we can recreate one of its most recognisable elements with relative ease. We can get a bit of code running with Pygame Zero – and a couple of functions borrowed from Pygame – to make barrels react to the platforms they’re on, roll down in the direction of a slope, and fall off the end onto the next platform. It’s a very simple physics simulation using an invisible bitmap to test where the platforms are and which way they’re sloping. We also have some ladders which the barrels randomly either roll past or sometimes use to descend to the next platform below.

Our Donkey Kong tribute up and running in Pygame Zero. The barrels roll down the platforms and sometimes the ladders.

Once we’ve created a barrel as an Actor, the code does three tests for its platform position on each update: one to the bottom-left of the barrel, one bottom-centre, and one bottom-right. It samples three pixels and calculates how much red is in those pixels. That tells us how much platform is under the barrel in each position. If the platform is tilted right, the number will be higher on the left, and the barrel must move to the right. If tilted left, the number will be higher on the right, and the barrel must move left. If there is no red under the centre point, the barrel is in the air and must fall downward.

There are just three frames of animation for the barrel rolling (you could add more for a smoother look): for rolling right, we increase the frame number stored with the barrel Actor; for rolling to the left, we decrease the frame number; and if the barrel’s going down a ladder, we use the front-facing images for the animation. The movement down a ladder is triggered by another test for the blue component of a pixel below the barrel. The code then chooses randomly whether to send the barrel down the ladder.

The whole routine will keep producing more barrels and moving them down the platforms until they reach the bottom. Again, this is a very simple physics system, but it demonstrates how those rolling barrels can be recreated in just a few lines of code. All we need now is a jumping player character (which could use the same invisible map to navigate up the screen) and a big ape to sit at the top throwing barrels, then you’ll have the makings of your own fully featured Donkey Kong tribute.

Here’s Mark’s code, which sets some Donkey Kong Barrels rolling about in Python. To get it working on your system, you’ll first need to install Pygame Zero. And to download the full code, go here.

Get your copy of Wireframe issue 24

You can read more features like this one in Wireframe issue 24, available now at Tesco, WHSmith, all good independent UK newsagents, and the Raspberry Pi Store, Cambridge.

Or you can buy Wireframe directly from Raspberry Pi Press — delivery is available worldwide. And if you’d like a handy digital version of the magazine, you can also download issue 24 for free in PDF format.

Make sure to follow Wireframe on Twitter and Facebook for updates and exclusive offers and giveaways. Subscribe on the Wireframe website to save up to 49% compared to newsstand pricing!

The post Code your own Donkey Kong barrels | Wireframe issue 24 appeared first on Raspberry Pi.


Source: Raspberry Pi – Code your own Donkey Kong barrels | Wireframe issue 24

Your new free online training courses for the autumn term

Over the autumn term, we’ll be launching three brand-new, free online courses on the FutureLearn platform. Wherever you are in the world, you can learn with us for free!

Three people looking facing forward

The course presenters are Pi Towers residents Mark, Janina, and Eirini

Design and Prototype Embedded Computer Systems

The first new course is Design and Prototype Embedded Computer Systems, which will start on 28 October. In this course, you will discover the product design life cycle as you design your own embedded system!

A diagram illustrating the iterative design life cycle with four stages: Analyse, design, build, test

You’ll investigate how the purpose of the system affects the design of the system, from choosing its components to the final product, and you’ll find out more about the design of an algorithm. You will also explore how embedded systems are used in the world around us. Book your place today!

Programming 103: Saving and Structuring Data

What else would you expect us to call the sequel to Programming 101 and Programming 102? That’s right — we’ve made Programming 103: Saving and Structuring Data! The course will begin on 4 November, and you can reserve your place now.

Illustration of a robot reading a book called 'human 2 binary phrase book'

Programming 103 explores how to use data across multiple runs of your program. You’ll learn how to save text and binary files, and how structuring data is necessary for programs to “understand” the data that they load. You’ll look at common types of structured files such as CSV and JSON files, as well as how you can connect to a SQL database to use it in your Python programs.

Introduction to Encryption and Cryptography

The third course, Introduction to Encryption and Cryptography, is currently in development, and therefore coming soon. In this course, you’ll learn what encryption is and how it was used in the past, and you’ll use the Caesar and Vigenère ciphers.

The Caesar cipher is a type of substitution cipher

You’ll also look at modern encryption and investigate both symmetric and asymmetric encryption schemes. The course also shows you the future of encryption, and it includes several practical encryption activities, which can be used in the classroom too.

National Centre for Computing Education

If you’re a secondary school teacher in England, note that all of the above courses count towards your Computer Science Accelerator Programme certificate.

Group shot of the first NCCE GCSE accelerator graduates

The very first group of teachers who earned Computer Science Accelerator Programme certificates: they got to celebrate their graduation at Google HQ in London.

What’s been your favourite online course this year? Tell us about it in the comments.

The post Your new free online training courses for the autumn term appeared first on Raspberry Pi.


Source: Raspberry Pi – Your new free online training courses for the autumn term

Estefannie’s Jurassic Park goggles

When we invited Estefannie Explains It All to present at Coolest Projects International, she decided to make something cool with a Raspberry Pi to bring along. But being Estefannie, she didn’t just make something a little bit cool. She went ahead and made Raspberry Pi Zero-powered Jurassic Park goggles, or, as she calls them, the world’s first globally triggered, mass broadcasting, photon-emitting and -collecting head unit.

Make your own Jurassic Park goggles using a Raspberry Pi // MAKE SOMETHING

Is it heavy? Yes. But these goggles are not expensive. Follow along as I make the classic Jurassic Park Goggles from scratch!! The 3D Models: https://www.thingiverse.com/thing:3732889 My code: https://github.com/estefanniegg/estefannieExplainsItAll/blob/master/makes/JurassicGoggles/jurassic_park.py Thank you Coolest Projects for bringing me over to speak in Ireland!! https://coolestprojects.org/ Thank you Polymaker for sending me the Polysher and the PolySmooth filament!!!!

3D-printing, sanding, and sanding

Estefannie’s starting point was the set of excellent 3D models of the iconic goggles that Jurassicpaul has kindly made available on Thingiverse. There followed several 3D printing attempts and lots of sanding, sanding, sanding, spray painting, and sanding, then some more printing with special Polymaker filament that can be ethanol polished.

Adding the electronics and assembling the goggles

Estefannie soldered rings of addressable LEDs and created custom models for 3D-printable pieces to fit both them and the goggles. She added a Raspberry Pi Zero, some more LEDs and buttons, an adjustable headgear part from a welding mask, and – importantly – four circles of green acetate. After quite a lot of gluing, soldering, and wiring, she ended up with an entirely magnificent set of goggles.

Here, they’re modelled magnificently by Raspberry Pi videographer Brian. I think you’ll agree he cuts quite a dash.

Coding and LED user interface

Estefannie wrote a Python script to interact with Twitter, take photos, and provide information about the goggles’ current status via the LED rings. When Estefannie powers up the Raspberry Pi, it runs a script on startup and connects to her phone’s wireless hotspot. A red LED on the front of the goggles indicates that the script is up and running.

Once it’s running, pressing a button at the back of the head unit makes the Raspberry Pi search Twitter for mentions of @JurassicPi. The LEDs light up green while it searches, just like you remember from the film. If Estefannie’s script finds a mention, the LEDs flash white and the Raspberry Pi camera module takes a photo. Then they light up blue while the script tweets the photo.


All the code is available on Estefannie’s GitHub. I love this project – I love the super clear, simple user experience provided by the LED rings, and there’s something I really appealing about the asynchronous Twitter interaction, where you mention @JurassicPi and then get an image later, the next time googles are next turned on.

Extra bonus Coolest Projects

If you read the beginning of this post and thought, “wait, what’s Coolest Projects?” then be sure to watch to the end of Estefannie’s video to catch her excellentCoolest Projects mini vlog. And then sign up for updates about Coolest Projects events near you, so you can join in next year, or help a team of young people to join in.

The post Estefannie’s Jurassic Park goggles appeared first on Raspberry Pi.


Source: Raspberry Pi – Estefannie’s Jurassic Park goggles

Try our new free machine learning projects for Scratch

Machine learning is everywhere. It’s used for image and voice recognition, predictions, and even those pesky adverts that always seem to know what you’re thinking about!

If you’ve ever wanted to know more about machine learning, or if you want to help you learners get started with machine learning, then our new free projects are for you!

The Terminator saying "My CPU is a neural net processor. A learning computer."

Spoiler alert: we won’t show you how to build your own Terminator. Trust us, it’s for the best.

Machine learning in education

When we hosted Scratch Conference Europe this summer, machine learning was the talk of the town: all of the machine learning talks and workshops were full with educators eager to learn more and find out how to teach machine learning. So this is the perfect time to bring some free machine learning resources to our projects site!

Smart classroom assistant

Smart classroom assistant is about creating your own virtual smart devices. You will create a machine learning model that recognises text commands, such as “fan on”, “Turn on my fan”, or my personal favourite, “It’s roasting in here!”.

animation of a fan running and a desk lamp turning on and off

In the project, you will be guided through setting up commands for a desk fan and lamp, but you could pick all sorts of virtual devices — and you can even try setting up a real one! What will you choose?

Journey to school

Journey to school lets you become a psychic! Well, not exactly — but you will be able to predict how your friends travel from A to B.

illustration of kids in school uniforms in front of a large street map

By doing a survey and collecting lots of information from your friends about how they travel around, you can train the computer to look for patterns in the numbers and predict how your friends travel between places. When you have perfected your machine learning model, you can try using it in Scratch too!

Alien language

Did you ever make up your own secret language that only you understood? Just me? Well, in the Alien language project you can teach your computer to understand your made-up words. You can record lots of examples to teach it to understand ‘left’ and ‘right’ and then use your model in Scratch to move a character with your voice!
animation of a cute alien creature on the surface of distant planet

Train your model to recognise as many sounds as you like, and then create games where the characters are voice-controlled!

Did you like it?

In the Did you like it? project, you create a character in Scratch that will recognise whether you enjoyed something or not, based on what you type. You will train your character by giving it some examples of positive and negative comments, then watch it determine how you are feeling. Once you have mastered that, you can train it to reply, or to recognise other types of messages too. Soon enough, you will have made your very own sentiment analysis tool!

illustration of kids with a computer, robot, and erlenmeyer flask

More machine learning resources

We’d like to extend a massive thank you to Dale from Machine Learning for Kids for his help with bringing these projects to our projects site. Machine Learning for Kids is a fantastic website for finding out more about machine learning, and it has loads more great projects for you to try, so make sure you check it out!

The post Try our new free machine learning projects for Scratch appeared first on Raspberry Pi.


Source: Raspberry Pi – Try our new free machine learning projects for Scratch

Fantastic Star Wars-themed Raspberry Pi projects

The weekend’s nearly here and the weather’s not looking too fantastic around these parts – we’re going to need some project ideas. Here’s a fun roundup of some of my favourite Star Wars-themed makes from the archive that I reckon you’ll really like.

Because, well, who doesn’t like Star Wars, right? Tell us which is your favourite in the comments.

Make your own custom LEDs using hot glue!

Grab a glue gun and your favourite Star Wars-themed ice cube trays to create your own custom LEDs, perfect for upping the wow factor of your next Raspberry Pi project. Learn how.

Build your own Star Wars droid

She may just have won a billion awards for Fleabag, but Phoebe Waller-Bridge is also known to some as the voice of L3-37, the salty droid companion of Lando Calrissian in Solo: A Star Wars Story.

Thanks to Patrick PatchBOTS Stefanski, you can build your own. Find out more.

Solo Star Wars Story L3-37 droid PatchBOTS

Darth Beats: Star Wars LEGO gets a musical upgrade

LEGO + Star Wars + Raspberry Pi? Yes please! Upgrade your favourite Star Wars merch to play music via the Pimoroni Speaker pHAT, thanks to Dan Aldred.

Darth Beats dremel

Star Wars Minecraft

There’s a reason Martin O’Hanlon is part of the Raspberry Pi Foundation team. This recreation of Star Wars Episode IV may or may not have been it – you decide.

Build your own Death Star… sort of

LED rings spinning at 300rpm around a Raspberry Pi? Yes please. Not only is this project an impressive feat of engineering, but it’s also super pretty! Find out more, young Padawan.

POV Globe Death Star

Do. Or do not. There is no Pi (sorry)

Are there any Star Wars-related Raspberry Pi projects we’ve missed? Let us know in the comments below!

The post Fantastic Star Wars-themed Raspberry Pi projects appeared first on Raspberry Pi.


Source: Raspberry Pi – Fantastic Star Wars-themed Raspberry Pi projects

Growth Monitor pi: an open monitoring system for plant science

Plant scientists and agronomists use growth chambers to provide consistent growing conditions for the plants they study. This reduces confounding variables – inconsistent temperature or light levels, for example – that could render the results of their experiments less meaningful. To make sure that conditions really are consistent both within and between growth chambers, which minimises experimental bias and ensures that experiments are reproducible, it’s helpful to monitor and record environmental variables in the chambers.

A neat grid of small leafy plants on a black plastic tray. Metal housing and tubing is visible to the sides.

Arabidopsis thaliana in a growth chamber on the International Space Station. Many experimental plants are less well monitored than these ones.
(“Arabidopsis thaliana plants […]” by Rawpixel Ltd (original by NASA) / CC BY 2.0)

In a recent paper in Applications in Plant Sciences, Brandin Grindstaff and colleagues at the universities of Missouri and Arizona describe how they developed Growth Monitor pi, or GMpi: an affordable growth chamber monitor that provides wider functionality than other devices. As well as sensing growth conditions, it sends the gathered data to cloud storage, captures images, and generates alerts to inform scientists when conditions drift outside of an acceptable range.

The authors emphasise – and we heartily agree – that you don’t need expertise with software and computing to build, use, and adapt a system like this. They’ve written a detailed protocol and made available all the necessary software for any researcher to build GMpi, and they note that commercial solutions with similar functionality range in price from $10,000 to $1,000,000 – something of an incentive to give the DIY approach a go.

GMpi uses a Raspberry Pi Model 3B+, to which are connected temperature-humidity and light sensors from our friends at Adafruit, as well as a Raspberry Pi Camera Module.

The team used open-source app Rclone to upload sensor data to a cloud service, choosing Google Drive since it’s available for free. To alert users when growing conditions fall outside of a set range, they use the incoming webhooks app to generate notifications in a Slack channel. Sensor operation, data gathering, and remote monitoring are supported by a combination of software that’s available for free from the open-source community and software the authors developed themselves. Their package GMPi_Pack is available on GitHub.

With a bill of materials amounting to something in the region of $200, GMpi is another excellent example of affordable, accessible, customisable open labware that’s available to researchers and students. If you want to find out how to build GMpi for your lab, or just for your greenhouse, Affordable remote monitoring of plant growth in facilities using Raspberry Pi computers by Brandin et al. is available on PubMed Central, and it includes appendices with clear and detailed set-up instructions for the whole system.

The post Growth Monitor pi: an open monitoring system for plant science appeared first on Raspberry Pi.


Source: Raspberry Pi – Growth Monitor pi: an open monitoring system for plant science

Tracking the Brecon Beacons ultramarathon with a Raspberry Pi Zero

On my holidays this year I enjoyed a walk in the Brecon Beacons. We set out nice and early, walked 22km through some of the best scenery in Britain, got a cup of tea from the snack van on the A470, and caught our bus home. “I enjoyed that walk,” I thought, “and I’d like to do one like it again.” What I DIDN’T think was, “I’d like to do that walk again, only I’d like it to be nearly three times as long, and it definitely ought to have about three times more ascent, or else why bother?”

Alan Peaty is a bit more hardcore than me, so, a couple of weekends ago, he set out on the Brecon Beacons 10 Peaks Ultramarathon: “10 peaks; 58 kilometres; 3000m of ascent; 24 hours”. He went with his friend Neil and a Raspberry Pi Zero in an eyecatching 3D-printed case.

A green 3D-printed case with a Raspberry Pi sticker on it, on a black backpack leaning against a cairn. In the background are a sunny mountain top, distant peaks, and a blue sky with white clouds.

“The brick”, nestling on a backpack, with sunlit Corn Du and Pen y Fan in the background

The Raspberry Pi Zero ensemble – lovingly known as the brick or, to give it its longer name, the Rosie IoT Brick or RIoT Brick – is equipped with a u-blox Neo-6 GPS module, and it also receives GPS tracking info from some smaller trackers built using ESP32 microcontrollers. The whole lot is powered by a “rather weighty” 20,000mAh battery pack. Both the Raspberry Pi and the ESP32s were equipped with “all manner of additional sensors” to track location, temperature, humidity, pressure, altitude, and light level readings along the route.

Charts showing temperature, humidity & pressure, altitude, and light levels along the route, together with a route map

Where the route crosses over itself is the most fervently appreciated snack van in Wales

Via LoRa and occasional 3G/4G from the many, many peaks along the route, all this data ends up on Amazon Web Services. AWS, among other things, hosts an informative website where family members were able to keep track of Alan’s progress along windswept ridges and up 1:2 gradients, presumably the better to appreciate their cups of tea and central heating. Here’s a big diagram of how the kit that completed the ultramarathon fits together; it’s full of arrows, dotted lines, and acronyms.

Alan, Neil, the brick, and the rest of their gear completed the event in an impressive 18 hours and one minute, for which they got a medal.

The brick, a small plastic box full of coloured jumper leads and other electronics; the lid of the box; and a medal consisting of the number 10 in large plastic characters on a green ribbon

Well earned

You can follow the adventures of this project, its antecedents, and the further evolutions that are doubtless to come, on the Rosie the Red Robot Twitter feed. And you can find everything to do with the project in this GitHub repository, so you can complete ultramarathons while weighed down with hefty power bricks and bristling with homemade tracking devices, too, if you like. Alan is raising money for Alzheimer’s Research UK with this event, and you can find his Brecon Beacons 10 Peaks JustGiving page here.

The post Tracking the Brecon Beacons ultramarathon with a Raspberry Pi Zero appeared first on Raspberry Pi.


Source: Raspberry Pi – Tracking the Brecon Beacons ultramarathon with a Raspberry Pi Zero

A low-cost, open-source, computer-assisted microscope

Low-cost open labware is a good thing in the world, and I was particularly pleased when micropalaeontologist Martin Tetard got in touch about the Raspberry Pi-based microscope he is developing. The project is called microscoPI (what else?), and it can capture, process, and store images and image analysis results. Martin is engaged in climate research: he uses microscopy to study tiny fossil remains, from which he gleans information about the environmental conditions that prevailed in the far-distant past.

microscoPI: a microcomputer-assisted microscope

microscoPI a project that aims to design a multipurpose, open-source and inexpensive micro-computer-assisted microscope (Raspberry PI 3). This microscope can automatically take images, process them, and save them altogether with the results of image analyses on a flash drive. It it multipurpose as it can be used on various kinds of images (e.g.

Martin repurposed an old microscope with a Z-axis adjustable stage for accurate focusing, and sourced an inexpensive X/Y movable stage to allow more accurate horizontal positioning of samples under the camera. He emptied the head of the scope to install a Raspberry Pi Camera Module, and he uses an M12 lens adapter to attach lenses suitable for single-specimen close-ups or for imaging several specimens at once. A Raspberry Pi 3B sits above the head of the microscope, and a 3.5-inch TFT touchscreen mounted on top of the Raspberry Pi allows the user to check images as they are captured and processed.

The Raspberry Pi runs our free operating system, Raspbian, and free image-processing software ImageJ. Martin and his colleagues use a number of plugins, some developed themselves and some by others, to support the specific requirements of their research. With this software, microscoPI can capture and analyse microfossil images automatically: it can count particles, including tiny specimens that are touching, analyse their shape and size, and save images and results before prompting the user for the name of the next sample.

microscoPI is compact – less than 30cm in height – and it’s powered by a battery bank secured under the base of the microscope, so it’s easily portable. The entire build comes in at under 160 Euros. You can find out more, and get in touch with Martin, on the microscoPI website.

The post A low-cost, open-source, computer-assisted microscope appeared first on Raspberry Pi.


Source: Raspberry Pi – A low-cost, open-source, computer-assisted microscope

Pulling Raspberry Pi translation data from GitHub

What happens when you give two linguists jobs at Raspberry Pi? They start thinking they can do digital making, even though they have zero coding skills! Because if you don’t feel inspired to step out of your comfort zone here — surrounded by all the creativity, making, and technology — then there is no hope you’ll be motivated to do it anywhere else.

two smiling women standing in front of a colourful wall

Maja and Nina, our translation team, and coding beginners

Maja and I support the community of Raspberry Pi translation volunteers, and we wanted to build something to celebrate them and the amazing work they do! Our educational content is already available in 26 languages, with more than 400 translations on our projects website. But our volunteer community is always translating more content, and so off we went, on an ambitious (by our standards!) mission to create a Raspberry Pi–powered translation notification system. This is a Raspberry Pi that pulls GitHub data to display a message on a Sense HAT and play a tune whenever we add fresh translated content to the Raspberry Pi projects website!

Breaking it down

There were three parts to the project: two of them were pretty easy (displaying a message on a Sense HAT and playing a tune), and one more challenging (pulling information about new translated content added to our repositories on GitHub). We worked on each part separately and then put all of the code together.

Two computers and two pastries

Mandatory for coding: baked goods and tea

Displaying a message on Sense HAT and playing a sound

We used the Raspberry Pi projects Getting started with the Sense HAT and GPIO music box to help us with this part of our build.

At first we wanted the Sense HAT to display fireworks, but we soon realised how bad we both are at designing animations, so we moved on to displaying a less creative but still satisfying smiley face, followed by a message saying “Hooray! Another translation!” and another smiley face. LED screen displaying the message 'Another translation!'

We used the sense_hat and time modules, and wrote a function that can be easily used in the main body of the program. You can look at the comments in the code above to see what each line does:

Python code snippet for displaying a message on a Sense HAT

So we could add the fun tune, we learned how to use the Pygame library to play sounds. Using Pygame it’s really simple to create a function that plays a sound: once you have the .wav file in your chosen location, you simply import and initialise the pygame module, create a Sound object, and provide it with the path to your .wav file. You can then play your sound:

Python code snippet for playing a sound

We’ve programmed our translation notification system to play the meow sound three times, using the sleep function to create a one-second break between each sound. Because why would you want one meow if you can have three?

Pulling repository information from GitHub

This was the more challenging part for Maja and me, so we asked for help from experienced programmers, including our colleague Ben Nuttall. We explained what we wanted to do: pull information from our GitHub repositories where all the projects available on the Raspberry Pi projects website are kept, and every time a new language directory is found, to execute the sparkles and meow functions to let us and EVERYONE in the office know that we have new translations! Ben did a bit of research and quickly found the PyGithub library, which enables you to manage your GitHub resources using Python scripts.

Python code snippet for pulling data from GitHub

Check out the comments to see what the code does

The script runs in an infinite loop, checking all repositories in the ‘raspberrypilearning’ organisation for new translations (directories with names in form of xx-XX, eg. fr-CA) every 60 minutes. Any new translation is then printed and preserved in memory. We had some initial issues with the usage of the PyGithub library: calling .get_commits() on an empty repository throws an exception, but the library doesn’t provide any functions to check whether a repo is empty or not. Fortunately, wrapping this logic in a try...except statement solved the problem.

And there we have it: success!

Demo of our Translation Notification System build

Subscribe to our YouTube channel: http://rpf.io/ytsub Help us reach a wider audience by translating our video content: http://rpf.io/yttranslate Buy a Raspberry Pi from one of our Approved Resellers: http://rpf.io/ytproducts Find out more about the #RaspberryPi Foundation: Raspberry Pi http://rpf.io/ytrpi Code Club UK http://rpf.io/ytccuk Code Club International http://rpf.io/ytcci CoderDojo http://rpf.io/ytcd Check out our free online training courses: http://rpf.io/ytfl Find your local Raspberry Jam event: http://rpf.io/ytjam Work through our free online projects: http://rpf.io/ytprojects Do you have a question about your Raspberry Pi?

Our ideas for further development

We’re pretty proud that the whole Raspberry Pi office now hears a meowing cat whenever new translated content is added to our projects website, but we’ve got plans for further development of our translation notification system. Our existing translated educational resources have already been viewed by over 1 million users around the world, and we want anyone interested in the translations our volunteers make possible to be able to track new translated projects as the go live!

One way to do that is to modify the code to tweet or send an email with the name of the newly added translation together with a link to the project and information on the language in which it was added. Alternatively, we could adapt the system to only execute the sparkles and meow functions when a translation in a particular language is added. Then our more than 1000 volunteers, or any learner using our translations, could set up their own Raspberry Pi and Sense HAT to receive notifications of content in the language that interests them, rather than in all languages.

We need your help

Both ideas pose a pretty big challenge for the inexperienced new coders of the Raspberry Pi translation team, so we’d really appreciate any tips you have for helping us get started or for improving our existing system! Please share your thoughts in the comments below.

The post Pulling Raspberry Pi translation data from GitHub appeared first on Raspberry Pi.


Source: Raspberry Pi – Pulling Raspberry Pi translation data from GitHub

View Stonehedge in real time via Raspberry Pi

You can see how the skies above Stonehenge affect the iconic stones via a web browser thanks to a Raspberry Pi computer.

Stonehenge

Stonehenge is Britain’s greatest monument and it currently attracts more than 1.5 million visitors each year. It’s possible to walk around the iconic stone circle and visit the Neolithic houses outside the visitor centre. Yet, worries about potential damage have forced preservationists to limit access.

With that in mind, Eric Winbolt, Interim Head of Digital/Innovation at English Heritage, had a brainwave. “We decided to give people an idea of what it’s like to see the sunrise and sunset within the circle, and allow them to enjoy the skies over Stonehenge in real time without actually stepping inside,” he explains.

This could have been achieved by permanently positioning a camera within the stone circle, but this was ruled out for fear of being too intrusive. Instead, Eric and developers from The Bespoke Pixel agency snapped a single panoramic shot of the circle’s interior using a large 8K high-res, 360-degree camera when the shadows and light were quite neutral.

“We then took the sky out of the image with the aim of capturing an approximation of the view without impacting on the actual stones themselves,” Eric says.

Stone me

By taking a separate hemispherical snapshot of the sky from a nearby position and merging it with the master photograph of the stones, the team discovered they could create a near real-time effect for online visitors. They used an off-the-shelf, upwards-pointing, 220-degree fish-eye lens camera connected to a Raspberry Pi 3 Model A+ computer, taking images once every four minutes.

This Raspberry Pi was also fitted with a Pimoroni Enviro pHAT containing atmospheric, air pressure, and light sensors. Captured light values from the sky image were then used to alter the colour values of the master image of the stones so that the light on Stonehenge, as seen via the web, reflected the ambient light of the sky.

What can you see?

“What it does is give a view of the stones as it looks right now, or at least within a few minutes,” says Eric. “It also means the effect doesn’t look like two images simply Photoshopped together.”

Indeed, coder Mark Griffiths says the magic all runs from Node.js. “It uses a Python shell to get the sensor data and integrates with Amazon’s AWS and an IoT messaging service called DweetPro to tie all the events together,” he adds.

There was also a lot of experimentation. “We used the HAT via the I2C connectors so that we could mount it away from the main board to get better temperature readings,” says Mark, “We also tried a number of experiments with different cameras, lenses, and connections and it became clear that just connecting the camera via USB didnít allow access to the full functionality and resolutions.”

Mark reverse-engineered the camera’s WiFi connection and binary protocol to work out how to communicate with it via Raspberry Pi so that full-quality images could be taken and downloaded. “We also found the camera’s WiFi connection would time out after several days,” reveals Mark, “so we had to use a relay board connected via the GPIO pins.”
With such issues resolved, the team then created an easy-to-use online interface that lets users click boxes and see the view over the past 24 hours. They also added a computer model to depict the night sky.

“Visitors can go to the website day and night and allow the tool to pan around Stonehenge or pause it and pan manually, viewing the stones as they would be at the time of visiting,” Eric says. “It can look especially good on a smart television. It’s very relaxing.”

View the stones in realtime right now by visiting the English Heritage website.

The post View Stonehedge in real time via Raspberry Pi appeared first on Raspberry Pi.


Source: Raspberry Pi – View Stonehedge in real time via Raspberry Pi

View Stonehenge in real time via Raspberry Pi

You can see how the skies above Stonehenge affect the iconic stones via a web browser thanks to a Raspberry Pi computer.

Stonehenge

Stonehenge is Britain’s greatest monument and it currently attracts more than 1.5 million visitors each year. It’s possible to walk around the iconic stone circle and visit the Neolithic houses outside the visitor centre. Yet, worries about potential damage have forced preservationists to limit access.

With that in mind, Eric Winbolt, Interim Head of Digital/Innovation at English Heritage, had a brainwave. “We decided to give people an idea of what it’s like to see the sunrise and sunset within the circle, and allow them to enjoy the skies over Stonehenge in real time without actually stepping inside,” he explains.

This could have been achieved by permanently positioning a camera within the stone circle, but this was ruled out for fear of being too intrusive. Instead, Eric and developers from The Bespoke Pixel agency snapped a single panoramic shot of the circle’s interior using a large 8K high-res, 360-degree camera when the shadows and light were quite neutral.

“We then took the sky out of the image with the aim of capturing an approximation of the view without impacting on the actual stones themselves,” Eric says.

Stone me

By taking a separate hemispherical snapshot of the sky from a nearby position and merging it with the master photograph of the stones, the team discovered they could create a near real-time effect for online visitors. They used an off-the-shelf, upwards-pointing, 220-degree fish-eye lens camera connected to a Raspberry Pi 3 Model A+ computer, taking images once every four minutes.

This Raspberry Pi was also fitted with a Pimoroni Enviro pHAT containing atmospheric, air pressure, and light sensors. Captured light values from the sky image were then used to alter the colour values of the master image of the stones so that the light on Stonehenge, as seen via the web, reflected the ambient light of the sky.

What can you see?

“What it does is give a view of the stones as it looks right now, or at least within a few minutes,” says Eric. “It also means the effect doesn’t look like two images simply Photoshopped together.”

Indeed, coder Mark Griffiths says the magic all runs from Node.js. “It uses a Python shell to get the sensor data and integrates with Amazon’s AWS and an IoT messaging service called DweetPro to tie all the events together,” he adds.

There was also a lot of experimentation. “We used the HAT via the I2C connectors so that we could mount it away from the main board to get better temperature readings,” says Mark, “We also tried a number of experiments with different cameras, lenses, and connections and it became clear that just connecting the camera via USB didnít allow access to the full functionality and resolutions.”

Mark reverse-engineered the camera’s WiFi connection and binary protocol to work out how to communicate with it via Raspberry Pi so that full-quality images could be taken and downloaded. “We also found the camera’s WiFi connection would time out after several days,” reveals Mark, “so we had to use a relay board connected via the GPIO pins.”
With such issues resolved, the team then created an easy-to-use online interface that lets users click boxes and see the view over the past 24 hours. They also added a computer model to depict the night sky.

“Visitors can go to the website day and night and allow the tool to pan around Stonehenge or pause it and pan manually, viewing the stones as they would be at the time of visiting,” Eric says. “It can look especially good on a smart television. It’s very relaxing.”

View the stones in realtime right now by visiting the English Heritage website.

The post View Stonehenge in real time via Raspberry Pi appeared first on Raspberry Pi.


Source: Raspberry Pi – View Stonehenge in real time via Raspberry Pi

Make a keyboard-bashing sprint game | Wireframe issue 23

Learn how to code a sprinting minigame straight out of Daley Thompson’s Decathlon with Raspberry Pi’s own Rik Cross.

Spurred on by the success of Konami’s Hyper Sports, Daley Thompson’s Decathlon featured a wealth of controller-wrecking minigames.

Daley Thompson’s Decathlon

Released in 1984, Daley Thompson’s Decathlon was a memorable entry in what’s sometimes called the ‘joystick killer’ genre: players competed in sporting events that largely consisted of frantically waggling the controller or battering the keyboard. I’ll show you how to create a sprinting game mechanic in Python and Pygame.

Python sprinting game

There are variables in the Sprinter() class to keep track of the runner’s speed and distance, as well as global constant ACCELERATION and DECELERATION values to determine the player’s changing rate of speed. These numbers are small, as they represent the number of metres per frame that the player accelerates and decelerates.

The player increases the sprinter’s speed by alternately pressing the left and right arrow keys. This input is handled by the sprinter’s isNextKeyPressed() method, which returns True if the correct key (and only the correct key) is being pressed. A lastKeyPressed variable is used to ensure that keys are pressed alternately. The player also decelerates if no key is being pressed, and this rate of deceleration should be sufficiently smaller than the acceleration to allow the player to pick up enough speed.

Press the left and right arrow keys alternately to increase the sprinter’s speed. Objects move across the screen from right to left to give the illusion of sprinter movement.

For the animation, I used a free sprite called ‘The Boy’ from gameart2d.com, and made use of a single idle image and 15 run cycle images. The sprinter starts in the idle state, but switches to the run cycle whenever its speed is greater than 0. This is achieved by using index() to find the name of the current sprinter image in the runFrames list, and setting the current image to the next image in the list (and wrapping back to the first image once the end of the list is reached). We also need the sprinter to move through images in the run cycle at a speed proportional to the sprinter’s speed. This is achieved by keeping track of the number of frames the current image has been displayed for (in a variable called timeOnCurrentFrame).

To give the illusion of movement, I’ve added objects that move past the player: there’s a finish line and three markers to regularly show the distance travelled. These objects are calculated using the sprinter’s x position on the screen along with the distance travelled. However, this means that each object is at most only 100 pixels away from the player and therefore seems to move slowly. This can be fixed by using a SCALE factor, which is the relationship between metres travelled by the sprinter and pixels on the screen. This means that objects are initially drawn way off to the right of the screen but then travel to the left and move past the sprinter more quickly.

Finally, startTime and finishTime variables are used to calculate the race time. Both values are initially set to the current time at the start of the race, with finishTime being updated as long as the distance travelled is less than 100. Using the time module, the race time can simply be calculated by finishTime - startTime.

Here’s Rik’s code, which gets a sprinting game running in Python (no pun intended). To get it working on your system, you’ll first need to install Pygame Zero. And to download the full code, head here.

Get your copy of Wireframe issue 23

You can read more features like this one in Wireframe issue 23, available now at Tesco, WHSmith, all good independent UK newsagents, and the Raspberry Pi Store, Cambridge.

Or you can buy Wireframe directly from Raspberry Pi Press — delivery is available worldwide. And if you’d like a handy digital version of the magazine, you can download issue 23 for free in PDF format.

Autonauts is coming to colonise your computers with cuteness. We find out more in Wireframe issue 23.

Make sure to follow Wireframe on Twitter and Facebook for updates and exclusive offers and giveaways. Subscribe on the Wireframe website to save up to 49% compared to newsstand pricing!

The post Make a keyboard-bashing sprint game | Wireframe issue 23 appeared first on Raspberry Pi.


Source: Raspberry Pi – Make a keyboard-bashing sprint game | Wireframe issue 23

Tinkernut’s Raspberry Pi video guide

“If you’ve ever been curious about electronics or programming, then the Raspberry Pi is an excellent tool to have in your arsenal,” enthuses Tinkernut in his latest video, Raspberry Pi – All You Need To Know.

And we aren’t going to argue with that.

Raspberry Pi – All You Need To Know

If you keep your ear to the Tinkering community, I’m sure you’ve heard whispers (and shouts) of the Raspberry Pi. And if you wanted to get into making, tinkering, computing, or electronics, the Raspberry Pi is a great tool to have in your tool belt. But what is it?

“This Pi can knit a Hogwarts sweater while saving a cat from a tree,” he declares. “It can recite the Canterbury Tales while rebuilding an engine.” Tinkernut’s new explainer comes after a short hiatus from content creation, and it’s a cracking little intro to what Raspberry Pi is, what it can do, and which model is right for you.

“This little pincushion, right here”

Tinkernut, we’re glad you’re back. And thank you for making us your first subject in your new format.

If you like what you see, be sure to check out more Tinkernut videos, and subscribe.

The post Tinkernut’s Raspberry Pi video guide appeared first on Raspberry Pi.


Source: Raspberry Pi – Tinkernut’s Raspberry Pi video guide

Another snazzy Raspberry Pi wallpaper for your phone and computer

After the success of our last snazzy wallpaper for your computer and smartphone, Fiacre is back with another visual delight.

Click one of the images below to visit the appropriate download page!


Standard rules apply: these images are for personal use only and are not to be manipulated, printed, turned into t-shirts, glazed onto mugs or sold.

Let us know in the comments if you decide to use the wallpaper, or tag a photo with #SnazzyRPi on Twitter and Instagram.

The post Another snazzy Raspberry Pi wallpaper for your phone and computer appeared first on Raspberry Pi.


Source: Raspberry Pi – Another snazzy Raspberry Pi wallpaper for your phone and computer