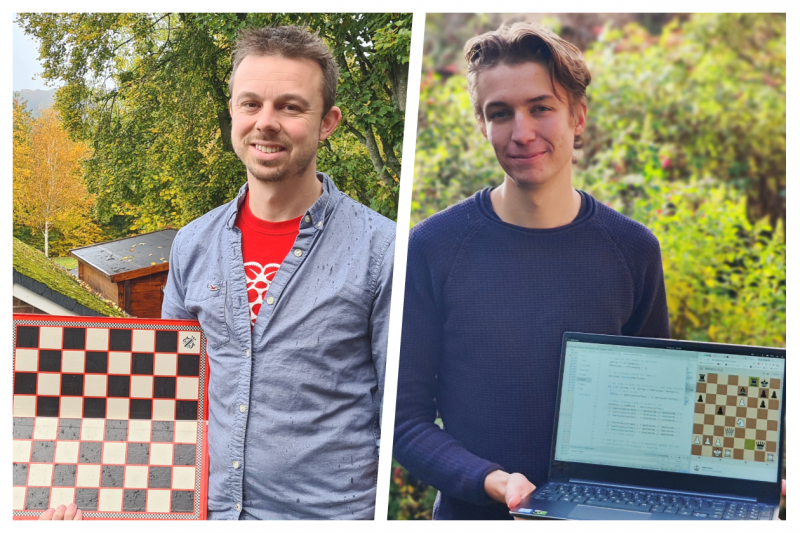
At the Raspberry Pi Foundation, we host a free online research seminar once a month to explore a wide variety of topics in the area of digital and computing education. This year, we’ve hosted eleven seminars — you can (re)discover slides and recordings on our website.
Now we’re getting ready for new seminars in 2021! In the coming months, our seminars are going to focus on diversity and inclusion in computing education. This topic is extremely important, as we want to make sure that computing is accessible to all, that we understand how to actively remove barriers to participation for learners, and that we understand how to teach computing in an inclusive way.
We are delighted to announce that these seminars focusing on diversity and inclusion will be co-hosted by the Royal Academy of Engineering. The Royal Academy of Engineering is harnessing the power of engineering to build a sustainable society and an inclusive economy that works for everyone.
We’re very excited to be partnering with the Academy because of our shared interest in ensuring that computing and engineering are inclusive and accessible to all.
Our upcoming seminars
The seminars take place on the first Tuesday of the month at 17:00–18:30 GMT / 12:00–13:30 EST / 9:00–10:30 PST / 18:00–19:30 CET.
5 January 2021: Peter Kemp (King’s College London) and Billy Wong (University of Reading) will be looking at computing education in England, particularly GCSE computer science, and how it is accessed by groups typically underrepresented in computing.
2 February 2021: Professor Tia Madkins (University of Texas at Austin), Nicol R. Howard (University of Redlands), and Shomari Jones (Bellevue School District) will be talking about equity-focused teaching in K–12 computer science. Find out more.
2 March 2021: Dr Jakita O. Thomas (Auburn University, Alabama) will be talking about her research on supporting computational algorithmic thinking in the context of intersectional computing.
April 2021: event to be confirmed
4 May 2021: Dr Cecily Morrison (Microsoft Research) will be speaking about her work on physical programming for people with visual impairments.
Join the seminars
We’d love to welcome you to these seminars so we can learn and discuss together. To get access, simply sign up with your name and email address.
Once you’ve signed up, we’ll email you the seminar meeting link and instructions for joining. If you attended our seminars in the past, the link remains the same.
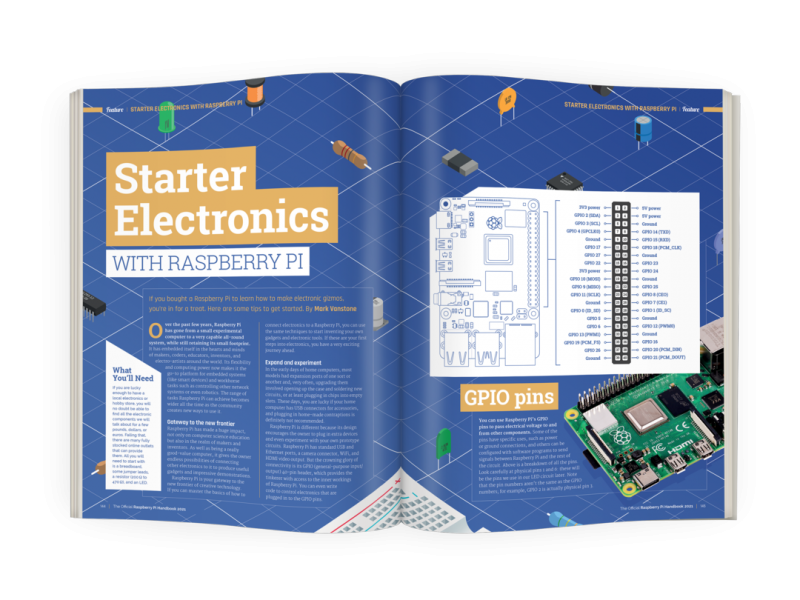
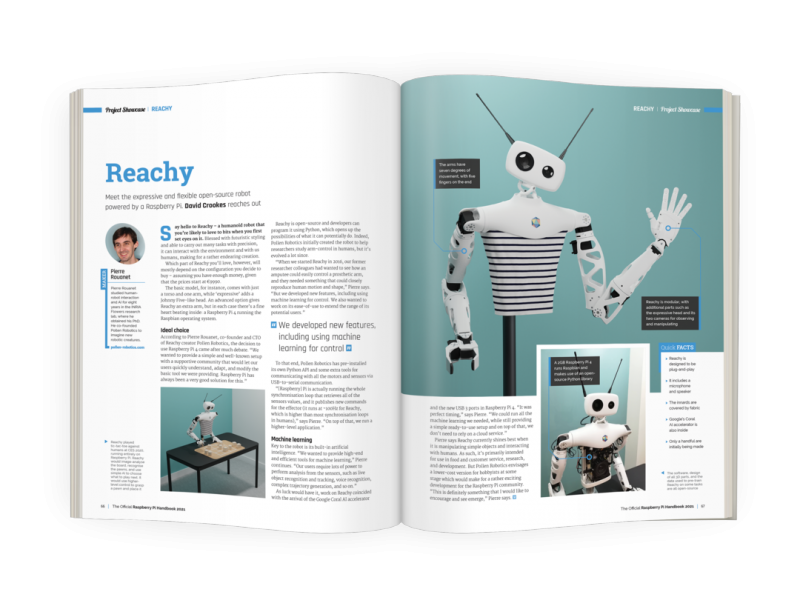
When I first investigated inserting a fan into the standard Raspberry Pi case there were two main requirements. The first was to keep the CPU cool in all usage scenarios. The second was to reduce or eliminate any changes to the current case and therefore avoid costly tool changes.
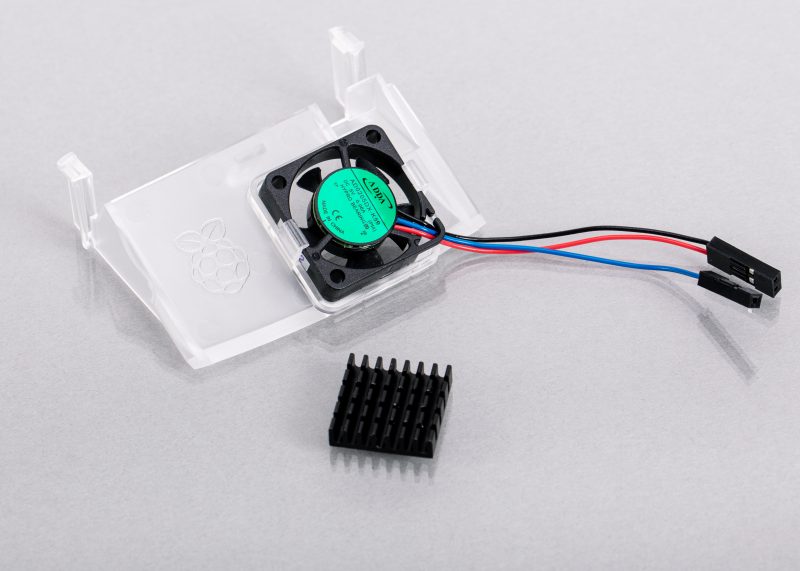
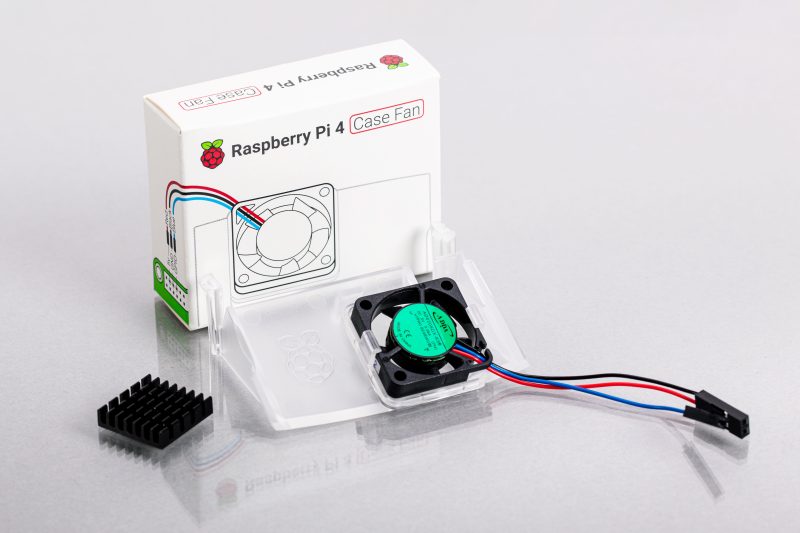
The case fan and heatsink
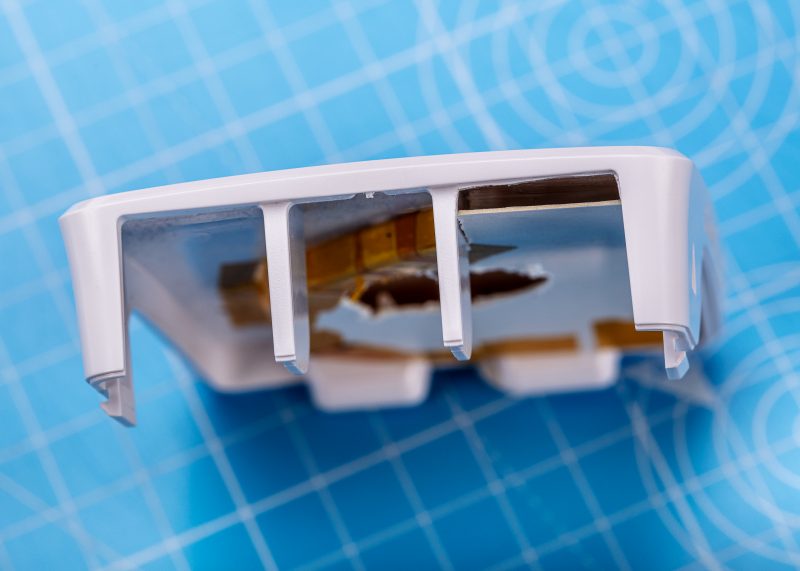
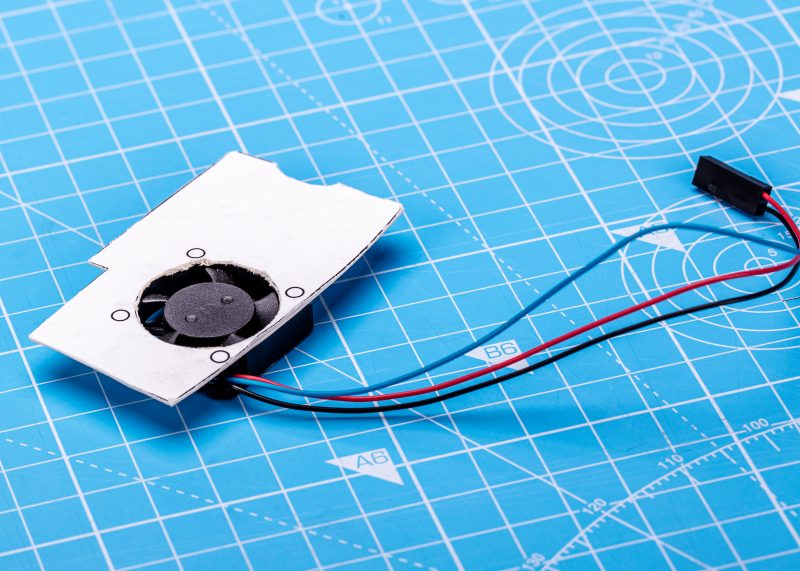
As I had no experience developing a fan, I did what all good engineers do and had a go anyway. We had already considered opening the space above the Ethernet connector to create a flow of air into the case. So, I developed my first prototype from a used Indian takeaway container (I cleaned it first), but the below card version was easier to recreate
The first prototype
Input port over the Ethernet connector
Air duct taped into the top of the case
The above duct is what remains from my first effort, the concept is relatively simple, draw air in over the Ethernet port, and then drive the air down onto the CPU. But it wasn’t good enough, running CPU-burn on all four cores required a fan which sounded like it was about to take off. So I spoke to a professional who did some computational fluid dynamics (CFD) analysis for us.
It’s a kind of magic
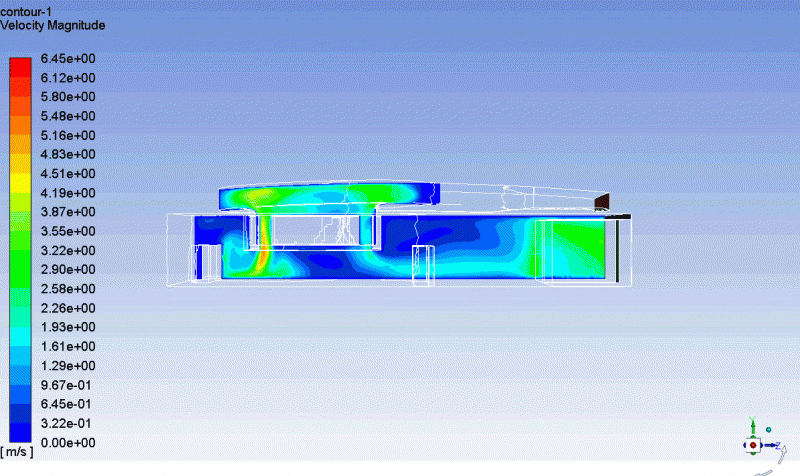
CFD analysis of a cross section of the case
CFD analysis takes a 3D description of the volume and calculates a simulation of fluid flow (the air) through the volume. The result shows where the air moves fastest (the green and red areas)
What this showed us is the position of the fan is important since the fastest moving bit of air is actually quite far from the centre of the processor, also:
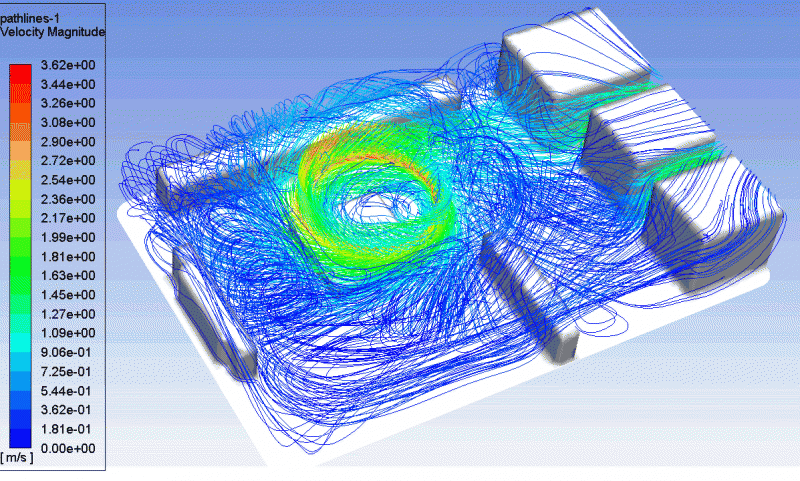
Bulk analysis of the air flow through the case
The picture above shows how most of the moving air (green and red) is mainly spinning around inside the fan. This happens because there is a pressure difference between the input and output sides of the fan (the sucky end and the blowy end). Fans just don’t work well that way, they are most efficient when unrestricted. I needed to go back to the drawing board. My next experiment was to add holes into the case to understand how much the airflow could be changed.
Improving airflow
HolesMore holes!
After running the tests with additional holes in both the lid and the base I concluded the issue wasn’t really getting air unrestricted in and out of the case (although the holes did make a small difference) but the effect the air duct was having on restricting the flow into the fan itself. Back to the drawing board…
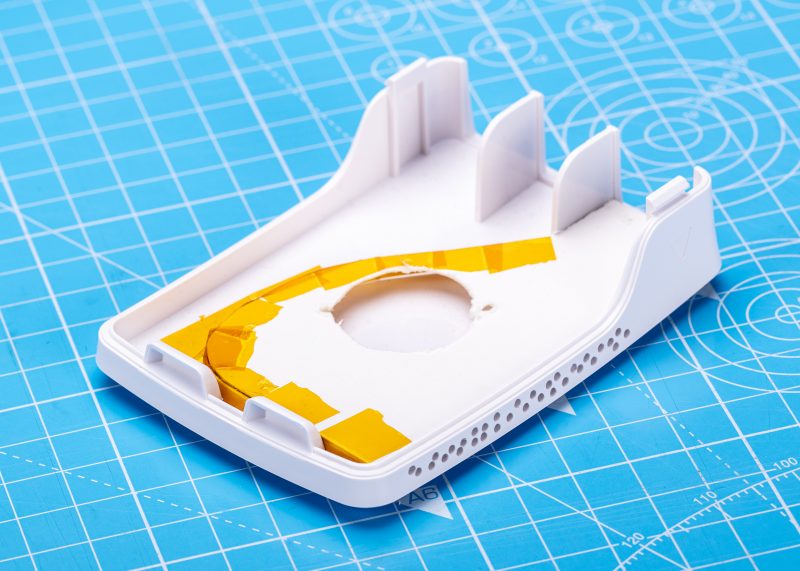
During a long run in the fens, I thought about the airflow over the Ethernet connector and through the narrow duct, wondering how we can open this up to reduce the constriction. I realised it might be possible to use the whole ‘connector end’ of the case as the inlet port.
The breakthrough
My first cardboard ‘bulkhead’
Suddenly, I had made a big difference… By drawing air from around the USB and Ethernet connectors the lid has been left un-modified but still achieves the cooling effect I was looking for. Next was to reduce the direction changes in the air flow and try to make the duct simpler.
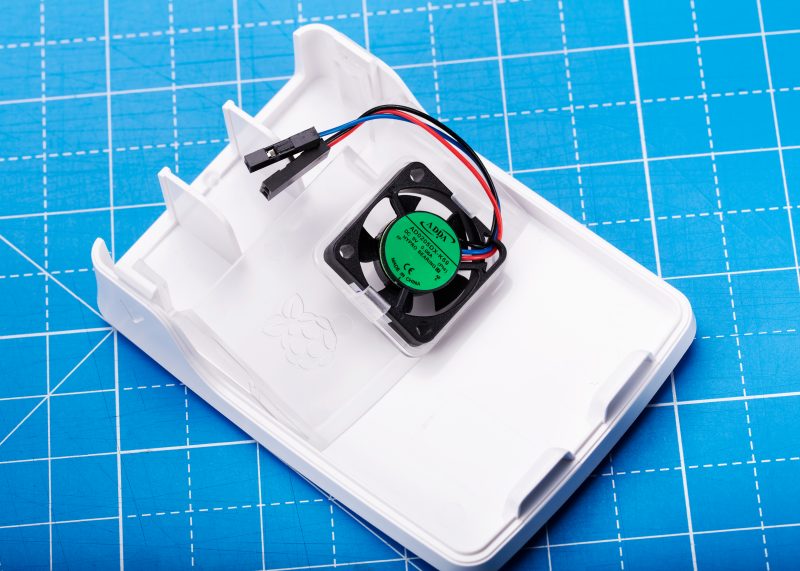
The bulkhead
The cardboard bulkhead does exactly what you need to do and nothing more. It separates the two halves of the case, and directs the air down directly at the processor. Using this design and the heatsink, I was able to achieve a cooling capable of easily running the cpuburn application but with an even smaller (quieter) fan.
The next job is to develop a plastic clip to attach the fan into the lid. That’s where our friends at Kinneir Dufort came in. They designed the injection moulded polycarbonate that makes an accurate interface with the Raspberry Pi’s PCB. The ‘bulkhead’ clips neatly into the slots in the lid, almost like it was planned!
The Raspberry Pi Case Fan has been developed with an advanced user in mind. It allows them to use the Raspberry Pi at its limits whilst retaining the unique finished exterior of the Raspberry Pi Case.
For those who love a good graph, here are the temperature results during a quad-core compile of the Linux kernel, as demonstrated in Eben’s launch post on Monday.
Buy your Raspberry Pi 4 Case Fan today
Raspberry Pi Case Fan is available from our Raspberry Pi Approved Resellers. Simply head over to the Case Fan page and select your country from the drop-down menu.
From our first prototype way back in 2006, to the very latest Raspberry Pi 400, everything we have built here at Raspberry Pi has been driven by a desire to inspire learning. I hope that each of you who uses our products discovers — or rediscovers — the joy of learning through making. The journey from technology consumer to technology creator can be a transformational one; today, on Giving Tuesday, I’m asking you to help even more young people make that journey.
Too few young people have the chance to learn how technology works and how to harness its power. Pre-existing disparities in access to computing education have been exacerbated by the coronavirus pandemic. At the Raspberry Pi Foundation, we’re on a mission to change this, and we’re working harder than ever to support young people and educators with free learning opportunities. Our partner CanaKit supports the Raspberry Pi Foundation’s mission, and they’ve extended the generous offer to match your donations up to a total of $5,000.
Alongside our low-cost, high-performance computers and free software, you may know that the Raspberry Pi Foundation provides free educational programmes including coding clubs and educator training for millions of people each year in dozens of countries. You might not know that the Raspberry Pi Foundation was founded as, and still remains, a nonprofit organisation. Our education mission is powered by dedicated volunteers, and our programmes are funded in part thanks to our customers who buy Raspberry Pi products, and in part by charitable donations from people like you.
Every donation we receive makes an impact on the young people and educators who rely on the Raspberry Pi Foundation. Ryka, for example, is a 10-year-old who attends one of our CoderDojo clubs. Since March she’s been using our project guides and following our Digital Making at Home code-along live streams. Her parents tell us:
“We were looking at ways to keep Ryka engaged during this lockdown period and came across Digital Making at Home. As a parent I can see that there has been discernible improvement in her abilities. We’ve noticed that she is engaged and takes interest in showing us what she was able to build. It has been a great use of her time.”
– Parent of a young person who learns through our programmes
Ryka joins millions of learners in our community around the world, many of whom now rely on us more than ever with schools and extracurricular activities disrupted. Through the ongoing support of our donors and volunteers, we’ve been able to rise to the challenge of the pandemic:
Thousands of young people have continued their digital making journey as part of Code Club and CoderDojo, following our rapid pivot to help club leaders run virtual clubs.
We have seen a 140% growth in community translations of our educational projects, covering languages from Arabic and Hindi, to Japanese and Spanish.
Millions of young people are making games, telling stories, and building websites — all through code! — using our online project guides.
Young coders and digital makers need our help in the year ahead as they take control of their computing education under challenging and uncertain circumstances. As a donor to the Raspberry Pi Foundation, you will be investing in our youngest generation of innovators and helping to create a spark in a young person’s life. On Giving Tuesday, I am grateful to each of you for the role you play in creating a world where everyone can learn, solve problems, and shape their future through the power of technology.
Today we’re launching a stocking-filler product to help you squeeze more performance out of your Raspberry Pi 4. The $5 Raspberry Pi 4 Case Fan clips inside the lid of the Official Case, and keeps your Raspberry Pi 4 cool even when running the heaviest workloads, at the most aggressive overclocks.
Raspberry Pi 4 power optimisation
Like all electronic products, Raspberry Pi generates waste heat as it works. Along with most fanless products – like most mobile phones – Raspberry Pi 4 was originally designed to operate in a “sprint-and-recover” mode: if run at maximum performance for an extended period it would heat up, and eventually throttle back to limit its temperature.
What’s in the box?
In practice, the power optimisation work that we’ve done over the last eighteen months has largely eliminated throttling for an uncased board, operating at the stock clock frequency of 1.5GHz, and in a typical ambient temperature.
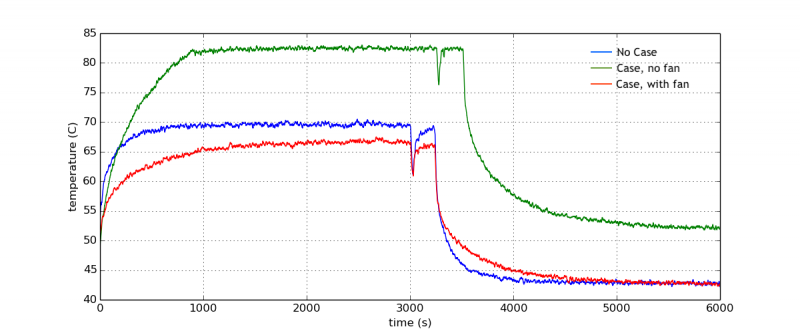
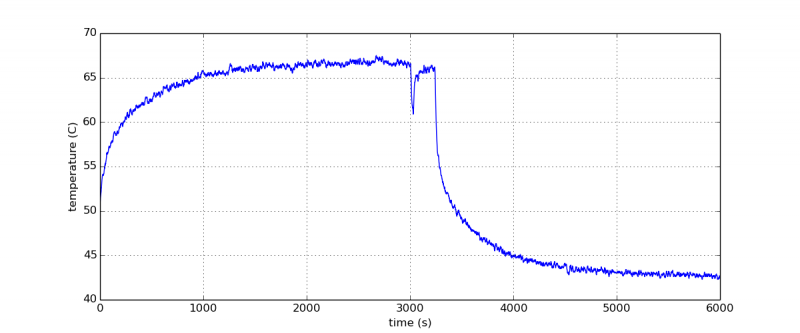
Here’s a graph of temperature during a quad-core compile of the Linux kernel: you can see the temperature barely exceeds 70C.
Quad-core kernel compile without case
Turning your Raspberry Pi “up to eleven”
But maybe you want to put your Raspberry Pi in a case; or you’ve noticed that your Raspberry Pi will overclock to 1.8GHz or more; or you want to use it in a higher ambient temperature. All of these things can put us back in sprint-and-recover mode.
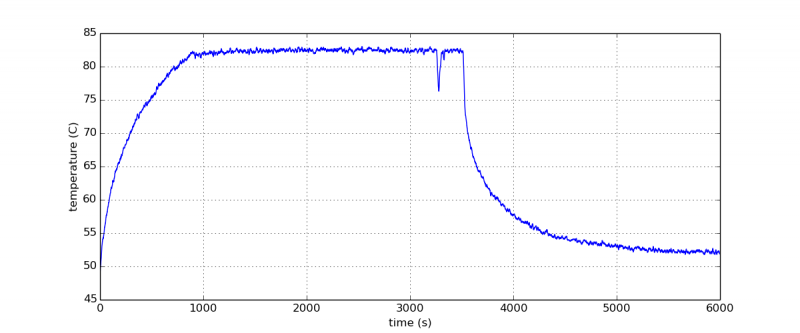
Here’s the same workload running on a board in a Raspberry Pi official case: now we hit the 80C throttle point and slow down, and the compile job takes (slightly) longer to complete.
Quad-core kernel compile in Raspberry Pi 4 Official Case
To run indefinitely at full speed under these conditions you’ll need either a passive cooling solution (like the excellent Flirc case), or an active one like the Raspberry Pi 4 Case Fan. It draws air in over the USB and Ethernet connectors, passes it over a small finned heatsink attached to the processor, and exhausts it through the SD card slot. Here’s our workload running with the case fan: now the board remains well below 70C, and as expected the compile job takes the same amount of time as on the uncased board.
Gordon Hollingworth will be here on Wednesday to talk about how he designed the Raspberry Pi 4 Case Fan ducting with the aid of a stack of Chinese takeout boxes and a glue gun.
Get your Raspberry Pi 4 Case Fan today
As with all our products, the Raspberry Pi Case Fan is available from our Raspberry Pi Approved Resellers. Simply head over to the Case Fan page and select your country from the drop-down menu.
If your country isn’t on the list yet, don’t worry, we’re constantly working to add further countries and resellers to the list. Until then, check out some of our Approved Resellers that offer international shipping.
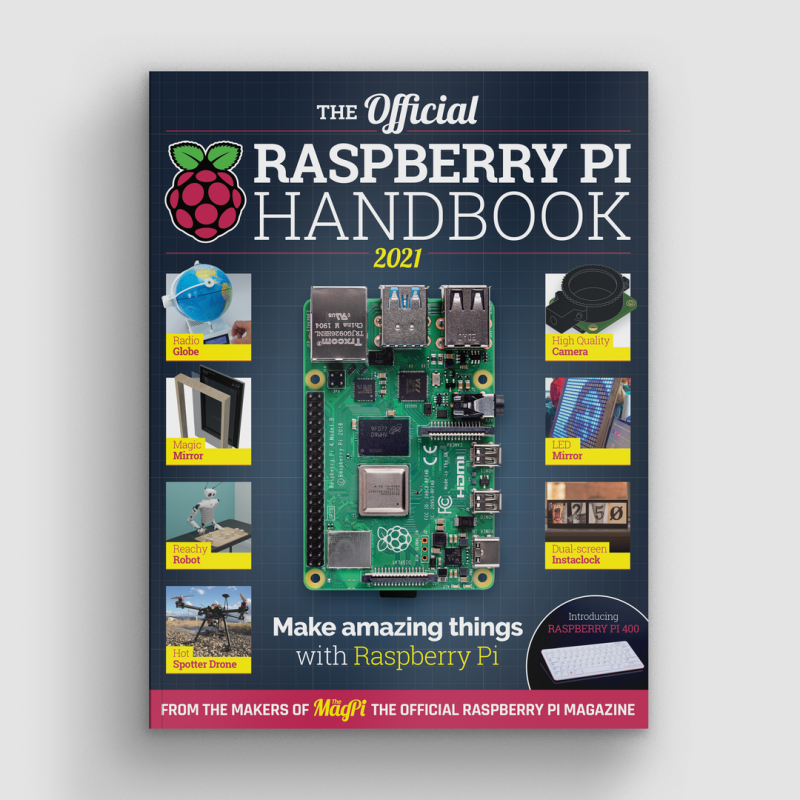
Hey everyone, come and see, come and see! Here’s a great new bookazine from the makers of the official Raspberry Pi magazine. We do love the folks at The MagPi. Clever, they are.
If, like us, you’re over 2020 already, dive into the pages of The Official Raspberry Pi Handbook 2021, and pretend it never happened. That will totally work.
To help you get the most of out of your Raspberry Pi computer, this official Handbook features 200 pages of essential information, inspiring projects, practical tutorials, and definitive reviews.
Beginner-friendly
If you’re an absolute beginner, you can learn from the Handbook how to set up your Raspberry Pi and start using it. Then you can move on to the step-by-step tutorials that will teach you how to code and make with your Raspberry Pi.
Shiny new stuff
You’ll also (re)discover the new Raspberry Pi 400 and High Quality Camera, both released this year. And you’ll find out about the top kits and accessories for your projects.
Be inspired
And finally, we’ve also picked out some incredible Raspberry Pi projects made by people in the community to inspire you to get making and coding.
Personally, we prefer new book smell and the crackle of physical pages but, if you’re less picky and don’t mind on-screen reading, the lovely folks at The MagPi have a PDF version you can download for free.
Most of you probably know that The MagPi didn’t start off official, though: eight and a half years ago, intrepid community members came together to create The MagPi as a fanzine, and it ran as one for 30 issues (plus one special) until early 2015, when it became part of Raspberry Pi and went official.
Officially official
For 70 issues now, the rest of the team and I have worked hard to bring Raspberry Pi fans a monthly magazine packed full of amazing content from the global Raspberry Pi (and wider maker) community. In the last six-ish years, I’ve built robots with you, stuffed Raspberry Pi Zeros into games controllers, lit up my Christmas tree, written far too many spooky puns, gone stargazing, recorded videos for numerous Raspberry Pi launches, and tried to help everyone who wanted to get their hands on the (in)famous issue 40.
Celebrating a milestone
I could go on, but I already have: for issue 100 we’re celebrating 100 incredible moments in Raspberry Pi history, from its humble beginnings to becoming the third best-selling computer ever, and one of the few to be on the International Space Station.
One of those moments was the release of Raspberry Pi 400, an incredibly cool model of Raspberry Pi that elicited a few ‘oohs’ and ‘aahs’ from me when mine arrived in the post. We give it the full MagPi breakdown with benchmarks and interviews, courtesy of our good friend Gareth Halfacree.
How to get issue 100
But wait, there’s more! We’ve managed to squeeze in our usual array of projects, tutorials, reviews, and community reports as well. Expect cool robots, funky guitars, handheld console building guides, and case reviews.
Never want to miss an issue? Subscribe to The MagPi and we’ll deliver every issue straight to your door. Also, if you’re a new subscriber and get the 12-month subscription, you’ll get a completely free Raspberry Pi Zero bundle with a Raspberry Pi Zero W and accessories.
I really think you’ll like this issue. Here’s to another 100.
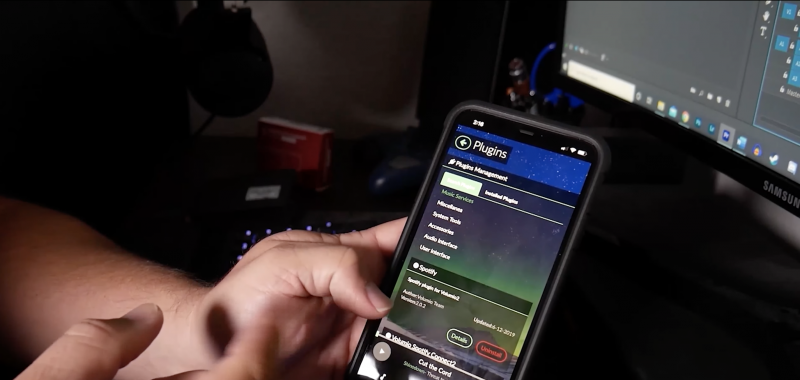
Mike reports a “substantial difference in sound quality” compared to his previous setup (the aforementioned and reviled Bluetooth and RCA plug options).
This project lets you use a Raspberry Pi as a music player and control it from your mobile phone.
You can use an Ethernet cable, but Mike wanted to utilise Raspberry Pi 4’s wireless connectivity to boot the Volumio app. This way, the Raspberry Pi music player can be used anywhere in the house, as it’ll create its own wireless hotspot within your home network called ‘Volumio’.
Eew! No more direct audio connection to your phone to listen to music.
You’ll need a different version of the Volumio app depending on whether you have an Android phone or iPhone. Mike touts the app as “super easy, really robust”. You just select the music app you usually use from the ‘Plugins’ section of the Volumio app, and all your music, playlists, and cover art will be there ready for you once downloaded.
And that’s basically it. Just connect to the Volumio OS via the app and tell your Raspberry Pi what to play.
Amp it up
To get his new music player booming all around the house, Mike used a Starke Sound AD4, which you can watch him unbox and review.
What kind of amplification system have you got paired up with your Raspberry Pi–powered music player?
Today we have a guest post from Igalia’s Iago Toral, who has spent the past year working on the Mesa graphic driver stack for Raspberry Pi 4.
It’s been nearly a year since we first announced that we were developing a Vulkan driver for the latest generation of Raspberry Pi devices (Raspberry Pi 4, Raspberry Pi 400, and Compute Module 4).
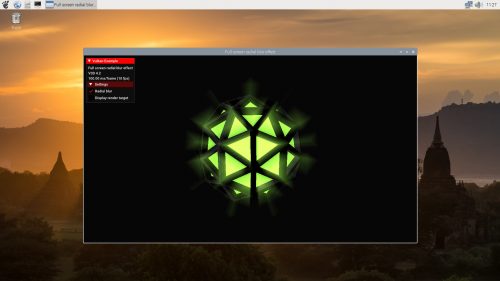
Sascha Willems’ Vulkan radial blur demo
In June we released the source code for our prototype driver, and last month we announced that the driver had been successfully merged to Mesa upstream.
Today we have some very exciting news to share: as of 24 November the V3DV Vulkan Mesa driver for Raspberry Pi 4 has demonstrated Vulkan 1.0 conformance.
Khronos describes the conformance process as a way to ensure that its standards are consistently implemented by multiple vendors, so as to create a reliable platform for application developers. For each standard, Khronos provides a large conformance test suite (CTS) that implementations must pass successfully to be declared conformant; in the case of Vulkan 1.0, the CTS contains over 100,000 tests.
Vulkan 1.0 conformance is a major milestone in bringing Vulkan to Raspberry Pi, but it isn’t the end of the journey. Our team continues to work on all fronts to expand the Vulkan feature set, improve performance, and fix bugs. So stay tuned for future Vulkan updates!
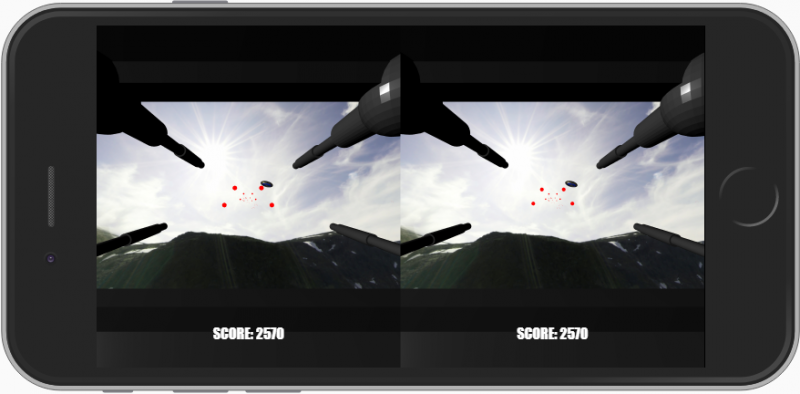
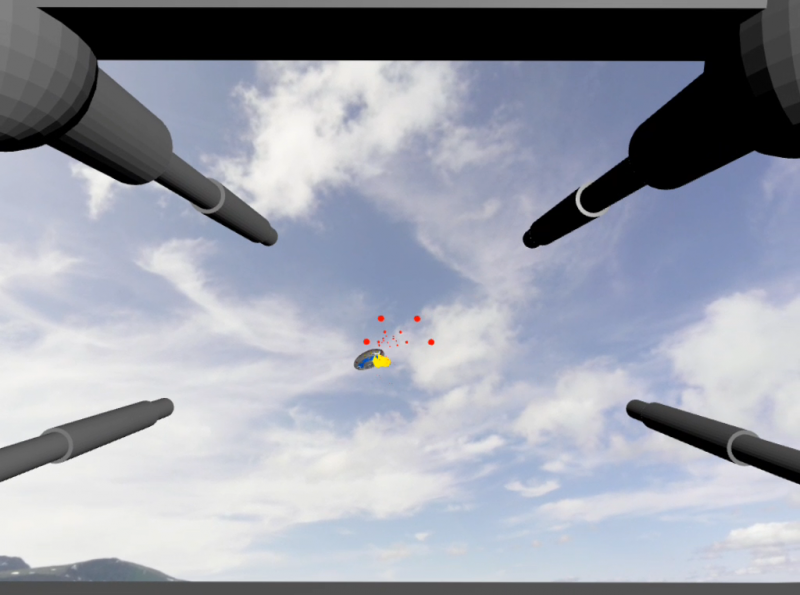
In the latest issue of Wireframe magazine, Mark Vanstone shows you how to turn a 3D shooter into a VR game for a variety of viewers, from Google Cardboard to gaming headsets.
Our shooter, now in VR format. Blast aliens from the sky as they fly over the mountains.
Browser development has really matured of late, with a number of exciting new features coming to the fore. Where WebGL was well supported, the new WebXR (previously WebVR) is now becoming standard in modern browsers. JavaScript ES5 has now been superseded by ES6, and with these new technologies, making browser-based apps – and specifically 3D games – is now a serious proposition. The other part of VR technology, the hardware, has also evolved – as mobile tech has become more powerful, so have the opportunities for cost-effective VR experiences.
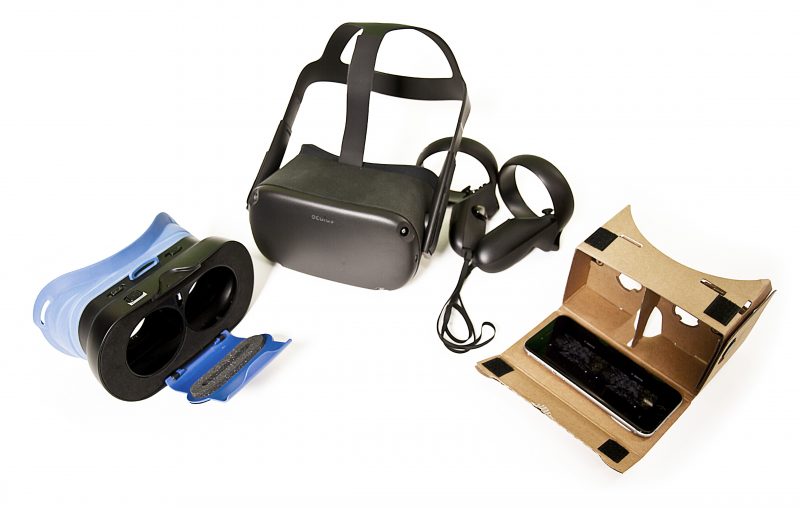
With a mobile phone you can create a stereoscopic display for use with a simple Cardboard viewer.
If you have an old mobile phone, perhaps an Make your own virtual reality 3D Shooter B iPhone 6 or a Samsung S7, you can get a Google Cardboard headset for £6 and turn it into a rudimentary VR viewer. In this article, we’ll show you how to set up a 3D shooter to run not only on that hardware, but also on other viewers such as the Gear VR or Daydream, and even gaming headsets such as the Oculus, HTC, or Valve. All of these have web browsers built in which can support WebXR or a 3D display, and although there are some differences between how they work, the process of displaying a 3D scene is mostly the same on all of them, so we can use the Three.js JavaScript library.
There’s a wide range of VR viewers and headsets on the market, from Google Cardboard to pricey gaming headsets like the Oculus, HTC, HP, Microsoft, and Valve ranges.
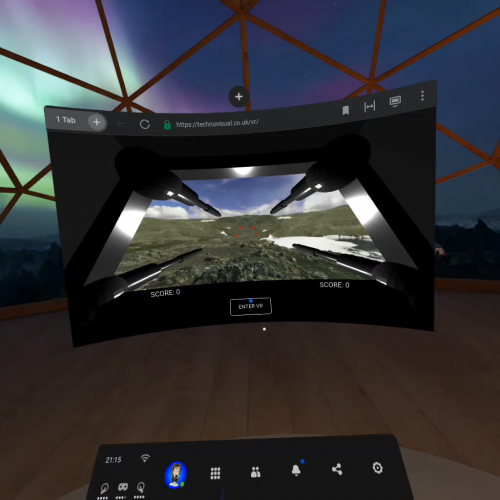
To begin, we’ll start with the Three.js 3D shooter we made in Wireframe #32 – if you missed it, you can download a copy. We’ll use the same models and much of the same code. The first change, though, is to update the code to run as an ES6 module. The non-module version of Three.js is being phased out at the end of 2020, so it’s probably best to get with the times and use the new stuff. As with our earlier shooter, you’ll need to run this code from a secure web server, which, for mobile phones and gaming headsets, will mean uploading it to somewhere suitable, but if you want to see it running, you can play it at technovisual.co.uk/vr.
Basic VR viewers
Now we need to consider the hardware we’re going to use to run our game. Let’s start at our baseline, Google Cardboard, and work up from there. Available from many outlets online (including Google’s store), it’s a cut-out kit, which you fold up to create a viewer.
From a browser window inside a gaming headset environment, you can launch a Three.js VR experience
There are two lenses to look through, two magnets in a recess on the side, and velcro tabs to hold a mobile phone. The magnets on the side serve as a selection mechanism which we’ll explore later.
Next, we have Gear VR-style viewers. There are many different types, priced from around £12 to £40, and these are essentially a better-built plastic version of the Cardboard but with a button on top to act as a selector. Phones of varying sizes can be used, and as long as the device isn’t more than about four years old, it should be up-to-date enough to run the 3D software.
For example, the six-year-old Samsung S5 is capable of displaying VR, but it’s a bit too slow to make the experience pleasant, whereas a five-year-old iPhone 6 is quite capable of displaying simple VR scenes smoothly. (With iPhones, you may need to switch on Experimental Features in the Safari settings, however.)
Proper pro kit
Gaming headsets are a bit different, since they have a built-in screen in the headset, and – in the case of the Oculus Go and Quest – an Android computer in there as well. Tethered headsets use the power of a connected computer to generate the display, and all of them use a slightly different Three.js system from the cheaper viewers to generate the 3D display.
As time goes on, it’s likely that more mobile phones will be compatible with the VR software used by the untethered gaming headsets. Gaming headsets also have sensors that track your movement as well as the tilt of the headset, providing six degrees of freedom.
Get the rest of the tutorial in Wireframe #44
This is just a taste of the comprehensive guide included in the latest issue of Wireframe magazine. If you’re not a subscriber, you can download a PDF copy for free from the Wireframe magazine website. Start at page 50 and work your way through to create your own VR shooter game.
And if you want to take advantage of Wireframe magazine’s latest subscription deal, you can get it for just £10 at the official Raspberry Pi Press online store.
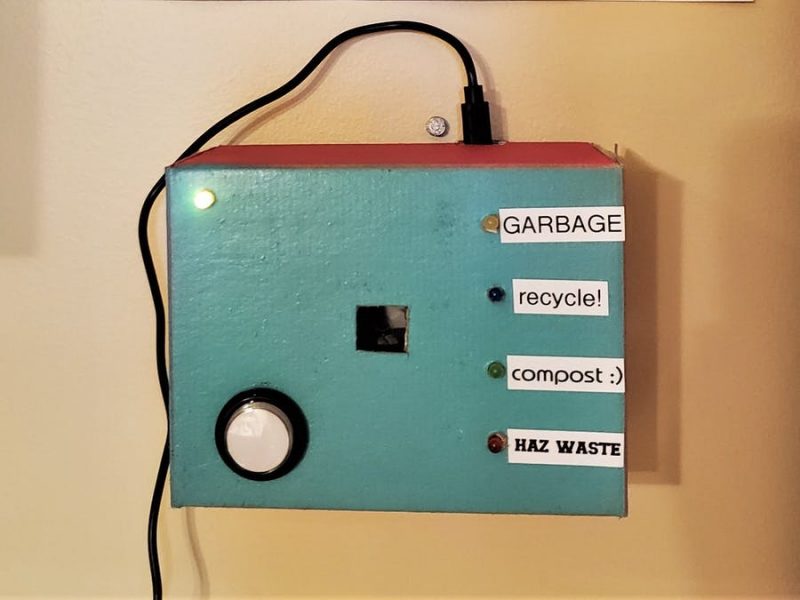
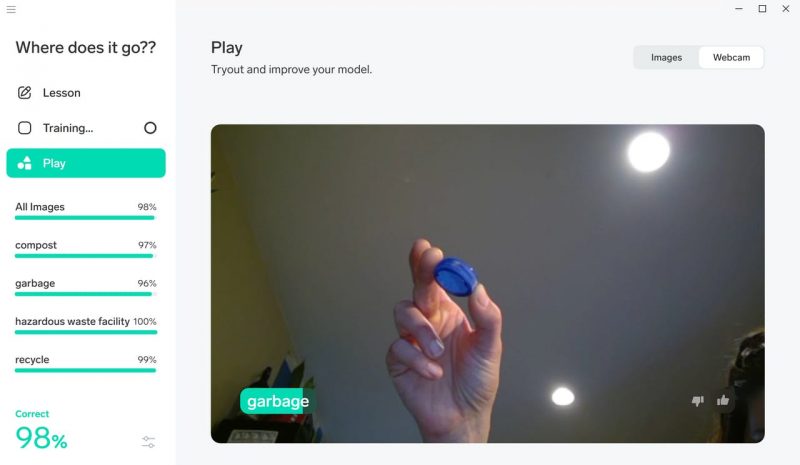
Maker Jen Fox took to hackster.io to share a Raspberry Pi–powered trash classifier that tells you whether the trash in your hand is recyclable, compostable, or just straight-up garbage.
Jen reckons this project is beginner-friendly, as you don’t need any code to train the machine learning model, just a little to load it on Raspberry Pi. It’s also a pretty affordable build, costing less than $70 including a Raspberry Pi 4.
“Haz waste”?!
Hardware:
Raspberry Pi 4 Model B
Raspberry Pi Camera Module
Adafruit push button
Adafruit LEDs
Watch Jen giving a demo of her creation
Software
The code-free machine learning model is created using Lobe, a desktop tool that automatically trains a custom image classifier based on what objects you’ve shown it.
The image classifier correctly guessing it has been shown a bottle cap
Training the image classifier
Basically, you upload a tonne of photos and tell Lobe what object each of them shows. Jen told the empty classification model which photos were of compostable waste, which were of recyclable and items, and which were of garbage or bio-hazardous waste. Of course, as Jen says, “the more photos you have, the more accurate your model is.”
Loading up Raspberry Pi
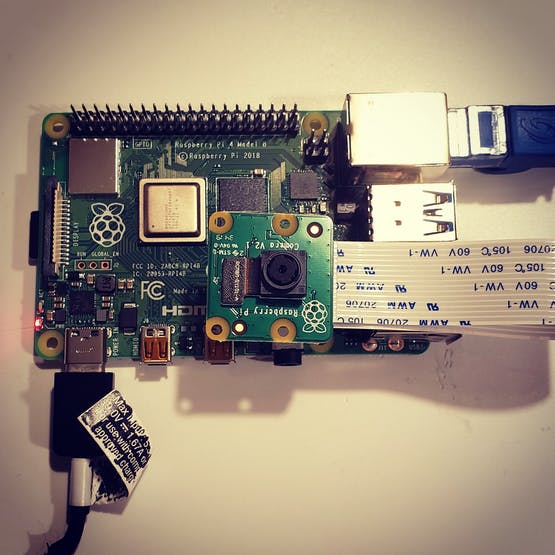
The Raspberry Pi Camera Module attached to Raspberry Pi 4
As promised, you only need a little bit of code to load the image classifier onto your Raspberry Pi. The Raspberry Pi Camera Module acts as the image classifier’s “eyes” so Raspberry Pi can find out what kind of trash you hold up for it.
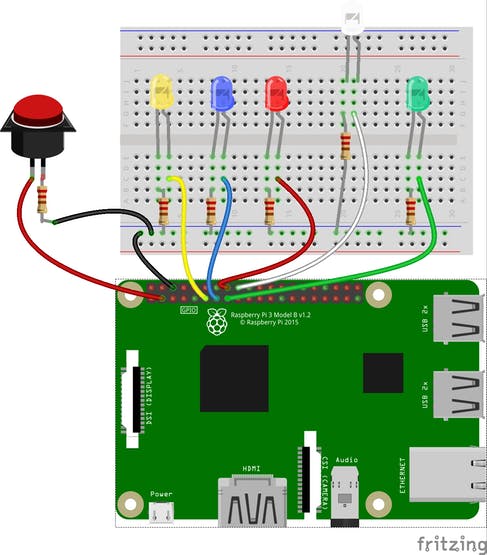
The push button and LEDs are wired up to the Raspberry Pi GPIO pins, and they work together with the camera and light up according to what the image classifier “sees”.
Here’s the fritzing diagram showing how to wire the push button and LEDS to the Raspberry Pi GPIO pins
You’ll want to create a snazzy case so your trash classifier looks good mounted on the wall. Kate cut holes in a cardboard box to make sure that the camera could “see” out, the user can see the LEDs, and the push button is accessible. Remember to leave room for Raspberry Pi’s power supply to plug in.
Jen’s hand-painted case mounted to the wall, having a look at a plastic bag
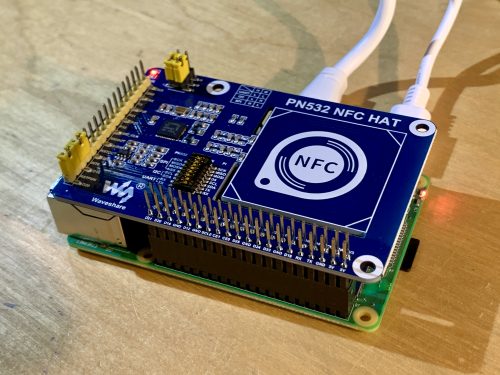
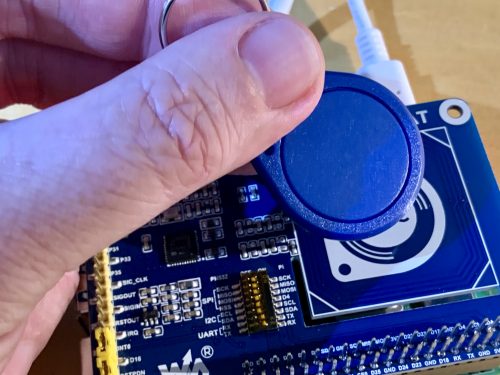
Add a bit of security to your project or make things selectable by using different cards. In the latest issue of HackSpace magazine, PJ Evans goes contactless.
The HAT is not hard on resources, so you can use many variants of Raspberry Pi
NFC (near-field communication) is based on the RFID (radio-frequency identification) standard. Both allow a device to receive data from a passive token or tag (meaning it doesn’t require external power to work). RFID supports a simple ID message that shouts ‘I exist’, whereas NFC allows for both reading and writing of data.
Most people come into contact with these systems every day, whether it’s using contactless payment, or a card to unlock a hotel or office door. In this tutorial we’ll look at the Waveshare NFC HAT, an add-on for Raspberry Pi computers that allows you to interact with NFC and RFID tokens.
Prepare your Raspberry Pi
We start with the usual step of preparing a Raspberry Pi model for the job. Reading RFID tags is not strenuous work for our diminutive friend, so you can use pretty much any variant of the Raspberry Pi range you like, so long as it has the 40-pin GPIO. We only need Raspberry Pi OS Lite (Buster) for this tutorial; however, you can install any version you wish. Make sure you’ve configured it how you want, have a network connection, and have updated everything by running sudo apt -y update && sudo apt -y upgrade on the command line.
Enable the serial interface
This NFC HAT is capable of communicating over three different interfaces: I2C, SPI, and UART. We’re going with UART as it’s the simplest to demonstrate, but you may wish to use the others. Start by running sudo raspi-config, going to ‘Interfacing options’, and selecting ‘Serial Interface’. When asked if you want to log into the console, say ‘No’. Then, when asked if you want to enable the serial interface, say ‘Yes’. You’ll need to reboot now. This will allow the HAT to talk to our Raspberry Pi over the serial interface.
Configure and install the HAT
As mentioned in the previous step, we have a choice of interfaces and swapping between them means changing some physical settings on the NFC HAT itself. Do not do this while the HAT is powered up in any way. Our HAT can be configured for UART/Serial by default but do check on the wiki at hsmag.cc/iHj1XA. The jumpers at I1 and I0 should both be shorting ‘L’, D16 and D20 should be shorted and on the DIP switch, everything should be off except RX and TX. Check, double-check, attach the HAT to the GPIO, and boot up.
The Waveshare HAT contains many settings. Make sure to read the instructions!
Download the examples
You can download some examples directly from Waveshare. First, we need to install some dependencies. Run the following at the command line: sudo apt install rpi.gpio p7zip-full python3-pip pip3 install spidev pyserial
Now, download the files and unpack them: cd wget https://www.waveshare.com/w/upload/6/67/Pn532-nfc-hat-code.7z 7z x Pn532-nfc-hat-code.7z
Before you try anything out, you need to edit the example file so that we use UART (see the accompanying code listing). cd ~/raspberrypi/python nano example_get_uid.py
Find the three lines that start pn532 = and add a # to the top one (to comment it out). Now remove the # from the line starting pn532 = PN532_UART. Save, and exit.
Try it out!
Finally, we get to the fun part. Start the example code as follows: python3 example_get_uid.py If all is well, the connection to the HAT will be announced. You can now place your RFID token over the area of the HAT marked ‘NFC’. Hexadecimal numbers will start scrolling up the screen; your token has been detected! Each RFID token has a unique number, so it can be used to uniquely identify someone. However, this HAT is capable of much more than that as it also supports NFC and can communicate with common standards like MIFARE Classic, which allows for 1kB of storage on the card. Check out example_dump_mifare.py in the same directory (but make sure you make the same edits as above to use the serial connection).
Going further
You can now read unique identifiers on RFID and NFC tokens. As we just mentioned, if you’re using the MIFARE or NTAG2 standards, you can also write data back to the card. The examples folder contains some C programs that let you do just that. The ability to read and write small amounts of data onto cards can lead to some fun projects. At the Electromagnetic Field festival in 2018, an entire game was based around finding physical locations and registering your presence with a MIFARE card. Even more is possible with smartphones, where NFC can be used to exchange data in any form.
Get HackSpace magazine 37 – Out Now!
Each month, HackSpace magazine brings you the best projects, tips, tricks and tutorials from the makersphere. You can get it from the Raspberry Pi Press online store, The Raspberry Pi store in Cambridge, or your local newsagents.
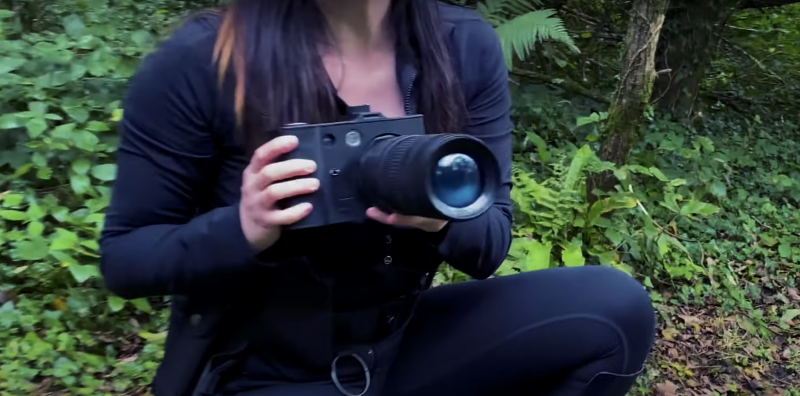
The trick with spy devices is to make sure they look as much like the object they’re hidden inside as possible. Where Raspberry Pi comes in is making sure the foam camera can be used as a real photo-taking camera too, to throw the baddies off the scent if they start fiddling with your spyware.
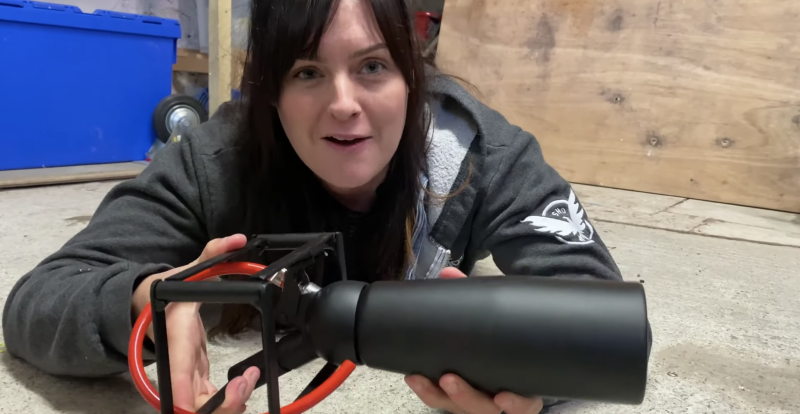
The foam-firing bit of Nathan’s invention was relatively simple to recreate – a modified chef’s squirty cream dispenser, hidden inside a camera-shaped box, gets the job done.
Squirty cream thing painted black and mounted onto camera-shaped frame
Ruth and Shawn drew a load of 3D-printed panels to mount on the box frame in the image above. One of those cool coffee cups that look like massive camera lenses hides the squirty cream dispenser and gives this build an authentic camera look.
THOSE cool camera lens-shaped coffee cups, see?
Techy bits from the build:
Raspberry Pi
Infrared LED
Camera module
Mini display screen
All the bits mentioned in the list above
The infrared LED is mounted next to the camera module and switches on when it gets dark, giving you night vision.
The mini display screen serves as a ‘lid’ to the blue case protecting the Raspberry Pi and mounts into the back panel of the ‘camera’
The Raspberry Pi computer and its power bank are crammed inside the box-shaped part, with the camera module and infrared LED mounted to peek out of custom-made holes in one of the 3D-printed panels on the front of the box frame.
The night vision mini display screen in action on the back of the camera
The foam-firing chef’s thingy is hidden inside the big fake lens, and it’s wedged inside so that when you lift the big fake lens, the lever on the chef’s squirty thing is depressed and foam fires out of a tube near to where the camera lens and infrared LED peek out on the front panel of the build.
Watch the #KidsInventStuff presenters test out Nathan’s invention
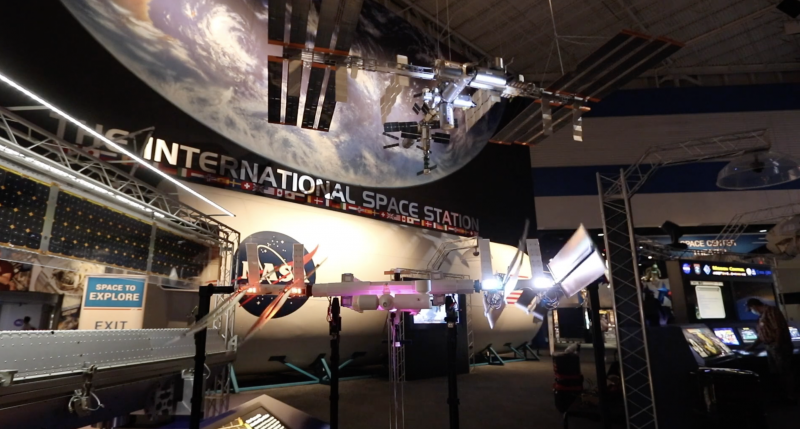
Did you see the coolest International Space Station (ISS) on Earth on the blog last week? ISS Mimic is powered by Raspberry Pi, mirrors exactly what the real ISS is doing in orbit, and was built by NASA engineers to make the ISS feel more real for Earth-bound STEAM enthusiasts.
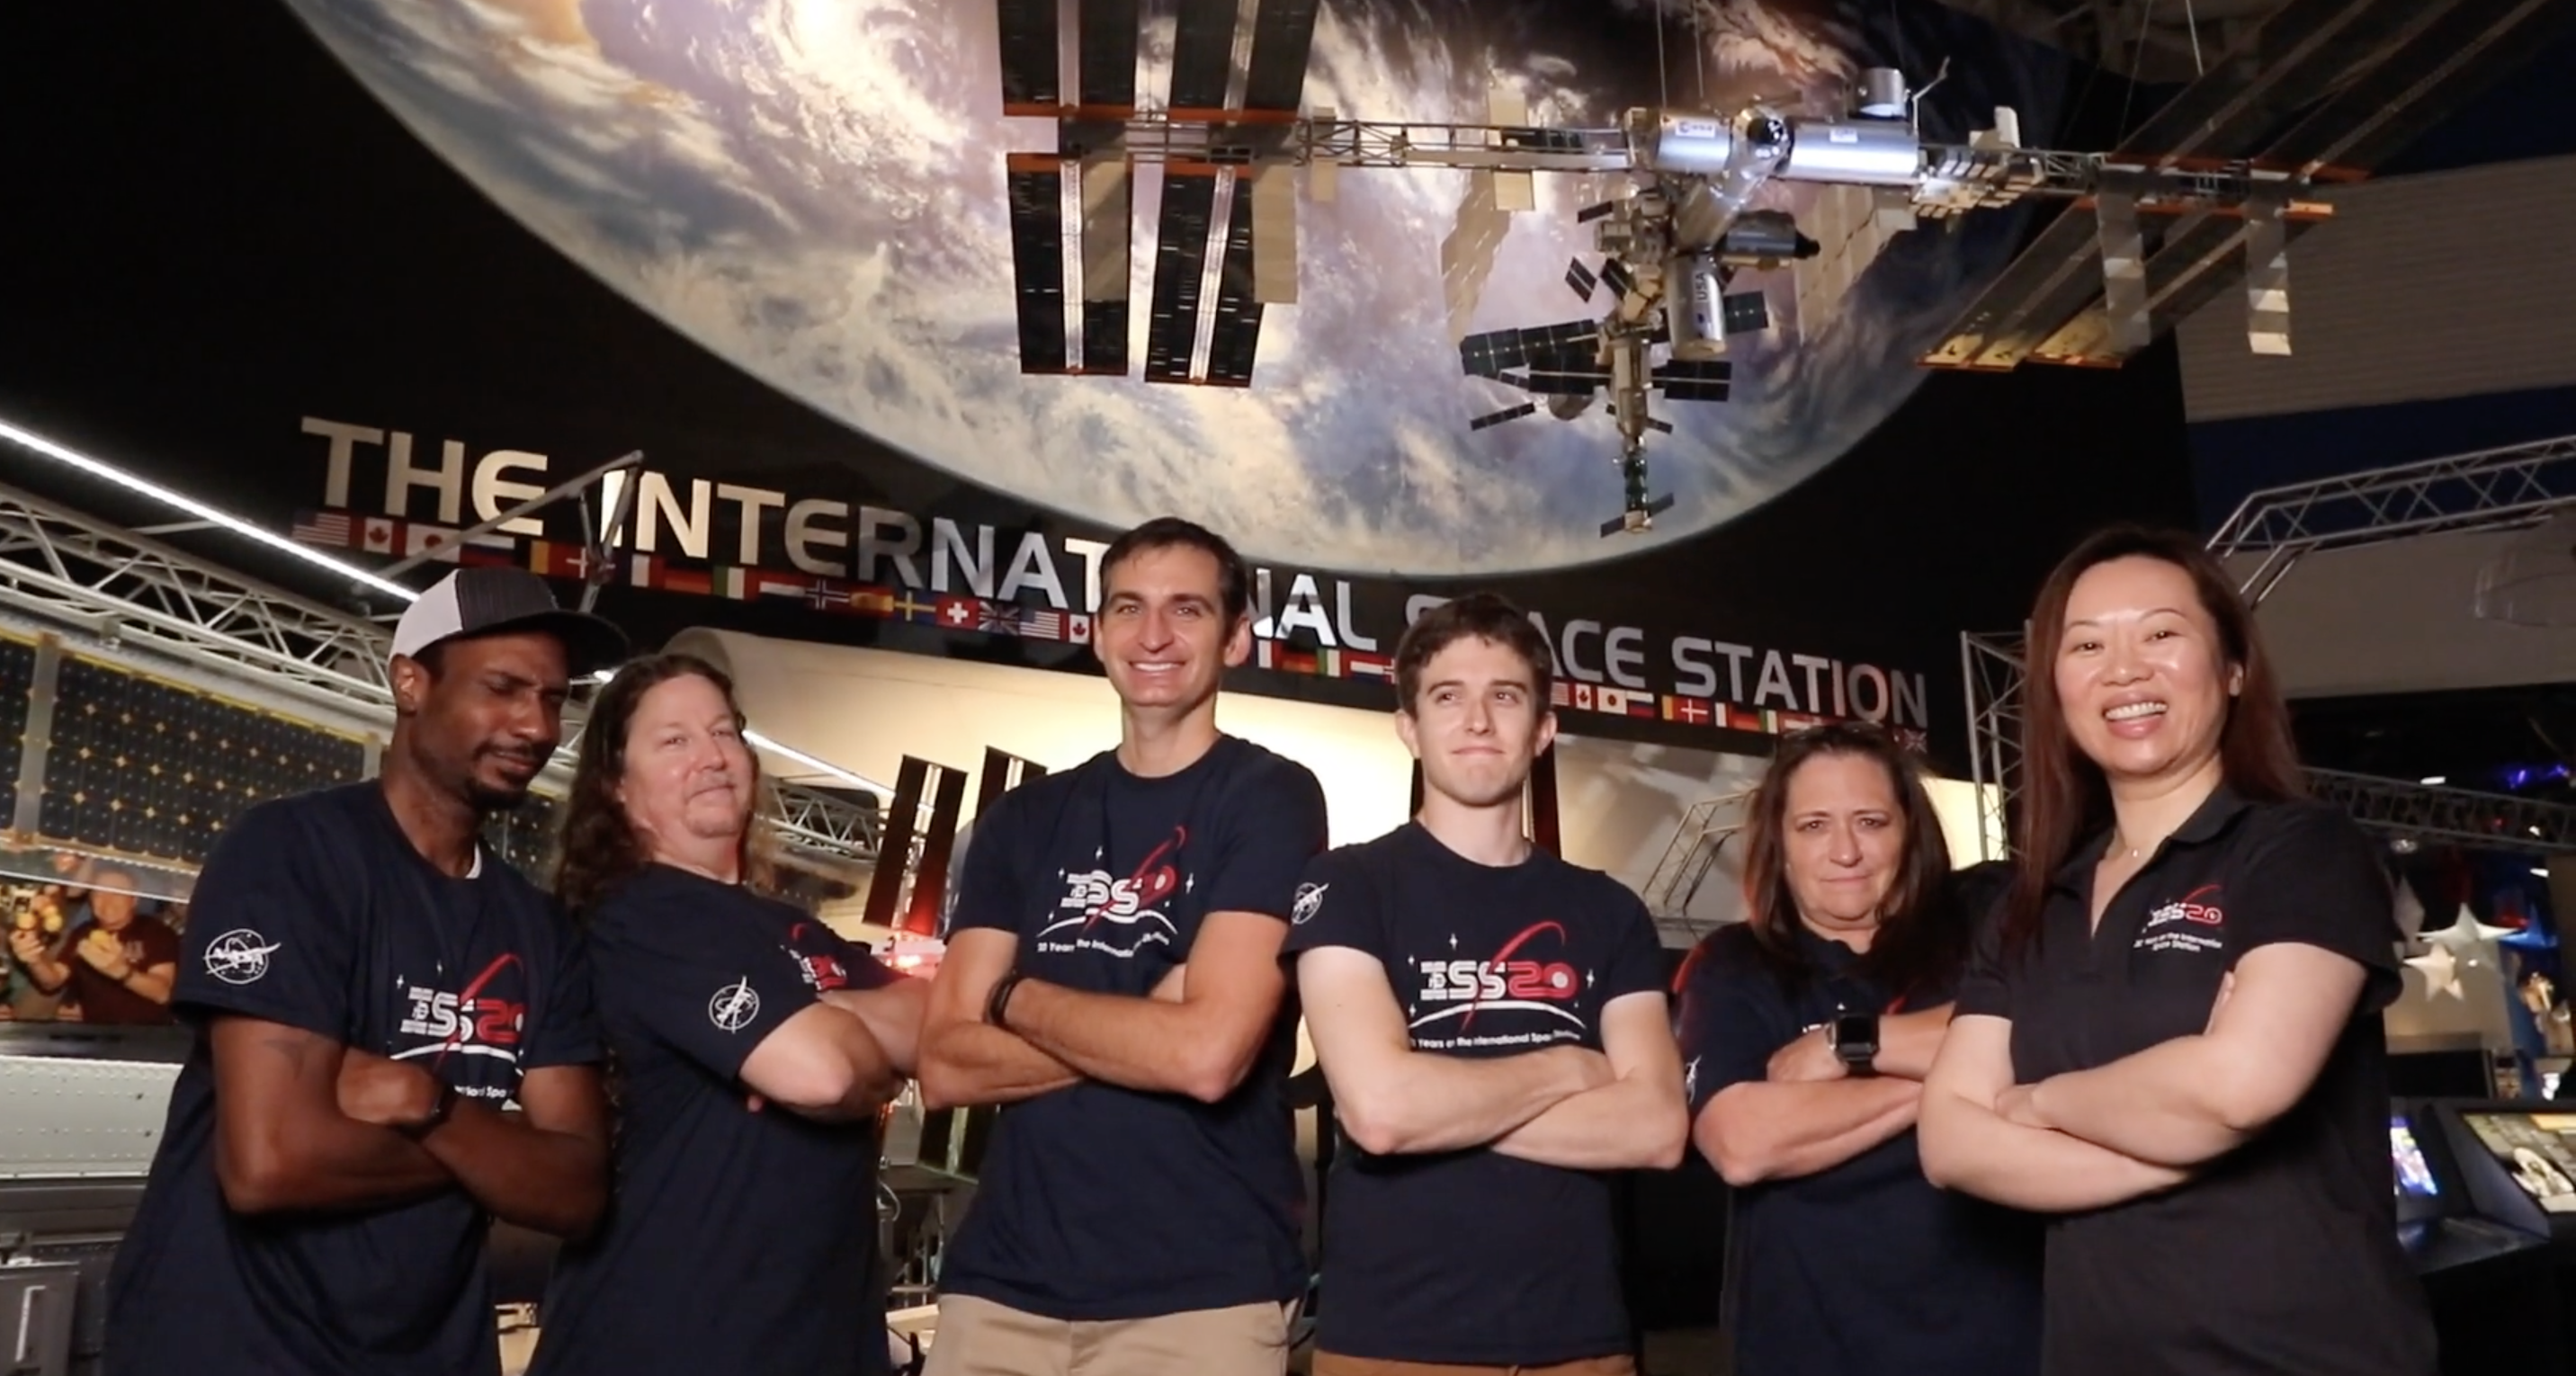
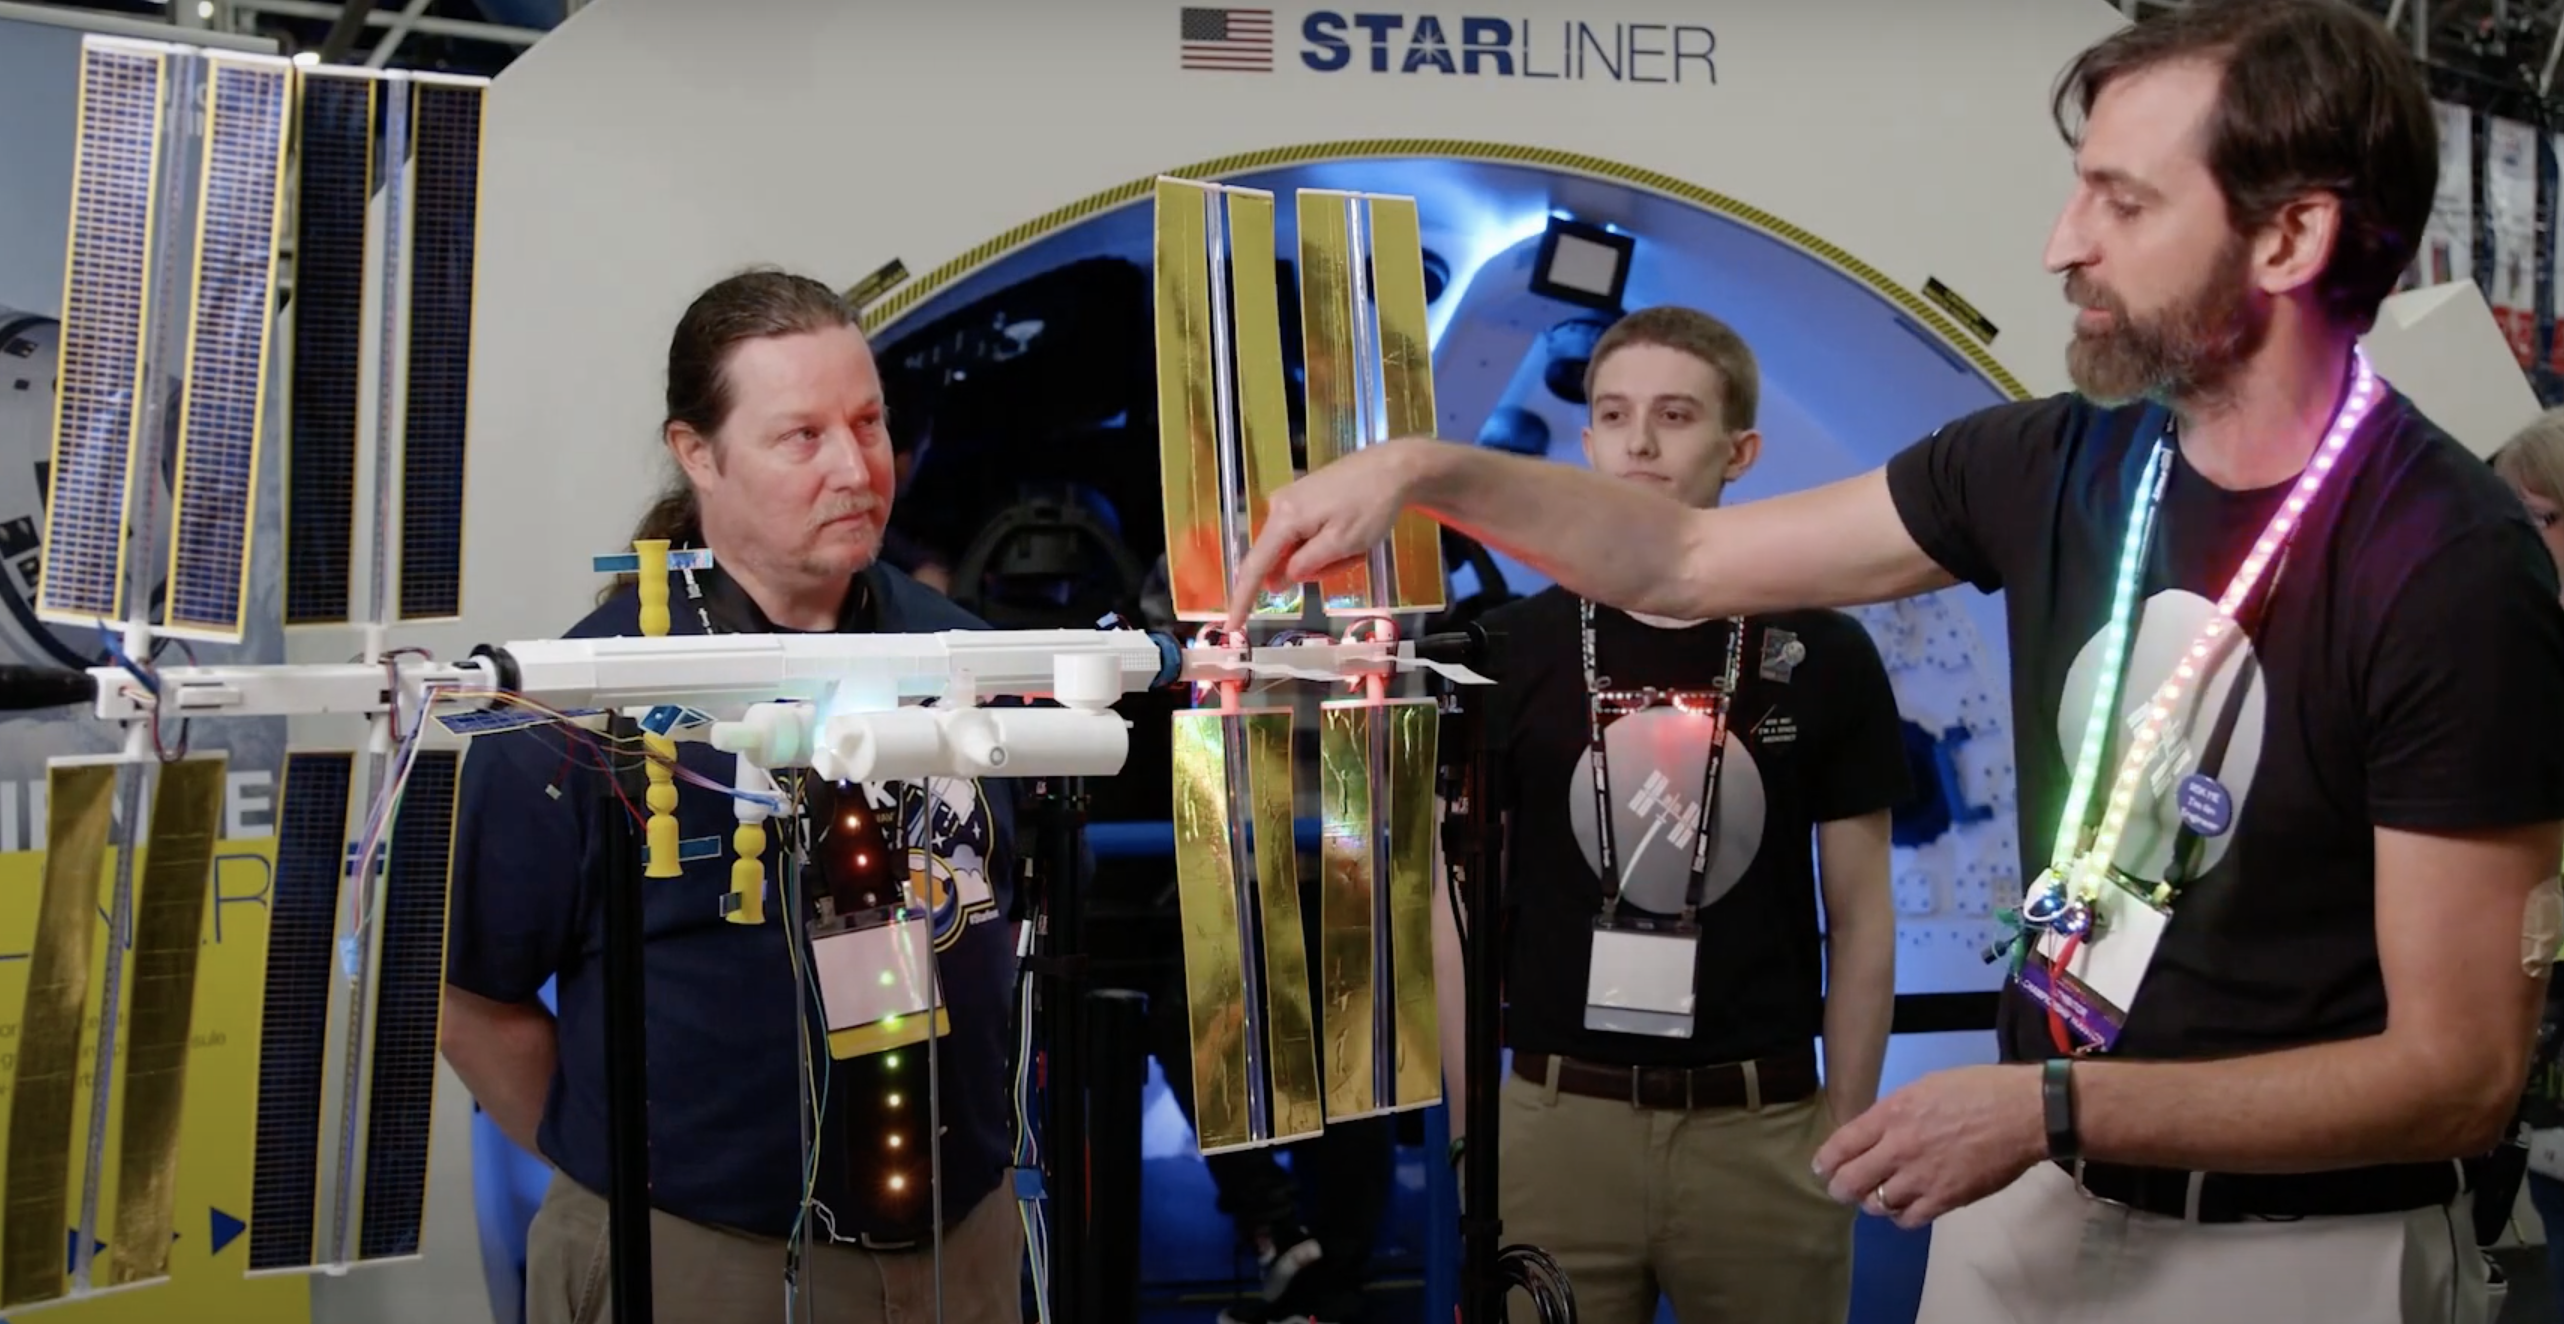
Here’s (most of) the team behind ISS Mimic
The team launched ISS Mimic in celebration of 20 years of continuous human presence in space on the ISS. And they’ve been getting lots of questions since we posted about their creation so, we asked them back to fill you in with a quick Q&A.
And here are newbies Dallas and Estefannie (Estefannie made the ISS Mimic video)
1. Since this is NASA-related, “MIMIC” must be an acronym, right?
Yes, we forced one: “Mechatronic Instantiated Model, Interactively Controlled”
2. What’s your subtitle?
“The second-most complicated International Space Station ever made”. We also like “1/100th scale for 1/100,000,000th cost”
3. Wait, are US tax dollars paying for you to make this?
No, it’s a volunteer project, but we do get lots of support. It’s done on our own time and money — though many NASA types and others have kicked in to help buy materials.
Yes — mostly other organisations that we have teamed up with. We partner with a non-profit makerspace near NASA, Creatorspace, for tools, materials, and outreach. And an awesome local 3D printer manufacturer, re:3D, has joined us and printed our (large) solar panels for free, and is helping to refine our models. They are also working towards making a kit of parts for sale for those who don’t have a printer or the time to print all the pieces, with a discount for educators.
Particularly helpful has been Space Center Houston (NASA’s visitor center), who invited us to present to the public and at an educator conference (pre-COVID), and allowed us to spend a full day filming in their beautiful facility. Our earliest supporter was Boeing, who we‘ve worked with to facilitate outreach to educators and students from the start.
The real International Space Station (ISS) in orbit
5. How long have you been working on this?
5 years — a looong time. We spent much effort early on to establish the scale and feasibility and test the capabilities of 3D printing. We maintained a hard push to keep the materials cost down and reduce build time/complexity for busy educators. We always knew we’d use Raspberry Pi for the brain, but were looking for less costly options for the mechatronics. We’d still like to cut the cost down a lot to make the project more attainable for lower-income schools and individuals.
6. Have you done any outreach so far?
All of the support has allowed us to take our prototype to schools and STEM events locally. But we really want this to be built around the world to reach those who don’t have much connection to space exploration and hands-on STEM. The big build is probably most suitable for teens and adults, while the alternative builds (in-work) would be much more approachable for younger students.
‘ISS Mimic’ on display
7. So, this just for schools?
No, not at all. Our focus is to make it viable for schools/educators — in cost and build complexity — but we want any space nerd to be able to build their own and help drive the design.
8. Biggest challenge?
Gravity. And time to work on the project… and trying to keep the cost down.
9. What about a Lunar Gateway or Habitat version of ISS Mimic?
It’s on our radar! Another build that’s screaming to be made is hacking the LEGO ISS model (released this year) to rotate its joints and light LEDs.
Raspberry Pi on the real ISS
There are two Raspberry Pi computers aboard the real ISS right now! And even better, young people have the chance to write Python code that will run on them — IN SPACE — as part of the European Astro Pi Challenge.
The most wonderful time of the year is approaching! “Most wonderful” meaning the time when you have to figure out what gift best expresses your level of affection for various individuals in your life. We’re here to take away some of that stress for you — provided your favourite individuals like Raspberry Pi, of course. Otherwise you’re on your own. Sorry.
We’ve got ideas for the gamers in your life, what to get for the Raspberry Pi “superfan” who has everything, and options that allow you to keep giving all year round.
Newest and hottest
If keeping up with the Joneses is your thing, why not treat your nearest Raspberry Pi fan to one of our newest products…
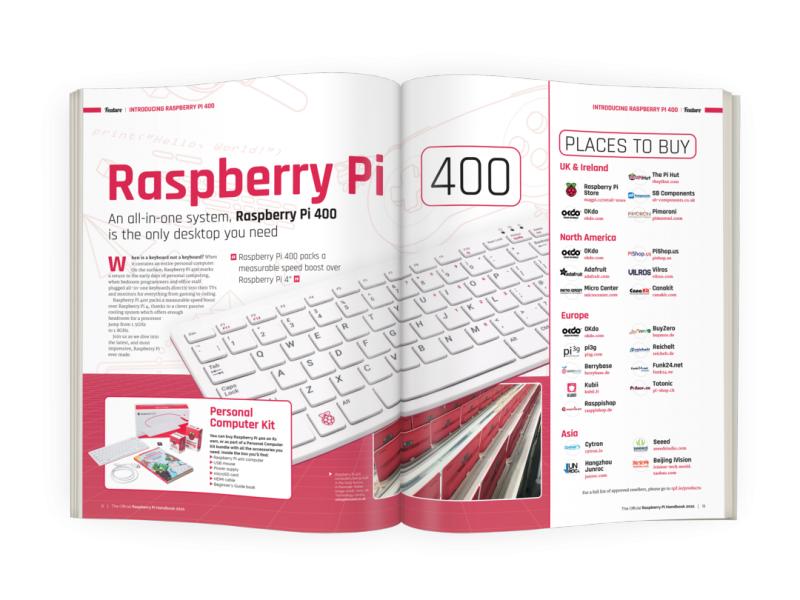
Raspberry Pi 400 | $70
This year, we released Raspberry Pi 400: a complete personal computer, built into a compact keyboard, costing just $70. Our community went wild about the possibilities that Raspberry Pi 400 opens up for home learners and for those who don’t have expensive tech options at their fingertips.
You just plug in a mouse, a monitor (any semi-modern TV screen should work), and go. The Raspberry Pi 400 Personal Computer kit costs $100 and comes with a few extras to help get you started. Or you can buy the Raspberry Pi 400 unit on its own.
Depending on where you are in the world, you may need to pre-order or join a waiting list, as Raspberry Pi 400 is in such high demand. But you could give a homemade ‘IOU’ voucher letting the recipient know that they will soon get their hands on one of our newest and most popular bits of kit.
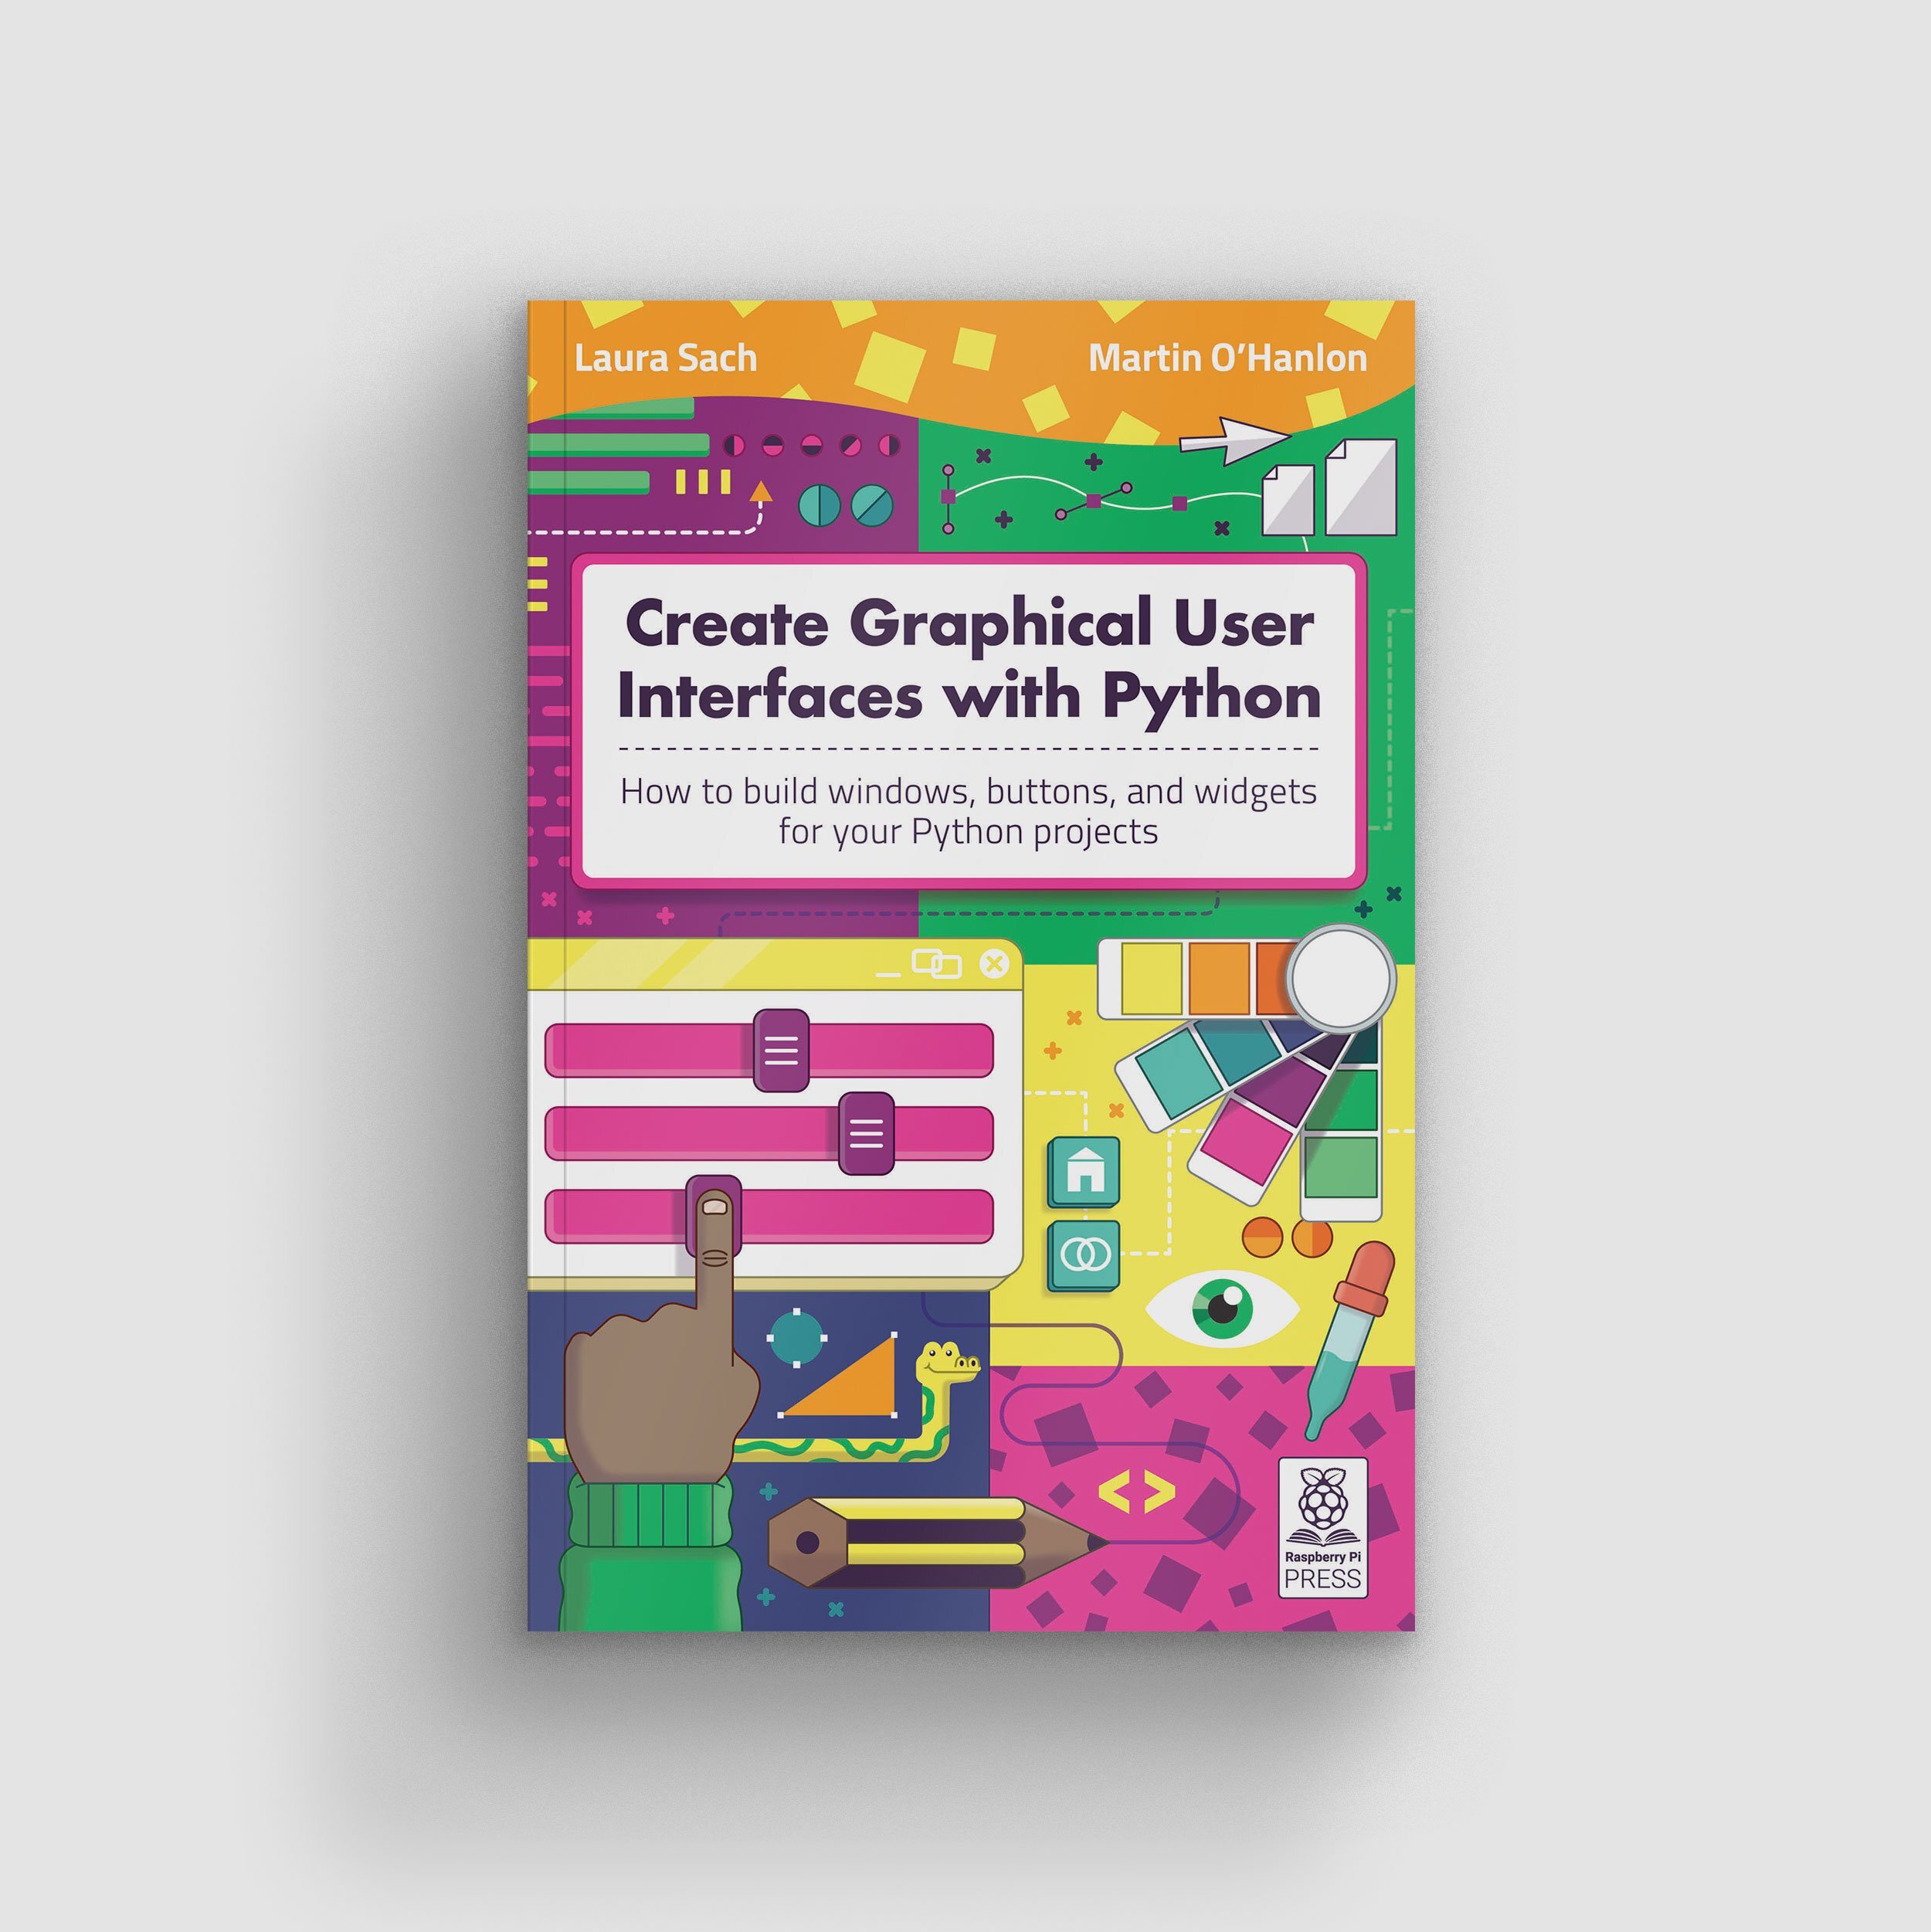
Our latest book of coding coolness | £10
We publish some cool books around these parts. Laura Sach and Martin O’Hanlon, who are both Learning Managers at the Raspberry Pi Foundation, have written the very newest one, which is designed to help you to get more out of your Python projects.
In Create Graphical User Interfaces with Python, you’ll find ten fun Python projects to create, including a painting program, an emoji match game, and a stop-motion animation creator. All for just £10.
So, if you’ve a keen coder in your midst, this book is the best choice to stretch their skills and keep them entertained throughout 2021. Buy it online from the official Raspberry Pi Press store.
The Pi Hut’s Raspberry Pi 4 Retro Gaming Kit costs £88 and includes everything you need to create your very own retro gaming console. All your lucky kit recipient has to find is a screen to plug into, and a keyboard to set up their new Raspberry Pi, which comes as part of the kit along with a case for it. The Pi Hut has also thrown in a 16GB microSD card, plus a reader for it, as well as our official micro HDMI cable. Job done.
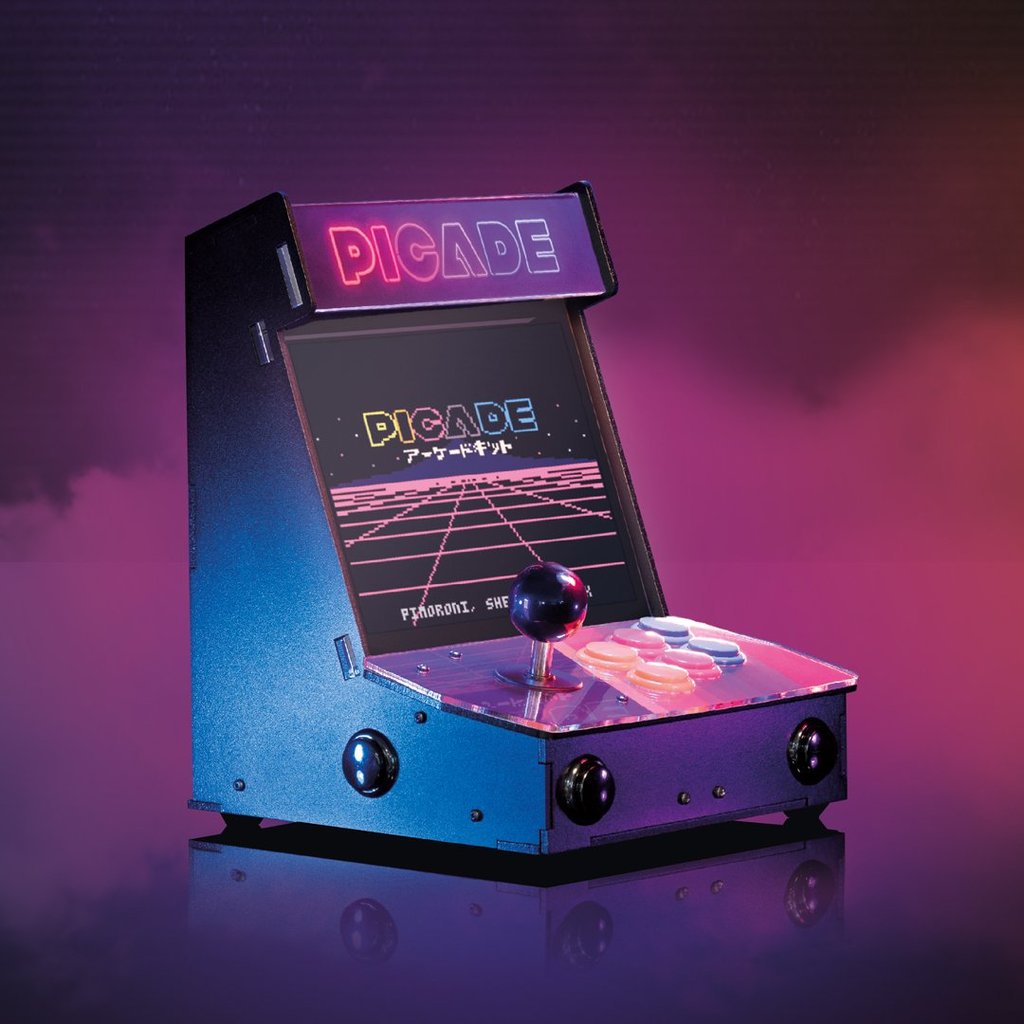
How cool does Picade look?! It’s sold by Pimoroni and you can buy an 8″ display set for £165,or a 10″ display version for £225. Show me a self-respecting gamer who doesn’t want a desktop retro arcade machine in their own home.
Picade is a Raspberry Pi–powered mini arcade that you build yourself. All you’ll need to add is your own Raspberry Pi, a power supply, and a micro SD card.
Code the Classics, Volume 1 | £12
And if the gamer on your gift list prefers to create their own retro video games, send them a copy of Code the Classics, Volume 1. It’s a stunning-looking hardback book packed with 224 pages telling the stories of some of the seminal video games of the 1970s and 1980s, and showing you how to create your own. Putting hours of projects in the hands of your favourite gamer will only set you back £12. Buy it online from the official Raspberry Pi Press store.
Raspberry Pi superfans
Raspberry Pi Zero W | $10
For just $10 apiece, you can drop a couple Raspberry Pi Zero W into any tinkerer’s stocking and they’ll be set for their next few projects. They will LOVE you for allowing them try a new, risky build without having to tear down something else they created to retrieve an old Raspberry Pi.
Babbage Bear | $9
What to get the superfan who already has a desk full of Raspberry Pi? An official Babbage Bear to oversee the proceedings! Babbage only costs £9 and will arrive wearing their own Raspberry Pi–branded T-shirt. A special Raspberry Pi Towers inhabitant made our Babbage this Christmassy outfit before we photographed them.
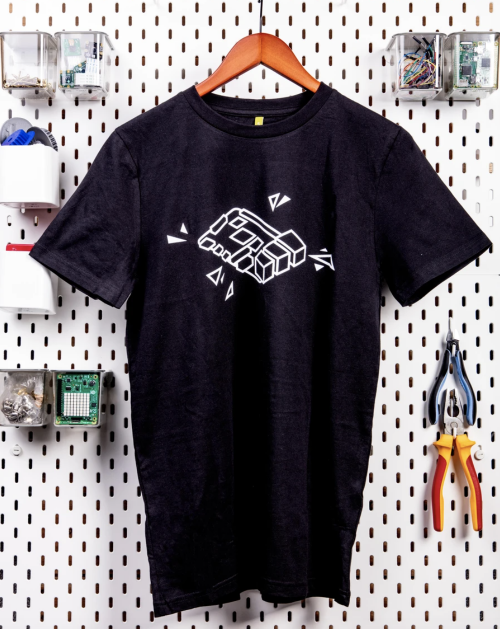
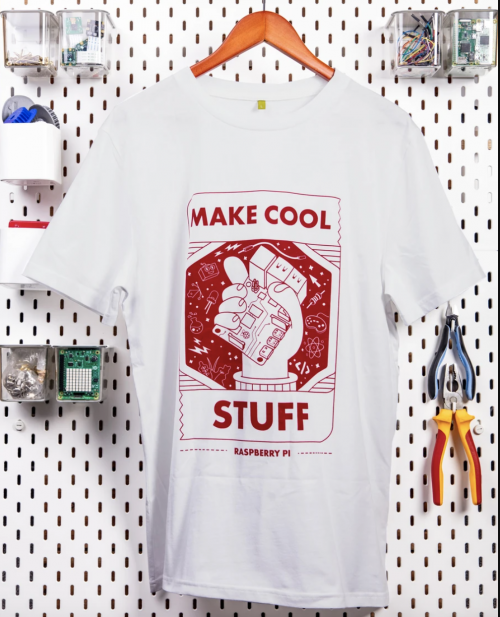
Official t-shirts | $12
Raspberry Pi “Pi 4” T-shirt
Raspberry Pi “Make Cool Stuff” T-shirt
If you’ve a superfan on your gift list, then it’s likely they already own a t-shirt with the Raspberry Pi logo on it — so why not get them one of these new designs?
Both costing just £12, the black Raspberry Pi “Pi 4” t-shirt was released to celebrate the launch of Raspberry Pi 4 and features an illustration of the powerful $35 computer. The white Raspberry Pi “Make Cool Stuff” option was created by Raspberry Pi’s own illustrator/animator extraordinaire Sam Alder. Drop that inside fact on the gift tag for extra superfan points.
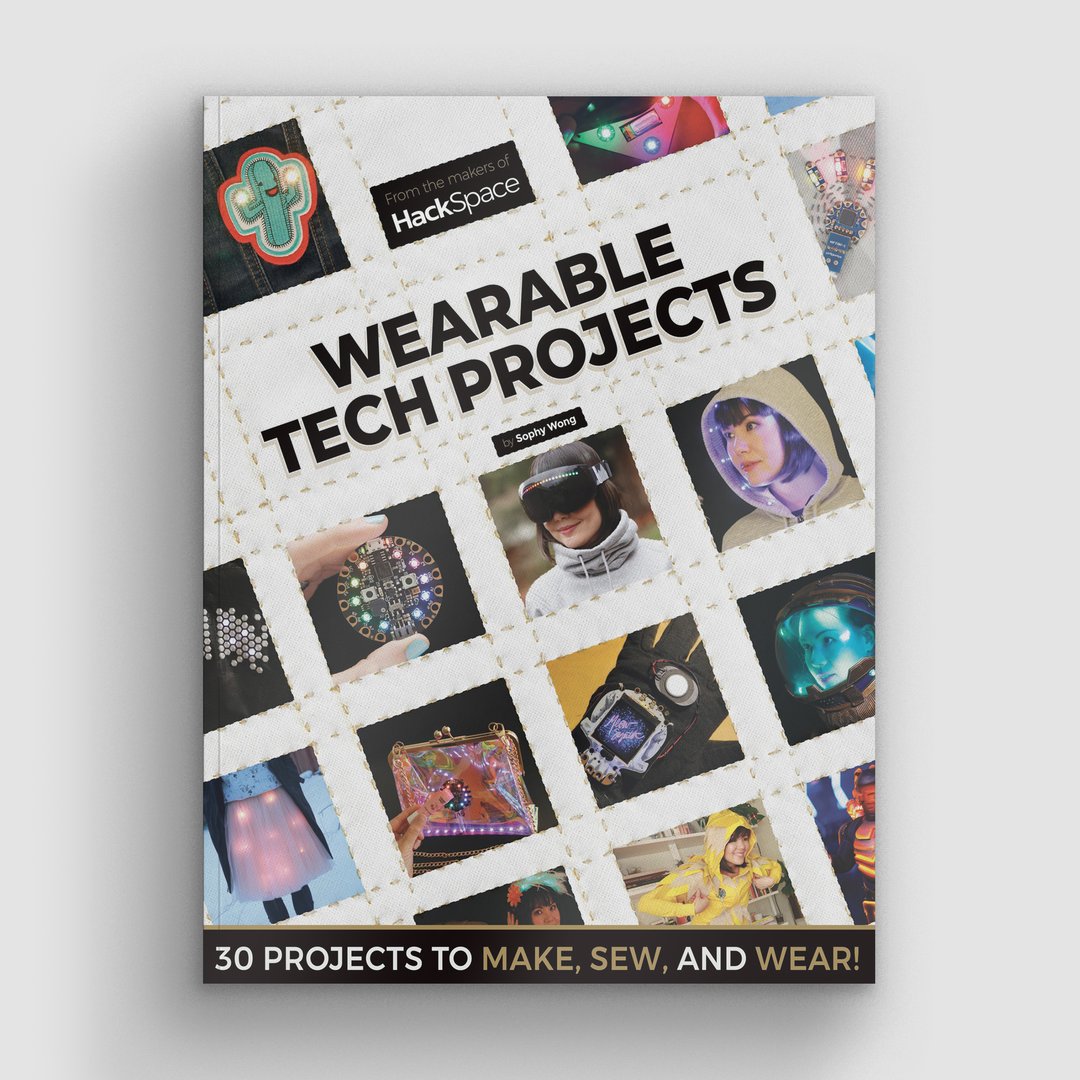
Wearable tech projects | £7
And if they’re the kind of superfan who would like to make their own Raspberry Pi-–themed clothing, gift them with our Wearable Tech Projects book. This 164-page book gathers up the best bits of wearable technology from HackSpace magazine, with tutorials such as adding lights to your favourite cosplay helmet, and creating a glowing LED skirt. It’s on sale for just £7 and you can buy it online from the official Raspberry Pi Press store.
Keep giving all year
What if you could give the joy of opening a Raspberry Pi–themed gift every single month for a whole year? Our magazine subscriptions let you do just that, AND they come with a few extra gifts when you sign up.
The MagPi magazine
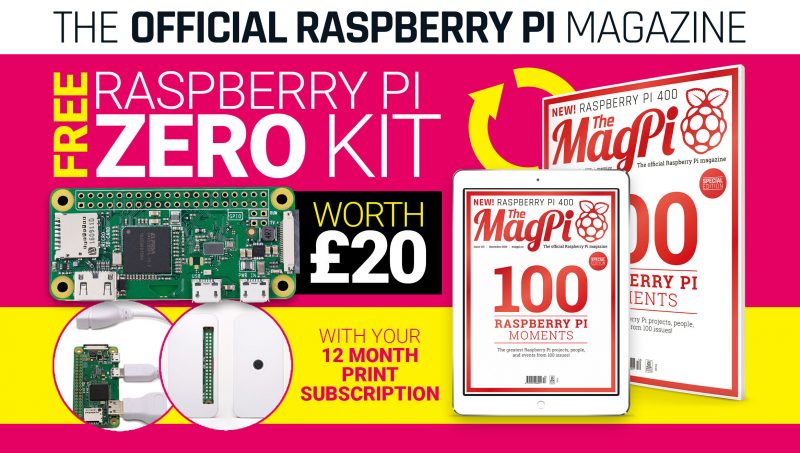
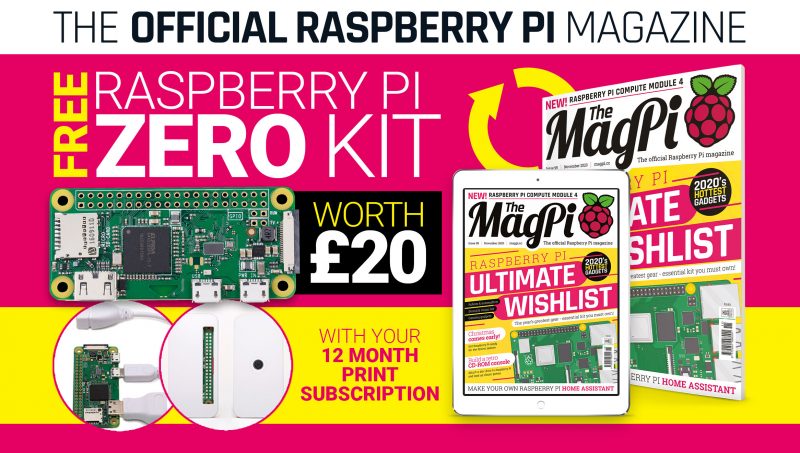
The official Raspberry Pi magazine comes with a free Raspberry Pi Zero kit worth £20 when you sign up for a 12-month subscription. The magazine is packed with computing and electronics tutorials, how-to guides, and the latest news and reviews.
HackSpace magazine is packed with projects for fixers and tinkerers of all abilities. 12-month subscriptions comes with a free Adafruit Circuit Playground Express, which has been specially developed to teach programming novices from scratch and is worth £25.
Wireframe magazine lifts the lid on video games. In every issue, you’ll find out how games are made, who makes them, and how you can make your own using detailed guides. The latest deal gets you three issues for just £10, plus your choice of one of our official books as a gift.
Custom PC is the magazine for people who are passionate about PC technology and hardware. You can subscribe to receive three issues for just £10, and you’ll also receive a book as a gift.
That’s all folks. Have a holly jolly one. Drop a question in the comments box below if you’re after something Raspberry Pi–themed which isn’t mentioned here. I’m half elf and should be able to help.
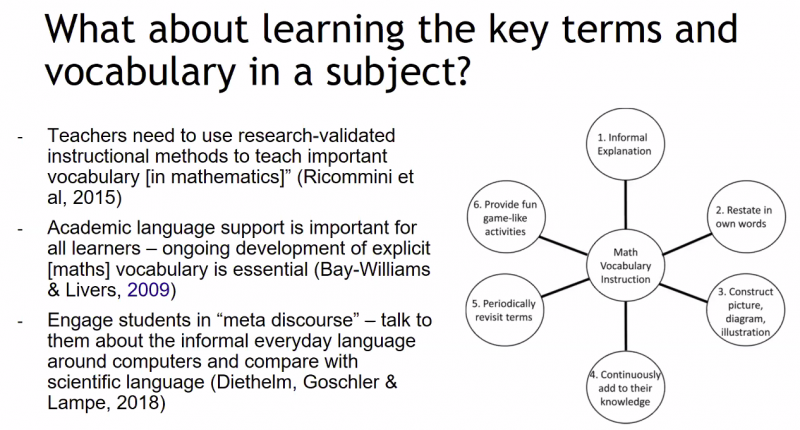
Whenever you learn a new subject or skill, at some point you need to pick up the particular language that goes with that domain. And the only way to really feel comfortable with this language is to practice using it. It’s exactly the same when learning programming.
In our latest research seminar, we focused on how we educators and our students can talk about programming. The seminar presentation was given by our Chief Learning Officer, Dr Sue Sentance. She shared the work she and her collaborators have done to develop a research-based approach to teaching programming called PRIMM, and to work with teachers to investigate the effects of PRIMM on students.
As well as providing a structure for programming lessons, Sue’s research on PRIMM helps us think about ways in which learners can investigate programs, start to understand how they work, and then gradually develop the language to talk about them themselves.
Productive talk for education
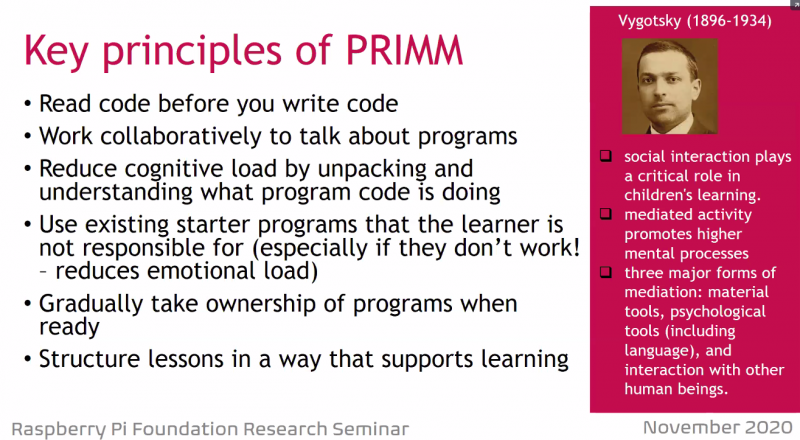
Sue began by taking us through the rich history of educational research into language and dialogue. This work has been heavily developed in science and mathematics education, as well as language and literacy.
In particular the work of Neil Mercer and colleagues has shown that students need guidance to develop and practice using language to reason, and that developing high-quality language improves understanding. The role of the teacher in this language development is vital.
Sue’s work draws on these insights to consider how language can be used to develop understanding in programming.
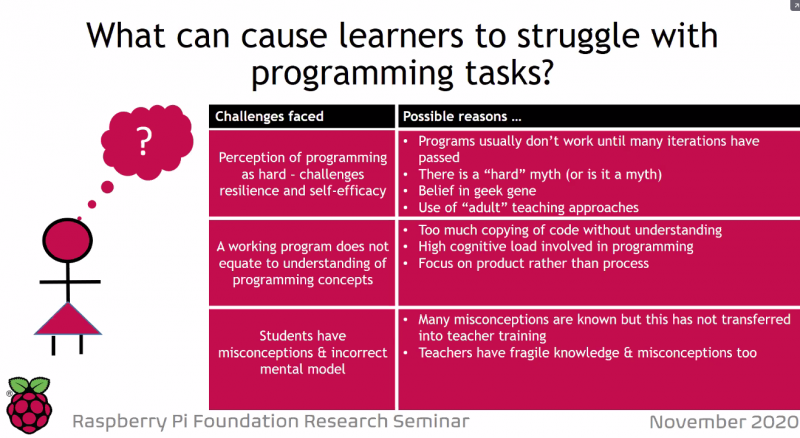
Why is programming challenging for beginners?
Sue identified shortcomings of some teaching approaches that are common in the computing classroom but may not be suitable for all beginners.
‘Copy code’ activities for learners take a long time, lead to dreaded syntax errors, and don’t necessarily build more understanding.
When teachers model the process of writing a program, this can be very helpful, but for beginners there may still be a huge jump from being able to follow the modeling to being able to write a program from scratch themselves.
PRIMM was designed by Sue and her collaborators as a language-first approach where students begin not by writing code, but by reading it.
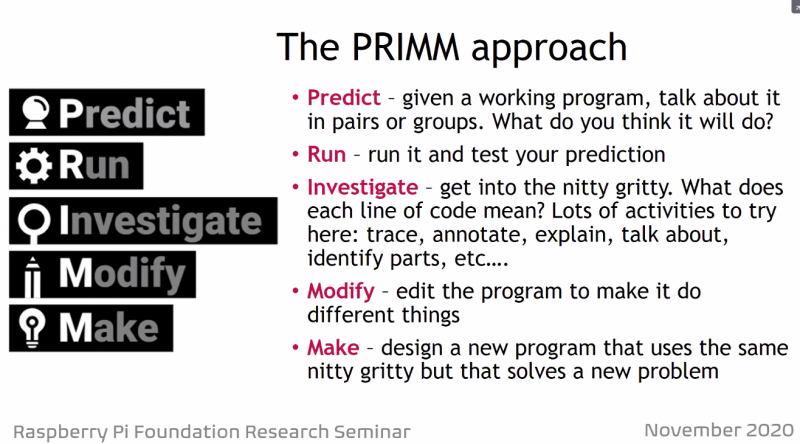
What is PRIMM?
PRIMM stands for ‘Predict, Run, Investigate, Modify, Make’. In this approach, rather than copying code or writing programs from scratch, beginners instead start by focussing on reading working code.
In the Predict stage, the teacher provides learners with example code to read, discuss, and make output predictions about. Next, they run the code to see how the output compares to what they predicted. In the Investigate stage, the teacher sets activities for the learners to trace, annotate, explain, and talk about the code line by line, in order to help them understand what it does in detail.
In the seminar, Sue took us through a mini example of the stages of PRIMM where we predicted the output of Python Turtle code. You can follow along on the recording of the seminar to get the experience of what it feels like to work through this approach.
The impact of PRIMM on learning
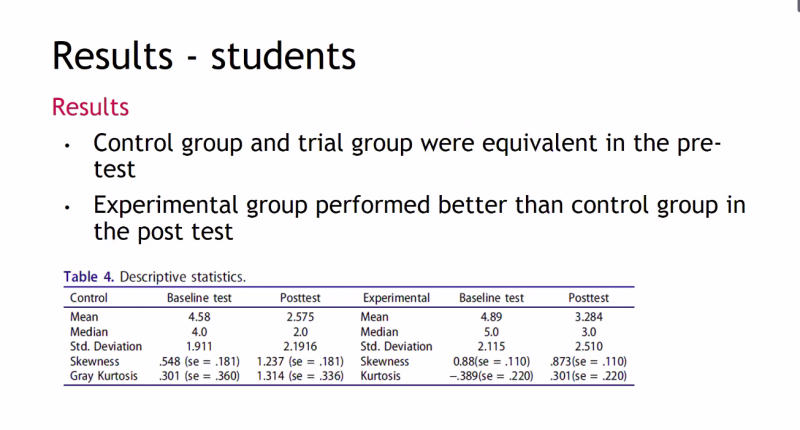
The PRIMM approach is informed by research, and it is also the subject of research by Sue and her collaborators. They’ve conducted two studies to measure the effectiveness of PRIMM: an initial pilot, and a larger mixed-methods study with 13 teachers and 493 students with a control group.
The larger study used a pre and post test, and found that the group who experienced a PRIMM approach performed better on the tests than the control group. The researchers also collected a wealth of qualitative feedback from teachers. The feedback suggested that the approach can help students to develop a language to express their understanding of programming, and that there was much more productive peer conversation in the PRIMM lessons (sometimes this meant less talk, but at a more advanced level).
The PRIMM structure also gave some teachers a greater capacity to talk about the process of teaching programming. It facilitated the discussion of teaching ideas and learning approaches for the teachers, as well as developing language approaches that students used to learn programming concepts.
The research results suggest that learners taught using PRIMM appear to be developing the language skills to talk coherently about their programming. The effectiveness of PRIMM is also evidenced by the number of teachers who have taken up the approach, building in their own activities and in some cases remixing the PRIMM terminology to develop their own take on a language-first approach to teaching programming.
Future research will investigate in detail how PRIMM encourages productive talk in the classroom, and will link the approach to other work on semantic waves. (For more on semantic waves in computing education, see this seminar by Jane Waite and this symposium talk by Paul Curzon.)
Resources for educators who want to try PRIMM
If you would like to try out PRIMM with your learners, use our free support materials:
If you missed the seminar, you can find the presentation slides alongside the recording of Sue’s talk on our seminars page.
In our next seminar on Tuesday 1 December at 17:00–18:30 GMT / 12:00–13:30 EsT / 9:00–10:30 PT / 18:00–19:30 CEST. Dr David Weintrop from the University of Maryland will be presenting on the role of block-based programming in computer science education. To join, simply sign up with your name and email address.
Once you’ve signed up, we’ll email you the seminar meeting link and instructions for joining. If you attended this past seminar, the link remains the same.
A sci-fi writer wanted to add some realism to his fiction. The result: a Raspberry Pi-based Martian timepiece. Rosie Hattersley clocks in from the latest issue of The MagPi Magazine.
The Mars Clock project is adapted from code Phil wrote in JavaScript and a Windows environment for Raspberry Pi
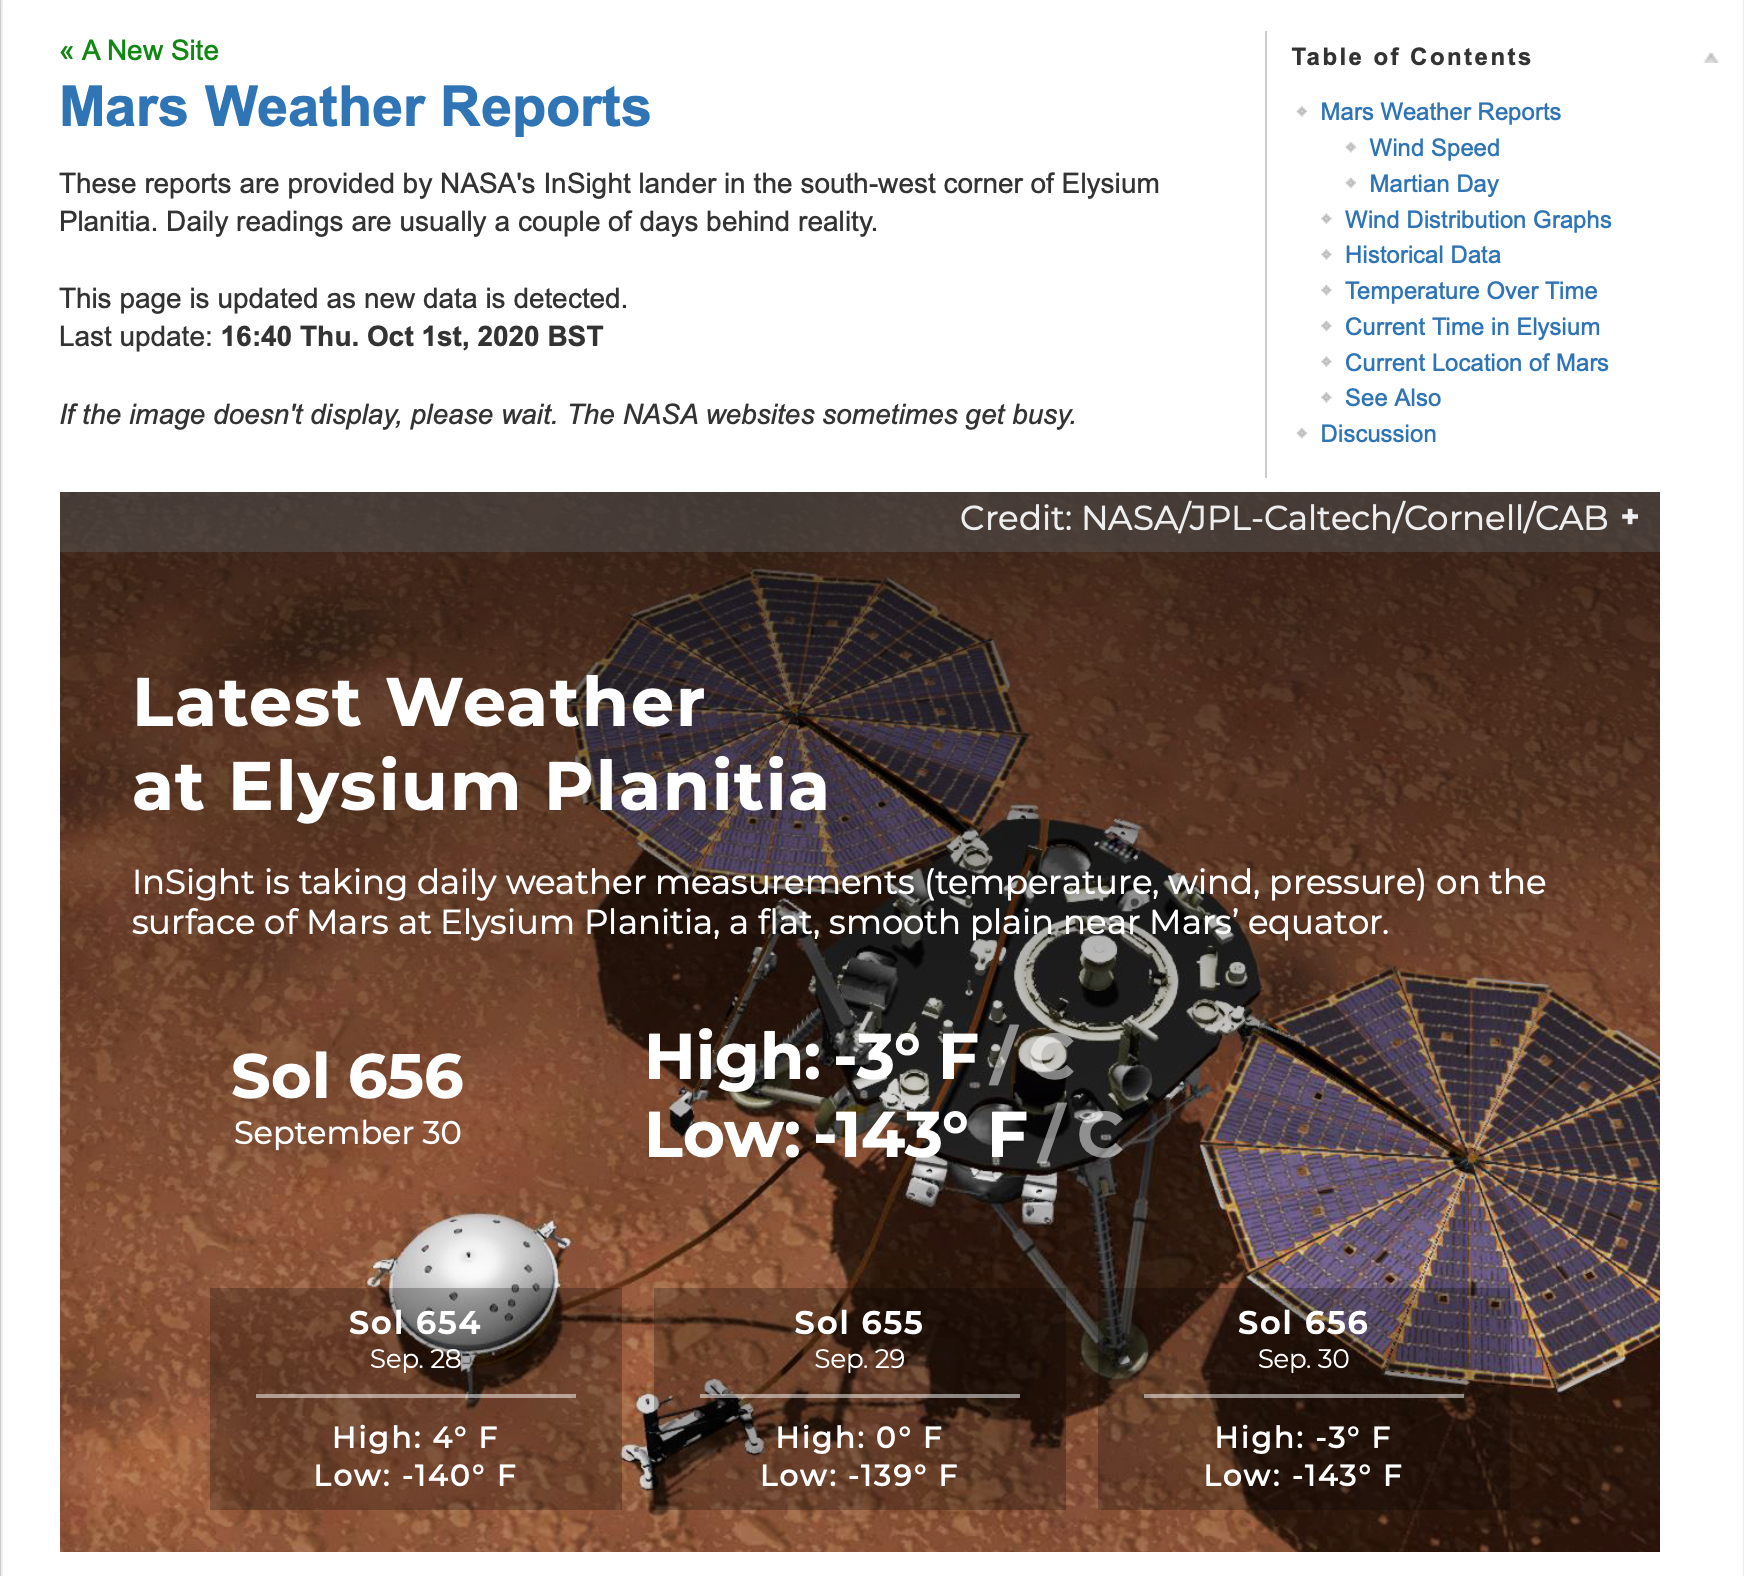
Ever since he first clapped eyes on Mars through the eyepiece of a telescope, Philip Ide has been obsessed with the Red Planet. He’s written several books based there and, many moons ago, set up a webpage showing the weather on Mars. This summer, Phil adapted his weather monitor and created a Raspberry Pi-powered Mars Clock.
Mission: Mars
After writing several clocks for his Mars Weather page, Phil wanted to make a physical clock: “something that could sit on my desk or such like, and tell the time on Mars.” It was to tell the time at any location on Mars, with presets for interesting locations “plus the sites of all the missions that made it to the surface – whether they pancaked or not.”
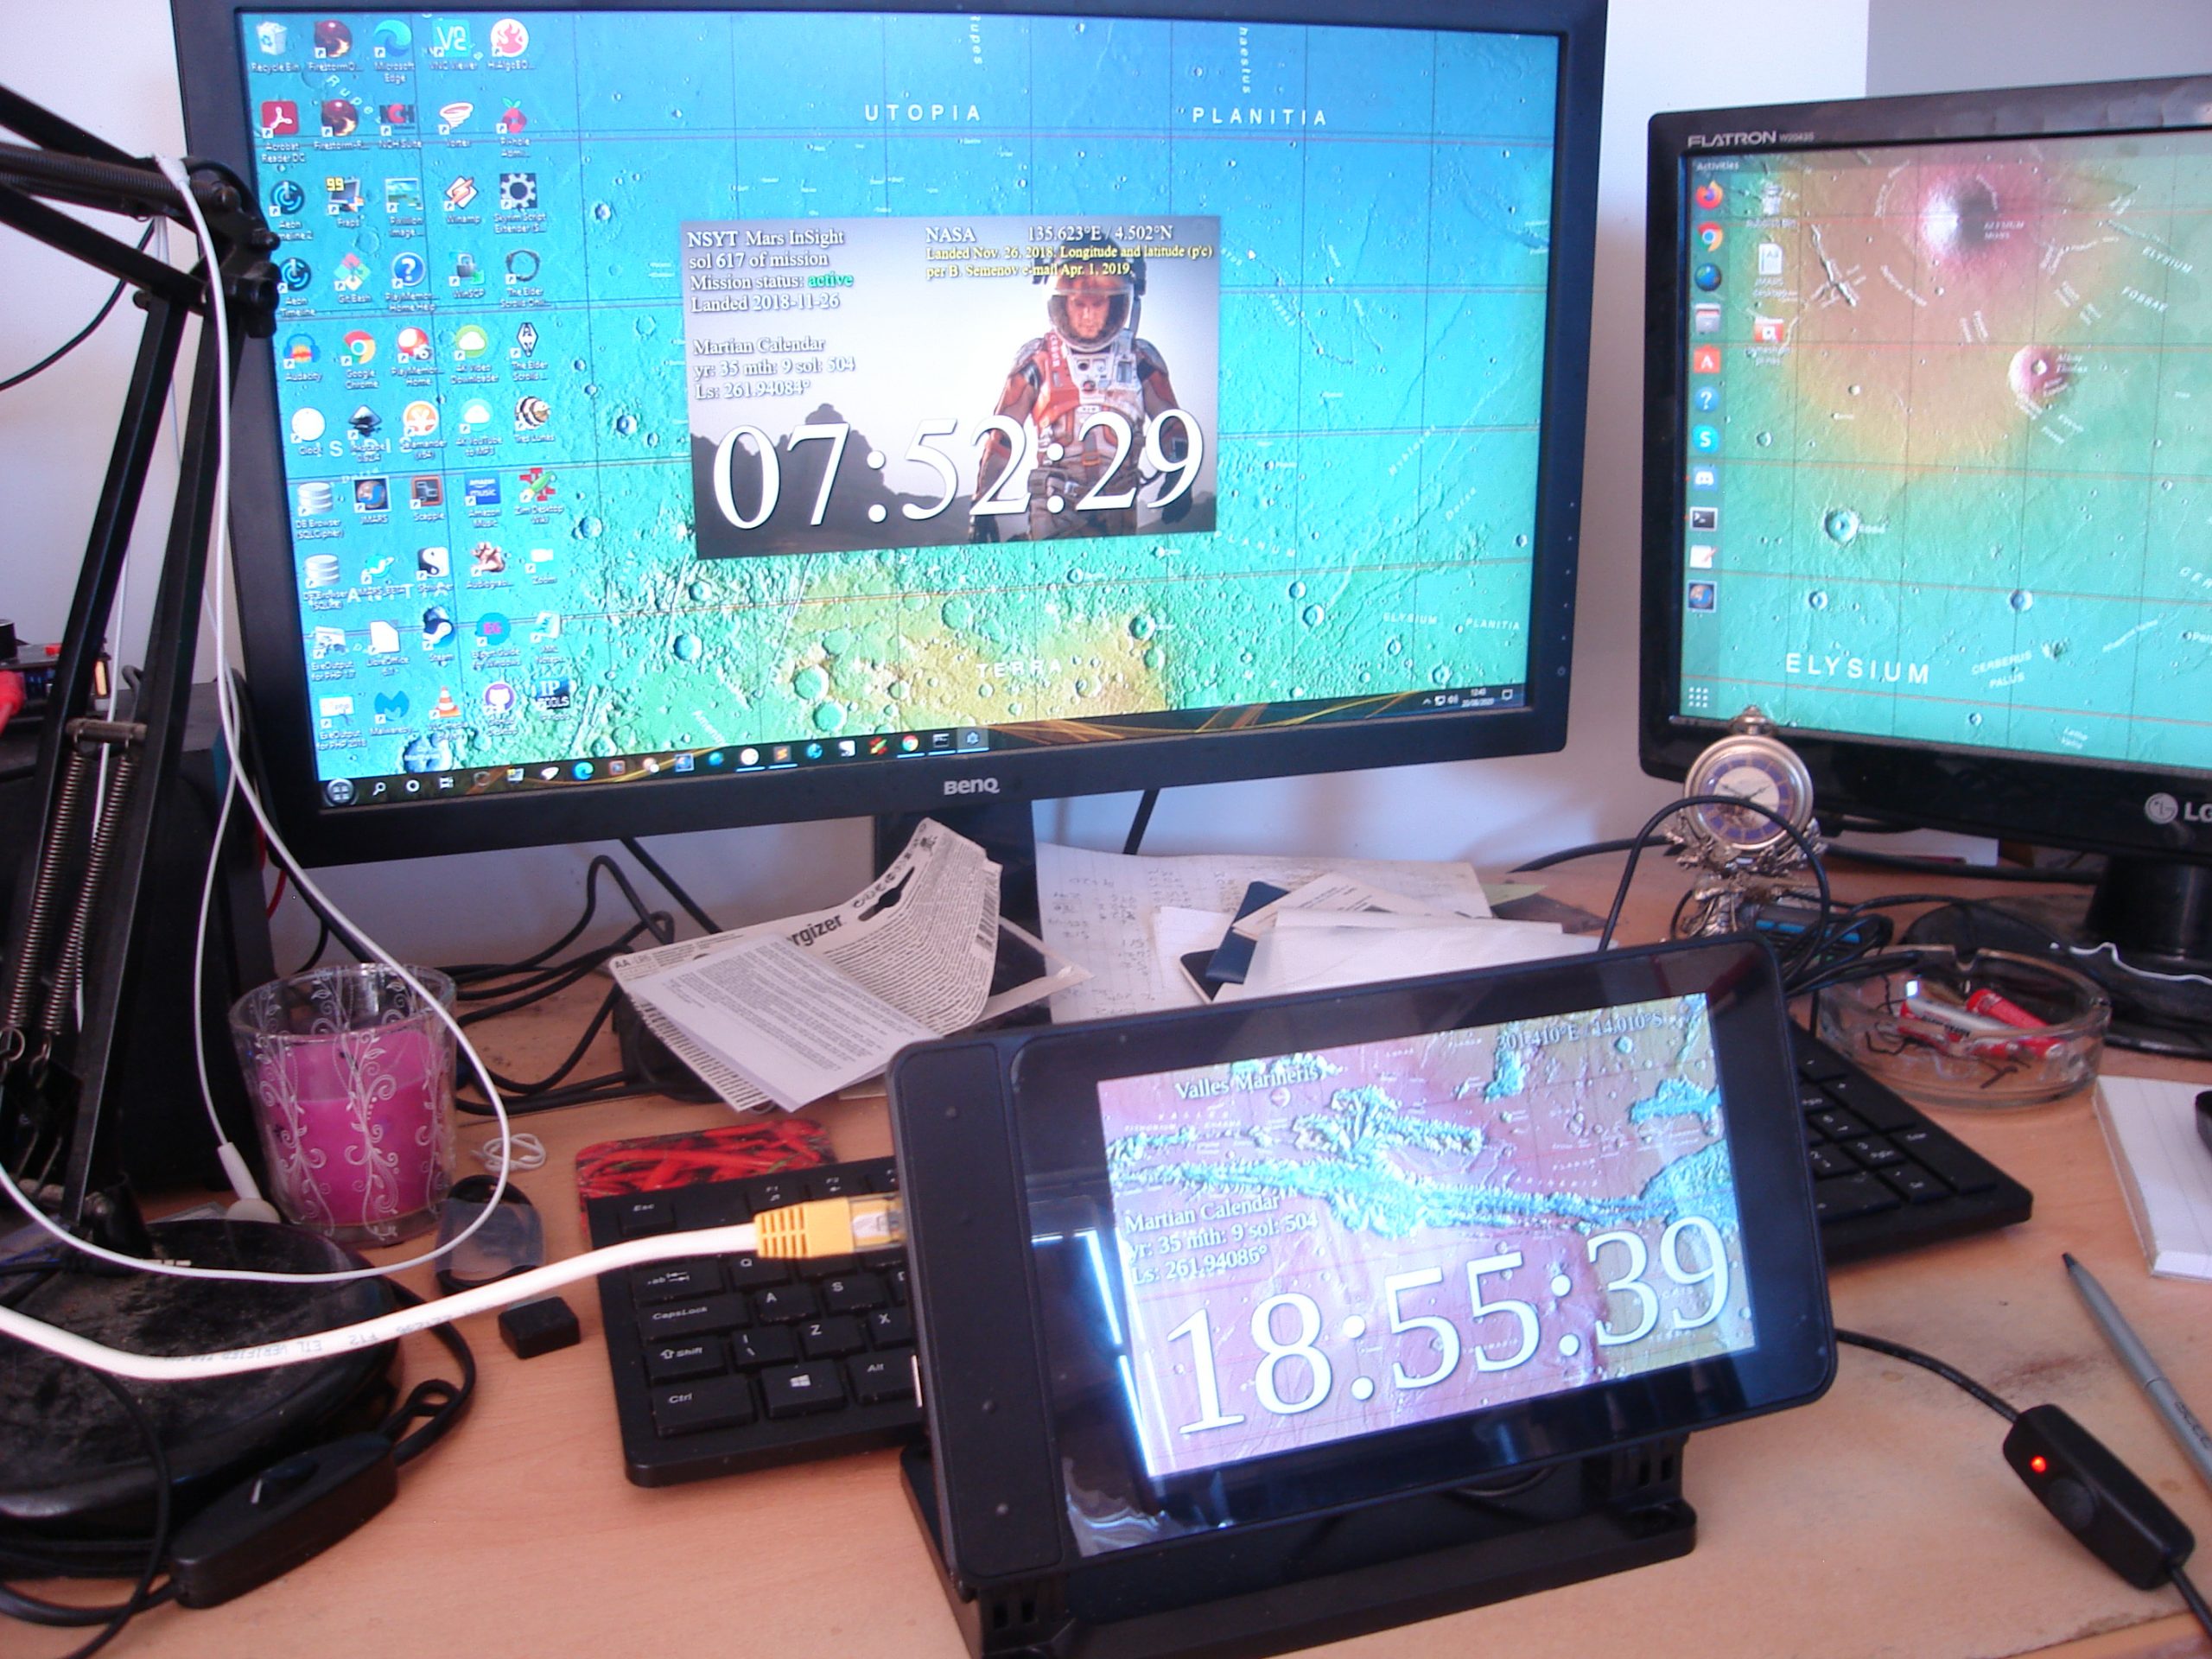
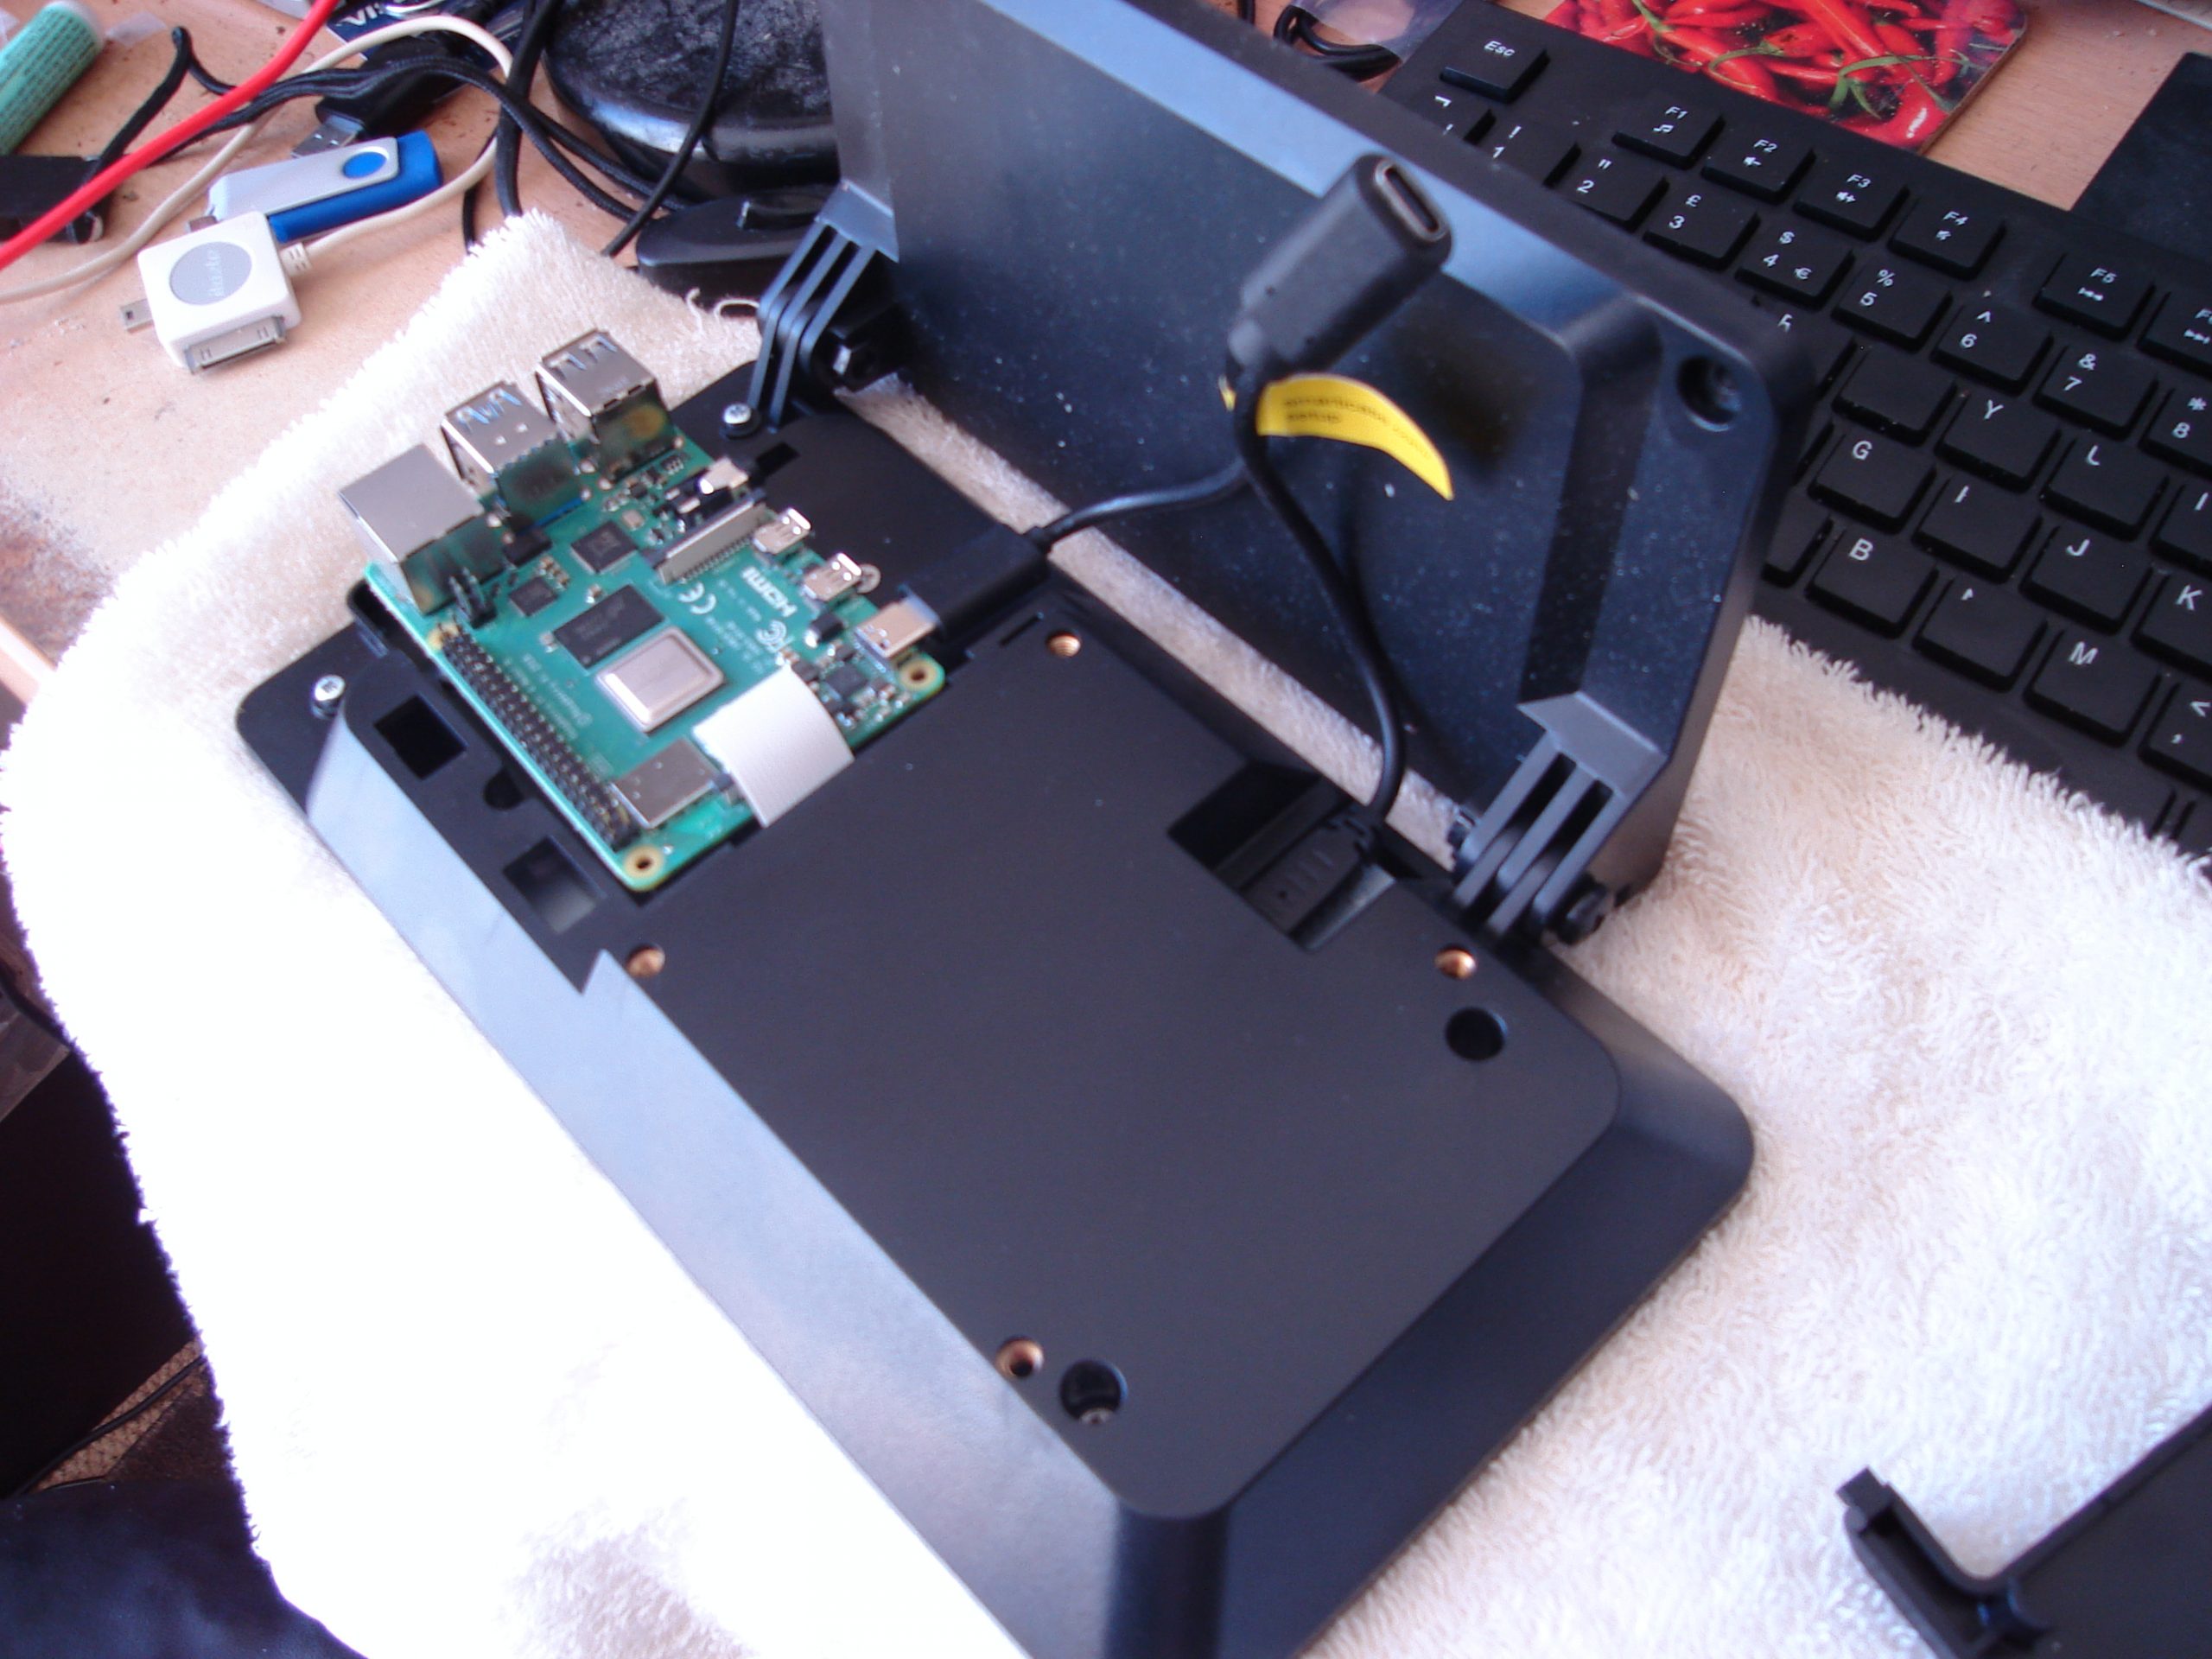
The projects runs on a 2GB Raspberry Pi 4 with official 7-inch touchscreen
Another prerequisite was that the clock had to check for new mission file updates and IERS bulletins to see if a new leap second had been factored into Universal Coordinated Time.
“Martian seconds are longer,” explains Phil, “so everything was pointing at software rather than a mechanical device. Raspberry Pi was a shoo-in for the job”. However, he’d never used one.
“I’d written some software for calculating orbits and one of the target platforms was Raspberry Pi. I’d never actually seen it run on a Raspberry Pi but I knew it worked, so the door was already open.” He was able to check his data against a benchmark NASA provided. Knowing that the clocks on his Mars Weather page were accurate meant that Phil could focus on getting to grips with his new single-board computer.
Phil’s Mars Weather page shows seasonal trends since March 2019.
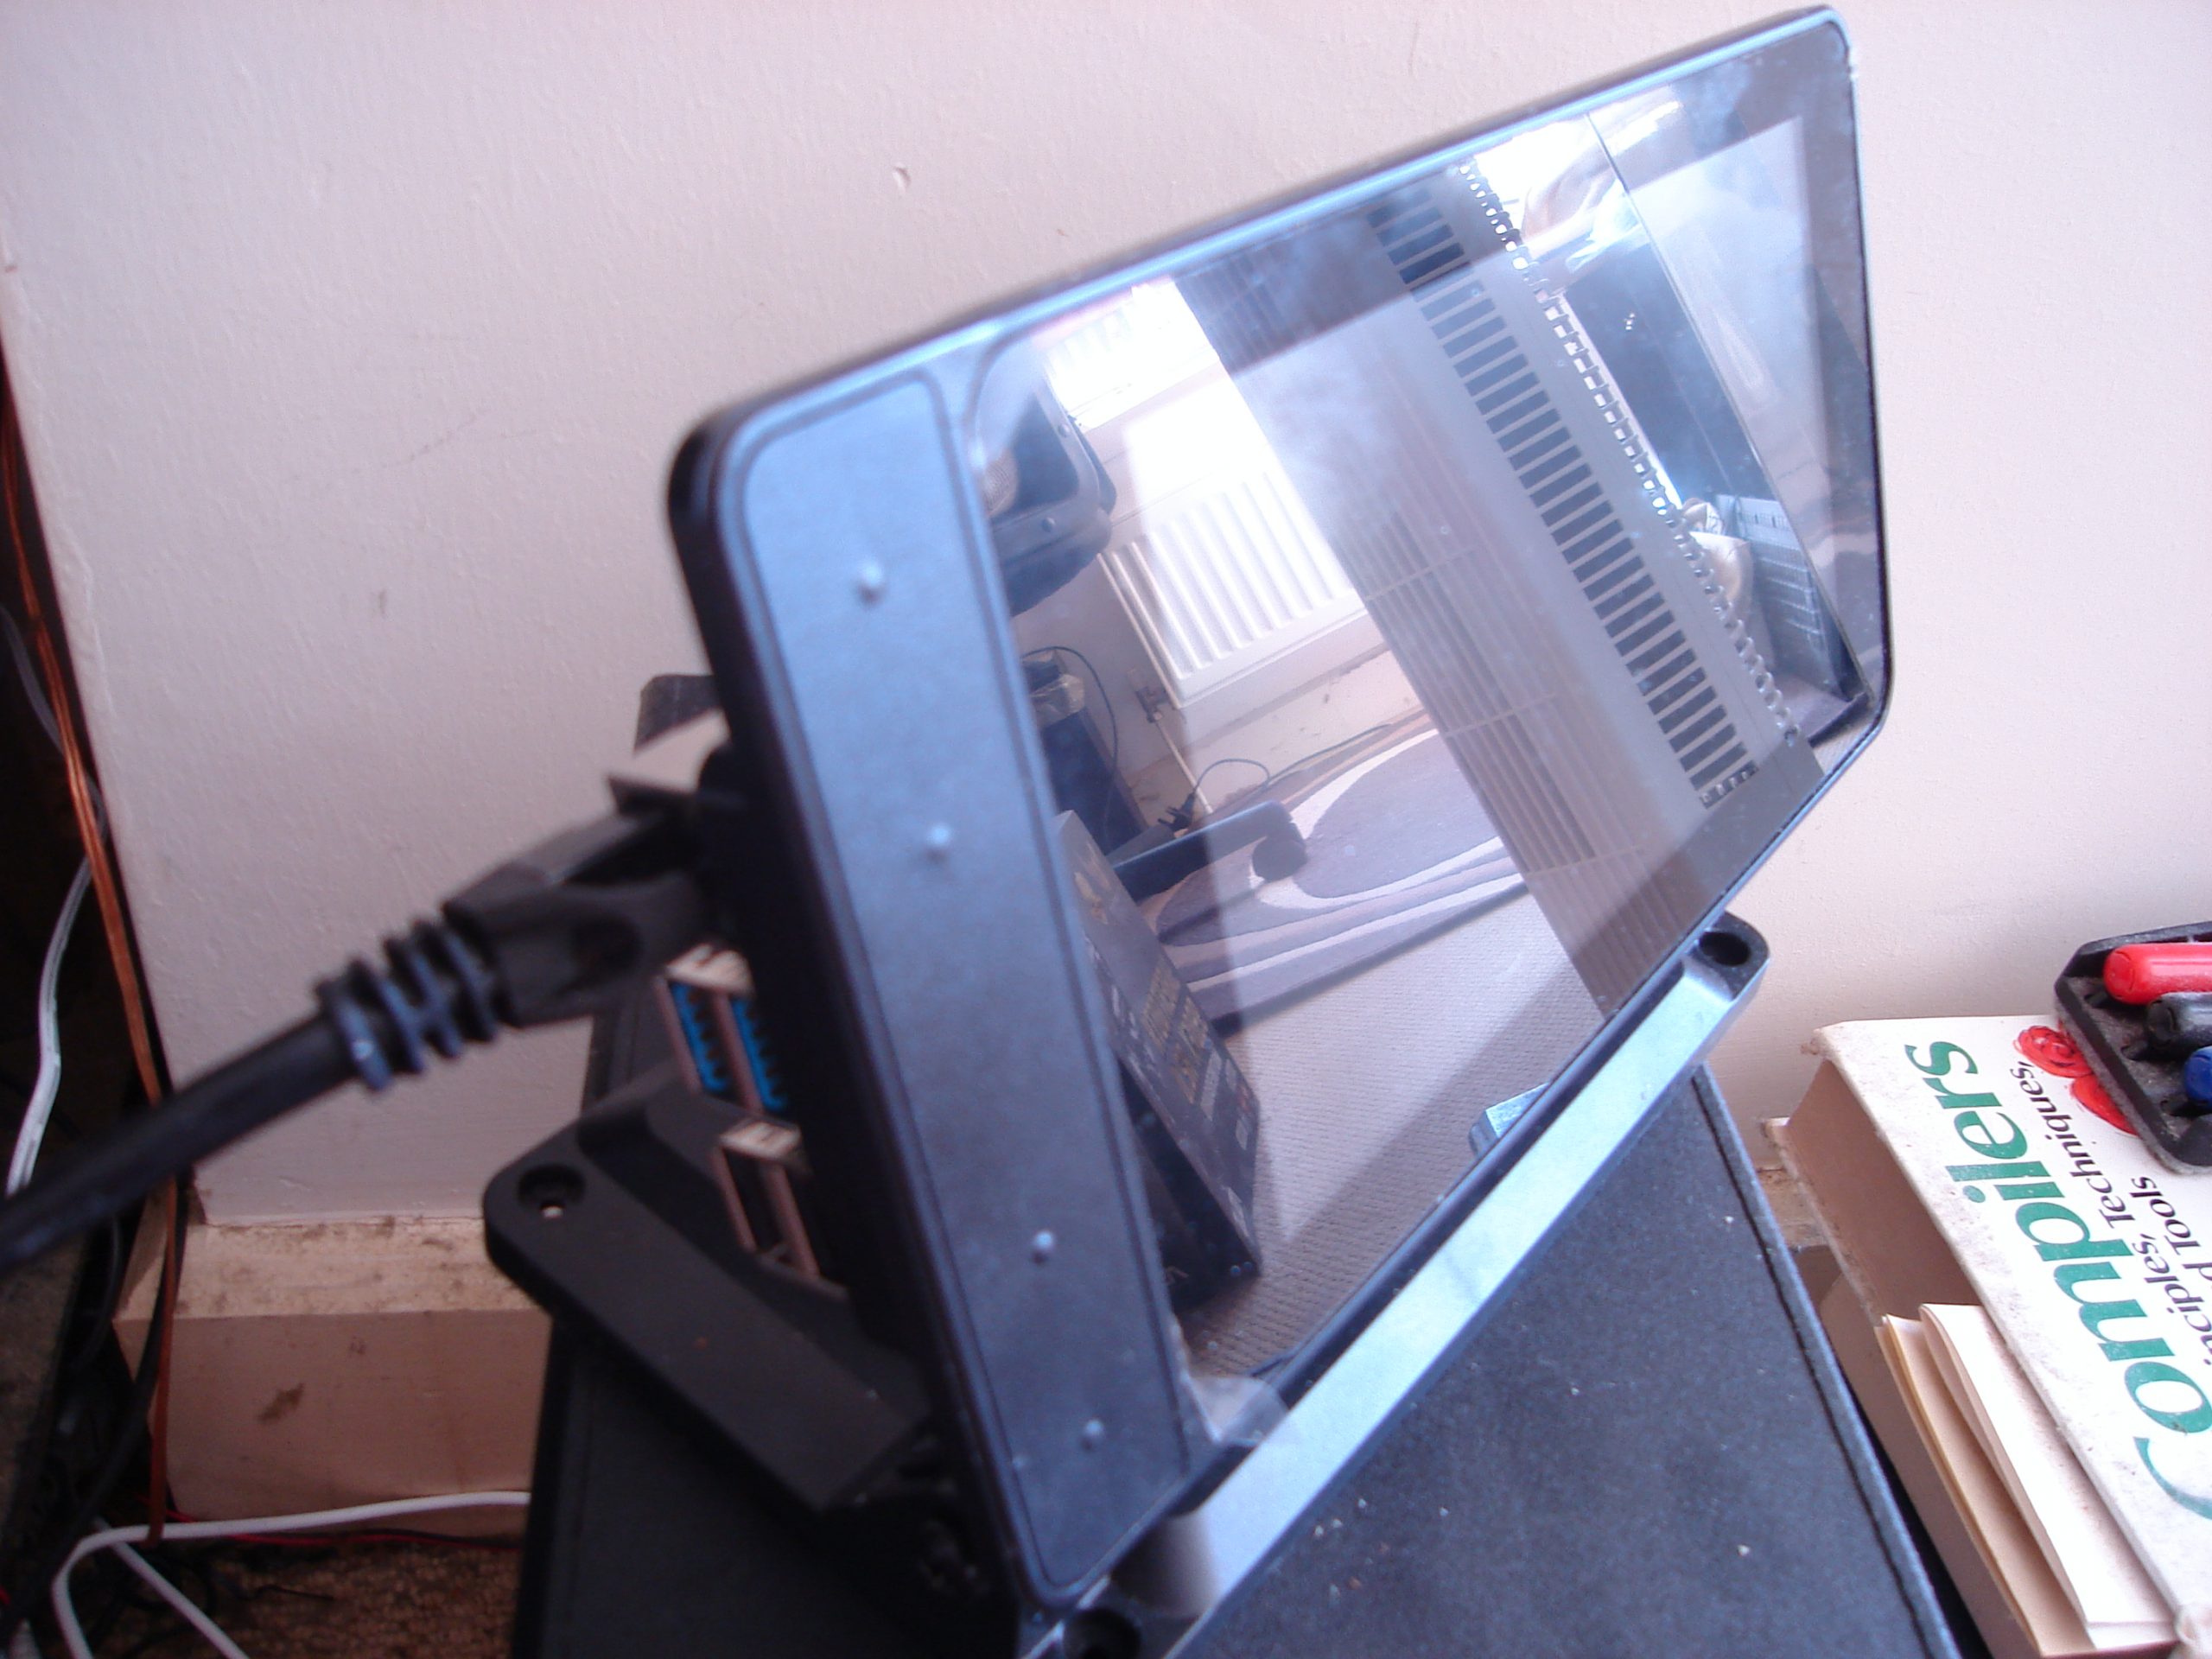
He chose a 2GB Raspberry Pi 4 and official-inch touchscreen with a SmartiPi Touch 2 case. “Angles are everything,” he reasons. He also added a fan to lower the CPU temperature and extend the hardware’s life. Along with a power lead, the whole setup cost £130 from The Pi Hut.
Since his Mars Clock generates a lot of data, he made it skinnable so the user can choose which pieces of information to view at any one time. It can display two types of map – Viking or MOLA – depending on the co-ordinates for the clock. NASA provides a web map-tile service with many different data sets for Mars, so it should be possible to make the background an interactive map, allowing you to zoom in/out and scroll around. Getting these to work proved rather a headache as he hit incompatibilities with the libraries.
Learn through experience
Phil wrote most of the software himself, with the exception of libraries for the keyboard and FTP which he pulled from GitHub. Here’s all the code.
The Mars Clock’s various skins show details of missions to Mars, as well as the location’s time and date
He used JavaScript running on the Node.js/Electron framework. “This made for rapid development and is cross-platform, so I could write and test it on Windows and then move it to the Raspberry Pi,” he says. With the basic code written, Phil set about paring it back, reducing the number and duration of CPU time-slices the clock needed when running. “I like optimised software,” he explains.
His decades as a computer programmer meant other aspects were straightforward. The hardware is more than capable, he says of his first ever experience of Raspberry Pi, and the SmartiPi case makers had done a brilliant job. Everything fit together and in just a few minutes his Raspberry Pi was working.
The SmartiPi Touch 2 case houses Raspberry Pi 4 and a fan to cool its CPU
Since completing his Mars Clock Phil has added a pi-hole and a NAS to his Raspberry Pi setup and says his confidence using them is such that he’s now contemplating challenging himself to build an orrery (a mechanical model of the solar system). “I have decades of programming experience, but I was still learning new things as the project progressed,” he says. “The nerd factor of any given object increases exponentially if you make it yourself.”
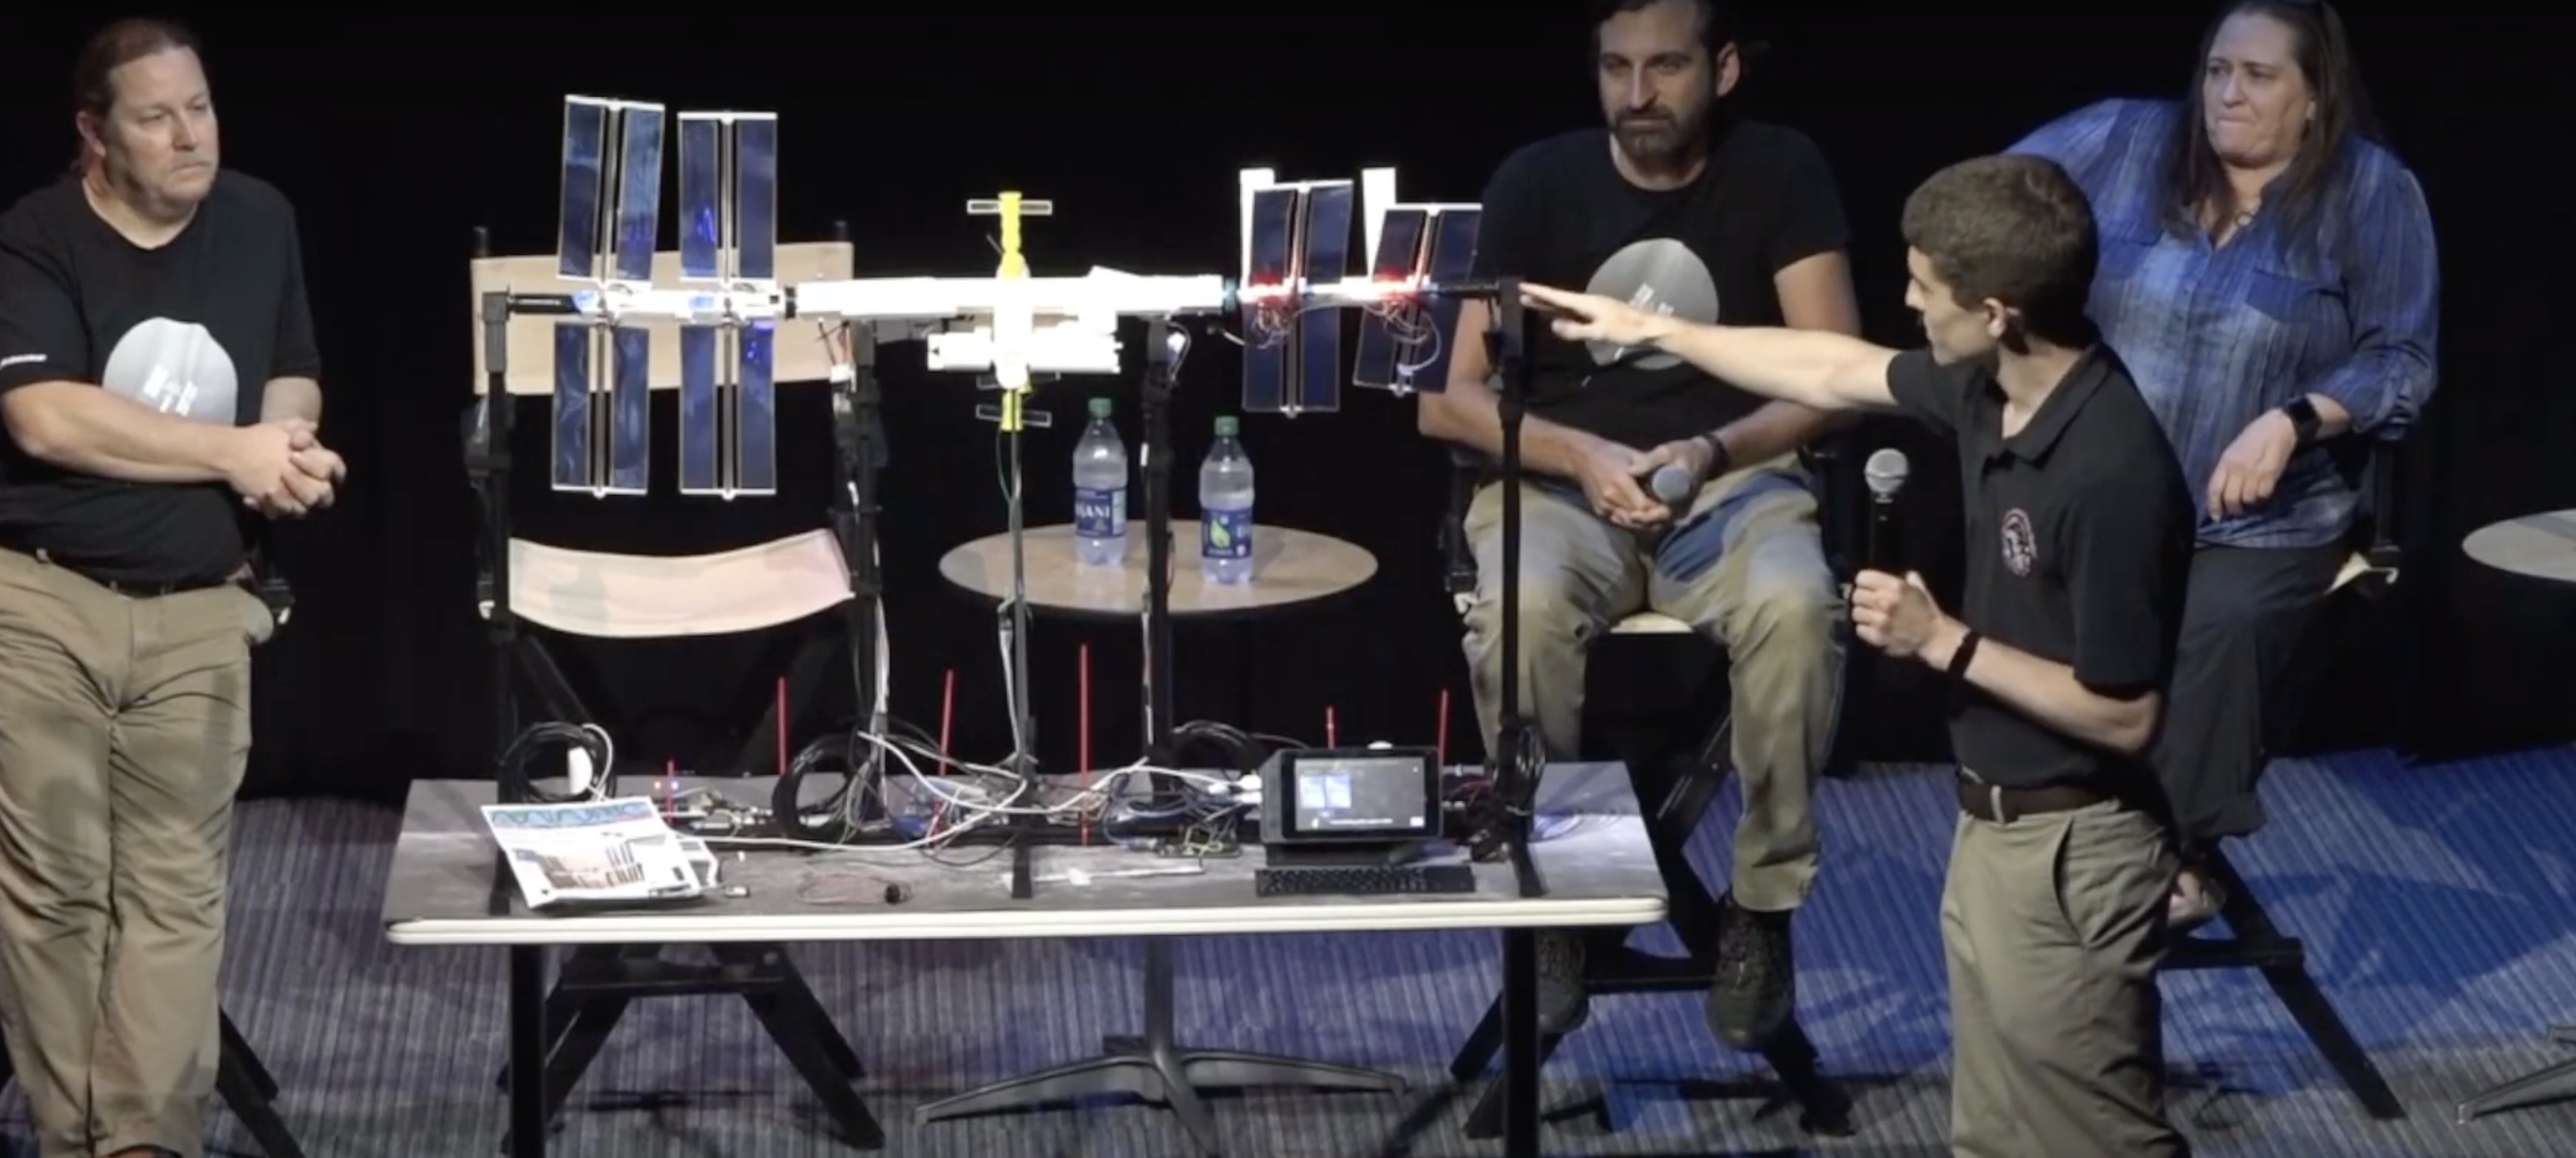
A group of us NASA engineers work on the International Space Station (ISS) for our day-jobs but craved something more tangible than computer models and data curves to share with the world. So, in our free time, we built ISS Mimic. It’s still in the works, but we are publishing now to celebrate 20 years of continuous human presence in space on the ISS.
This video was filmed and produced by our friend, new teammate, and Raspberry Pi regular Estefannie of Estefannie Explains it All. Most of the images in this blog are screen grabbed from her wonderful video too.
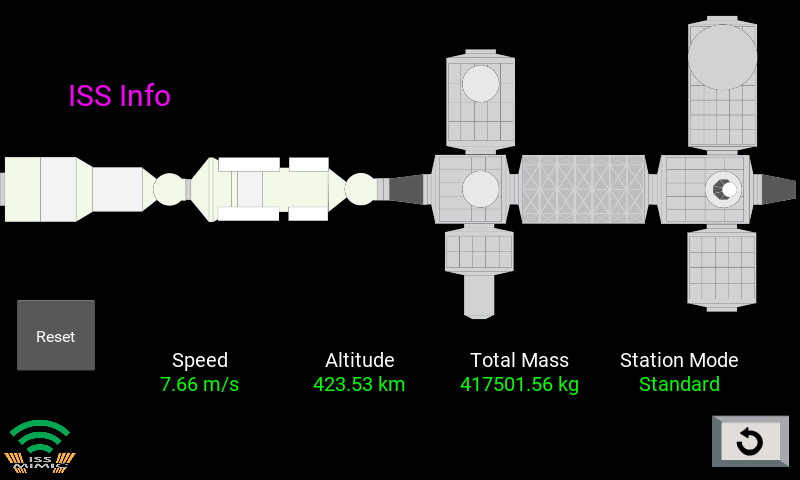
What does Mimic do?
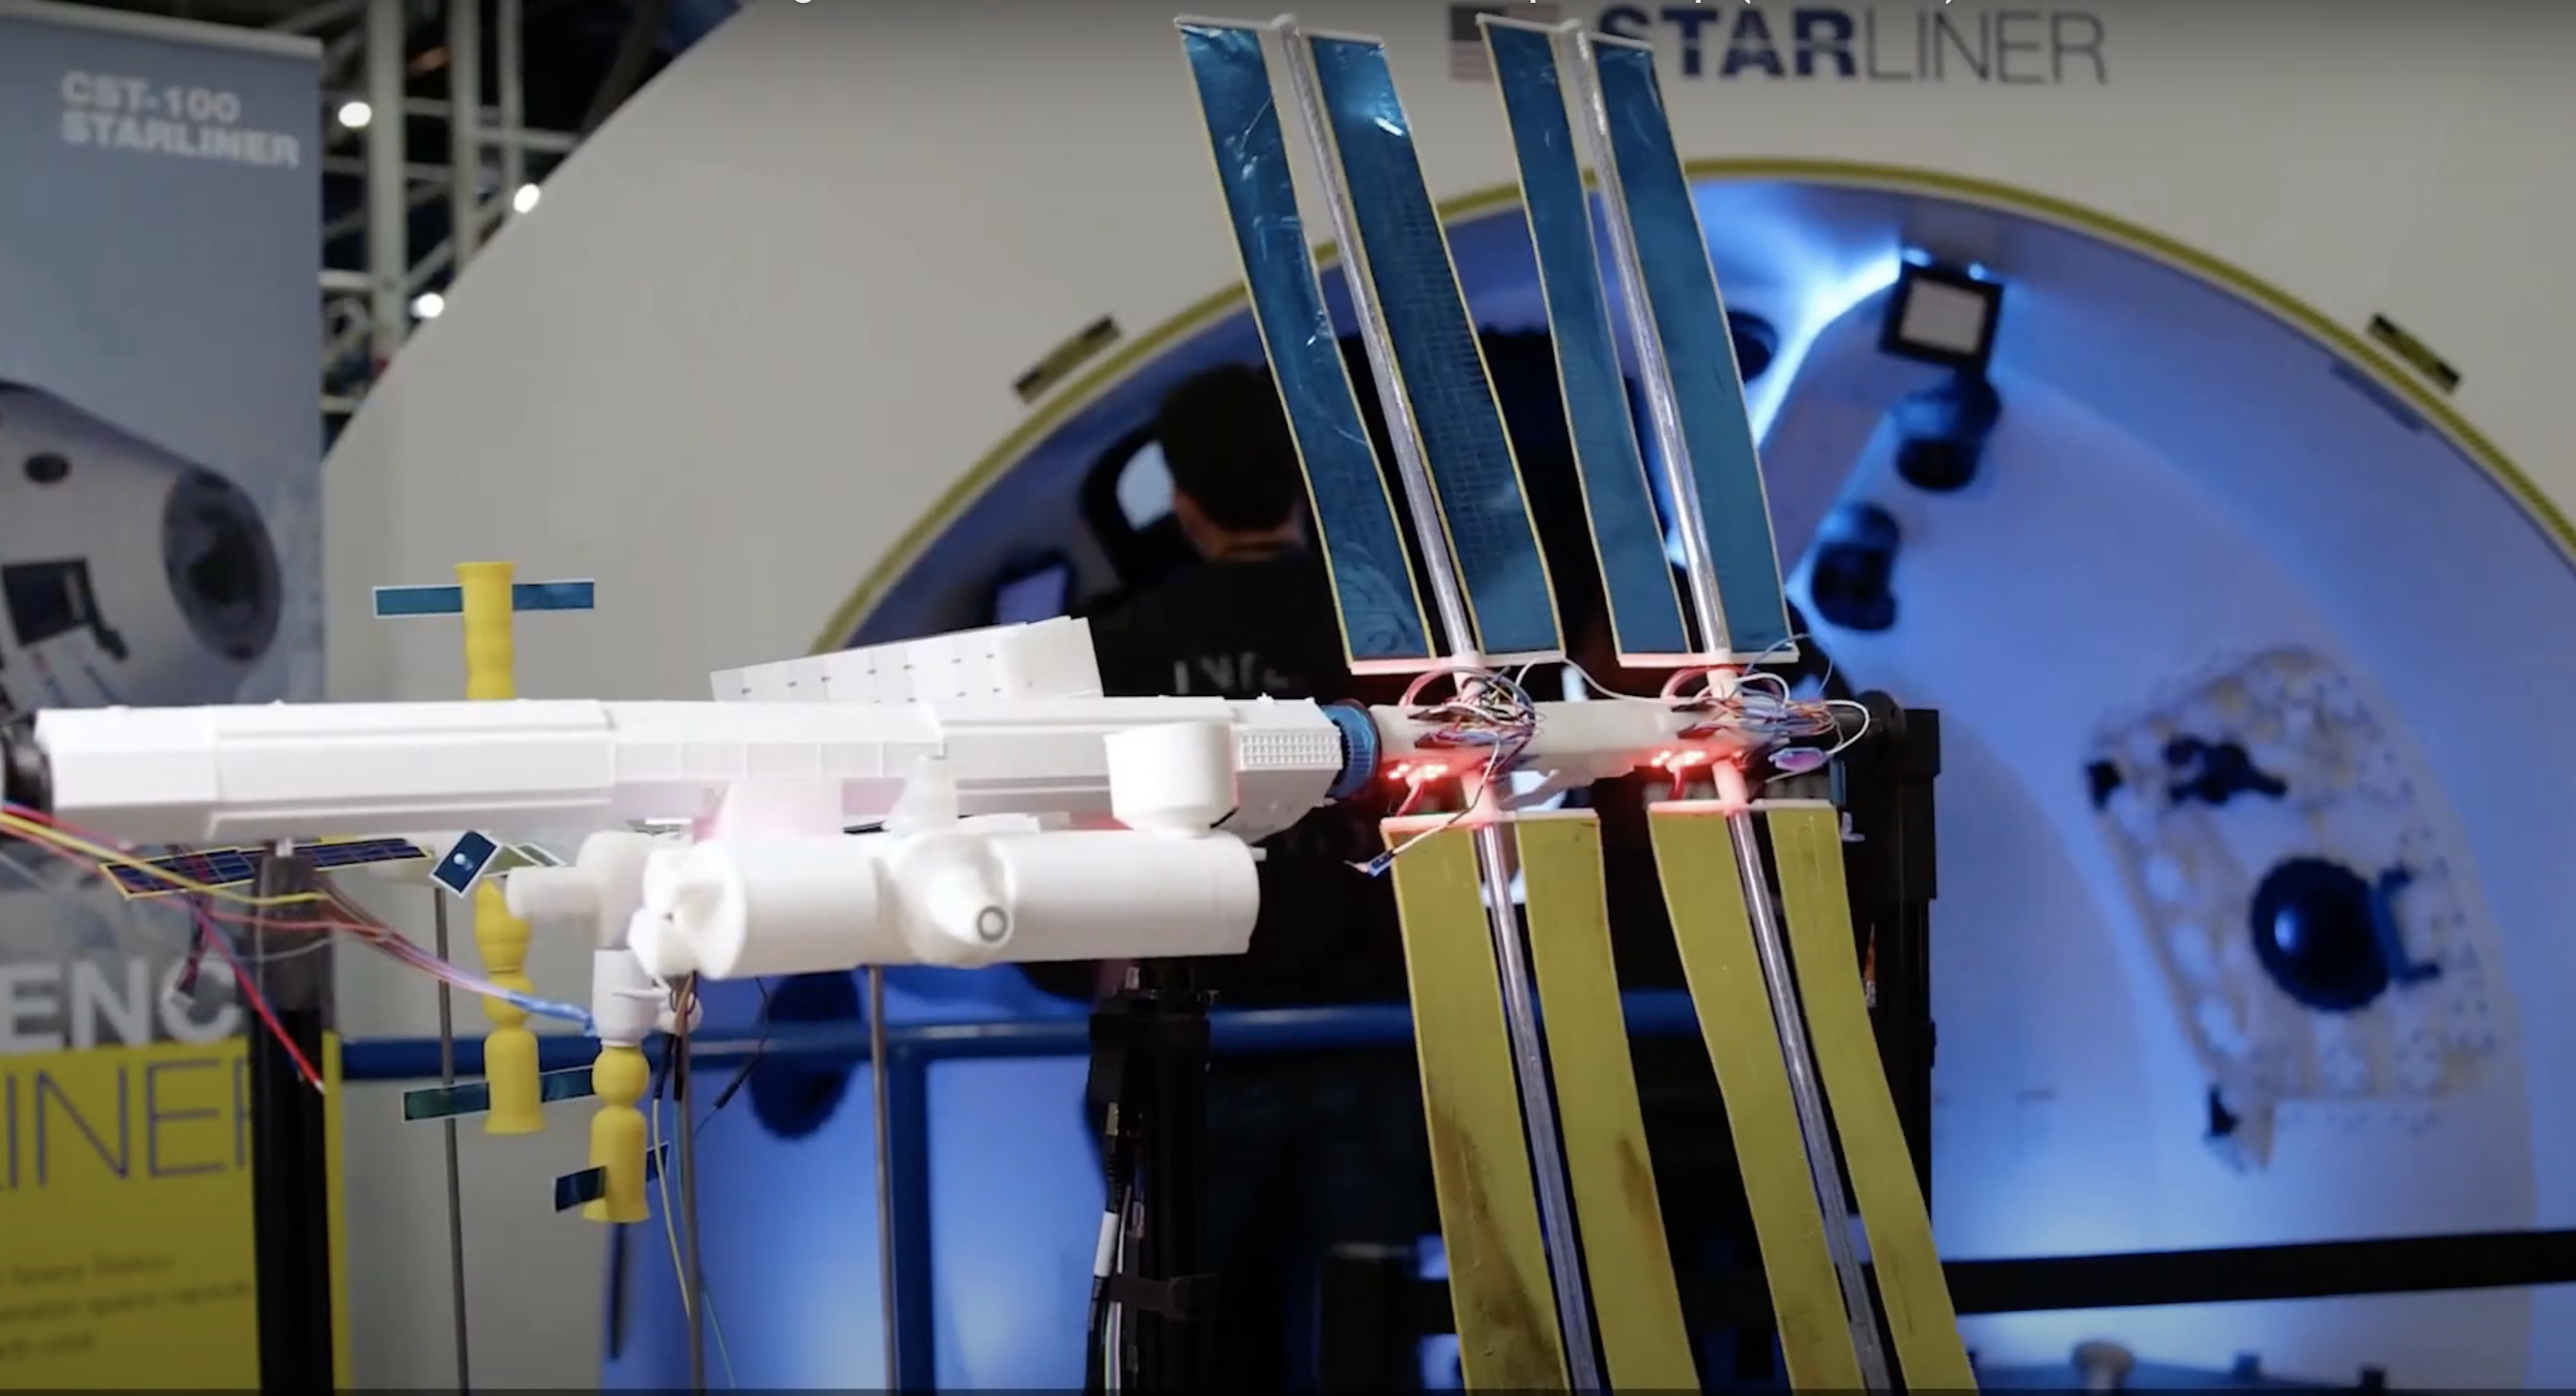
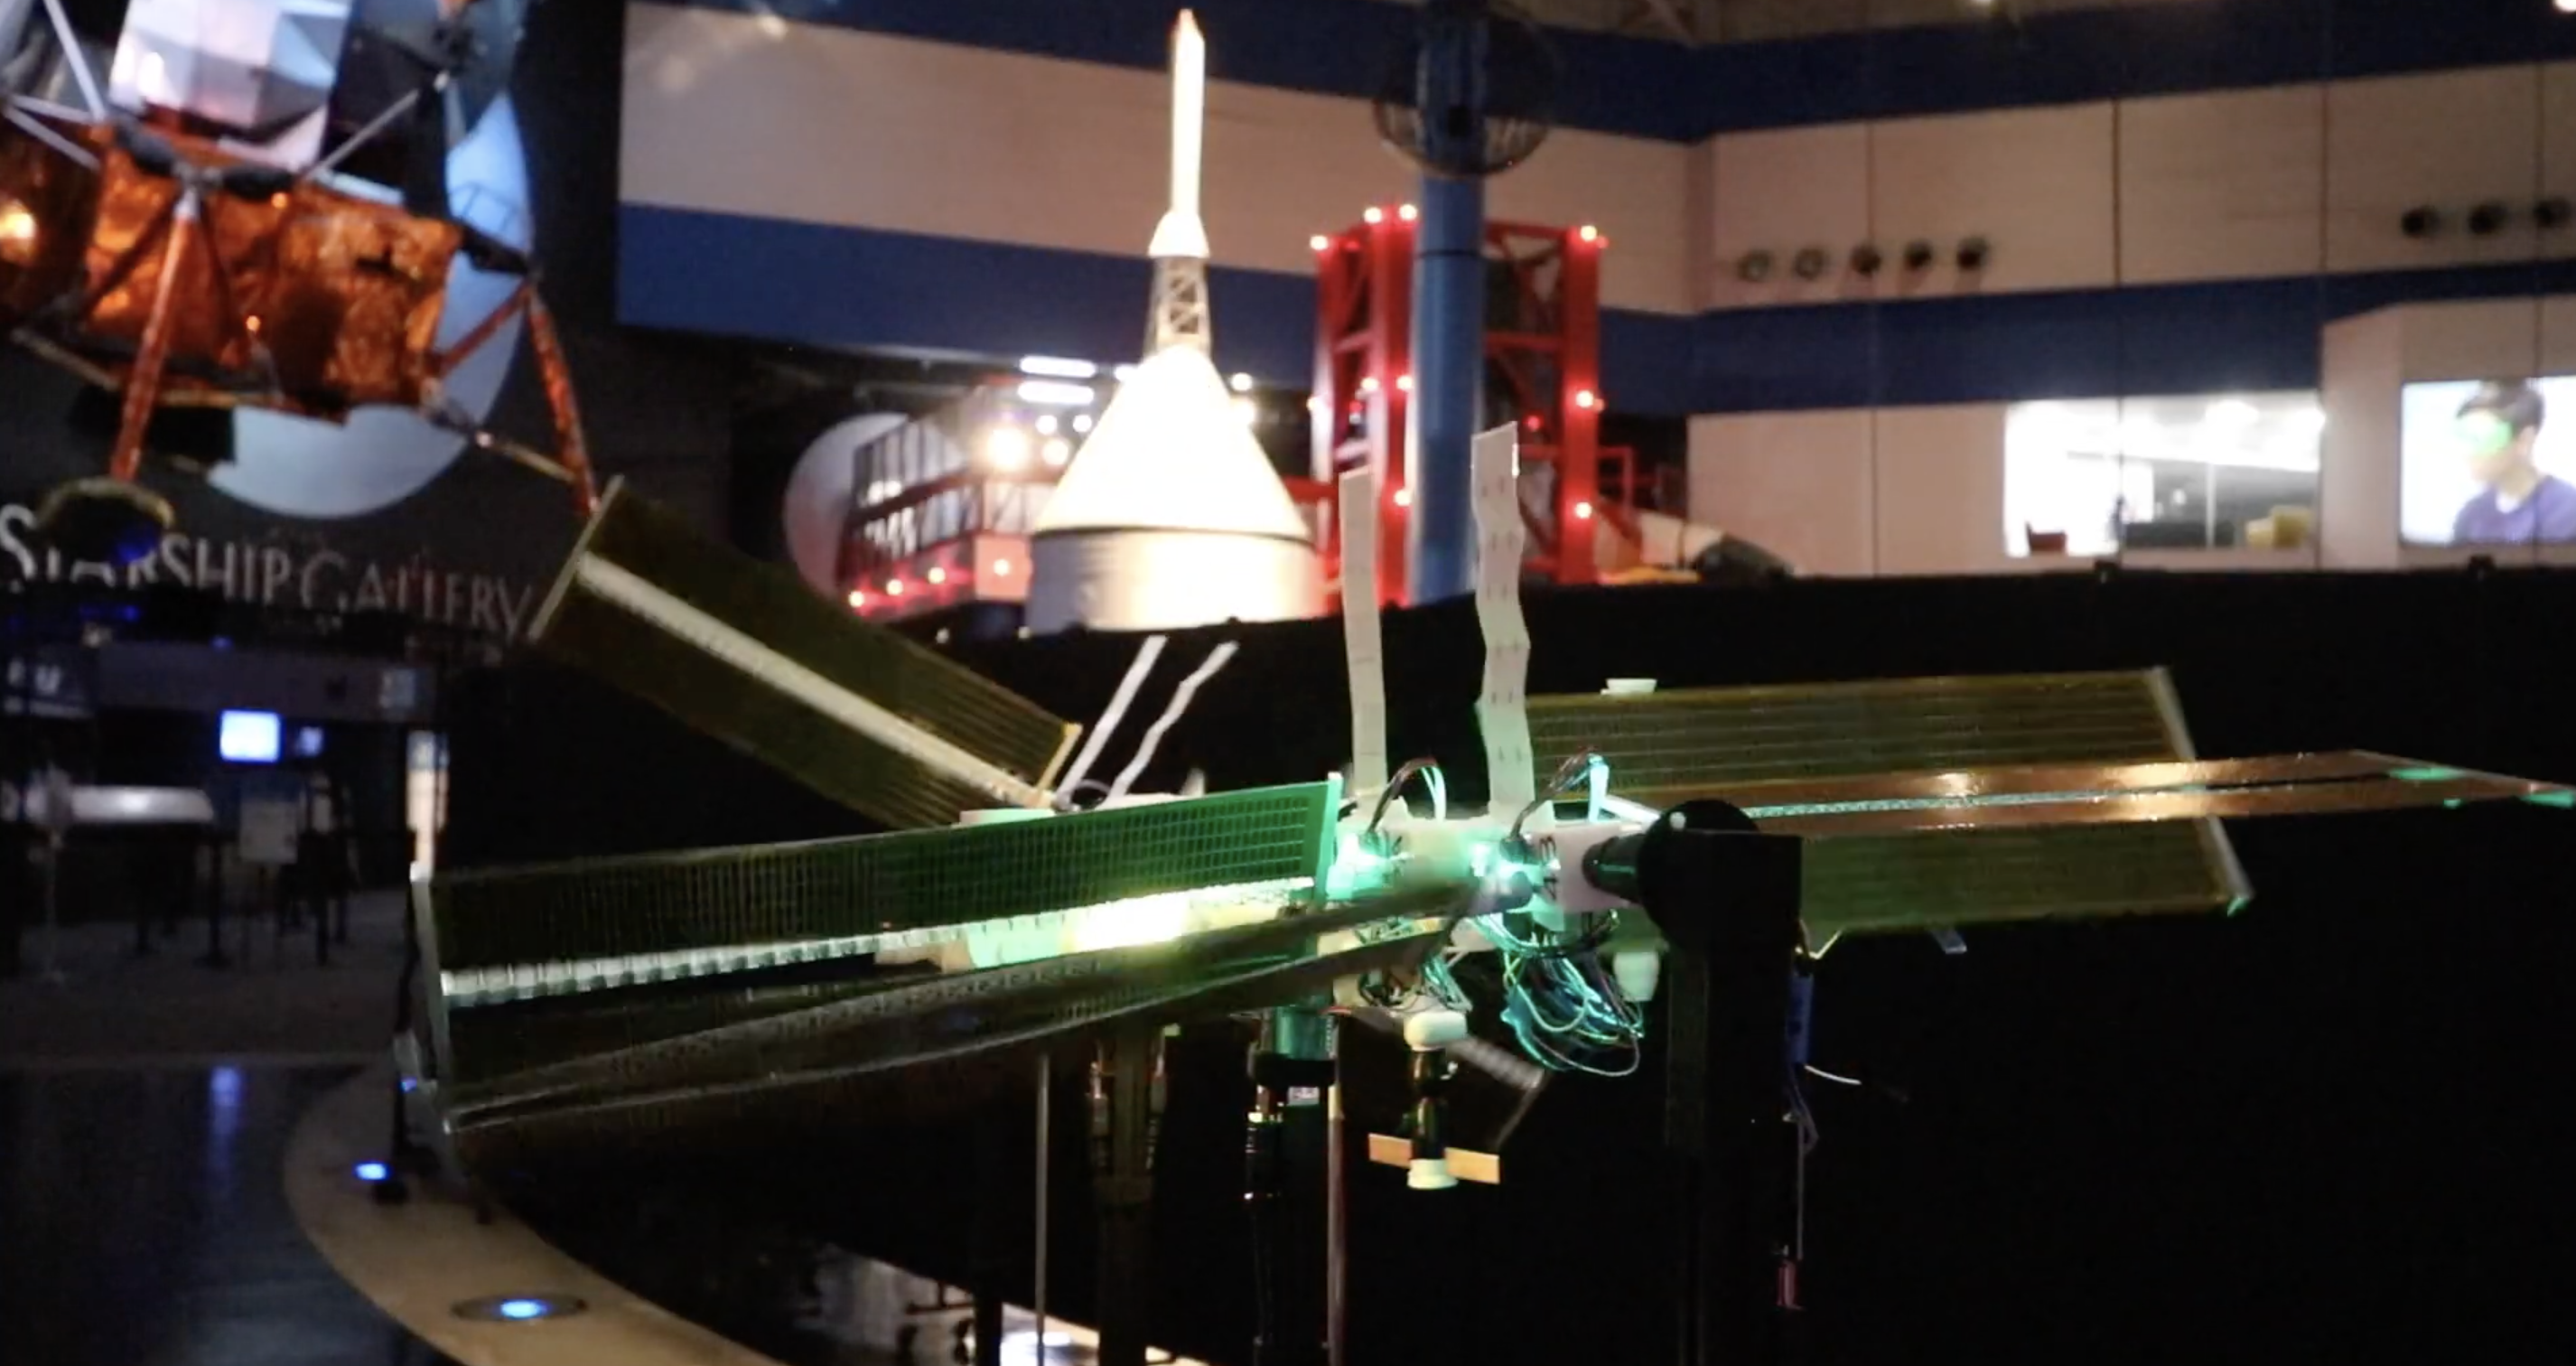
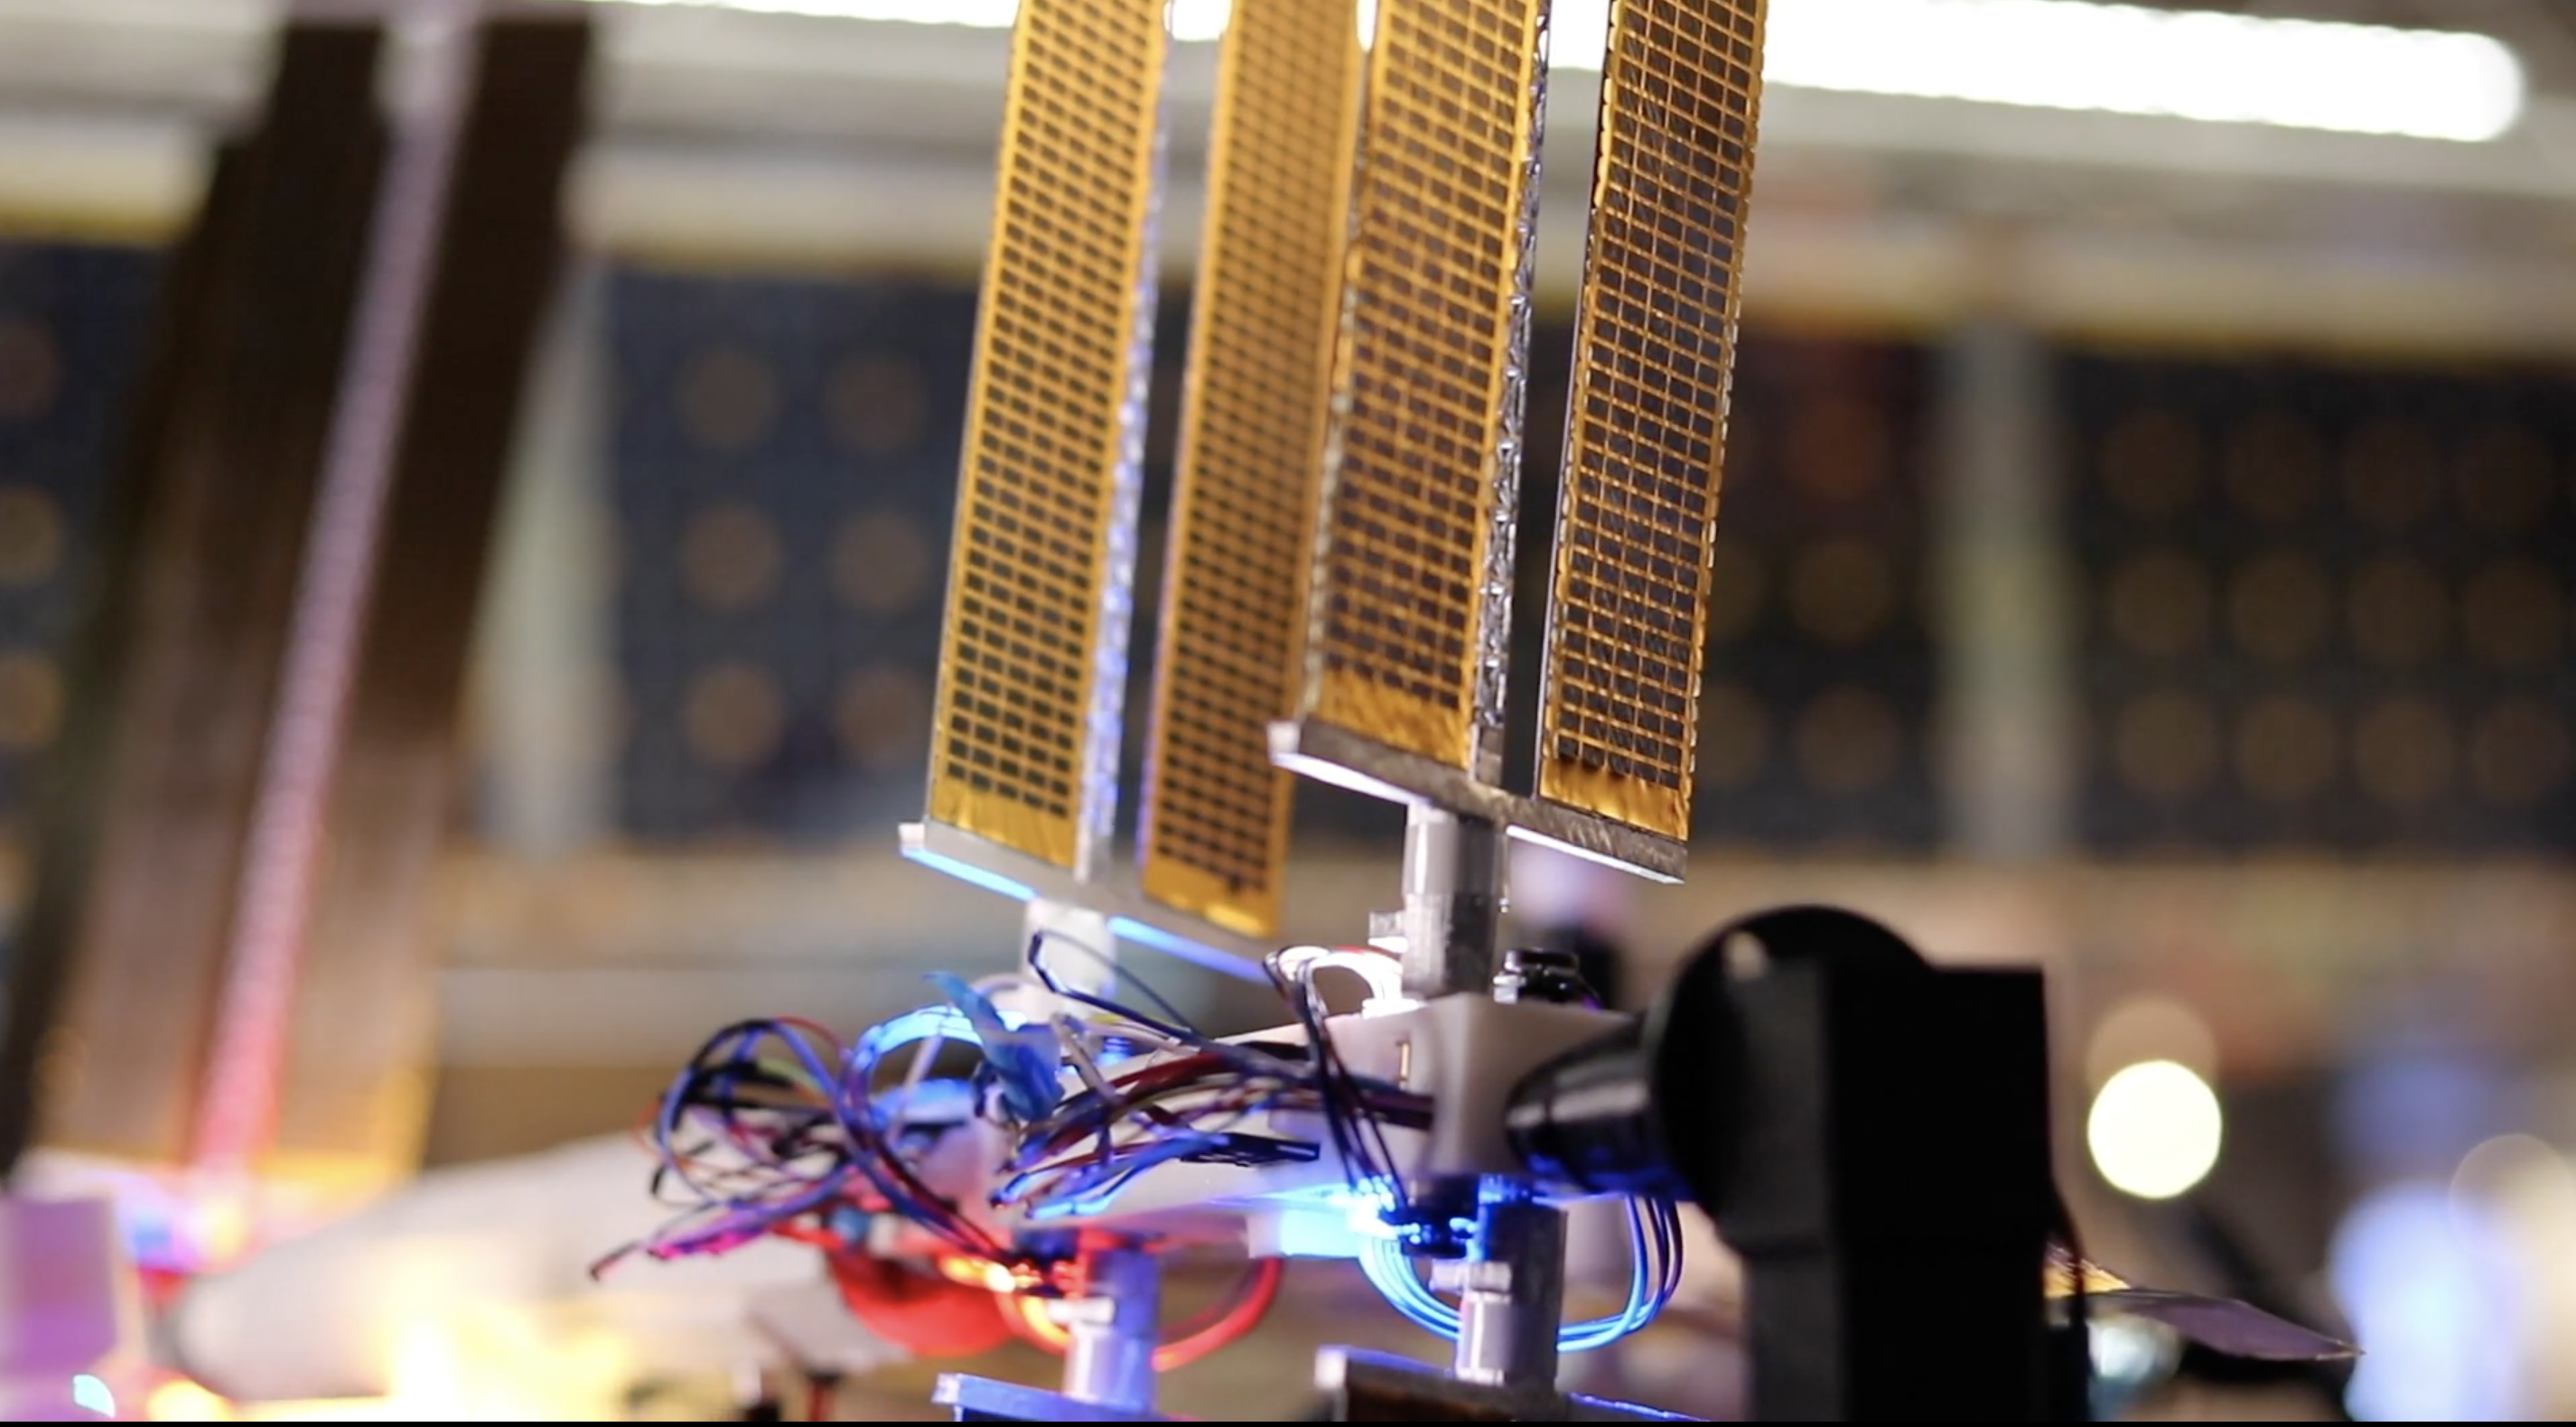
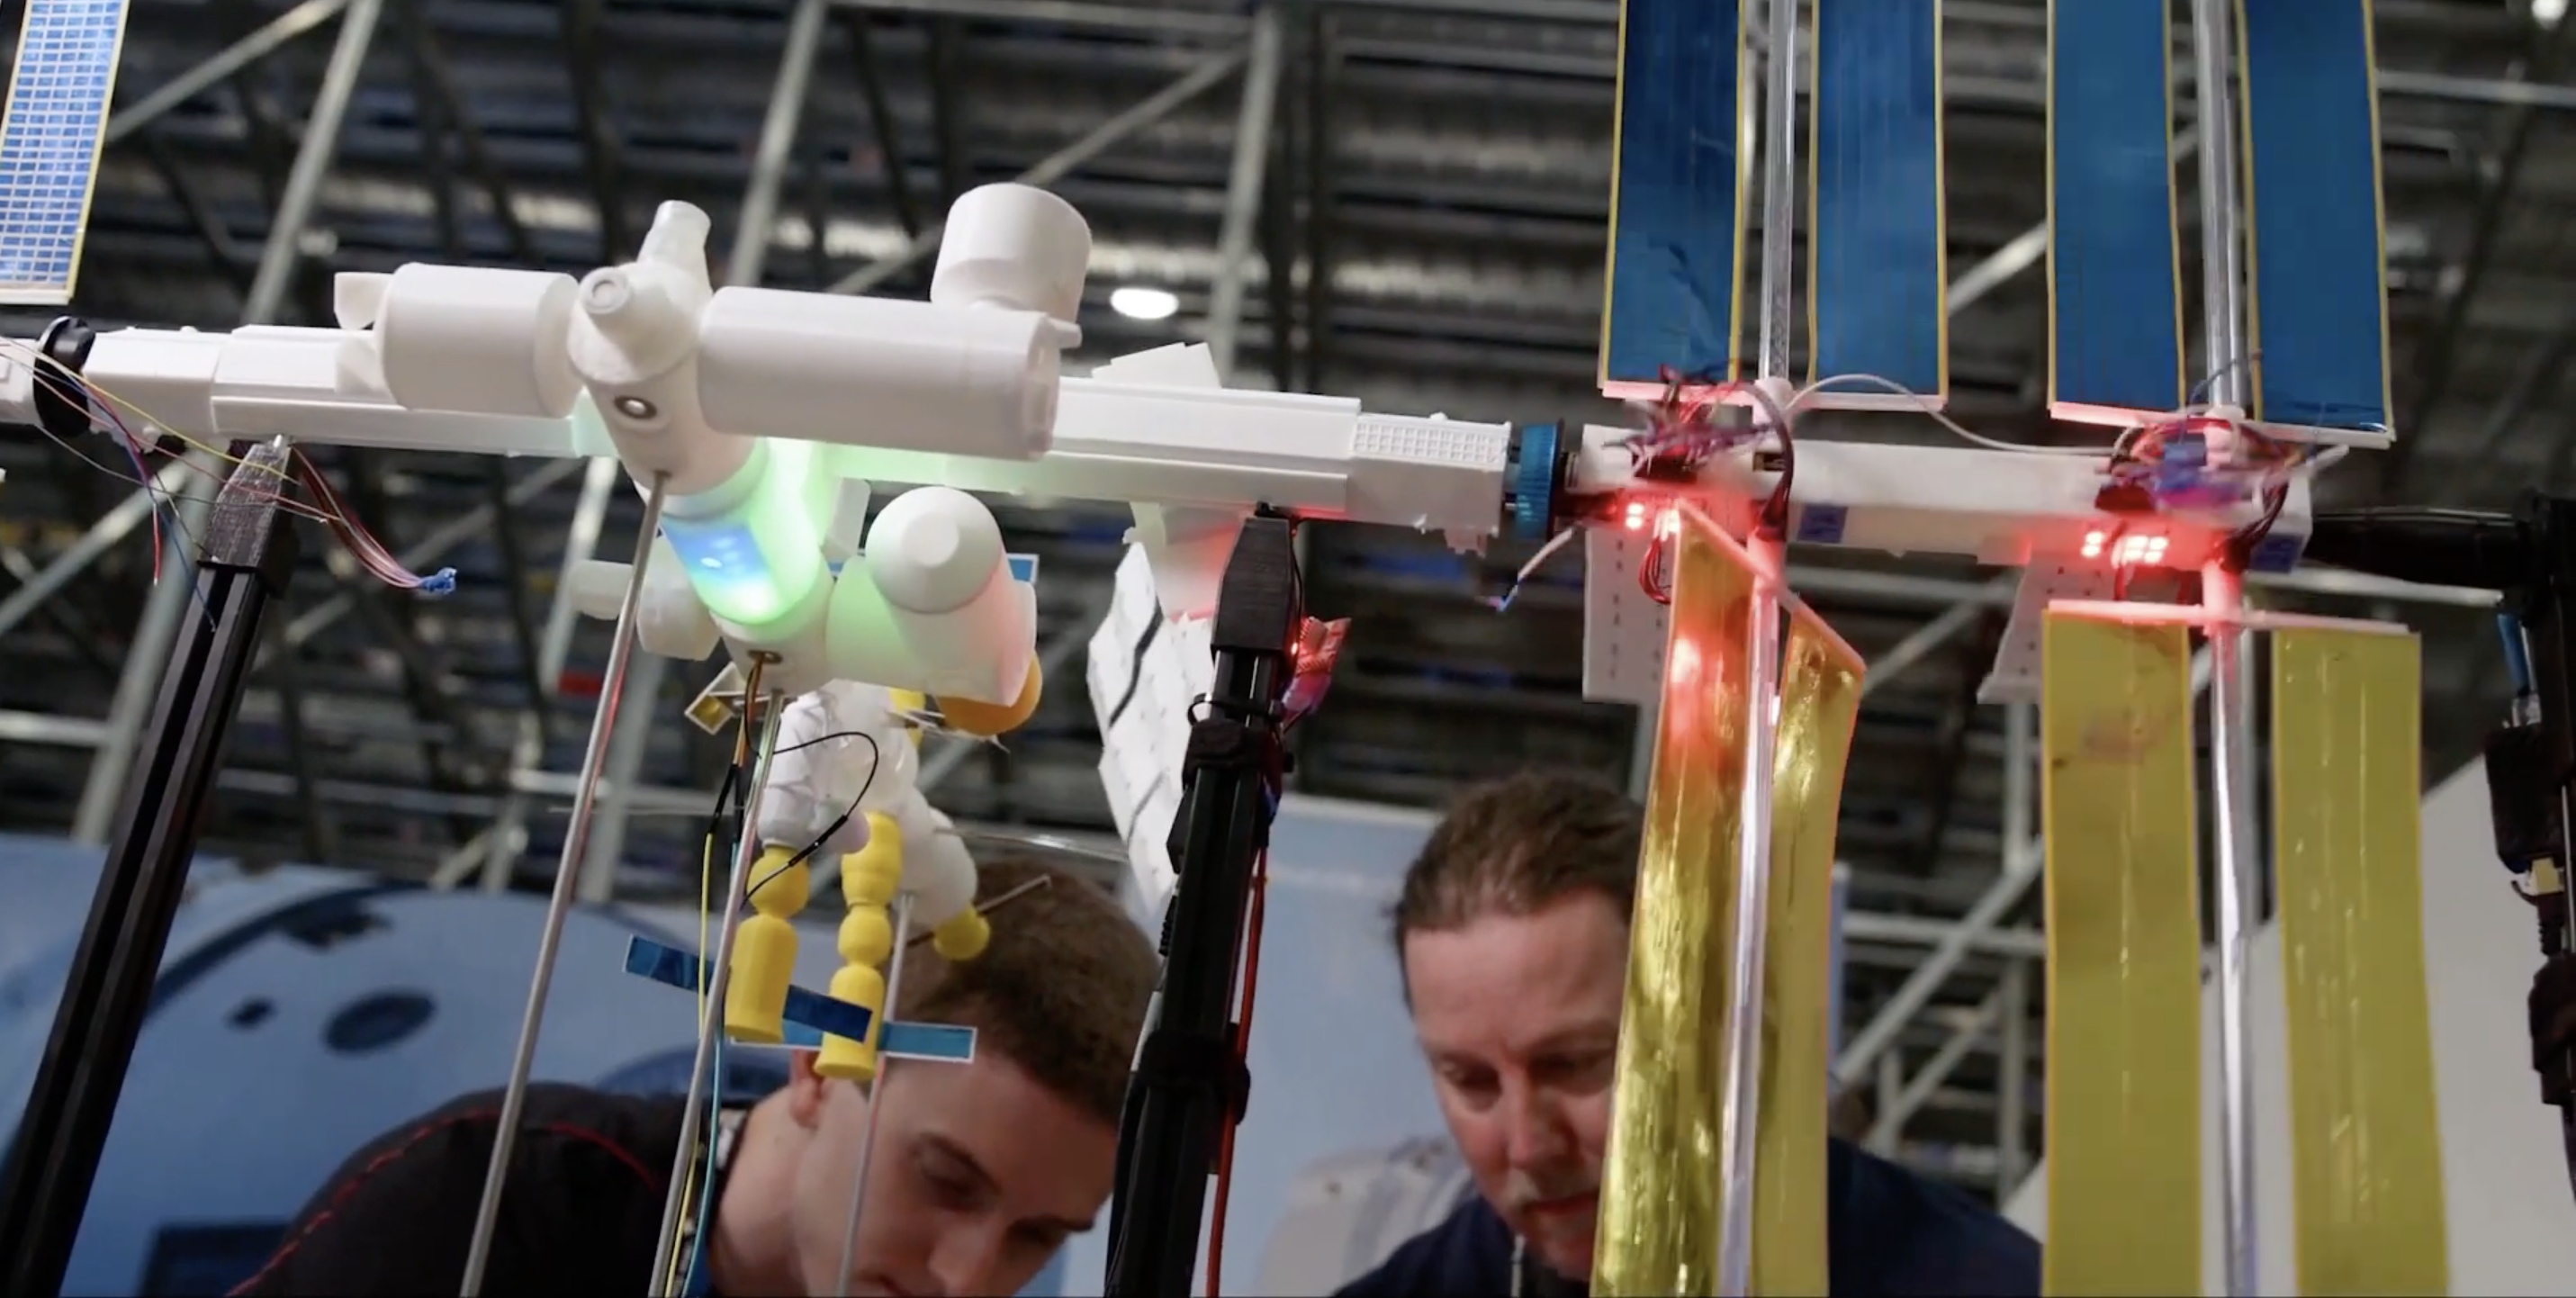
ISS Mimic is a 1% scale model of the International Space Station, bringing the American football field-sized beauty down to a tabletop-sized build. Most elements are 3D printed — even the solar arrays. It has 12 motors: 10 to control the solar panels and two to turn the thermal radiators. All of these are fed by live data streaming from the ISS, so what you see on ISS Mimic is what’s happening that very moment on the real deal up in space.
Physical connection
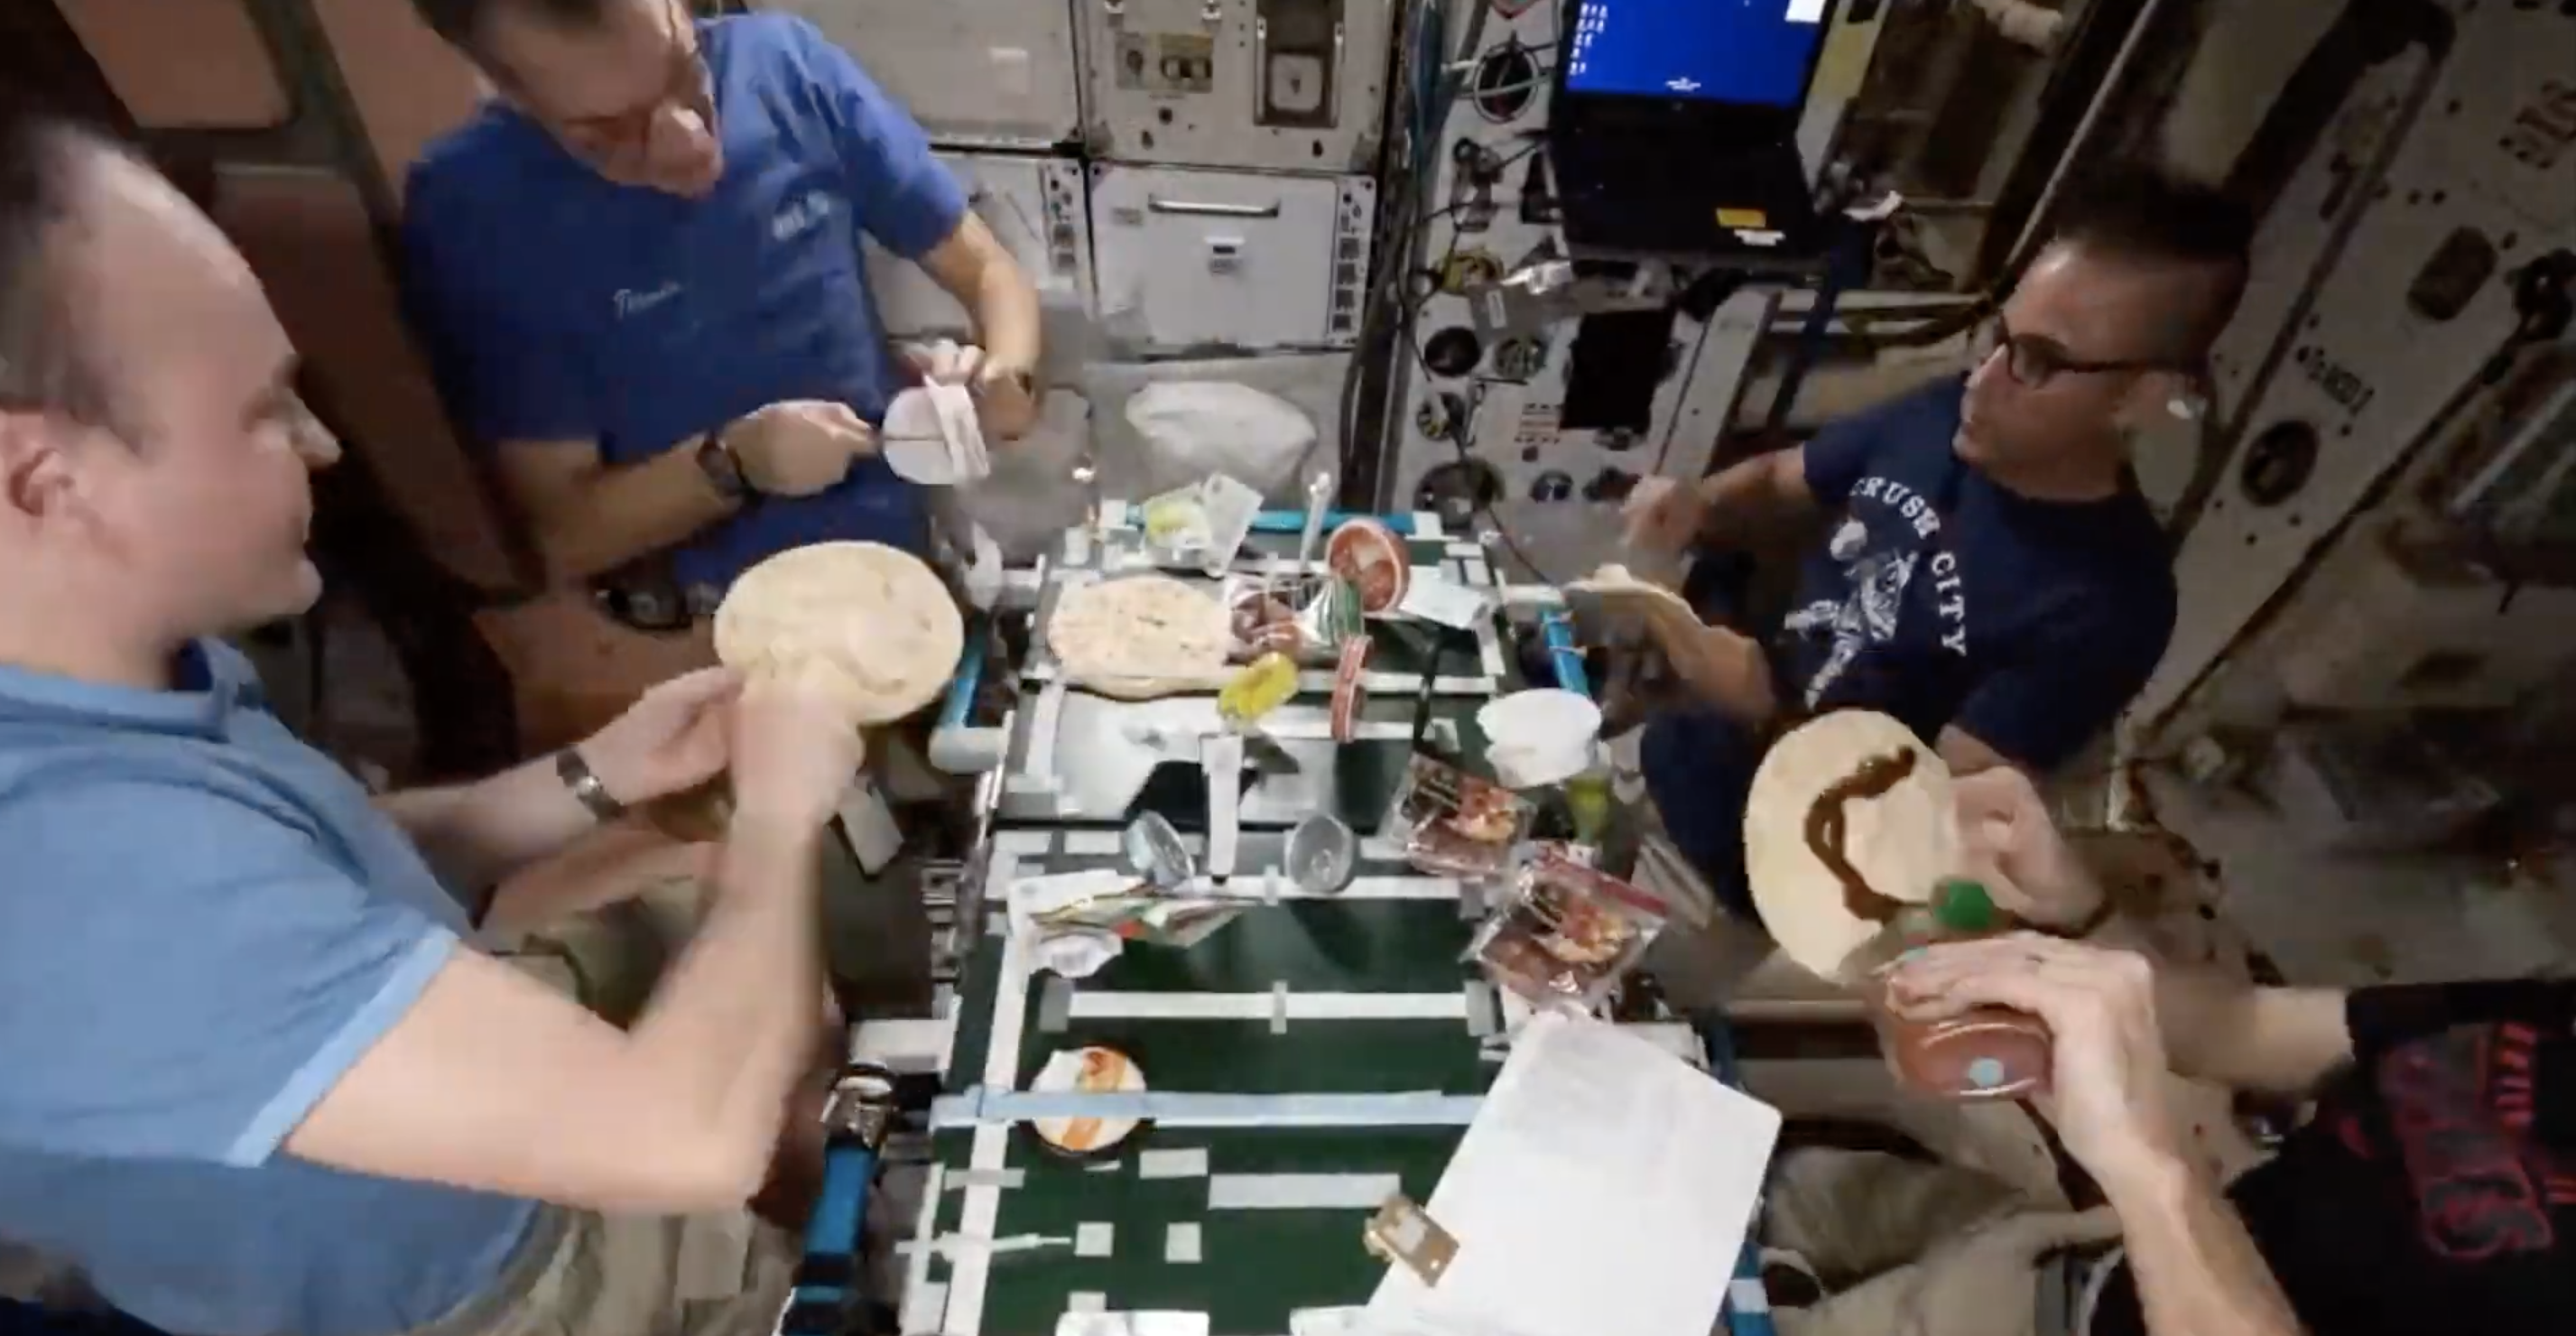
Lunch onboard the real ISS
Despite the global ISS effort, most people seem to feel disconnected from space exploration and all the STEAM goodness within. Beyond headlines and rocket launches, even space enthusiasts may feel out of touch. Most of what is available is via apps and videos, which are great, but miss the physical aspect.
Some of the team showing off their homage to the ISS
ISS Mimic is intended to provide an earthbound, tangible connection to that so-close-but-so-far-away orbiting science platform. We want space excitement to fuel STEAM interest.
Raspberry Pi brains and Braun
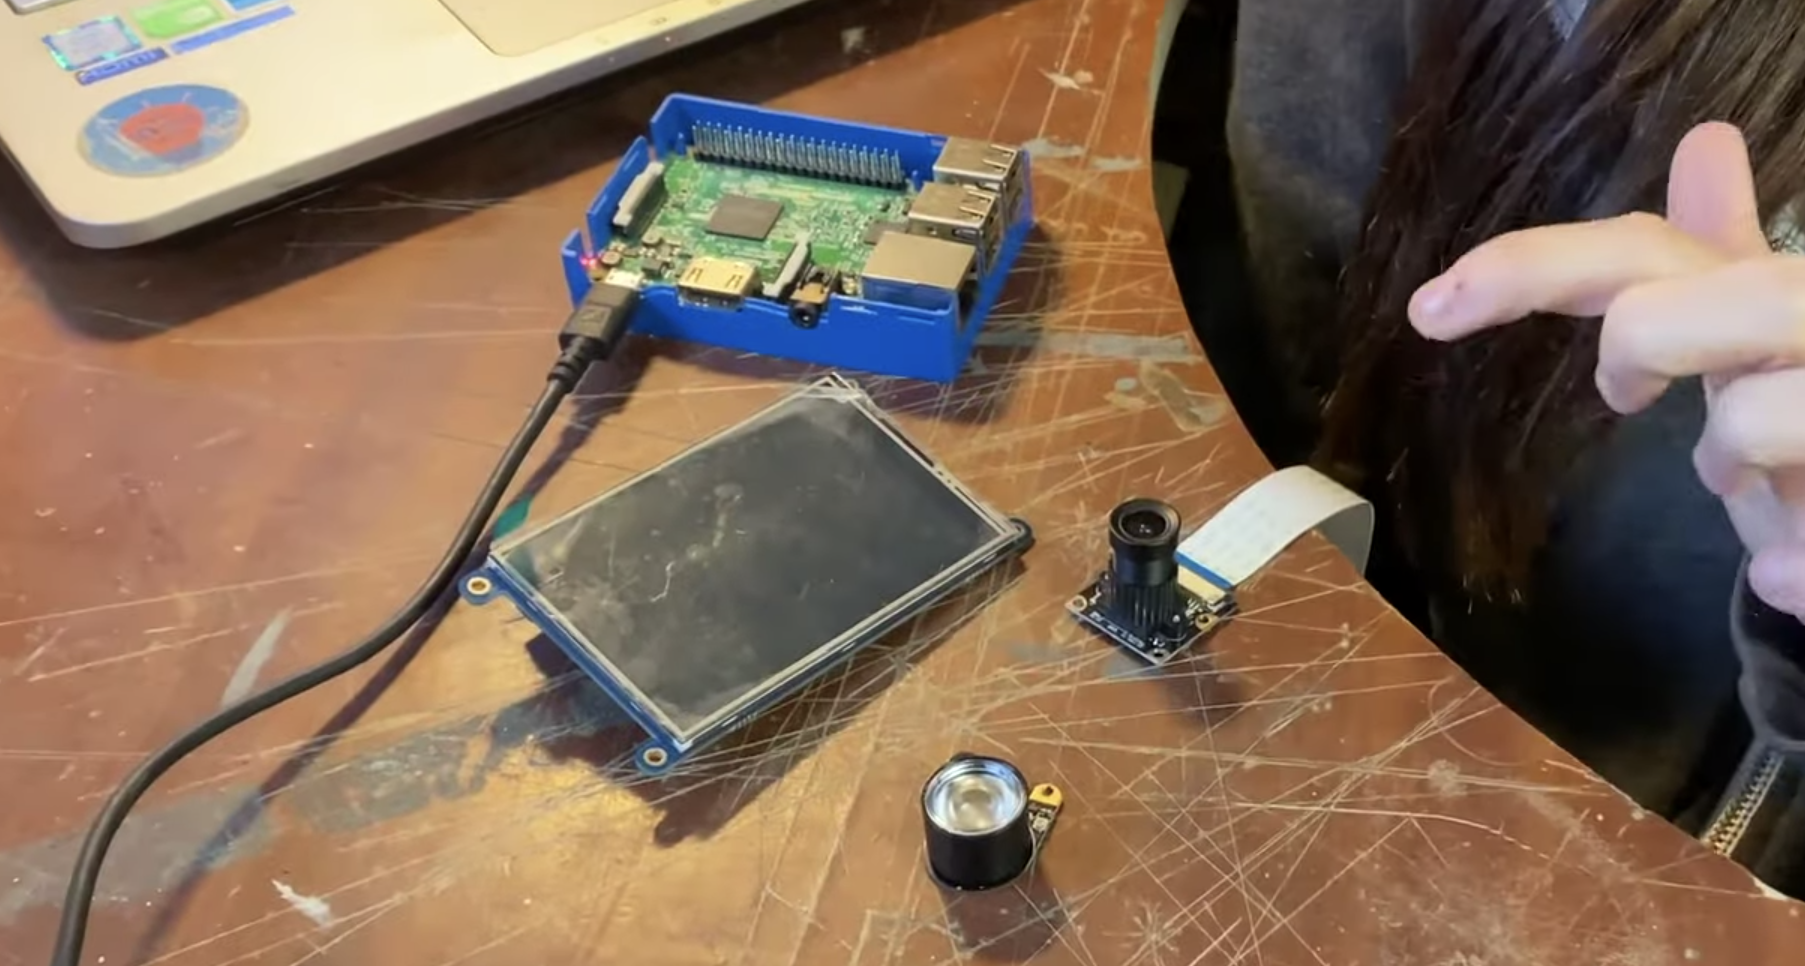
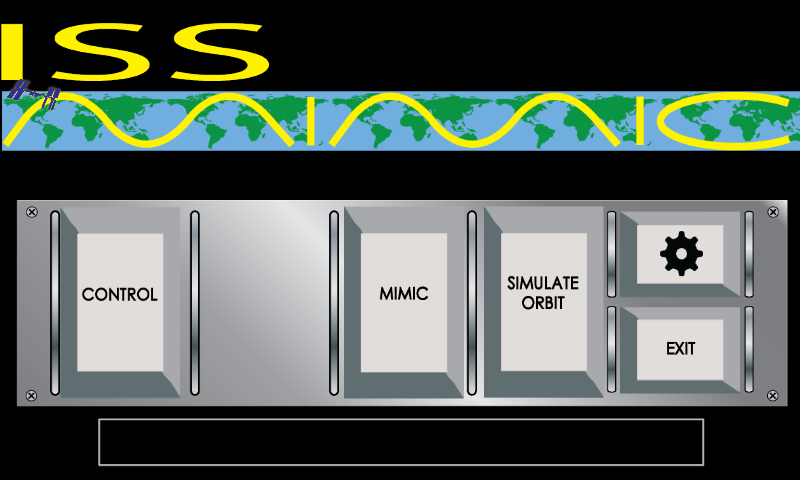
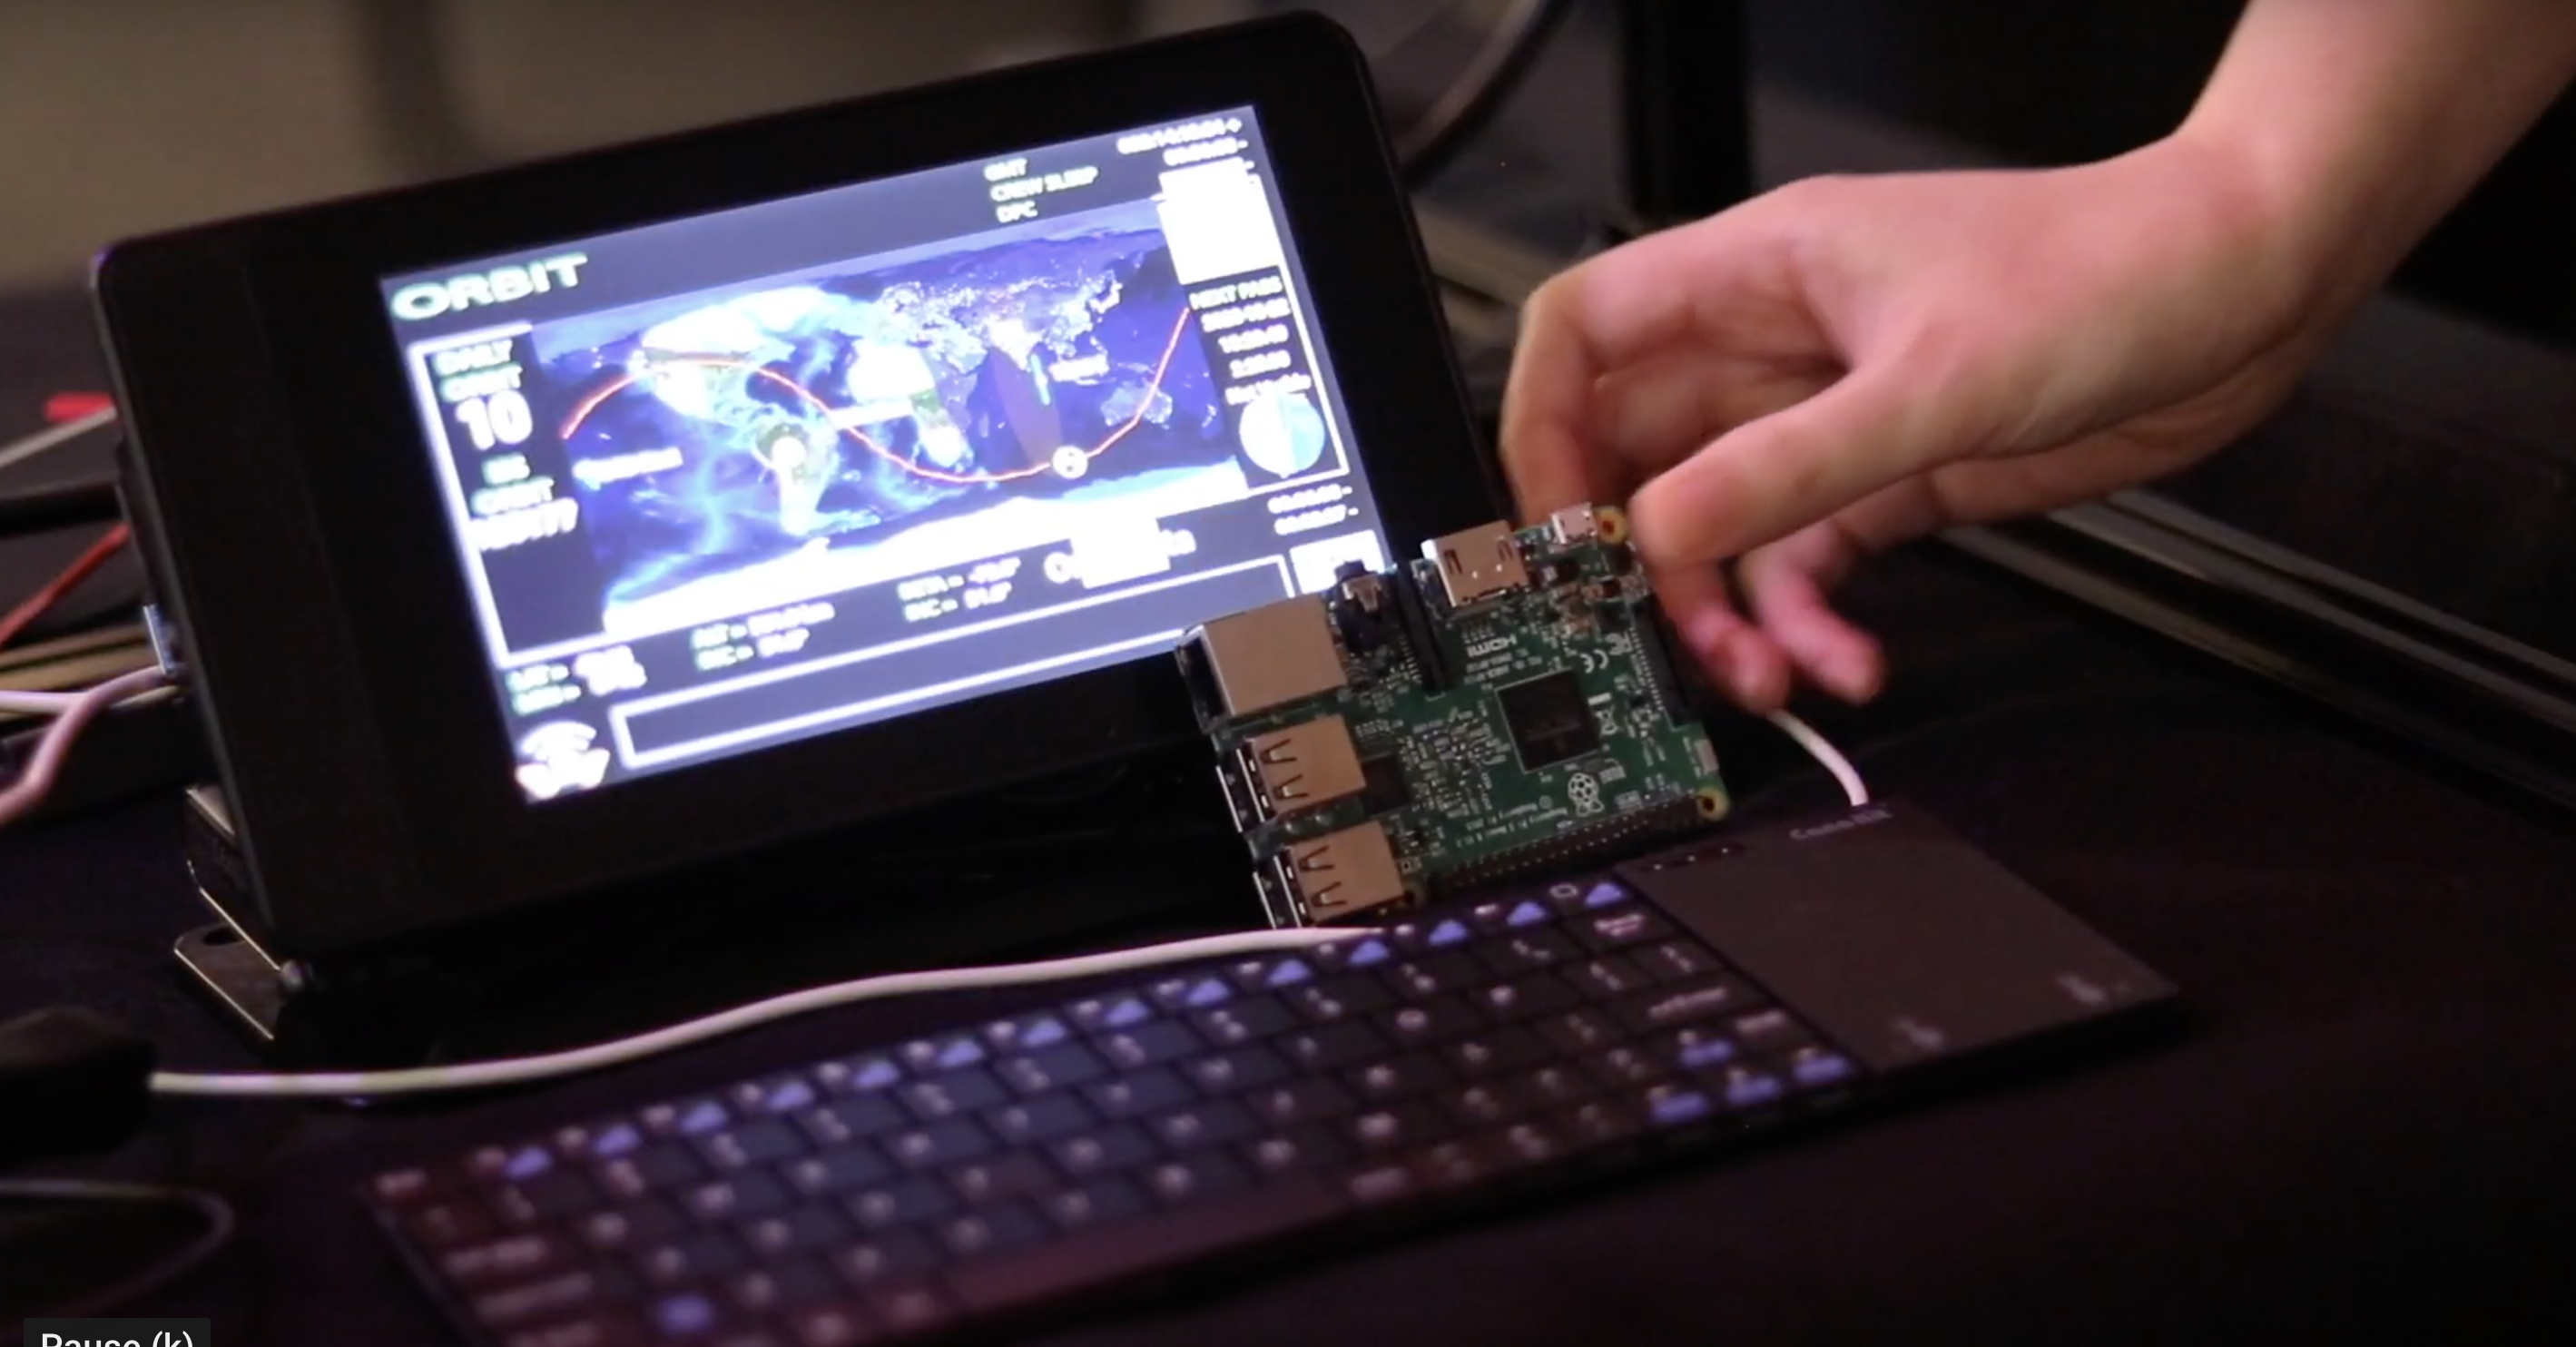
As you may have guessed, a Raspberry Pi is the brain of the business. Raspberry Pi taps into NASA’s public ISS live data stream to parse the telemetry into the bits we want. There’s JavaScript and tons of Python, including Kivy for the graphics.
The main screen for the Mimic program
Users toggle through various touchscreen data displays of things like battery charge states, electrical power generated, joint angles, communication dish status, gyroscope torques, and even airlock air pressure — fun to watch prior to a spacewalk!
The user can also touchscreen-activate the physical model, in which case Raspberry Pi sends the telemetry along to Arduinos, which in turn command motors in the model to do their thing, rotating the solar panels and thermal radiators to the proper angle. The solar panel joints use compact geared DC motors with Hall-effect sensors for feedback. The sensor signals are sent back down to the Arduino, which keeps track of the position of each joint compared to ISS telemetry, and updates motor command accordingly to stay in sync.
Some of the data Raspberry Pi can receive
The thermal radiator motors are simpler. Since they only rotate about 180° total, a simple RC micro servo is utilised with the desired position sent from an Arduino directly from the Raspberry Pi data stream.
When MIMIC is in ‘live mode’, the motor commands are the exact data stream coming from ISS. This is a fun mode to leave it in for long durations when it’s in the corner of the room. But it changes slowly, so we also include advanced playback, where prior orbit data stored on Raspberry Pi is played back at 60× speed. A regular 90-minute orbit profile can be played back in 90 seconds.
Tracking the ISS orbit
We also have ‘disco mode’, which may have been birthed during lack of sleep, but now we plan to utilise it whenever we want to grab attention — such as to alert users that the ISS is flying overhead.
LED addiction
We may have a mild LED addiction, and we have LEDs embedded where the ISS batteries would live at the base of the solar arrays. They change colour with the charge voltage, so we can tell by watching them when the ISS is going into Earth’s shadow, or when the batteries are fully charged, etc.
That doesn’t look like TOO many LEDs to us…
A few times when we were working on the model and the LEDs suddenly changed, we thought we had bumped something. But it turned out the first array was edging behind Earth. These are fun to watch during spacewalks, and the model gives us advanced notice that the crew is about to be in darkness.
We plan to cram more LEDs in to react to other data. The project is open source, so anyone can build one and improve the design — help wanted! After all, the ISS itself is a worldwide collaboration with 19 countries participating by providing components and crew.
Chaotic wire management
The solar panels on the ISS are mounted on what’s known as the ‘outboard truss’ — one each on the Port and Starboard ends of ISS. Everything on the outboard truss rotates together as part of the sun-tracking (in addition to each solar array rotating individually). So, you can’t just run the power/signal wires through the interface or they would twist and break. ISS Mimic has the same issue.
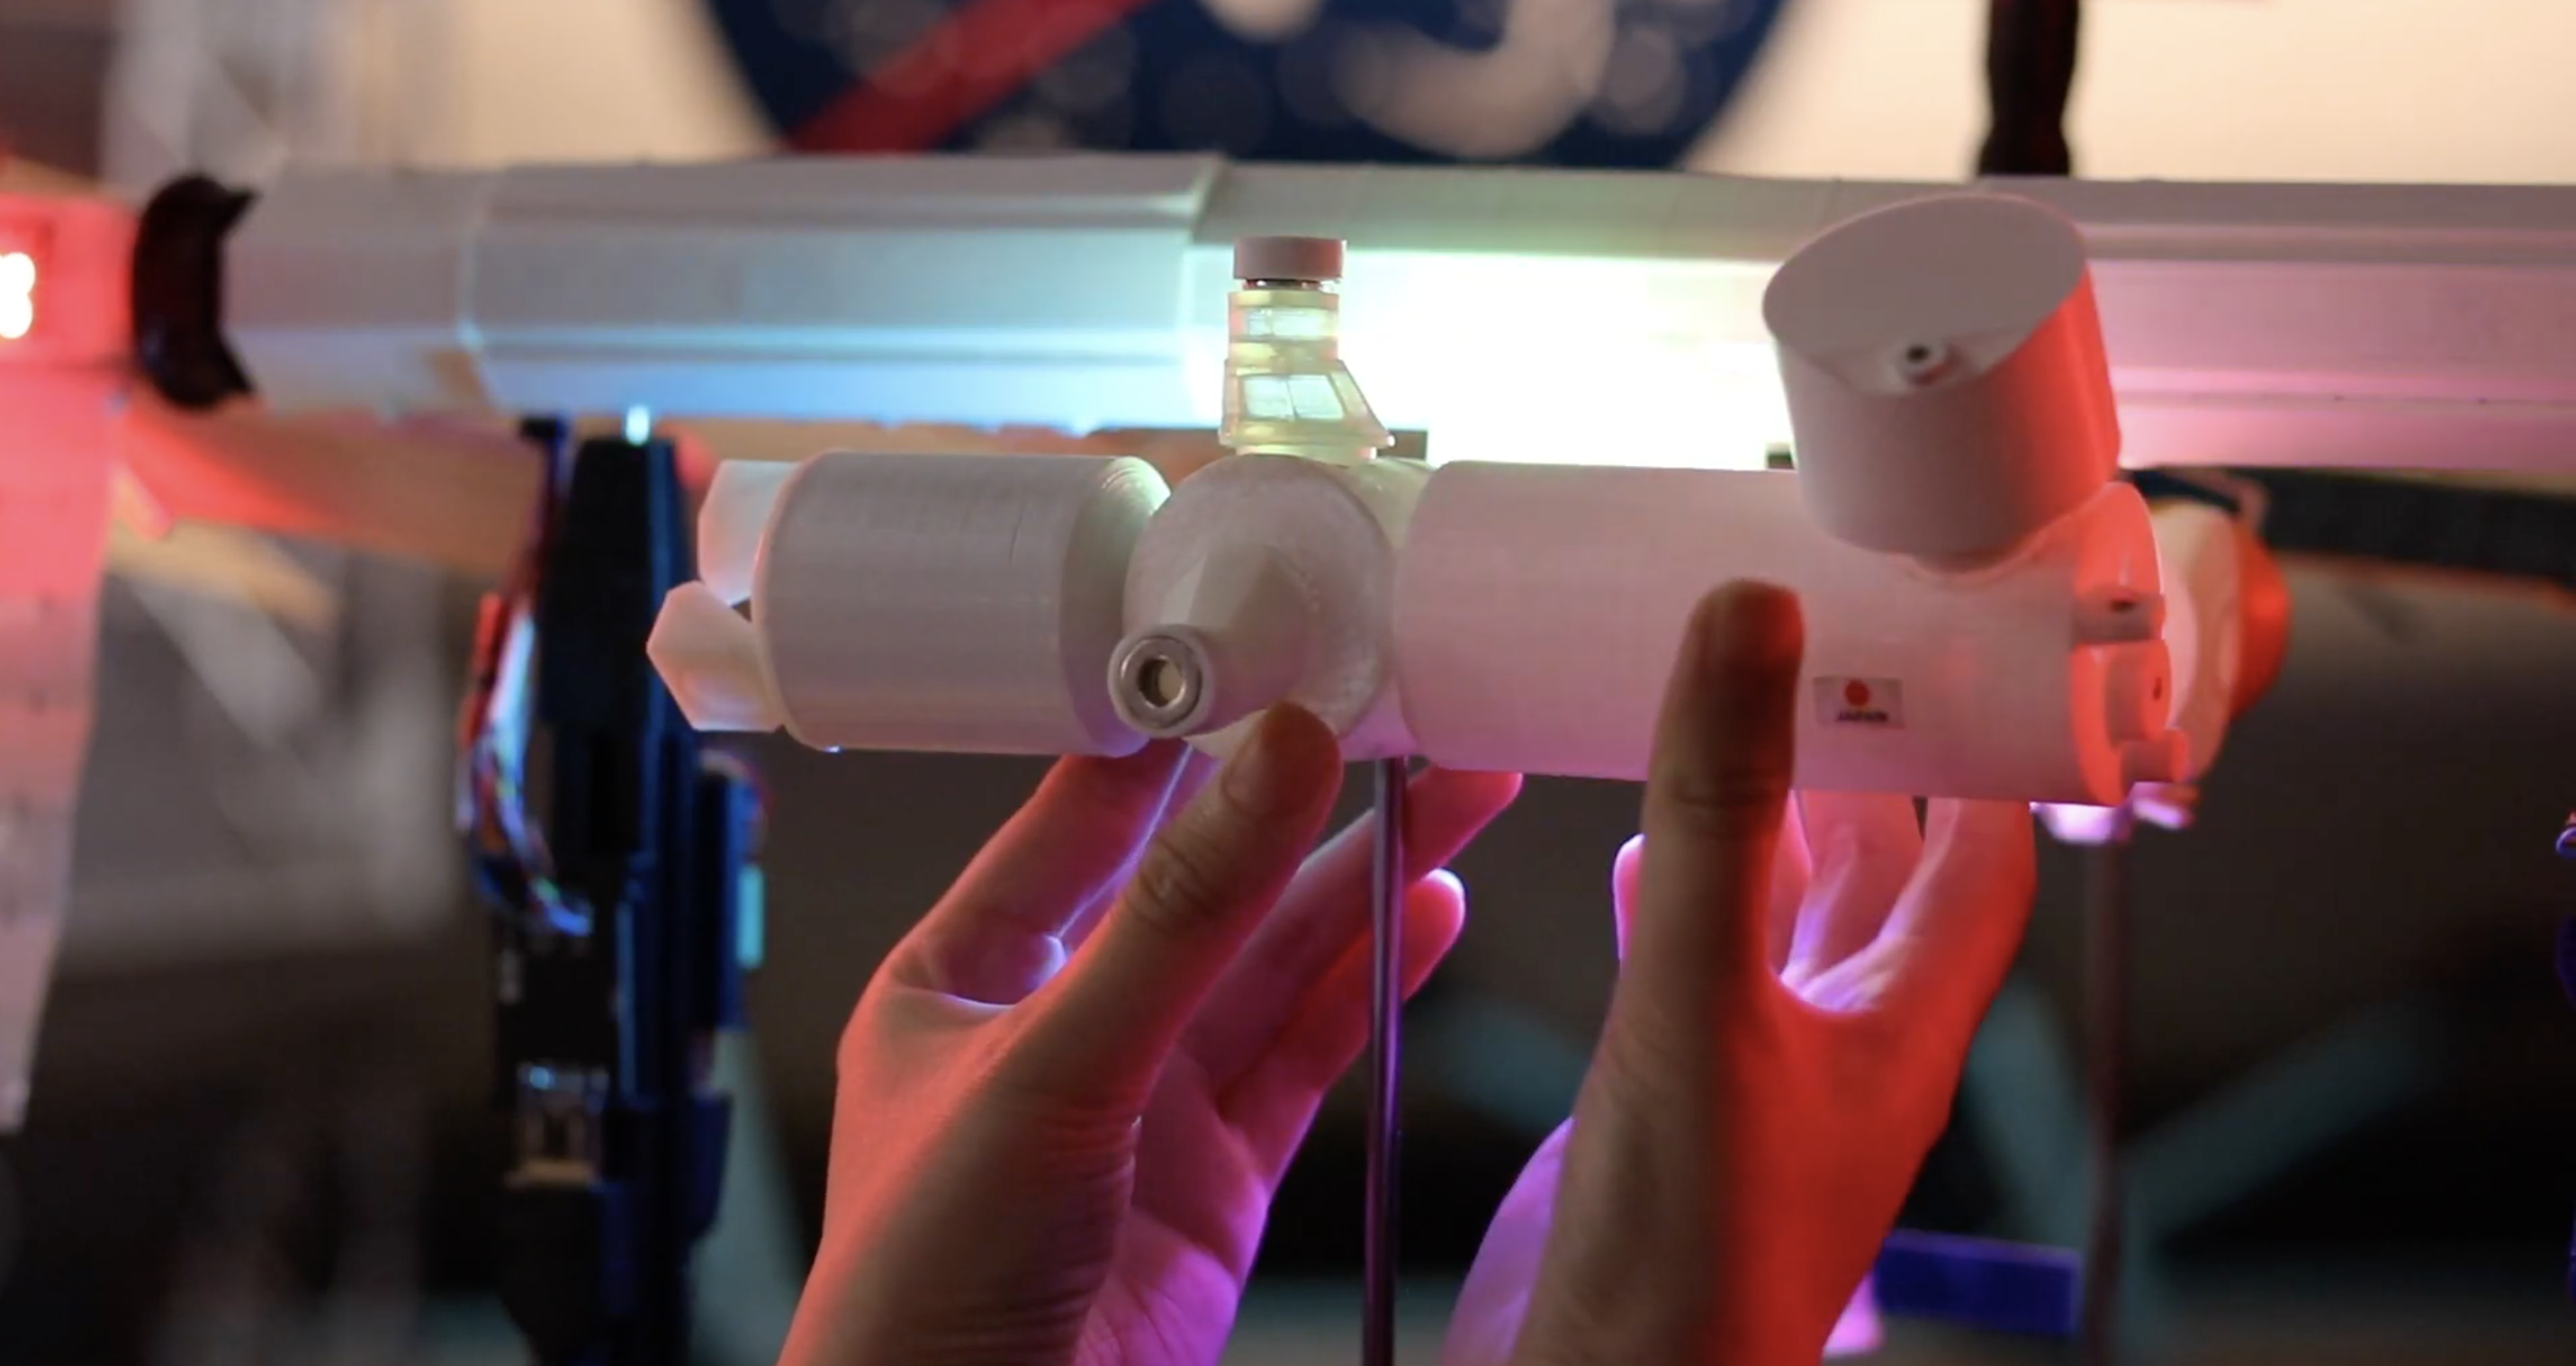
A closer look at ISS Mimic’s mini solar panels
Even though our solar panels don’t generate power, their motors still require power and signals. The ISS has a specialised, unique build; but fortunately we were able to solve our problem with a simple slip ring design sourced from Amazon.
So twisty. So shiny. So tricky to manage cables for.
Wire management turned out to be a big issue for us. We had bird nests in several places early on (still present on the Port side solar), so we created some custom PCBs just for wire management, to keep the chaos down. We incorporated HDMI connectors and cables in some places to provide nice shielding and convenient sized coupling — actually a bit more compact than the Ethernet we’d used before.
The real ISS flexing its power-generating solar panels in space
Also, those solar panels are huge, and the mechanism that supports the outboard truss (everything on the sides that rotate together) on the ISS includes a massive 10 foot diameter bull gear called the Solar Alpha Rotary Joint. A pinion gear from a motor interfaces with this gear to turn it as needed.
Some of the 3D printed parts
We were pleasantly surprised that our 3D-printed bull gear held up quite well with a similar pinion-driven design. Overall, our 3D prints have survived better than expected. We are revamping most models to include more detail, and we could certainly use help here.
Education focus
Our sights are set firmly on educators as our primary area of focus, and we’ve been excited to partner with Space Center Houston to speak at public events and a space exploration educator conference with international attendance earlier this year.
ISS Mimic at STEM outreach during FIRST Robotics National Championship (Houston)
The feedback has been encouraging and enlightening. We want to keep getting feedback from educators, so please provide more insights via the contact info listed at the bottom.
NASA Mission Control — failure is actually an option… sometimes
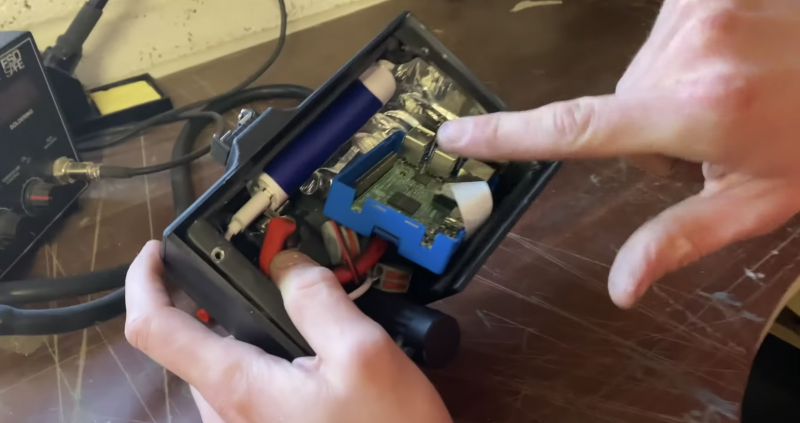
A highlight for the team was when the ISS Mimic prototype was requested to live for a month in NASA’s Mission Control Center and was synced to live data during an historic spacewalk. Mimic experienced an ‘anomaly’ when a loose wire caused one of the solar panel motors to spin at 100× the normal rate.
Our tiny computer with the ISS Mimic’s control panel
You’ll be happy to know that none of the engineering professionals were fooled into thinking the real ISS was doing time-trials. Did I mention it’s still a work in progress? You can’t be scared of failure (for non-critical applications!), particularly when developing something brand-new. It’s part of shaking out problems and learning.
Space exploration has an exciting Future
Showing off ISS Mimic STEM outreach during the first Robotics National Championship
It’s an exciting time in human and robotic spaceflight, with lots of budding projects and new organisations joining the effort. This feels like a great time to deepen our connection to this great progress, and we hope ISS Mimic can help us to do that, as well as encourage more students to play in coding, mechatronics, and STEAM.
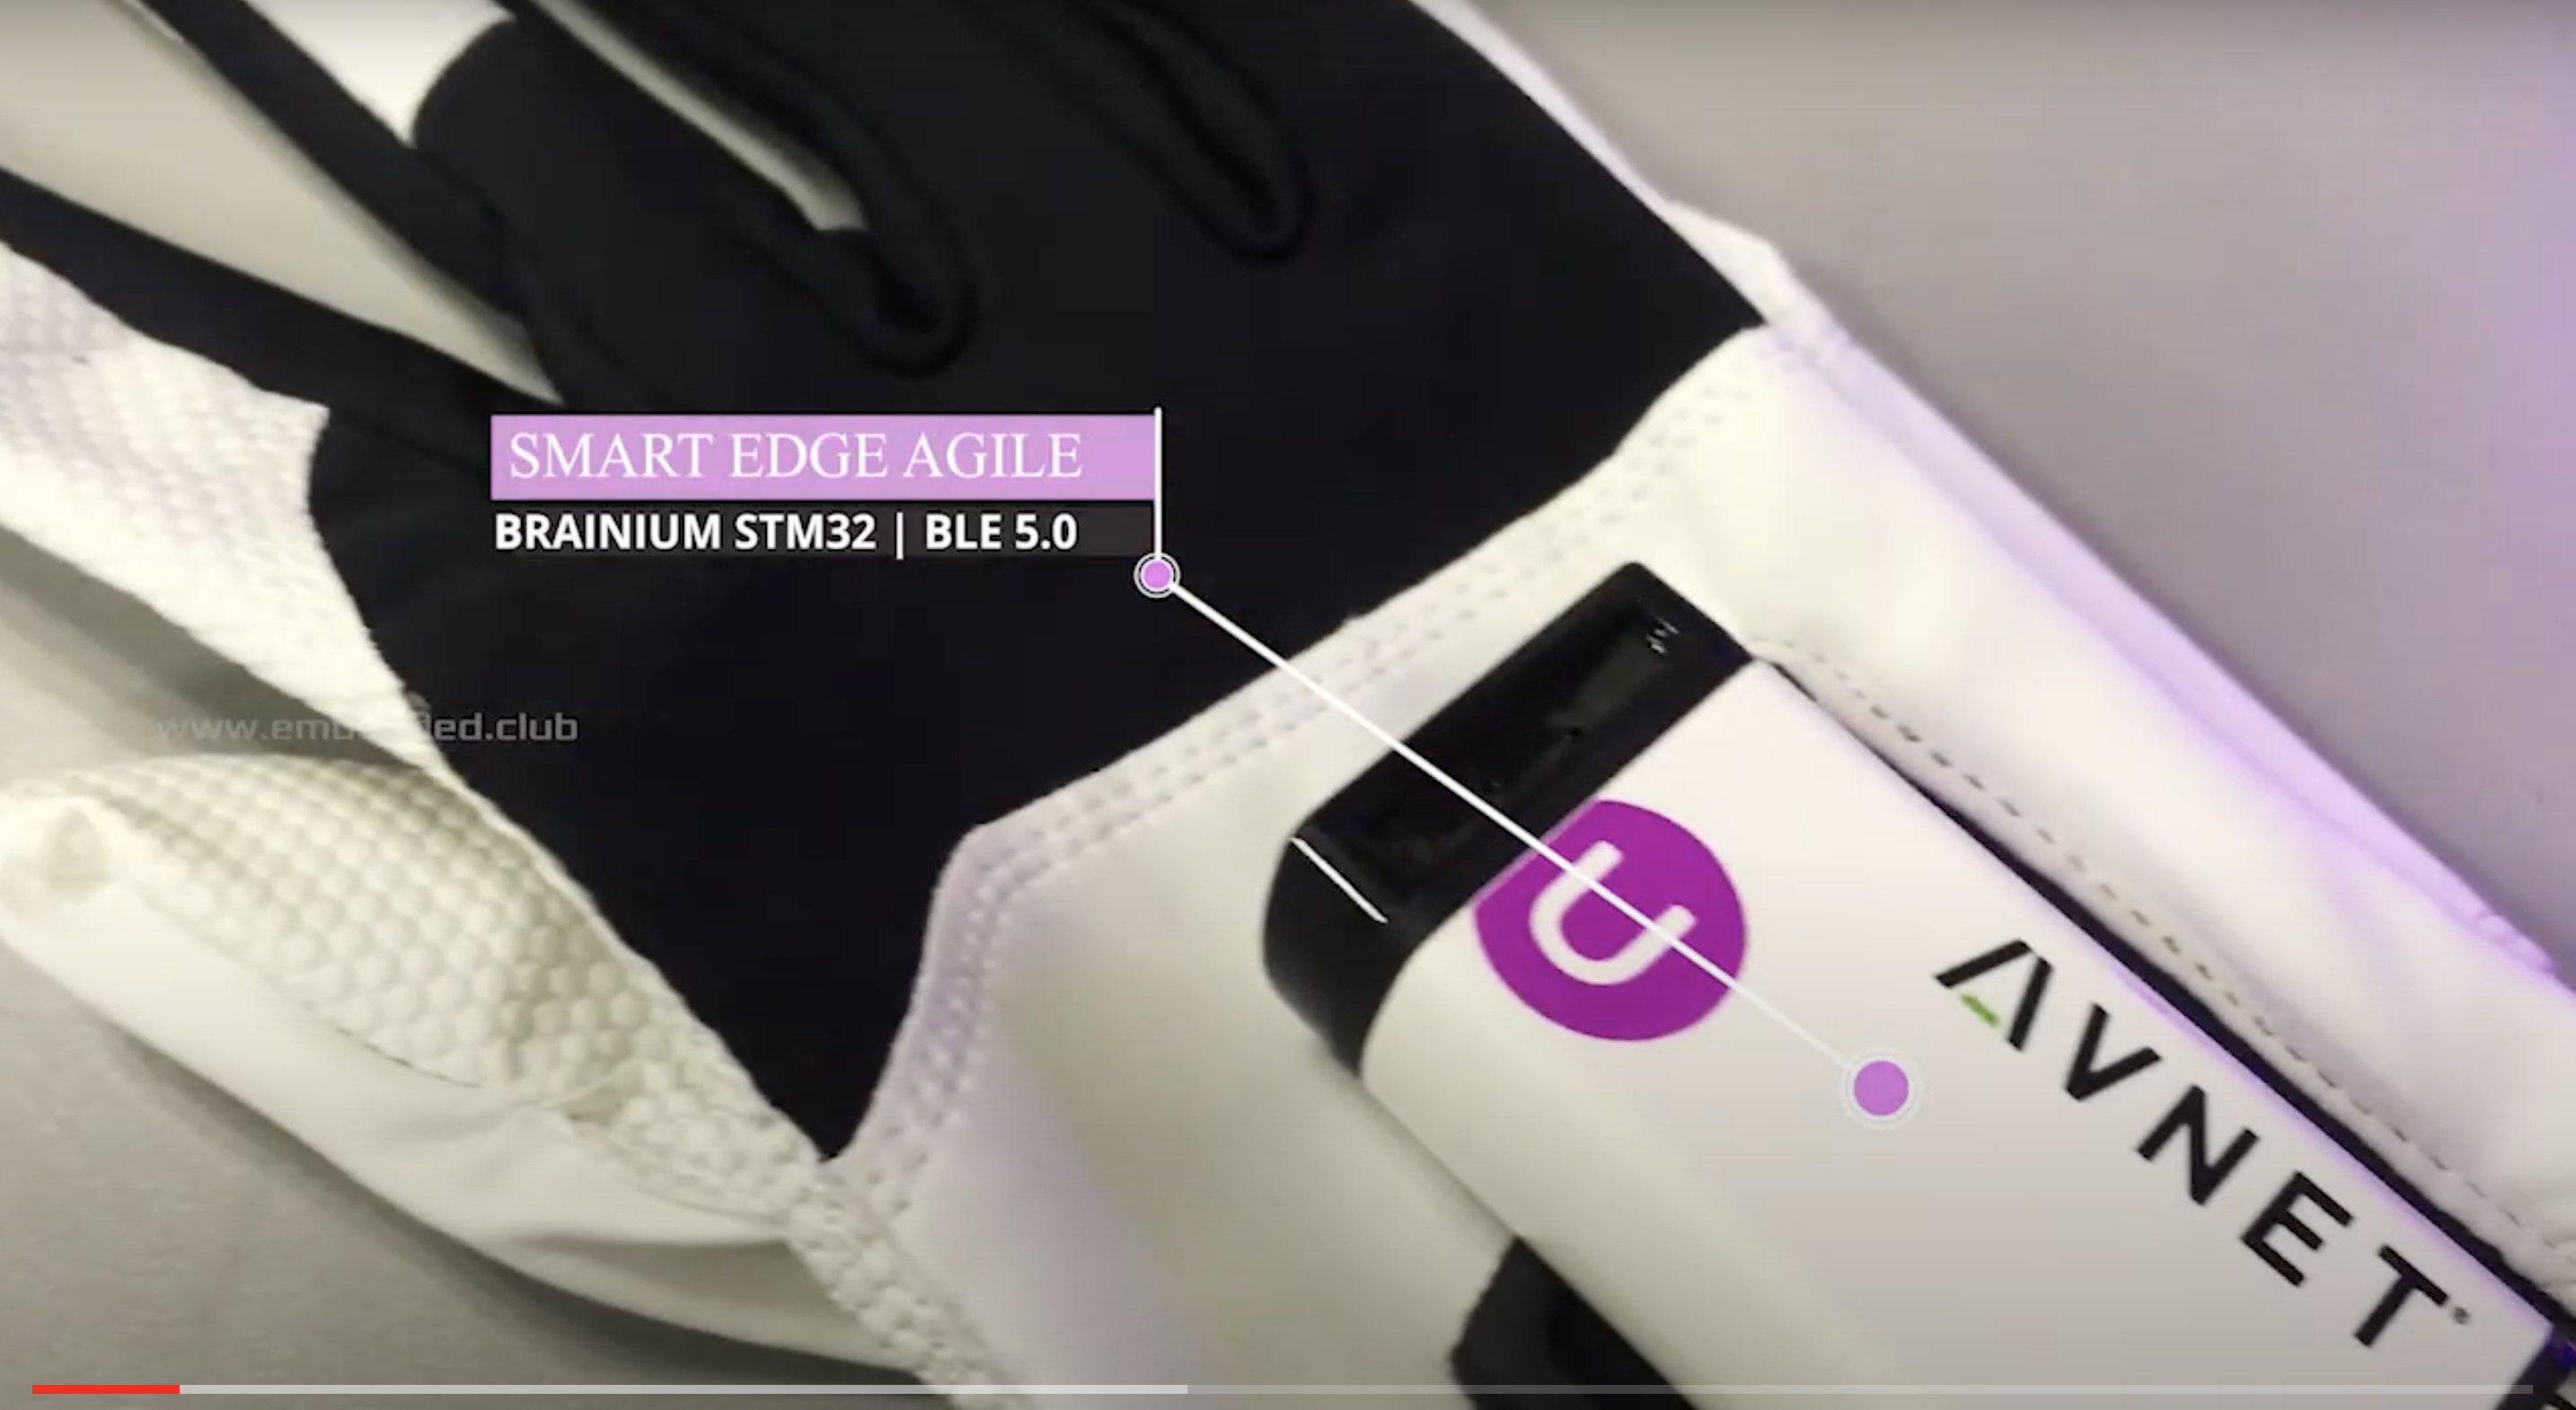
Animator/engineer Ashok Fair has put witch-level finger pointing powers in your hands by sticking a SmartEdge Agile, wirelessly controlled by Raspberry Pi Zero, to a golf glove. You could have really freaked the bejeezus out of Halloween party guests with this (if we were allowed to have Halloween parties that is).
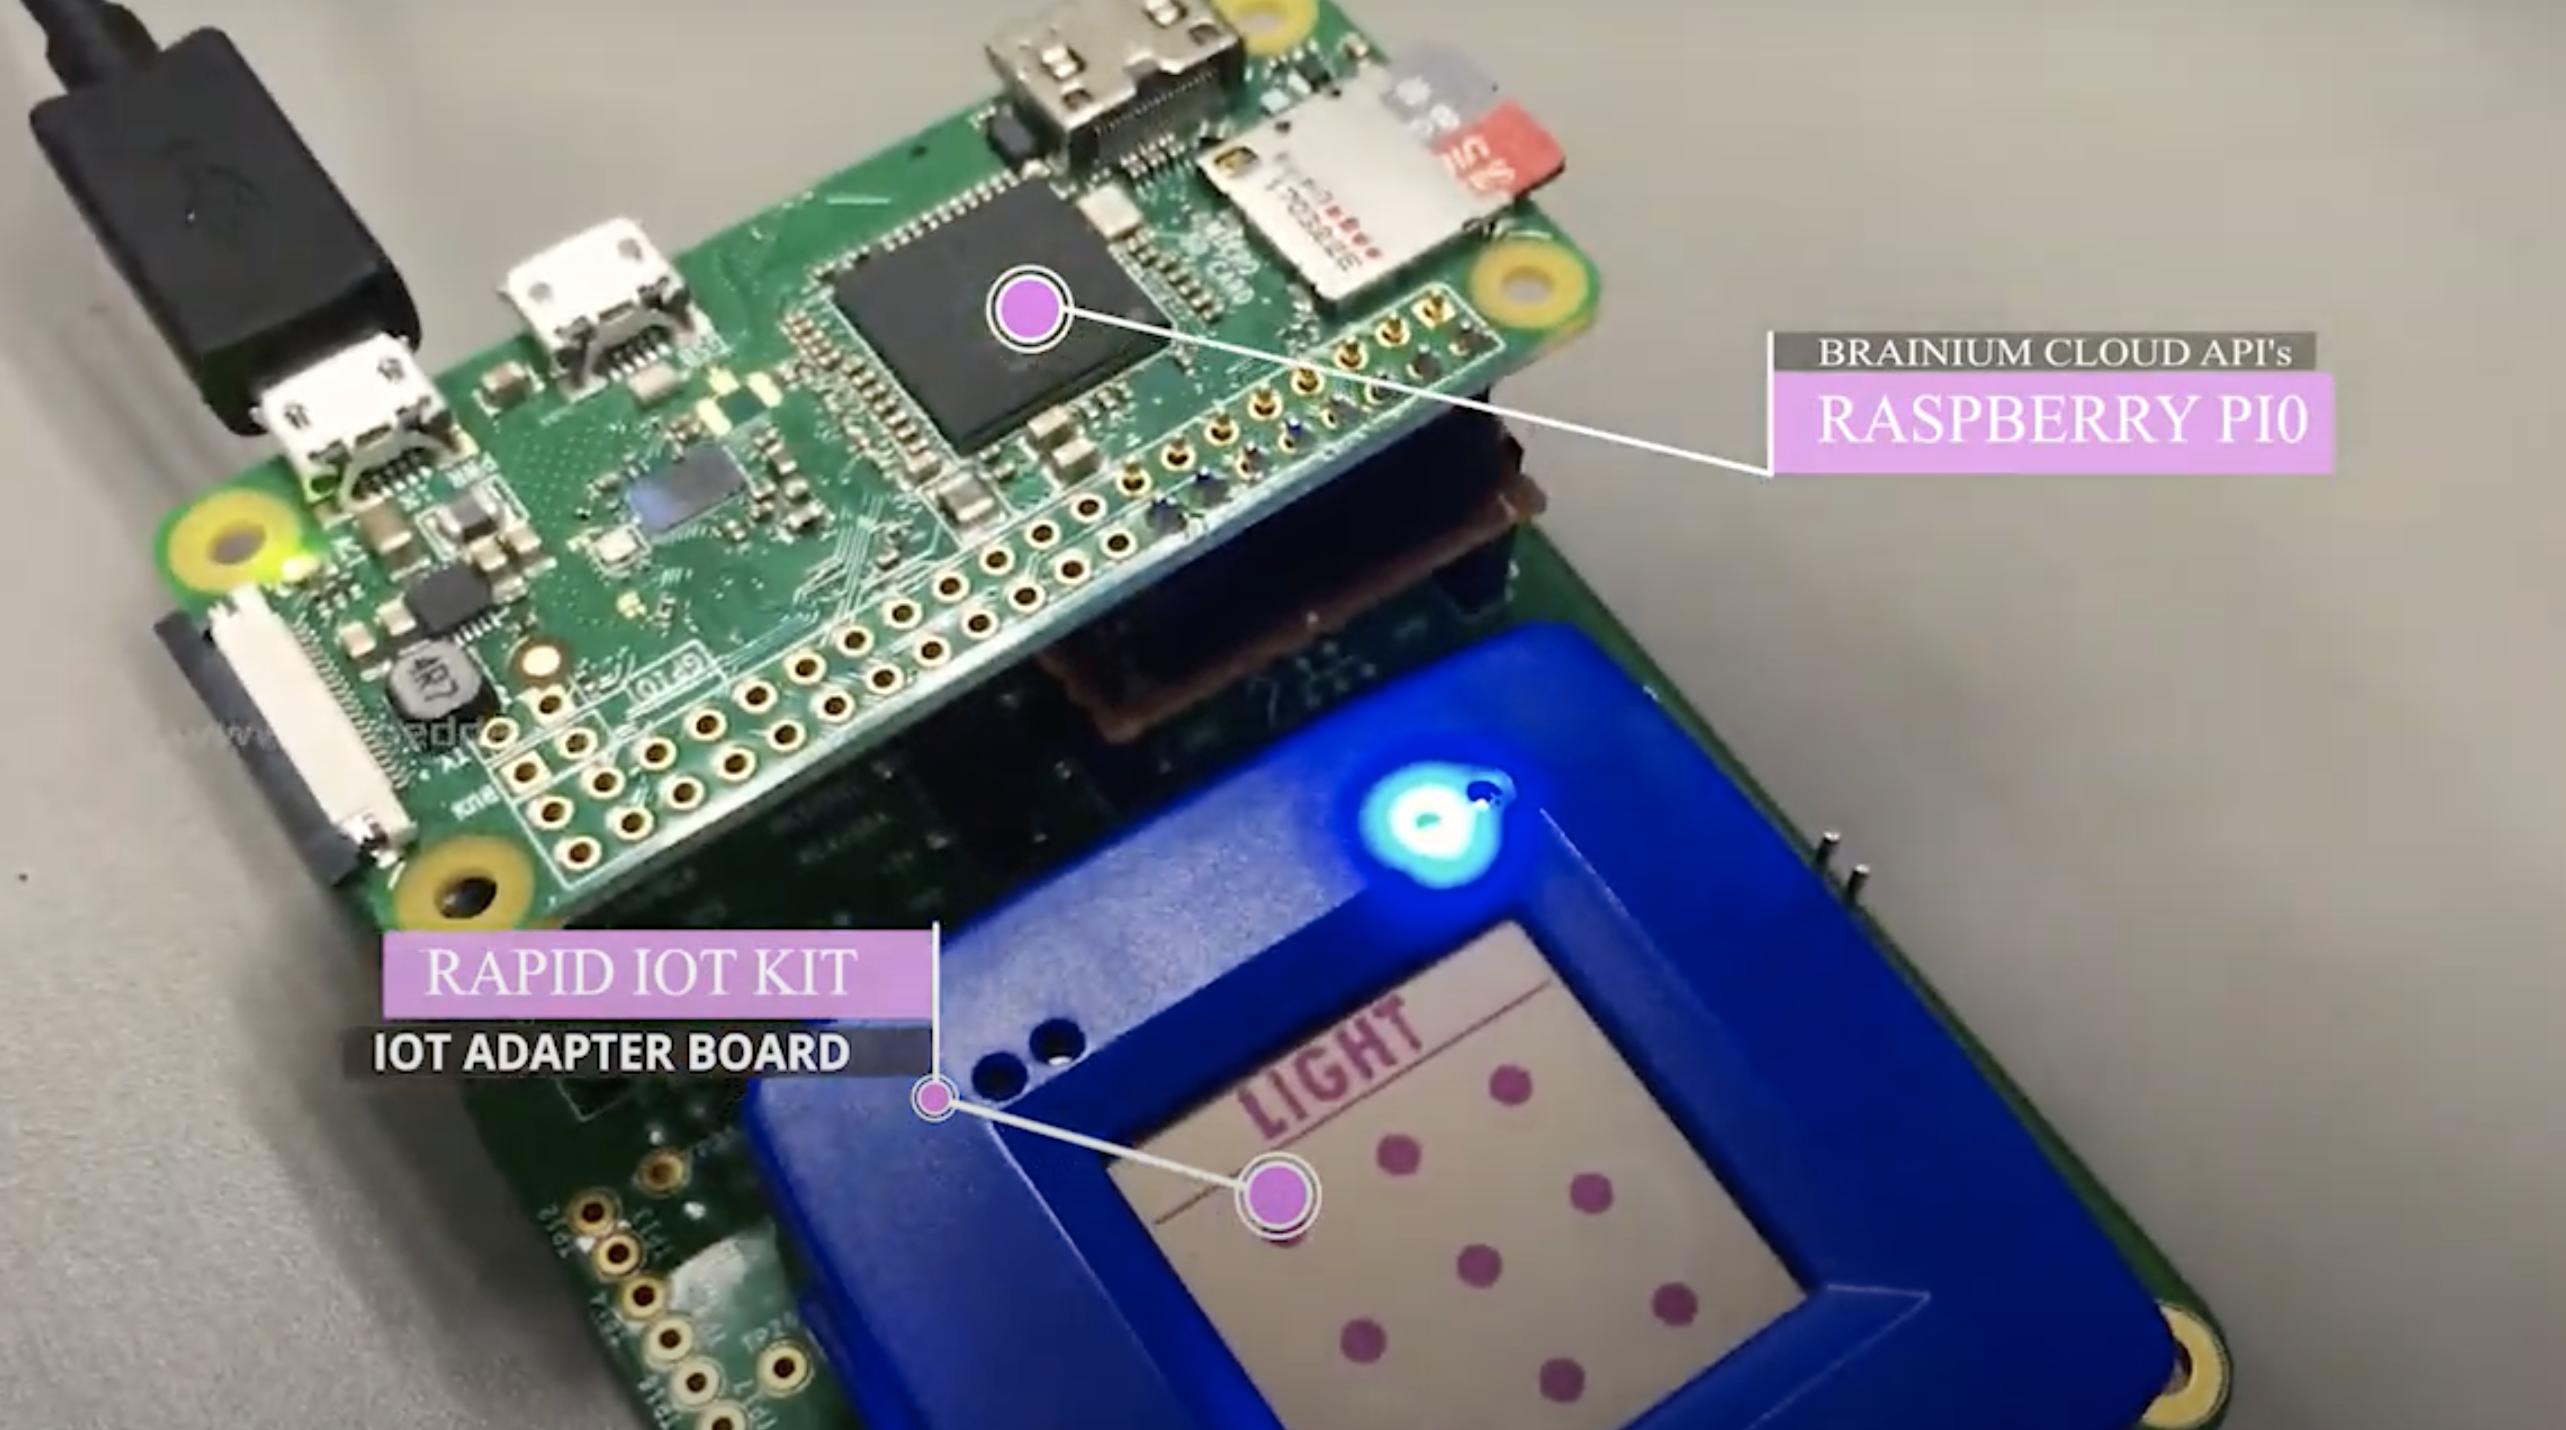
The build uses a Smart Edge Agile IoT device with Brainium, a cloud-based tool for performing machine learning tasks.
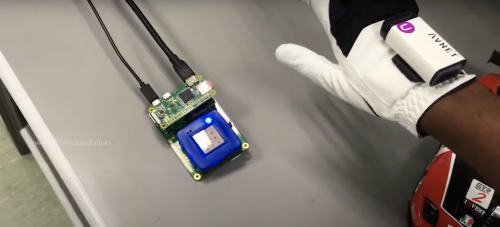
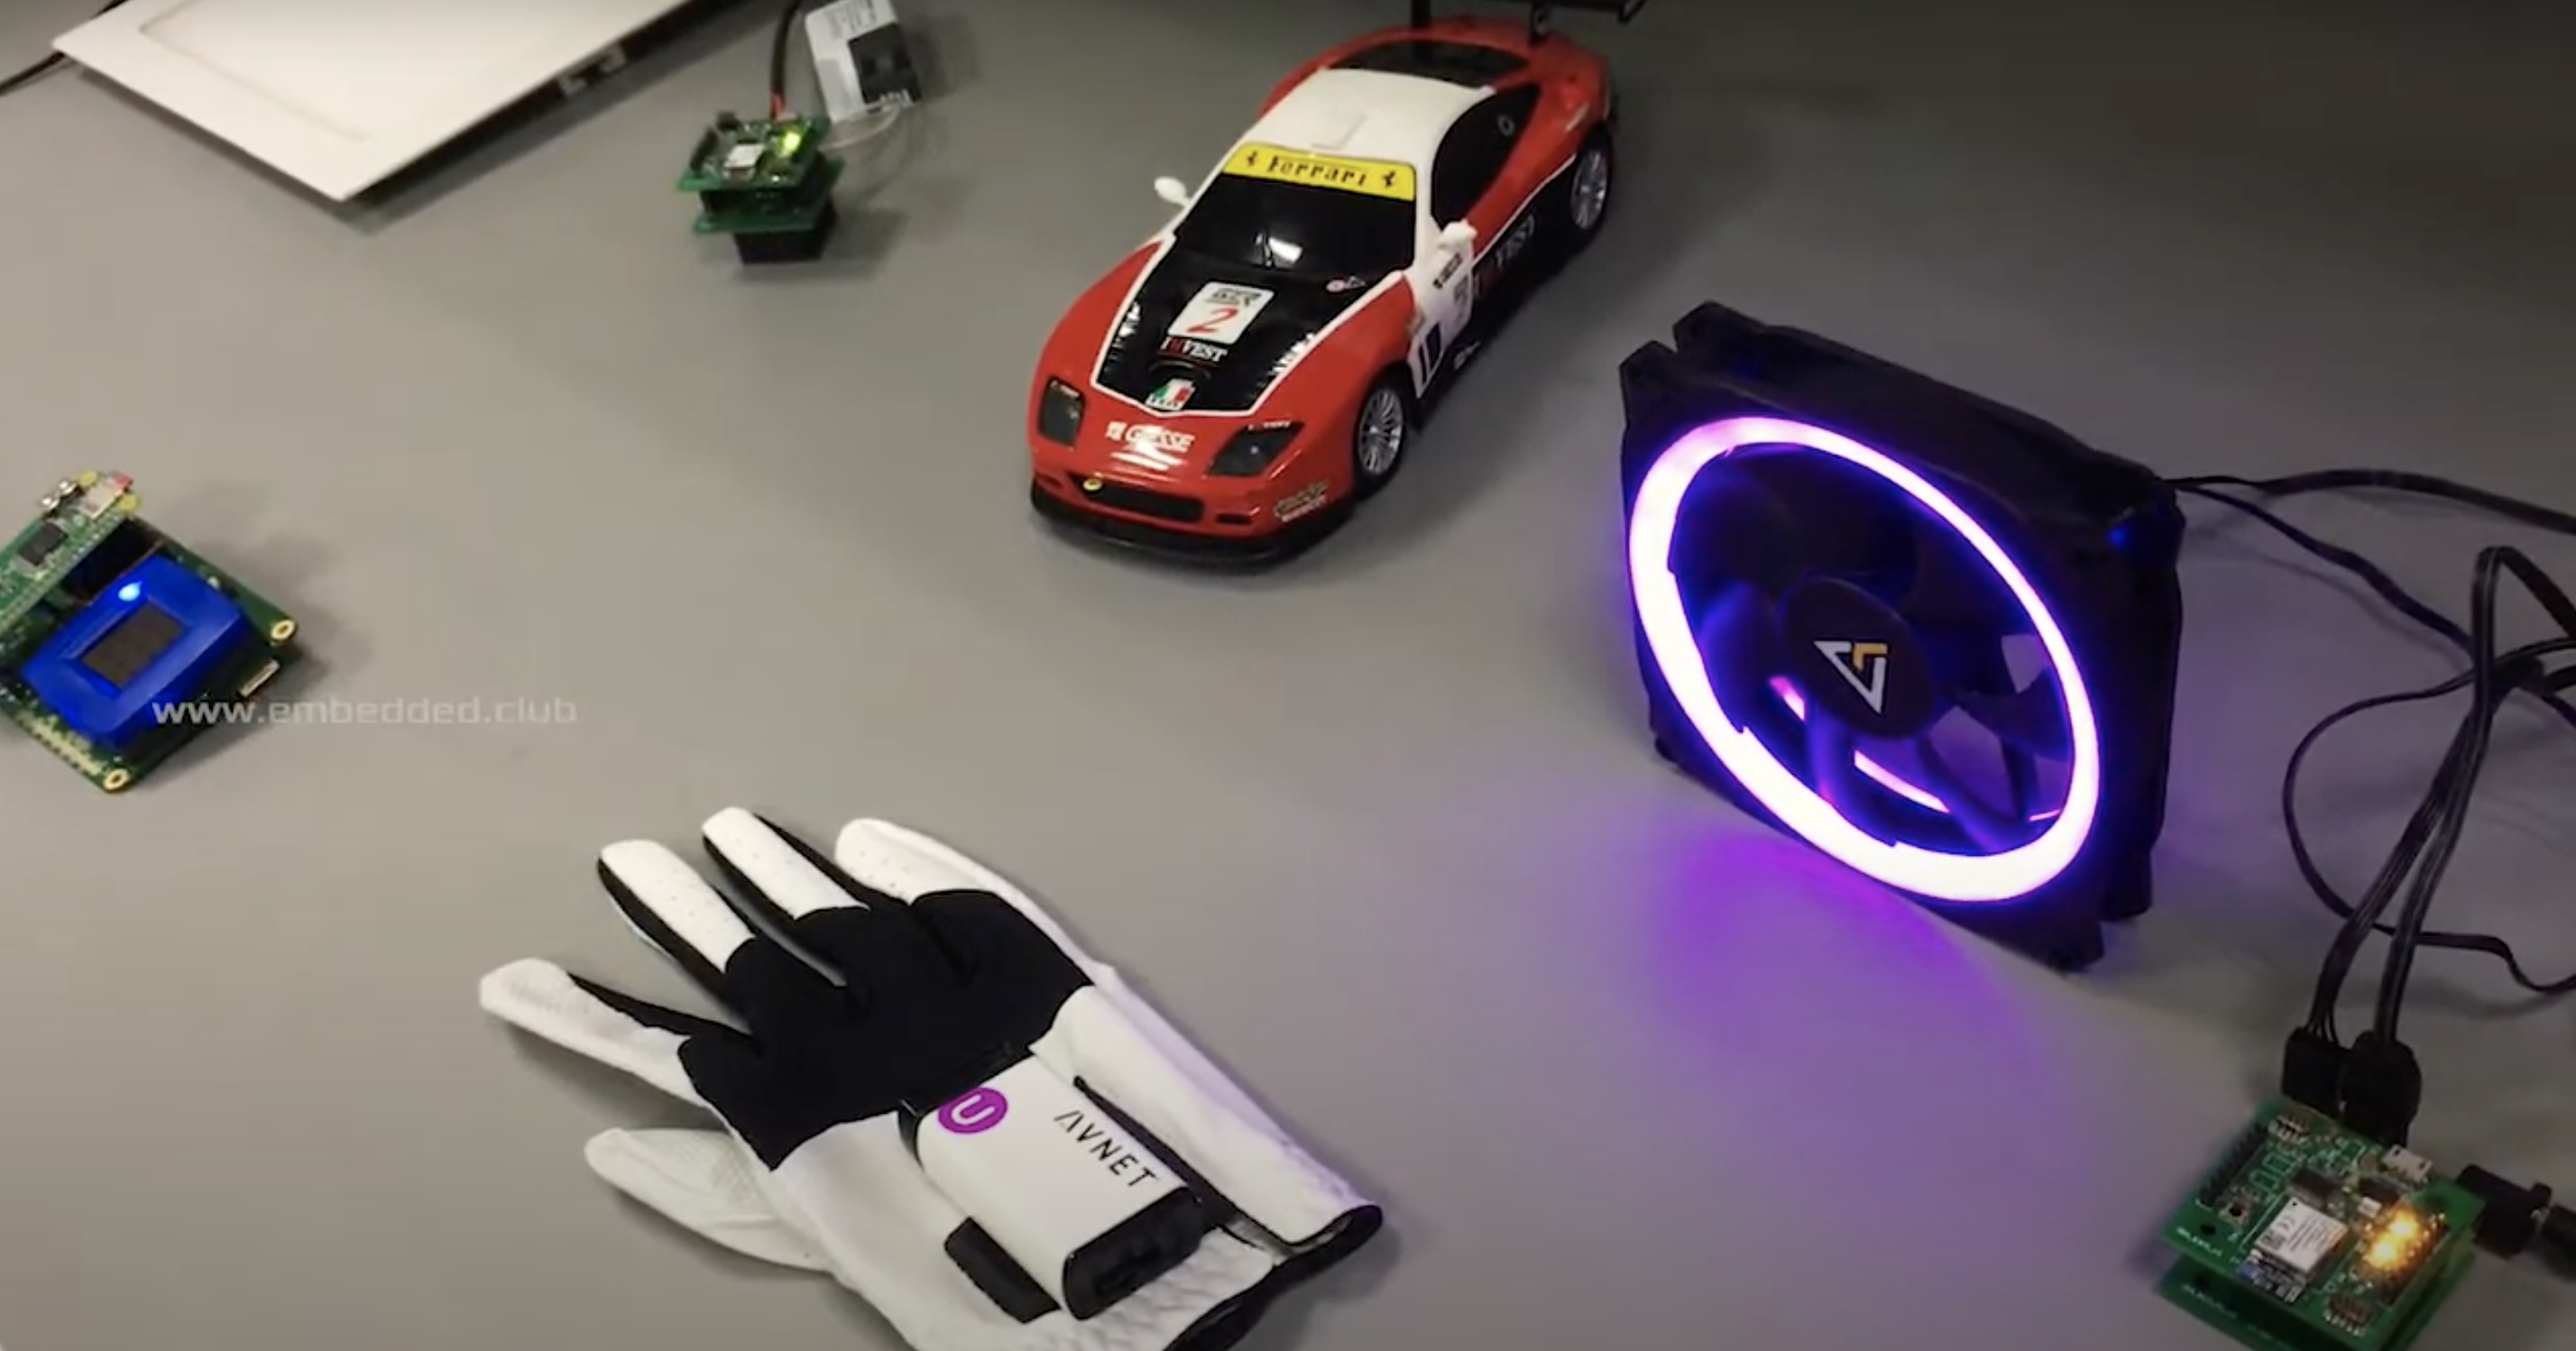
The Rapid IoT kit is interfaced with Raspberry Pi Zero and creates a thread network connecting to light, car, and fan controller nodes.
The Brainium app is installed on Raspberry Pi and bridges between the cloud and Smart Edge device. MQTT is running on Python and processes the Rapid IoT Kit’s data.
The device is mounted onto a golf glove, giving the wearer seemingly magical powers with the wave of a hand.
NXP Rapid IoT Prototyping Kit (the square blue screen stuck on the adaptor board with the Raspberry Pi Zero)
Brainium AI Studio app
Golf glove
Waking up the Rapid IoT screen
To get started, the glove wearer draws a pattern above the screen attached to the Raspberry Pi to unlock it and wake up all the controller nodes.
The light controller node is turned on by drawing a clockwise circle, and turned off with an counter-clockwise circle.
The full kit and caboodle
The fan is turned on and off in the same way, and you can increase the fan’s speed by moving your hand upwards and reduce the speed by moving your hand down. You know it’s working by the look of the fan’s LEDs: they blinker faster as the fan speeds up.
Make a pushing motion in the air above the car to make it move forward, and you can also make it turn and reverse.
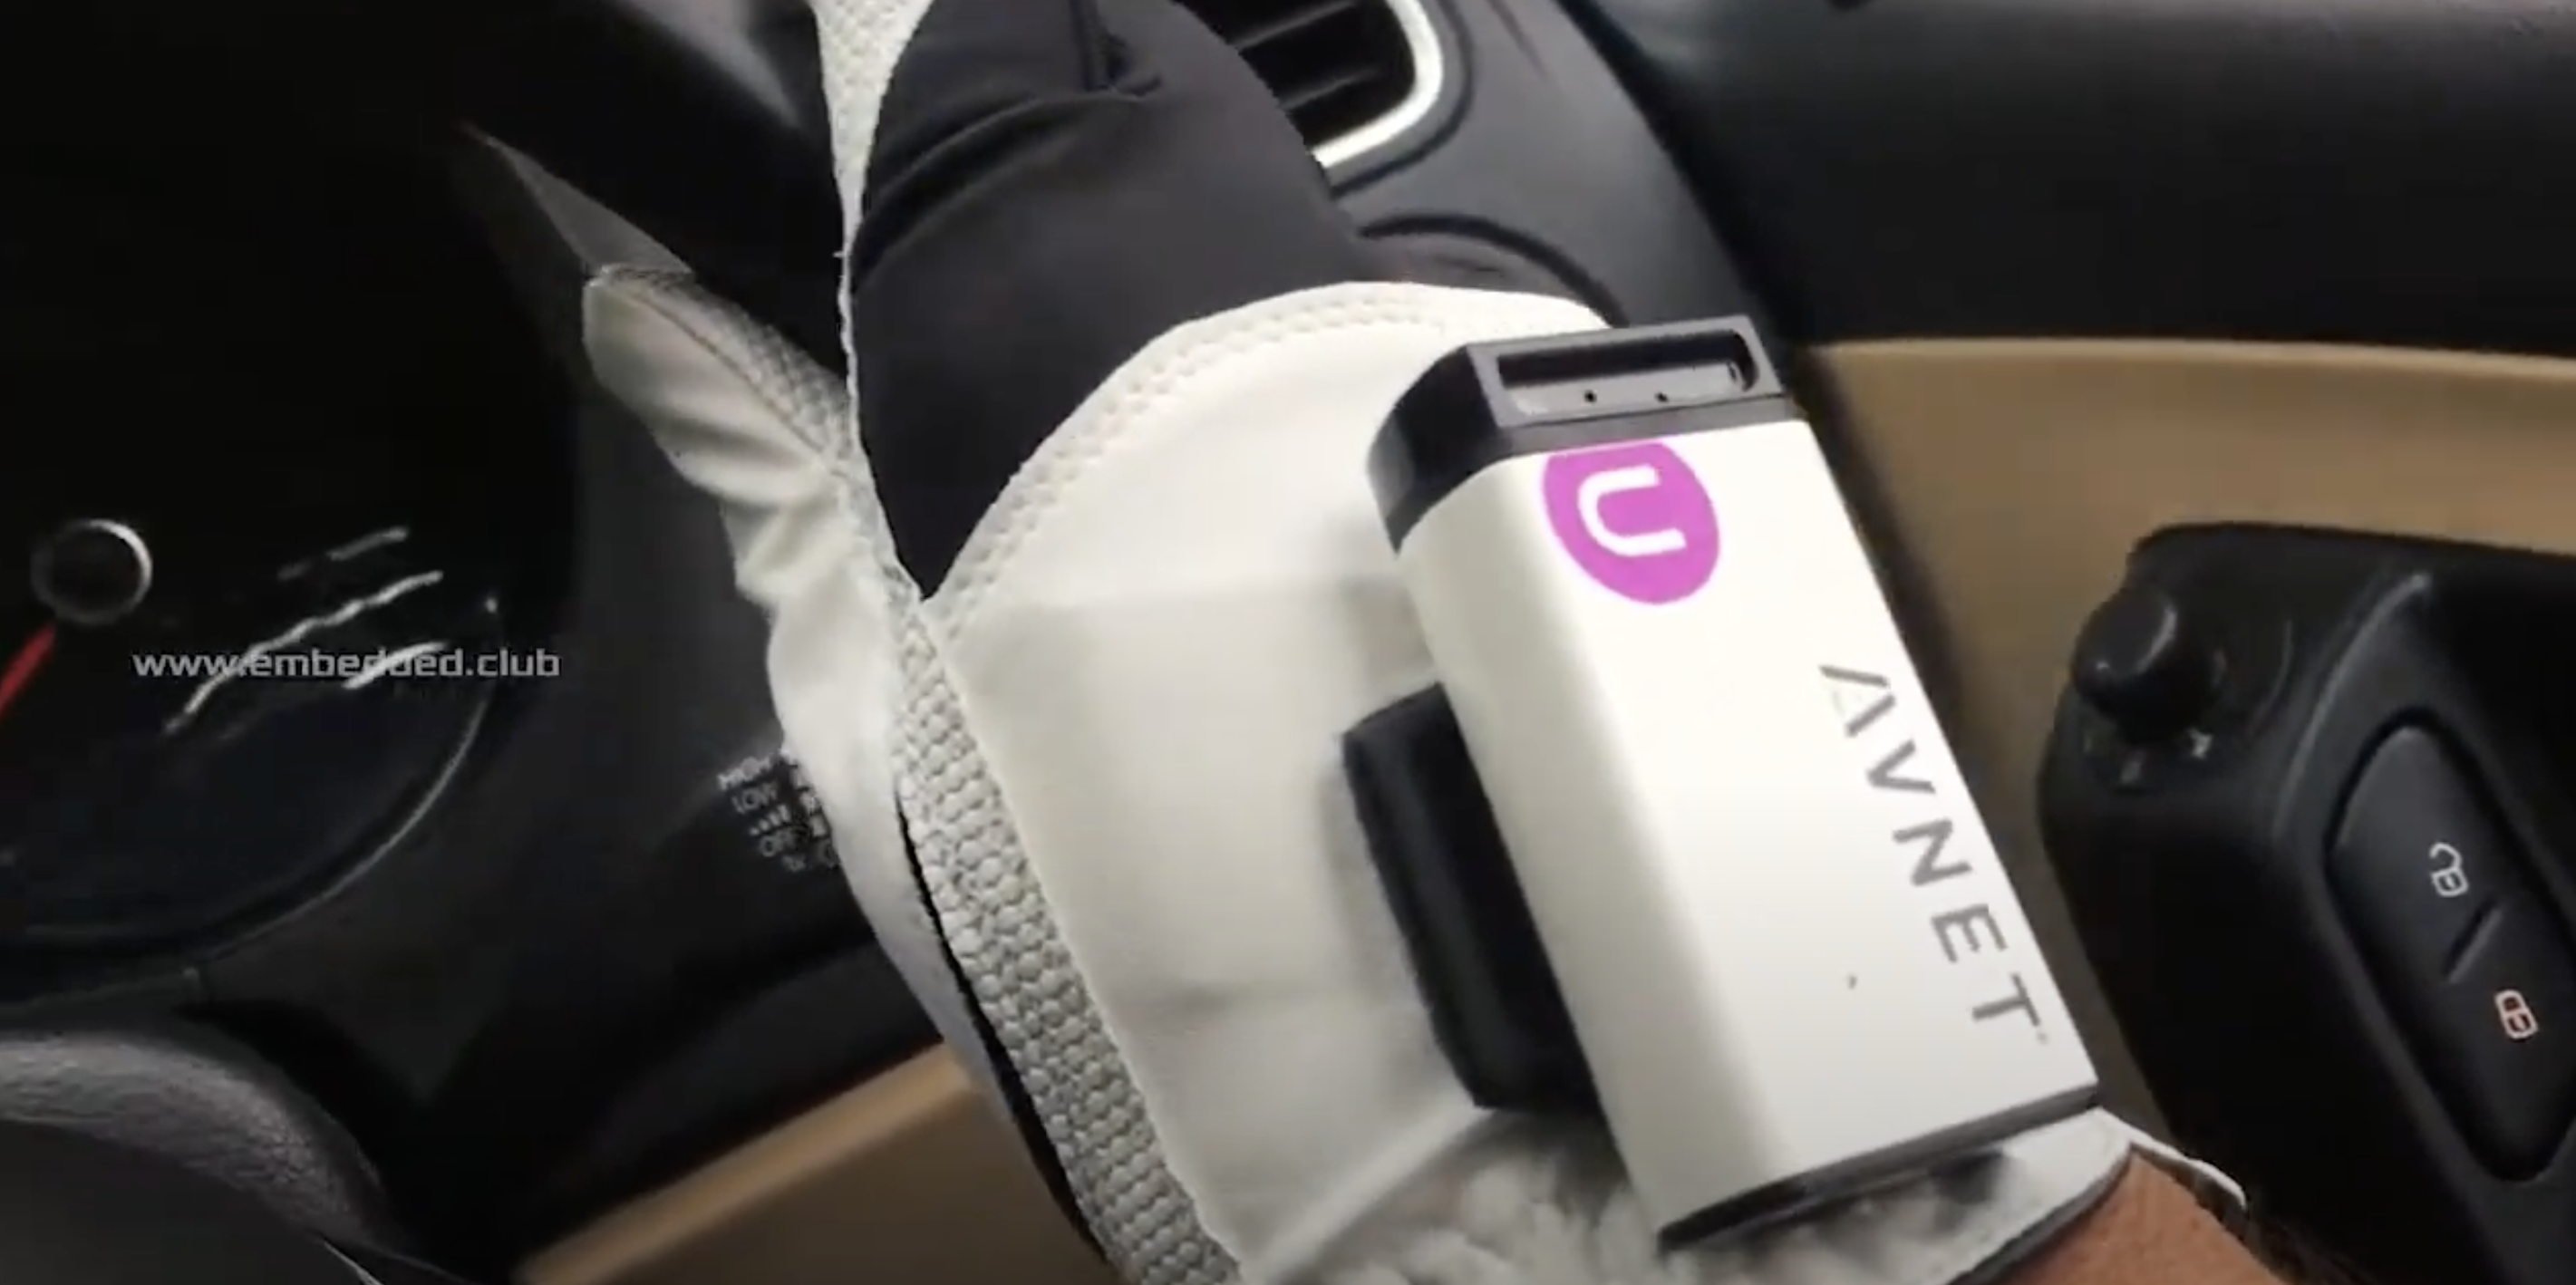
“Driving glove”
If you wear the glove while driving, it collects data in real time and logs it on the Brainium cloud so you can review your driving style.
When we think back to our school days, we can all recall that one teacher who inspired us, believed in us, and made all the difference to how we approached a particular subject. It was someone we maybe took for granted at the time and so we only realised (much) later how amazing they were.
I hope this post makes you think of a teacher or mentor who has made a key difference in your life!
Here computer science student Jonathan Alderson and our team’s Ben Garside talk to me about how Ben supported and inspired Jonathan in his computer science classroom.
The teacher: Ben Garside. The student: Jonathan Alderson.
Hi Jonathan! How did you get into computing?
Jonathan: My first memories of using a computer were playing 3D Pinball, Club Penguin, and old Disney games, so nothing productive there…or so I thought! I was always good at IT and Maths at school, and Computing seemed to be a cross between the two, so I thought it would be good.
Jonathan and Ben, can you remember your time working together? It’s been a while now!
Jonathan: I met Mr Garside at the start of sixth form. Our school didn’t have a computer science course, so a few of us would walk between schools twice a week. Mr Garside really made me feel welcome in a place where I didn’t know anyone.
When learning computer science, it’s difficult to understand the importance of new concepts like recursion, classes, or linked lists when the examples are so small. Mr Garside’s teaching made me see the relevance of them and how they could fit into other projects; it’s easy to go a long time without using concepts because you don’t necessarily need them, even when it would make your life a lot easier.
Mr Garside really made me feel welcome in a place where I didn’t know anyone. […] Mr Garside’s teaching made me see the relevance of [new computer science concepts] and how they could fit into other projects.
Jonathan Alderson
Ben: It was a real pleasure to teach Jonathan. He stands out as being one of the most inquisitive students that I have taught. If something wasn’t clear to him, he’d certainly let me know and ask relevant questions so that he could fully understand. Jonathan was also constantly working on his own programming projects outside of lessons. During his A level, I remember him taking it upon himself to write a program that played chess. Each week he would demonstrate the progress he had made to the class. It was a perfect example of decomposition as he tackled the project in small sections and had a clear plan as to what he wanted to achieve. By the end of his project, not only did he have a program that played chess, but it was capable of playing against real online users including making the mouse clicks on the screen!
Moving from procedural to object-oriented programming (OOP) can be a sticking point for a lot of learners, and I remember Jonathan finding this difficult at first. I think what helped Jonathan in particular was getting him to understand that this wasn’t as new a concept as he first thought. OOP was just a different paradigm where he could still apply all of the coding structures that he was already confident in using.
That sounds like a very cool project. What other projects did you make, Jonathan? And how did Ben help you?
Jonathan: My final-year project, [a video game] called Vector Venture, ended up becoming quite a mammoth task! I didn’t really have a clue about organising large projects, what an IDE was, or you could split files apart. Mr Garside helped me spend enough time on the final report and get things finished. He was very supportive of me releasing the game and got me a chance to speak at the Python North East group, which was a great opportunity.
Ben: Vector Venture was a very ambitious project that Jonathan undertook, but I think by then he had learned a lot about how to tackle a project of that size from previous projects such as the chess program. The key to his success was that whilst he was learning, he was picking projects to undertake that he had a genuine interest in and enjoyed developing. I would also tell my A level students to pick as a project something that they will enjoy developing. Jonathan clearly enjoyed developing games, but I also had students who picked projects to develop programs that would solve problems. For example, one of my students developed a system that would take online bookings for food orders and manage table allocation for a local restaurant.
I would tell my A level students to pick as a project something that they will enjoy developing.
Ben Garside
I think that point about having fun while learning something challenging like programming is really important to highlight. So what are you doing now, Jonathan?
Jonathan: I have just completed my undergraduate degree at the University of Leeds (UoL) with a place on the Dean’s List and am staying to complete a Masters in High Performance Graphics.
During my time at UoL, I’ve had three summer placements creating medical applications and new systems for the university. This helped me understand the social benefits of computer science; it was great to work on something that is now benefitting so many people. My dissertation was on music visualisation, mapping instrument attributes of a currently playing song to control parameters inside sharers on the GPU to produce reactive visualisations. I’ve just completed an OpenGL project to create procedural underwater scenes, with realistic lighting, reflections, and fish simulations. I’m now really looking forward to completing my Game Engine project for my masters and graduating.
Teachers are often brilliant at taking something complicated and presenting it in a clearer way. Are those moments of clarity part of what motivates you to teach, Ben?
Ben: There are lots of things that excite me about teaching computer science. Before I worked for the Raspberry Pi Foundation, there was a phrase I heard Carrie Anne Philbin say when I attended a Picademy: we are teaching young people to be digital makers, logical thinkers, and problem solvers, not just to be consumers of technology. I felt this really summed up how great it is to teach our subject. Teaching computer science means that we’re educating young people about the world around them and how technology plays its part in their lives. By doing this, we are empowering them to solve problems and to make educated choices about how they use technology.
Teaching computer science means that we’re educating young people about the world around them and how technology plays its part in their lives.
Ben Garside
As for my previous in-school experiences, I loved those lightbulb moments when something suddenly made sense to a student and a loud “Yesssss!” would break the silence of a quietly focused classroom. I loved teaching something that regularly sparked their imaginations; give them a single lesson on programming, and they would start to ask questions like: “Now I’ve made it do that…does this mean I could make it do this next?“. It wasn’t uncommon for students to want to do more outside of the classroom that wasn’t a homework activity. That, for me, was the ultimate win!
How about you?
Who was the teacher who helped shape your future when you were at school? Tell us about them in the comments below.
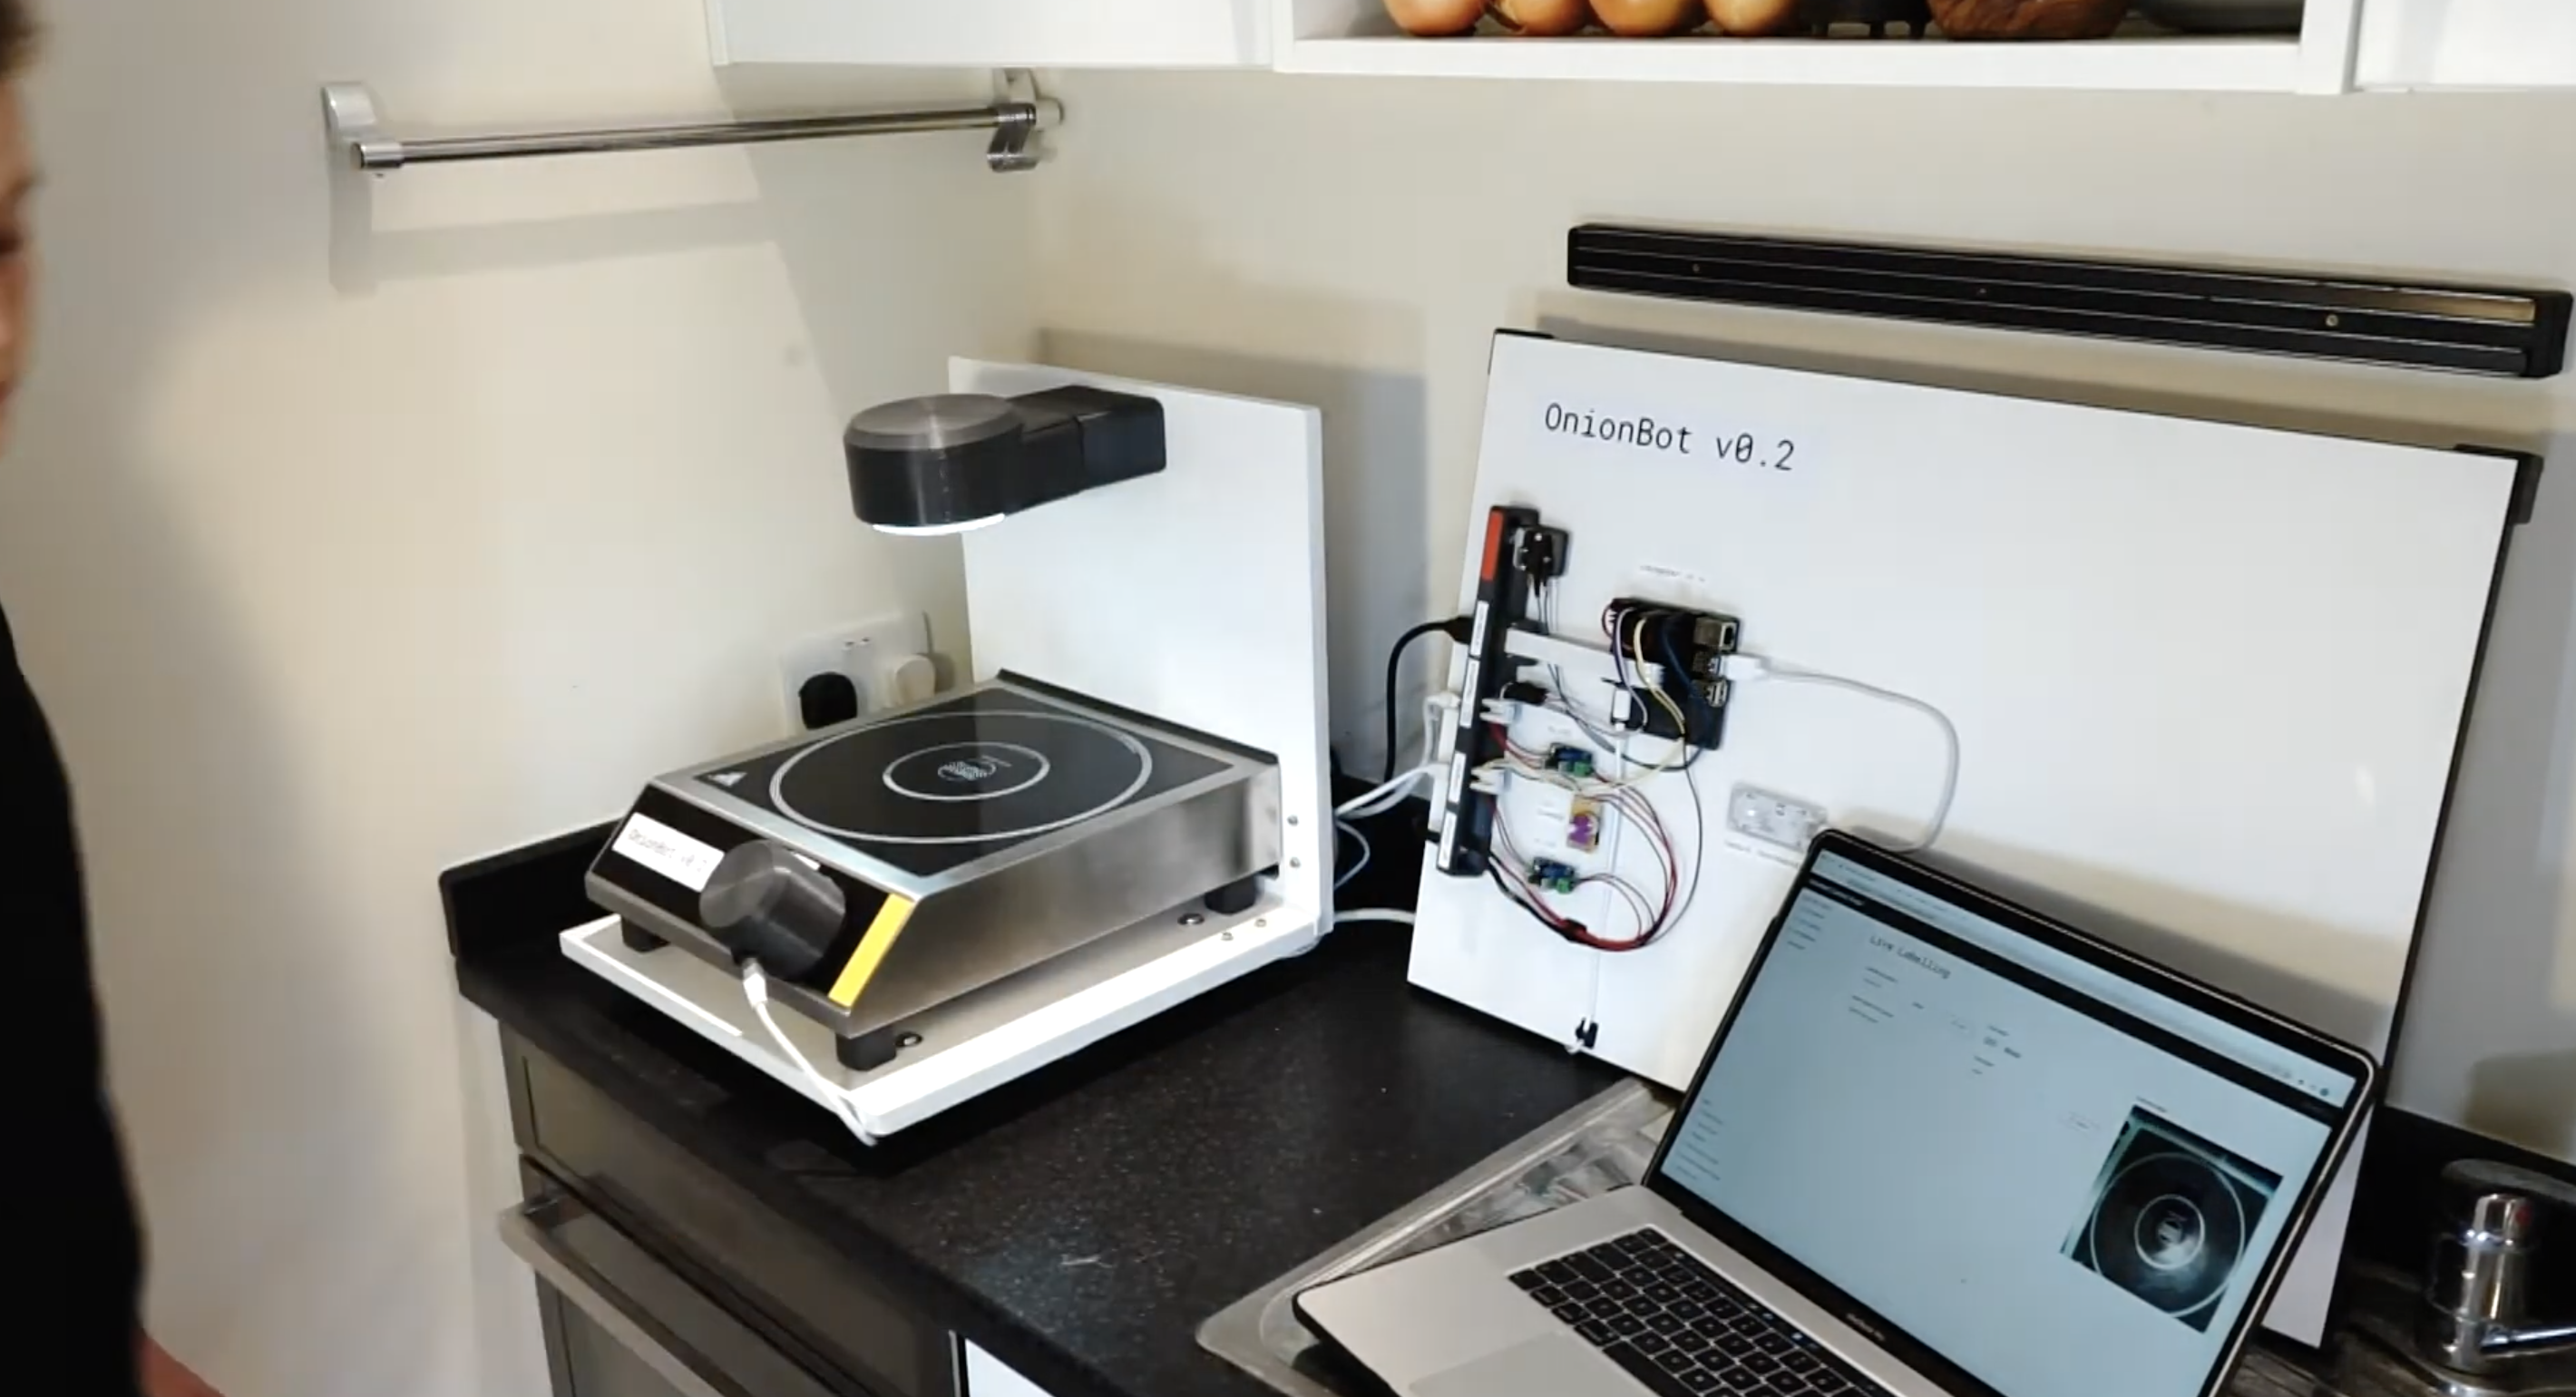
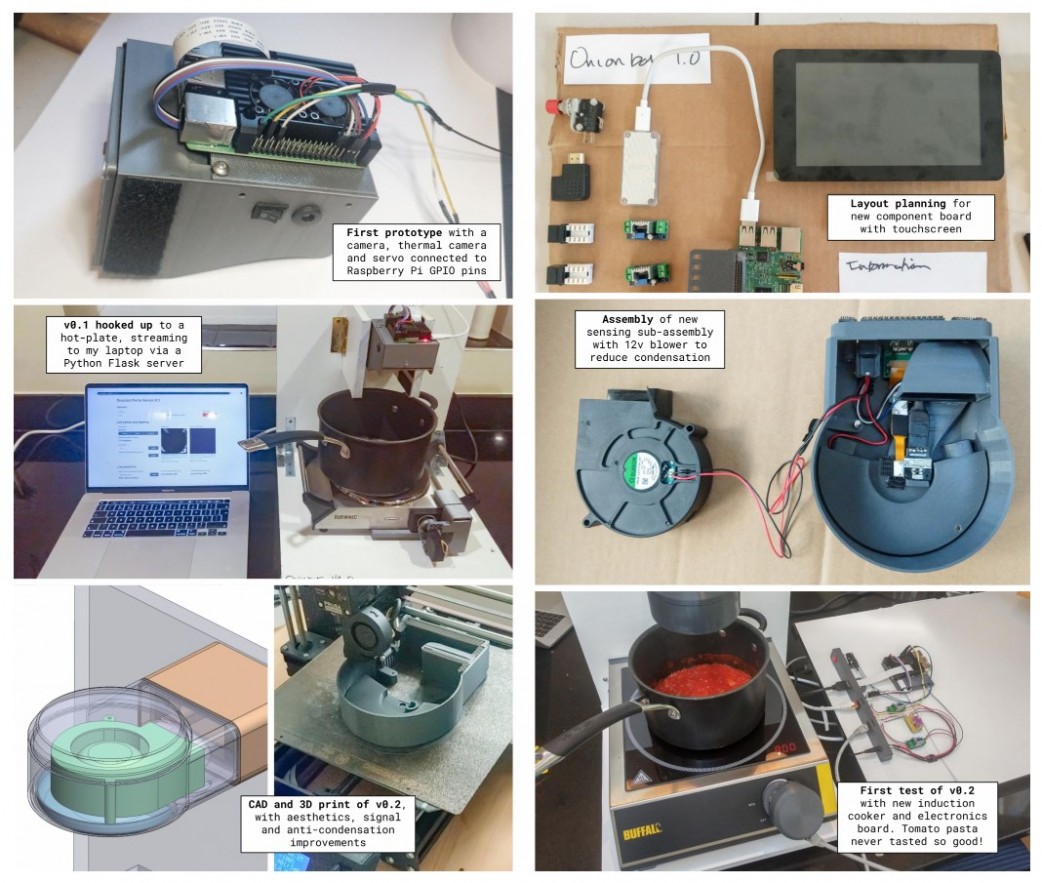
Design Engineering student Ben Cobley has created a Raspberry Pi–powered sous-chef that automates the easier pan-cooking tasks so the head chef can focus on culinary creativity.
Ben named his invention OnionBot, as the idea came to him when looking for an automated way to perfectly soften onions in a pan while he got on with the rest of his dish. I have yet to manage to retrieve onions from the pan before they blacken so… *need*.
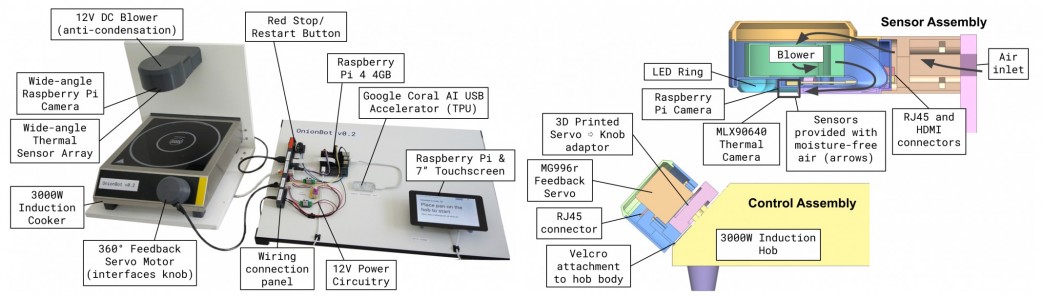
The full setup (you won’t need a laptop while you’re cooking, so you’ll have counter space)
Ben’s affordable solution is much better suited to home cooking than the big, expensive robotic arms used in industry. Using our tiny computer also allowed Ben to create something that fits on a kitchen counter.
What can OnionBot do?
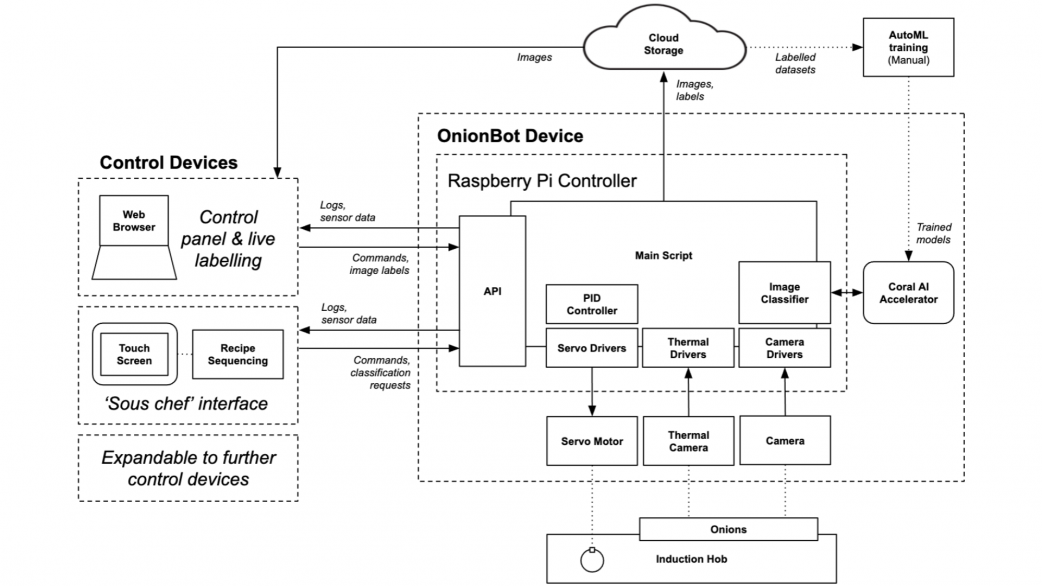
Tells you on-screen when it is time to advance to the next stage of a recipe
Autonomously controls the pan temperature using PID feedback control
Detects when the pan is close to boiling over and automatically turns down the heat
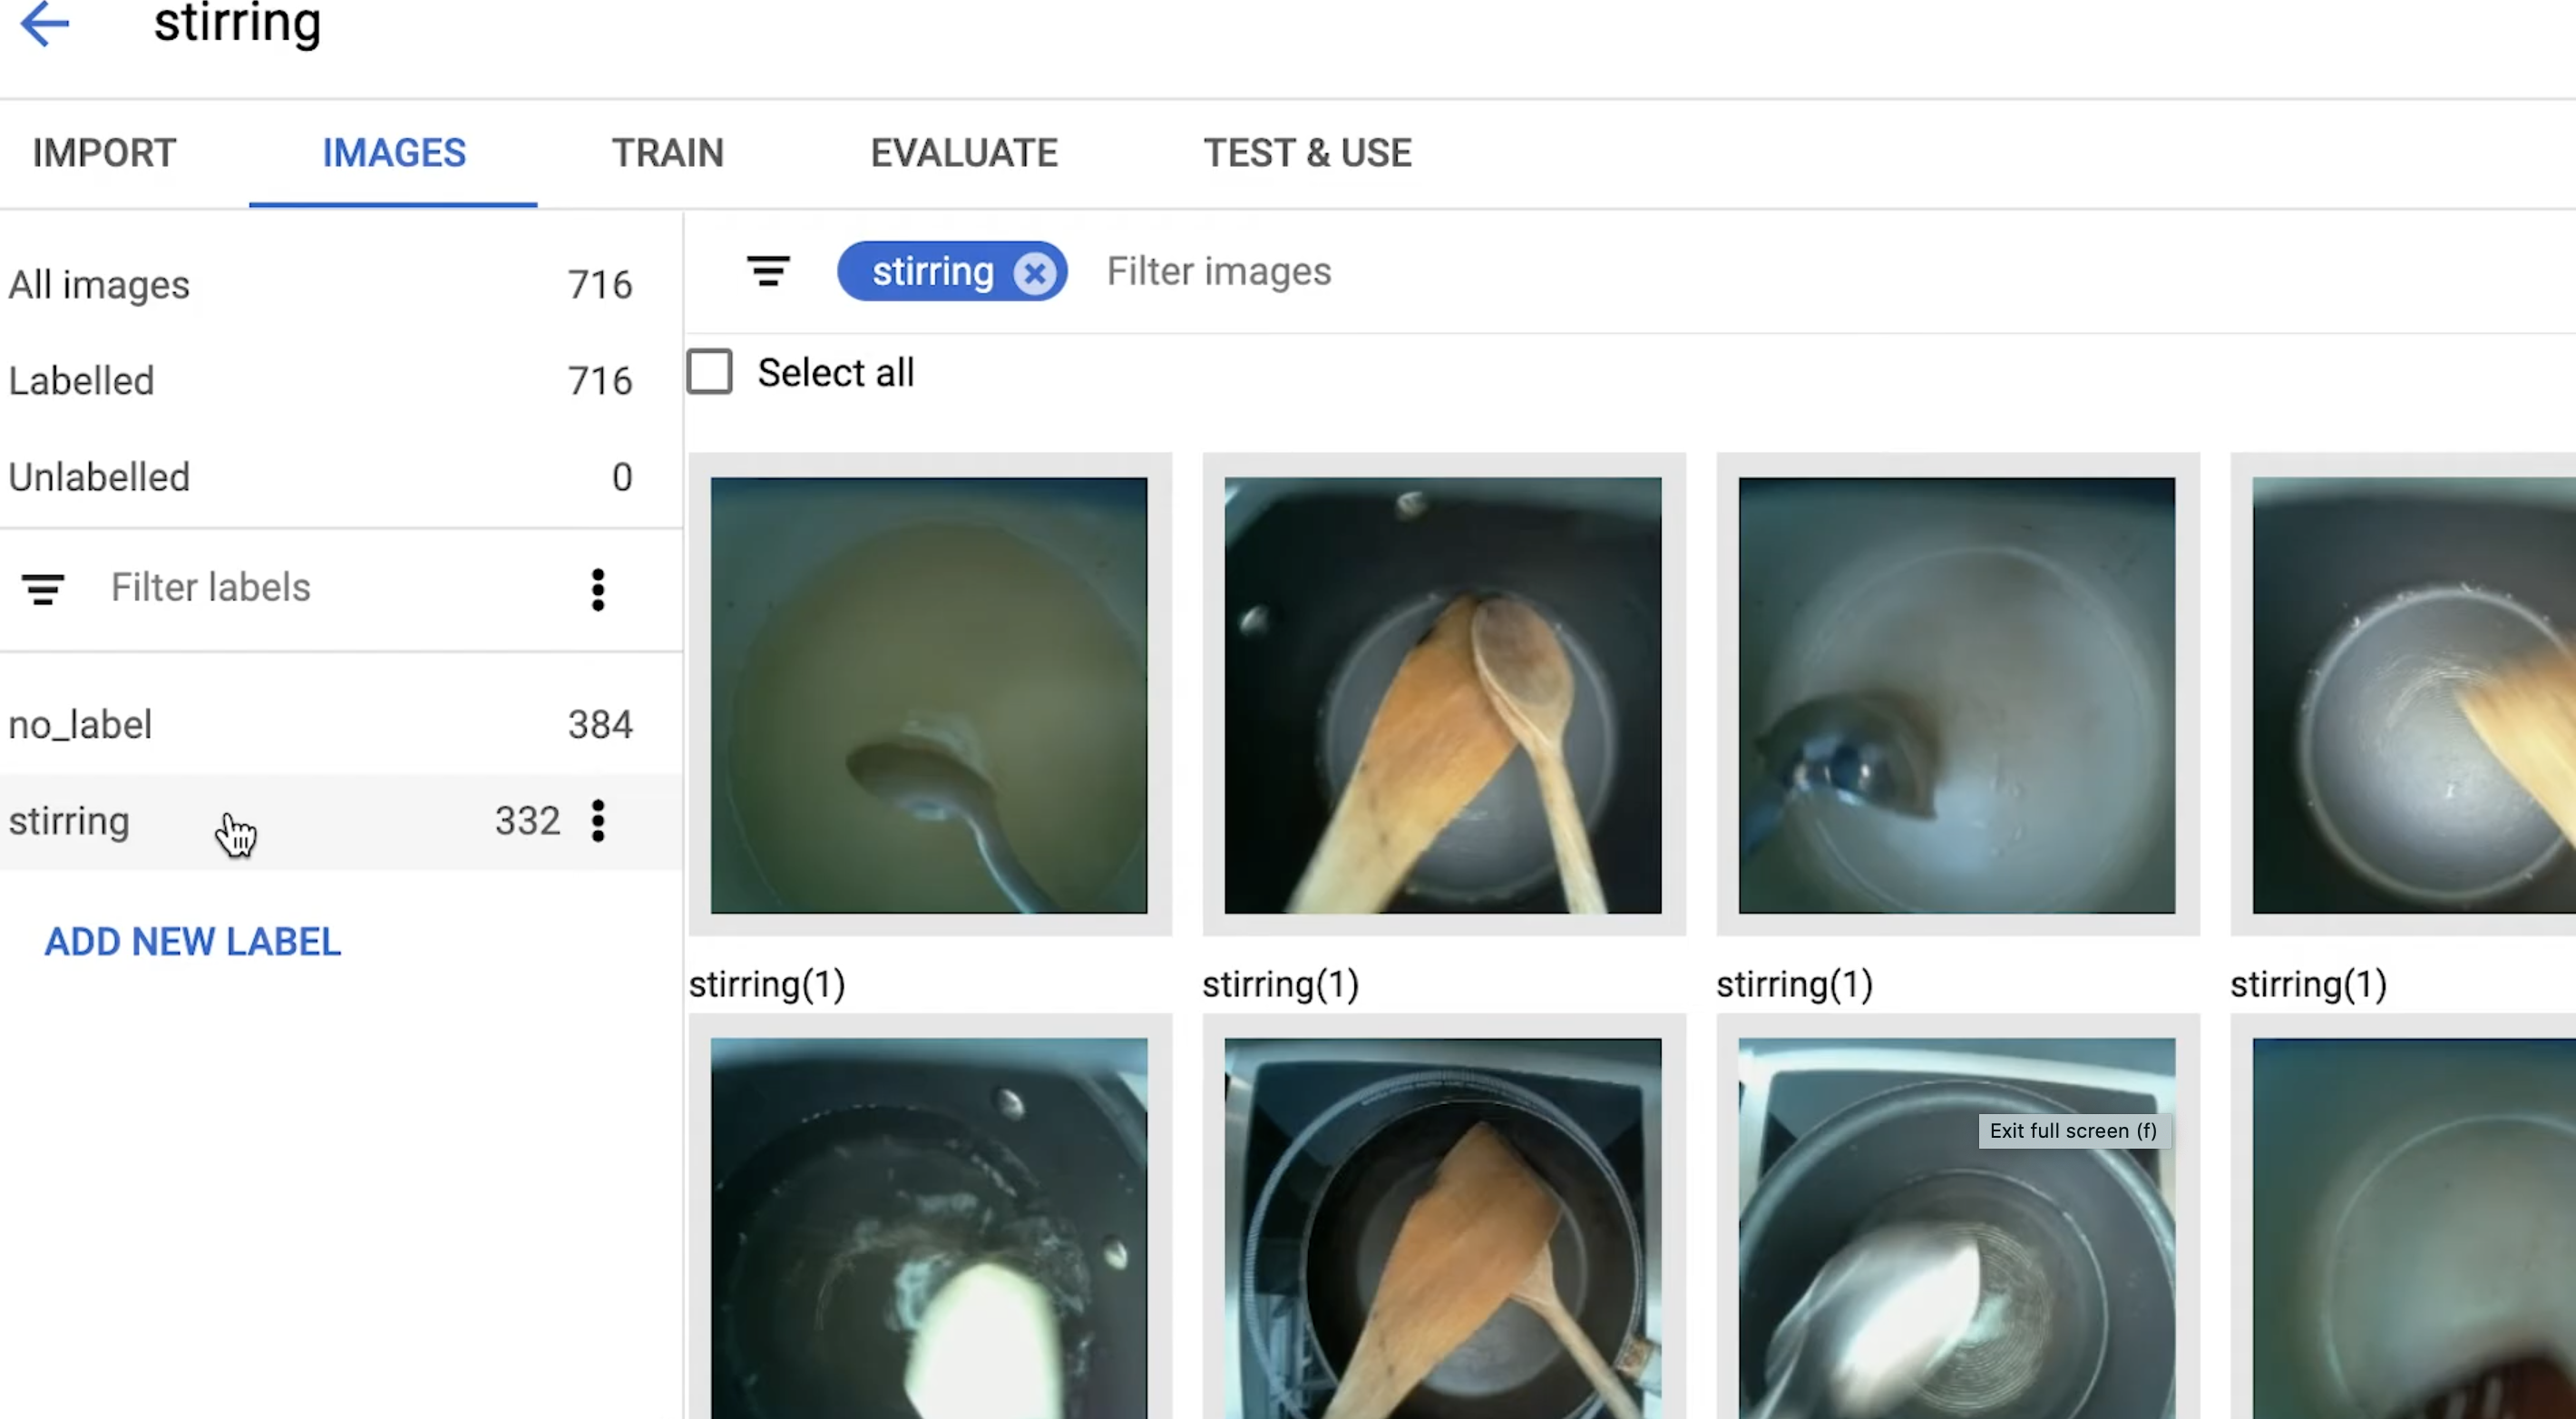
Reminds you if you haven’t stirred the pan in a while
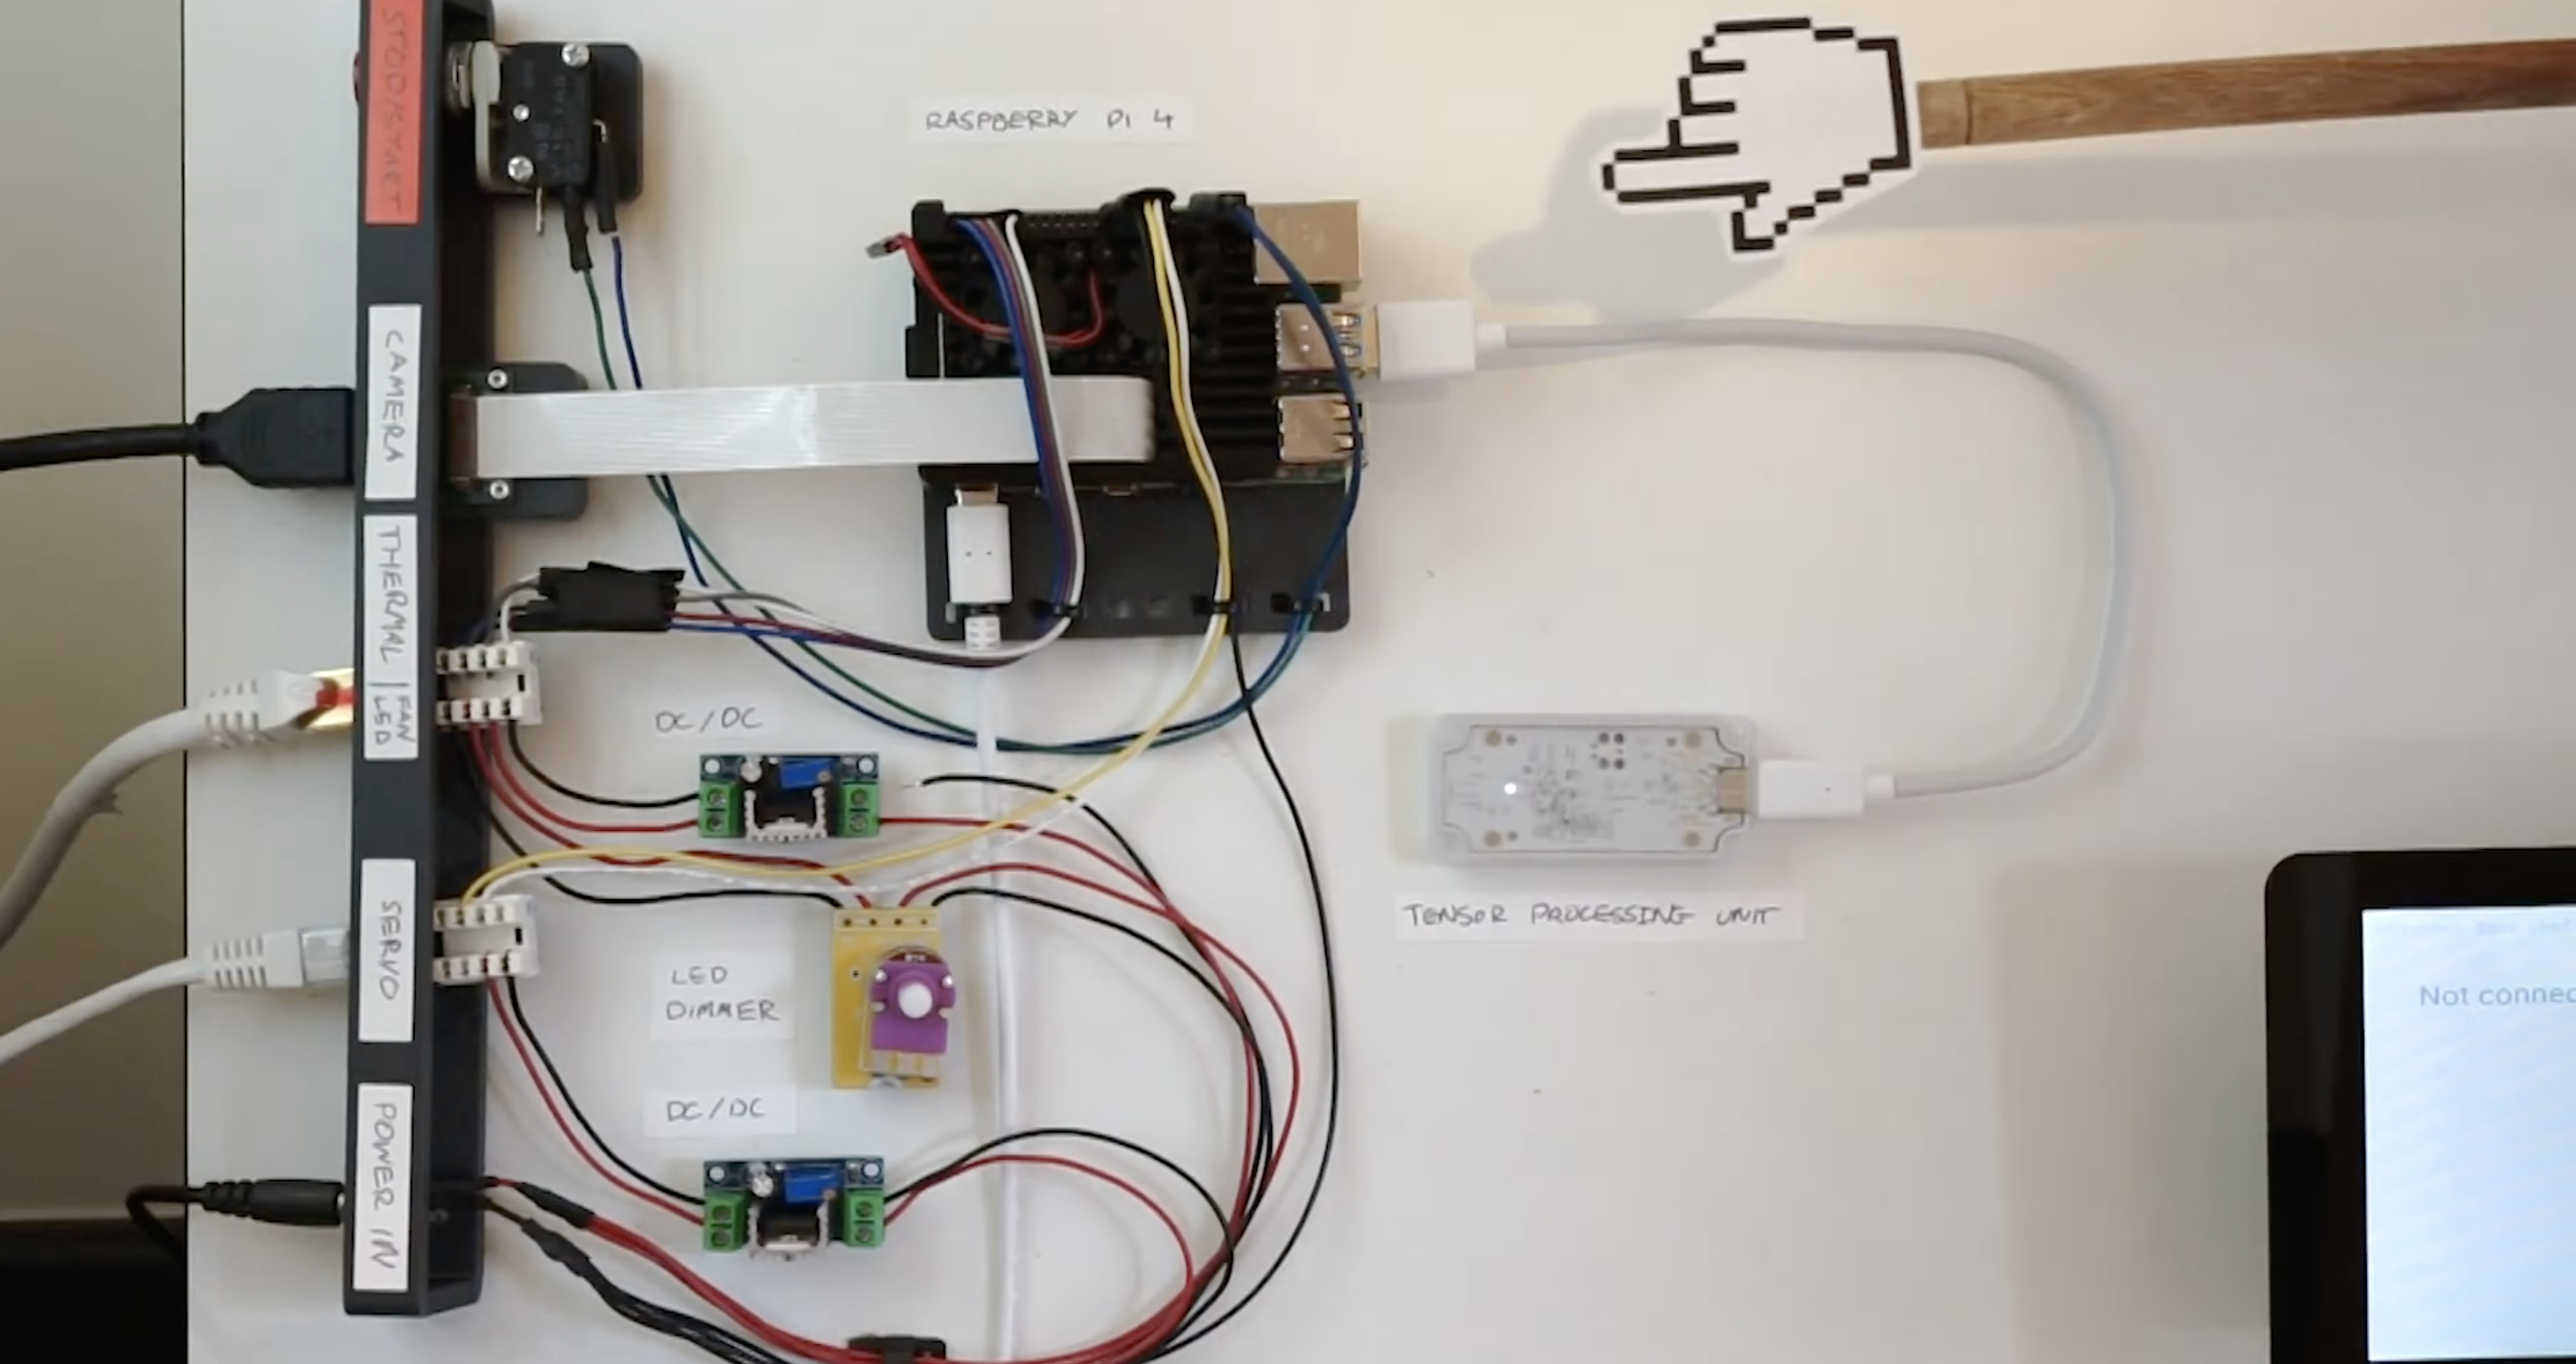
A thermal sensor array suspended above the stove detects the pan temperature, and the Raspberry Pi Camera Module helps track the cooking progress. A servo motor controls the dial on the induction stove.
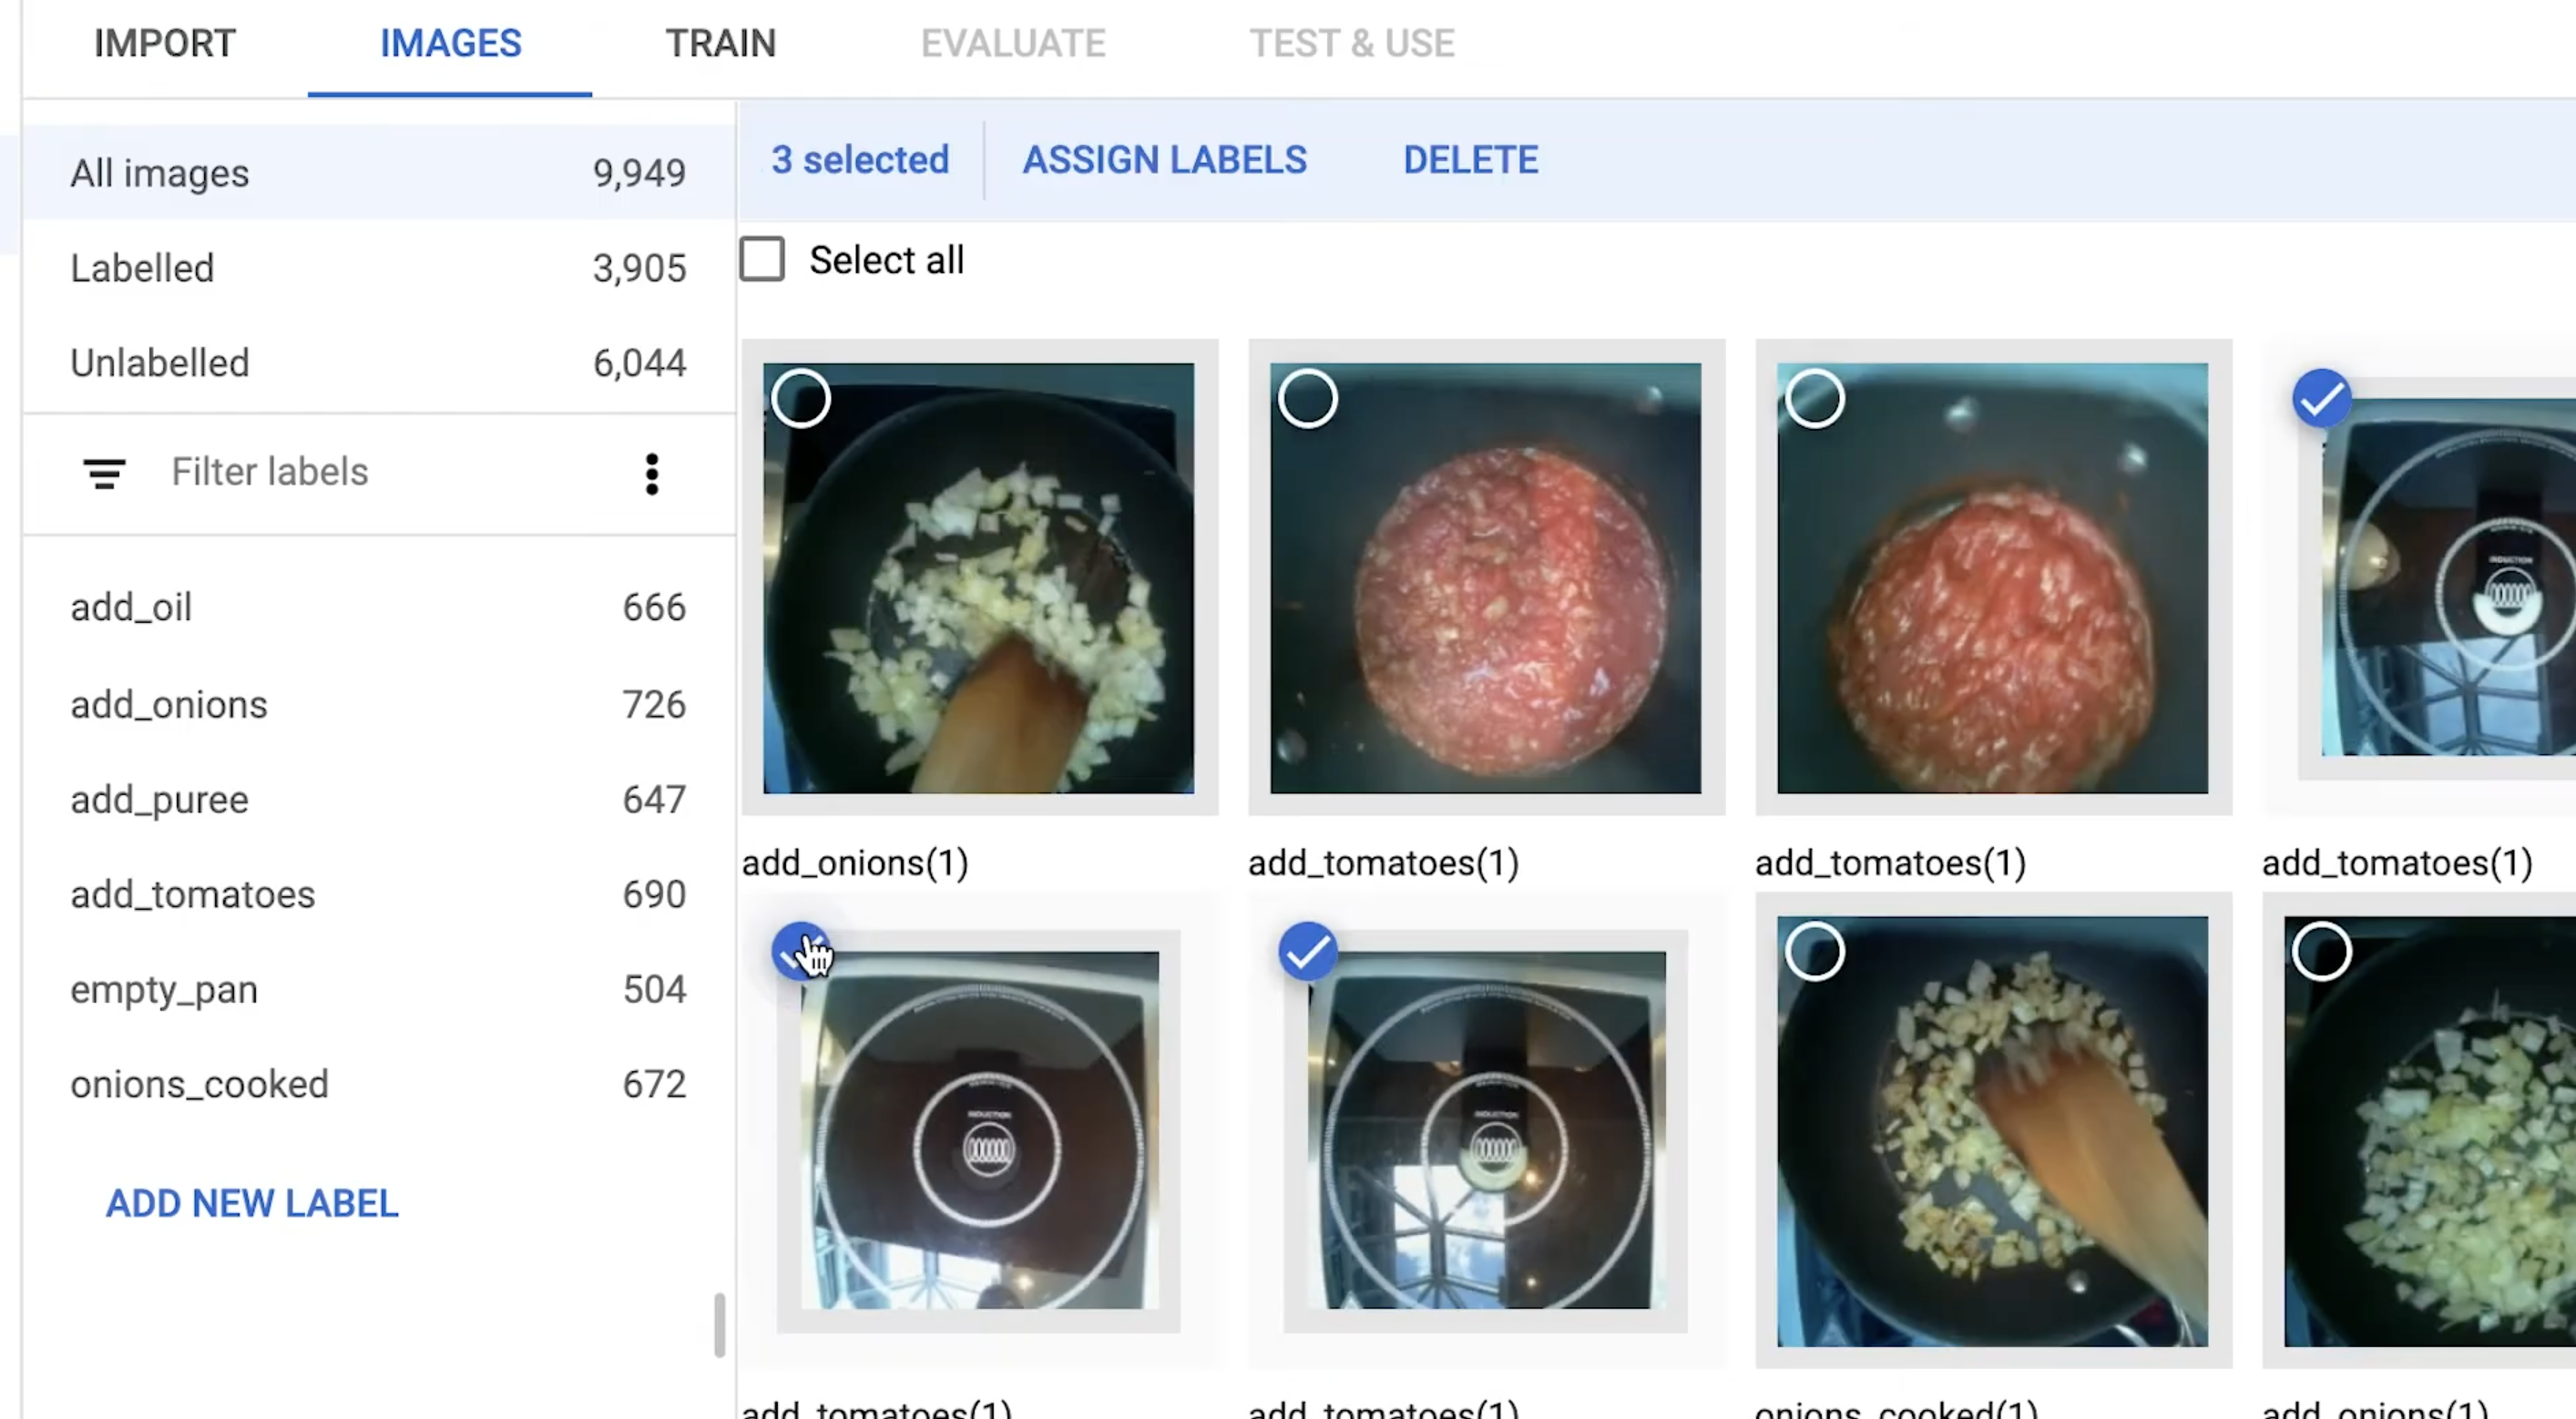
Labelling images to train the image classifier
No machine learning expertise was required to train an image classifier, running on Raspberry Pi, for Ben’s robotic creation; you’ll see in the video that the classifier is a really simple drag-and-drop affair.
Ben has only taught his sous-chef one pasta dish so far, and we admire his dedication to carbs.
Training the image classifier to know when you haven’t stirred the pot in a while
Ben built a control panel for labelling training images in real time and added labels at key recipe milestones while he cooked under the camera’s eye. This process required 500–1000 images per milestone, so Ben made a LOT of pasta while training his robotic sous-chef’s image classifier.
Ben open-sourced this project so you can collaborate to suggest improvements or teach your own robot sous-chef some more dishes. Here’s OnionBot on GitHub.