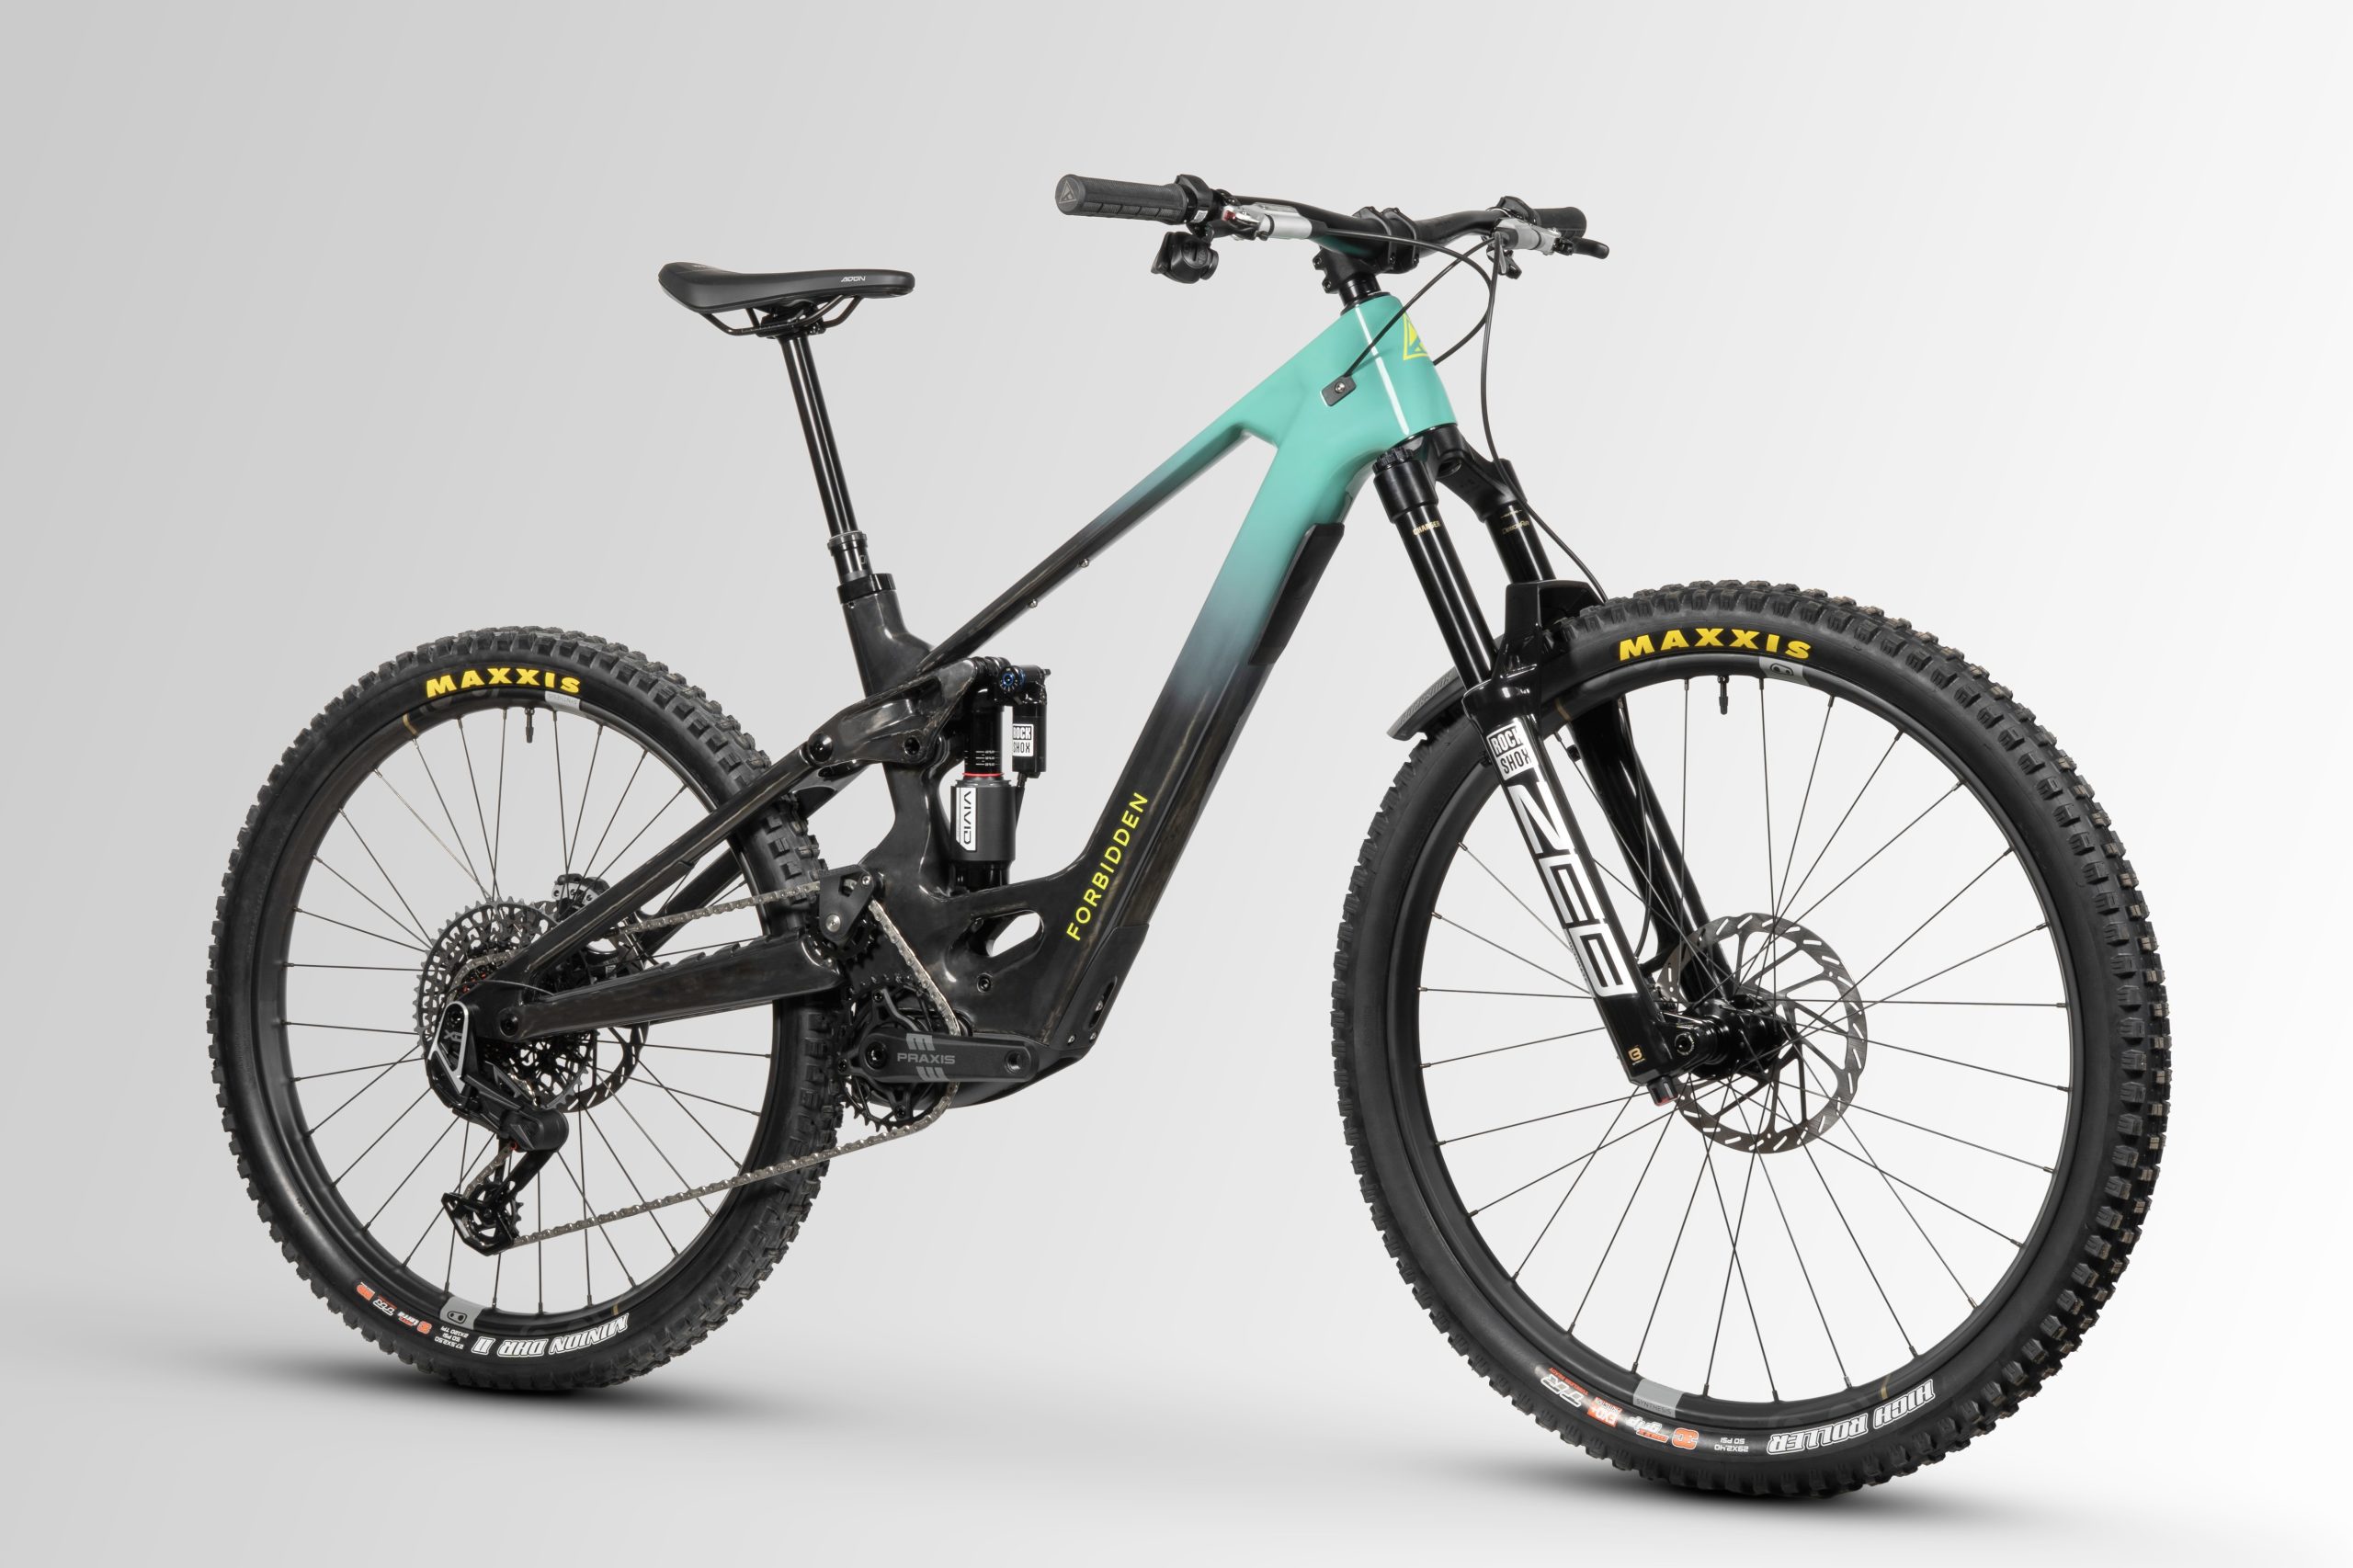
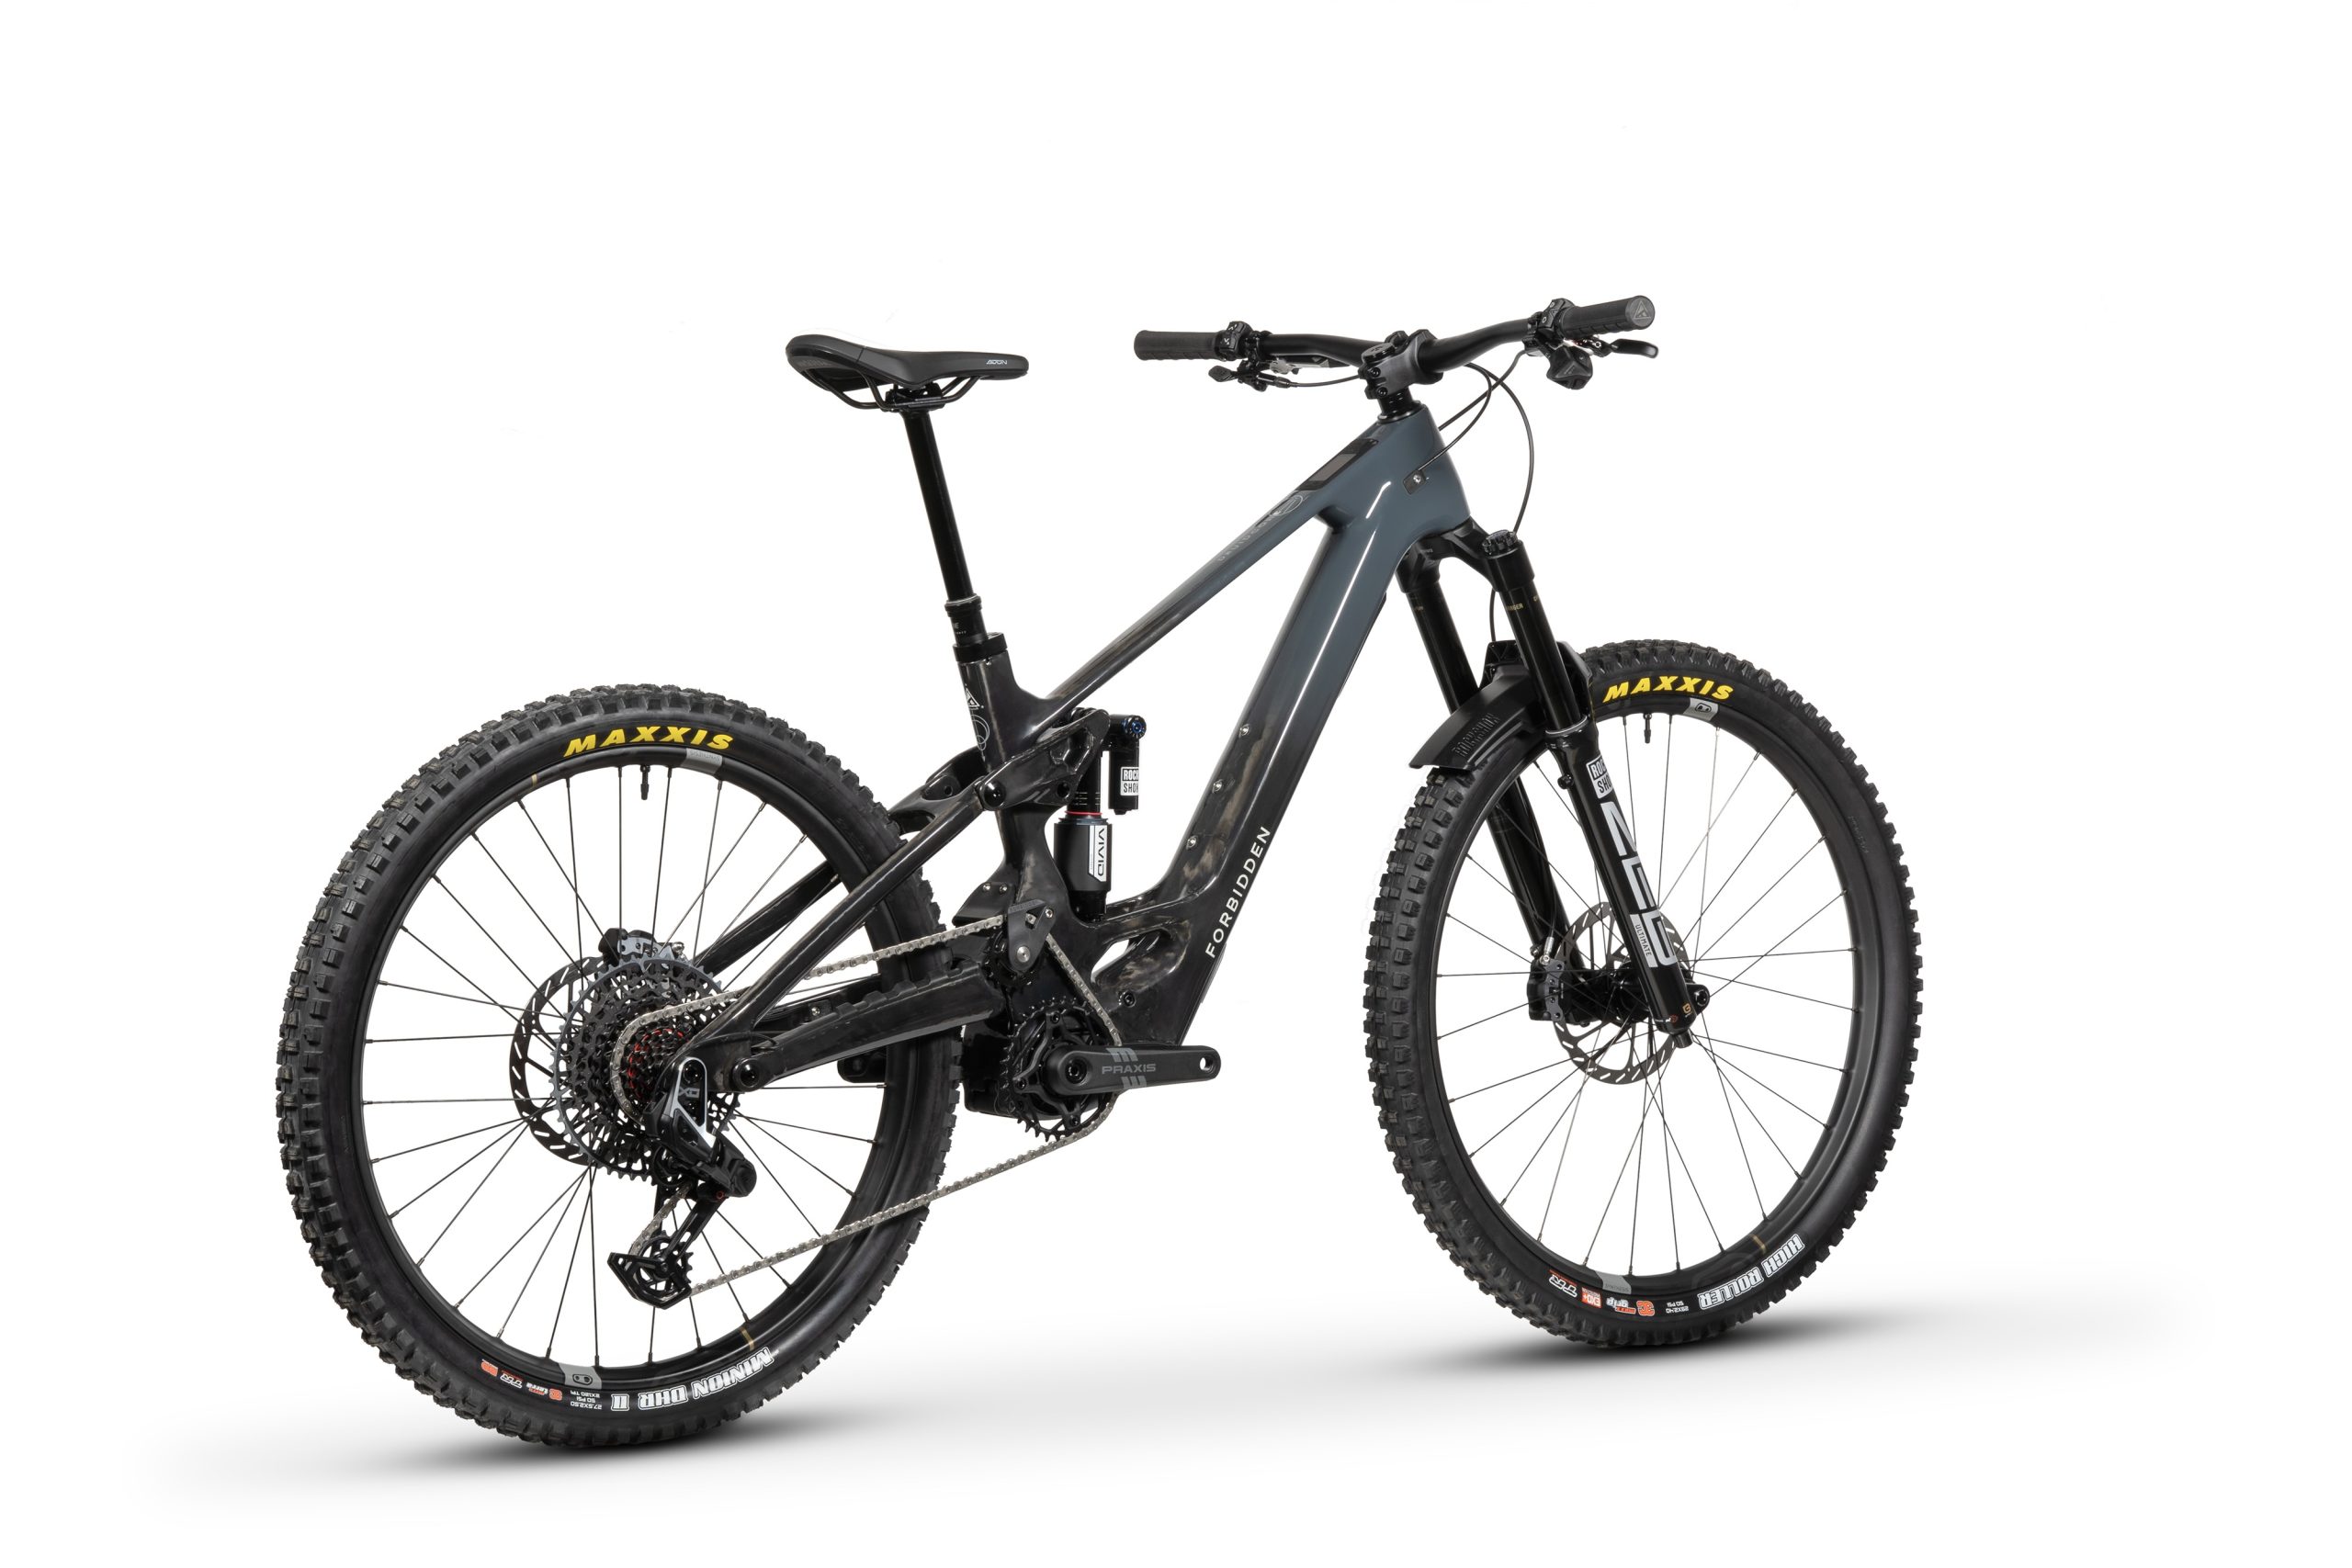
Forbidden has announced two new eMTBs, utilising the brand’s high-pivot suspension design and the DJI Avinox motor – the Druid E LitE and the Druid E CorE.
Both of the bikes in the new Druid E family have two travel options, with correspondingly different battery sizes.
The Druid E CorE has 150mm of travel, a 160mm fork and a larger 800Wh battery.
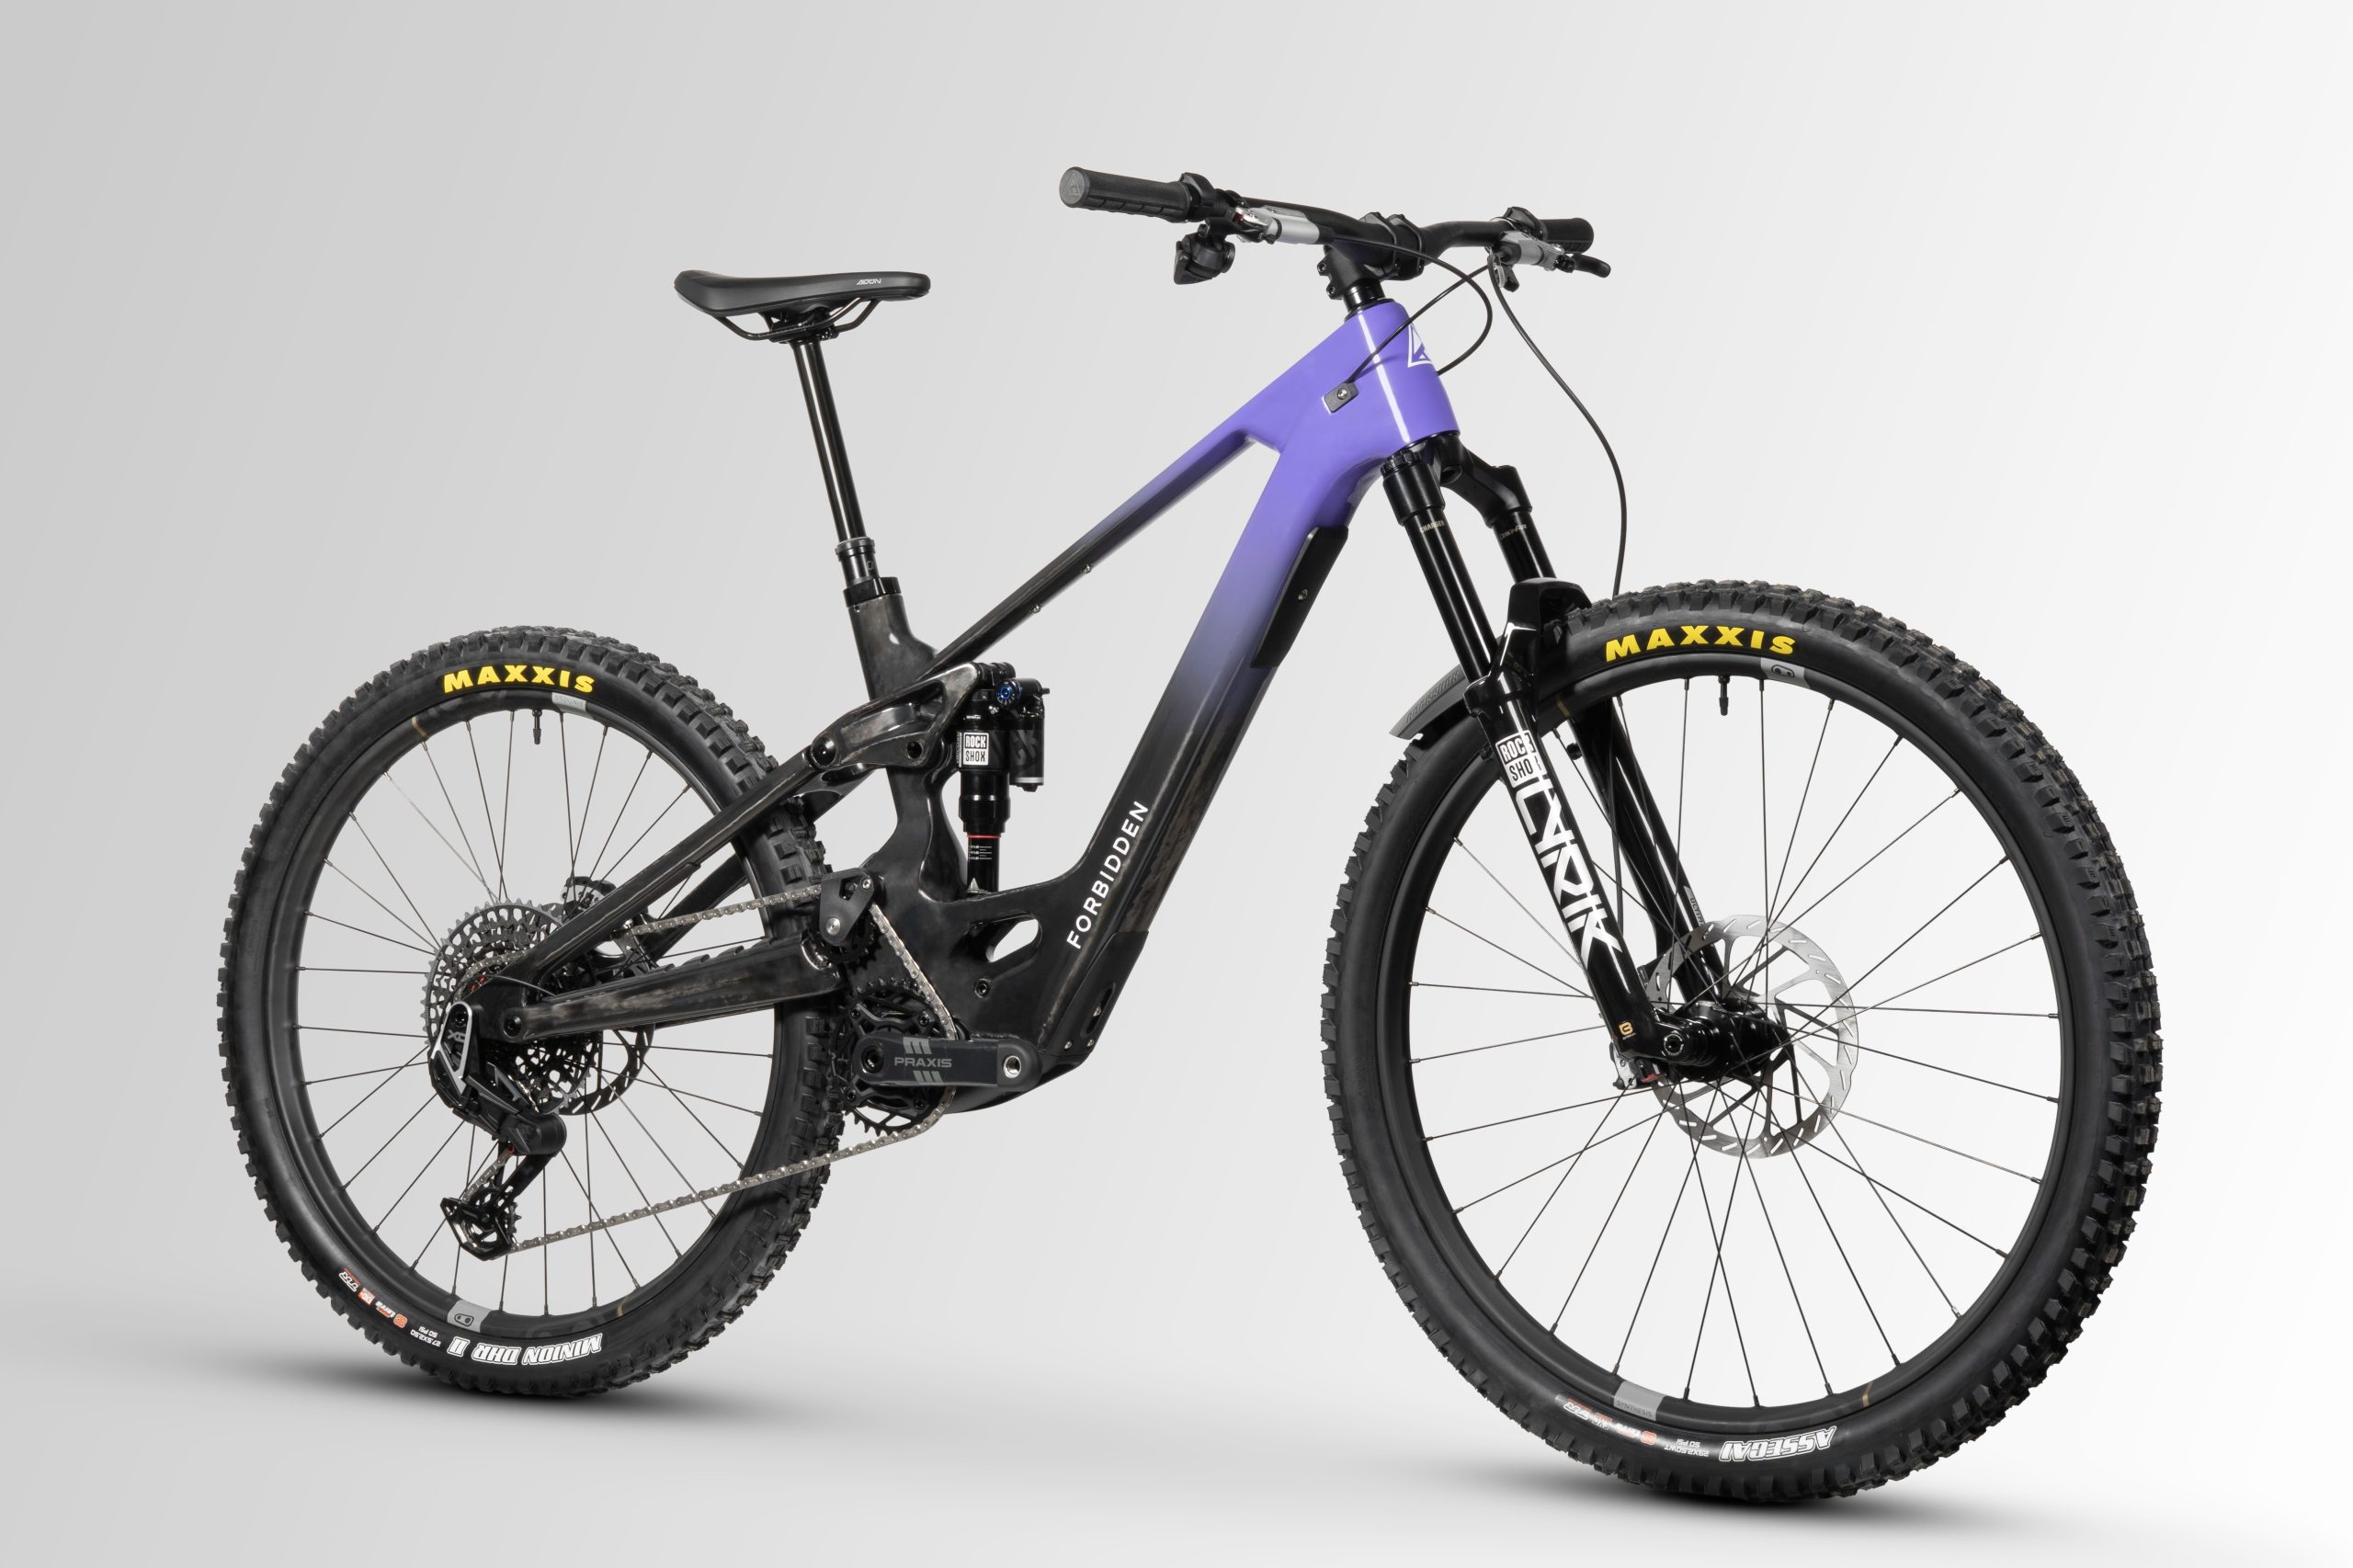
Want to go big? The Druid E CorE is for you. Forbidden
While the Druid E LitE is slightly more trail-focused, the CorE is built with burlier kit, and is named to honour Forbidden’s late bike builder, Cory Thornton.
Forbidden’s goal was to build a bike that matches the capability and ride characteristics of the Druid mountain bike, with the added punch of the market’s most powerful motor.
Why am I so excited?
The high-pivot system gives a rearward axle path, smoothing out bumps. Forbidden
Forbidden’s high-pivot suspension layout gives it great on-trail characteristics. It’s smooth and fast, and capable on the toughest terrain.
At the same time, the DJI Avinox motor in the Amflow bike blew almost every bike tester away with its controllable, high levels of power and torque – as yet still unmatched (despite Specialized’s best efforts).
Combining the two, as I hoped would happen, should make for an extremely capable eMTB.
Forbidden Druid E details
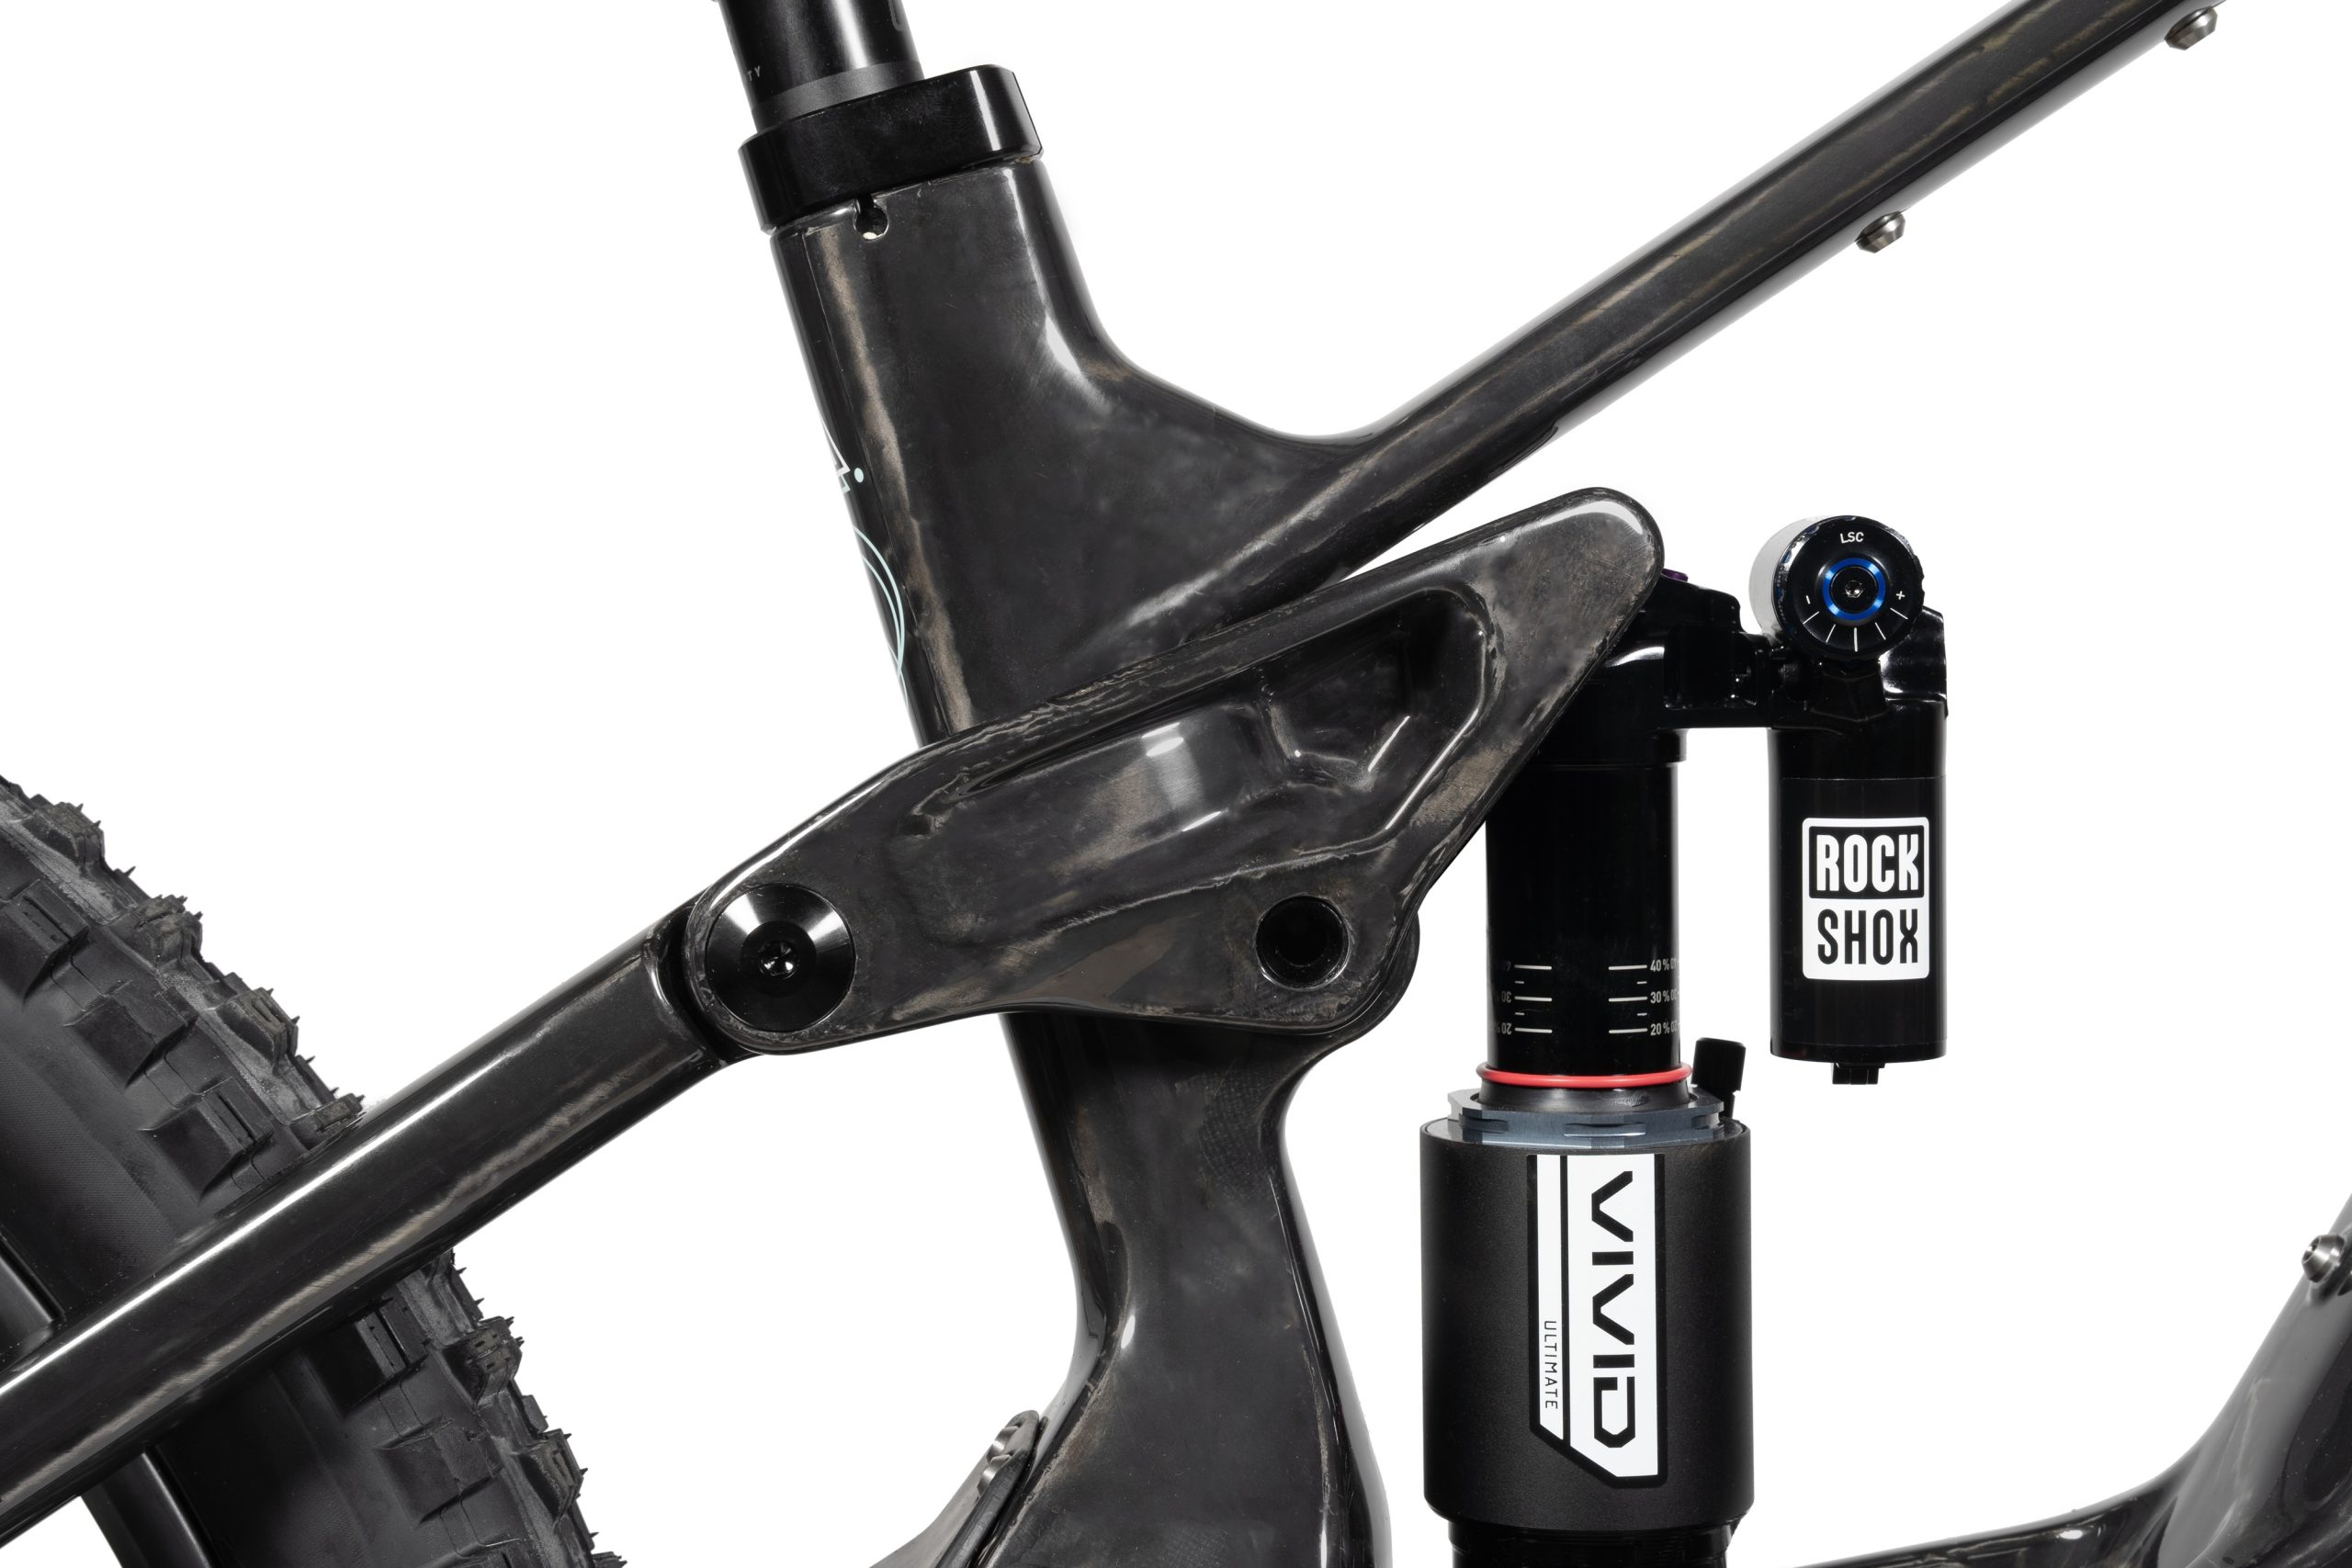
A carbon rocker keeps the weight low. Forbidden
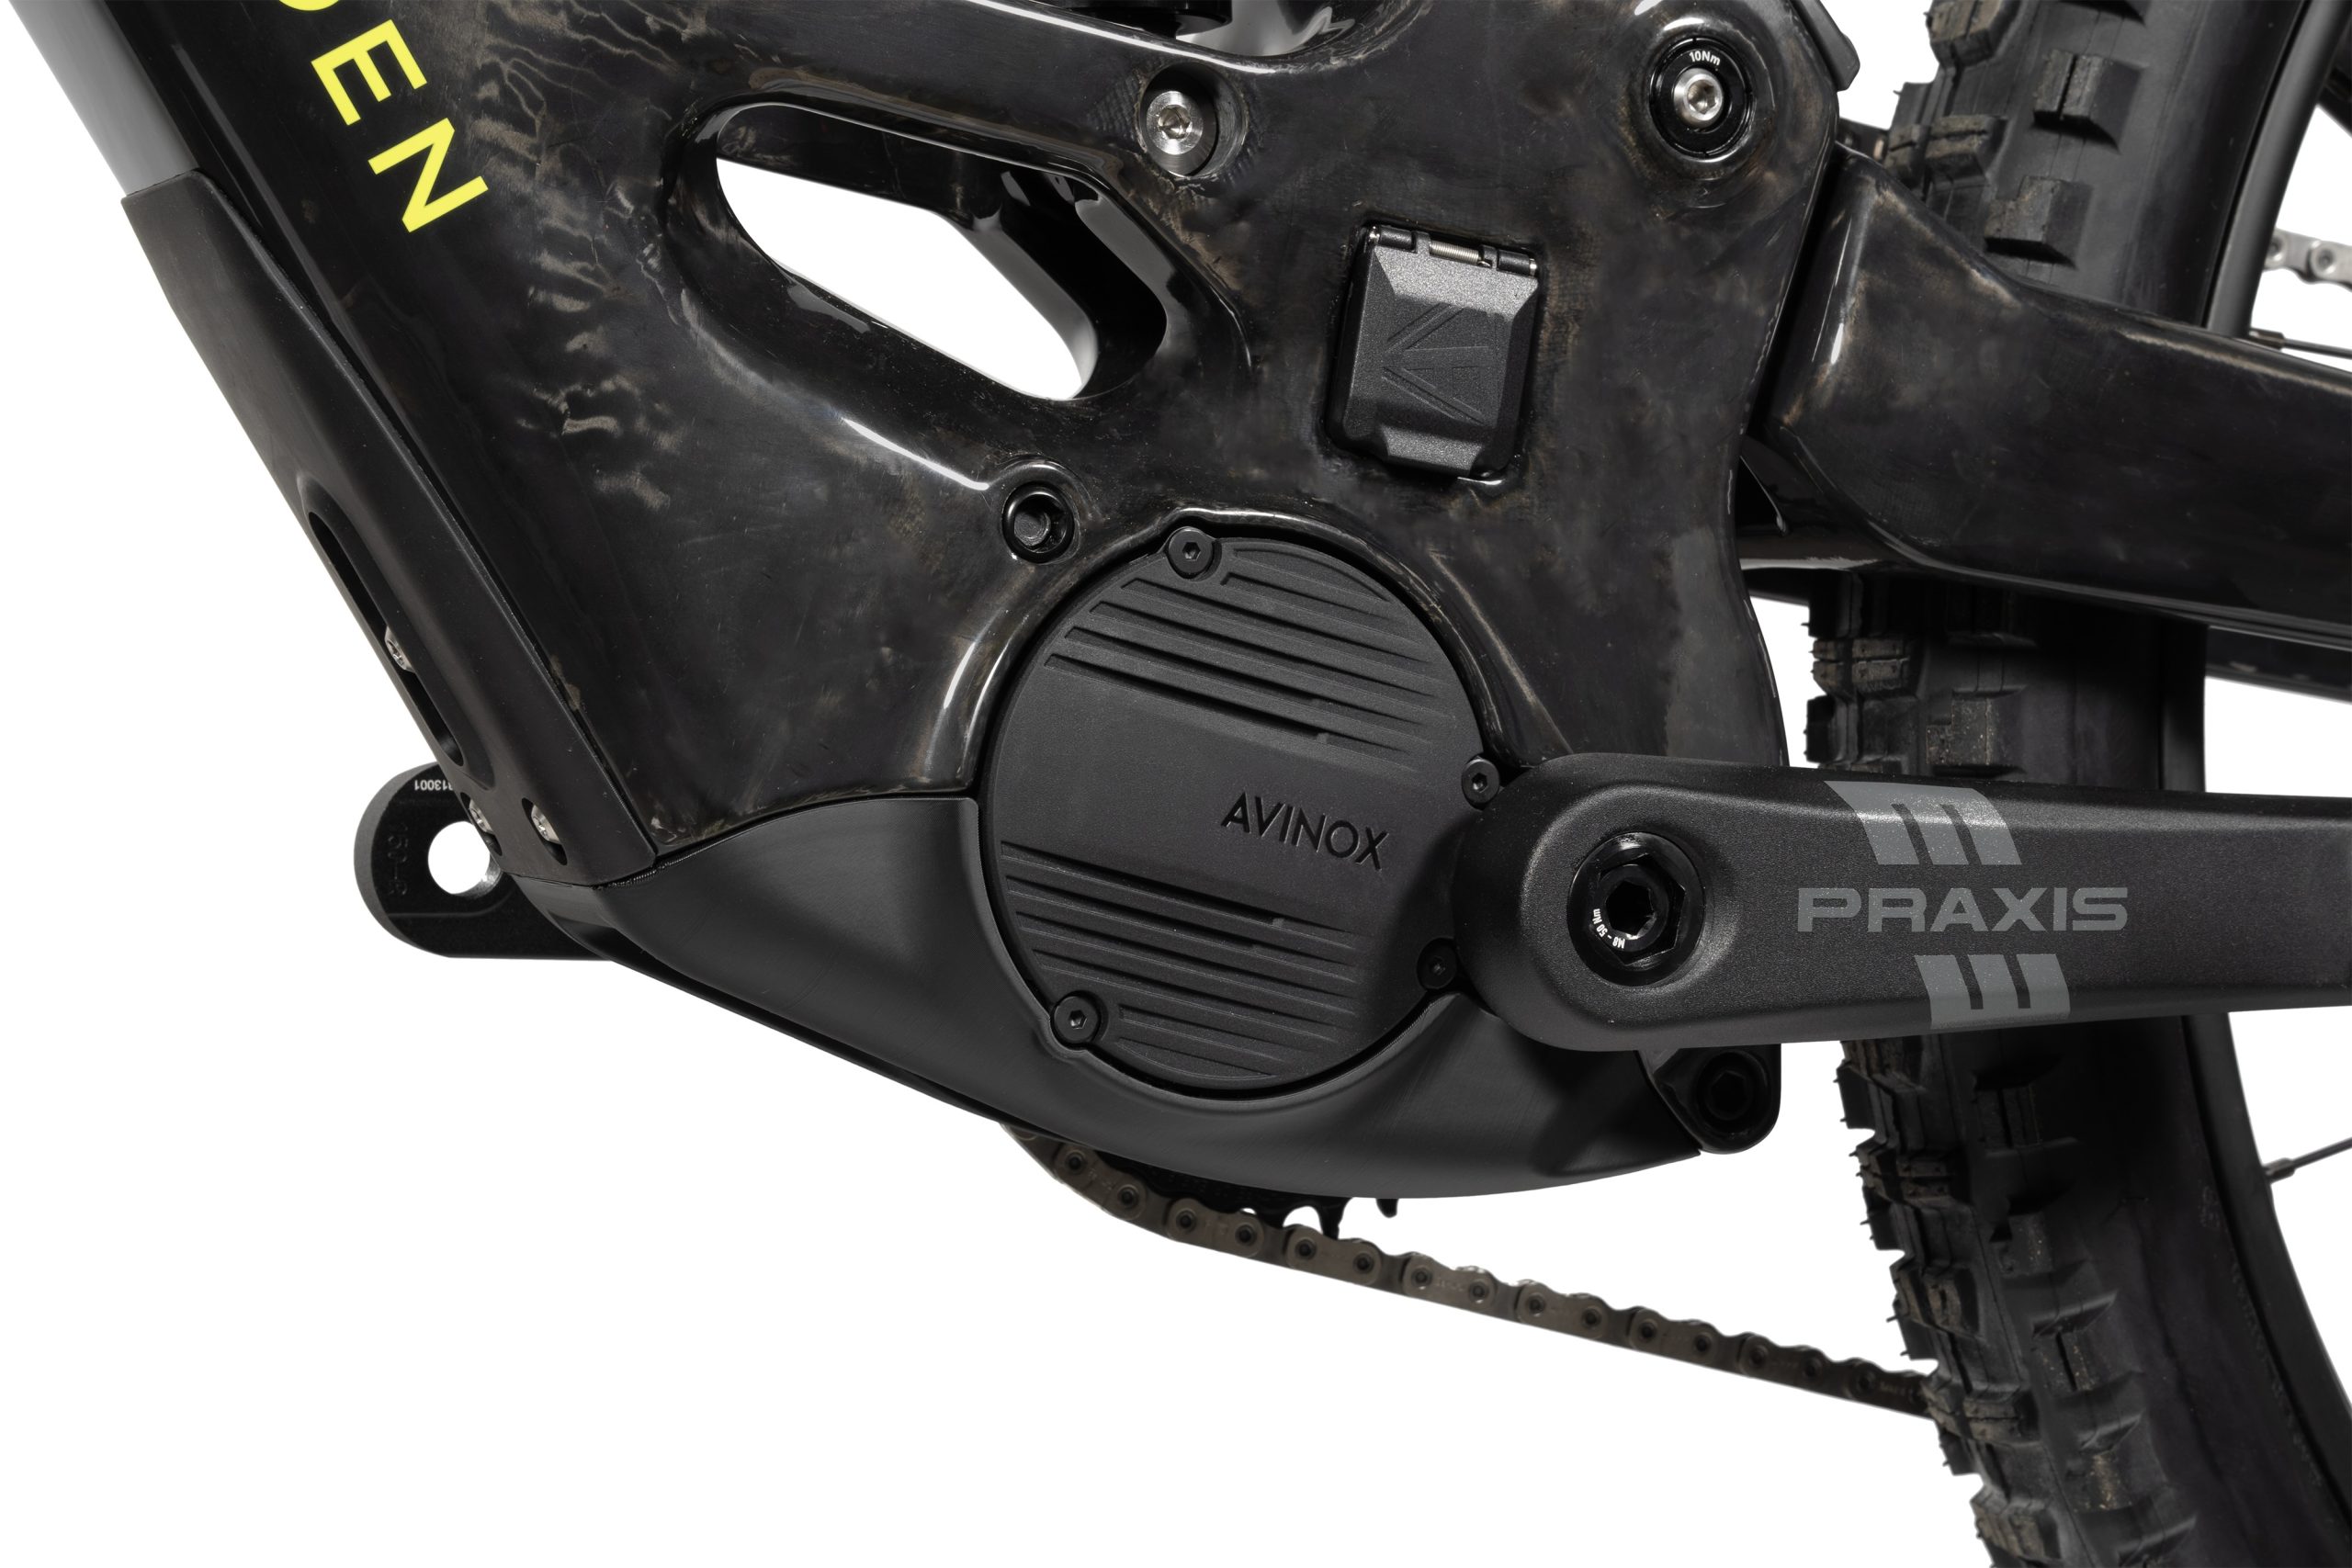
Both of the new bikes feature a carbon construction, including carbon links. There’s plenty of protection on there to keep the frame safe and the ride quiet.
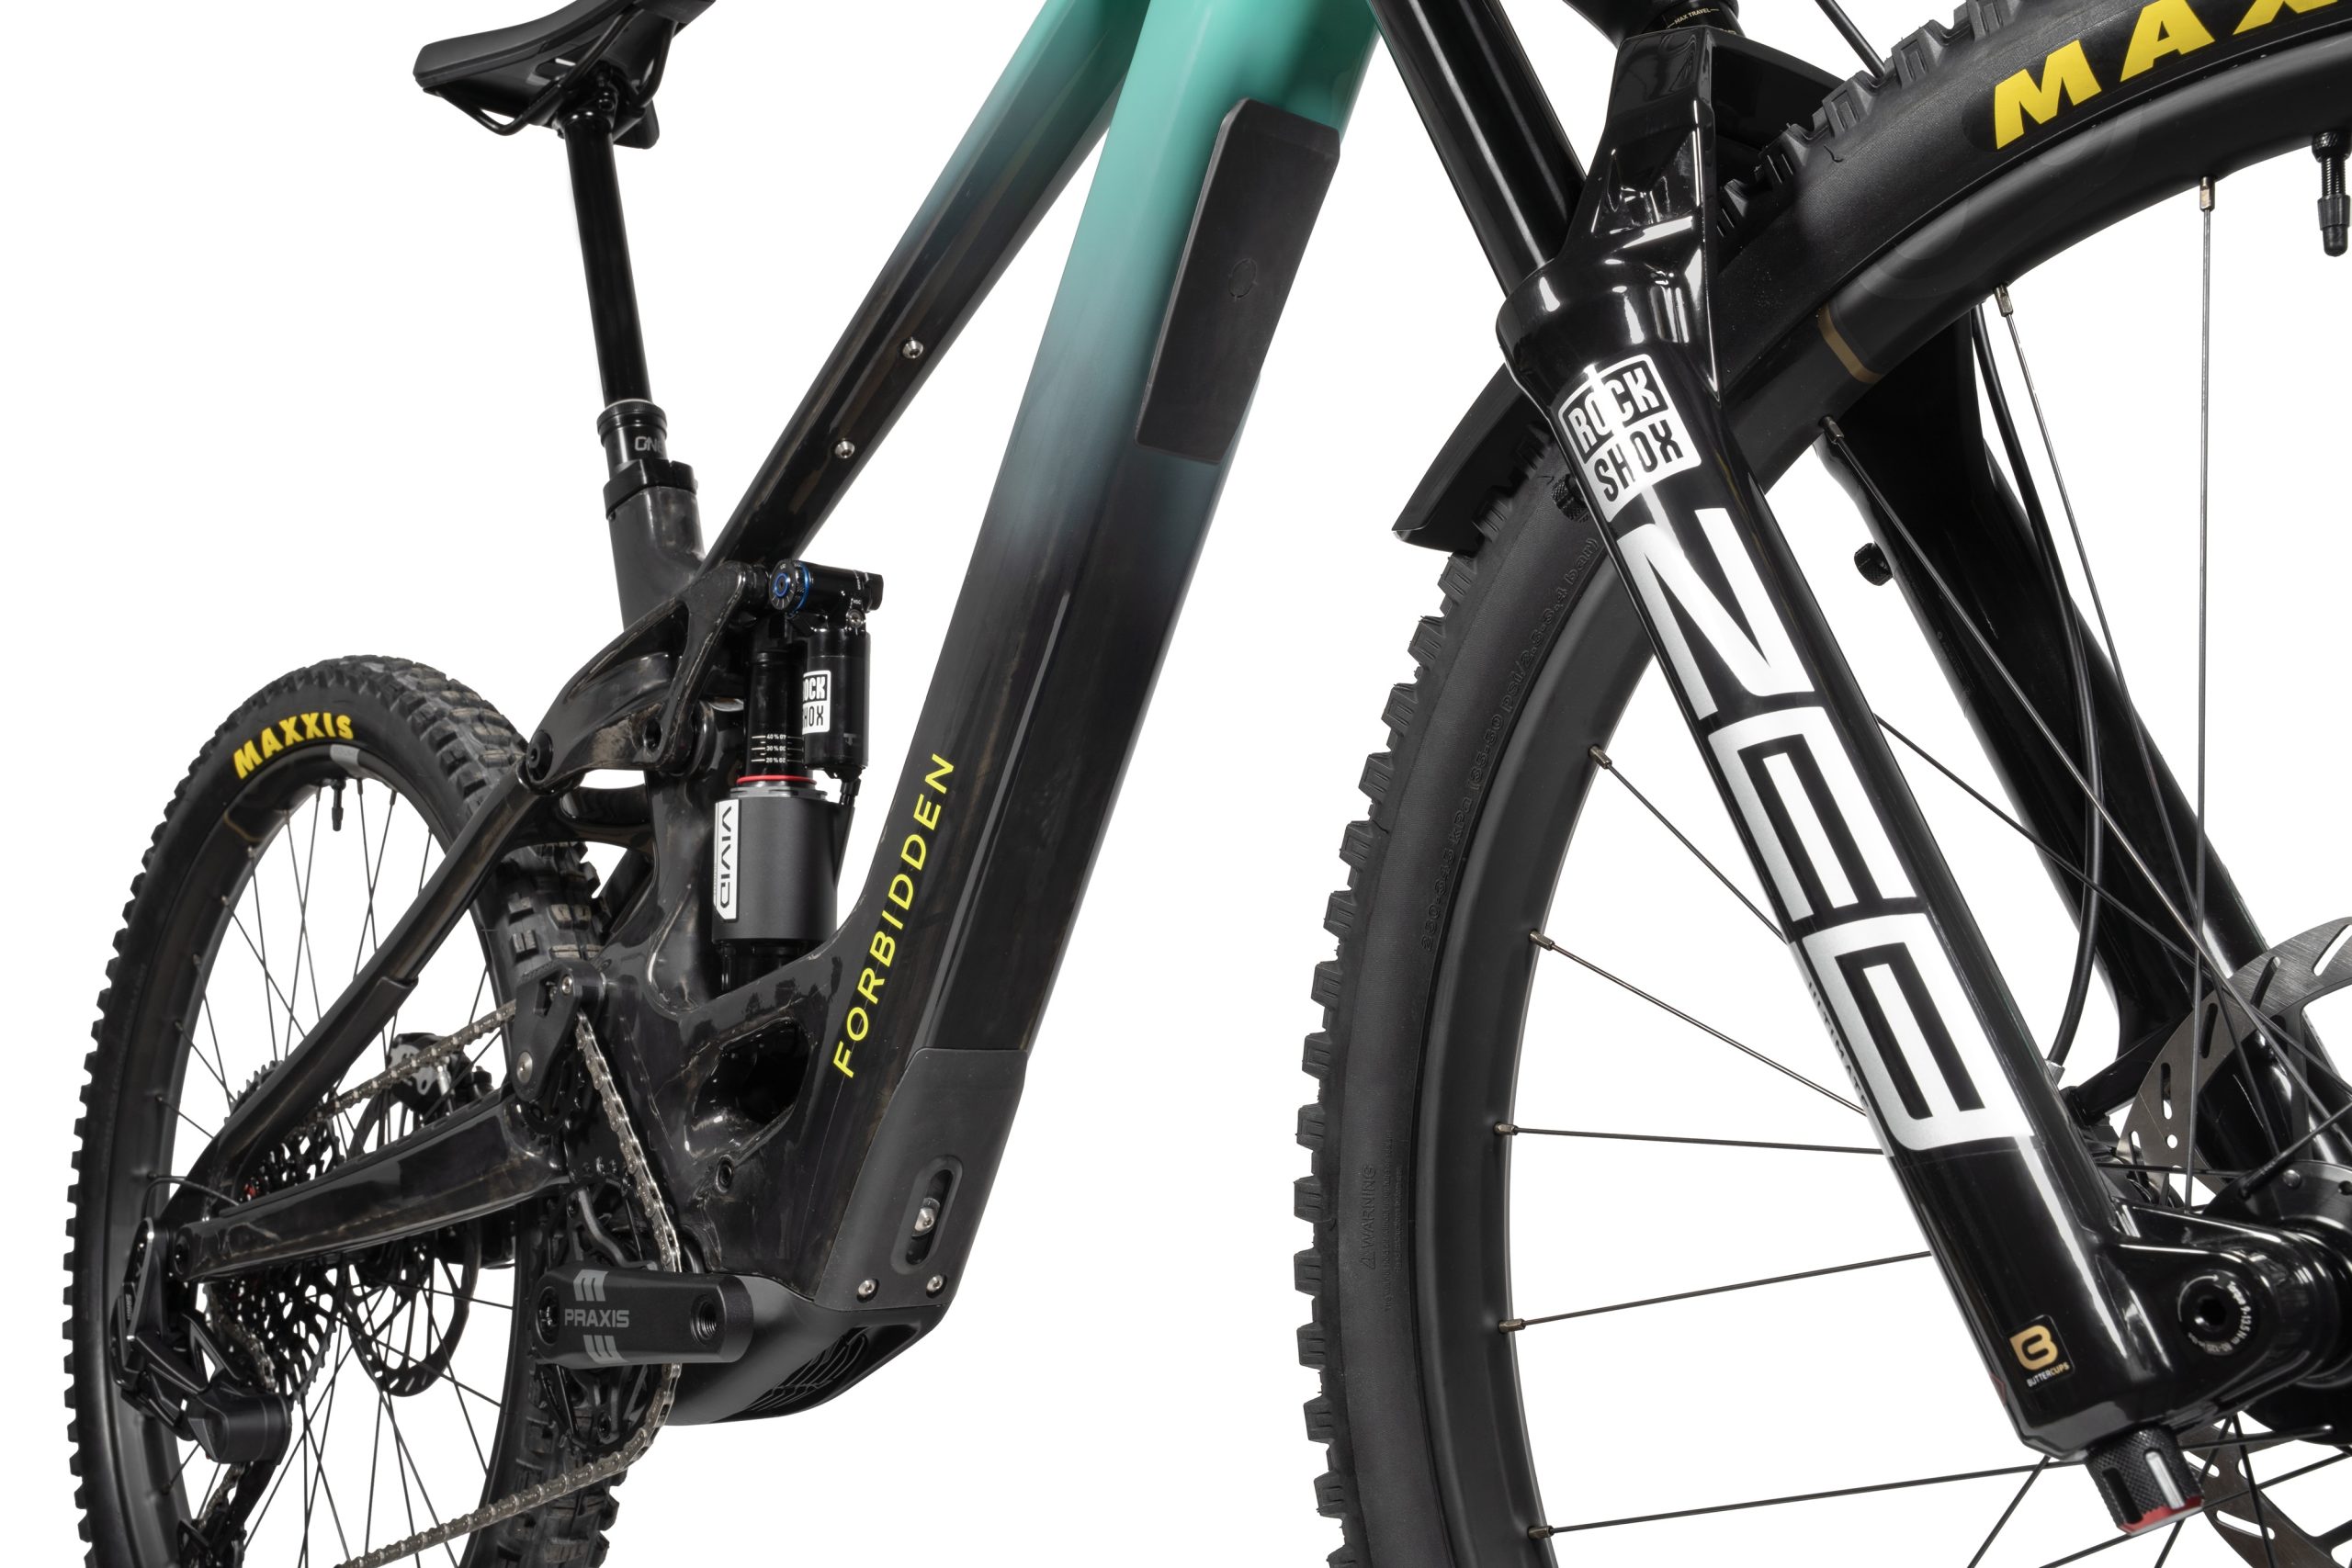
There’s space for a full-sized bottle in the frame, as well as an accessory mount.
Oversized bearings, additional sealing and a steel idler featuring two sets of bearings are there to boost durability, while the bikes come with a lifetime warranty.
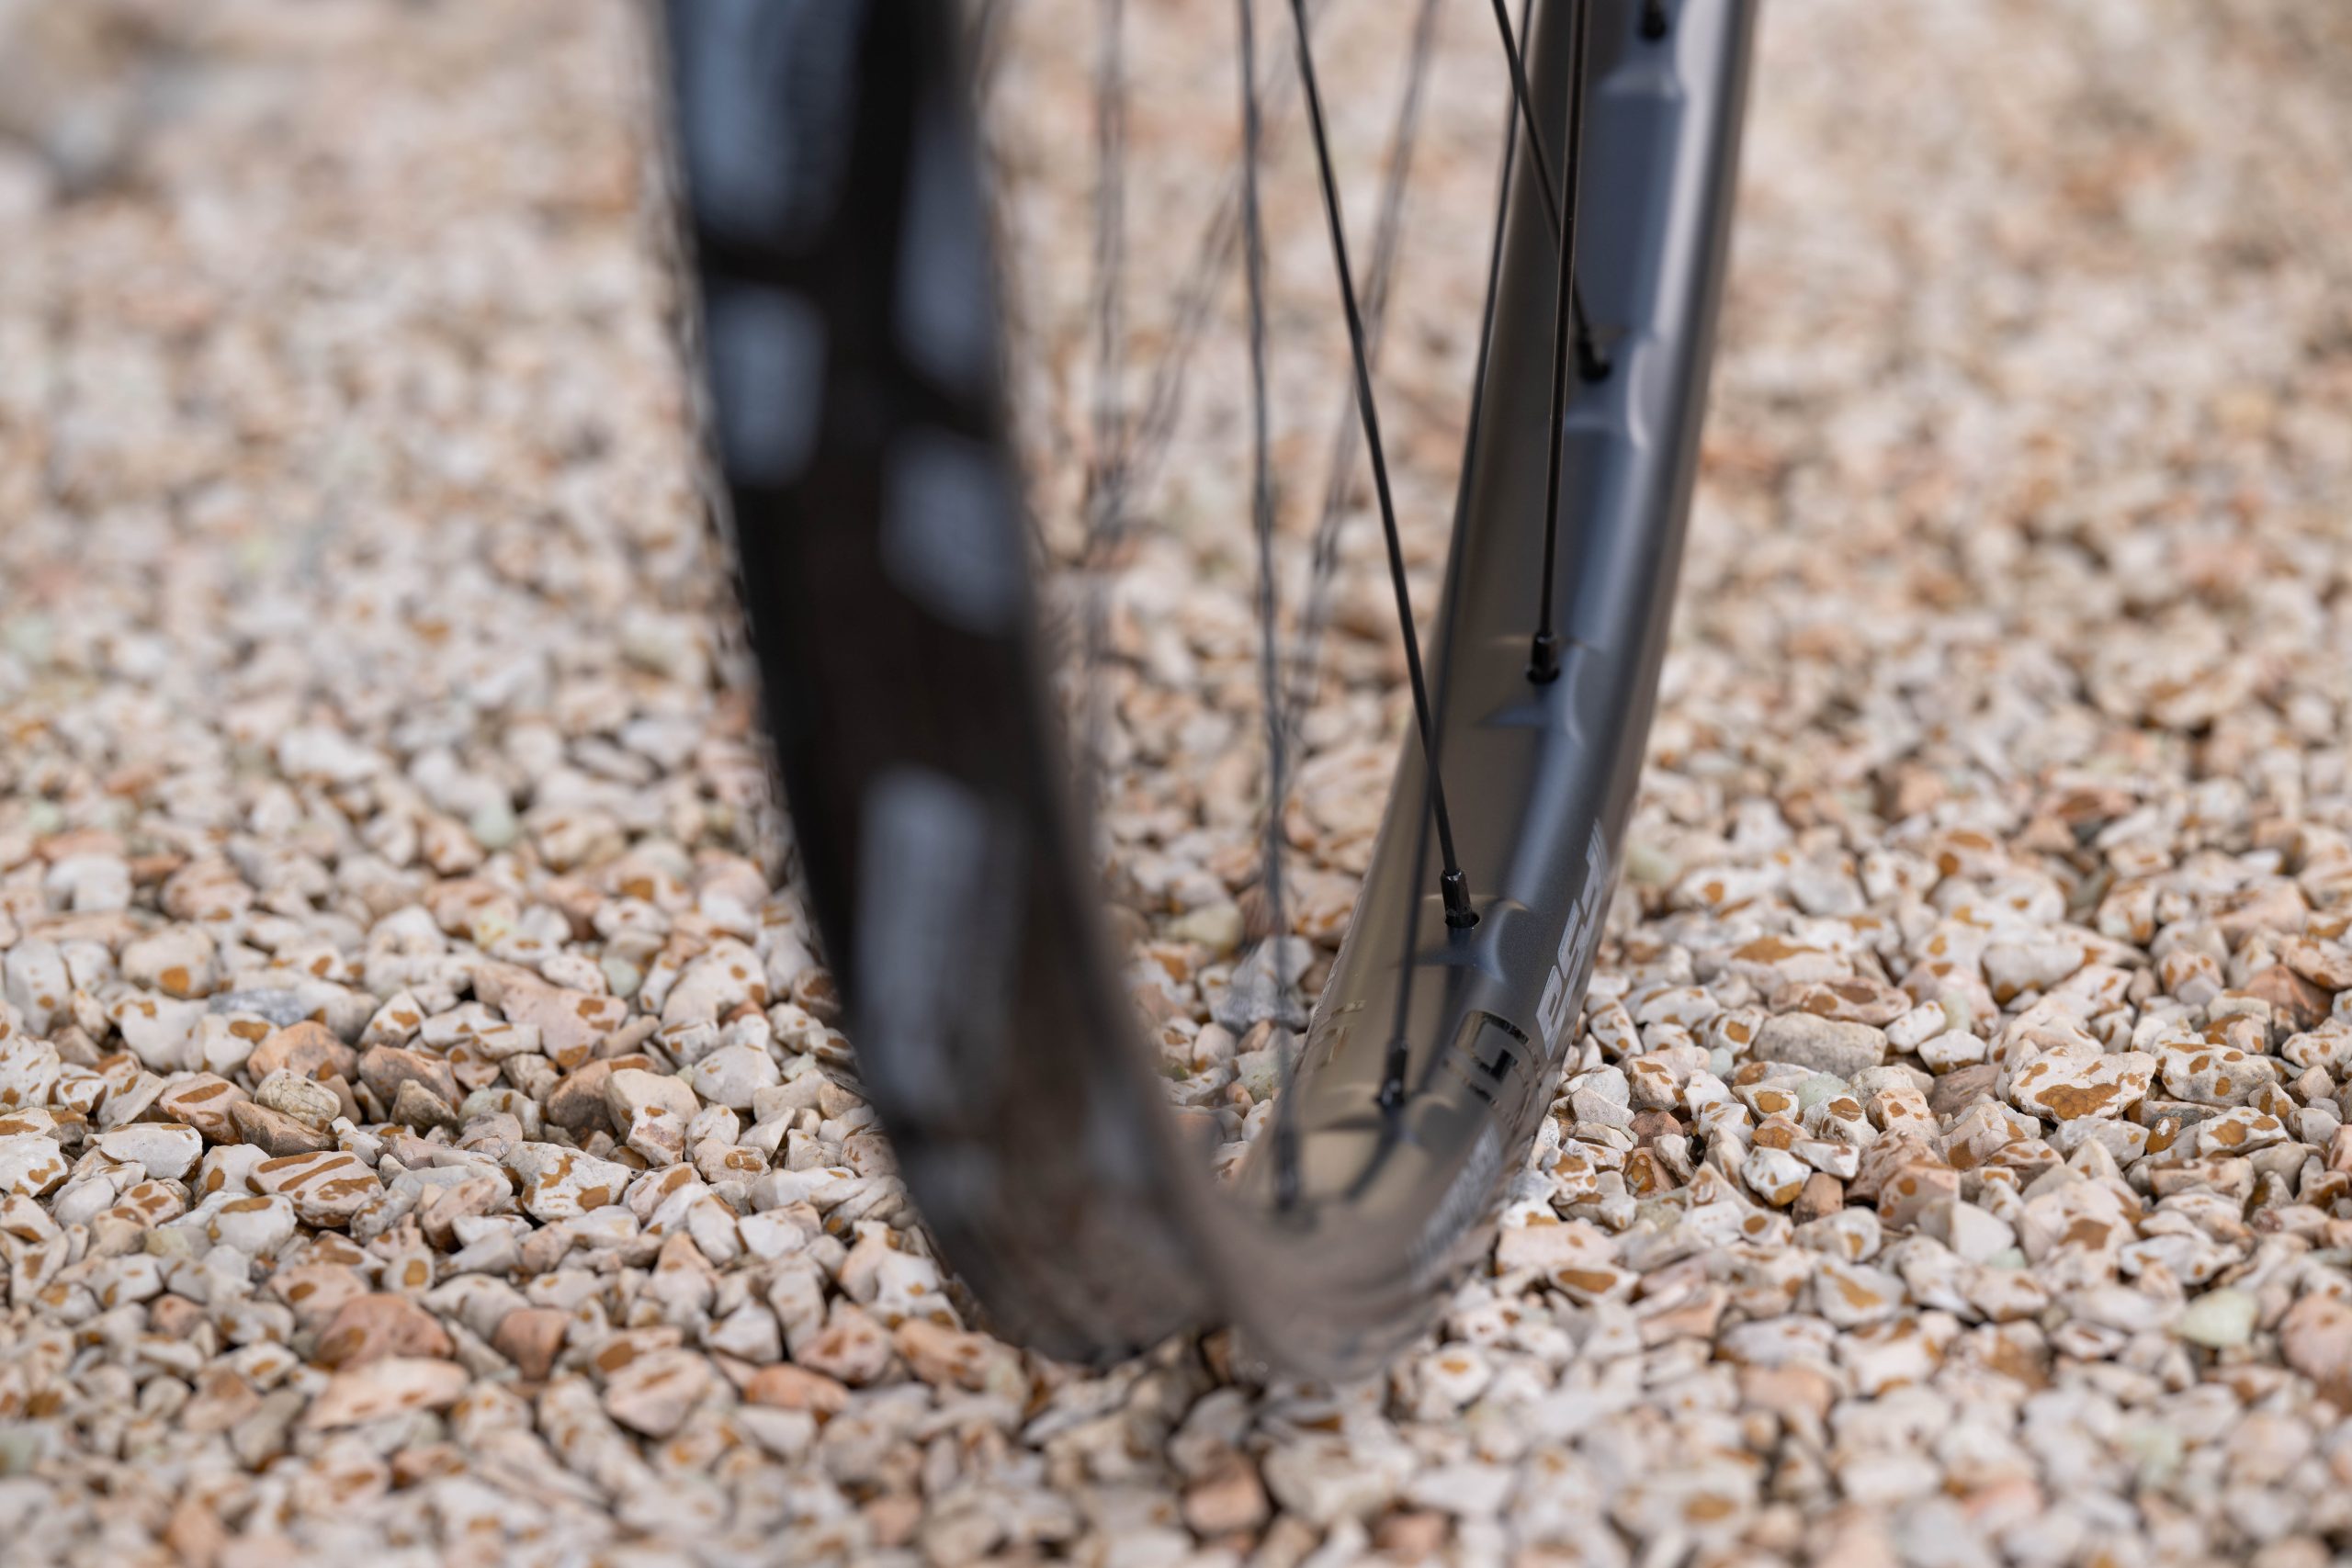
The bikes feature mixed wheel sizes. Forbidden claims this helps keep them agile and manoeuvrable, despite the added weight of the motor and battery.
Forbidden Druid E geometry
Plenty of protection for the down tube here. Forbidden
Although they’re modern, the figures on the geometry sheet might not look particularly extreme.
However, there’s good reason for this, according to Forbidden.
The reach figure, in particular, is fairly short (in the most modern terms), while the stack is tall.
Forbidden says the distance between the cranks and the bar is what really dictates geometric fit.
Put the front end up higher – for DH control and confidence – and you can reduce the reach, ensuring there’s a consistent fit and feel.
So, don’t expect any wild, stretched ride positions here.
To further complement this descending bias, there are short seat tubes to maximise dropper drop – 180mm on the smallest size – and short cranks.
The LitE has 155mm cranks, while the CorE gets 150mm.
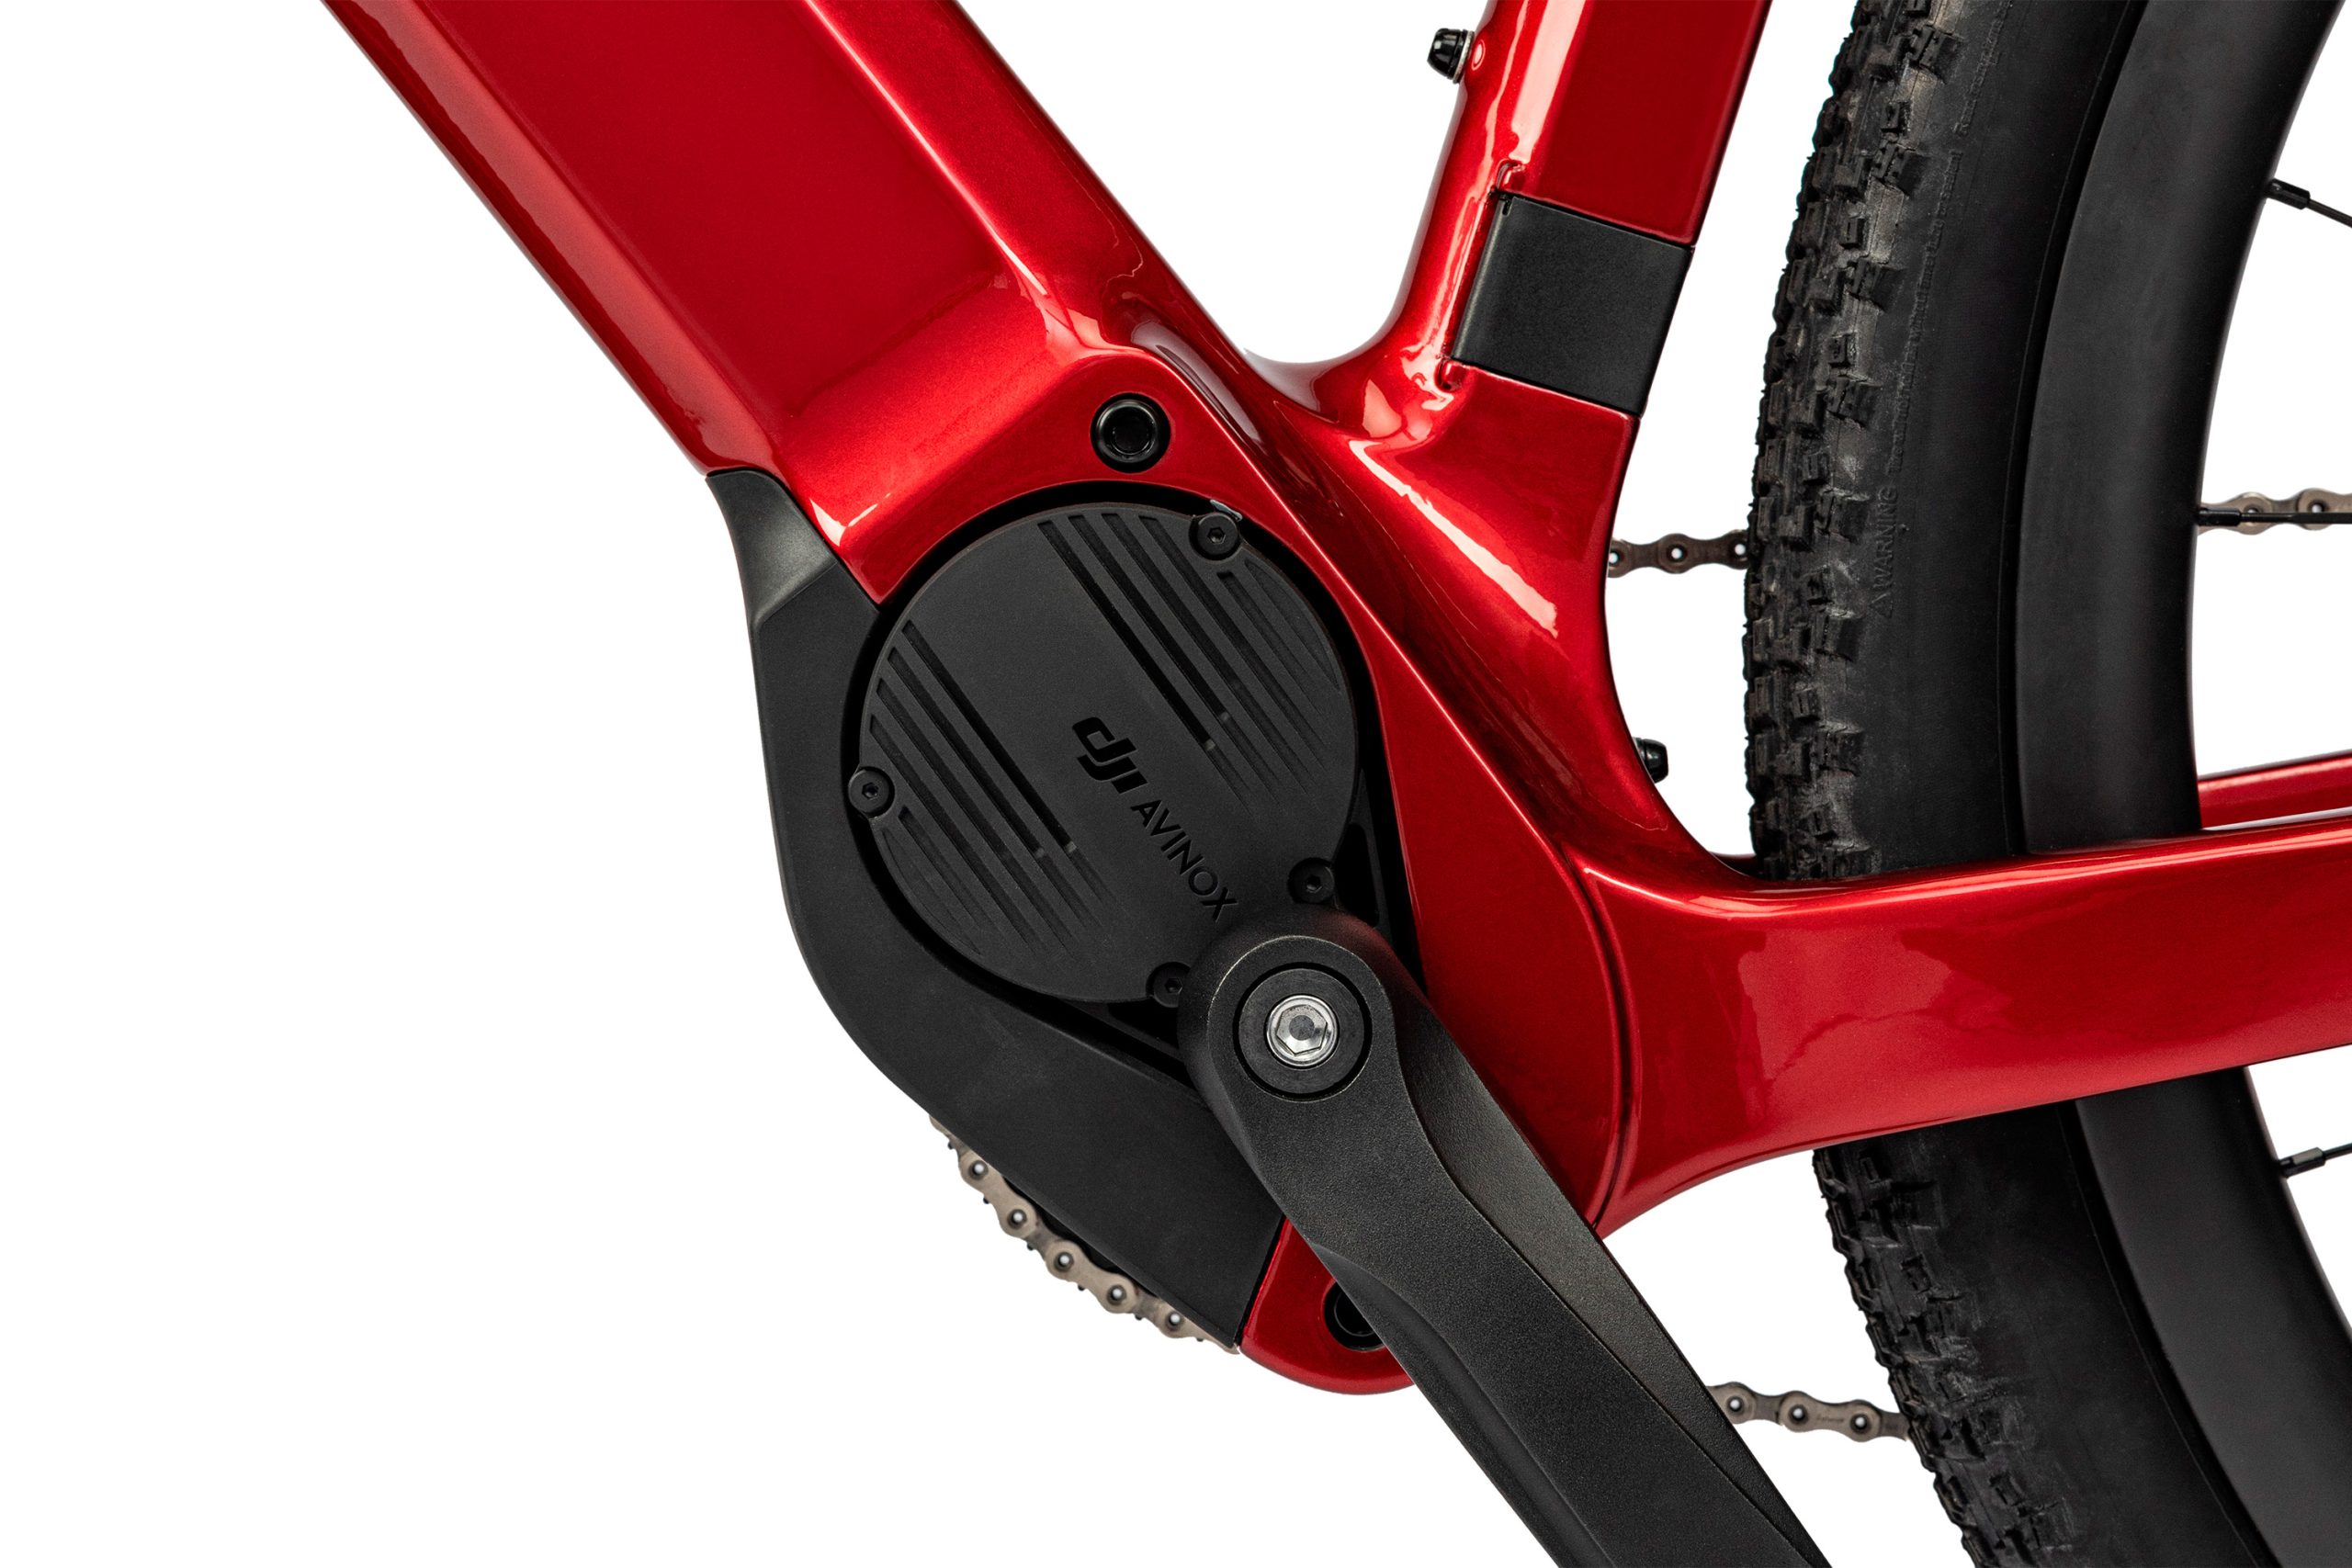
Why DJI?
DJI’s Avinox is the most hyped motor around. Forbidden
There’s tons of hype around the DJI Avinox motor, and it’s easy to see why brands, especially smaller, more reactive ones, are flocking towards it.
The first reason is the power – 800W peak power, with a 1,000W boost function is, frankly, ridiculous.
Then there’s the lesser-discussed (but more important in my opinion) torque figure – the real grunt of an eMTB motor when you’re churning up a techy climb – 120Nm here.
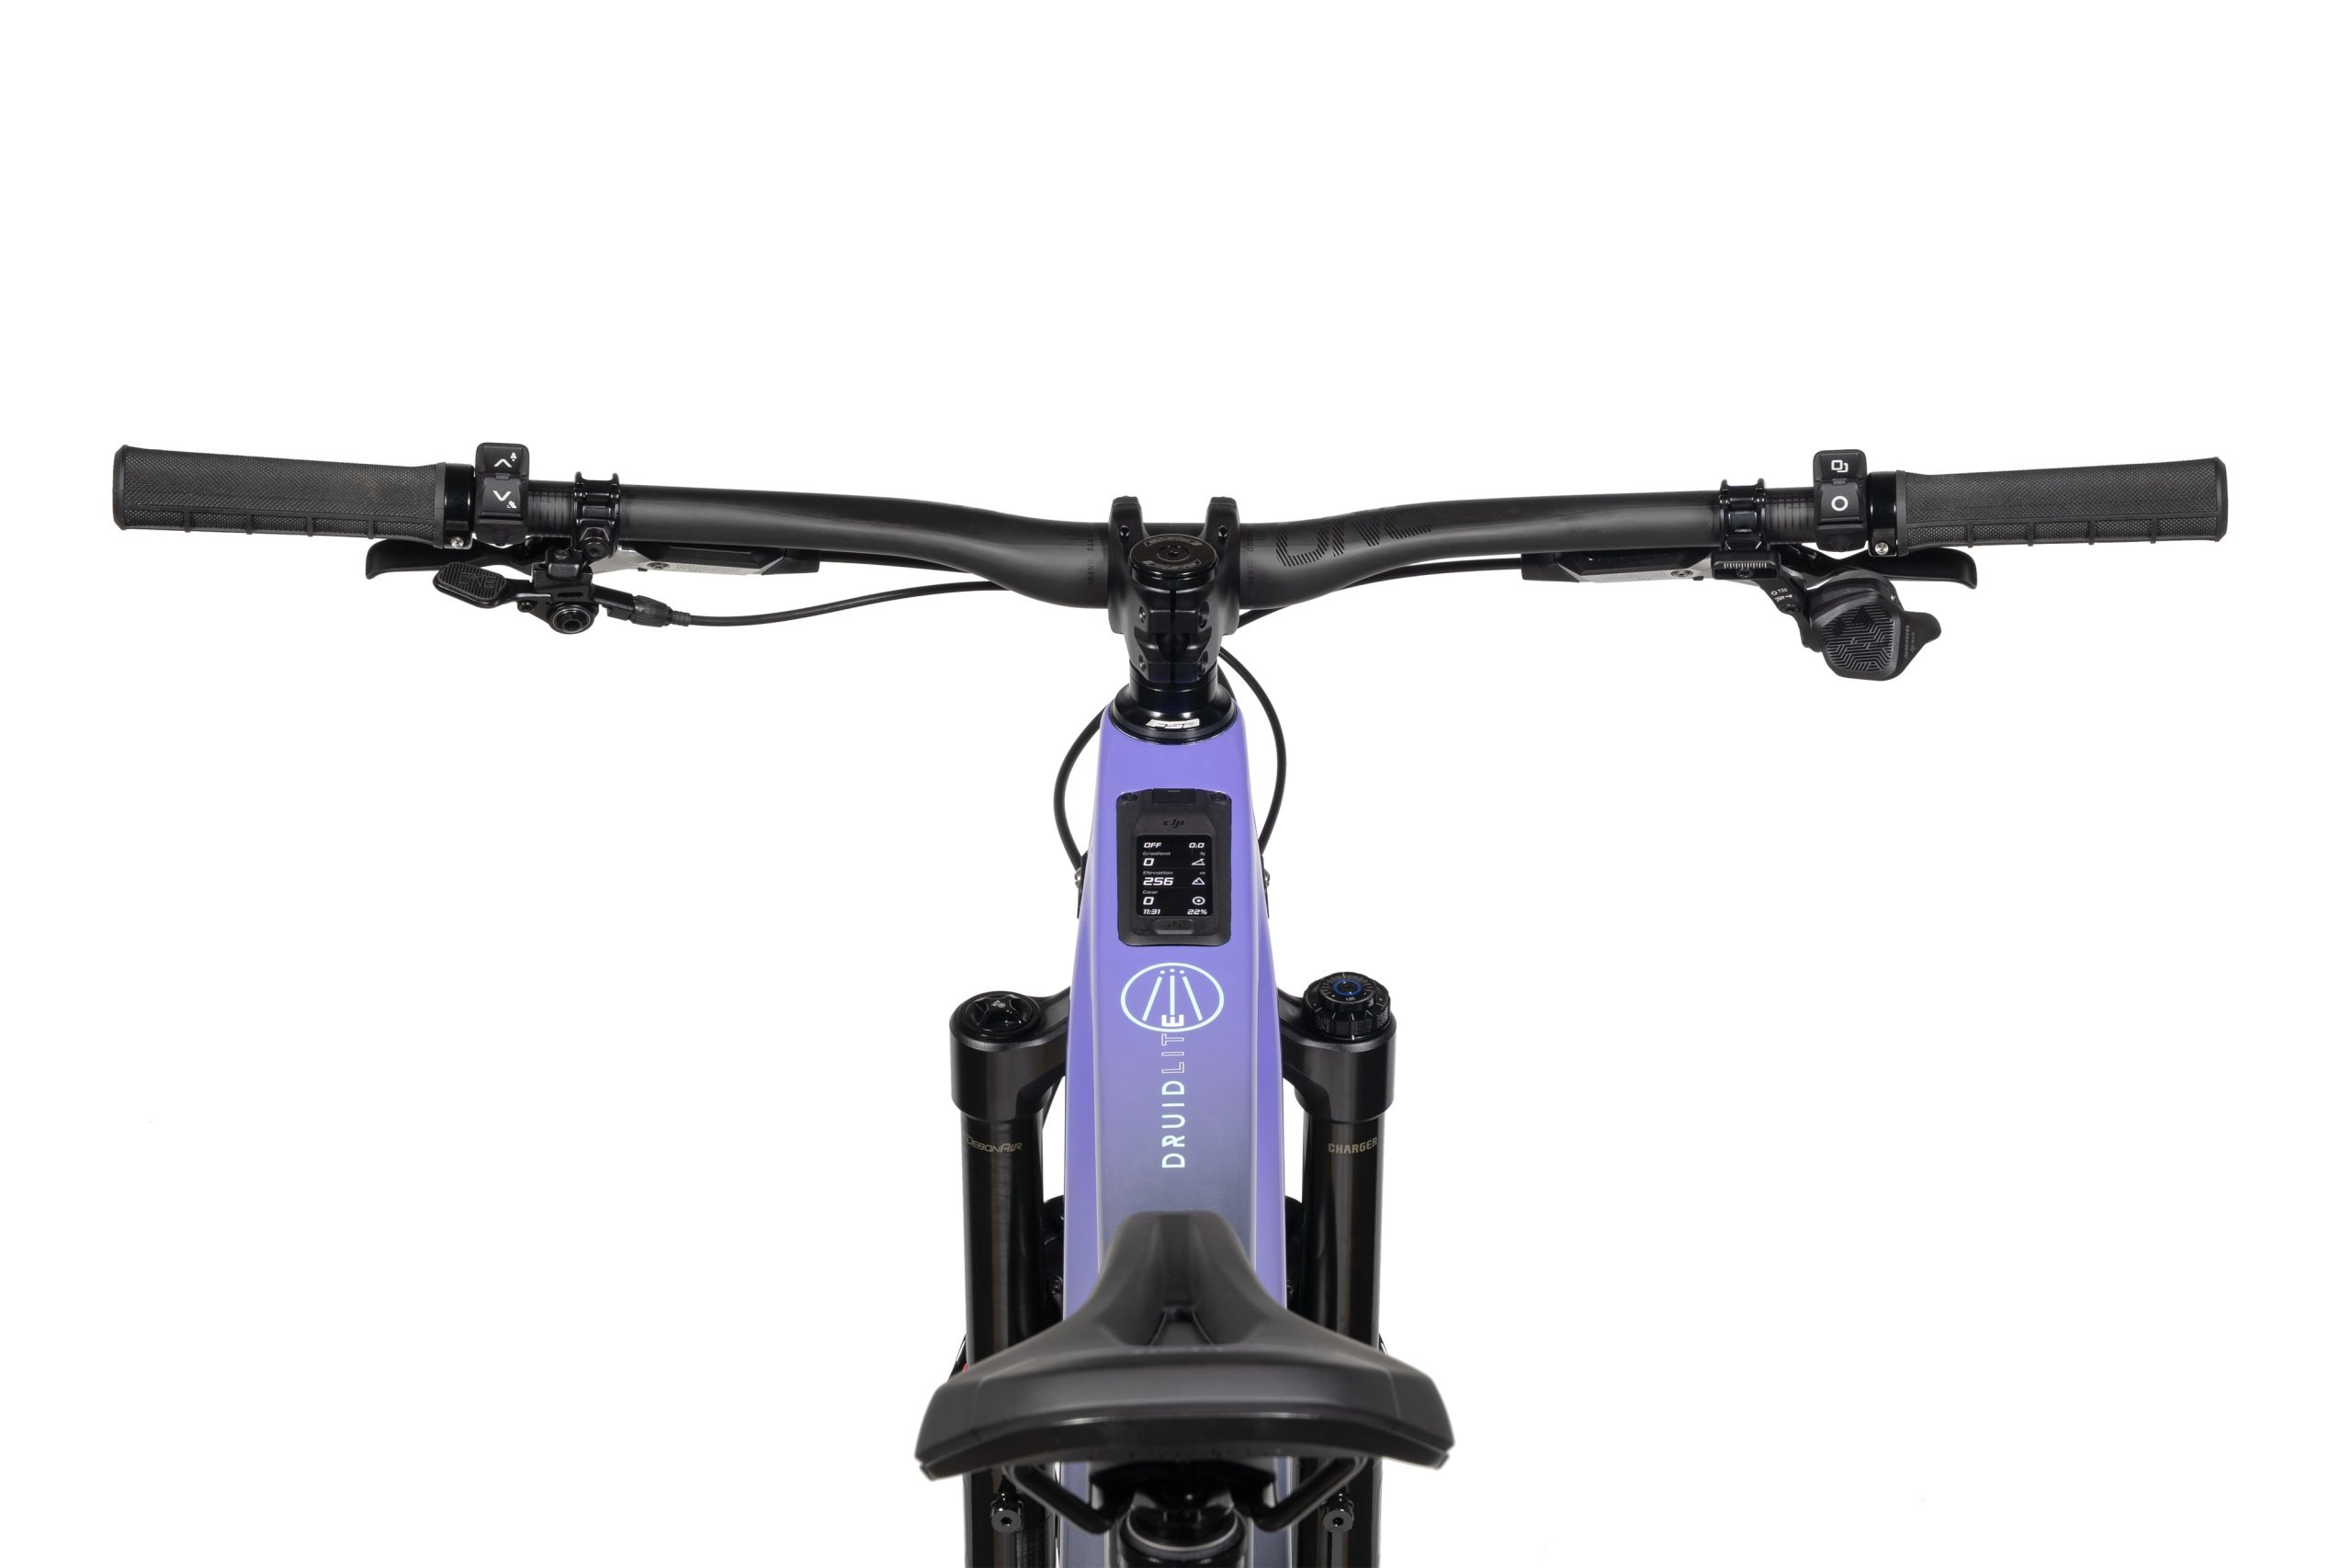
DJI’s top-tube mounted display is data-rich. Forbidden
That surpasses the new S-Works-only torque figure of 111Nm on the new Turbo Levo, the new Druid’s closest competitor, and will beat rumoured updates to Bosch’s motor, as far as we understand.
It’s also not a particularly heavy system, at 2.5kg (the Bosch Performance CX comes in at 2.8kg), and the UI and app are as detailed as they come.
Forbidden Druid E LitE and CorE spec and price details
The Druid E LitE is ready to hit the trails, with 140/150mm of suspension travel. Forbidden
At the time of writing, we are waiting for confirmed specifications and pricing. We will update the story when we have this information.
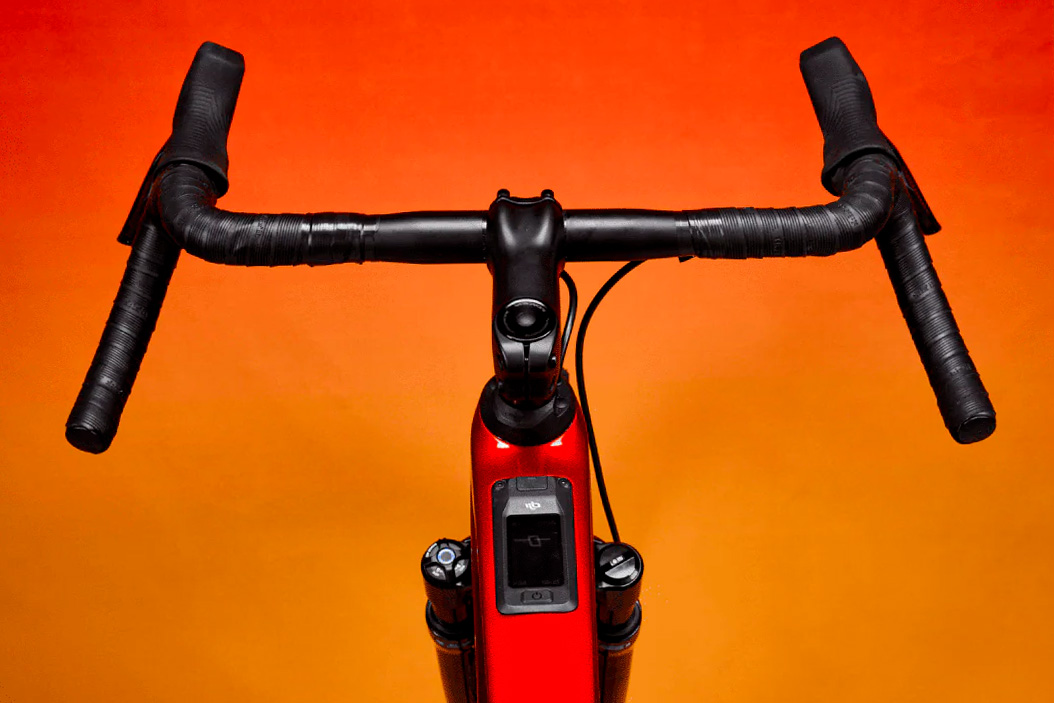
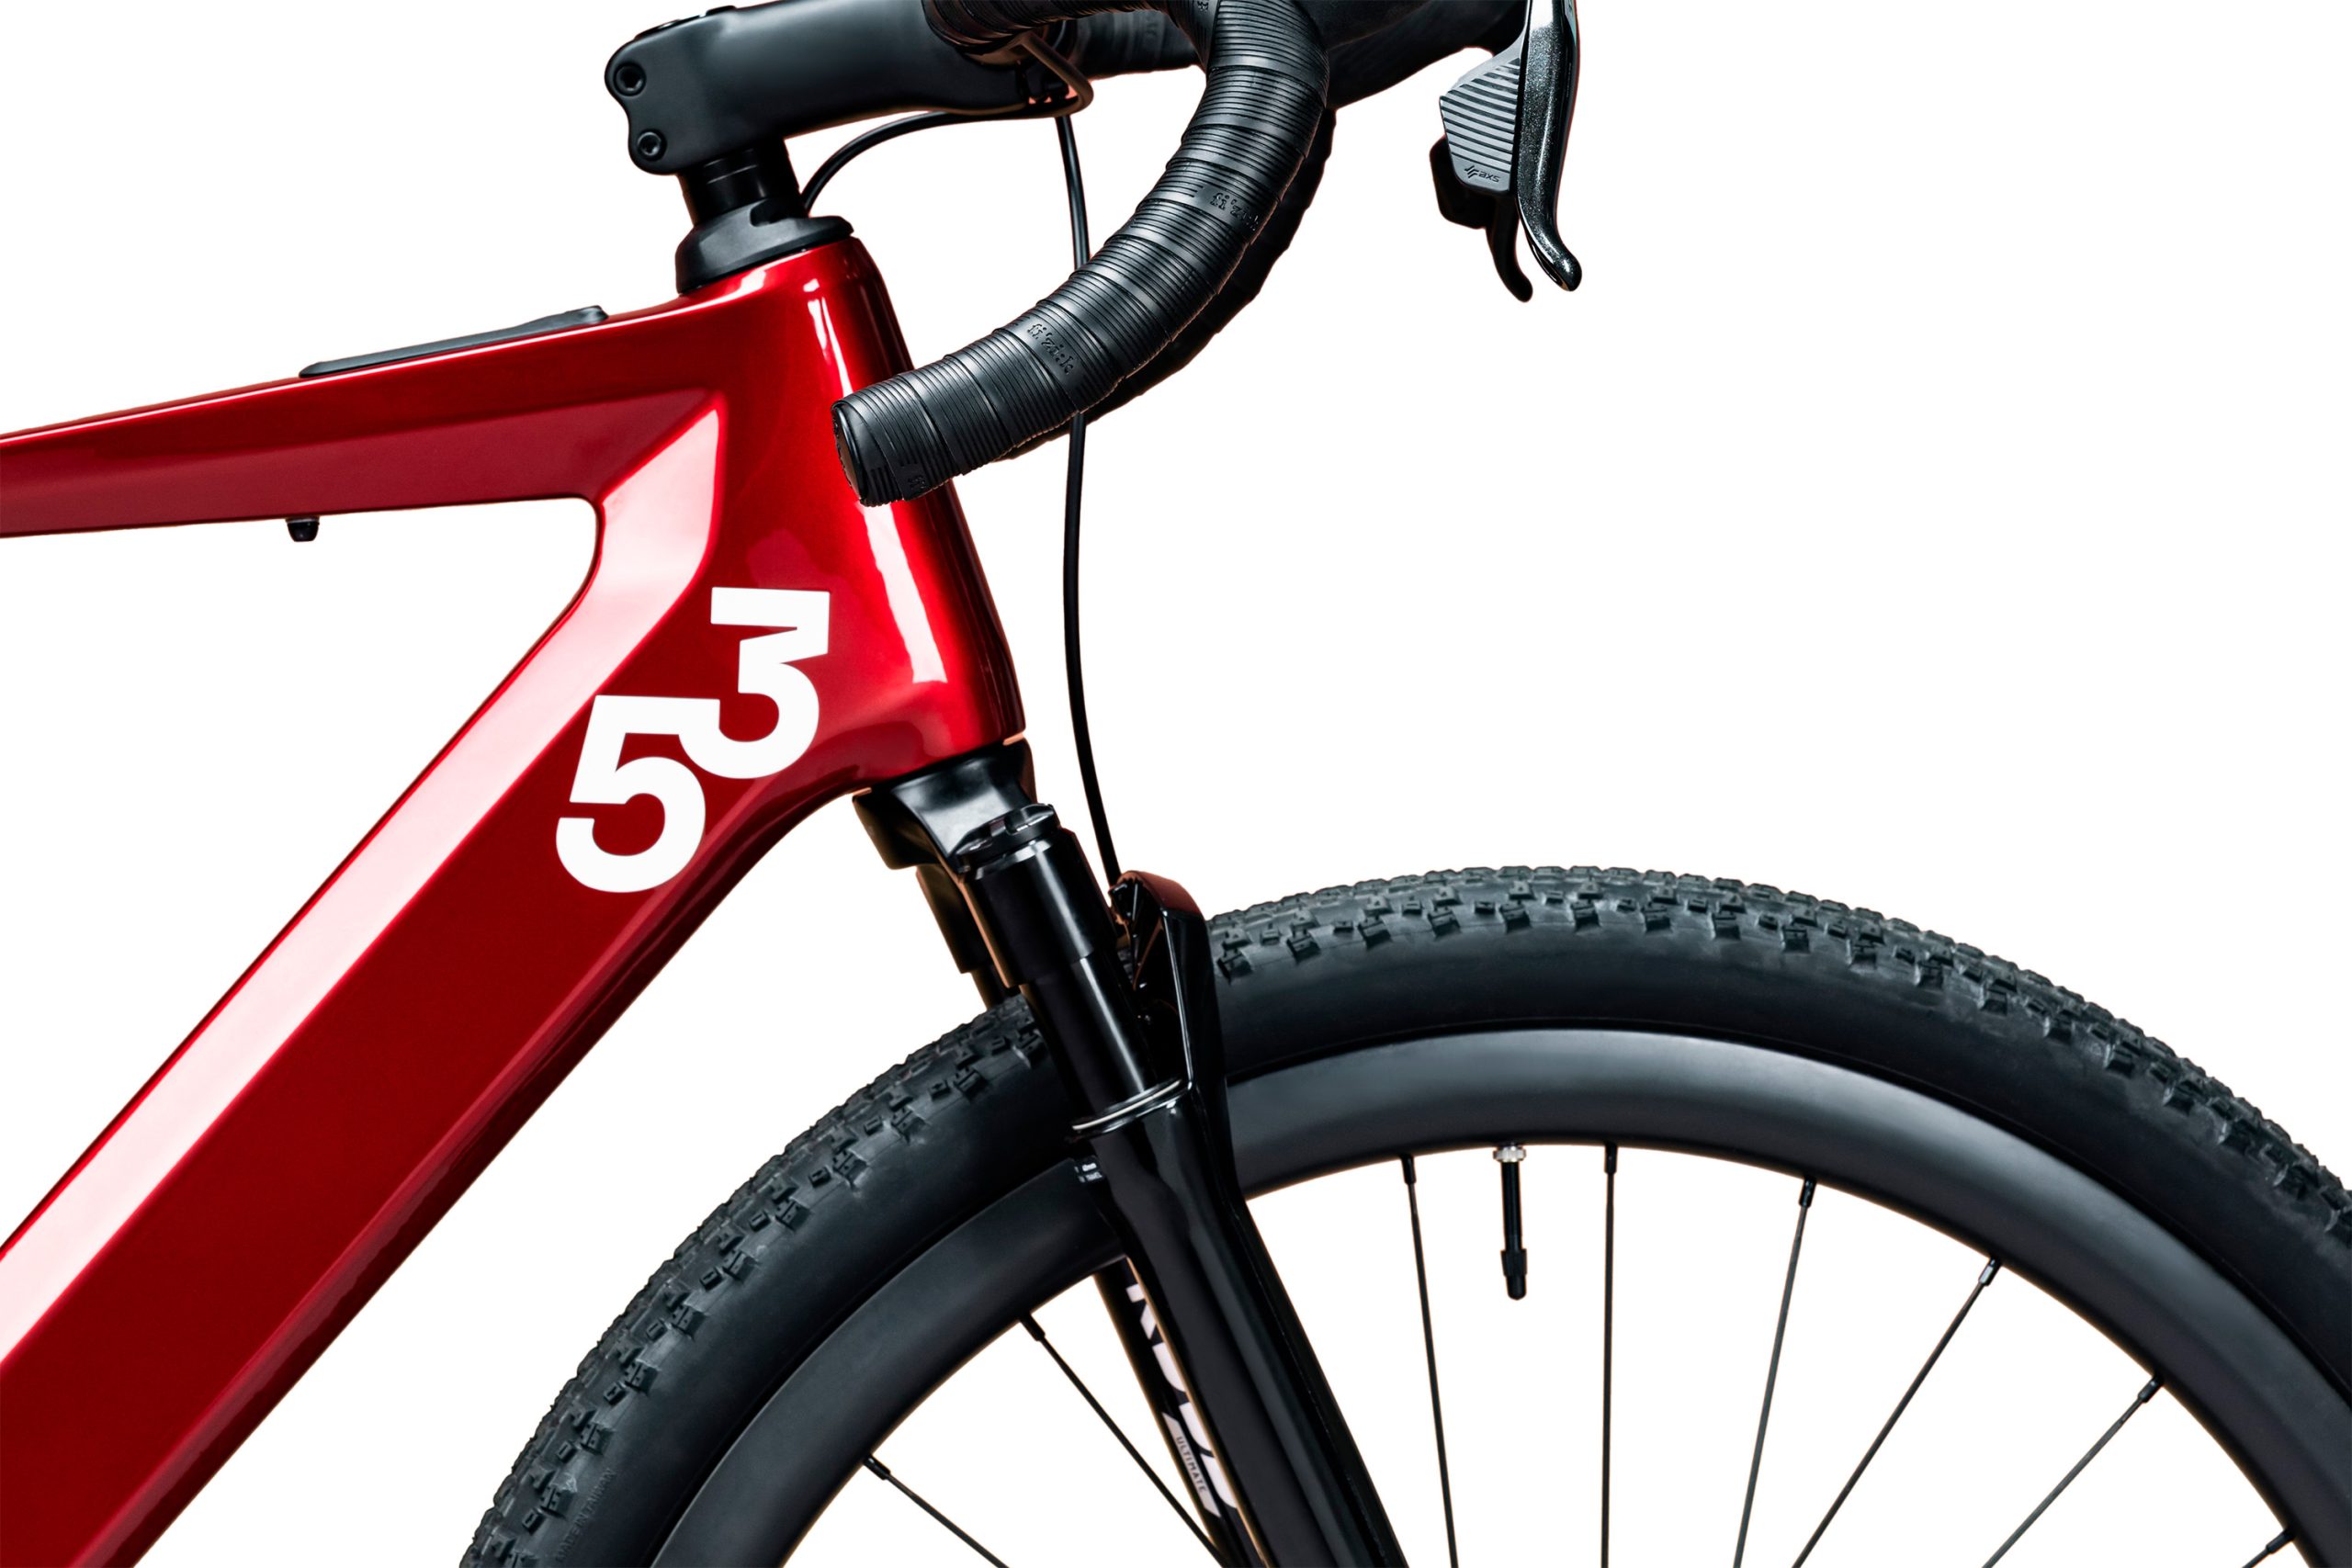
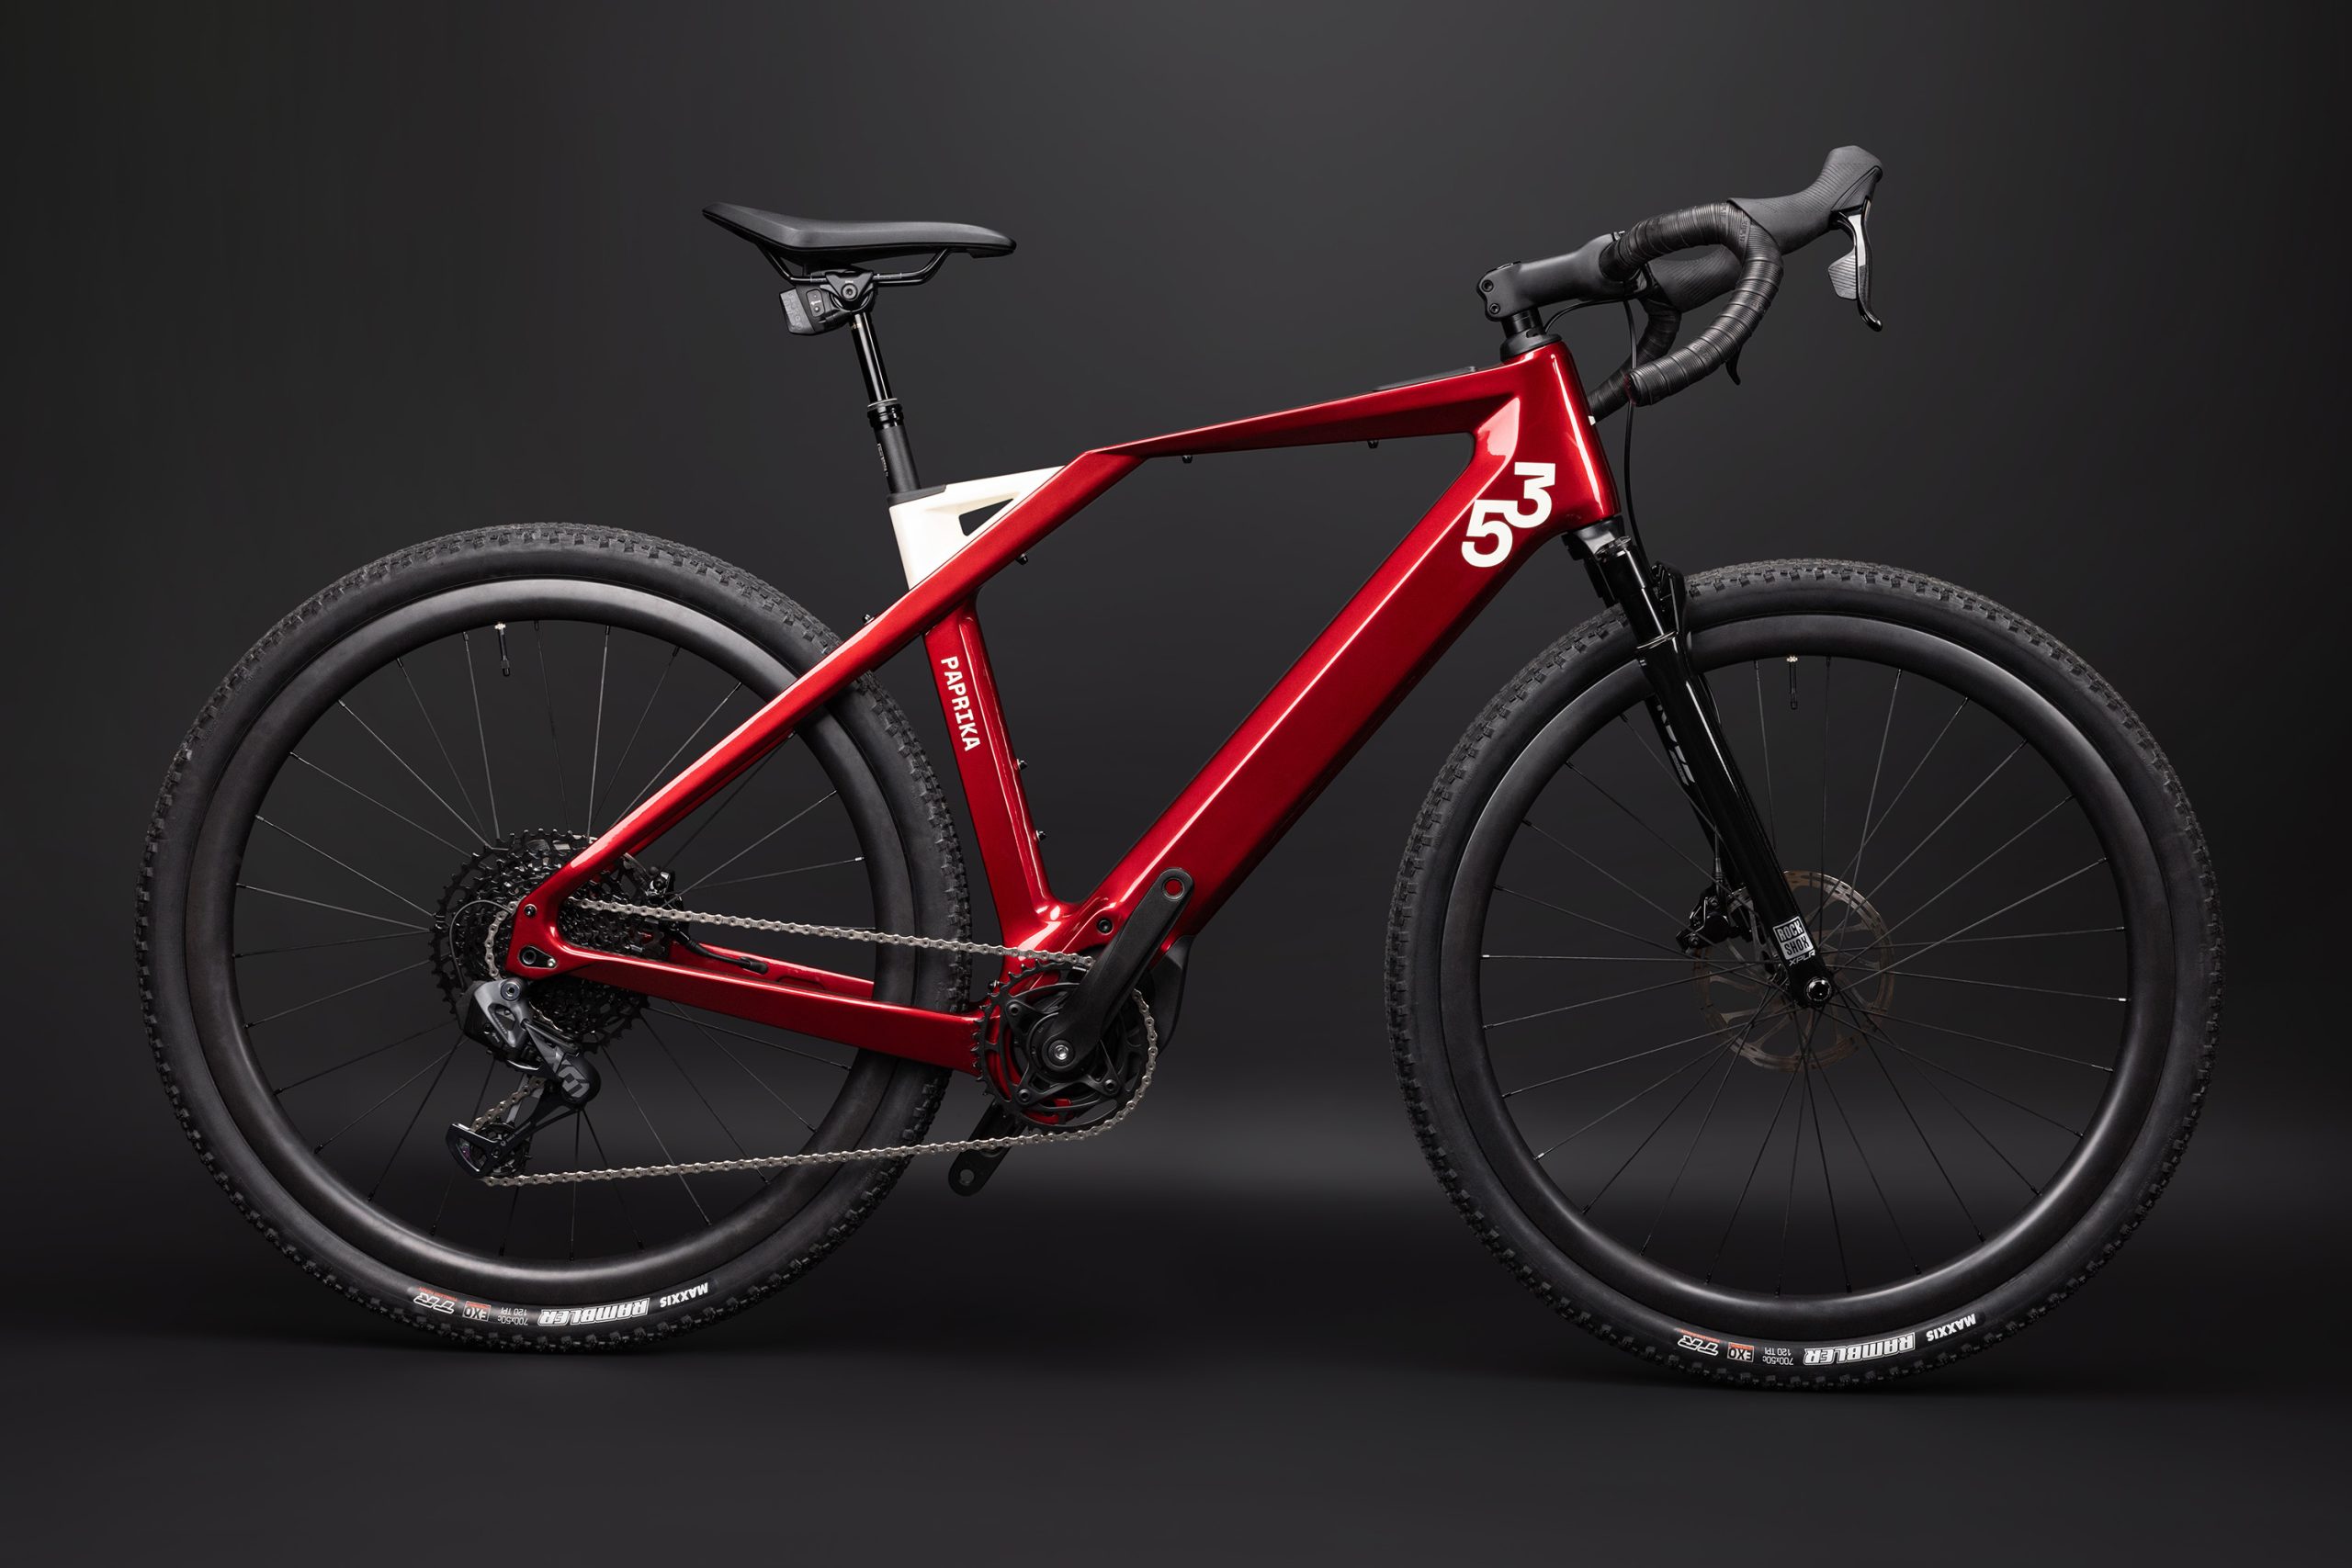
While Forbidden’s Druid E launched today was long rumoured to be the first third-party bike to feature the motor, Paprika 53’s Model 25 GT joins it on launch day as the first electric gravel bike.
Unlike other systems, DJI uses a touchscreen display. Paprika 53
The bike features a full carbon fibre frame, integrating the DJI’s touchscreen display into the top tube, battery in the downtube and motor in the bottom bracket area.
Paprika 53 says it has made the bike as compliant as possible, theorising that the added power will mean riders spend more time in the saddle.
RockShox’s Rudy Ultimate XPLR fork should provide good damping for larger bumps. Paprika 53
The frame features what Paprika 53 calls a dropline dip to absorb bumps, with the design also allowing for better saddle height adjustability.
As well as two bottle cage mounts, the frame appears to have accessory mounts under the drop line dip and under the top tube, although these don’t look compatible with the standard mounting hardware.
SRAM’s Reverb AXS XPLR dropper post sits in the frame, allowing for the saddle to be dropped out of the way on descents.
The Model 25 GT borders the line of XC bike with wide 50mm tyres and front suspension. Paprika 53
The brand has developed its own handlebar – the Parabola Carbon Bar which features 25 degrees of flare, and is said to add control and comfort to the front end.
A mullet drivetrain is used, combining SRAM’s road Force eTap AXS shifters and X01 Eagle AXS mountain bike drivetrain with a 38t front chainring and 11-50t cassette.
Paprika 53’s own carbon wheels are wrapped in 50mm Maxxis’ Rambler tyres.
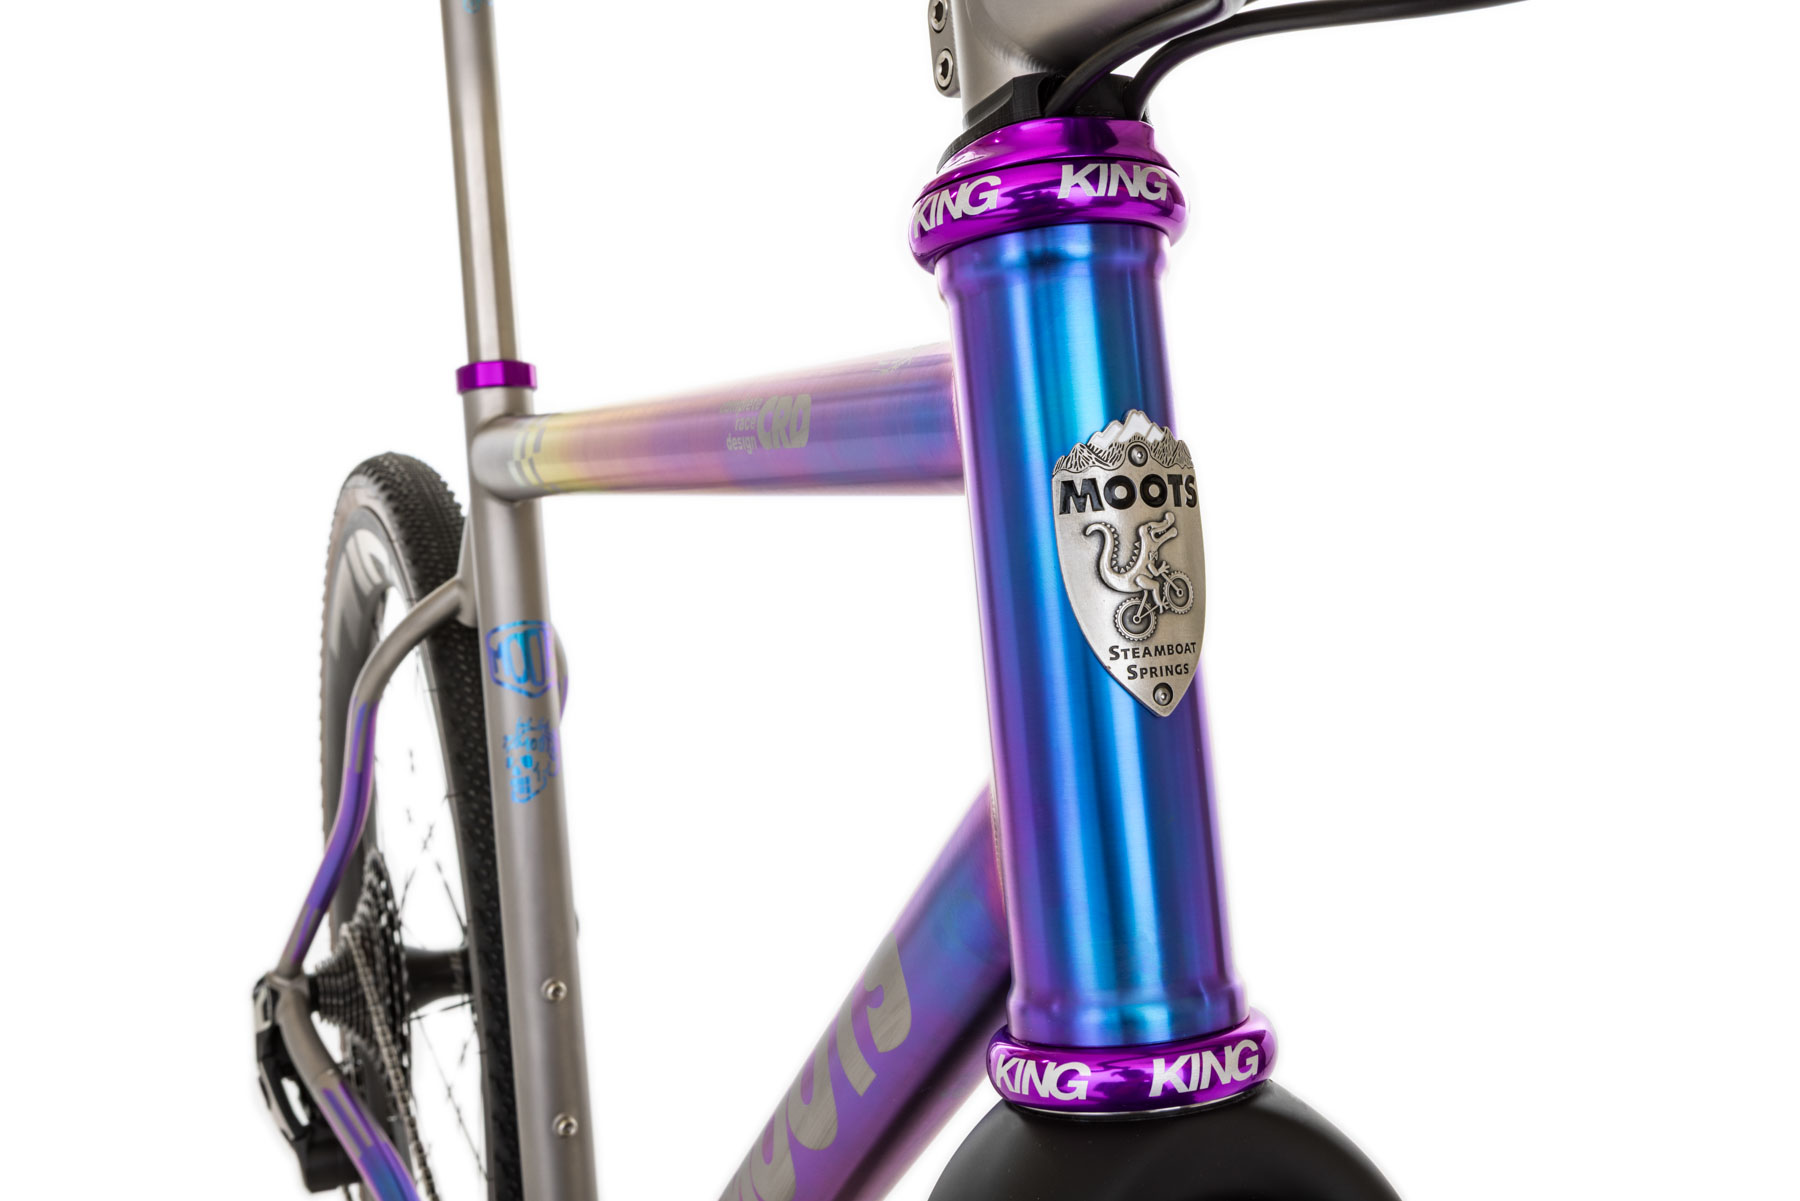
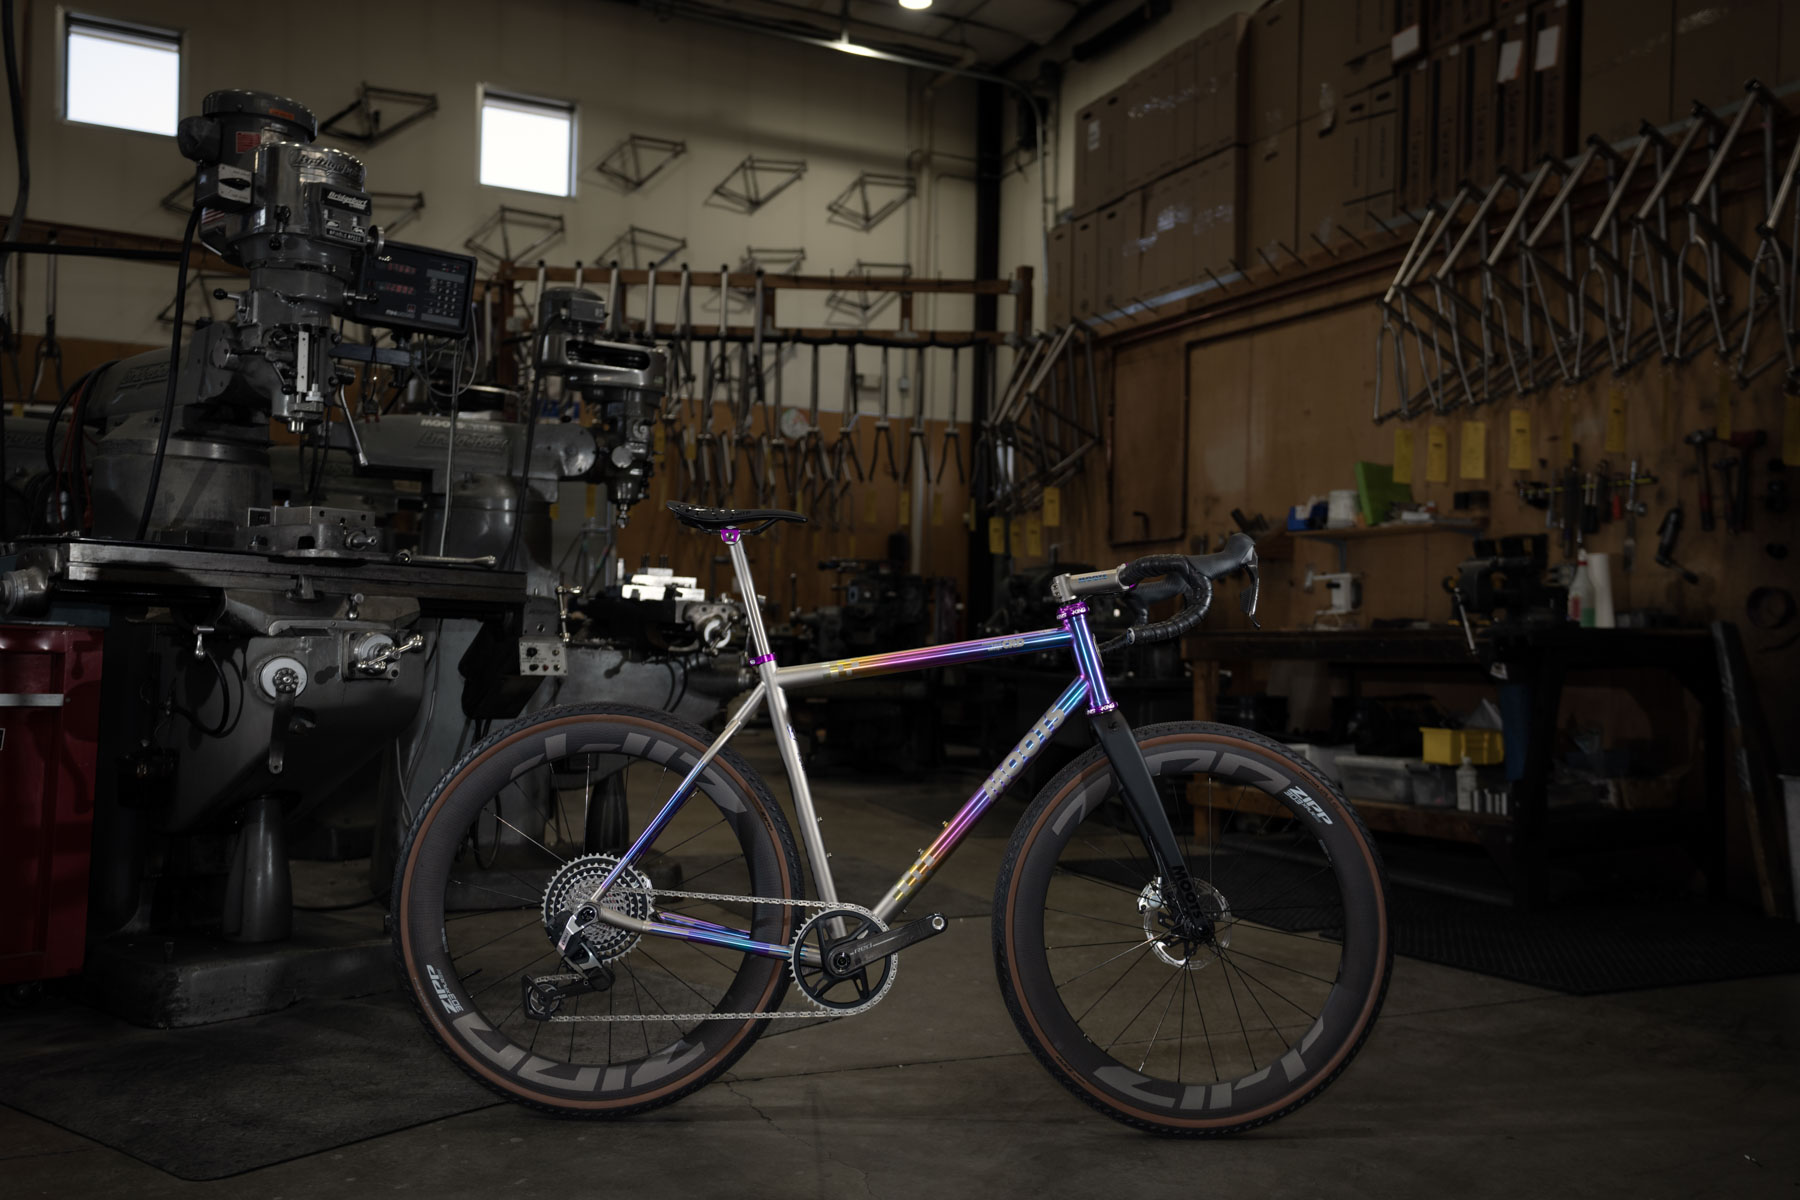
Just in case you thought the Moots Routt CRD wasn’t exclusive enough, the Steamboat, Colorado, titanium specialists have been busy working on this ultra-limited-edition version.
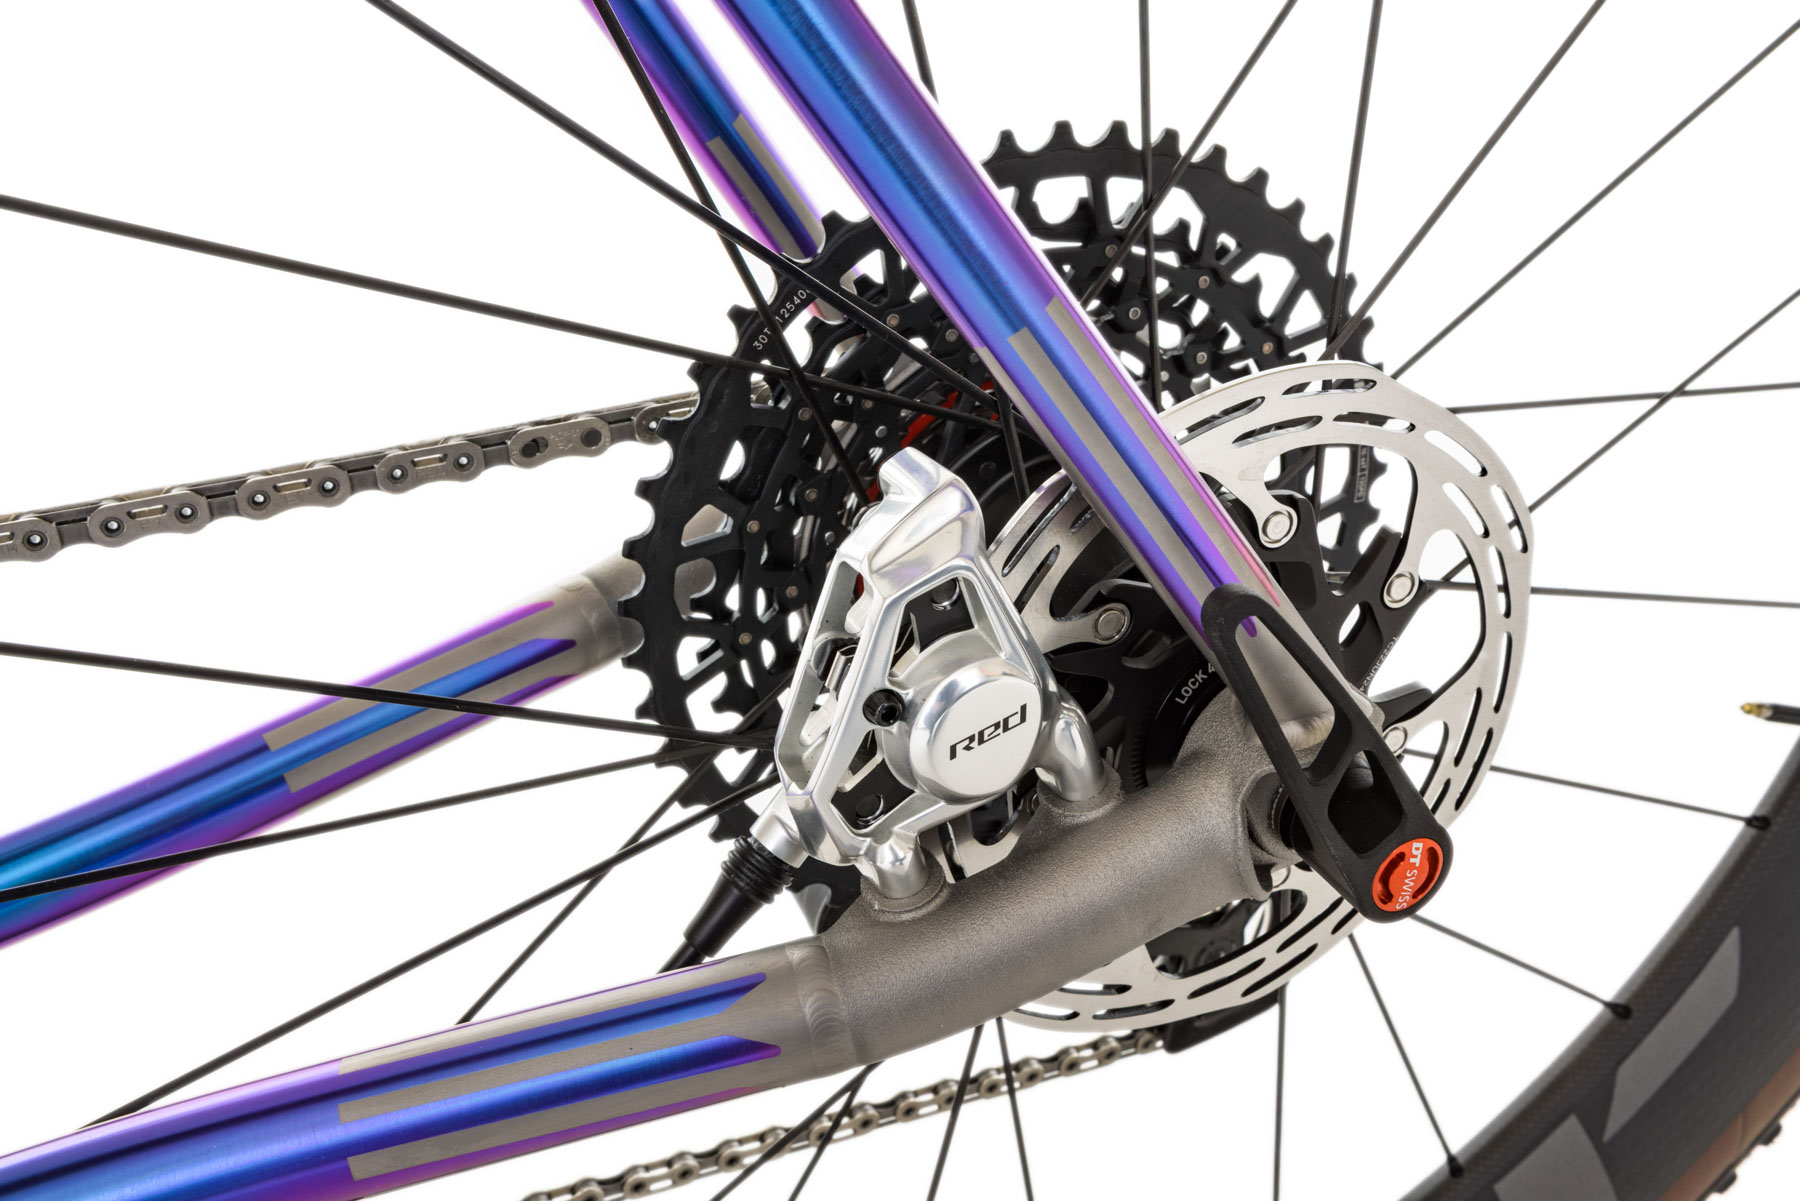
Based on the ‘standard’ Routt CRD, the limited-edition bike gets Moots’ lightweight RSL titanium tubing, along with 3D-printed Universal Derailleur Hanger dropouts, a T47 bottom bracket, an all-new integrated cockpit and Moots’ carbon gravel fork.
The California Dreamin’ Routt CRD isn’t your average gravel bike, though – it comes with another layer of exclusivity and a price tag of $15,899.
Even more exclusive
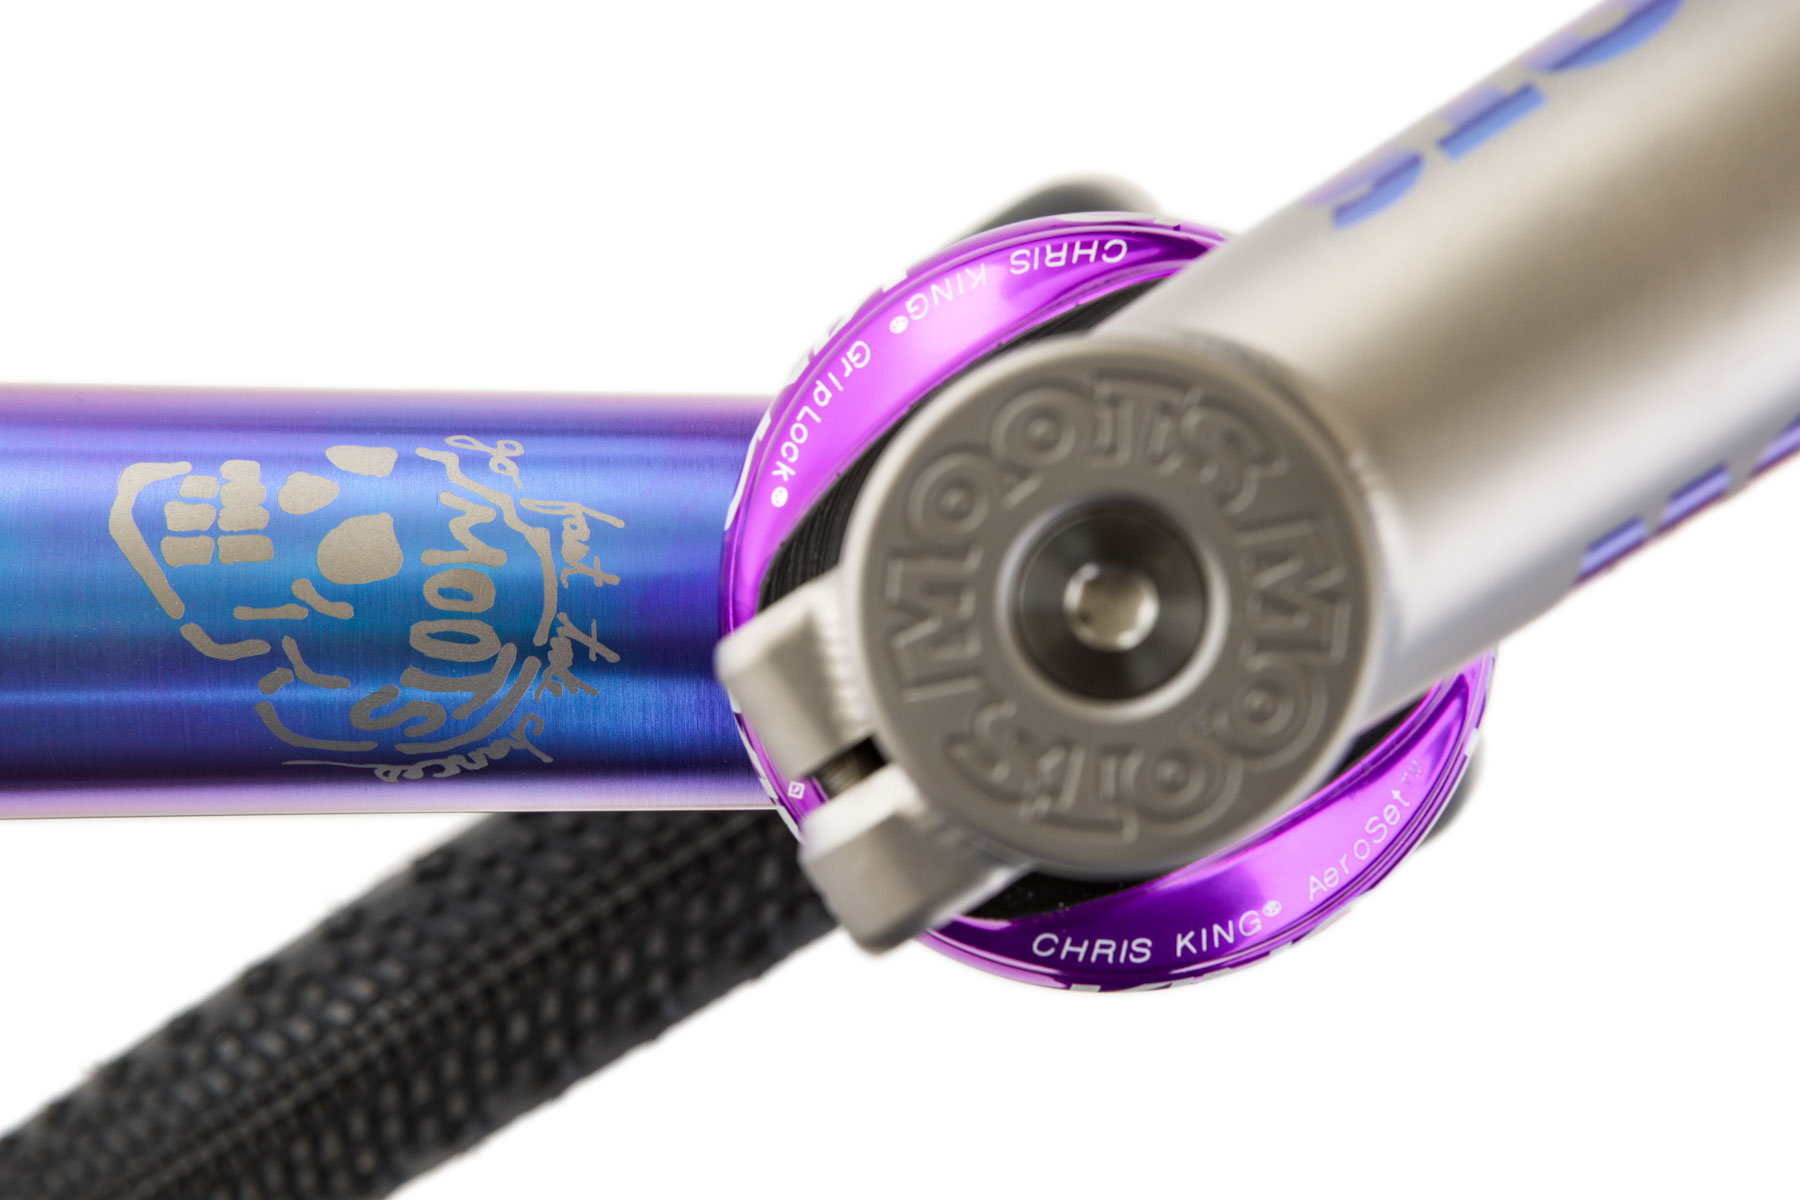
The California Dreamin’ Routt CRD comes with matching Chris King components. Moots
The California Dreamin’ Routt CRD is a collaboration with Chris Johnston of Outdoor Bros.
Every element of the California Dreamin’ finish is created by Richard Jara. Moots
The finish of the bike is inspired by Johnston’s ride along the west coast of California, from the Pacific Coast Highway to the gravel routes in the Sierra Nevada.
“I wanted a bike that could adapt seamlessly to whatever terrain I encountered,” Johnston explains. “It needed to have both capability and personality, capturing the essence of California style and performance.”
The rear dropouts are made from 3D-printed titanium. Moots
Fine-art finishing
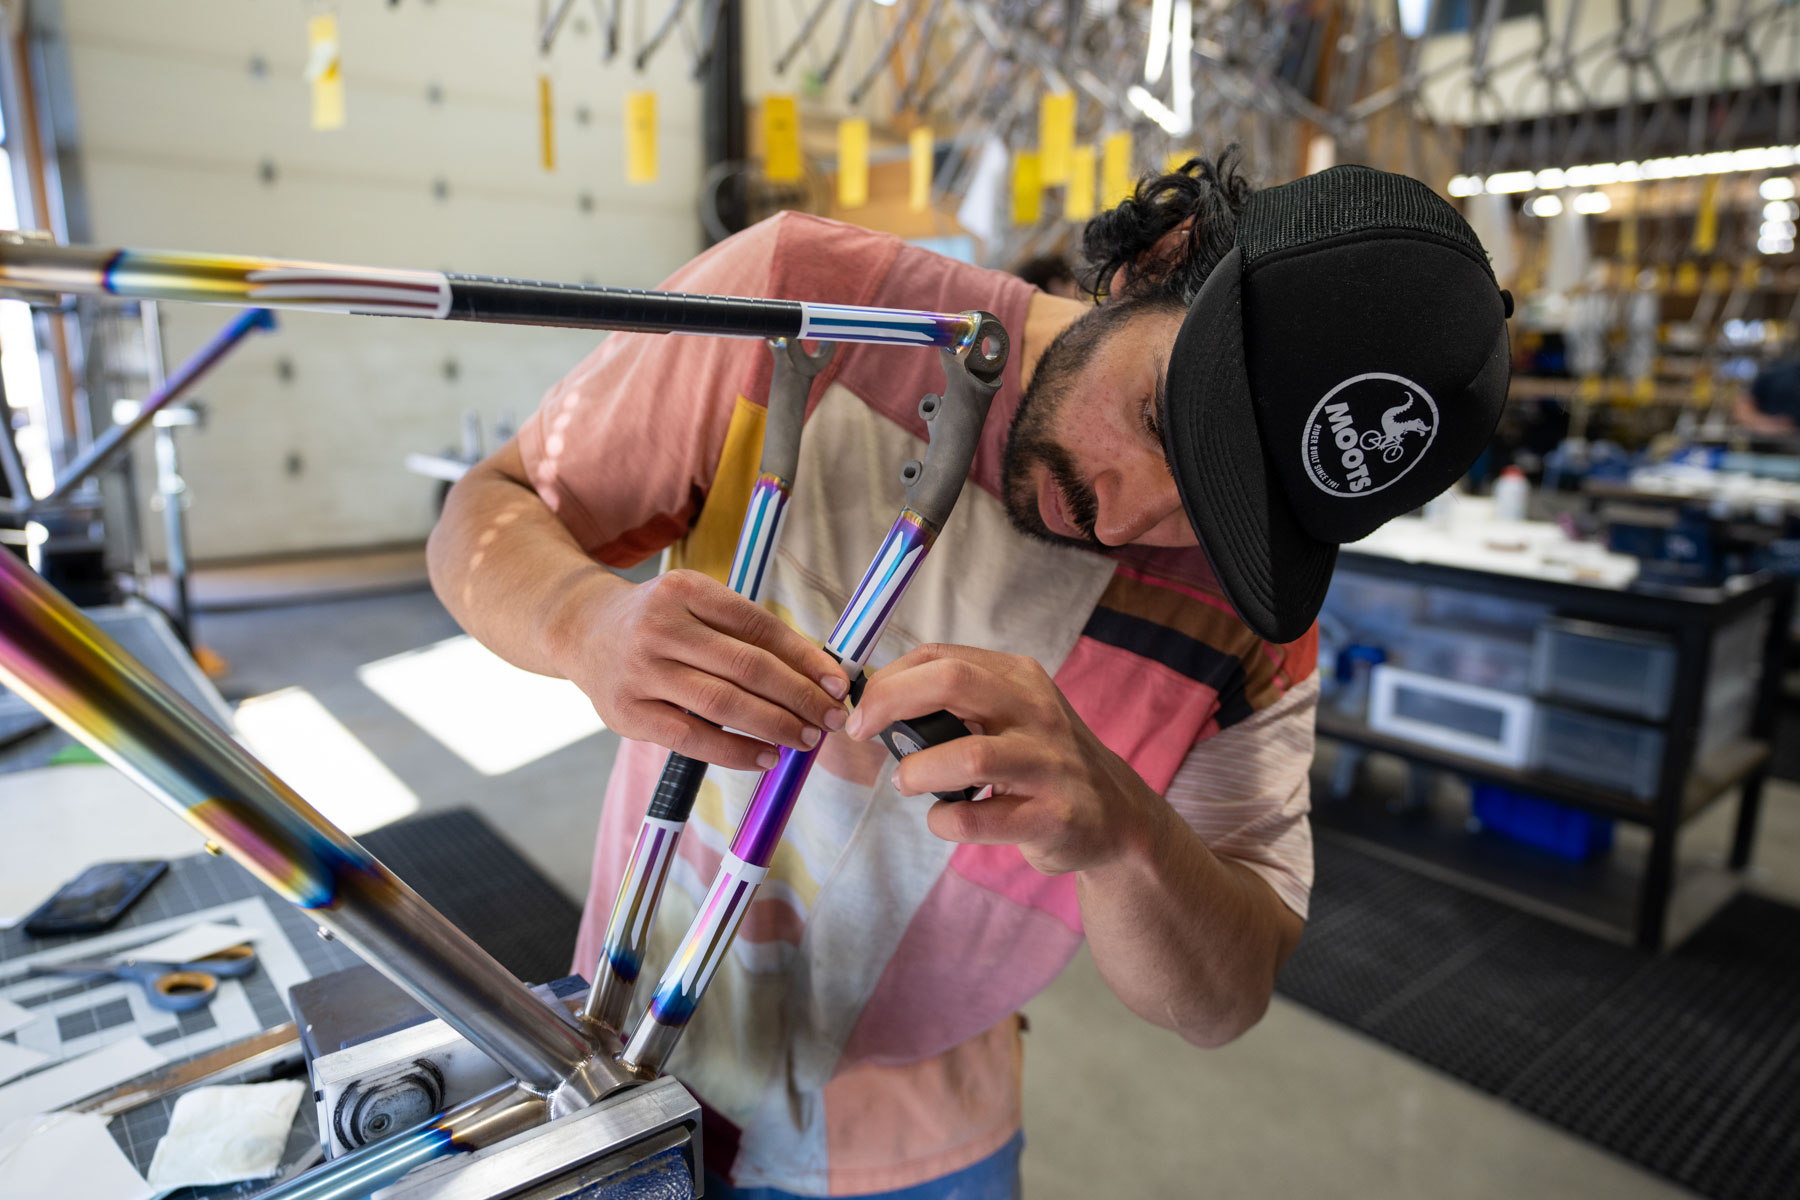
Moots’ anodising and graphics specialist Richard Jara finishes each bike meticulously. Moots
What that means is a Moots CRD with a massively labour-intensive finish. Moots told us it takes three full working days to complete the finish alone.
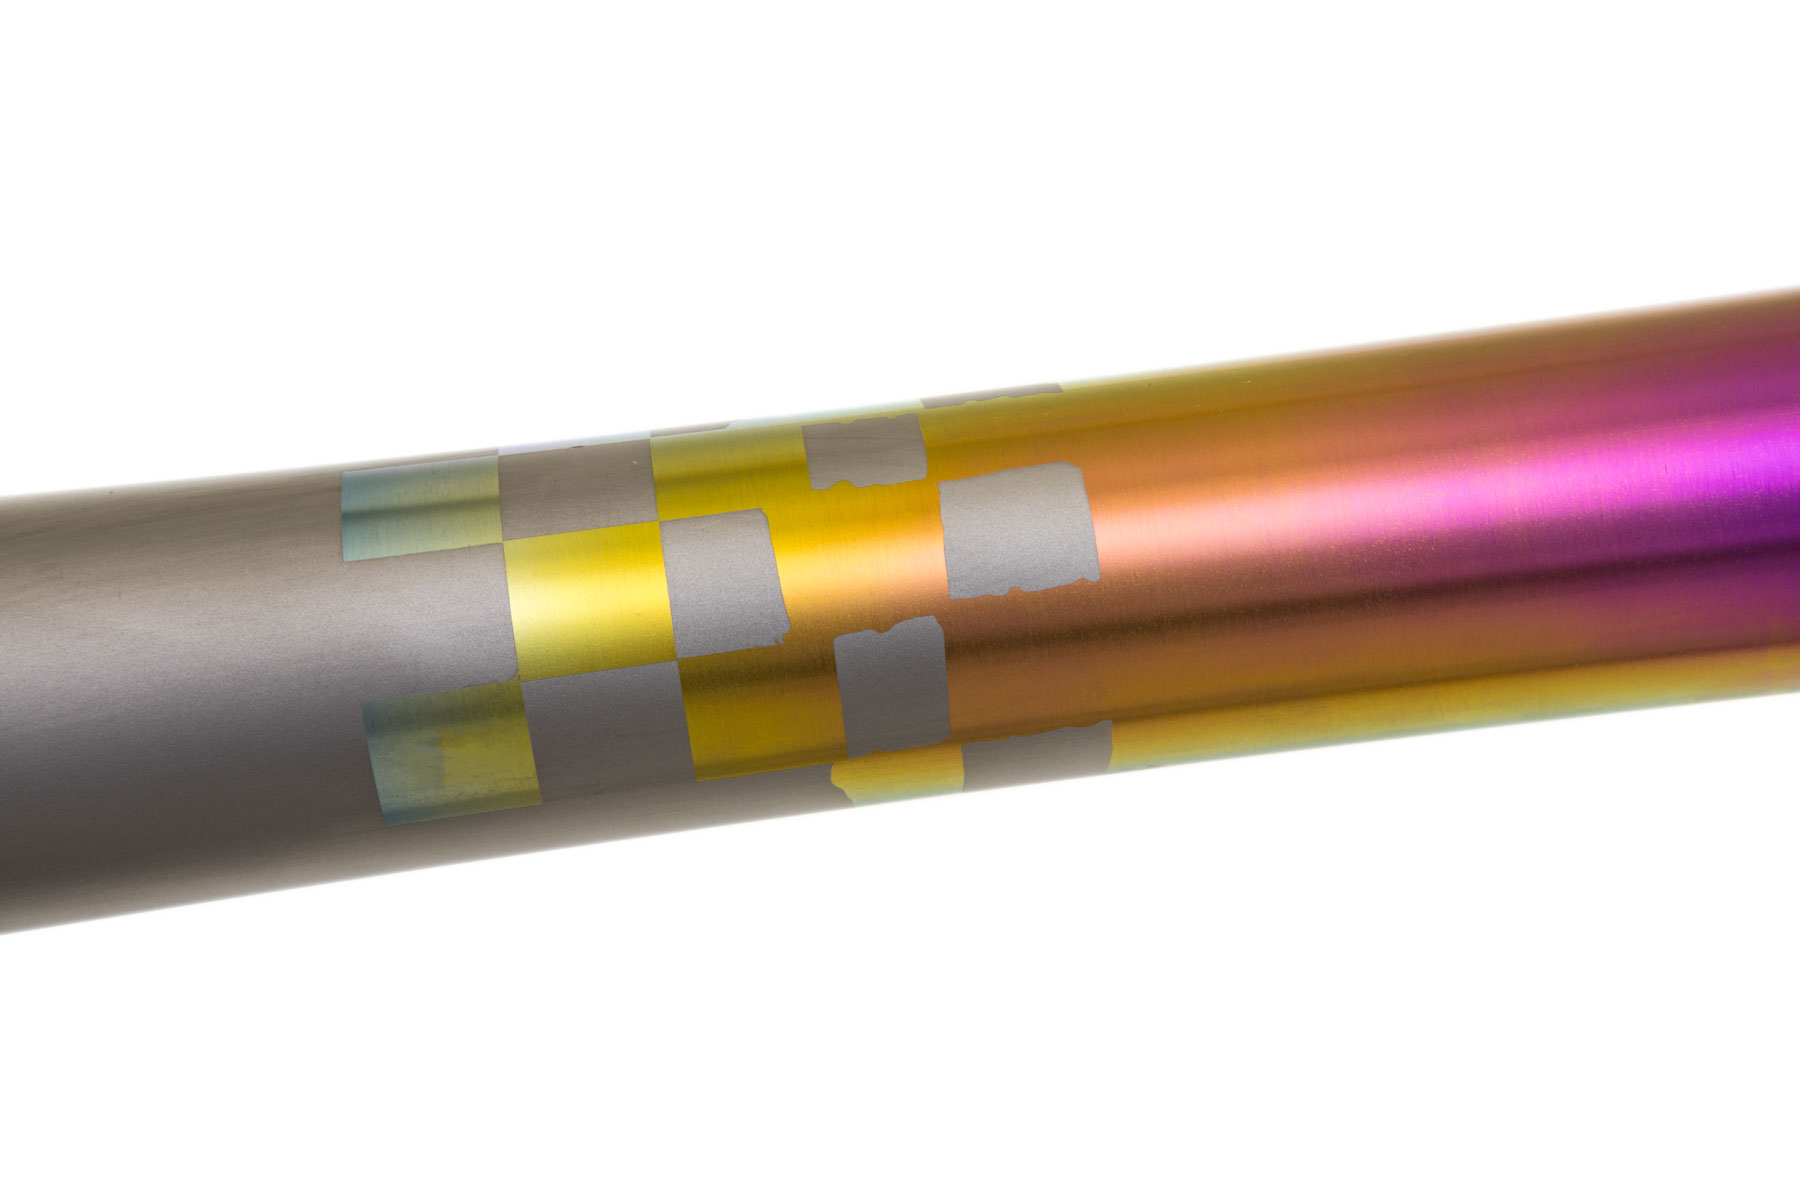
The finish involves a meticulous anodising treatment that shifts from a high-voltage blue to a vibrant pink. It is paired with hand-finished checkerboard graphics and subtle skull details.
Moots’ in-house specialist Richard Jara completes each frameset by hand, meaning no two frames from this limited run are alike.
“The anodising process is like painting with voltage, and Jara is Michelangelo,” says Johnston. “Every frame will have nuances, subtle colour shifts, and intentional imperfections that add character and depth. It’s raw, refined and thoughtfully detailed.”
The attention to detail is beyond Moots’ standard bikes. Moots
A frameset or complete bike can be ordered from Moots, but the run is limited to 25, so it won’t be around for long.
No two California Dreamin’ bikes will be identical.
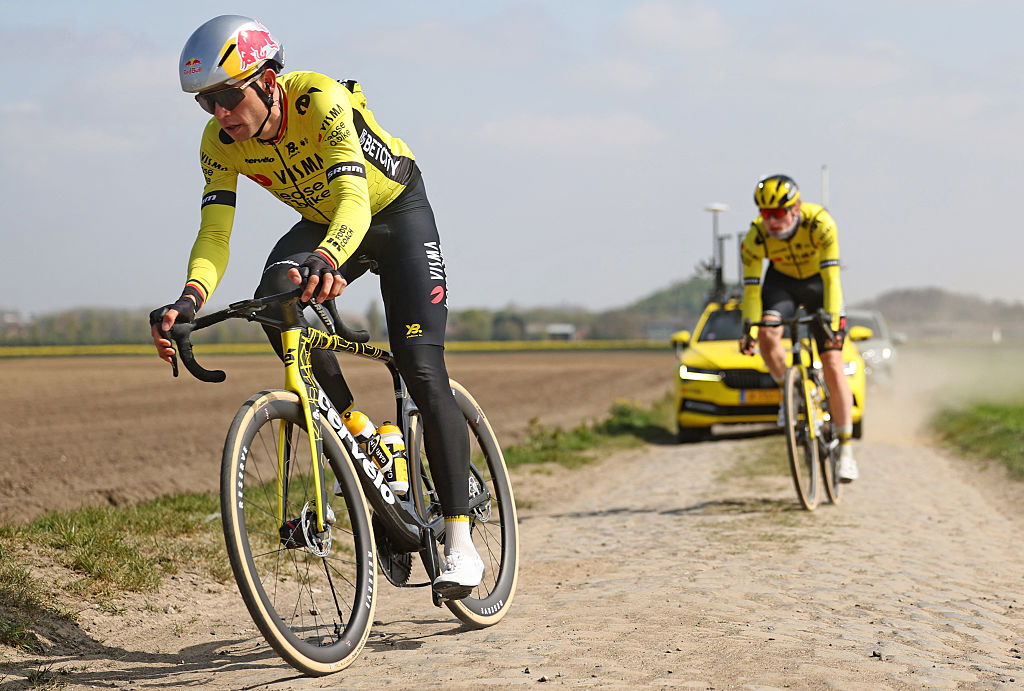
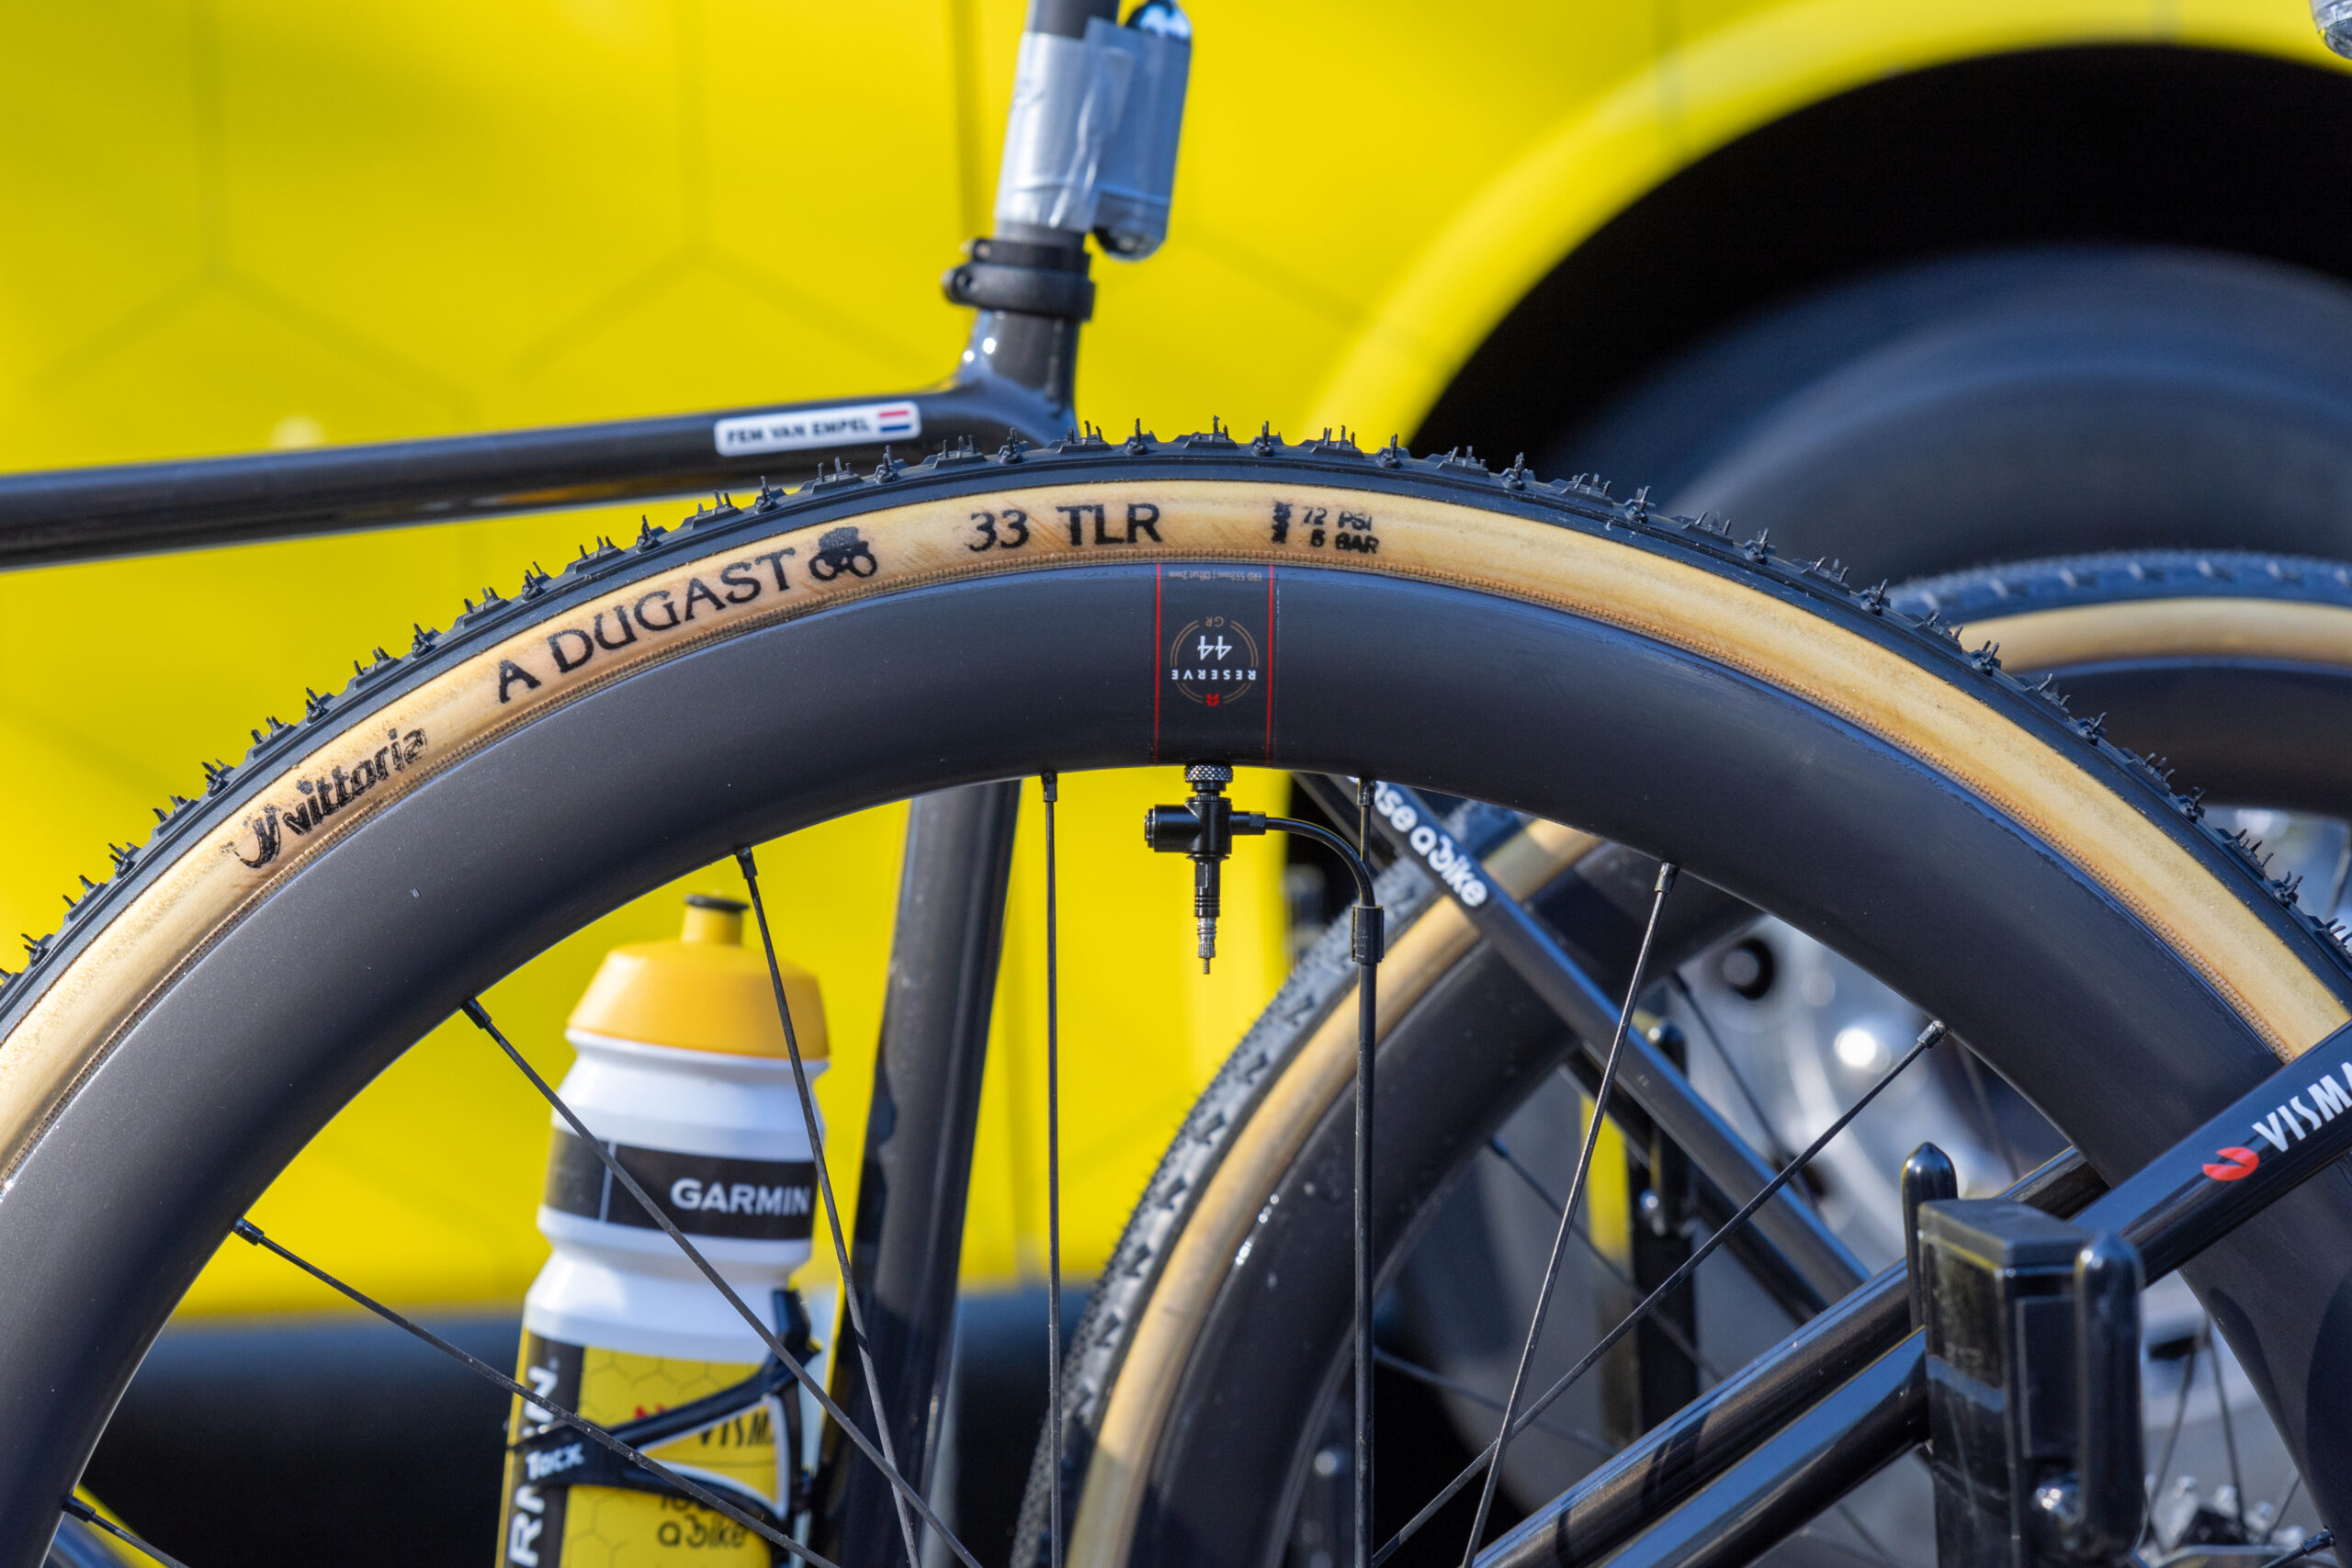
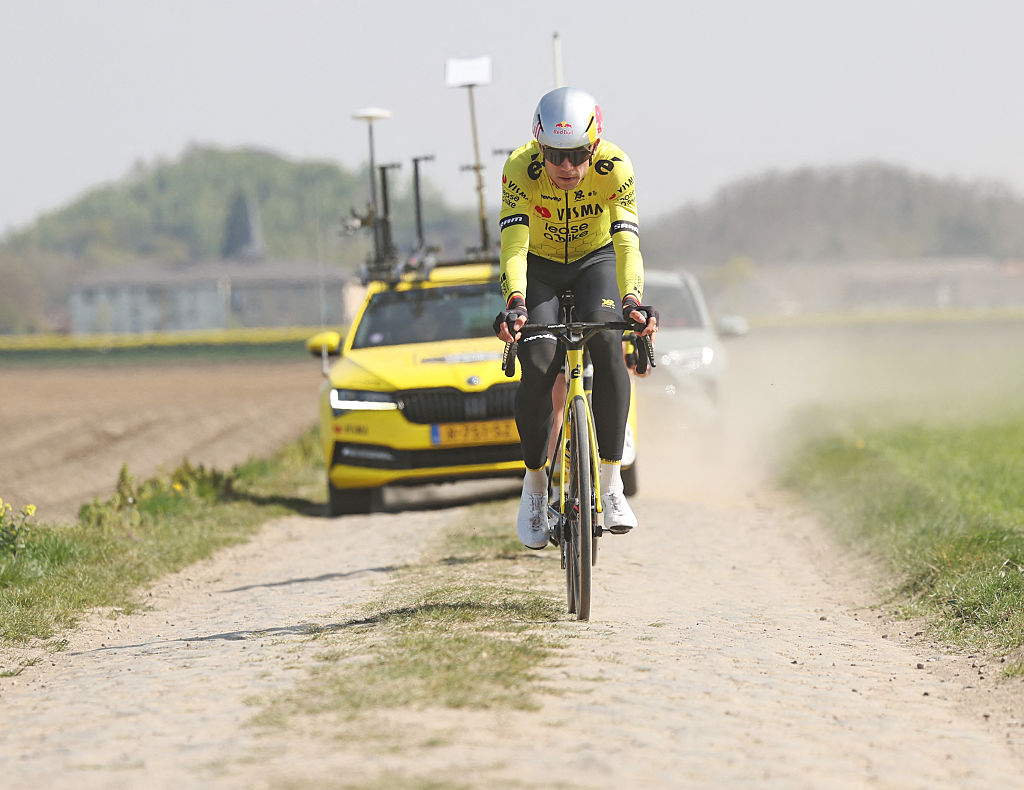
Photos of Wout van Aert’s recce ride ahead of Paris-Roubaix this weekend show the Visma–Lease a Bike leader using Gravaa’s KAPS tyre inflation system.
The Gravaa system uses a hub containing a mini-electronic inflator, which enables the rider to adjust tyre pressures on the fly via a wireless trigger mounted on the bars.
However, this isn’t Gravaa’s first sighting in the cobbled Classics, with three of Visma–Lease a Bike’s riders using the system in the 2023 edition of Paris-Roubaix.
Dylan van Baarle, Christophe Laporte, and Edoardo Affini all used the pressure adjustment system, though van Baarle – the Paris-Roubaix winner in 2022 with Ineos-Grenadiers – was involved in a crash that ended his race.
Wout van Aert used Gravaa’s on-the-fly tyre pressure adjustment system for his Paris-Roubaix recce on Thursday. Look closely and you can see the oversized hub and hose running from the valve. Getty Images
Judging by the photos of van Aert’s recce on Thursday, the Belgian is riding his favoured Cervélo S5, while the wheelset looks like Reserve’s Gravaa-compatible wheelset with a 42mm-deep front and 49mm-deep rear rim.
The Vittoria tyres look to take up nearly all of the S5’s 34mm tyre clearance. Could Wout be using the largest 32mm size available in the Corsa Pro range?
Marianne Vos used the system at the UCI Gravel World Championships. Liam Cahill / Our Media
Wout also looks to be using SRAM Red AXS in a 1x setup, and the crankset appears to be the Red Aero E1 1x option.
Van Aert has finished on the podium twice at Paris-Roubaix. Getty Images
Whether van Aert will use the Gravaa system in Sunday’s race remains to be seen.
At the very least, he’ll be gathering some very useful pre-race tyre pressure data ahead of the toughest one-day race on the professional calendar for both riders and their equipment.
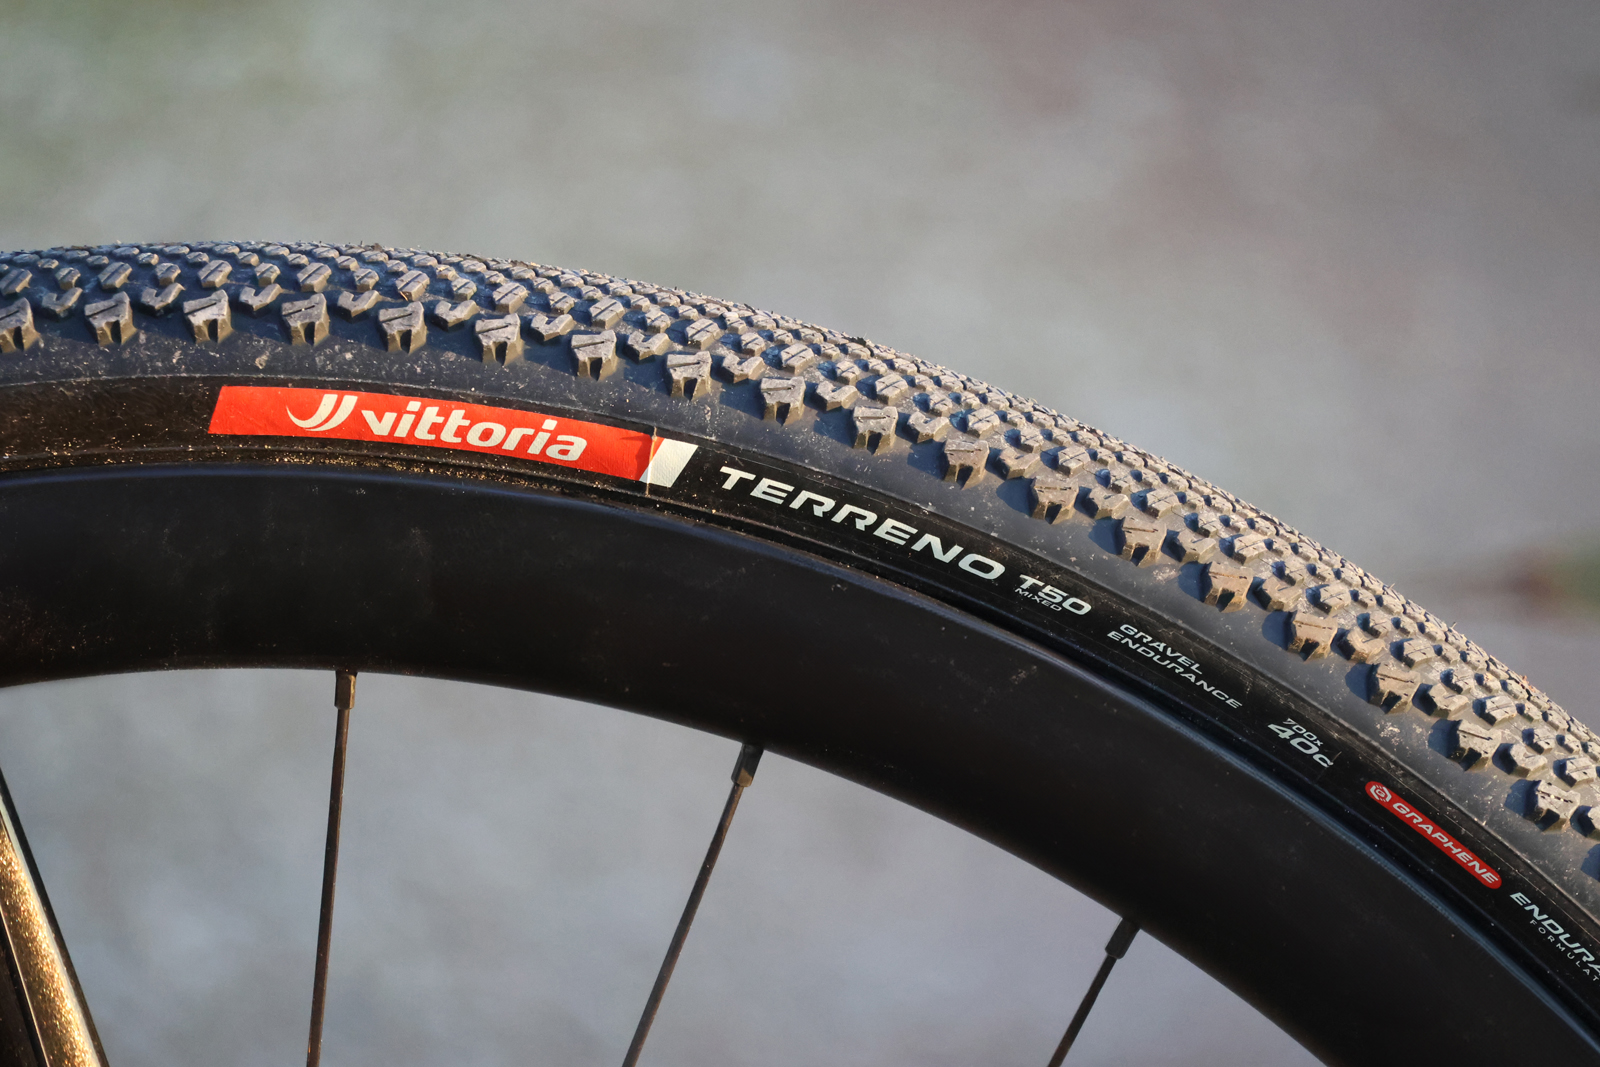
Vittoria will rename its gravel tyres from July to make choosing the ideal tyre easier. The company has also announced its mixed-terrain T50 tyre is now available in more sizes.
Previously, Vittoria’s gravel bike tyres were called the Terreno Zero, Terreno Dry, Mezcal and Terreno Wet.
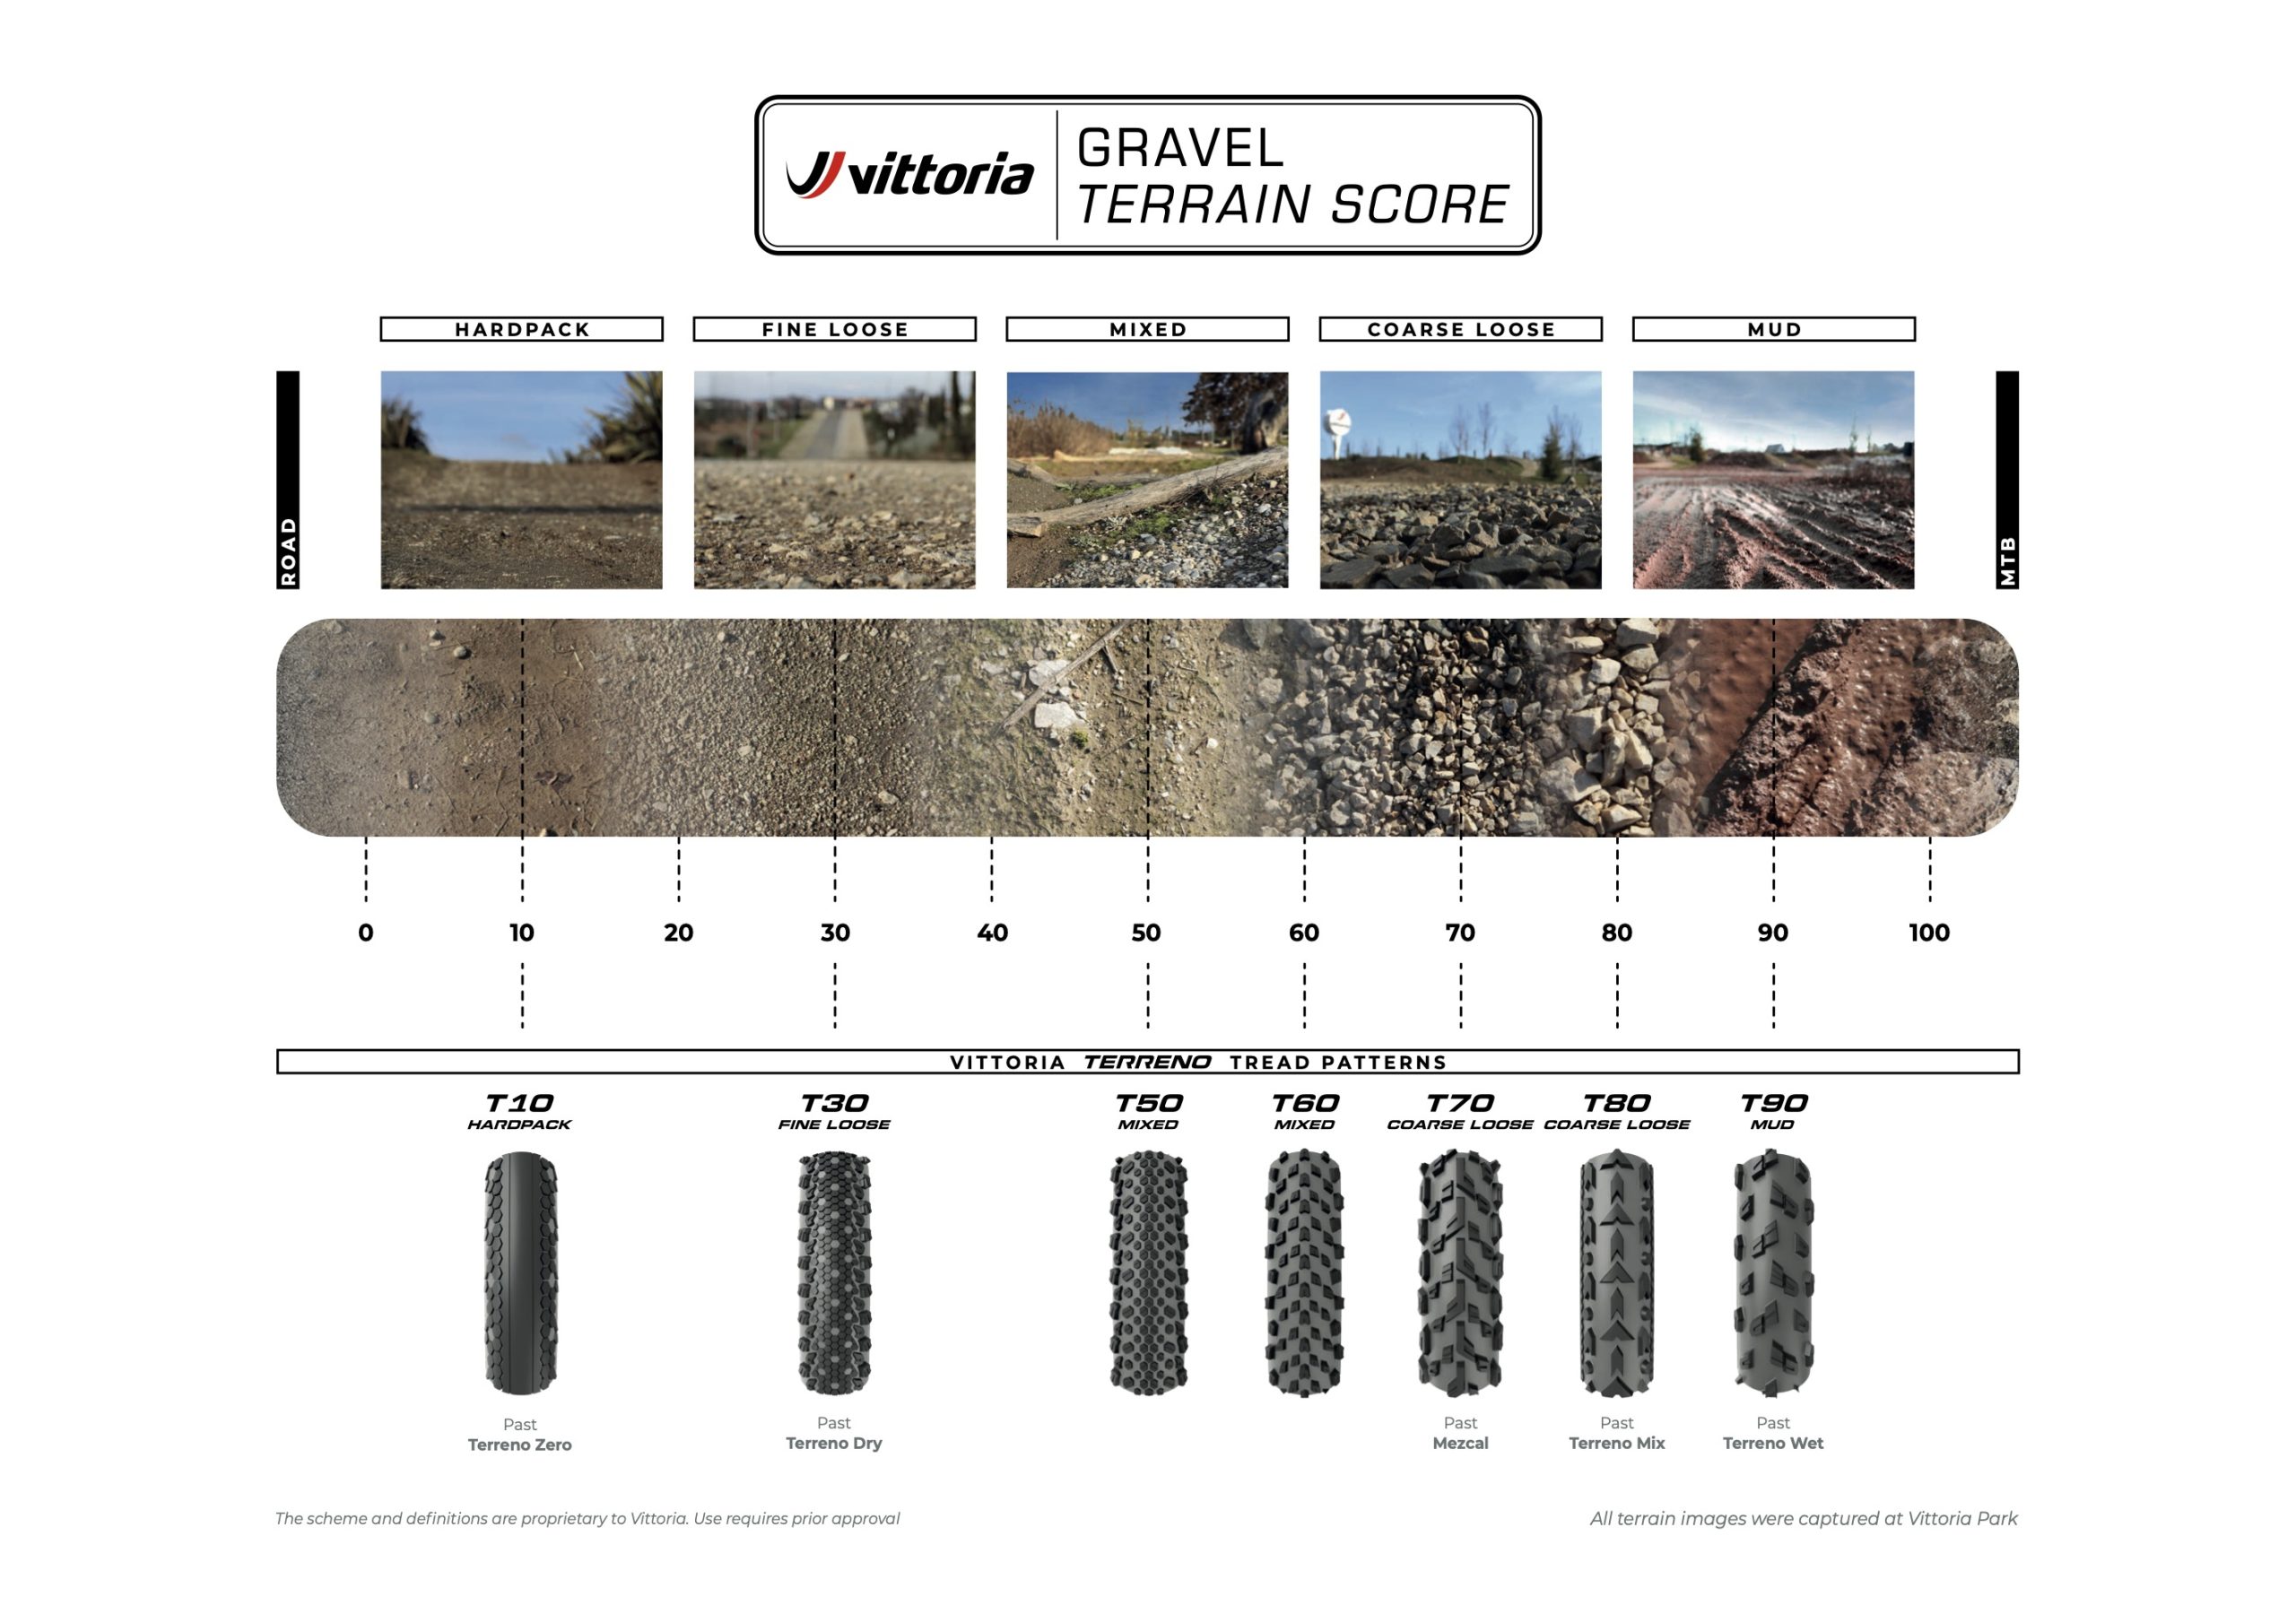
But its tyres will be named based on the brand’s new Gravel Terrain Score, or T-Score. Vittoria says the T-Score ranks surfaces on a scale from 0 (smooth like tarmac) to 100 (almost impossible to ride on a gravel bike).
The T-Score breaks gravel riding into five main terrains: hardpack; fine loose; mixed; coarse loose; and mud.
This diagram shows the T-Score scale, the surfaces and corresponding tyres. Vittoria
With the new T-Score system, all you’ll need to do to find the right gravel tyre is assess which surface you’re riding on and choose a tyre accordingly.
Stijn Vriends, chairman and CEO of Vittoria, says: “When riders follow the chart and start by identifying the type or types of terrain they intend to ride, and by simply tracing their way down, a rider can quickly identify the perfect tyre for their situation.”
The tyres in Vittoria’s endurance gravel tyre range will feature new labelling, which will correspond to the Terrain Score scale. It will adopt the new naming convention across its sport and performance gravel tyre ranges later in the year.
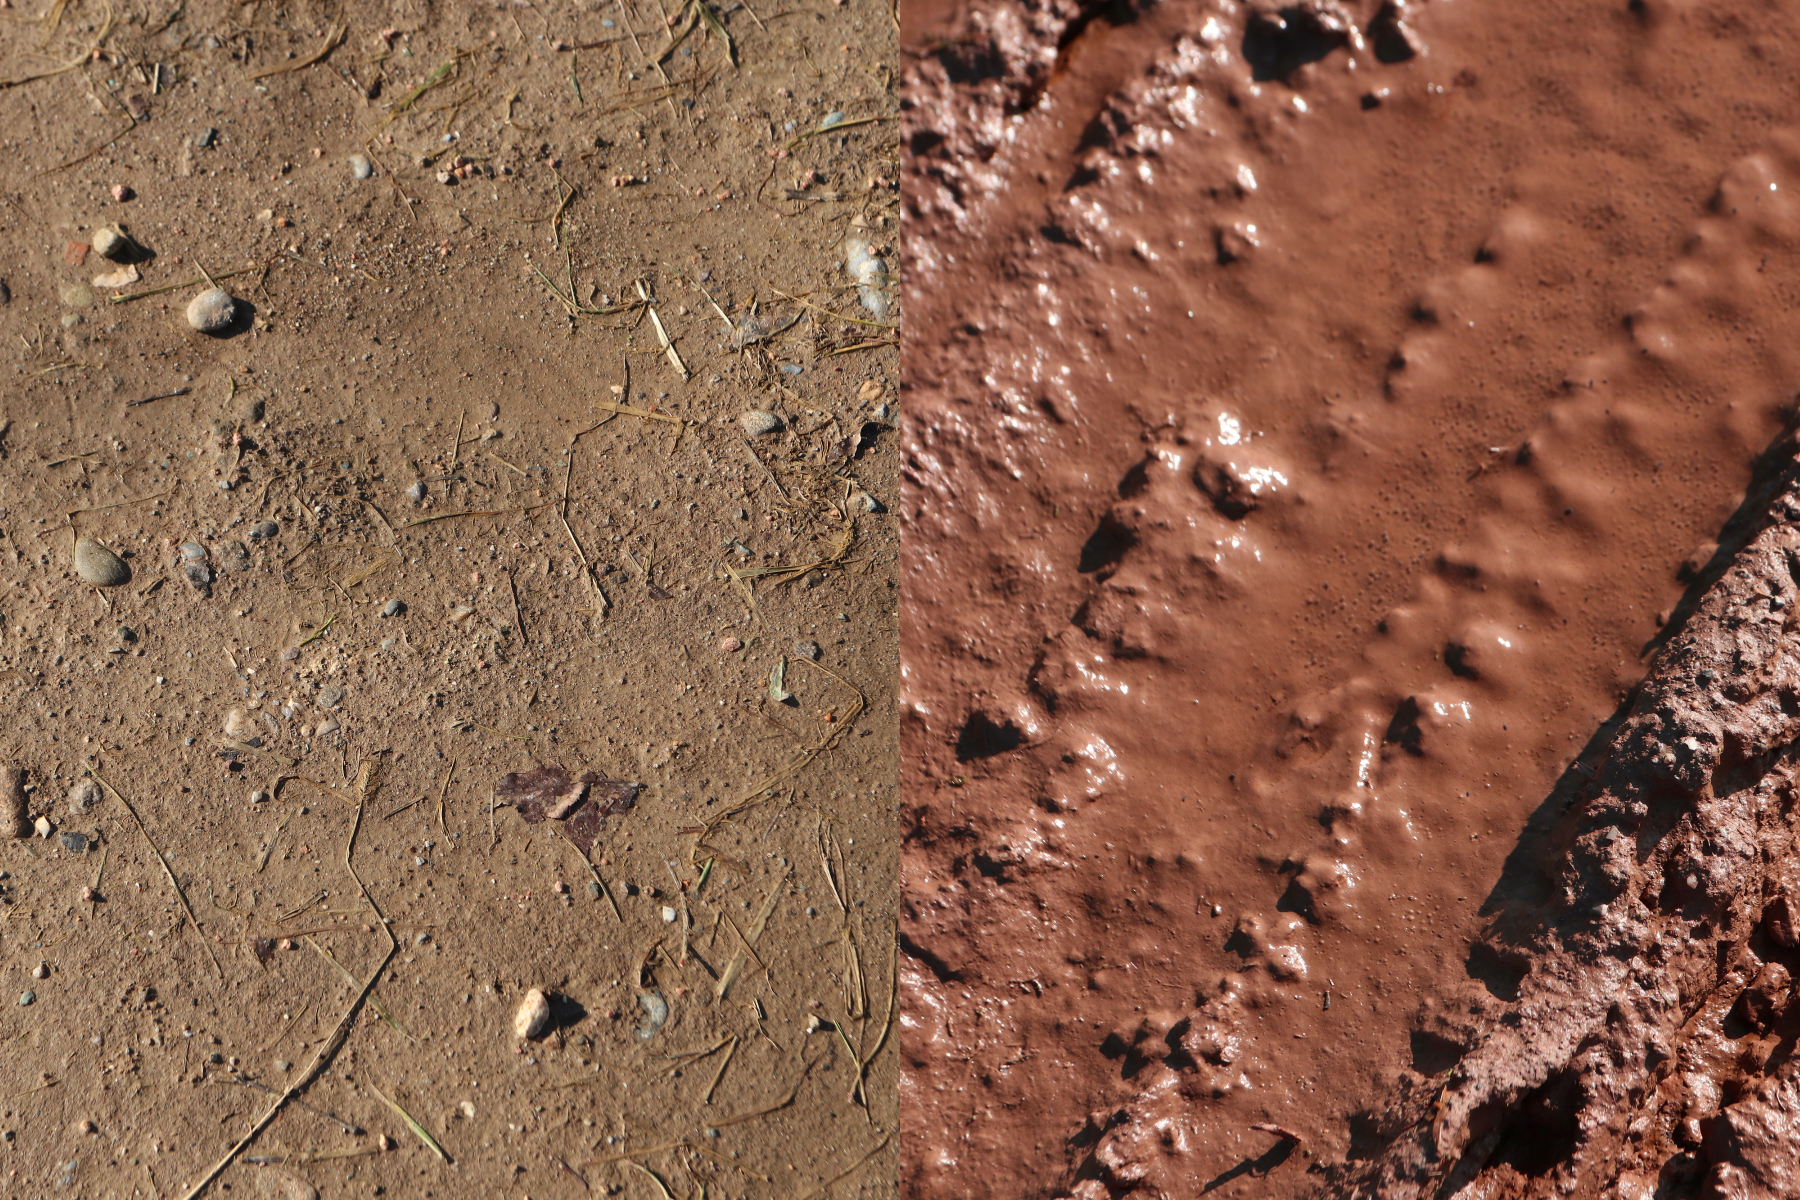
The scale covers everything from hardpack (left) to mud (right). Vittoria
For example, this means the Terreno Zero, suitable for riding on hardpack, will now be called the T10.
At the opposite end of the spectrum, the Terreno Wet, suitable for riding in mud, will be called the T90.
“In all the choices we make, we always strive to put ourselves in the cyclist’s perspective, and this Gravel Terrain Score is precisely an effort to simplify every rider’s decision, as each of them knows what bike they own and what type of terrain they will ride on the most,” says Vanessa ten Hoff, Vittoria’s chief marketing and innovation officer.
Some of Vittoria’s previous gravel tyre names highlighted whether they were suitable for dry or wet riding. But ten Hoff says this was “sort of misleading” because the dry tyres also work well in the wet. “It’s more important to focus on the terrain,” she says.
Vittoria’s new gravel tyre names at a glance
New tyre name
Ideal surface
Previous name
T10
Hardpack
Terreno Zero
T30
Fine loose
Terreno Dry
T50
Mixed
N/A
T70
Coarse loose
Mezcal
T80
Coarse loose
Terreno Mix
T90
Mud
Terreno Wet
A confusing golden age?
Vittoria thinks choosing a gravel tyre should be a simpler process. Vittoria
In a white paper, Vittoria explains that we are in a “golden age” of gravel riding. There is an evolution in the bikes and equipment people use as well as riders “enjoying a fresh perspective”.
But the momentum in innovation has led to confusion over equipment and application. This is an issue BikeRadar’s senior technical editor Warren Rossiter addressed, arguing that we need to change the way we categorise gravel bikes.
Vittoria says this issue is particularly true with tyres, and that it should be simpler to pick the right ones.
Instead, consumers are faced with complex naming conventions and product categories.
Stating you’re into gravel riding is the ‘beginning of a battle’. Vittoria
In the white paper, Vittoria says the category of ‘gravel tyres’ does little to guide a consumer towards the correct product for their riding, be it gravel racing or bikepacking, for example.
It says a consumer stating they are interested in gravel riding to a shop assistant is the ‘beginning of a battle’.
“[T]hey must pour [sic] through seemingly endless tread designs, widths, casing and worst of all model names are devoid of any clear contextual application,” it says.
Vittoria says the T-Score will bring some clarity to these interactions: “When that same gravel consumer enters the shop, the dealer can ask, ‘what percentage of the time do you ride off-road?’, and the consumer answer will automatically link their needs to the correct product.”
Vittoria adds that if a consumer has tried one of the products before but wants more off-road capability, knowing which tyre to choose becomes easier. Likewise, if they want a faster tread, they can choose a tyre with a lower T-Score.
Vittoria T50 gravel tyre
Vittoria has also launched the new T50 gravel tyre. Vittoria
The T50 gravel tyre has no previous equivalent in Vittoria’s range. The tyre is the first from Vittoria to follow the new T-Score naming convention and it’s now available in three sizes.
Designed for mixed terrains, Vittoria says the T50 ensures you can find the “perfect” tyre for your riding in its new categorisation.
Vittoria says the tyre provides “unparalleled speed and capability across various terrains, from hardpack to mixed conditions”.
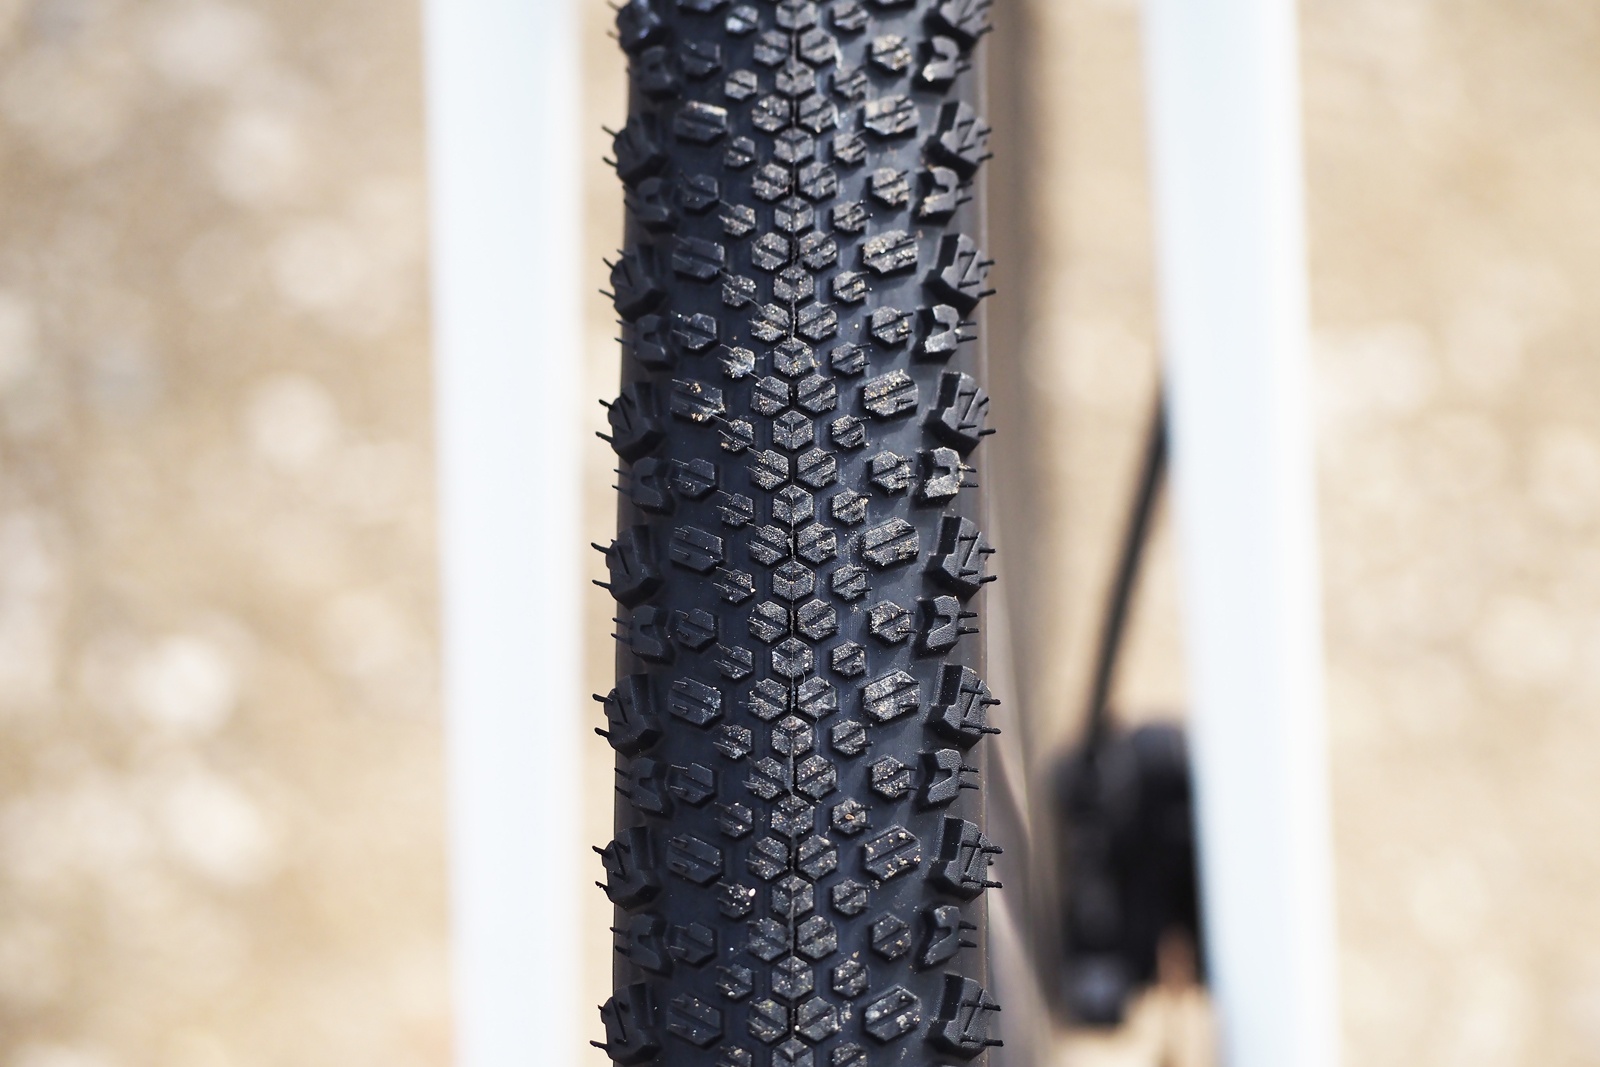
Ten Hoff explains that the new V-shaped tread plays an integral role in this performance.
The tread is said to aid speed and braking. Vittoria
“If you’re going in the riding direction, when the V shape comes down it has the smallest area that grips. But if you’re breaking or cornering, this is where the bigger part of the area is gripping,” she says.
The new directional siping texture on the tyre aids the T50’s performance across the surface.
Sitting wide of the V, there are two lines of lugs on the tread. Ten Hoff says these lugs provide “progressive feedback” when you are leaning and that the lugs on the edge of the tyre are different sizes to help free debris.
“This is what makes the T50 a really, really fast tyre,” she says, adding that the T50 doesn’t feel like a mixed-terrain tyre.
Elsewhere, the tyre uses Vittoria’s endurance casing for adaptability and strength. It features reinforced nylon sidewalls for puncture resistance and stability. The tyre also features an anti-puncture belt.
The T50 uses Vittoria’s Endurance Formulation tyre compound with graphene, making it suitable for long-distance gravel riding.
The tyre will be available in three sizes, from 40m to 50mm, costing €58.95.
It will also be available with black or brown sidewalls, which will soon be available for all Vittoria’s gravel tyres.
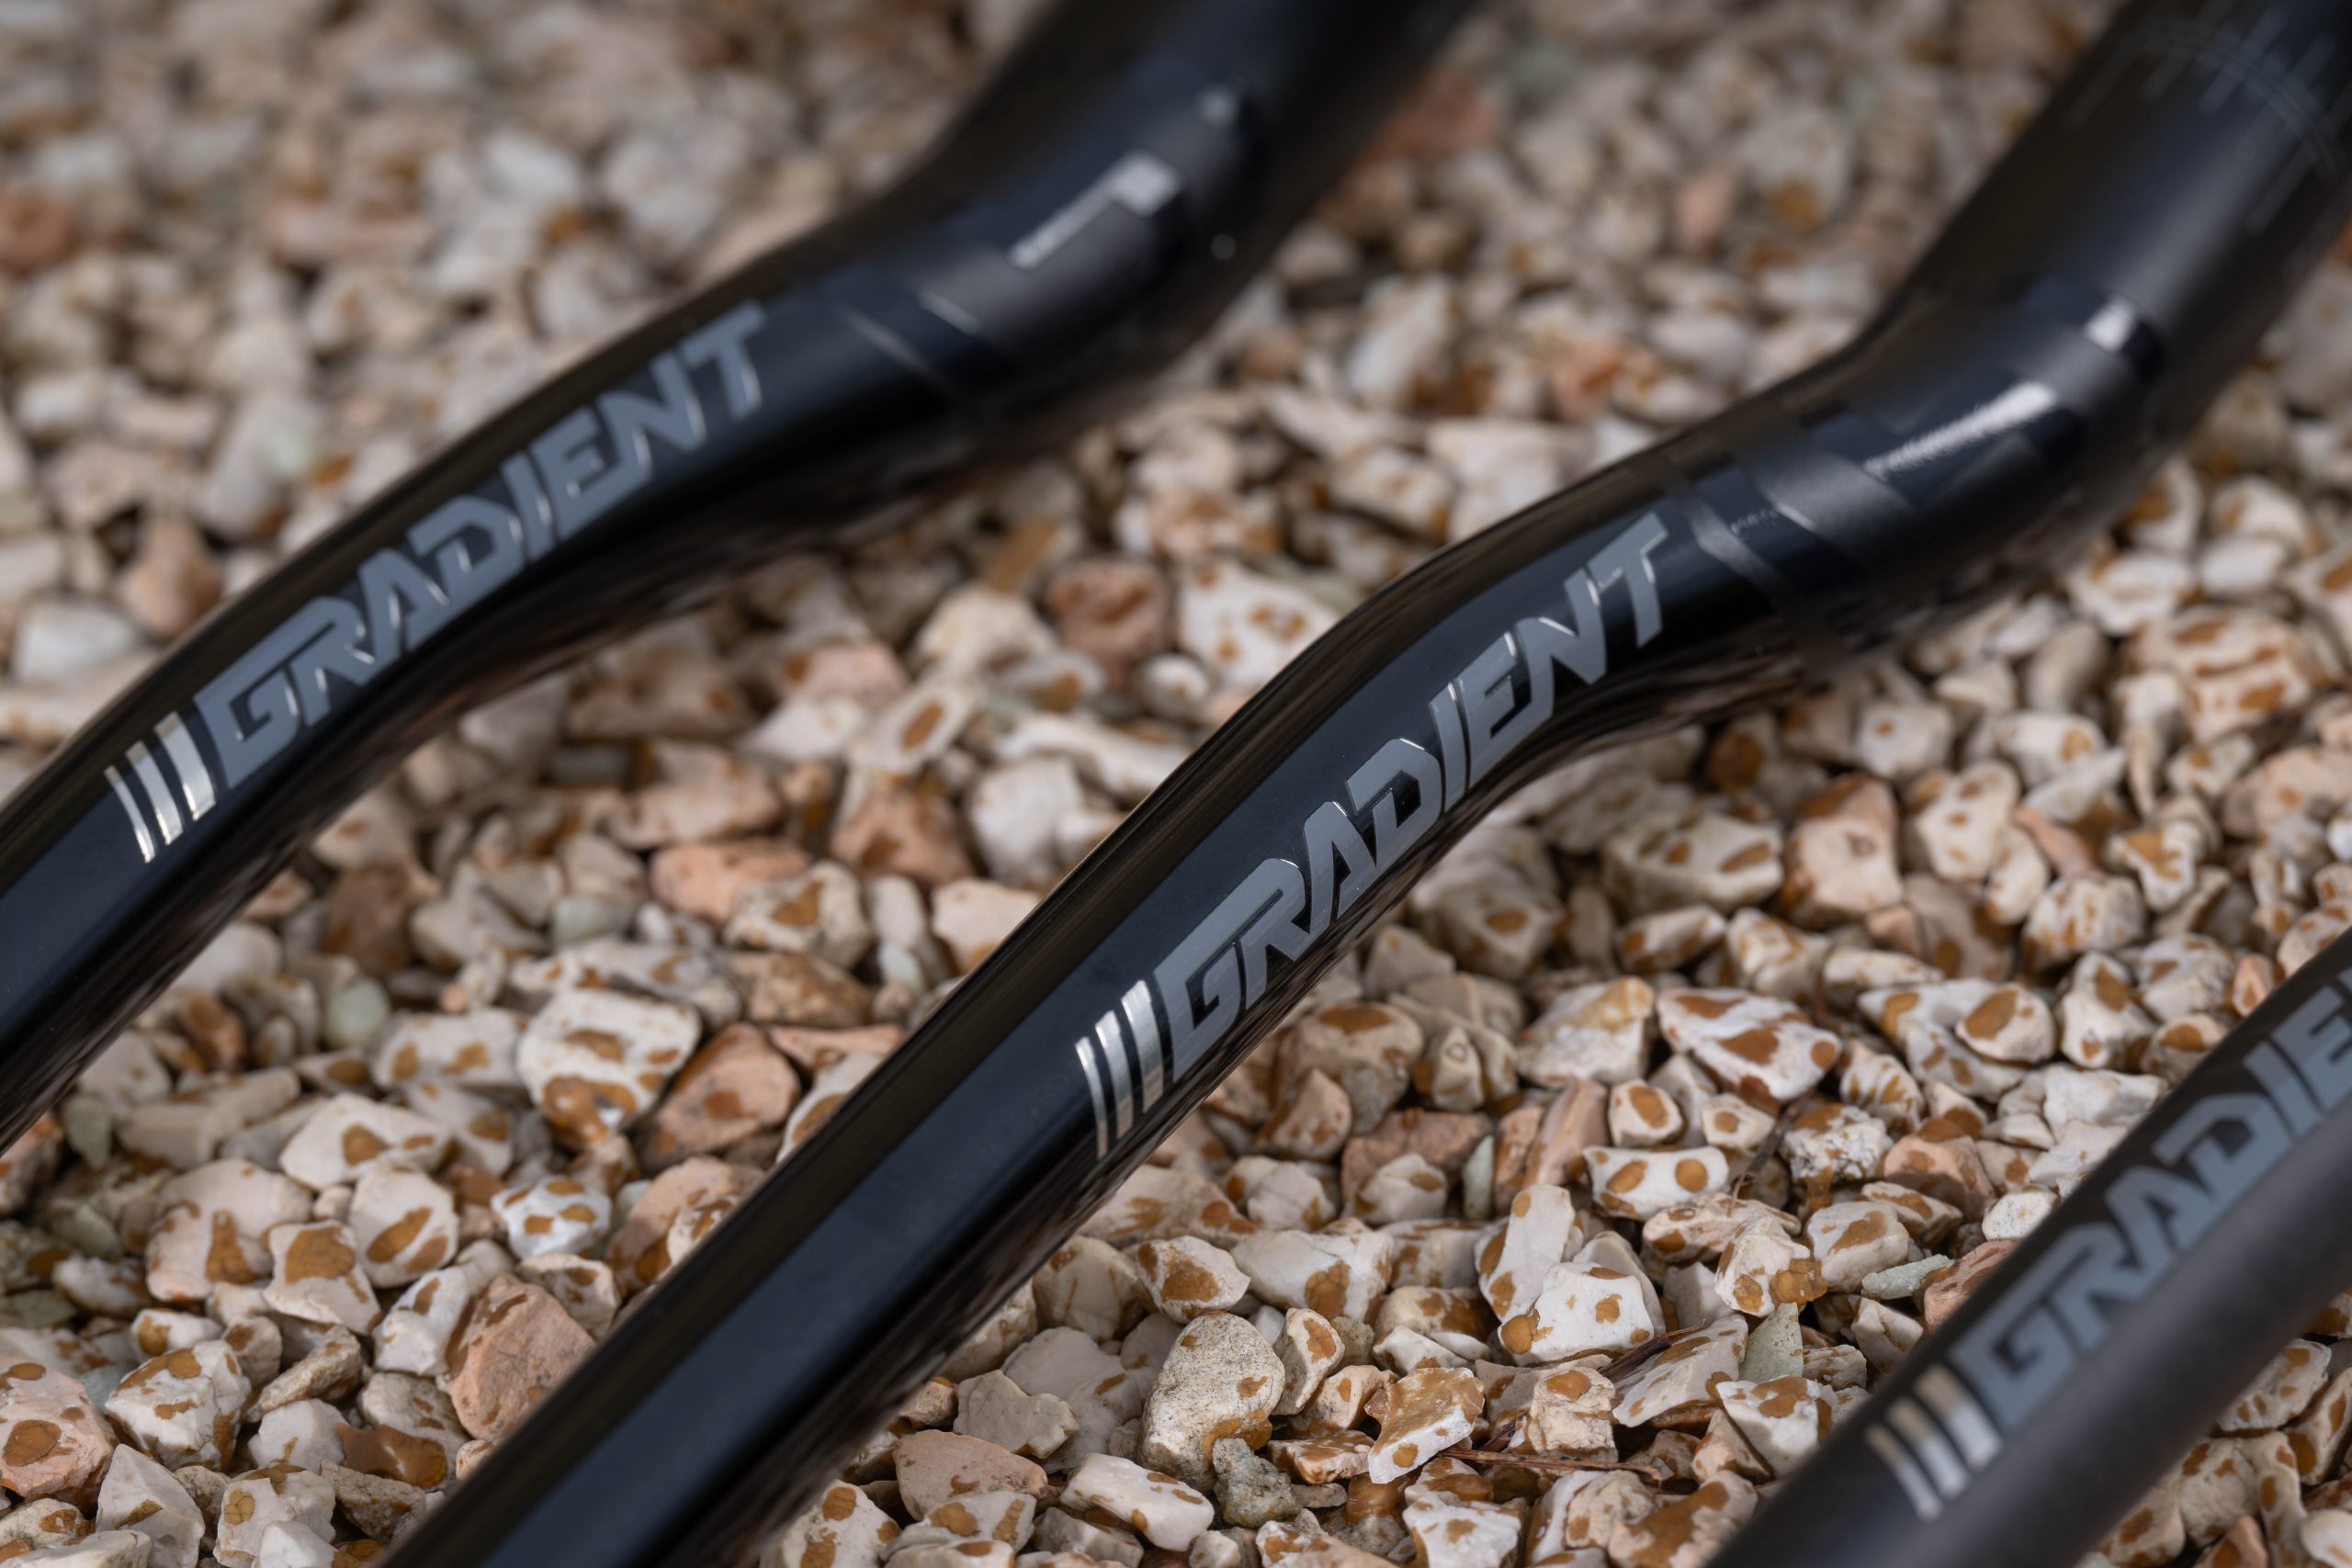
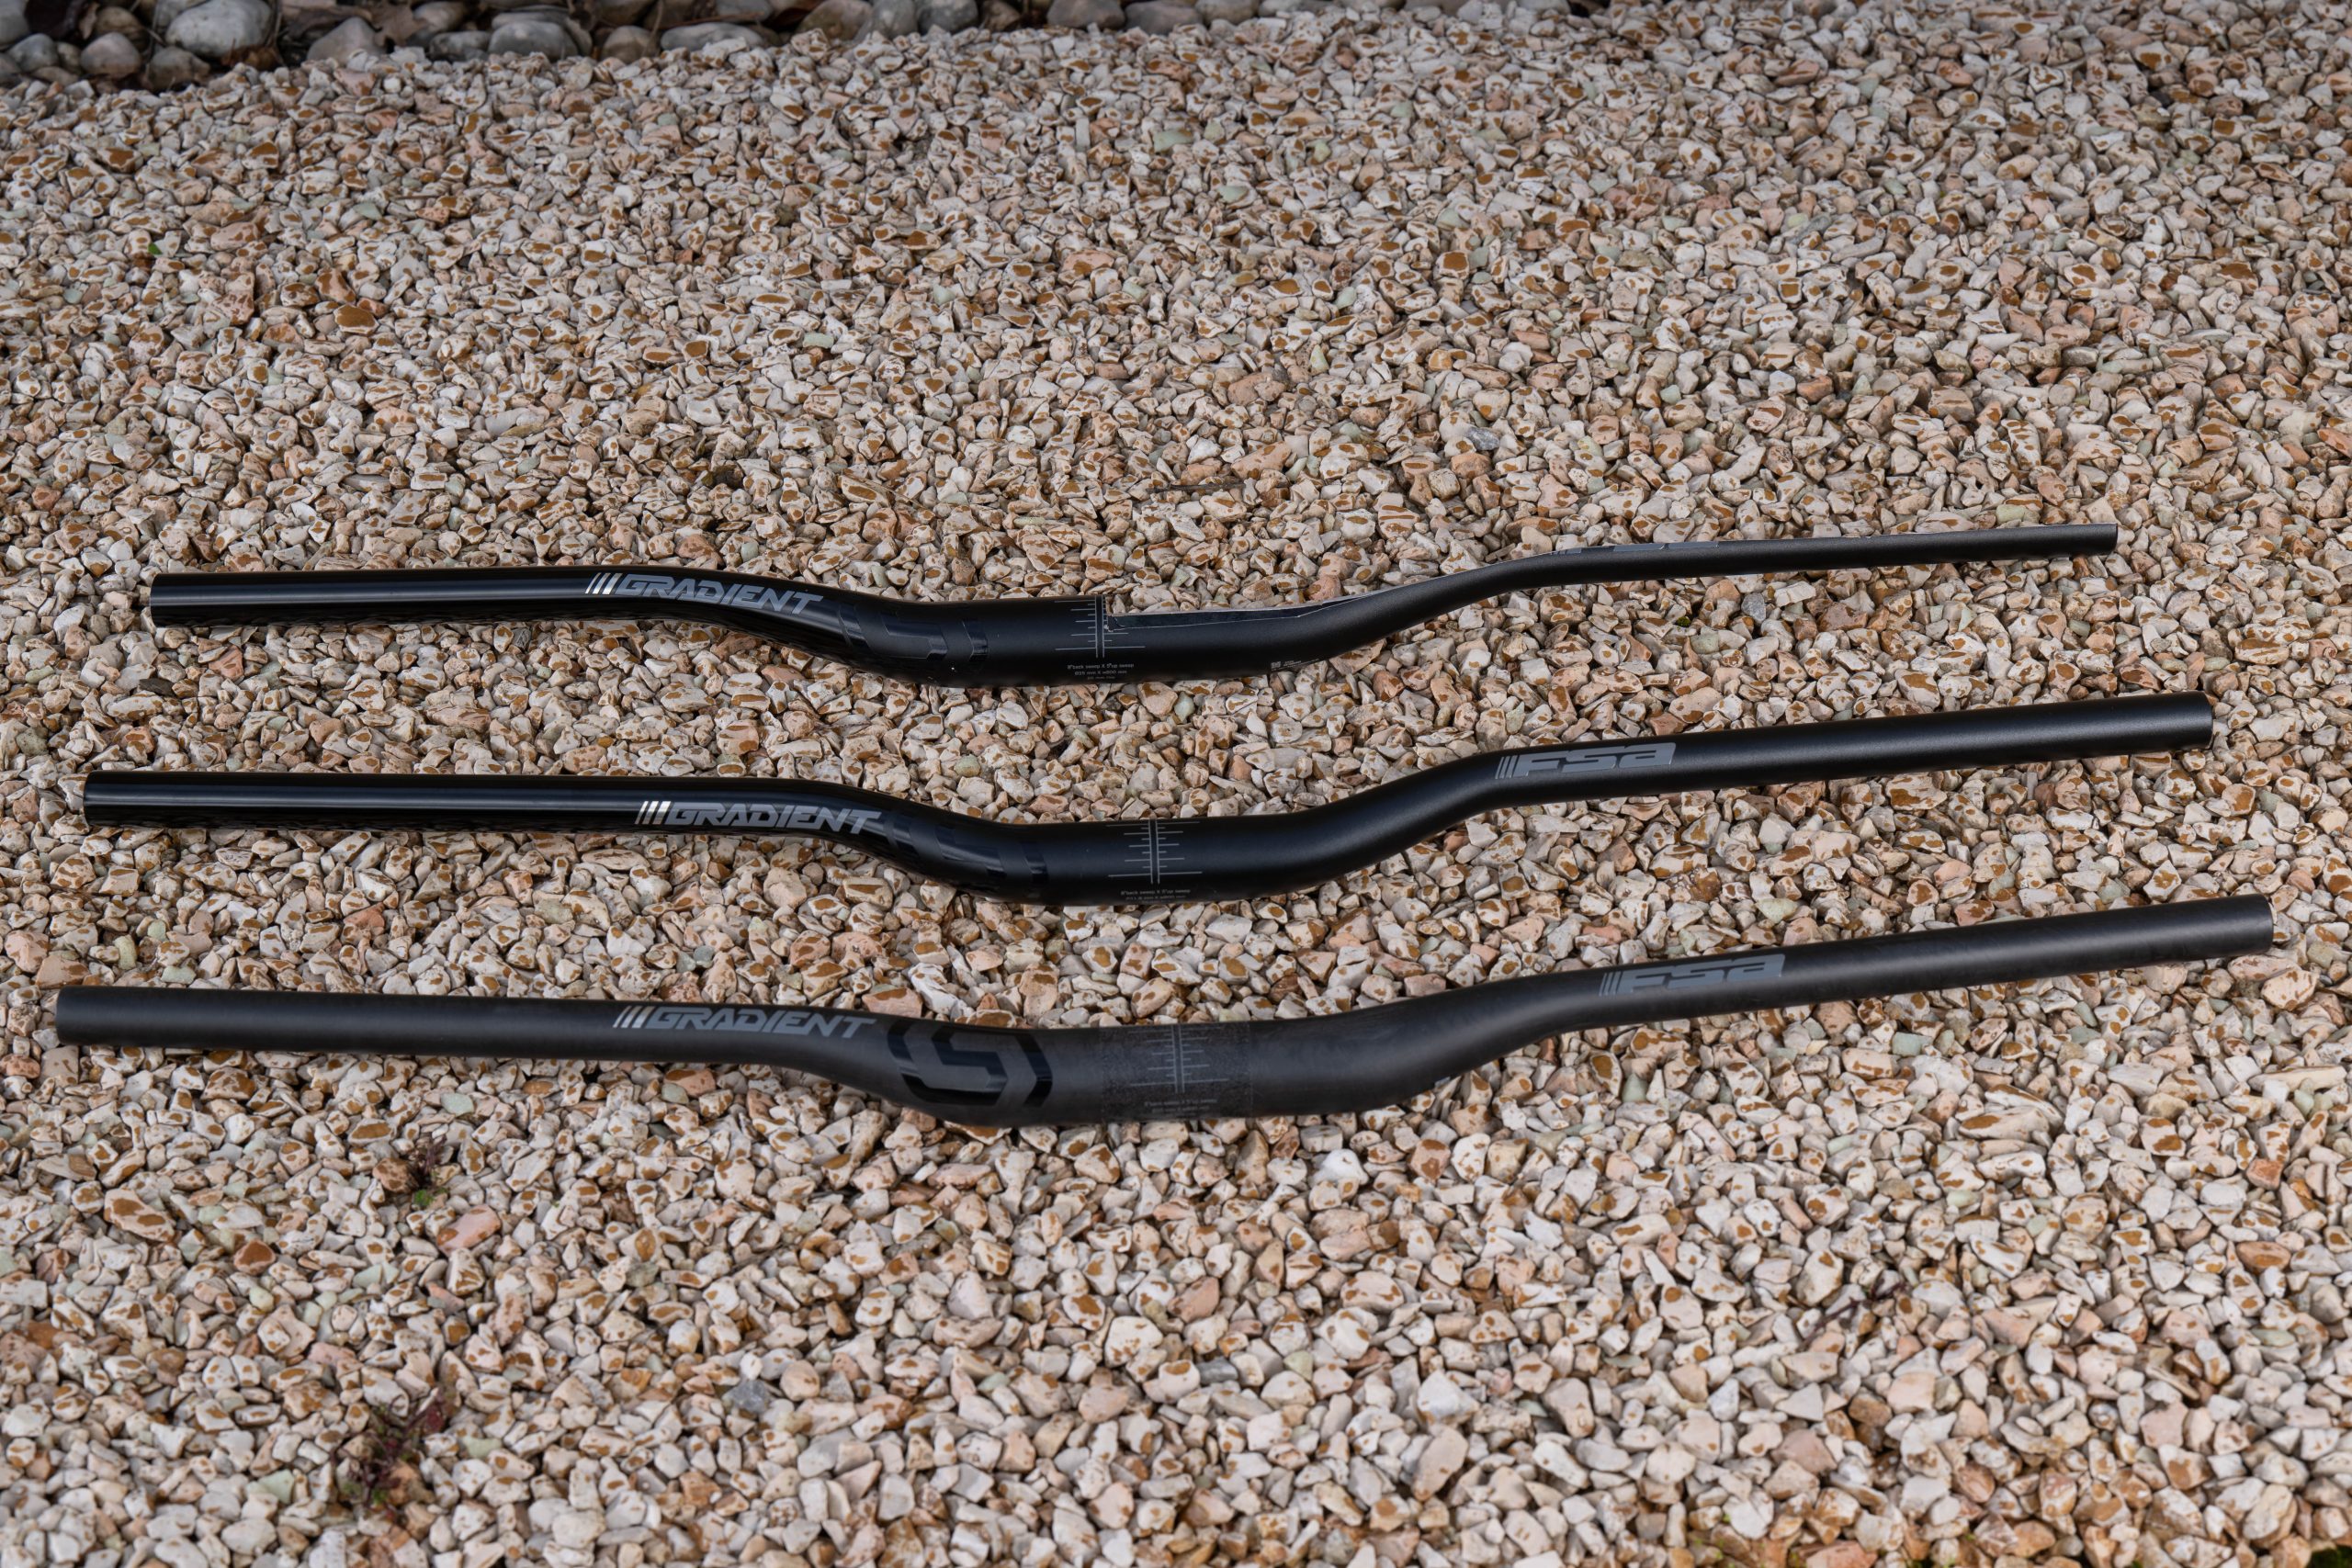
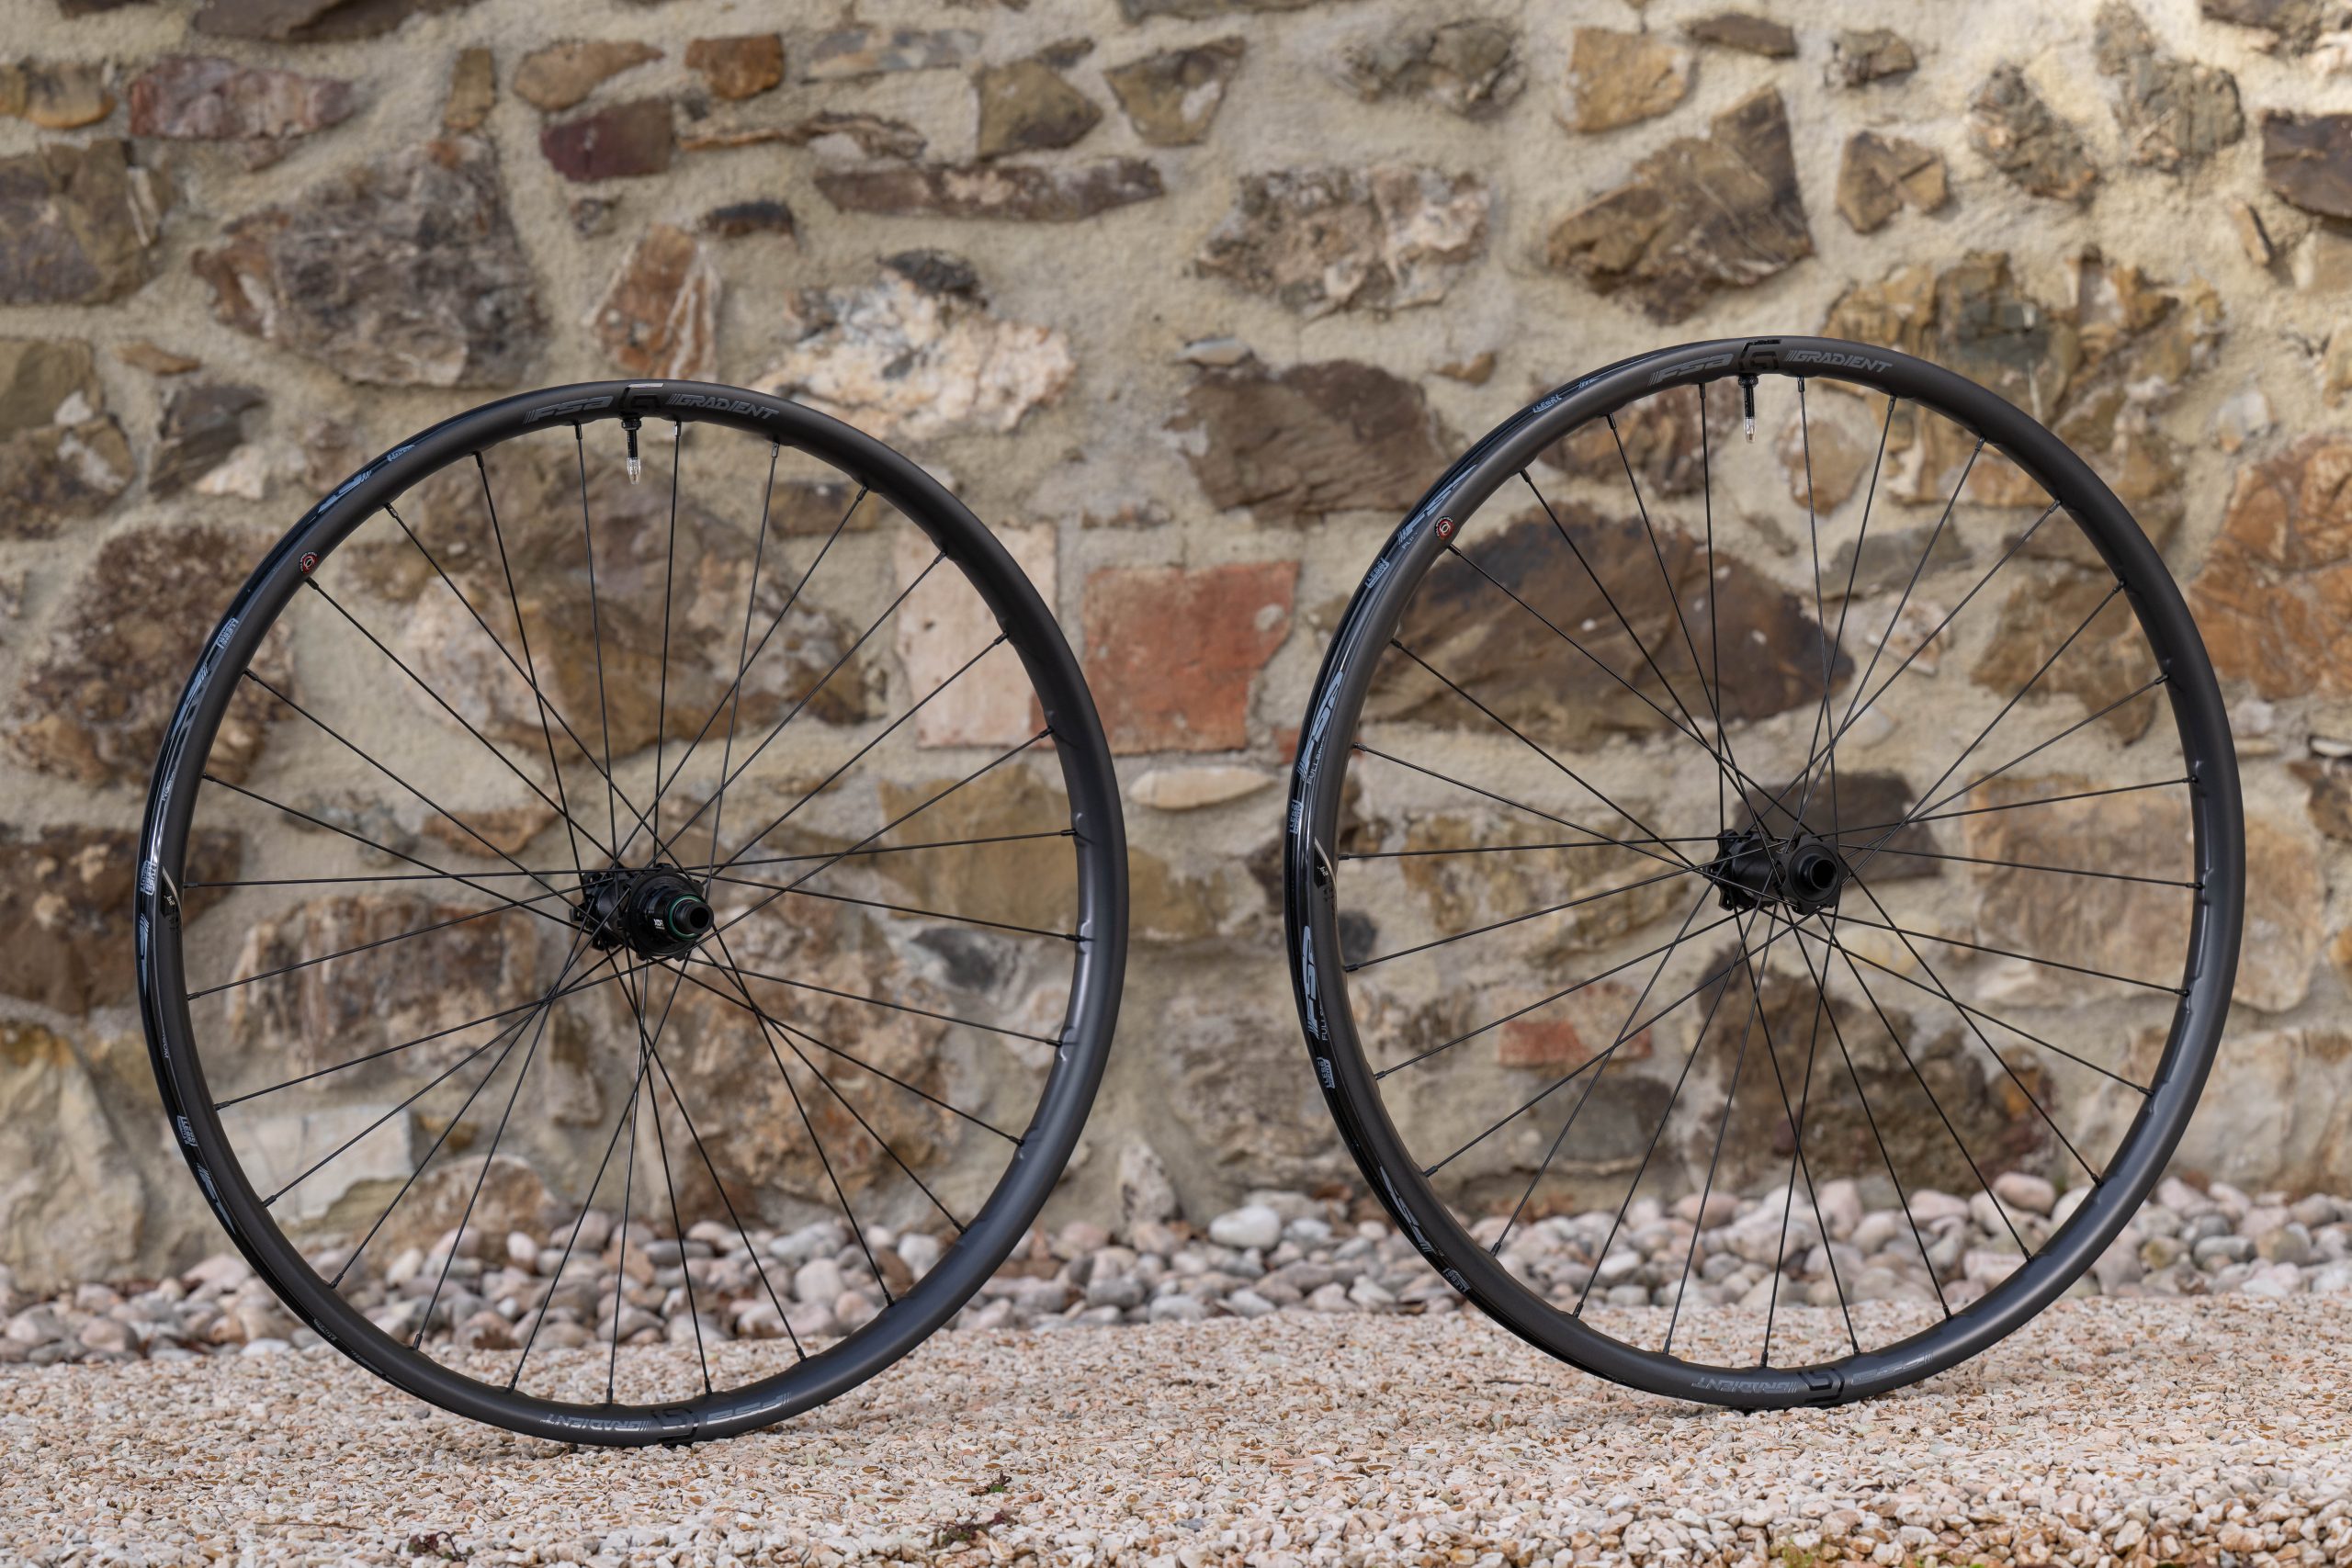
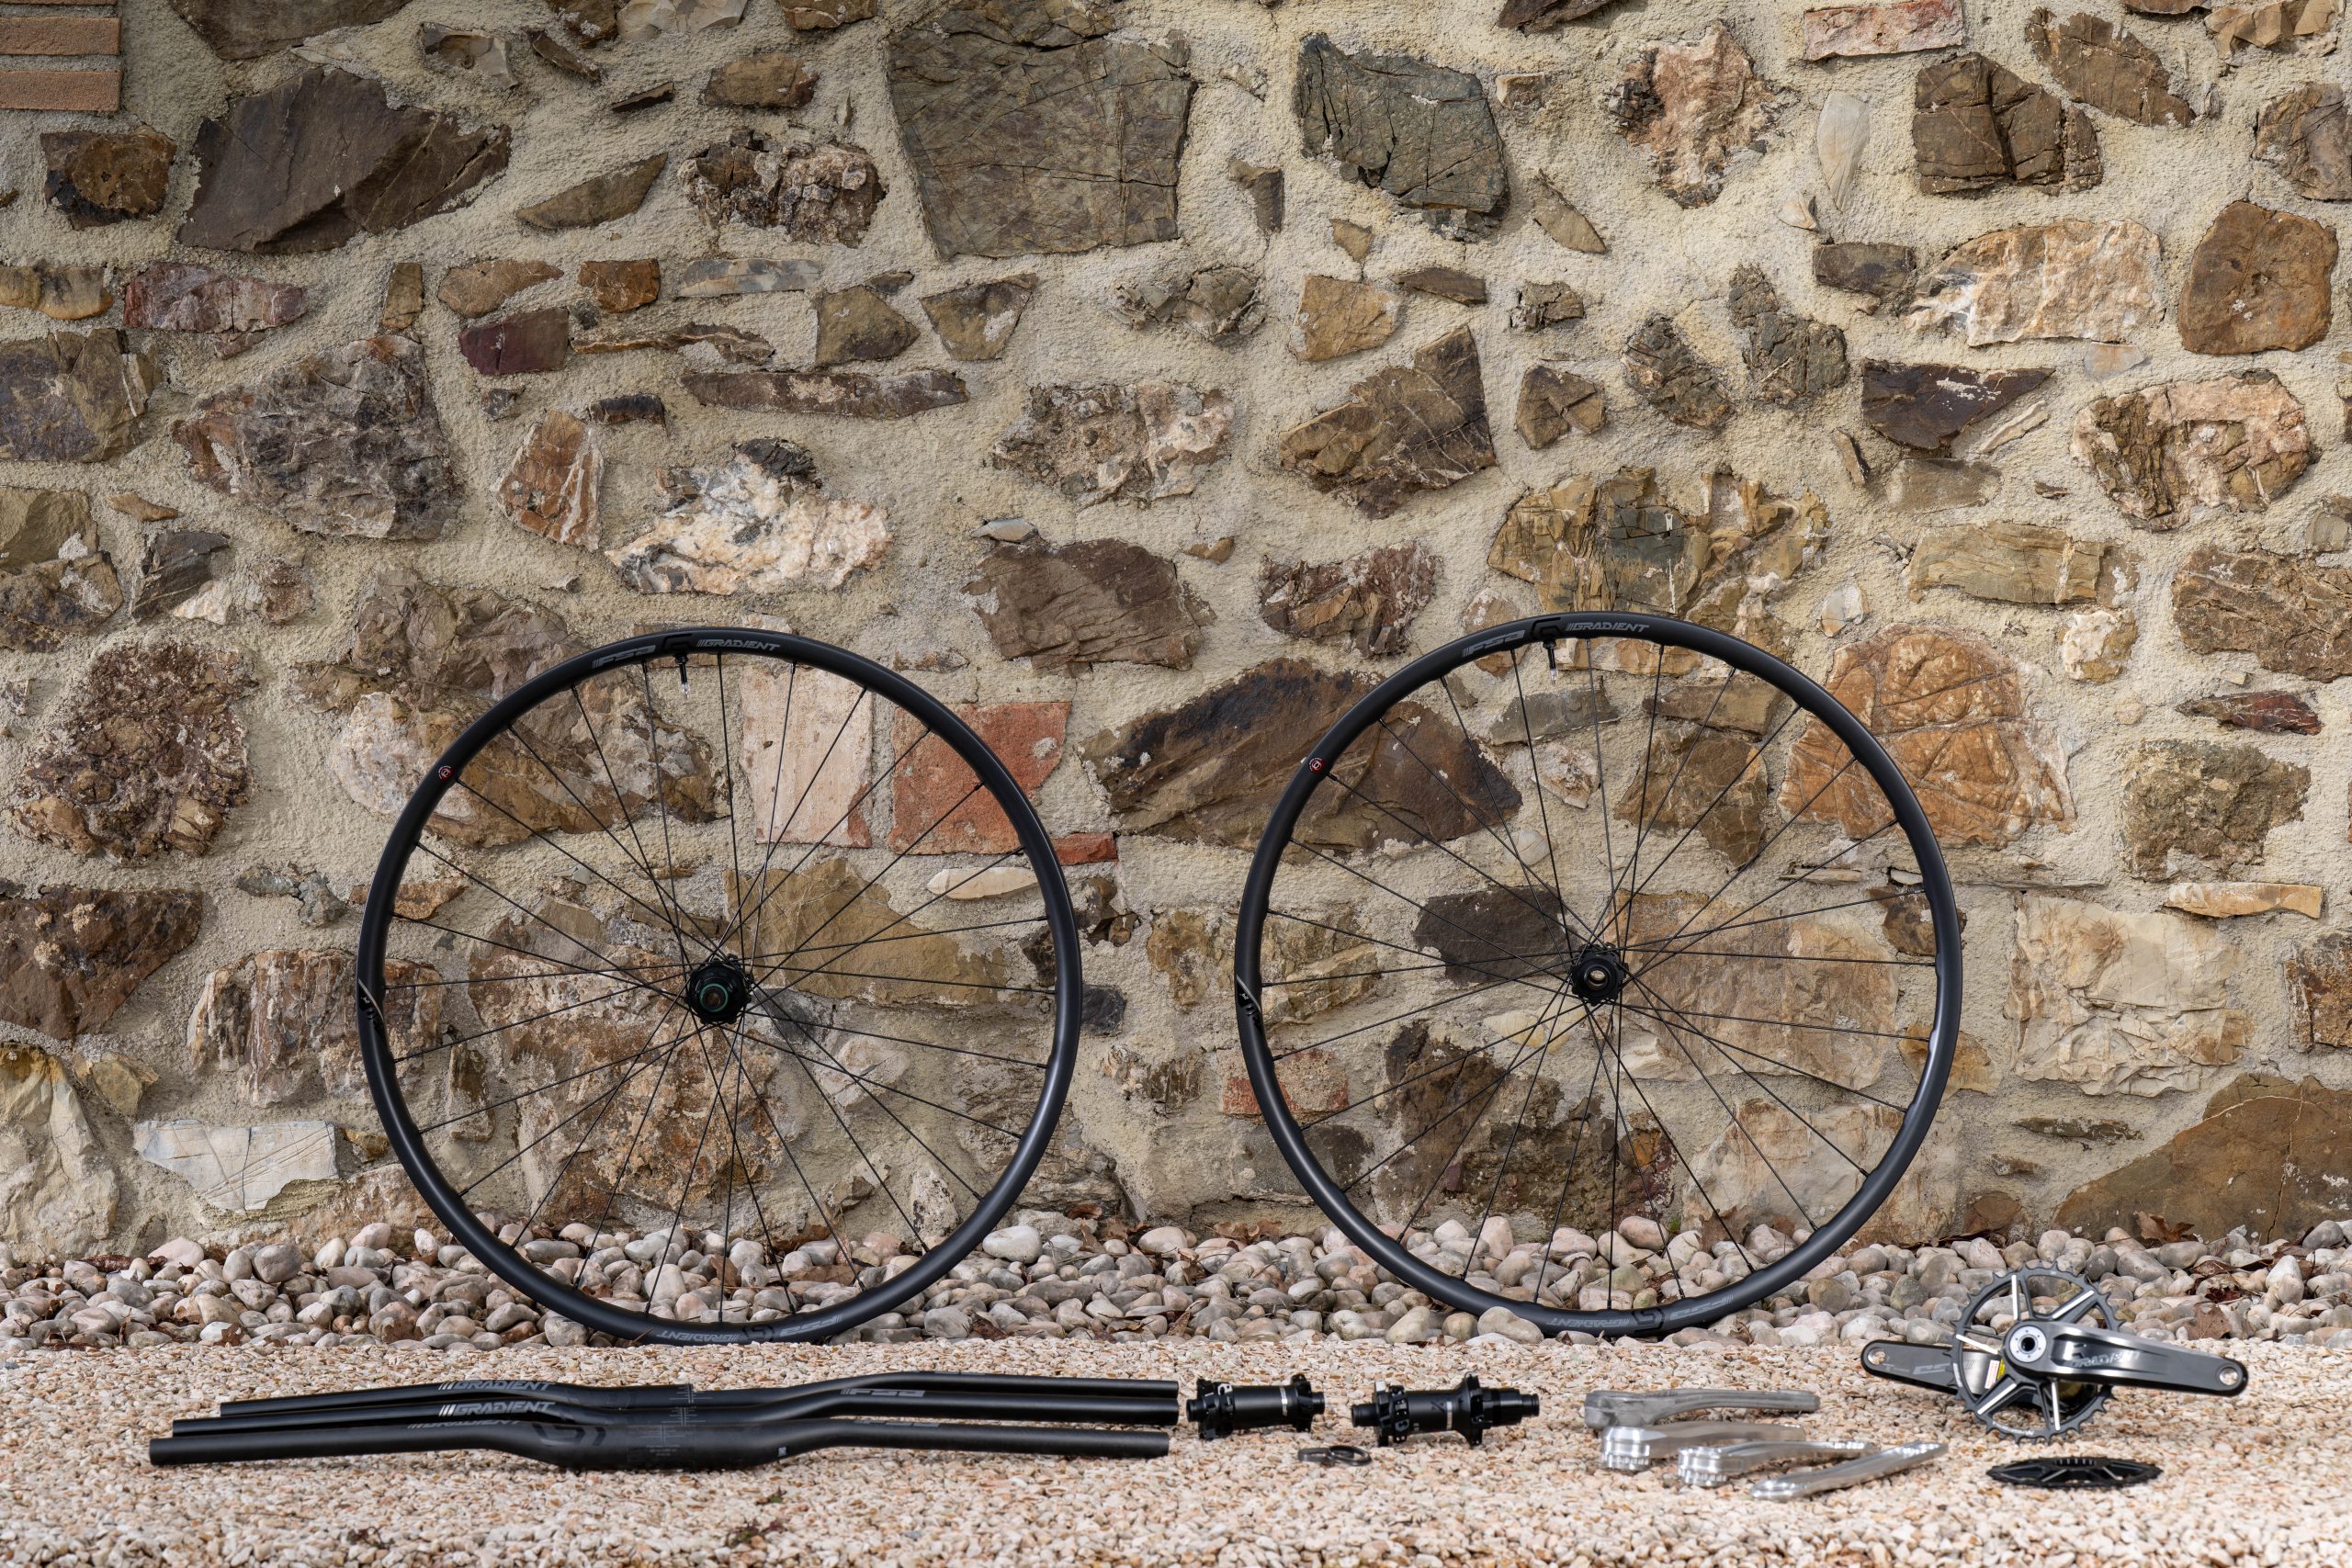
FSA’s all-new Gradient components range is designed to boost rider performance by targeting compliance and durability.
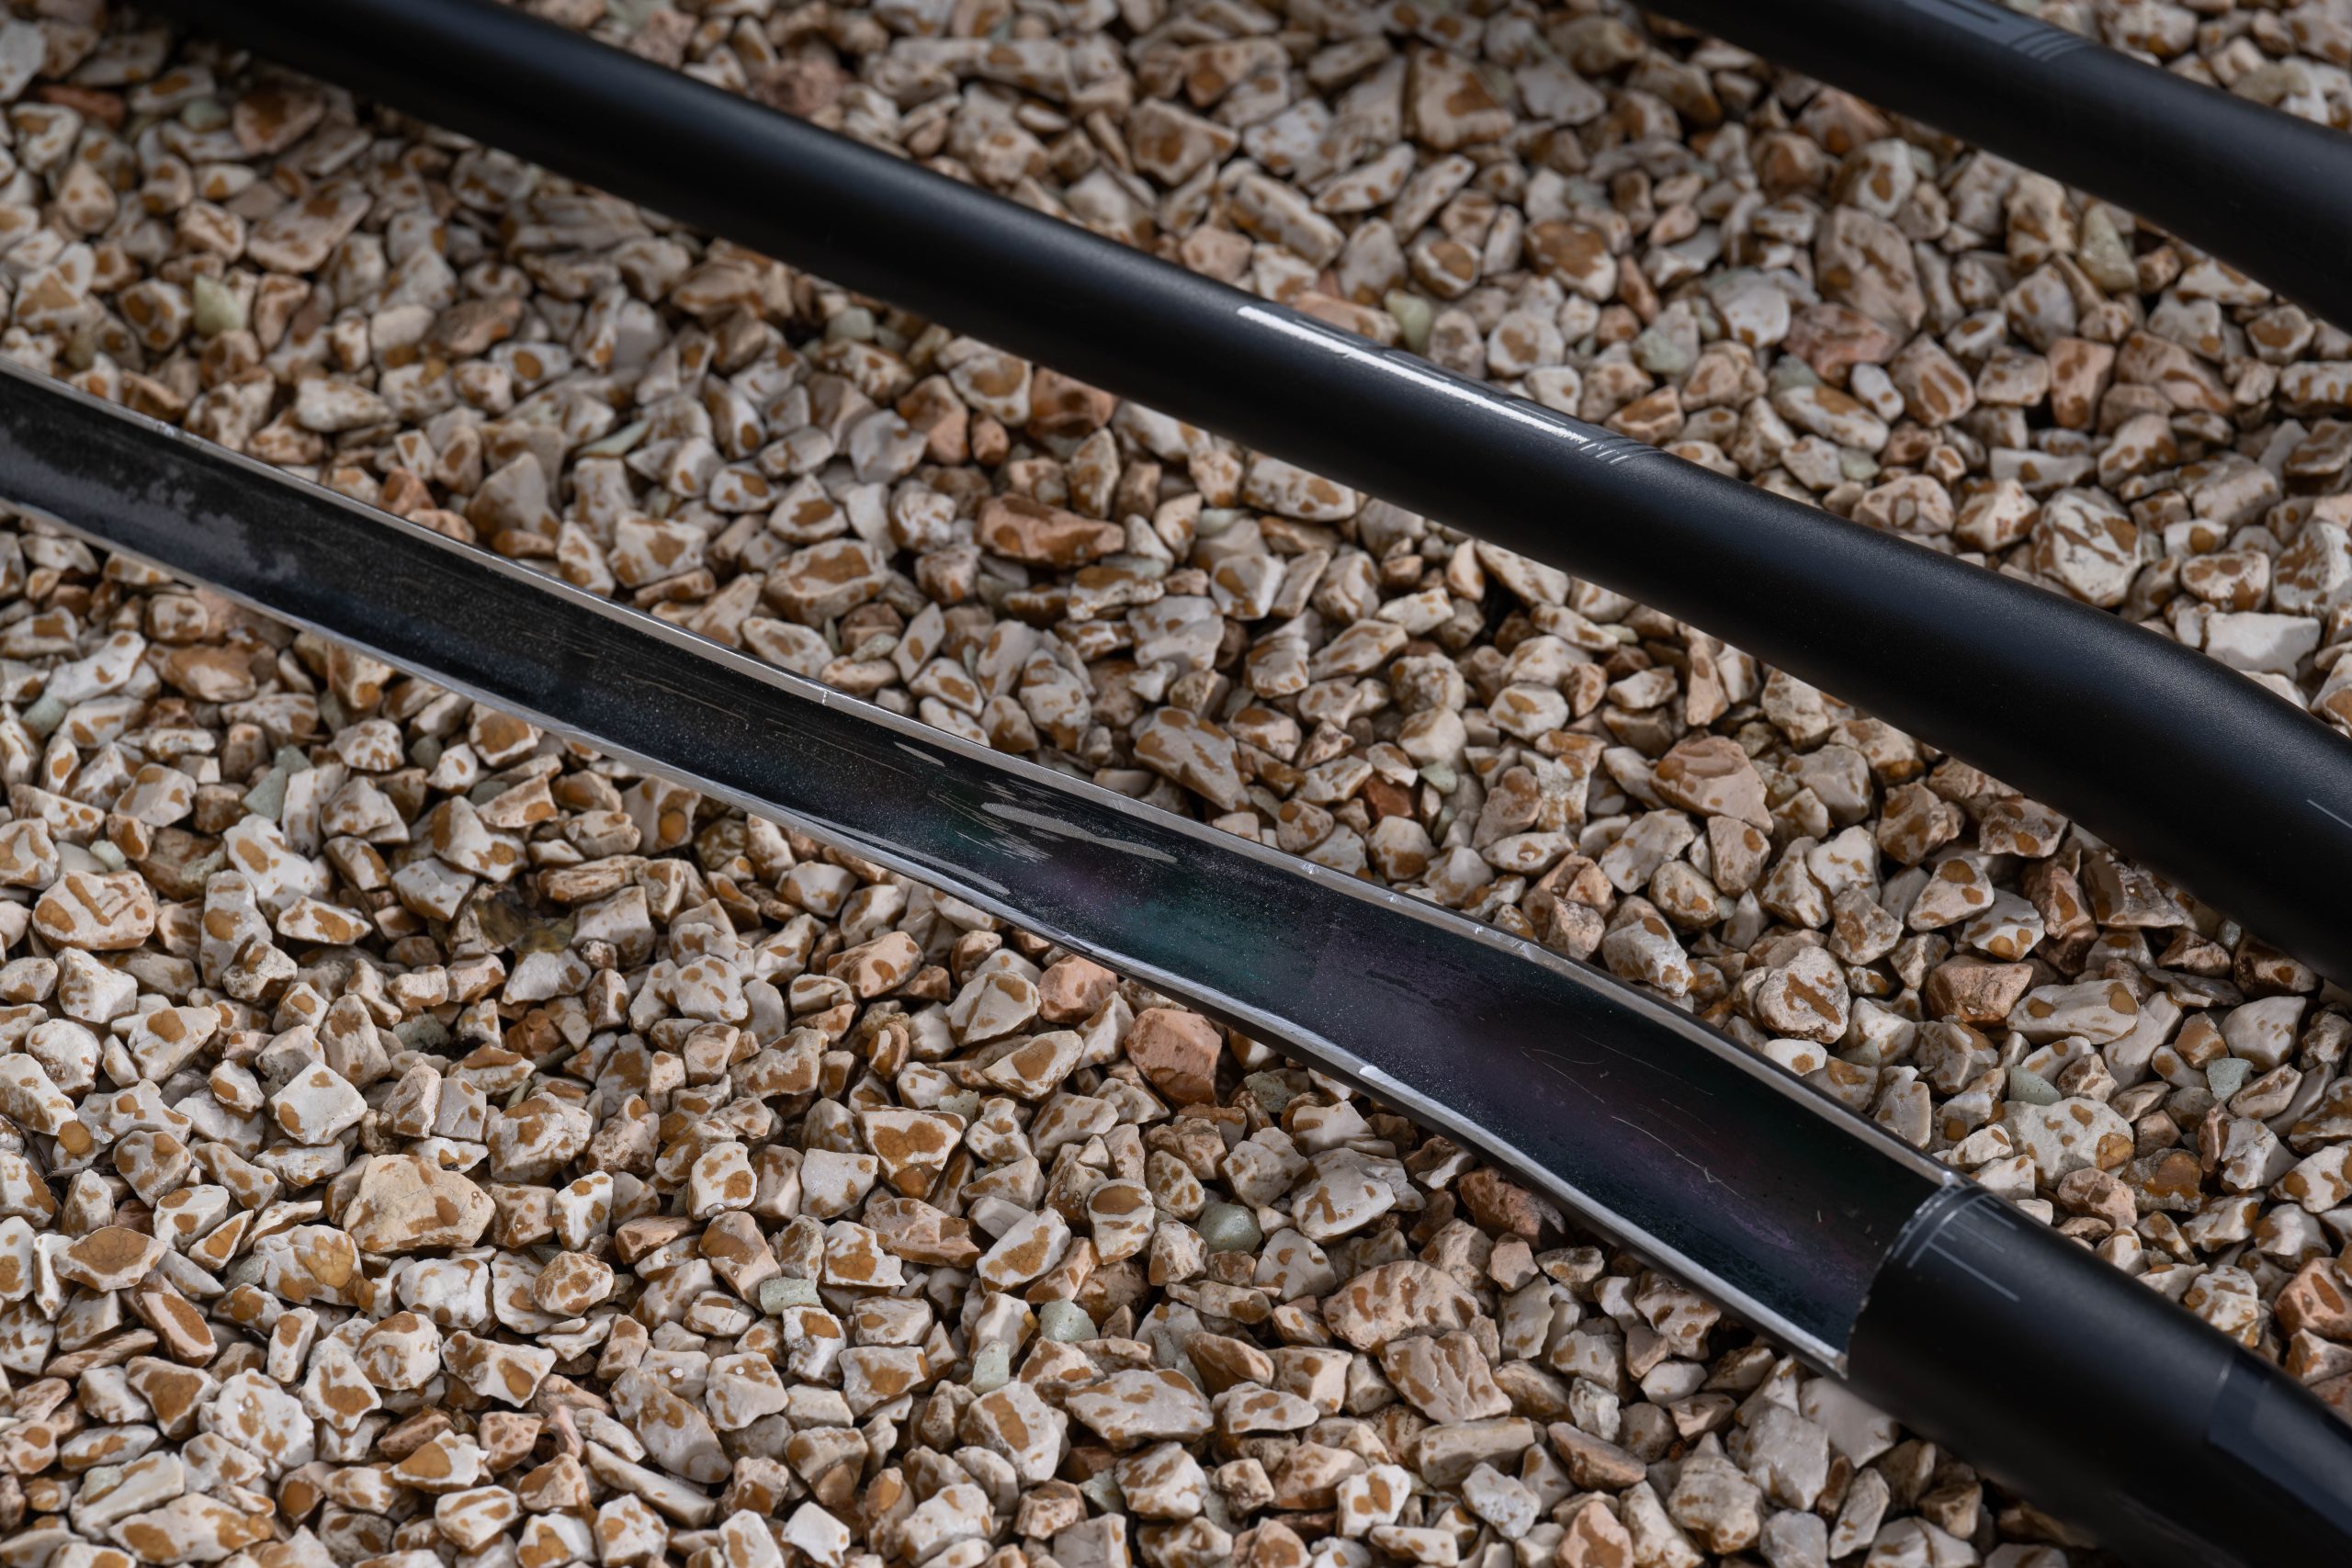
From the new i30 carbon wheels to both the carbon and aluminium handlebars, all of Gradient’s premium-level components have been developed in conjunction with the Atherton Continental race team to be as compliant and strong as possible.
The new range encompasses mountain bike wheels, handlebars, stems, and cranks and chainrings, with prices ranging from £99.99 / $99 / €119.99 for the direct-mount stem up to £1,499 / $1,420 / €1,498 for the wheelset.
While the new i30 wheelset – with its striking-looking variable-depth rim – is probably the biggest news here, it’s the carbon and alloy handlebars that piqued my interest the most.
Bars aren’t boring
The bars have been tuned to have in-built flex and dampen harshness. Mountain bike Connection Winter / Mirror Media
Handlebars are the most important contact point between you and your bike.
While your pedals, saddle and sometimes frame act as two-way translators between you and the bike, it’s the handlebar you have the most visceral, raw connection with.
Your hands are filled with nerve endings, sending millions of sensory inputs to your brain every millisecond.
Harshness, steering vagueness, feel and comfort are derived – in large part – from the bar.
Getting it right is, therefore, important and FSA thinks it has done just that with the newest Gradient kit.
Offered in two material types – carbon and alloy – and two stem-clamp diameters for each material – 31.8mm and 35mm – the brand has gone to great lengths to emphasise the importance of their feel.
They’ve got a relatively standard shape. Mountain bike Connection Winter / Mirror Media
All variants share an 800mm width, eight-degree backsweep and five-degree upsweep. The carbon versions come in 20mm and 30mm rises, and the alloy ones 25mm and 40mm.
Now the important bit; the carbon bar’s layup has been specially formulated to “increase compliance”, and is said to offer “superior vibration-damping qualities” helping “reduce arm fatigue”.
While that may sound like word soup to the less tech-savvy, it basically means the new bar should – although it’s not guaranteed – filter out some of the trail’s buzzy, harsh vibrations that can cause your hands to cramp and seize up.
The alloy bar is claimed to do a similar thing, but FSA acknowledges the two materials are not equal.
Increased compliance is the main focus, however.
Here, the brand says aluminium – at least with how it has been manufactured – is going to “absorb large impacts” and help reduce rider fatigue when the terrain goes from extreme to crazy.
To improve the bar’s resonance-damping abilities beyond the alloy’s own properties, FSA has ‘squashed’ or flattened its bends (where it rises) to reduce stiffness.
FSA says the proof is in the pudding, with its sponsored riders choosing the alloy version over the carbon one, because of the smoother feel.
Not missing a trick, though, the brand’s latest, or should I say resurgent, smaller bar-clamp diameter standard is claimed to increase the damping further without feeling – in my words – ‘noodly’.
Cashing in on compliance
The cutaway reveals the bar’s wall thickness, showing how the construction boosts compliance. Mountain bike Connection Winter / Mirror Media
FSA isn’t the only brand cashing in on this latest compliance craze, however.
As manufacturing and technology, and therefore bikes, improved quickly throughout the late 2000s and early 2010s, every component and frame became stiffer.
As a sum of their parts, we reached a tipping point where bikes were too rigid.
They rode like bucking broncos, with each part transferring every one of the trail’s undulations directly into your hands, wrists and arms.
This resulted in a tiring and uncontrollable ride.
Brands such as OneUp launched the compliance-tuned Carbon Handlebar, and later the alloy alternative, pioneering the ovalised or flattened profile where the bar raises.
We’ve also seen this expertise with compliance used in wheel building – the Crankbrothers Synthesis being a prime example – where the front is tuned for compliance and the rear for stiffness.
FSA hopes it’s onto something by tapping into this performance-enhancing trend.
FSA’s i30 wheels
At just under 1,900g a pair, they’re relatively light, but also expensive, costing £1,499 / $1,420 / €1,489. Mountain bike Connection Winter / Mirror Media
The new i30 wheels are also claimed to offer compliance and a smooth ride quality.
That’s thanks, firstly, to a “special carbon layup”, where material is presumably added in some places and removed from others to tune stiffness.
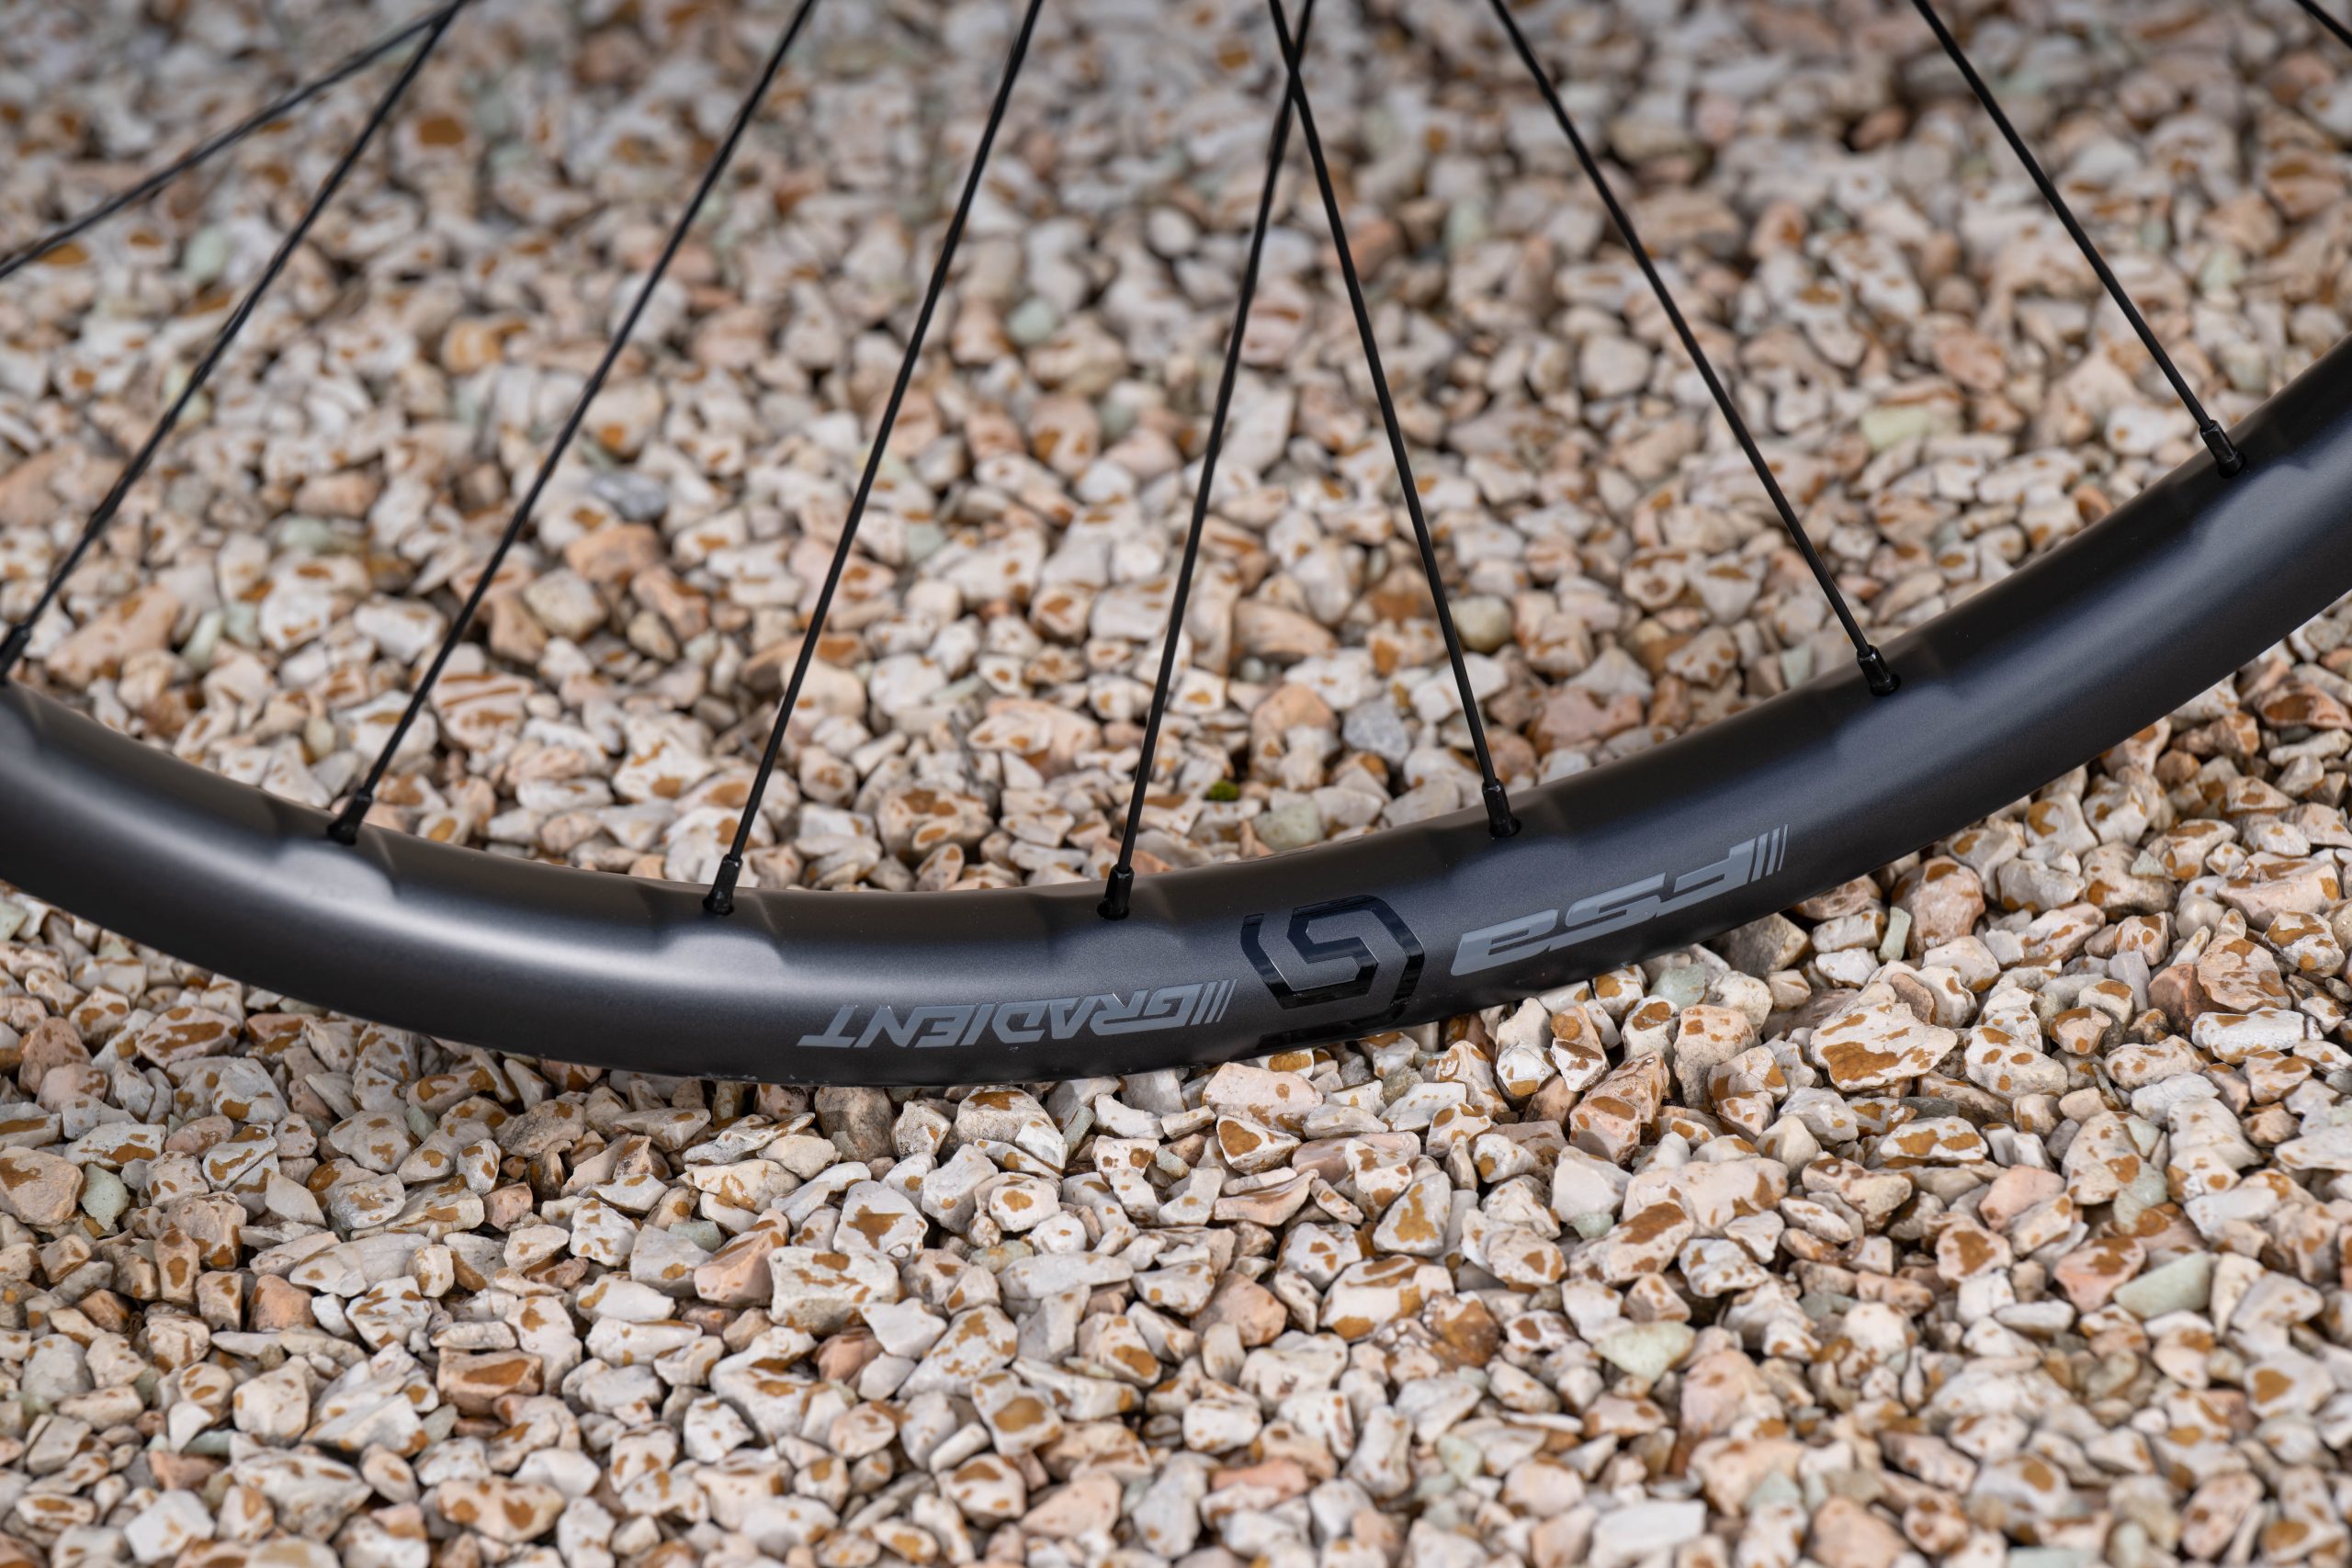
Secondly, and just as importantly, it’s because of the striking variable-height rim. Here, the spokes anchor onto a thicker, taller section. There is then a lower, thinner section between each spoke.
Mimicking FSA road-wheel tech – called ‘interspoke milling technology’ – the wheels are said to be light and strong.
This 22mm to 24mm height variation is behind a good chunk of the compliance ‘magic’.
The raised portions give the rim a 24mm depth, and 22mm for the lower sections. Mountain bike Connection Winter / Mirror Media
FSA claims the lower height “provides increased flexibility”. By implication, a more flexible rim means vibrations and big hits are better absorbed by the wheels.
With a 30mm internal width – hence the name i30 – FSA is saying this metric also plays its part in tuning strength or stiffness and “handling”, which reading between the lines means the wheels’ ability to absorb vibrations.
Details make the difference
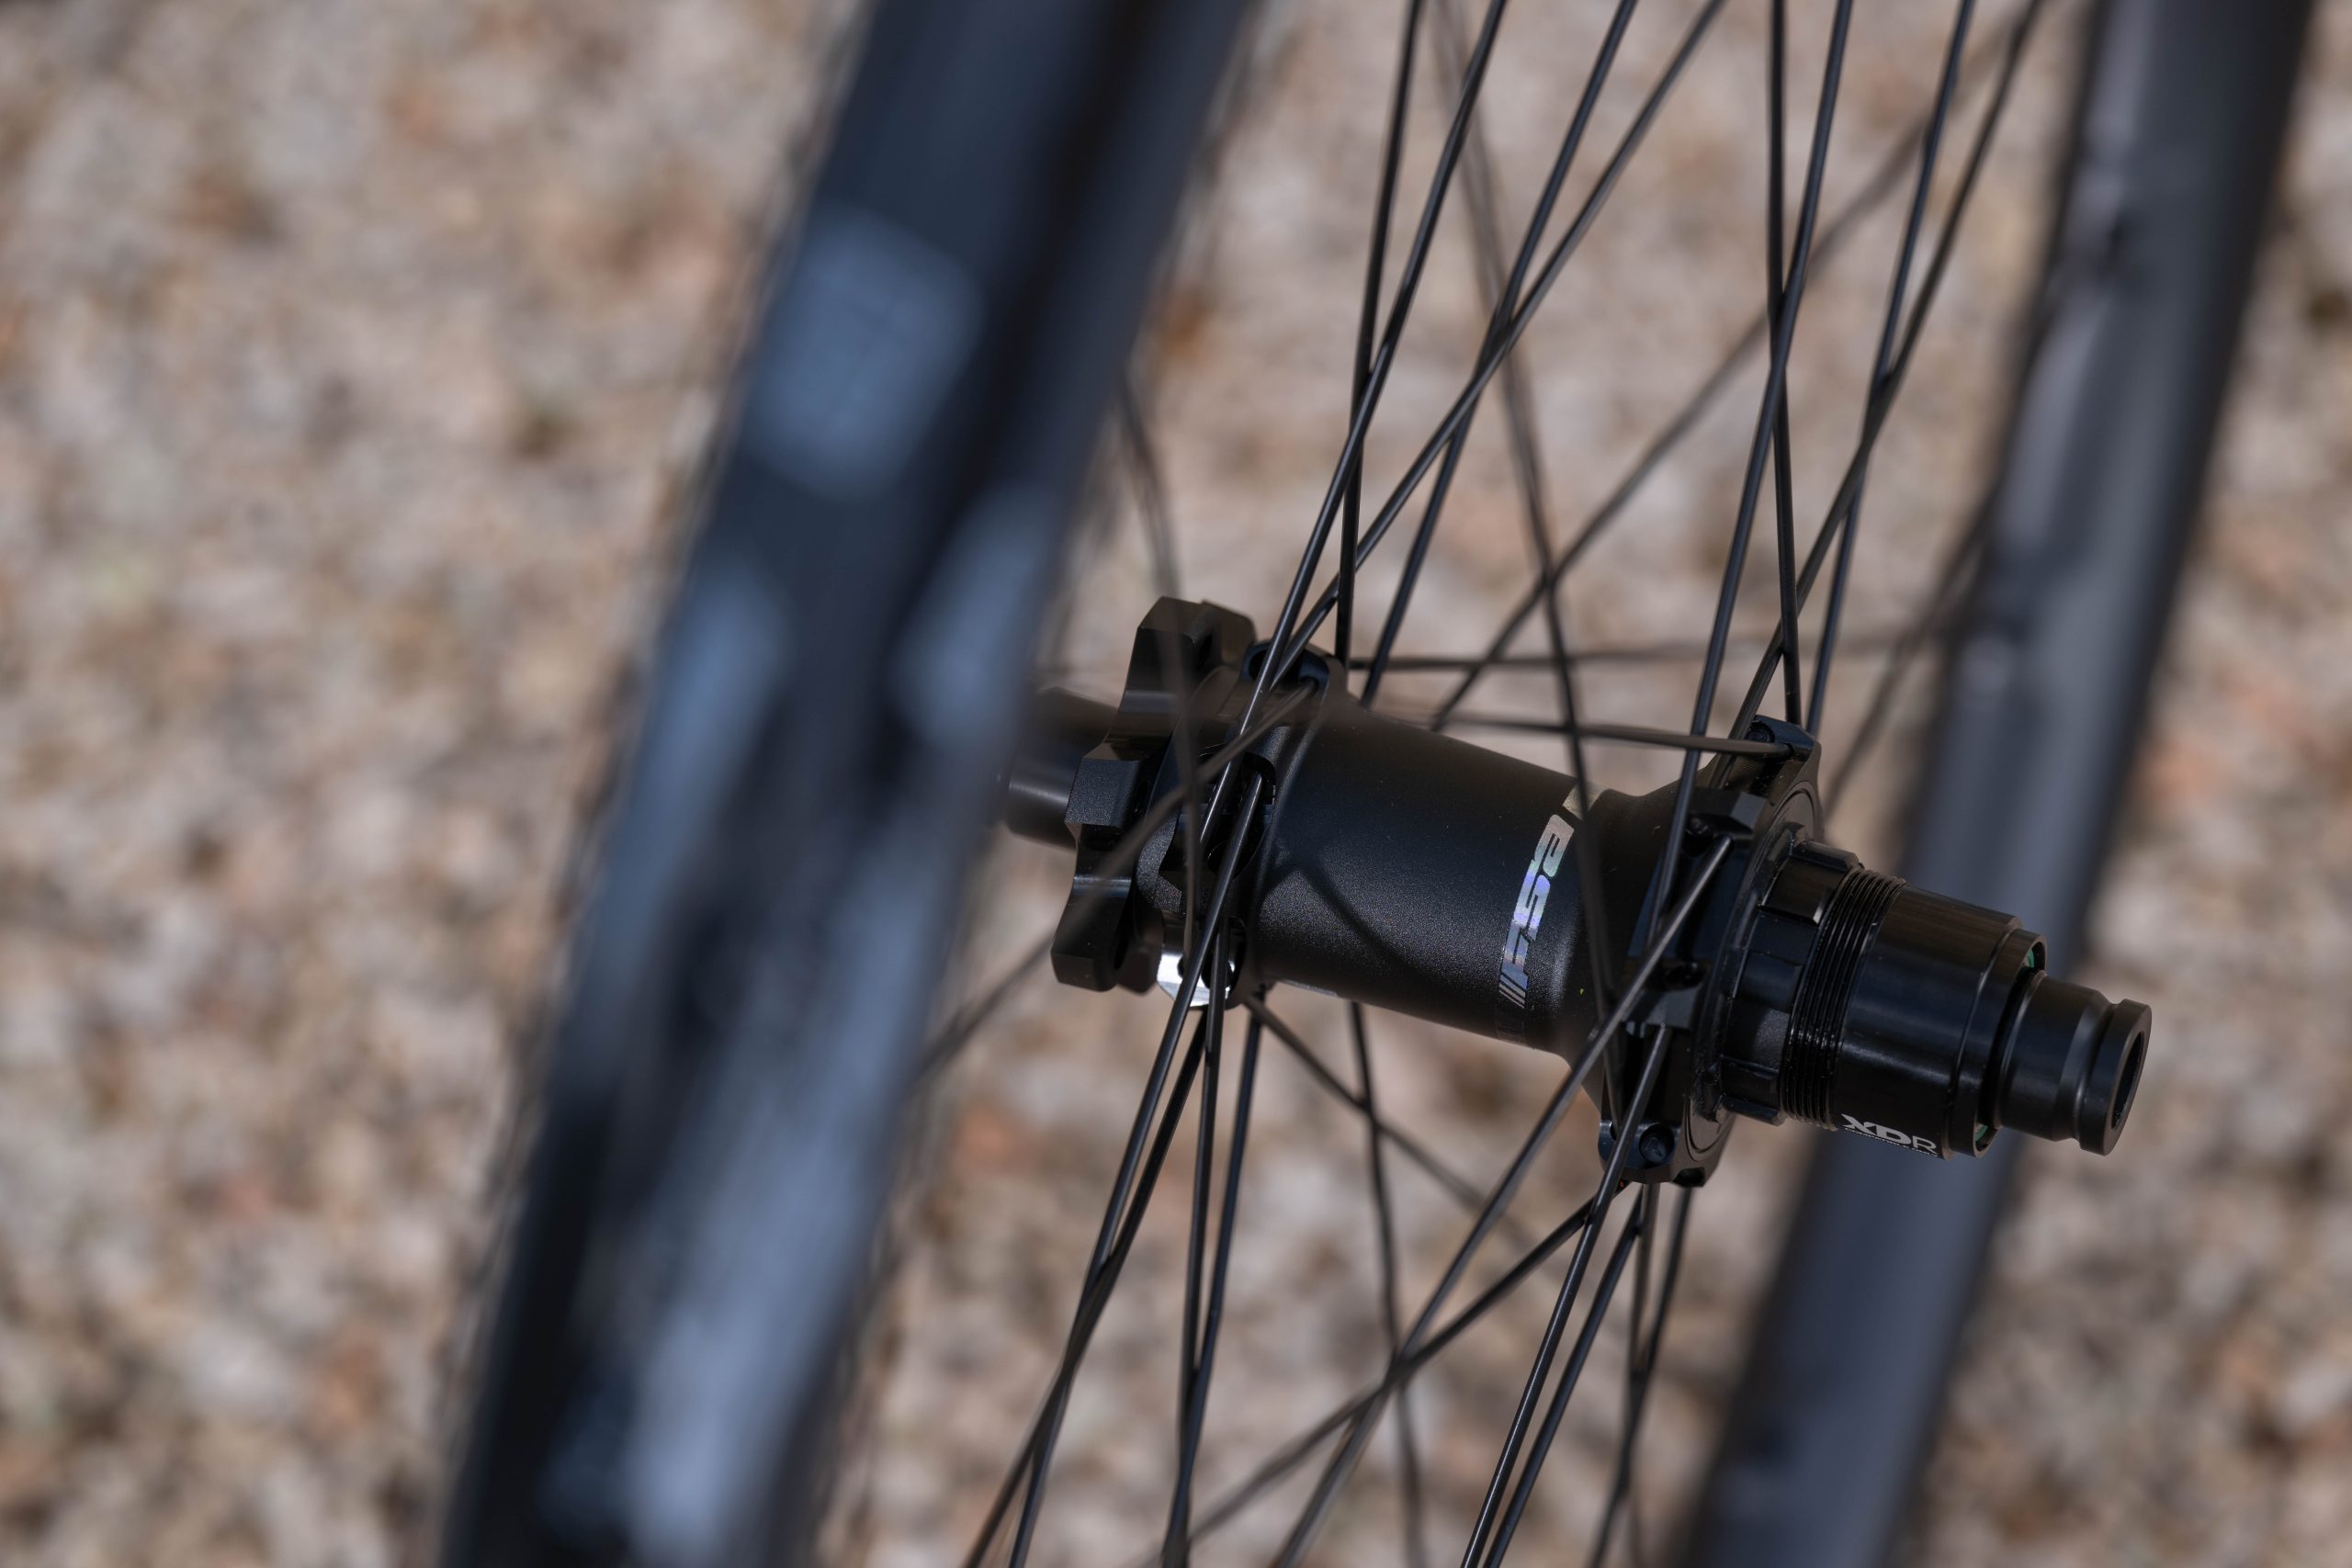
The rear hub has a 72-point engagement ratchet-style freehub. Mountain bike Connection Winter / Mirror Media
In terms of other details, the rims have a 4mm asymmetrical design, where the spokes sit off to one side, helping create an evenly tensioned build.
The rims have a 37mm external width – which is par for the course these days – and a 3.5mm sidewall width, which is claimed to reduce pinch flats.
The hubs have Microspline and SRAM XD freehubs, running on a 72-point ratchet-style engagement system.
According to FSA, the hubs have a tool-free design to speed up and simplify maintenance.
Extensive testing has put each part of the wheels through stringent ride-simulating torture.
Torsional, ISO, impact, fatigue, mud and spoke testing have all been carried out.
Emerging with the highest ASTM5 rating, the i30 wheels look impressive.
In fact, FSA’s so confident in the wheels’ durability, it’s offering a lifetime warranty on them.
A pair of 29in wheels are claimed to weigh 1,869g, which is marginally heavier than DT’s EXC 1200, but slightly lighter than the EXC 1501 wheels, both of which set the benchmark in carbon wheel performance.
Hold on, what about the wheel build?
There’s little mention of the wheels’ build in the i30 press material. Mountain bike Connection Winter / Mirror Media
The most important part of a wheel is arguably its build.
No amount of individual component tuning can compensate for a badly built wheel, whether that’s because it’s weak and wobbly, or ultra-stiff and harsh.
And we all know the painstaking approach pro racers and their mechanics take to wheel builds, finely tuning spoke tension to adjust the feel.
It’s a bit of an art; and while FSA may have done all this, it’s a surprise to see it’s not shouting about it.
Not mentioning how its wheels are built beyond stating the spokes are evenly tensioned thanks to the rim’s asymmetrical design seems like a bit of an omission.
The only other tidbit of information I could glean is about the spokes and their mounting points.
The brand says it has “[applied] a force of 150kg to the spokes and rim spoke holes” to check durability and strength, but there’s no mention of spoke tension.
Of course, the brand’s engineers aren’t stupid and neither are the pro riders who have used and tested the wheels, so until I try a pair, I’m going to take FSA’s word about these claims.
Rounding out the Gradient range
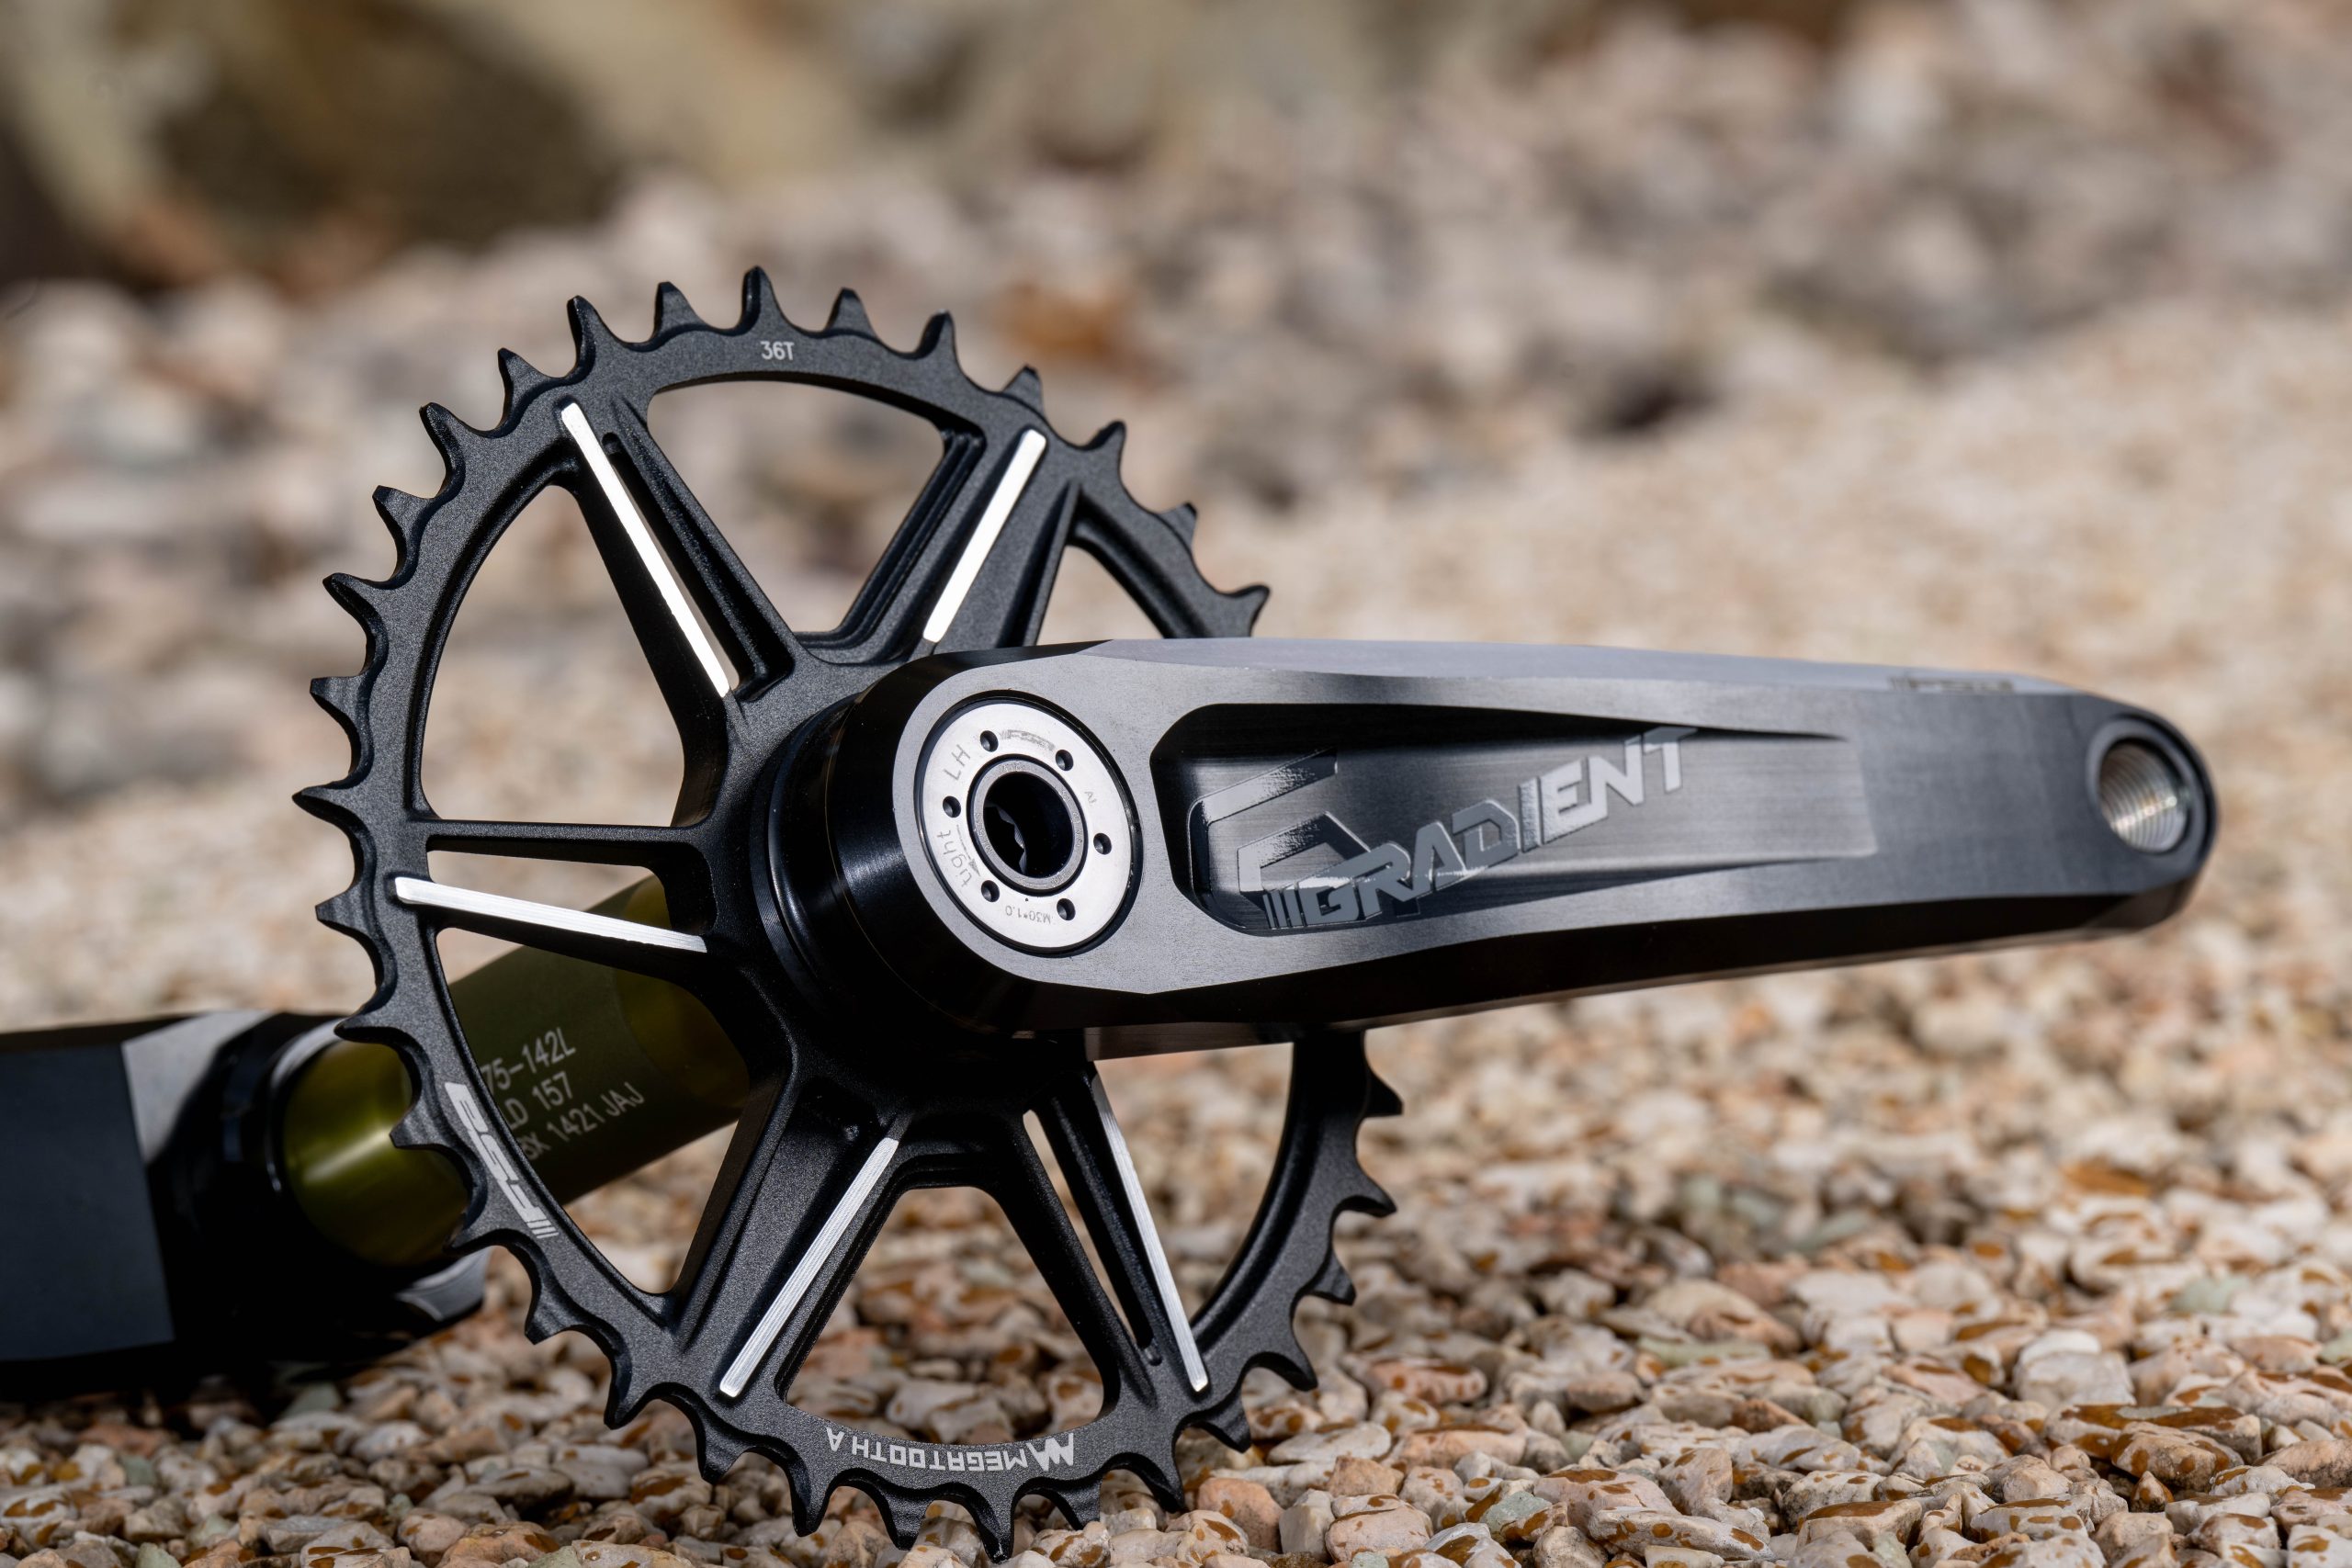
FSA’s new Gradient crankset is made from forged aluminium.
Although not focused on compliance like the bars and wheels, the new Gradient range also includes stems – both fork crown direct-mount and steerer-bolted – and a 1x aluminium crankset.
The Gradient cranks are made from forged aluminium with CNC machine finishing, where two halves of each crank arm are made from a single block of material and then seamlessly bonded together.
They’re available in 165mm, 170mm and 175mm lengths and have 30t to 36t (in 2t increments) chainring options.
Both the direct-mount and steerer-bolted stems are available to match the 31.8mm and 35mm clamp-diameter Gradient handlebars.
The direct-mount stem comes in 45mm and 50mm lengths, while the steerer-bolted stem has 33mm, 45mm and 50mm lengths.
FSA Gradient range prices
A selection of the new Gradient kit. Mountain bike Connection Winter / Mirror Media
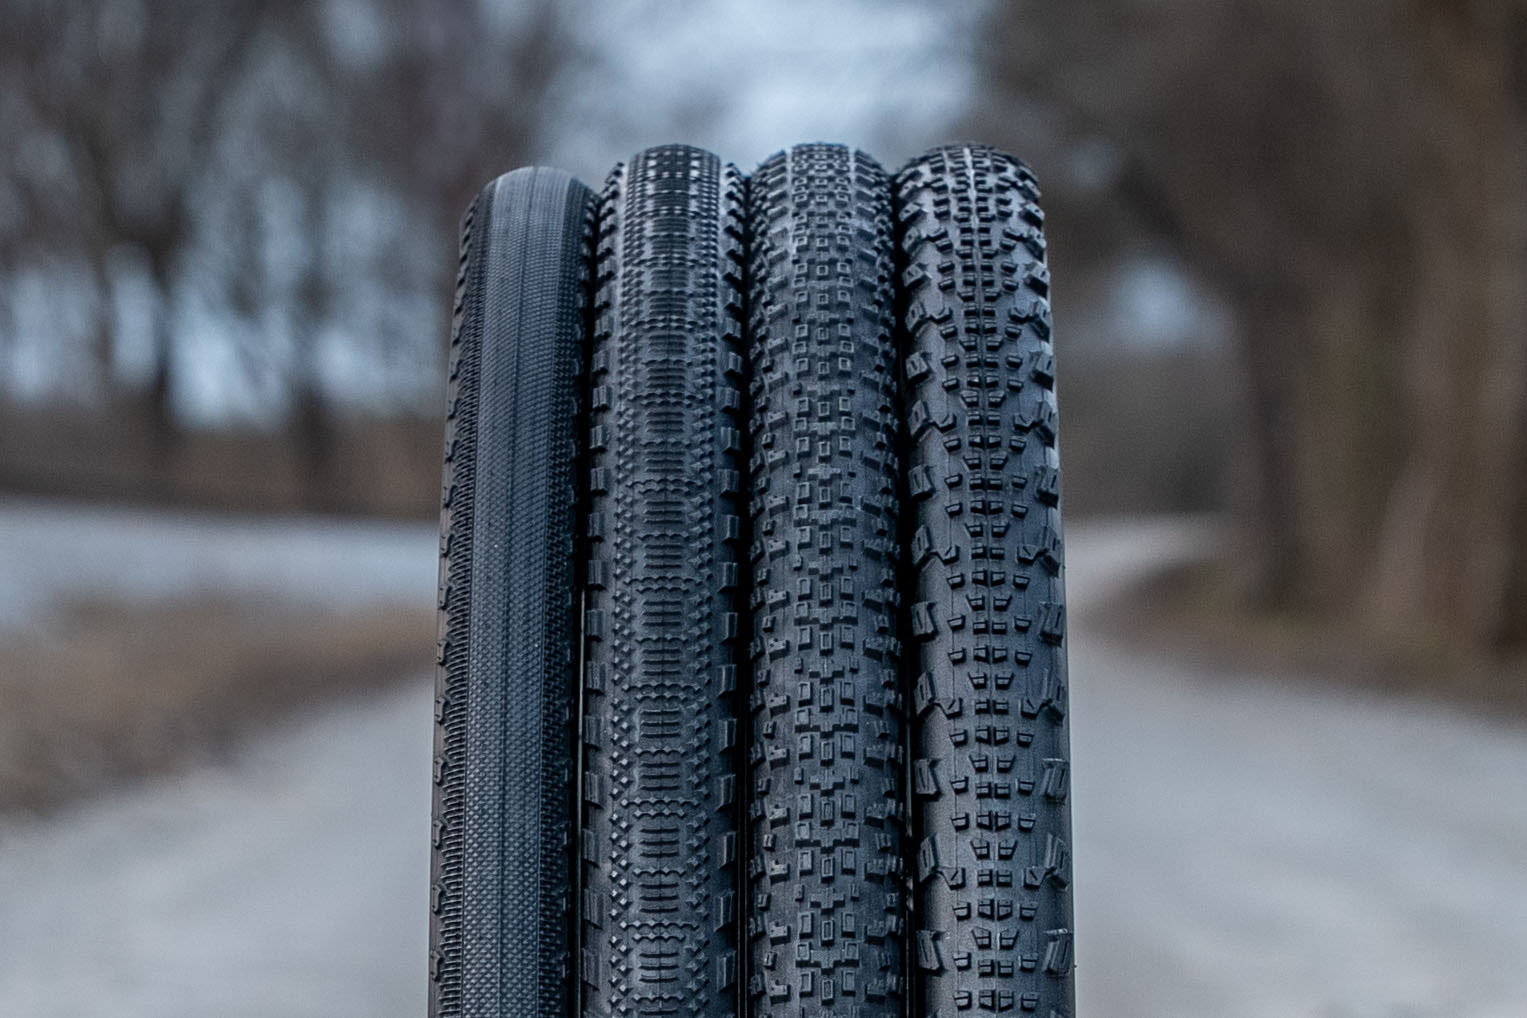
Gravel racing has been full of tyre talk of late, from the shift towards larger volumes to racers opting to use low-rolling-resistance tyres from mountain biking.
The issue is that, bar a few exceptions, gravel tyre tech has tried to span the wide variety of gravel riding.
That spectrum covers everything from fast, flat-out shorter-distance gravel racing to multi-day epics, bikepacking and everything in between.
That has meant tyre compounds have tended towards the hard-wearing rather than race-developed options.
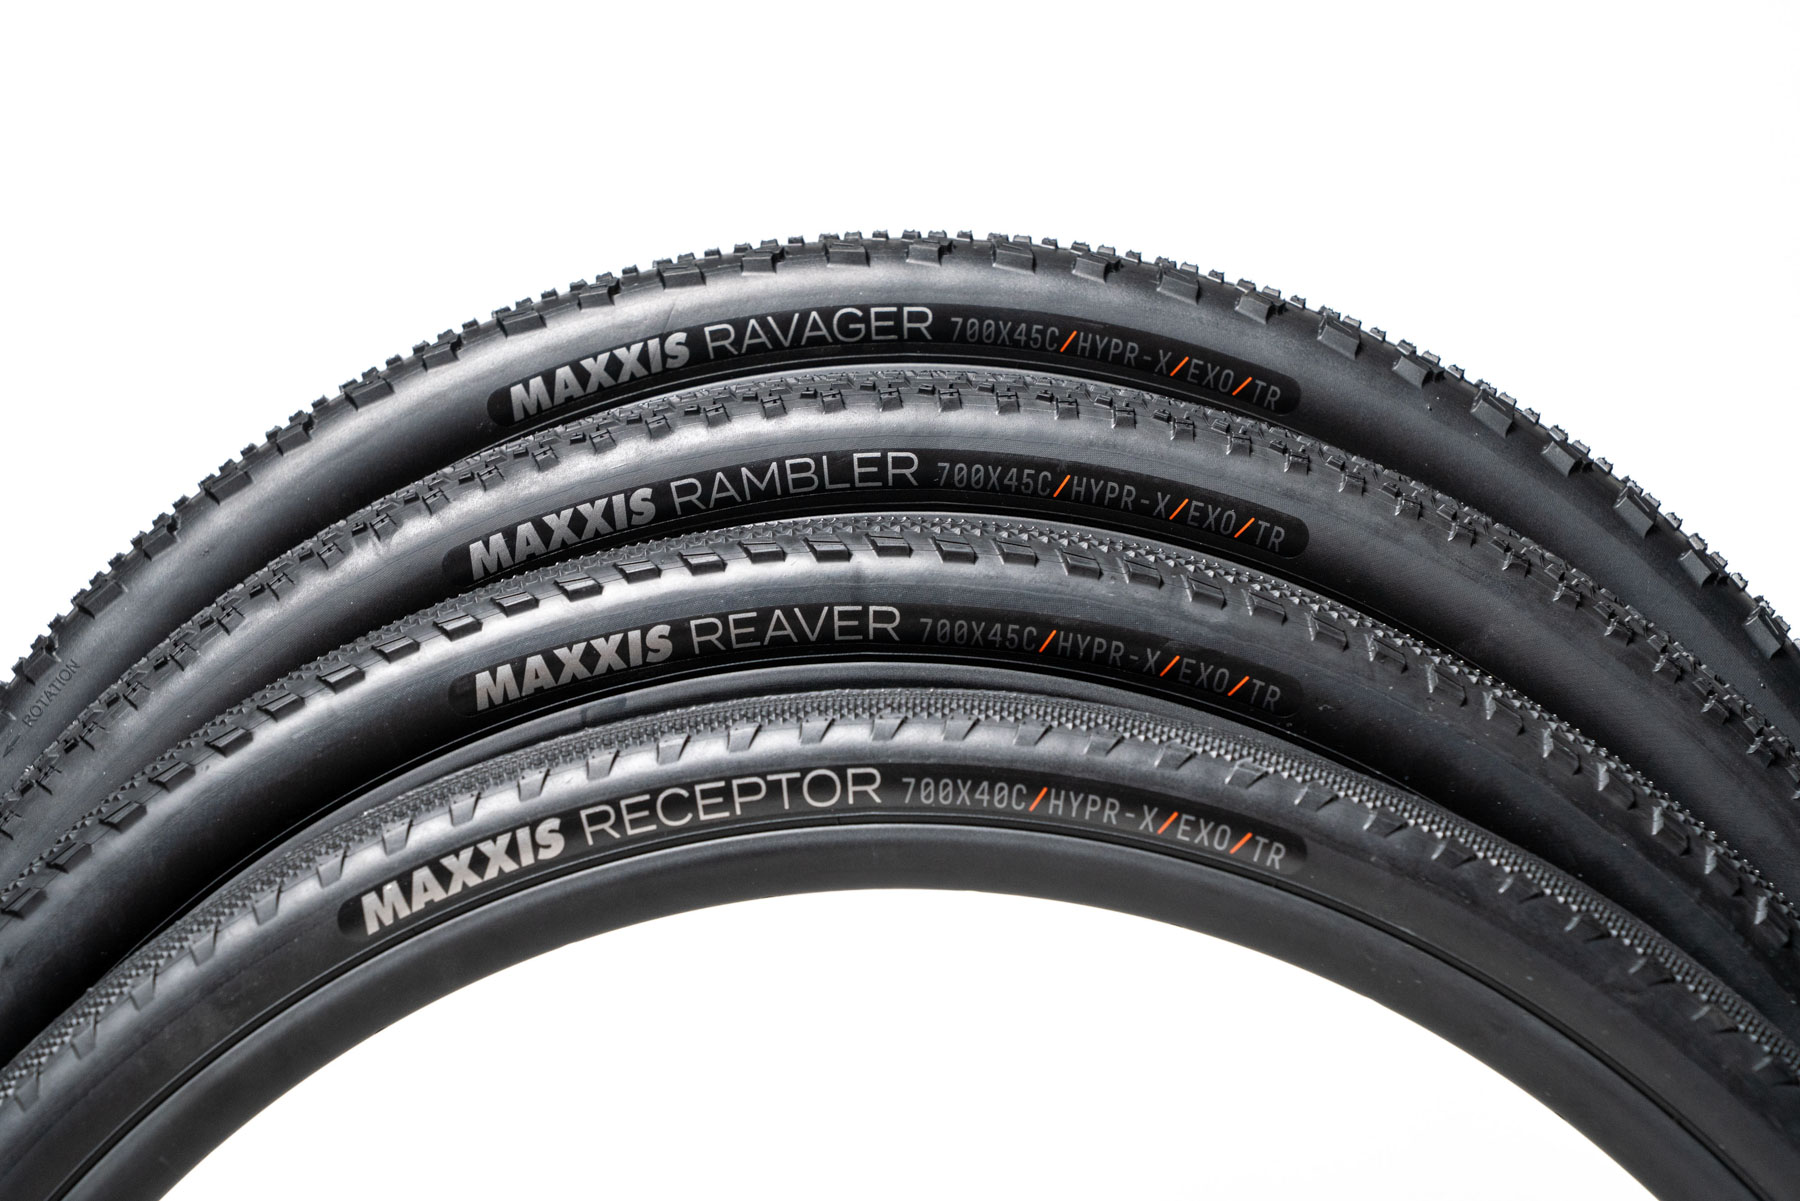
Well, it looks as if Maxxis has become the first MTB tyre brand to take gravel tyre tech seriously, introducing its new gravel-specific HYPR-X compound.
Where the mountains meet the road
Maxxis’ gravel range has a tread for every condition. Maxxis
The new HYPR-X compound blends the road-racing HYPR compound from the High Road SL tyre with the race-winning MaxxSpeed mountain bike compound.
The new HYPR-X compound is being rolled out on Maxxis’ four gravel models – the Receptor, Reaver, Rambler and Ravager.
Higher grip, lower rolling resistance
Maxxis’ new HYPR-X compound has been introduced across the whole gravel tyre range. Maxxis
Maxxis claims the new compound brings with it a 19 per cent improvement in cornering traction and 25 per cent less rolling resistance in lab testing.
The compound is wrapped around Maxxis’ 120 TPI casing, updated from the previous generation with a stronger nylon yarn. Maxxis claims this will vastly increase tread durability.
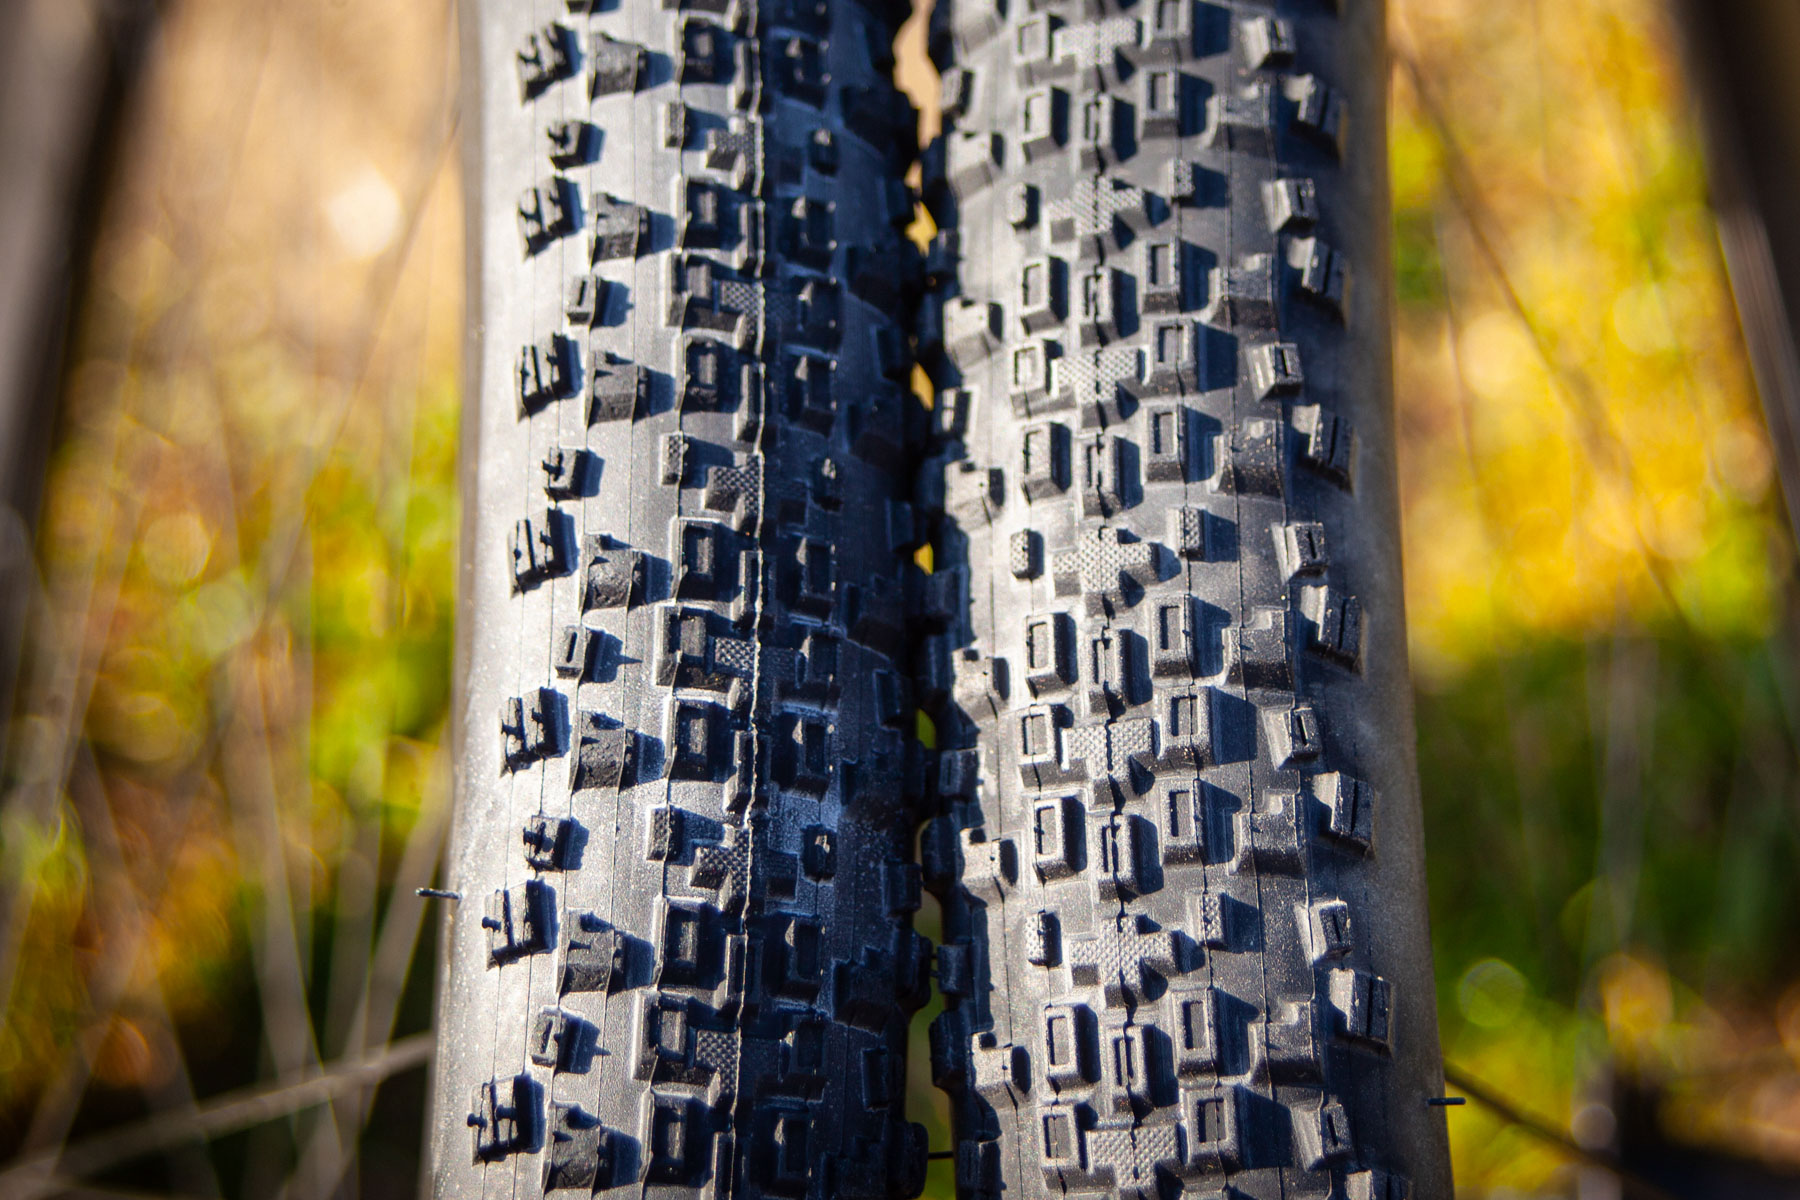
The old Rambler (left) and the new grippier, lower-rolling-resistance HYPR-X Rambler (right). Warren Rossiter / OurMedia
We’ve got a set of the new HYPR-X compound Ramblers and I’ve tested them side-by-side with the current Dual-compound Ramblers over a few brief rides. We’ll follow up with a full test of the new Ramblers soon.
My first impressions are that the new compound has much more elasticity than its predecessor.
The shoulder tread deforms more easily in the corners and the grip feels much more assured. Meanwhile, its roll on the road feels impressively quick for a treaded tyre.
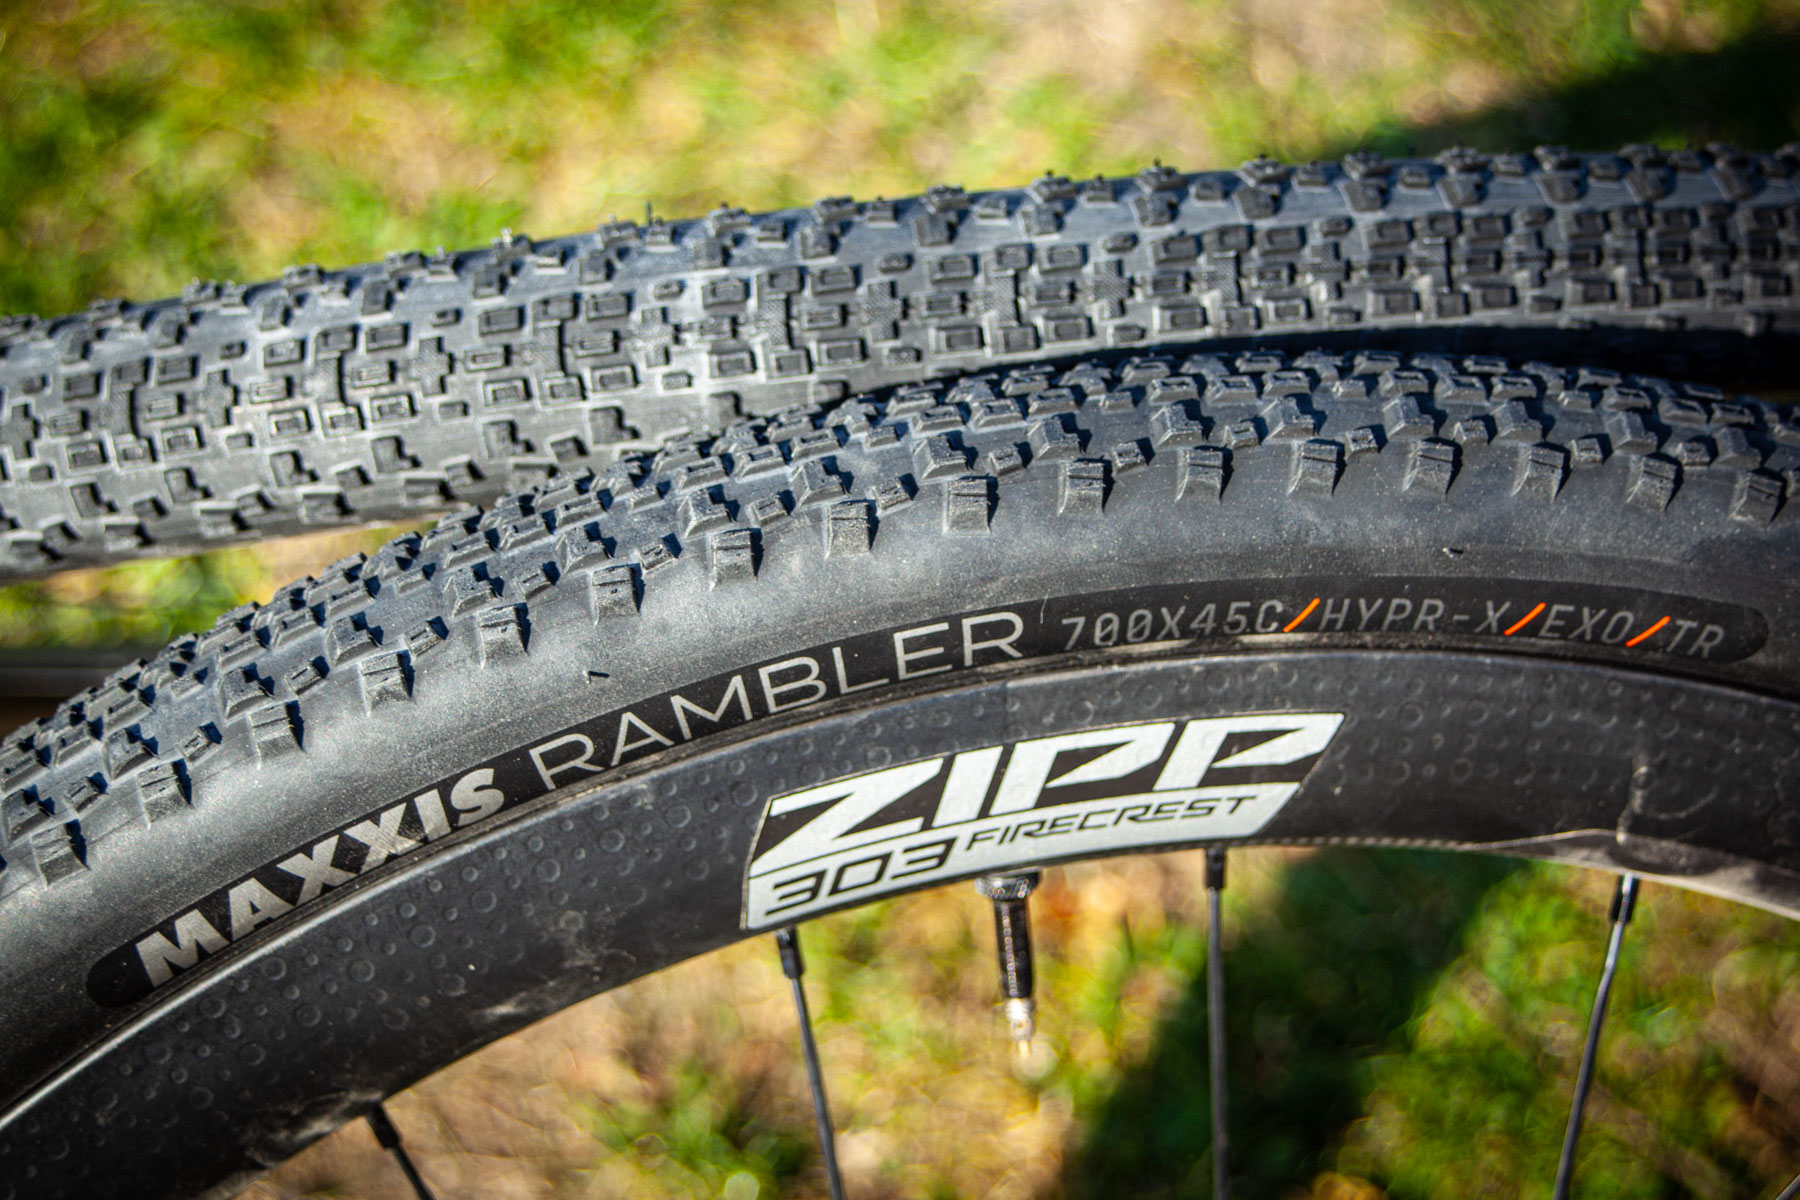
The new Rambler gets updated graphics on its hot patch. Warren Rossiter / OurMedia
Given the previous Rambler was one of the best gravel tyres, this new compound looks to be improving on that very high standard.
The new HYPR-X brings a small increase in weight to 566.3g (45mm), compared to 560.3g (45mm) on the previous Dual-compound tyre.
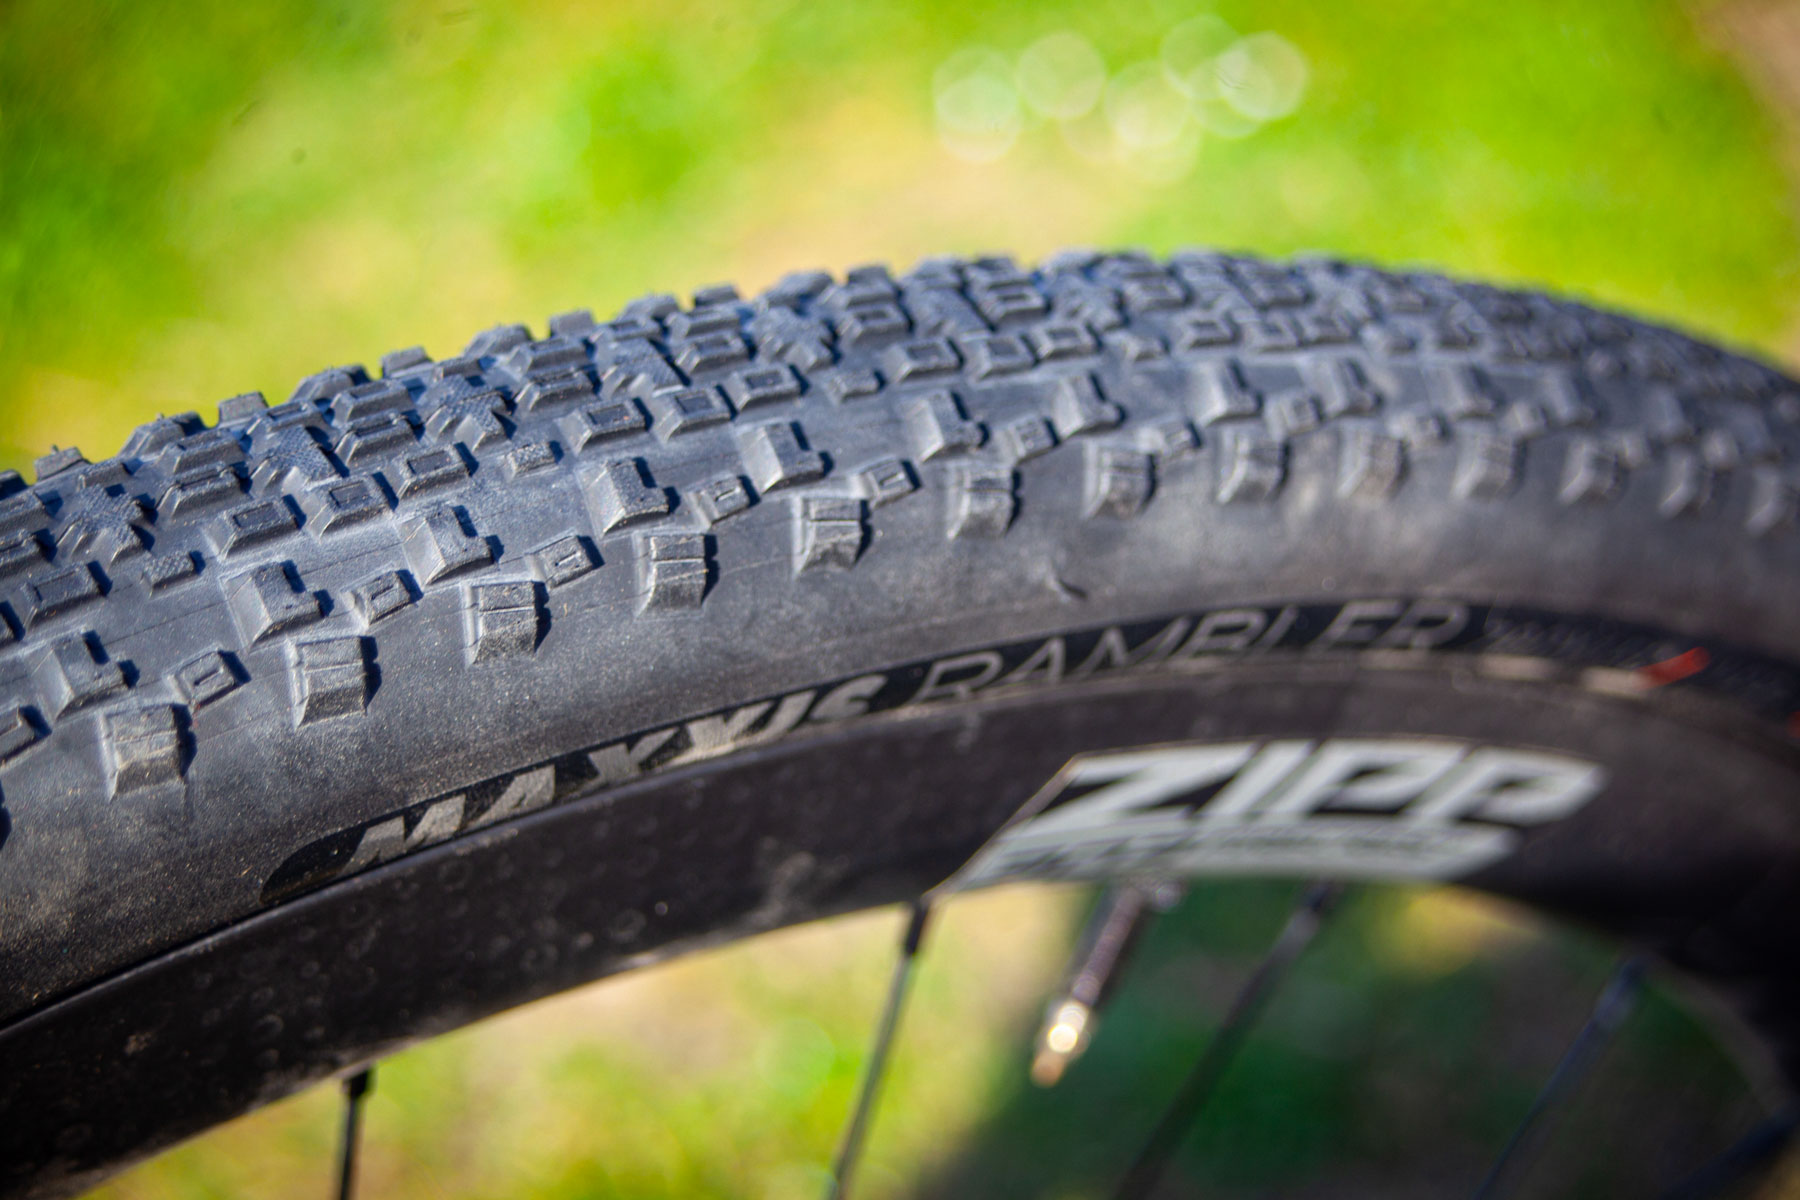
Maxxis Rambler HYPR-X specifications
The new compound has a much more elastic feel to its pronounced shoulder tread. Warren Rossiter / OurMedia
The Reaver and the Rambler with HYPR-X and new casing will be available first in 700x45c, with other sizes arriving over the next three months.
All sizes of the Ravager and the Receptor are scheduled to roll out in the third quarter of 2025.
Maxxis has confirmed pricing will be the same as its current gravel tyres.
With days 1 and 2 of Zwift Community Live 2025 ridden and uploaded, I was feeling the fatigue in the legs. But the weather was beautiful in Mallorca, the vibe at ZCL was perfect, and nothing was going to stop me from taking on the toughest ride of the week up Sa Calobra! Here’s how the final day of ZCL unfolded for me…
Ride Plan
Today I was again taking on the “Uber Pretzel” version of the three ride options. If ZCL had a “Queen Stage”, this was it: as much distance as the day before, but twice as much elevation! We would ride from sea level up to the top of the famous Sa Calobra climb, then descend it all the way down to sea level before turning around to climb our way out:
I really wasn’t sure how well my tired legs would handle all the elevation, so I resolved to take it easy and enjoy the ride so I could finish ZCL on a high note.
Ride Summary
Getting Started
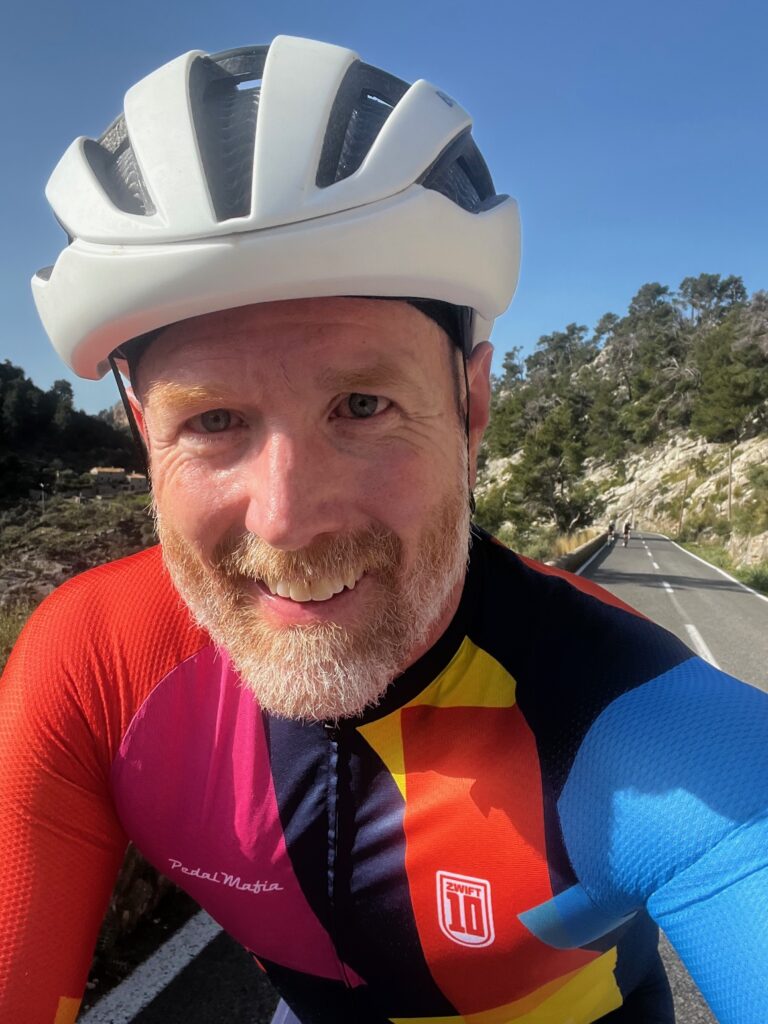
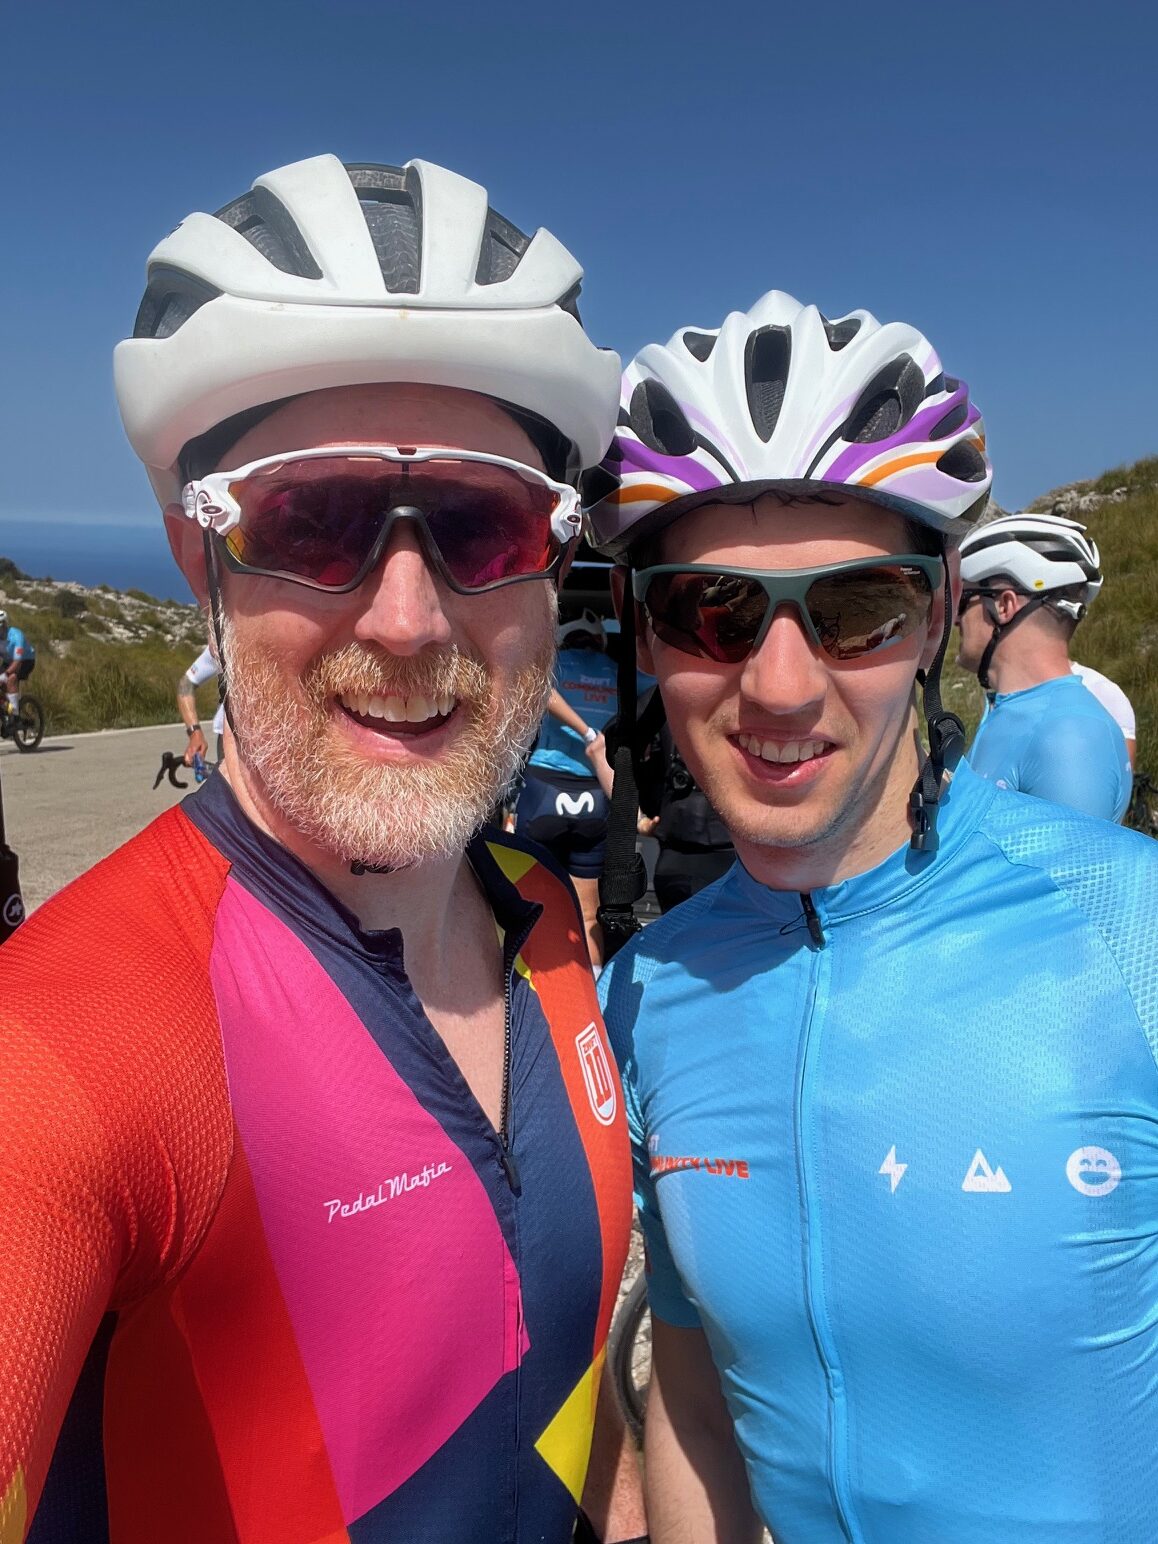
Once again, the dining room was buzzing for breakfast as all the Uber riders chatted about their day. Sa Calobra is a bucket list climb for many, so there were lots of excited – if not a little nervous – riders in the room. I was one of them.
After a quick breakfast full of clean carbs (whole grains, fruit, and yogurt) I kitted up and headed out to the starting area.
Since I wanted to make sure I saved my legs for the climbs without holding up my group too much, I resolved to join a more medium-paced group instead of one of the first, faster groups. I was also looking to ride with some Zwifters I hadn’t ridden with yet, so I joined the group led by Zwift’s Director of Women’s Strategy, Kate Veronneau. (I knew from prior experience that Kate is both a very strong rider and an experienced ride leader. She wouldn’t steer us wrong!)
Let the Fun Begin: Coll de sa Batalla
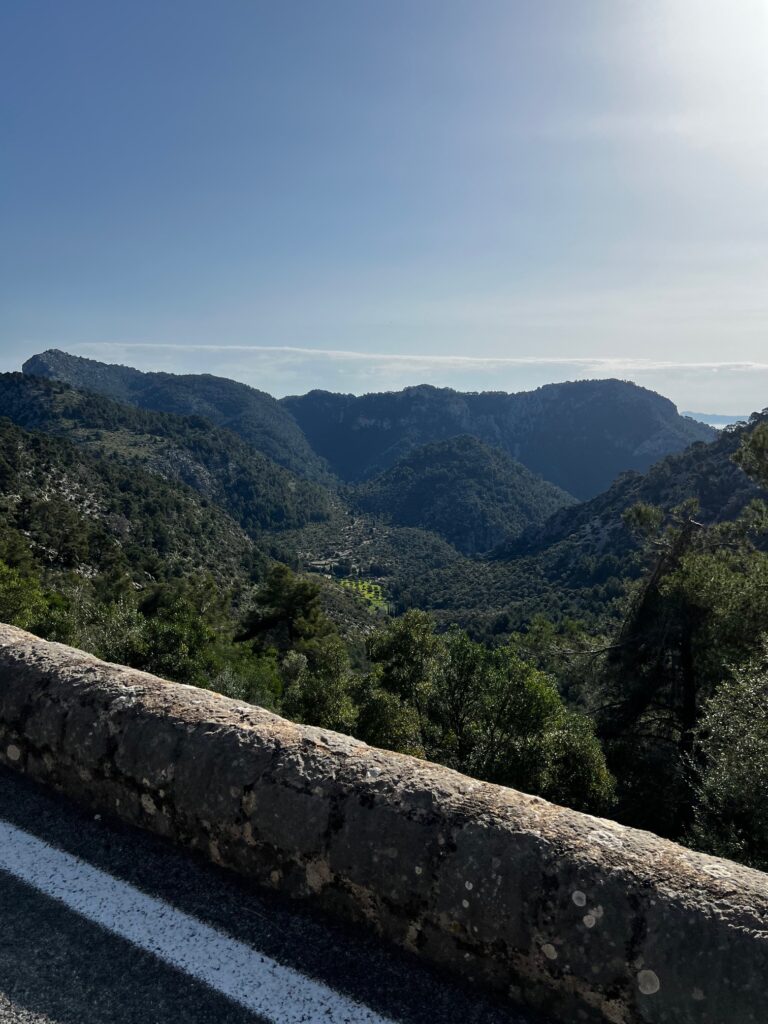
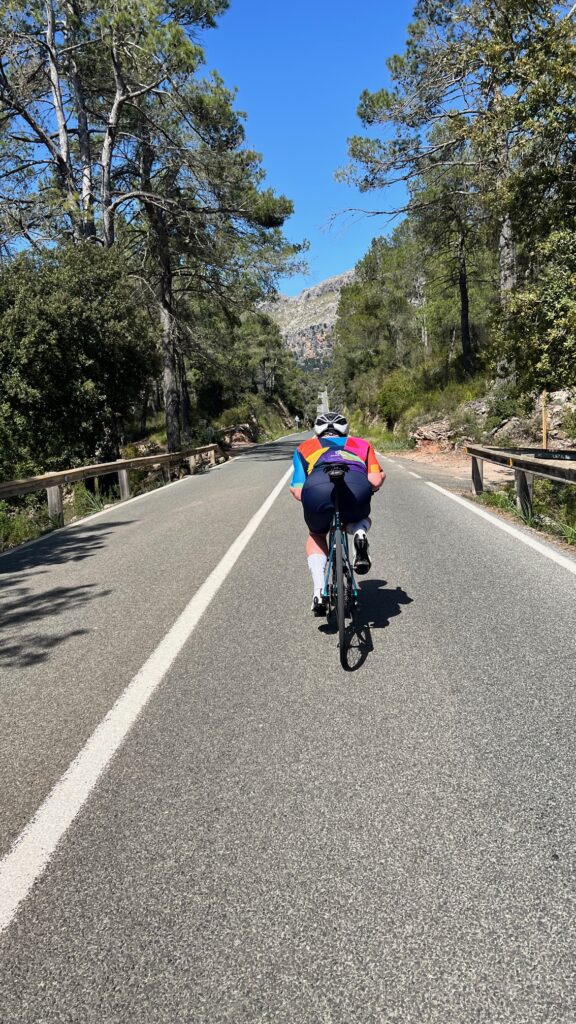
The first 10km of the ride were quite flat, and the group got into a rhythm. Then the ground sloped up so we were climbing – but this was just the easy stuff. 25km in, the switchbacks began as we made our way up the Coll de sa Batalla (7.9km at 6%):
This is where most of the group pulled away from me, and I just rode my own ride, enjoying the switchback climb and valley views as I lugged my “overmuscled” physique toward Sa Calobra.
Solo climbing time on Coll de sa BatallaValley view from Coll de sa Batalla
I caught up to the group where they’d stopped at the Repsol gas station, and I thought we were close to the start of the Sa Calobra descent.
We were not.
Thinking we didn’t have much climbing left, and with legs that felt decently fresh, I followed the front two guys (one wearing an Everesting jersey, which should have tipped me off) who quickly got away from the rest of the group as we put in a solid climbing effort to finish off Coll de sa Batalla.
A Surprising Climb
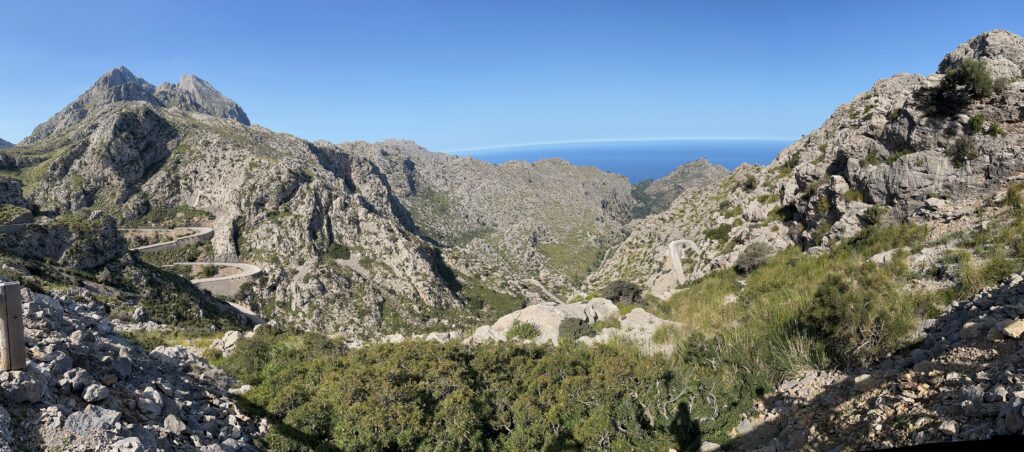
A fun rollercoaster descent followed, lulling me into a sense of security. Then the road pitched upward – surprisingly so – and I realized I had made a bit of a mistake. We still had another 3.1km at 6% to climb to the top of Coll dels Reis before we could descend the other side (which is Sa Calobra). I was soon caught and (once again) passed by most of the group. Ha!
We regrouped at the top of Coll dels Reis on the Sa Calobra side, and Kate explained that we could hang out there, at the top of Sa Calobra. Or we could descend it, then turn around and climb back up. Everyone in our group was there to ride Sa Calobra, so down we went.
Descending Sa Calobra
It’s hard to adequately describe my experience descending Sa Calobra for the first time. It’s such an otherworldly and unique road. The smooth, serpentine turns seem to undulate endlessly, contrasting with the rocky mountainside as you look down and try to wrap your head around how it’s all laid out.
The road was smooth and dry, the temperature was cool but not cold, and there were no cars getting in the way. I took advantage of it and enjoyed the descent, staying off the brakes when it felt safe (because fast is fun), but not taking any unnecessary risks, either.
It was perhaps halfway down that I began passing Zwifters who were in the first, fast group and on their way up the climb. Nick Nellis from TFC, Nick Kalkounis from ZwiftHQ, Jeff Linder from NorCal Cycling, Nathan Guerra, Jason Stern from DIRT… I yelled “Allez allez!” at everyone I recognized, flashing a smile as they suffered their way up the climb. I knew I’d be there soon enough.
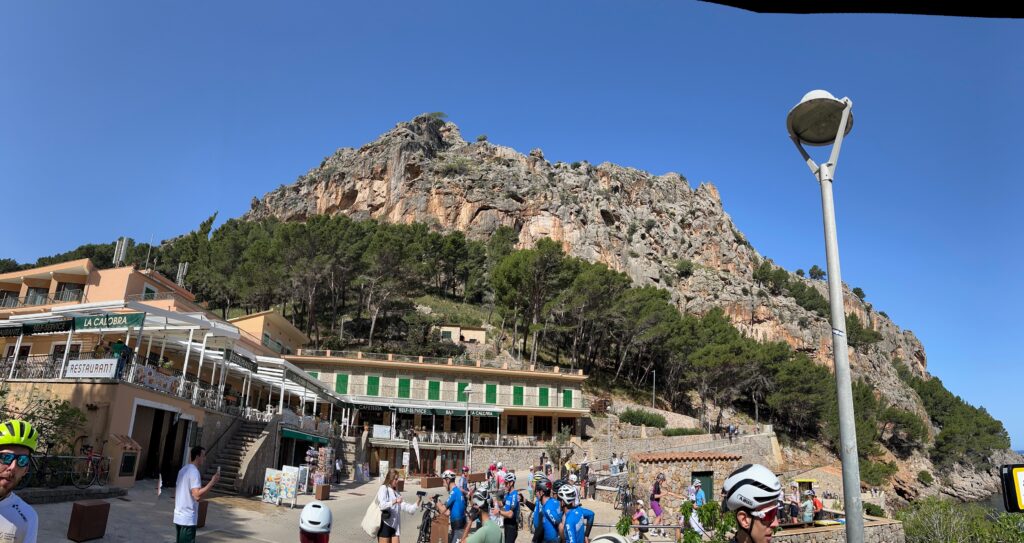
Soon enough I was down at the bottom with a whole lot of cyclists, and it was time to turn around and pay the piper.
Climbing Sa Calobra
I told the two riders with me that I was going to treat this like a Zwift TTT race: holding what seemed like too easy of a pace at the start so I still had something to give at the end. So I chugged along around 220W, somewhere between 2.5 and 3 W/kg, and just enjoyed this infamous climb.
(At least, I think that’s where my power was. I’m not convinced my Garmin pedals were reading accurately, since my L/R balance was way off, indicating at least one misreading pedal.)
In the early part of the climb, I met one of the Zwifters with me: Vlad. He’s from the Ukraine, and lives in Kiev. He’s only ridden indoors, on Zwift, since the war began. ZCL was his first opportunity to ride outside in over three years. Wow.
Zwifters from later groups began zipping past us, descending as we climbed, and we started yelling “Ride On!” to everyone we recognized. You could hear the Ride Ons all over the mountain as Zwifters shared the love. Super fun!
The end of the climb actually came a bit earlier that I’d expected, but that’s not to say it felt short. The Zwift support van was parked perhaps 100 meters before the finish line of the Strava segment, so as I neared the van I heard yells of “push all the way to the sign!” Everyone had to go hard to the line.
I clocked a blazing 50:28 on the official segment, earning me 81,823rd place out of 165,549 riders. Top 50%!
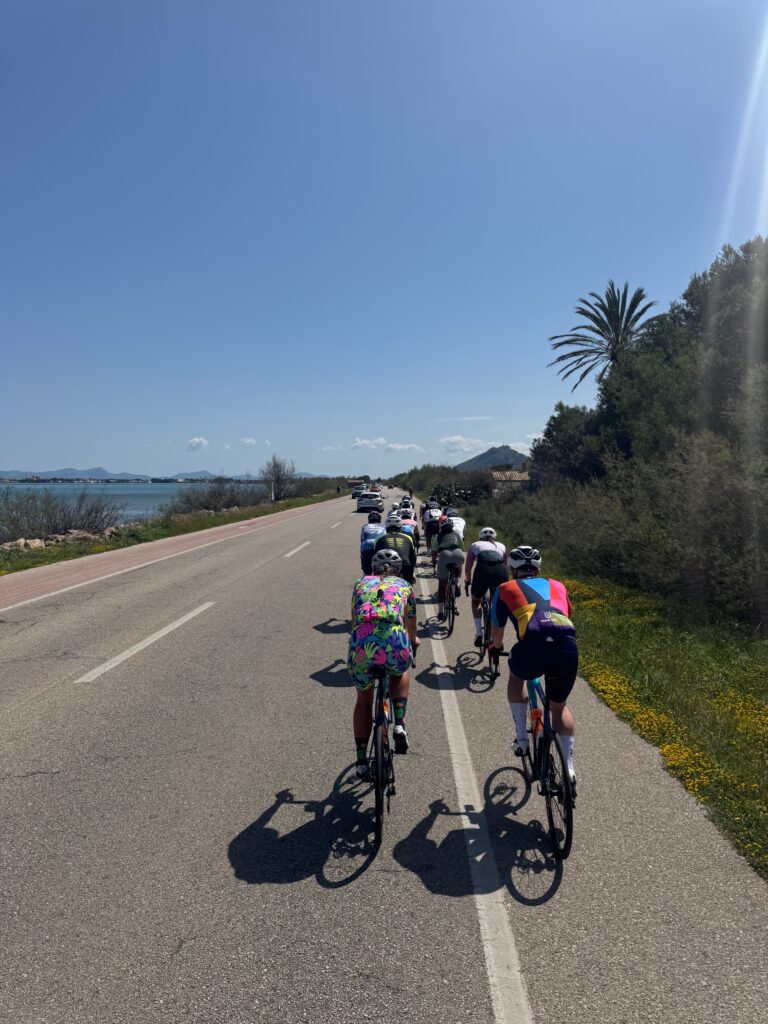
All Downhill from Here
We regrouped at the support van, then made our way together to the coffee shop for a welcome shot of caffeine and cake. Our 2000 meters of climbing were essentially done, we just had a mostly-downhill 40km left to knock out.
Cyclists know that’s a great way to end a ride. Top-knotch route design right there.
It was probably bad form for me to enjoy a cheeky supertuck off the front of the group on a long, straight section of downhill. But it felt like such a fun and Zwifty thing to do. (Take that, UCI!)
SupertuckingSpinning with the Zwinfluencers
And it’s also possible that a few others and myself enjoyed ourselves a bit too much, relishing the speed of the rolling descent. Kate eventually rolled up to the front to get things slowed down and grouped together, and we began making our way toward home as a unit once again… slowly.
Mercifully, when a faster group of Zwifters rolled by, Kate said we could join them if we wanted to roll faster, so a few of us did just that. That’s how I ended up riding next to Ayesha McGowan (@ayesuppose) and Carolyn Carter (@la_triathlete) in a zippy group of influencers (Zwinfluencers?) who towed me the rest of the way into Mallorca.
The day was far from over, though. After a shower and some hangout time with Monica to hear how her ride went, we headed for dinner (fajitas!) followed by the final fireside chat hosted by Matt Stephens.
This third chat was by far my favorite of the three nights. Matt’s two guests were Sirs Chris Hoy and Mark Cavendish, and those three men held everyone’s attention for over an hour. The conversation was expertly guided by Matt and included serious notes (Sir Chris talking about his stage 4 cancer diagnosis) but also lots of stories and laughs.
Stephens with Hoy and CavThanking the ride leaders and ZHQ crew
Eric Min came up next, thanking everyone for coming, inviting the Zwift staffers and ride leaders up for a round of applause, and promising a ZCL for 2026. (Everyone cheered, because everyone wants to do it again!)
We ended the night with a 10-minute ZCL highlights video, which I wish Zwift had uploaded somewhere because I’d include it here. (It was so well done, and really captured the positive energy and community vibes of the week.) It felt like the perfect ending to an incredible few days.
That’s a Wrap
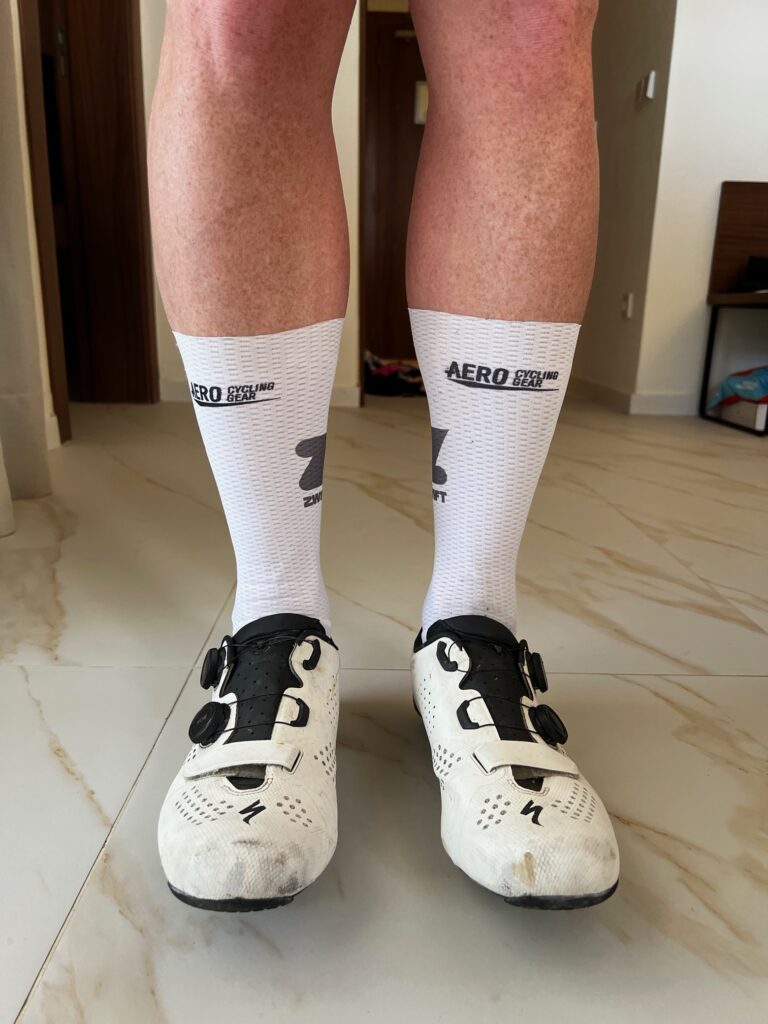
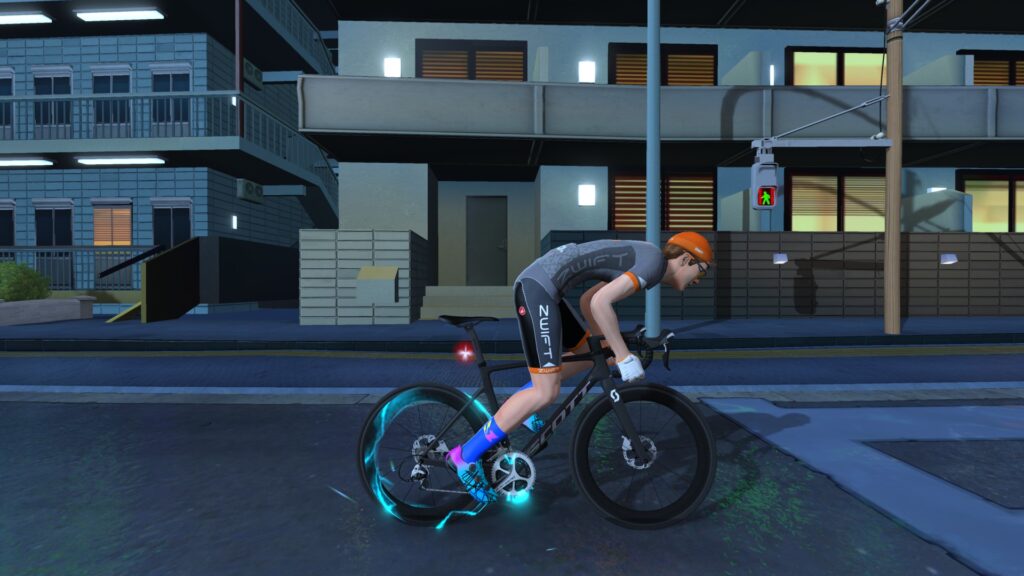
I may write one more post with additional thoughts on all things ZCL, because there was so much I haven’t shared in these daily summaries. But since it’s past midnight here in St. Andrews, Scotland, where Monica and I have extended our European stay, for now I’ll leave you with a #humblebrag shot of the sweet aero socks Zwift gave everyone at ZCL:
The Tiny Races concept came to me while I was riding outdoors one day, trying to figure out a way to make workouts on Zwift more enjoyable. Like many Zwifters, I’d done a lot of structured workouts on Zwift, and I’ll readily admit that they provide very efficient and targeted training stimulus.
There’s just one problem: I find structured workouts to be lonely, painful, and boring.
So the Tiny Races were created, with the goal of pushing riders hard in 4 back-to-back events lasting 5-10 minutes each. The hope was that you’d get a lot of VO2-level work in on each race, effectively turning your hour of racing into an hour-long VO2 workout.
But Tiny Races aren’t a perfectly structured VO2 workout. Yes, you’ll get a lot of VO2-level work in. But it may vary greatly depending on your strengths as a rider, and the course chosen for the day.
So on this Saturday, I decided to try something I’d never done before. I would simply treat the first 4 minutes of each race as a VO2 interval, shooting to average 350W during that time. Then I would ease and recover as I finished the race.
Then do it again, and again. And again. Four VO2 intervals. Because on this particular day, I was more interested in getting a quality workout in than I was in finishing high in the race rankings.
Here’s how the races (workouts?) unfolded…
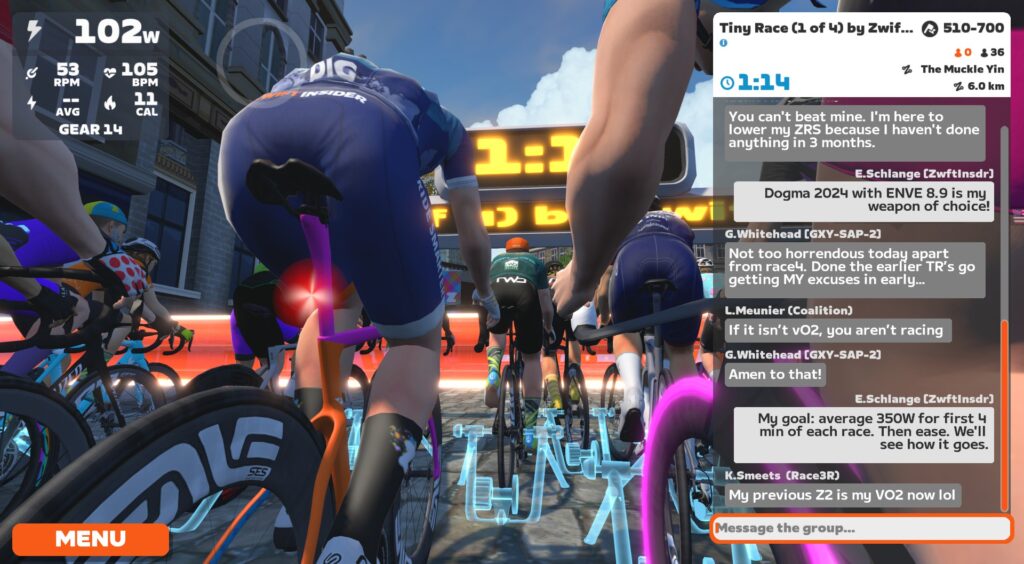
Race 1
The first race was 6km of The Muckle Yin, ending at the Breakaway Brae Reverse banner. I chatted a bit with the other racers, even telling them what my plan was:
Soon enough, we were off! I found myself in the wind as we climbed The Cliffs section, and as a racer, this just felt wrong. I was wasting watts! But not today. Today, I needed to hold 350W for the first 4 minutes.
I stayed on or near the front for most of that climb, then the clock hit 4 minutes and I eased up.
4 minutes at 352W, HR 173bpm
We were so close to the top of the climb and the descent that followed that I put in a little extra work to hold onto the pack so I could stay in the draft until the Corkscrew Castle climb. When we hit that climb the pack flew away, and I finished the last 1.5km easy, clicking to watch the front riders finish before I crossed the line in 36th.
My racing score dropped from 549 to 529 in this single race.
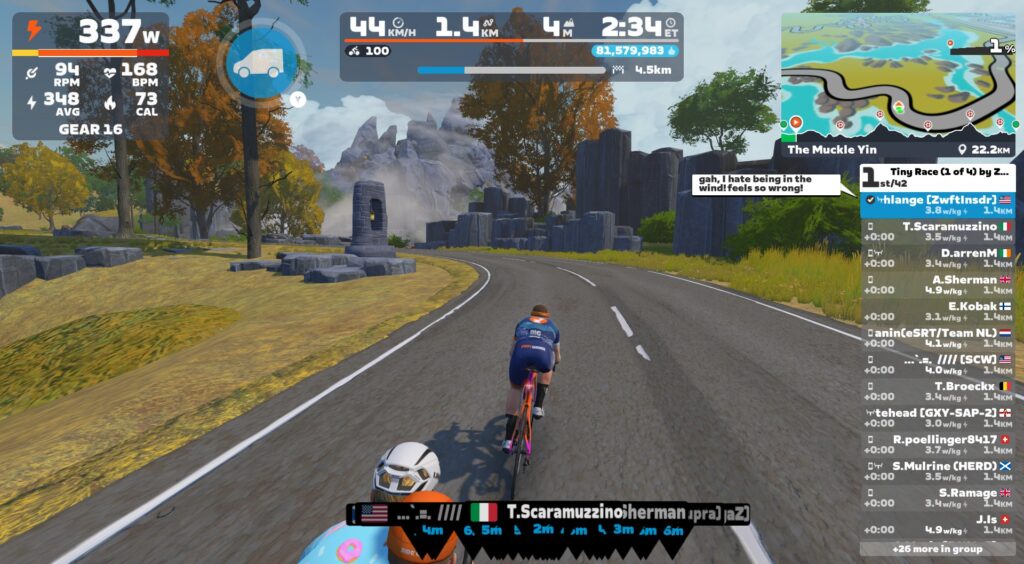
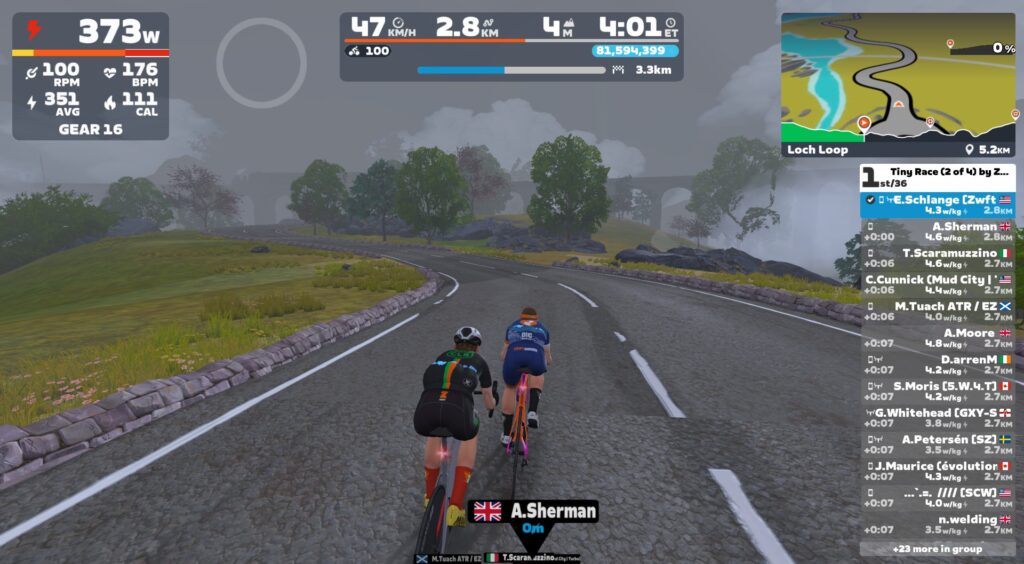
Race 2
The second race was on 6.2km of Loch Loop, ending at the entrance to Corkscrew Castle. This race begins with a long, slack descent down The Cliffs section that we climbed in the previous race. Again, I had to hold 350W for the first 4 minutes, so against my racing instincts I went hard out of the gate onto the descent where I would normally be recovering.
I got an aero powerup at the start, and decided to use it as I went off the front, to make the race more interesting. One rider, A. Sherman, saw my attack and followed. Let’s go!
I was using my steering to shorten the course a bit, but Sherman didn’t have steering, so eventually I gave up and let the game autosteer so we could work together. (Although “work together” really isn’t accurate, because all I was doing was holding 350W. Sherman would have to decide if he wanted to sit on my wheel or push hard and be in the wind.)
I’d say he chose poorly, sitting in the wind just ahead of me for most of my 4-minute effort instead of taking some time to recover. But maybe he was doing a VO2 interval too!
When I sat up at the 4-minute mark, I messaged, “Good luck!” and let Sherman ride away. We had a 6-second gap on the peloton.
4 minutes at 352W, HR 176bpm
I clicked to watch how Sherman got along. He ended up getting caught on Breakaway Brae with 1.2km to go. Nice try, sir!
I rolled in at 34th place out of 36. My racing score dropped from 529 to 509. Woah!
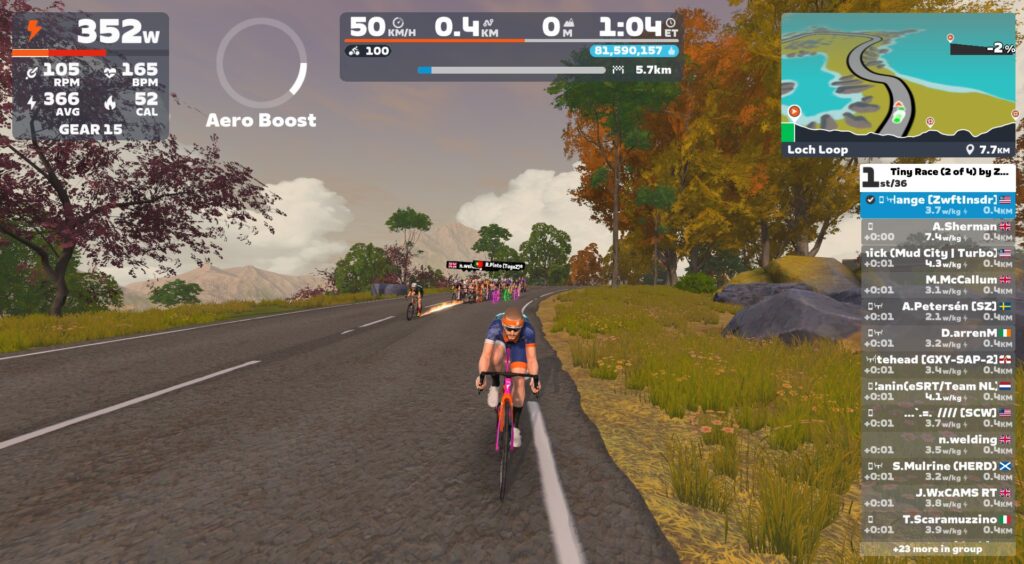
Race 3
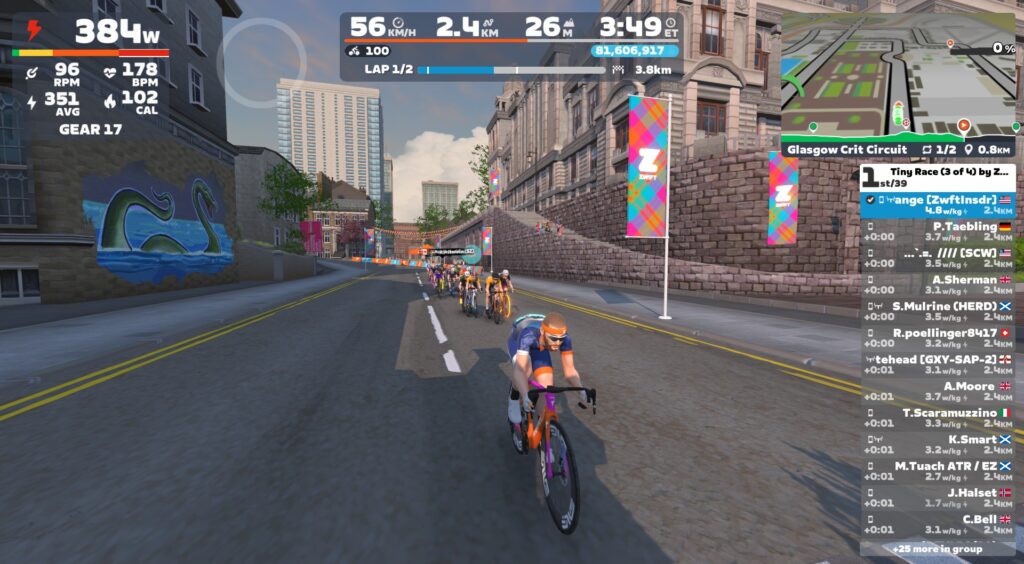
For our third race, we were taking on 2 laps of Glasgow Crit Circuit. The VO2 intervals weren’t killing me yet, so I knew I had the power to do it again. But how hard would it be to hit that 350W average on Glasgow’s undulating roads?
Only one way to find out.
Once again I was off the front early. Then we hit the Clyde Kicker, and I almost got dropped as everyone revved up the power big-time and I tried to keep it fairly steady! I used my aero powerup to chase back onto the group, finding myself off the front again before the lap was finished.
4 minutes at 350W, HR 178bpm
I finished 31 out of 39, dropping my racing score to 503. One race/interval left!
Race 4
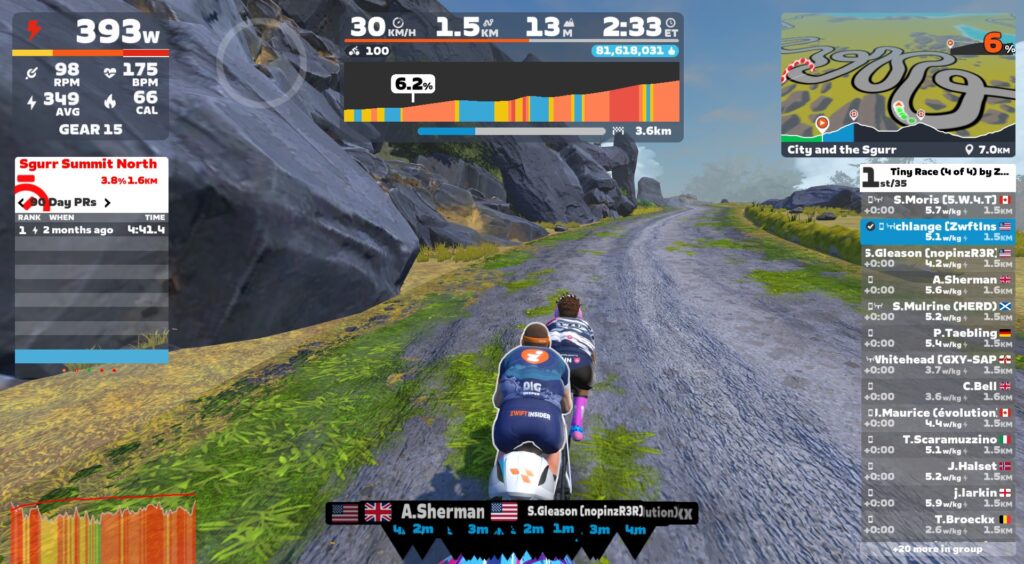
The final race was on City and the Sgurr, a route I rather despise since it quickly takes you up the gravel side of the Sgurr climb, where I always get dropped.
No pressure today, though. I just needed to hold 350W for 4 minutes, which would put me somewhere in the middle of that climb.
Again, I found myself on the front for most of the lead-in to the climb. And I stayed there for the initial bit of the climb before the pack swamped me when things got steep:
I finished my last 4-minute interval just a few meters off the back of the peloton. Job done!
4 minutes at 354W, HR 177bpm
I finished the dirt climb, descended the other side, then climbed the paved side to complete the race at the top of the Sgurr 30th out of 35., dropping my racing score to 490.
Watch my race video:
Takeaways
My “Tiny Racing as VO2 Workout” experience left me with two key takeaways to discuss.
A VO2 Workout that Doesn’t Suck?
I must say that doing a VO2 workout this way was much more enjoyable than doing a typical structured VO2 workout. And I’ve done a lot of structured VO2 workouts! I found it easier than anticipated to hit the target average wattage, and in fact impressed myself with how close I got.
I think it’s a combination of the rush of being off the front of a race (which pushes you to keep pushing) as well as the rush of just being in a pack of riders who are all pushing hard. It took my mind off of the suffering of the VO2 effort somewhat, and the intervals didn’t feel as long.
If structured workouts are lonely, painful, and boring, doing them in a race wasn’t lonely at all, less painful (thanks to some distraction) and much less boring, partly due to the challenge of hitting the target power without ERG mode, and partly due to being in the middle of a race.
What I’d like to do next is work to extend these intervals by increasing the target wattage (increments of 10W) or time (increments of 30s). I’d like to work up to 5 minutes at 360, then see if we can keep pushing!
Tanking My Zwift Racing Score
I’m a fan of Zwift Racing Score, but I must say I was surprised by how precipitously it dropped in these four races.
It was particularly surprising because the three races I’d done leading up to these had been Zwift Games climbing races where I’d lost badly, but my score had only dropped a total of 6 points across those events:
Stage 3: 550 to 549 when I finished 94th out of 128 (see results)
Stage 4: 549 to 548 when I finished 39th out of 60 (see results)
Stage 5: 548 to 544 when I finished 25th out of 33 (see results)
I’m at a bit of a loss to explain how those three events lowered my score by only 6 points, while the four Tiny Races dropped my score by a total of 54 points. All I can figure is that placing very near the bottom of the race impacts your score a lot more than placing, say, in the bottom 1/3 of the group.
(If you’ve got any great insights into how my score dropped so significantly, please share them in the comments below! I’ve reached out to my contacts at ZHQ to see if they can provide any insight…)
Questions or Comments?
Have you ever done a race as a structured workout? Explain your approach, and how it went. Got other questions or comments? Share below!
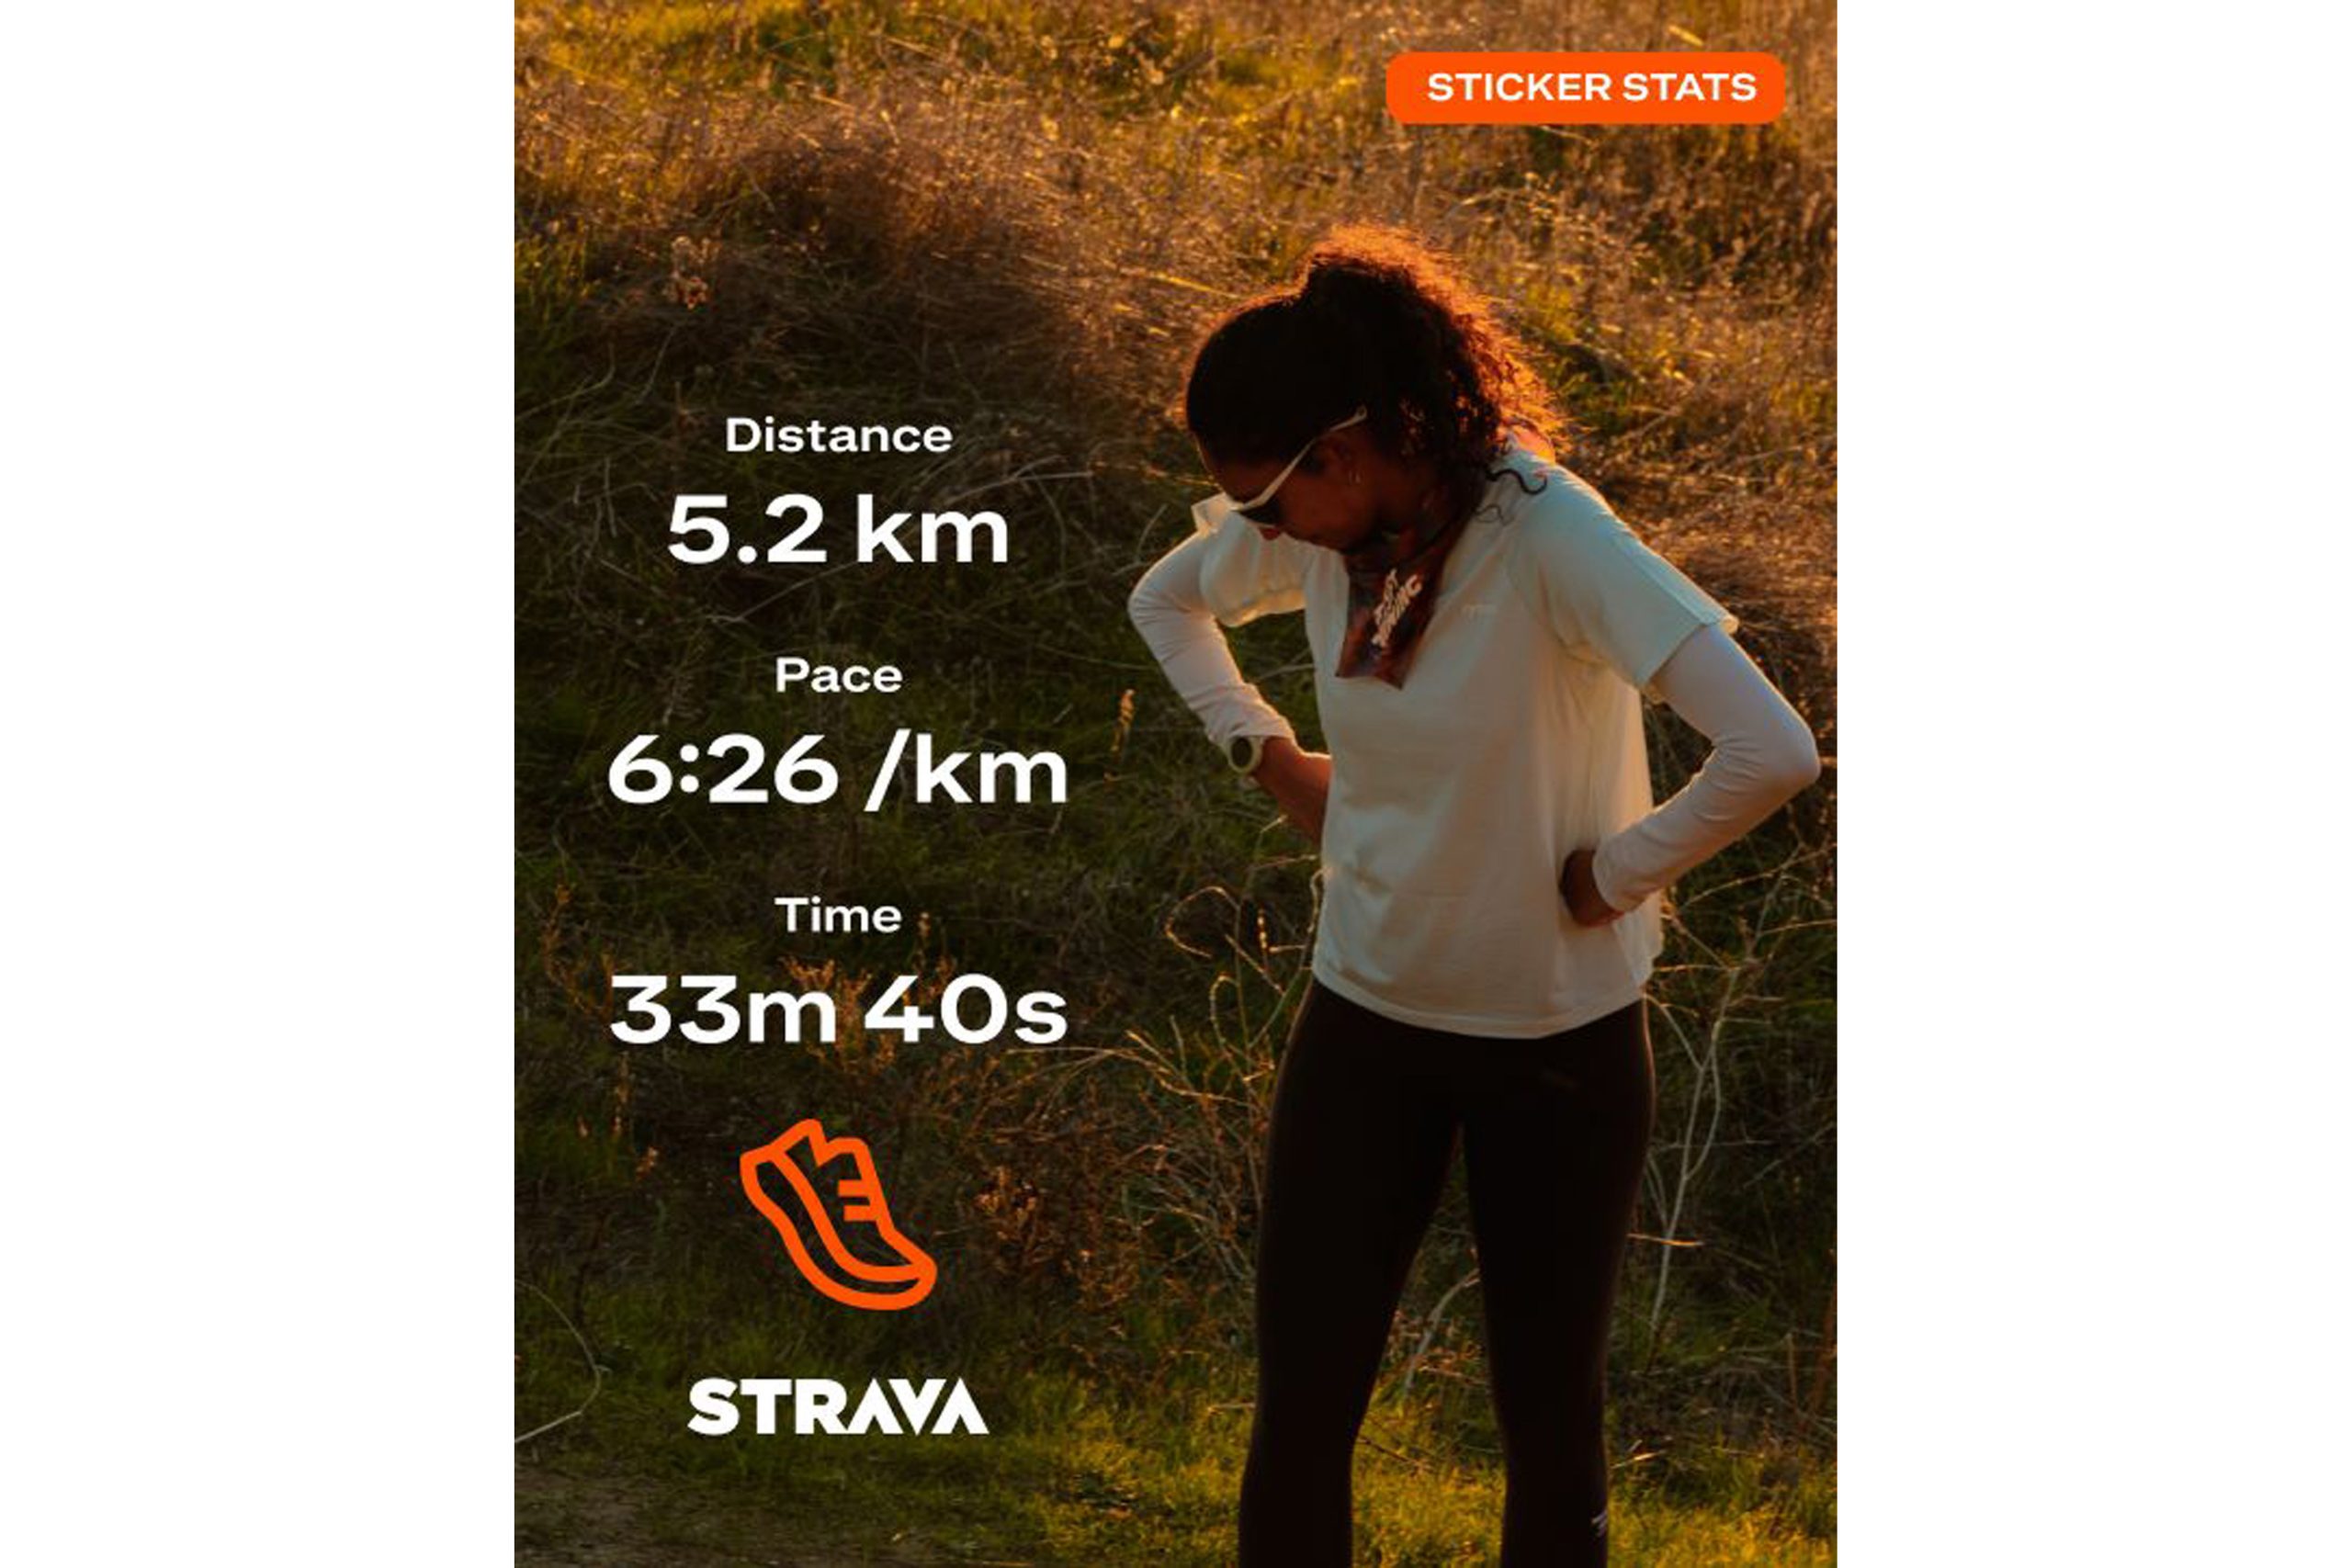
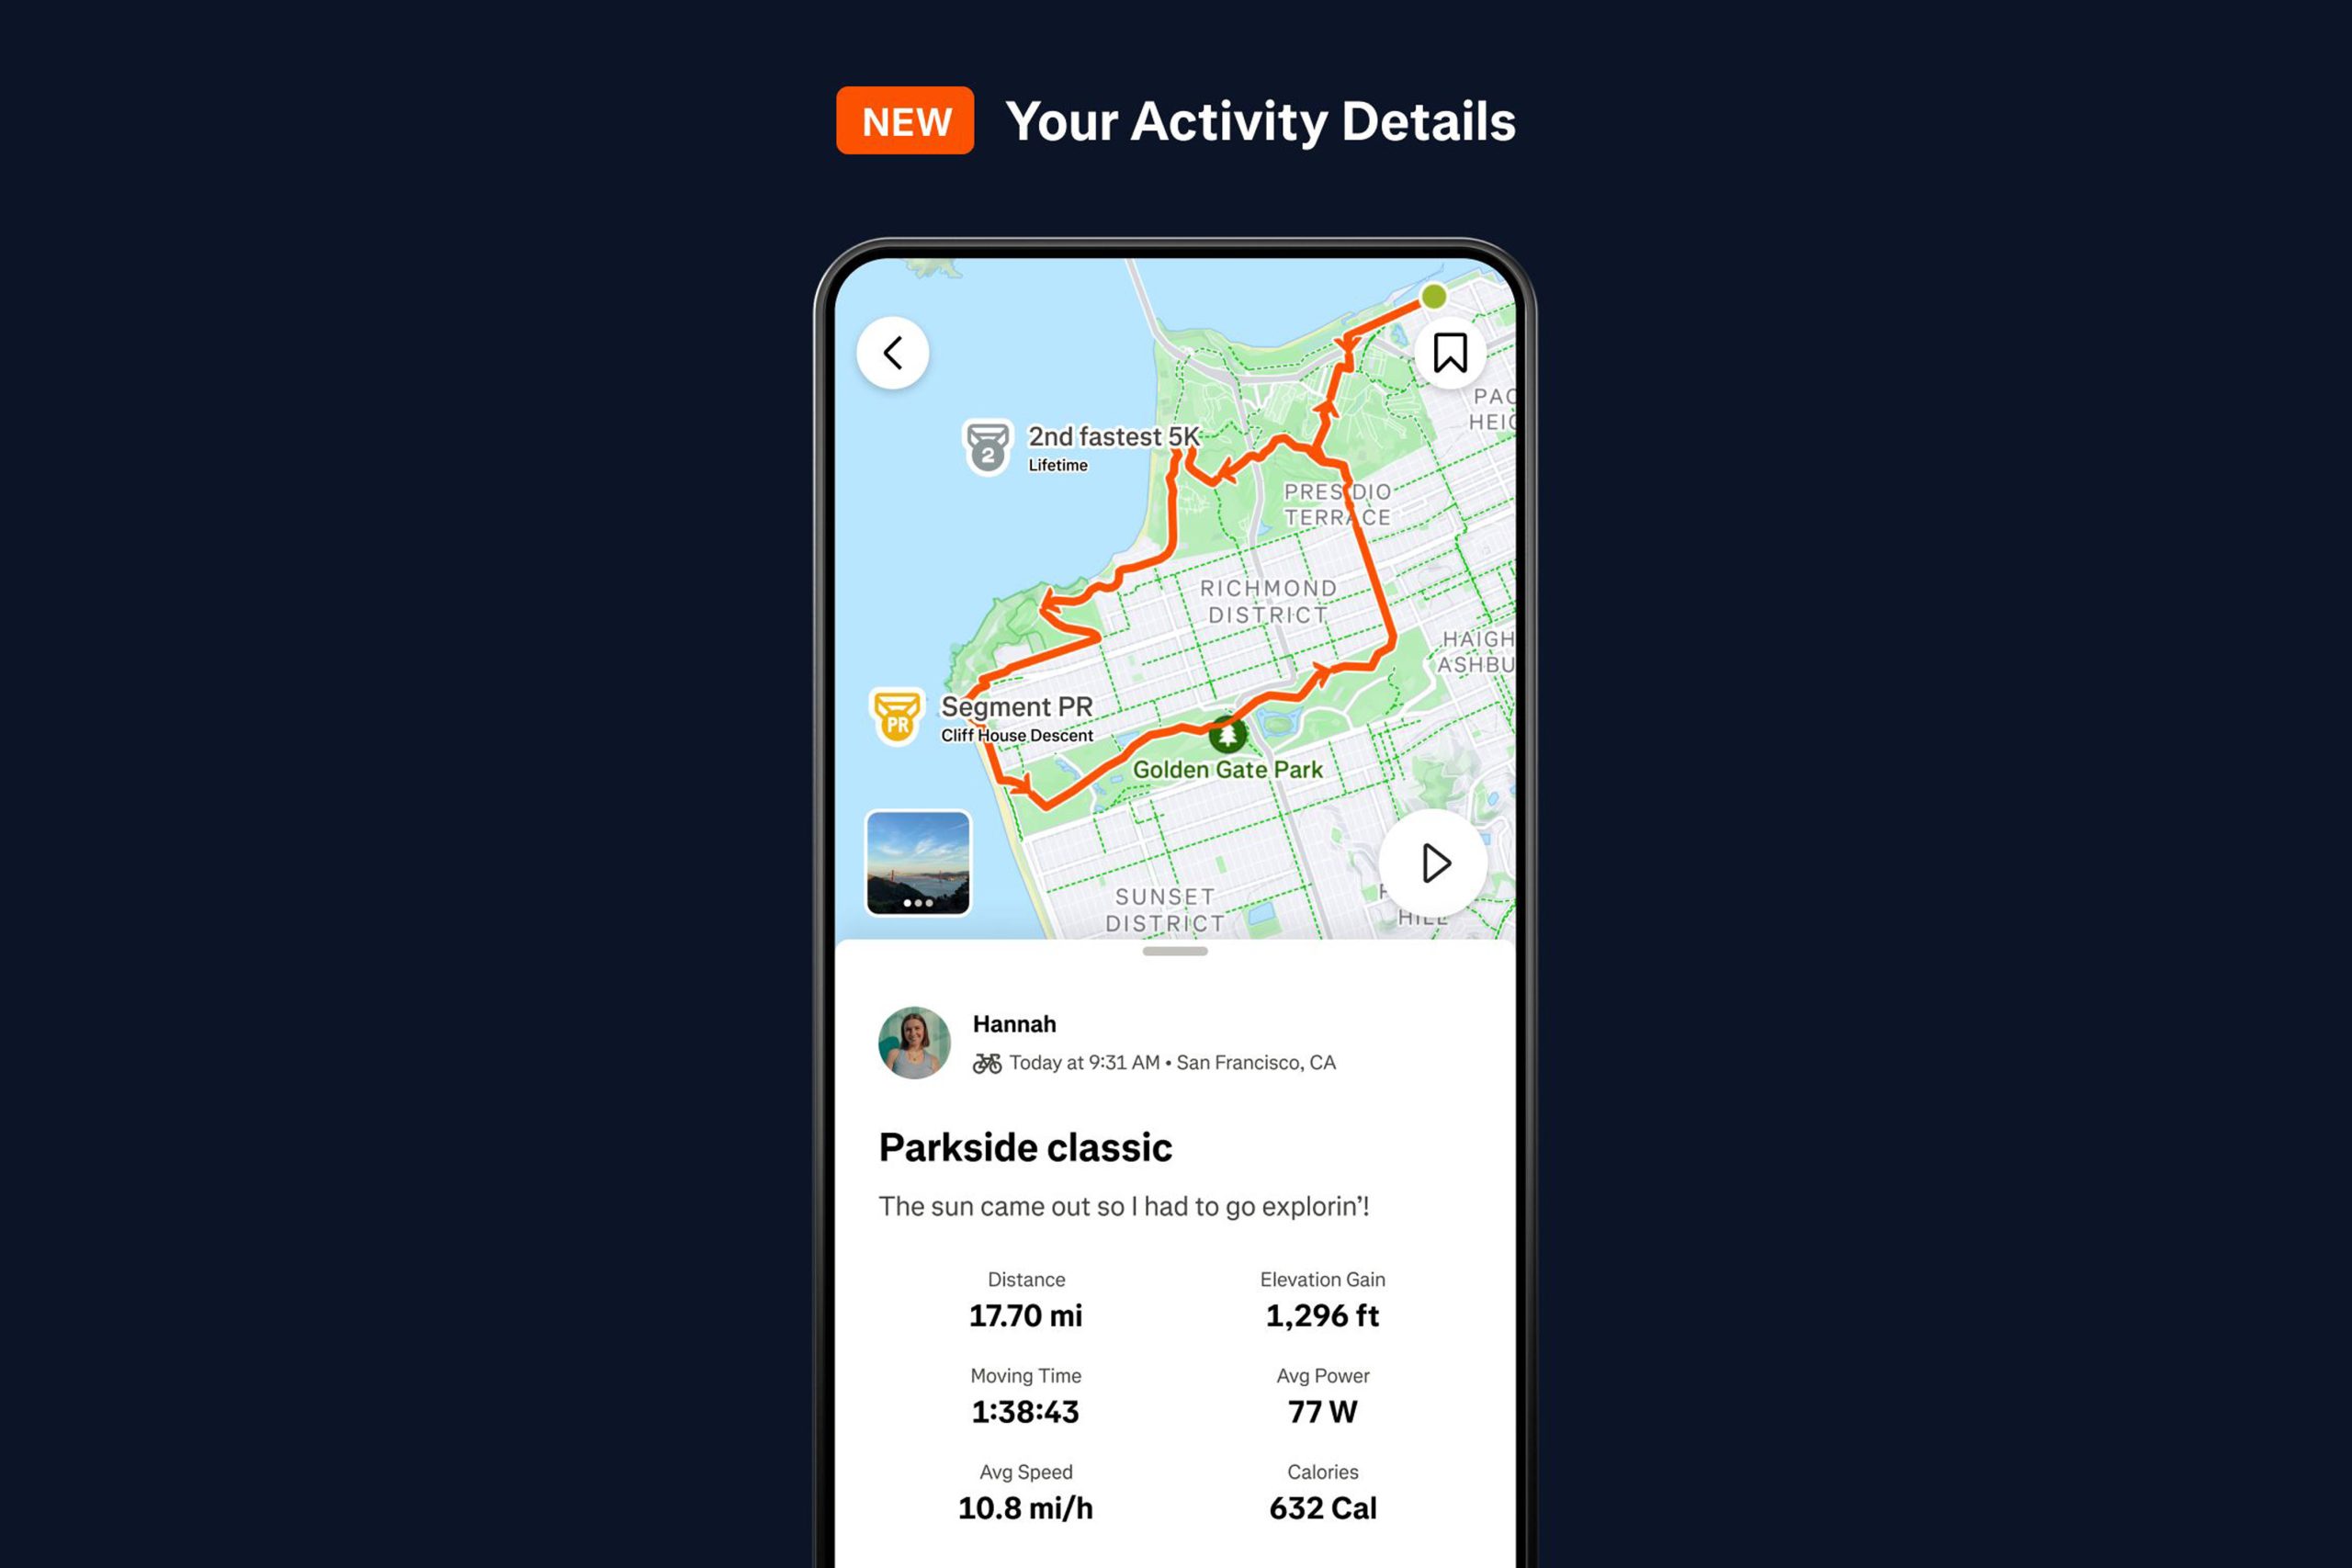
Strava has launched new ‘Sticker Stats’ that can be shared on social media to show off your activities in greater detail.
The announcement comes alongside a host of other updates to the popular ride-sharing app, including the integration of FATMAP’s ‘advanced mapping technology’, refinements to its routing capabilities and a refresh of the Activity Details page.
Strava’s new Sticker Stats feature makes it easier to share activity stats on social media. Strava
Strava’s new Sticker Stats feature is designed to enhance the way activities can be shared on social media platforms, such as Instagram.
Accessed via the share button on Strava’s app, the feature creates a transparent ‘sticker’ that can be copied to your clipboard and overlaid onto photos, or imported directly into Instagram as a story.
Each sticker features distance, elevation gain and ride time, plus a line drawing of the route map, followed by Strava’s logo.
The only thing to note is that an activity’s ‘visibility’ must be set to ‘everyone’ or ‘followers’ – private activities can’t be shared.
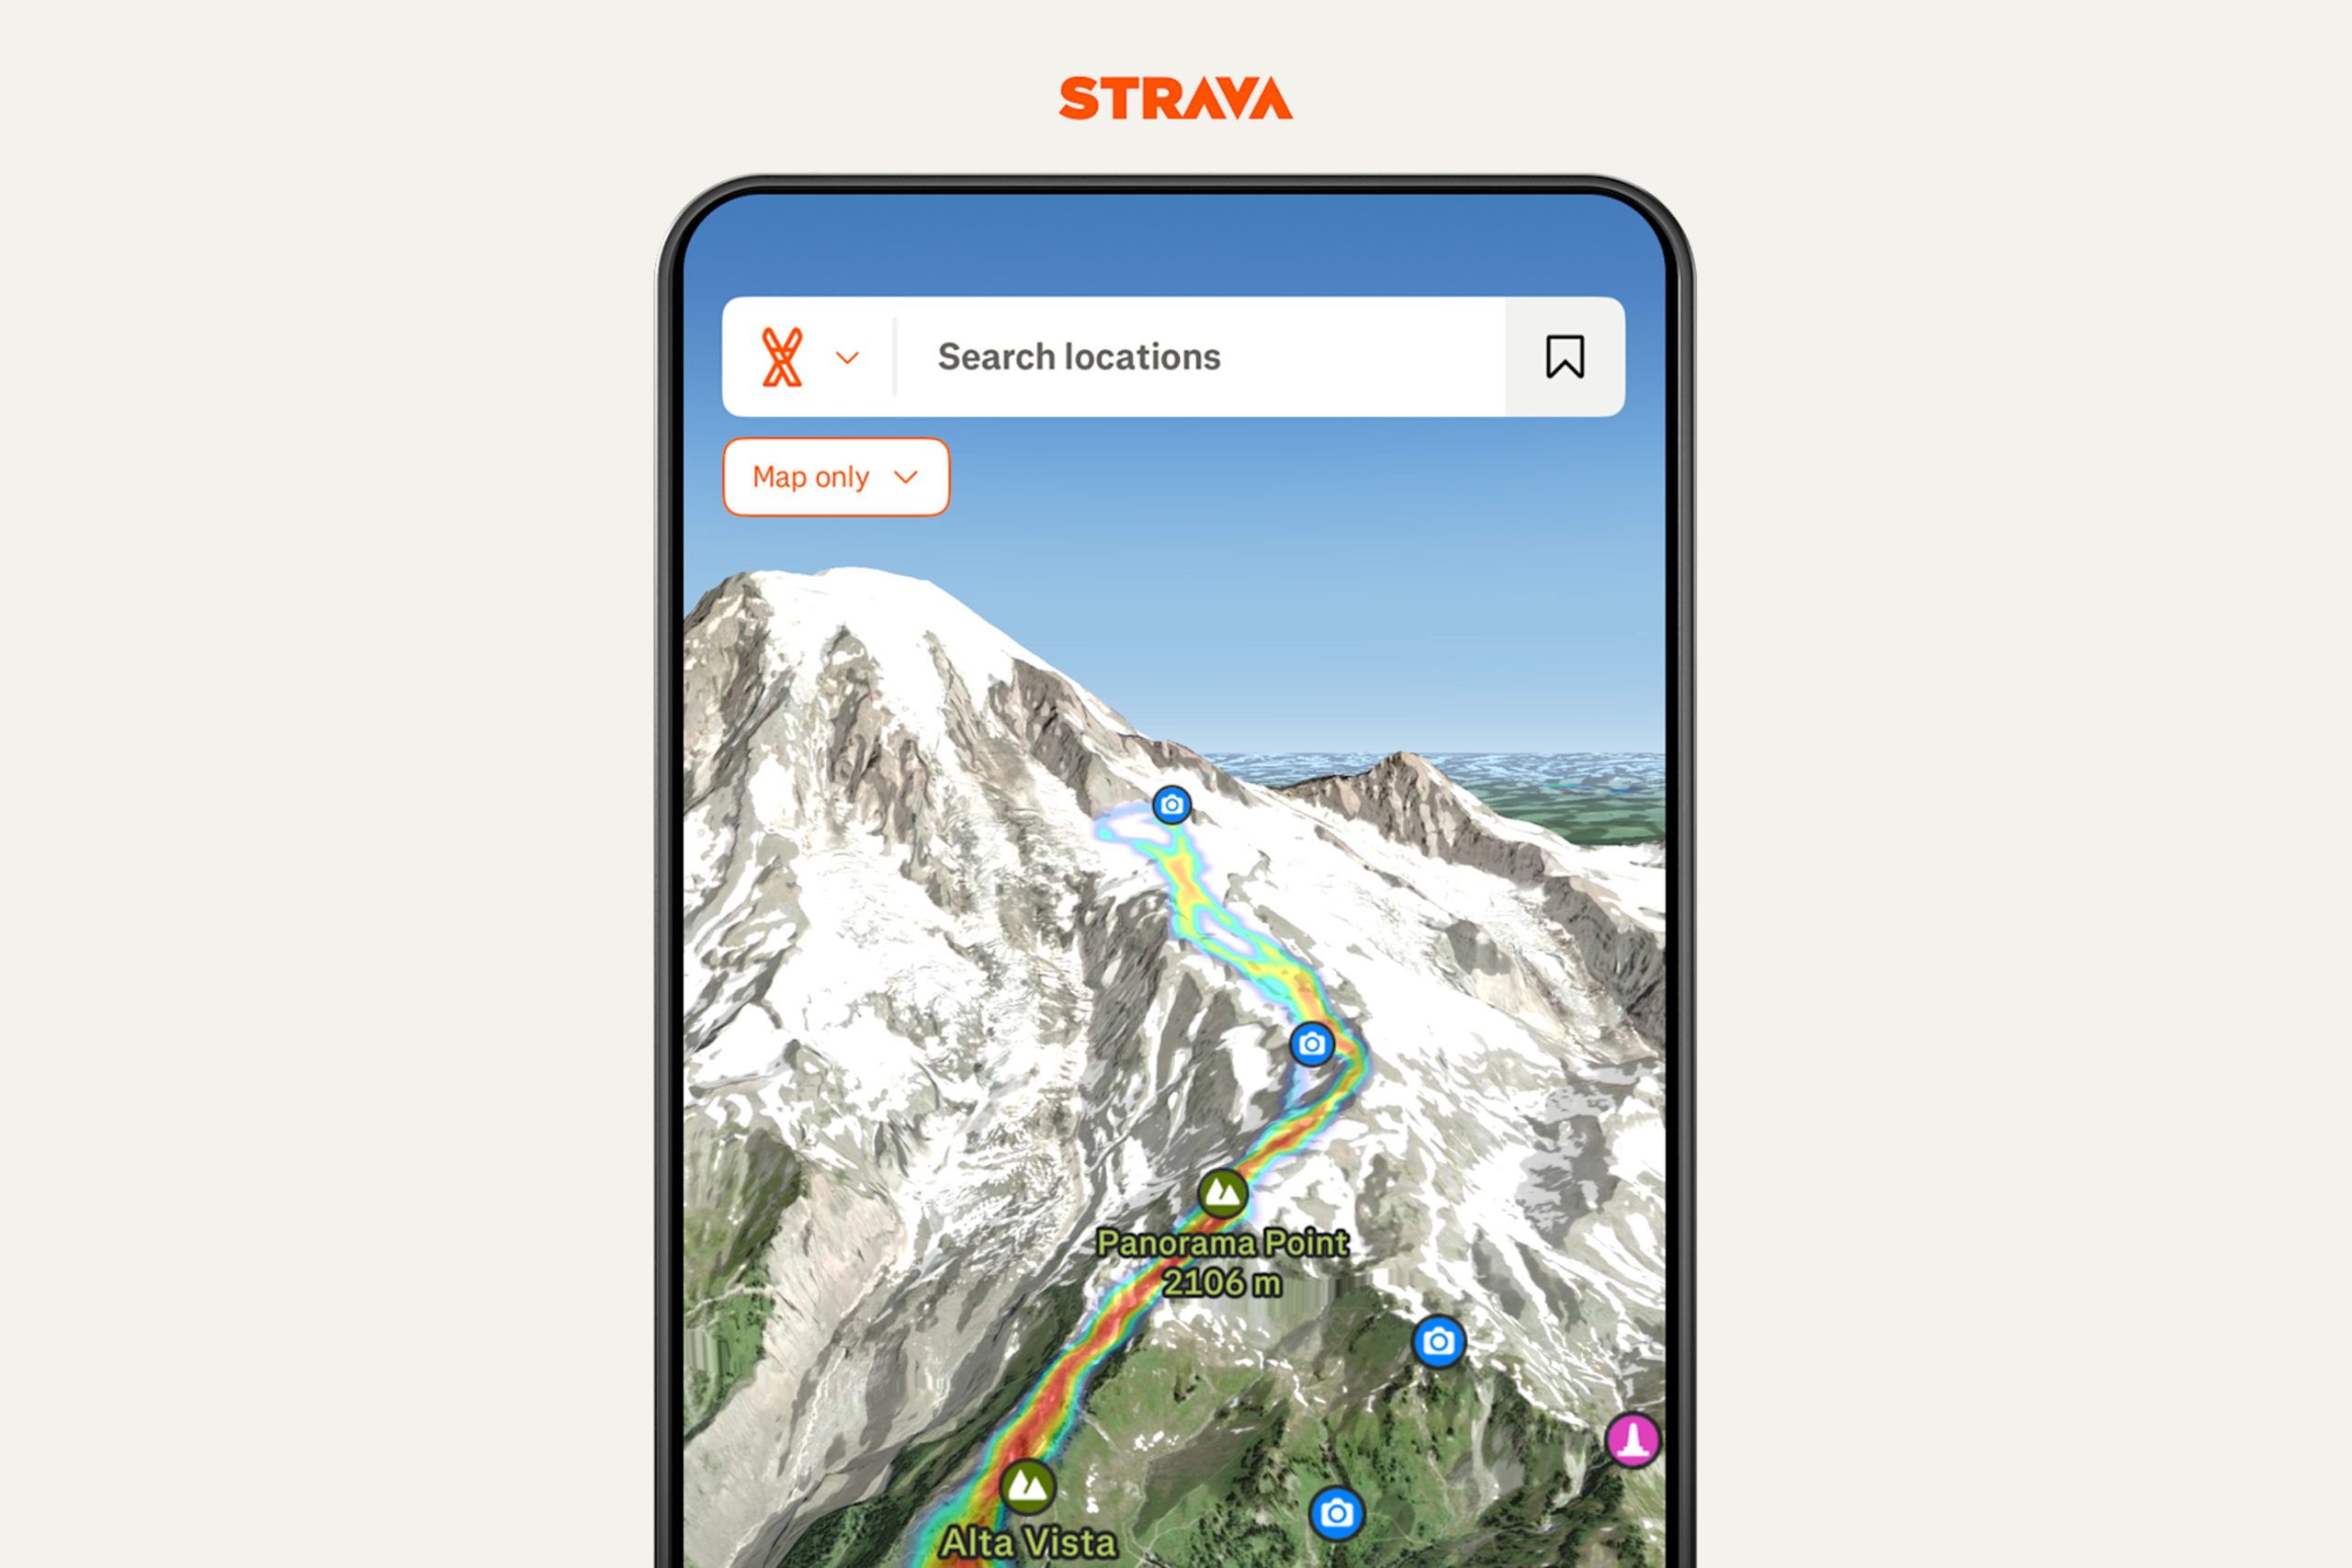
Mapping updates
Strava has announced a slew of new winter-focused mapping tools. Strava
Having acquired FATMAP – a company that produced detailed 3D maps designed for outdoor enthusiasts – in 2022, Strava has announced its capabilities have now been integrated into its platform.
In what the brand is calling a “major upgrade” to its mapping features, Strava says the technology delivers “lifelike 3D terrain, detailed satellite imagery, and new maps layers for planning winter and trail activities”.
Many of the features are integrated from FATMAP, which Strava acquired in 2022. Strava
Focused primarily on winter activities, such as skiing and snowboarding, Strava says its ‘proprietary Map Rendering Engine’ will provide users with new insights such as:
Avalanche gradient – shows steep gradients (between 25 and 45+ degrees) where avalanches are likely to occur
Gradient – displays slope angles between 0 and 90 degrees
Aspect – shows which direction a slope faces “to help users find the best snow and understand how much sun a particular face of the mountain might receive”
Winter Map Style – a winter-specific map optimised for planning “snow activities”
Strava says these new features are available now in the Maps tab on its app or in the map sections of activities.
Route search and filtering
Routes can now be searched and filtered. Strava
In addition to these new mapping tools, Strava says users can now use keywords and/or filters to search through saved routes.
The goal, as you might expect, is to help users find saved routes more easily – and prevent users with lots of saved routes having to scroll through everything manually.
Available now, users will be able to filter routes by length, elevation, difficulty, who created them “and more”.
It’s worth noting, however, these features are only available to paid subscribers.
Redesigned Activity Details
The Activity Details page gets a refresh. Strava
Something that applies to all Strava users, however, is the redesigned Activity Details page.
Strava says this update brings “a new look” to this page, alongside fresh insights and highlights from each activity.
This update consists of two headline features:
All-in-one view – the map, route and any photos or videos from an activity can now be seen on a single page, with users able to toggle quickly between maps and stats
Relive your wins – medals and/or trophies for personal records and KOM/QOMs will now appear on the map, helping you more quickly locate any notable efforts or achievements from an activity
These features are live now on Strava for all users.
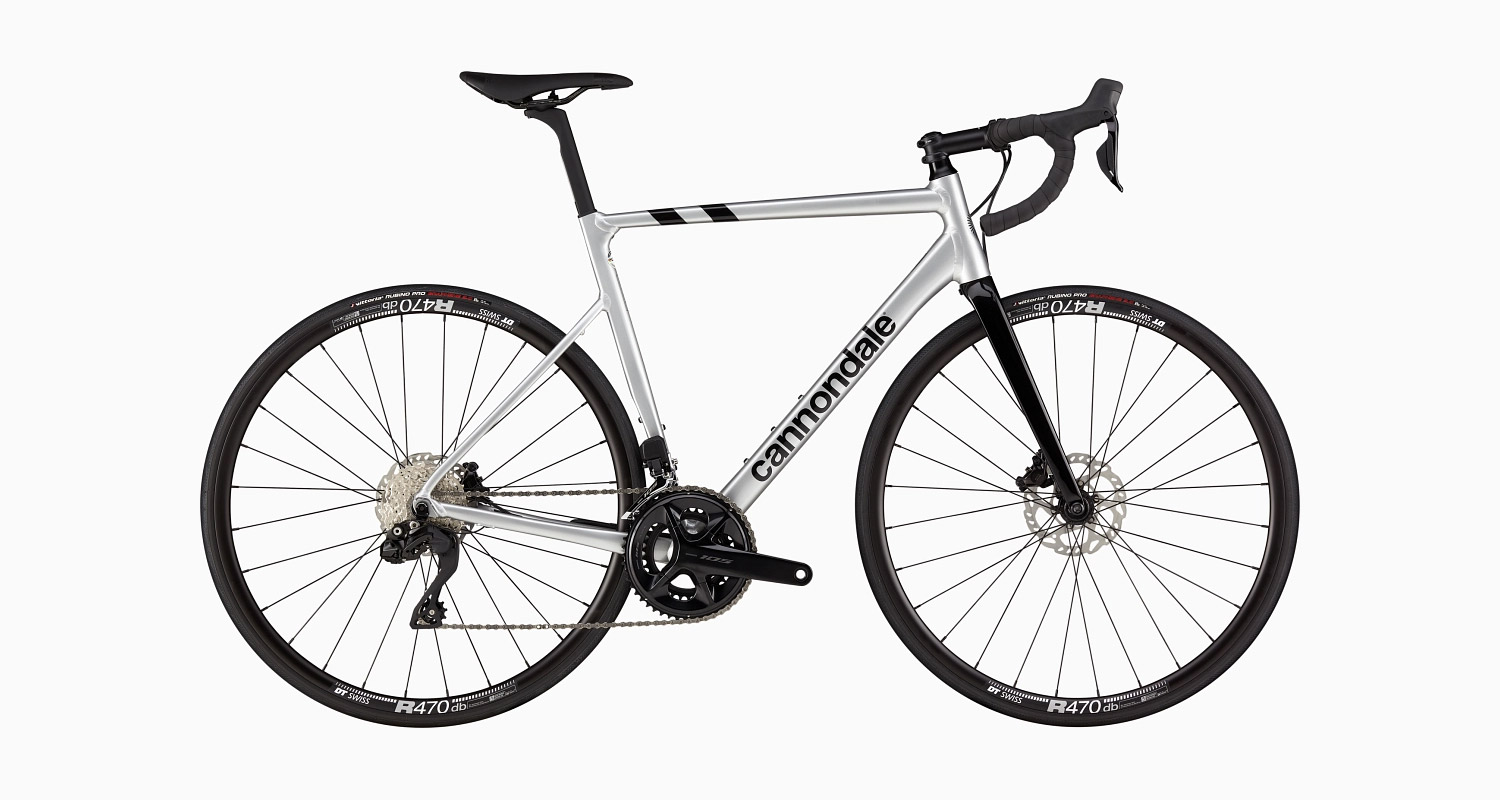
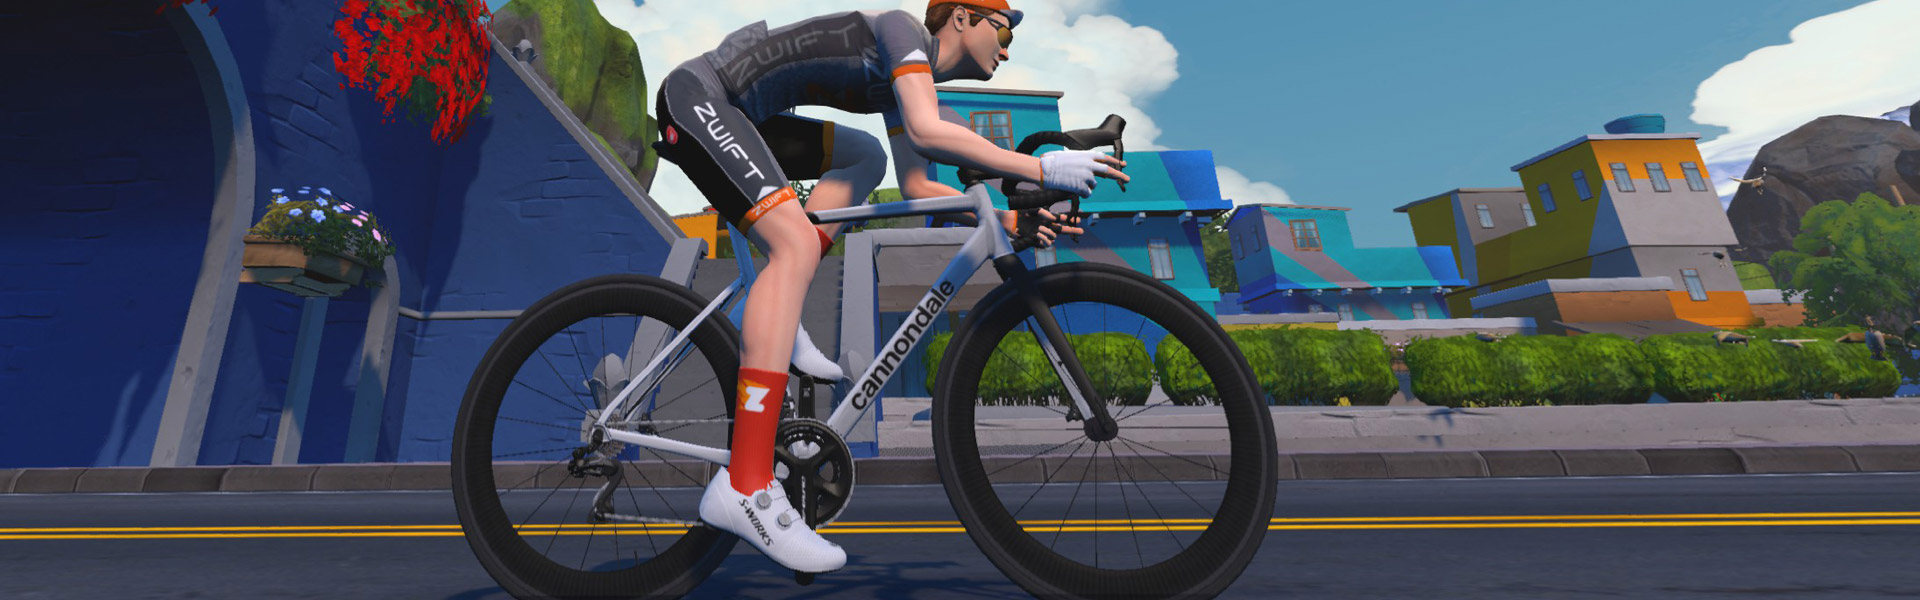
Zwift’s latest update included the welcome addition of several new bike frames, including two bikes from US-based Cannondale. We’ve already written about the speedy SuperSix Evo LAB71, so today we’ll cover the more budget-friendly CAAD13, which Cannondale calls “the speediest, smoothest, best handling, finest performing aluminum race bike on the planet”:
You’ll need to be updated to game version 1.86+ to see the CAAD13 in Zwift’s Drop Shop. You’ll also need to be at level 14+ with 500,000 Drops to buy it. Here’s how it’s described in the Drop Shop:
“Experience the Cannondale CAAD13, a bike that embodies Cannondale’s legacy in aluminum frame design. Its lightweight, aerodynamic structure offers exceptional speed and agility, ensuring you conquer every virtual climb and sprint. With a tapered head tube and wider tires for enhanced stability and handling, the CAAD13 is perfect for both spirited rides and competitive races. Elevate your cycling experience with a bike built for performance and comfort, ready to tackle any challenge.
It’s rated 3 stars for aero and 3 stars for weight, so we know it’s not the lightest bike. But a 4-star system isn’t the most granular of performance measurements, so we ran this frame through our precise tests to measure performance at nerd-level detail. Let’s dive in!
Note: test results below are from a 75kg, 183cm rider holding 300W steady using Zwift’s stock 32mm Carbon wheelset.
Aero (Flat/Rolling) Performance
The CAAD13 is surprisingly fast, given its cost and unlock level. It trims 58.4s off our baseline Zwift Carbon frame over an hour of flat riding, putting it less than 5 seconds behind the game’s fastest frame.
Climb Performance
The CAAD13 performs worse climbs than it does on the flats, coming in at the 47the percentile in our rankings.
This bike shaves 28.8 seconds off of our baseline Zwift Carbon’s time on an hourlong climb, which means it’s ~27 seconds slower across an hourlong climb compared to the fastest climbing bike (S-Works Tarmac SL8).
Upgrading Your Cannondale CAAD13
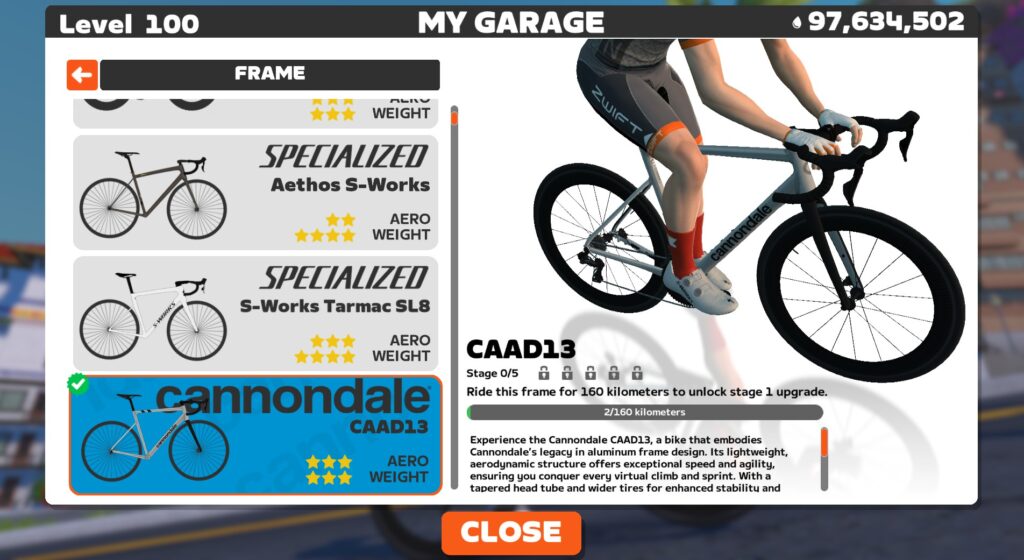
Like all frames in Zwift, the CAAD13 can be upgraded in five stages. As a high-end race bike, each of the five stages results in a performance improvement. The Cannondale CAAD13 upgrade stages are as follows:
Ride 200km, pay 100,000 Drops for an aero upgrade
Ride 260km, pay 200,000 Drops for a weight reduction
Ride 320km, pay 350,000 Drops for a drivetrain efficiency improvement
Ride 380km, pay 500,000 Drops for an aero upgrade
Ride 440km, pay 750,000 Drops for a weight reduction
You can expect a fully upgraded CAAD13 to be approximately 28 seconds faster on a flat hour and 36 seconds faster on an hourlong climb vs the “stock” CAAD13.
Conclusions
Cannondale’s CAAD13 is the worst performer of the four new frames added in Zwift’s latest update… but that doesn’t make it a bad bike. If you’re a Cannondale fan looking for a different frame, this may be the ticket.
It doesn’t have a color slider, but it is more affordable and unlocked at a lower level than the other three new frames.
Questions or Comments?
Got questions or comments about this frame? Share below…
Important note: this post contains speed test results for Zwift frames or wheels. These results may change over time, and a bike’s performance relative to others may also change. We don’t always revise posts when performance rankings change, but we do keep current, master versions of our speed test results which are always available. See the frame charts, wheel charts, and Tron vs Top Performers for current performance data.
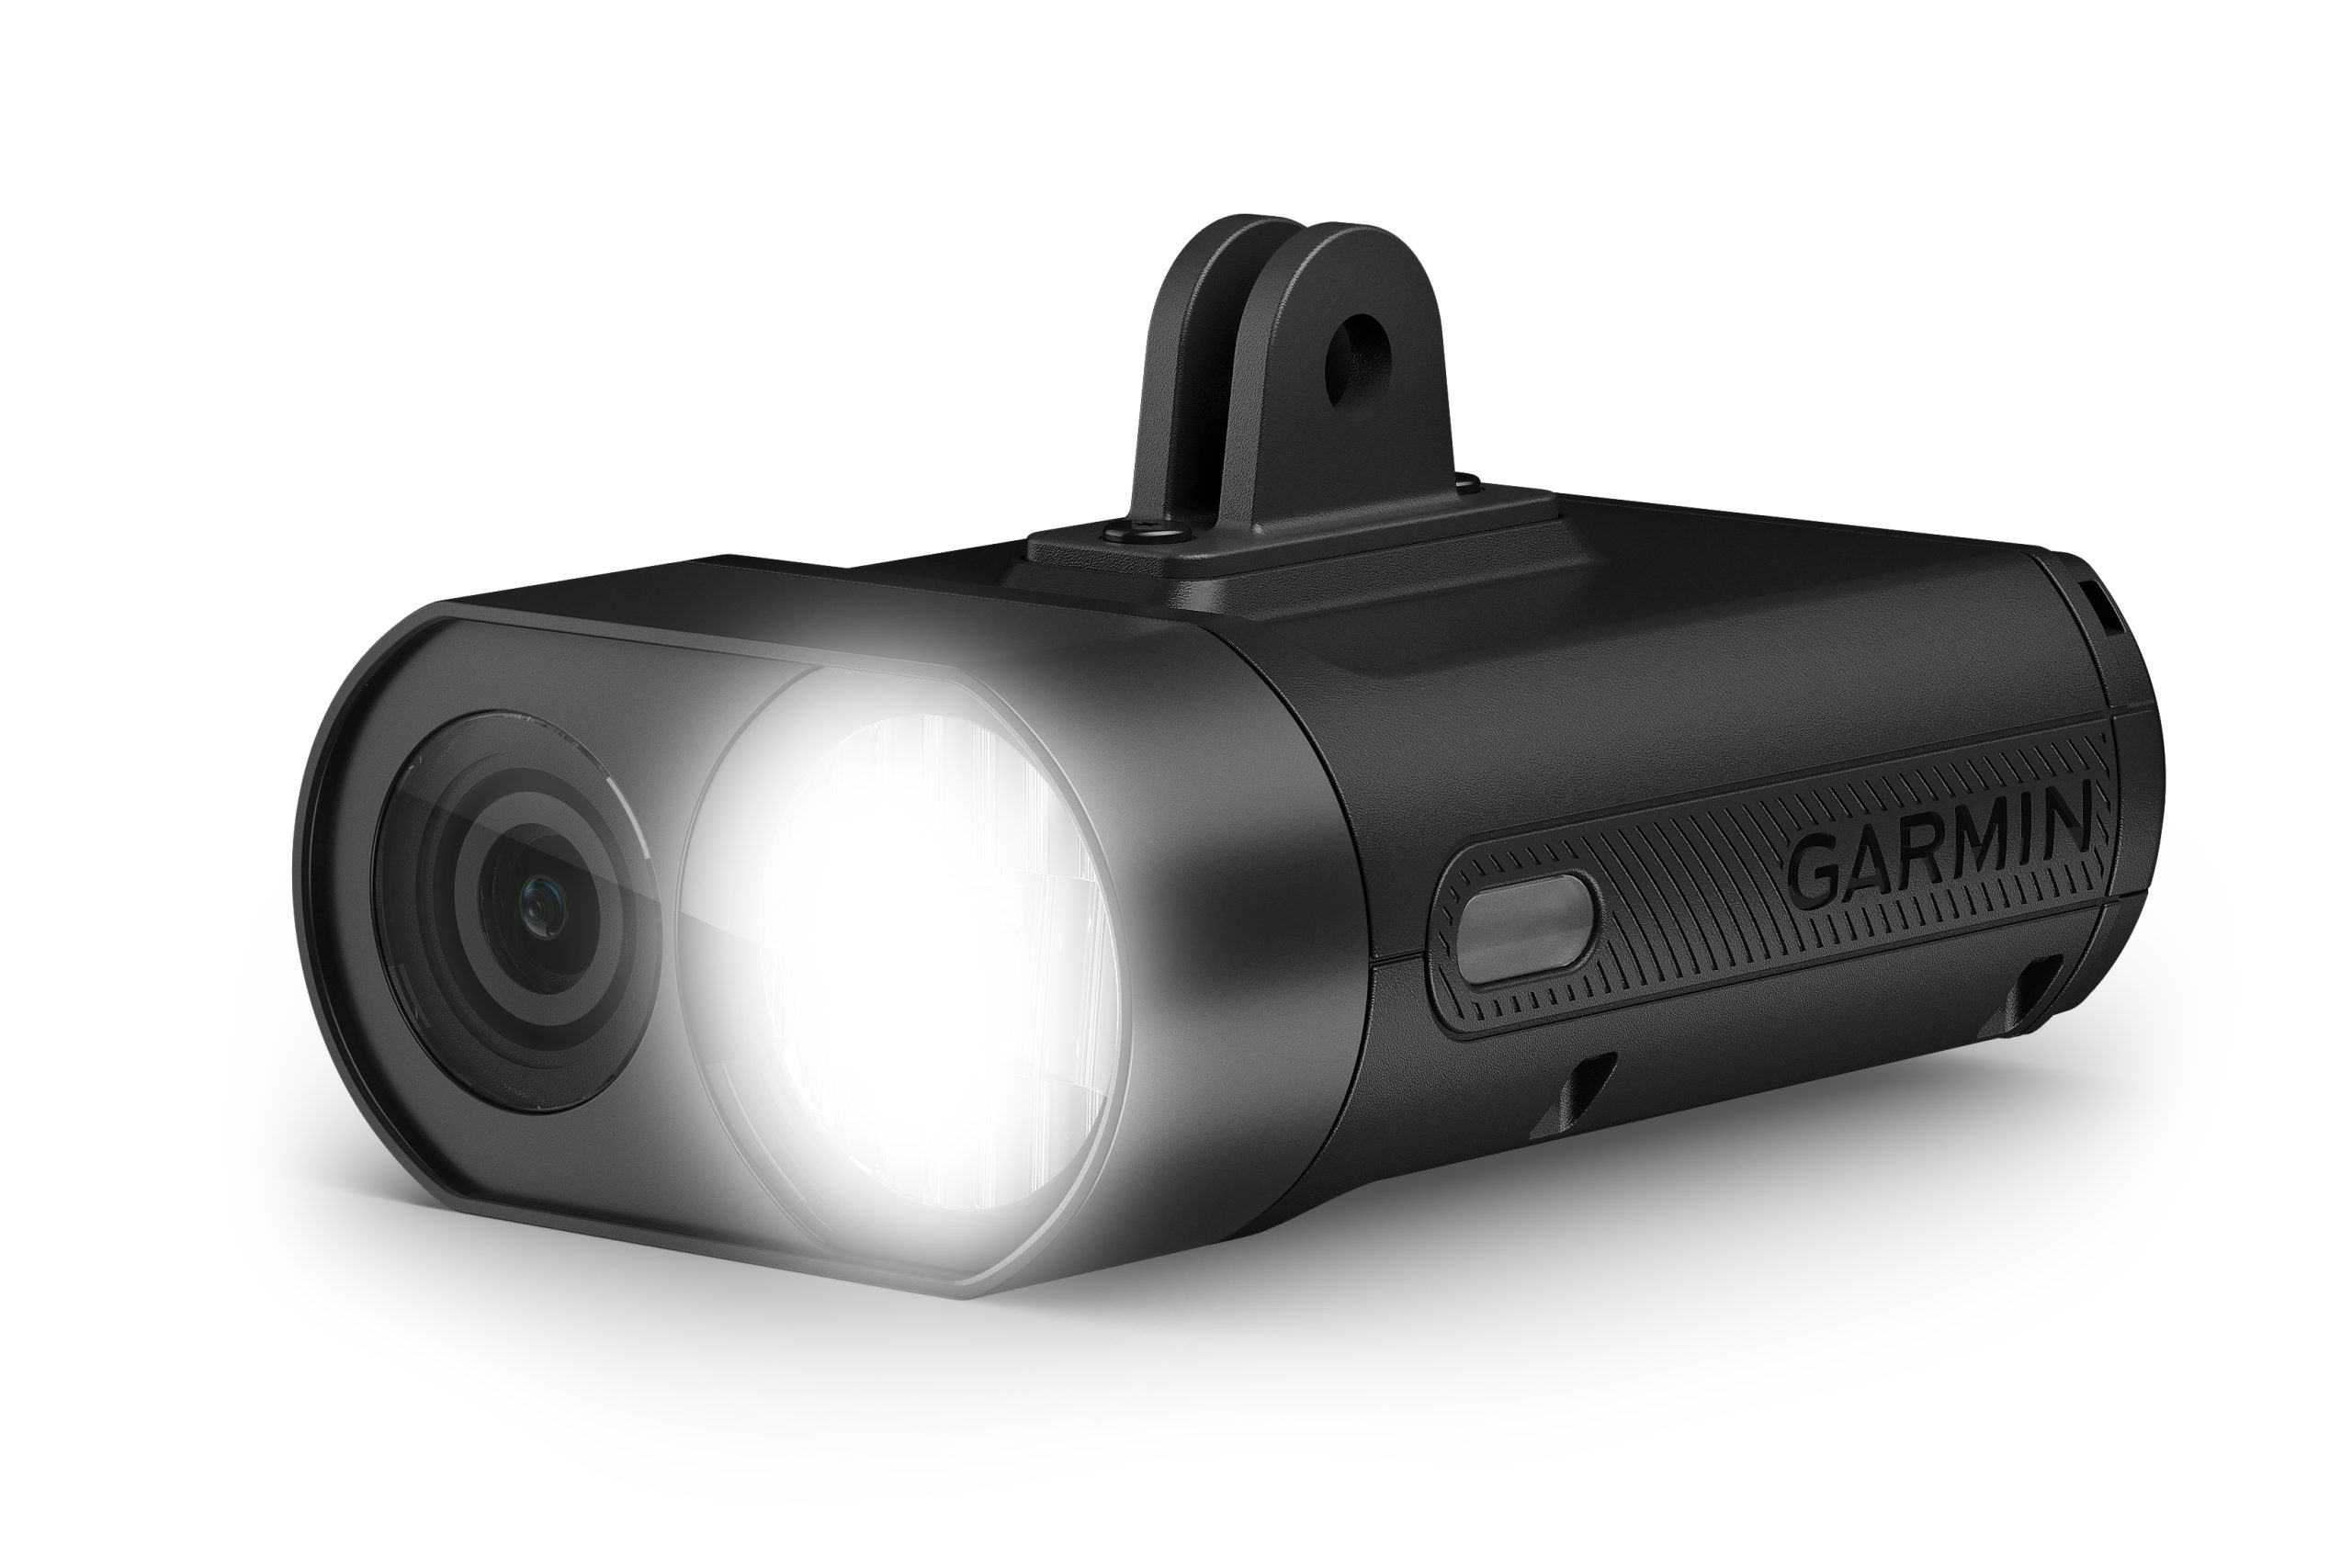
Garmin has launched its new Varia Vue camera headlight system, with the ability to record footage in 4K resolution.
The Varia Vue syncs with Garmin Connect and Garmin Vault (its subscription-based online storage for recorded videos), and the brand’s dedicated Varia app, plus the RCT715 rear-view radar and camera light.
The Varia Vue costs £459.99 / $549.99 / €549.99, plus £9.99 / $9.99 / €11.99 per month for the Vault subscription (or £99.99 / $99.99 / €119.99 per year).
Digital image stabilisation
Garmin says the new Varia Vue can record in 4K. Garmin
According to Garmin, the Varia Vue can record footage in 4K resolution and benefits from the brand’s digital image stabilisation technology.
Digital image stabilisation effectively crops raw recorded images – by cutting off the edge of the frames, the camera processes a smoothed-out version of the footage.
As a result, in general use, it’s unlikely the processed footage will be output in true 4K resolution, but it should be more than enough to capture details such as vehicle registration plates and faces. There’s also a microphone, which has been concealed from the wind to aid ‘clean’ audio capture.
The Varia Vue automatically detects incidents and saves them to Garmin Vault. Garmin
All data is stored in Garmin’s Vault online data bank, which is encrypted. That said, it’s worth noting that some territories don’t allow the use of camera technology in this way.
Garmin says the Varia Vue will automatically detect ‘incidents’ and save them to Vault via WiFi. It can also sync with the brand’s RCT715 rear-facing camera-light device to create a two-view account of an incident.
The device has a claimed battery life of up to nine hours with the light switched off. With the light switched on in ‘day flash’ mode, Garmin says the battery life dips to around seven hours.
That said, bikepackers and multi-day riders are catered for, given that the device can be charged on the go (via a battery pack or dynamo setup, for example) while the camera function is switched on.
Adaptable lighting with a cropped beam
The light has a maximum output of 600 lumens. Garmin
The light can emit up to 600 lumens – generally considered enough for visibility in a built-up area with ambient street lighting – across five modes, including the day flash setting.
This means the light isn’t StVZO-compliant, but the beam is cut off to reduce glare for oncoming road users.
A dedicated StVZO version is available in Germany and the the Nordic countries, which produces up to 165 lumens and up to four hours’ battery life – lower due to the lack of flashing modes, which are less power-hungry.
Similarly, Garmin claims the light is adaptable to riding speed and ambient light, but only when the unit is paired with a Garmin Edge bike computer.
The Varia Vue can also be controlled from a Garmin Edge device, or via the brand’s Varia app.
Garmin Varia Vue prices and availability
The light is claimed to be adaptable to your riding speed and ambient light. Garmin
The Garmin Varia Vue is available now, priced at £459.99 / $549.99 / €549.99.
The Varia Vue requires a Garmin Vault subscription at £9.99 / $9.99 / €11.99 per month (or £99.99 / $99.99 / €119.99 per year).
The Varia Vue isn’t supplied with a memory card, so you’ll need to factor that into the overall cost.
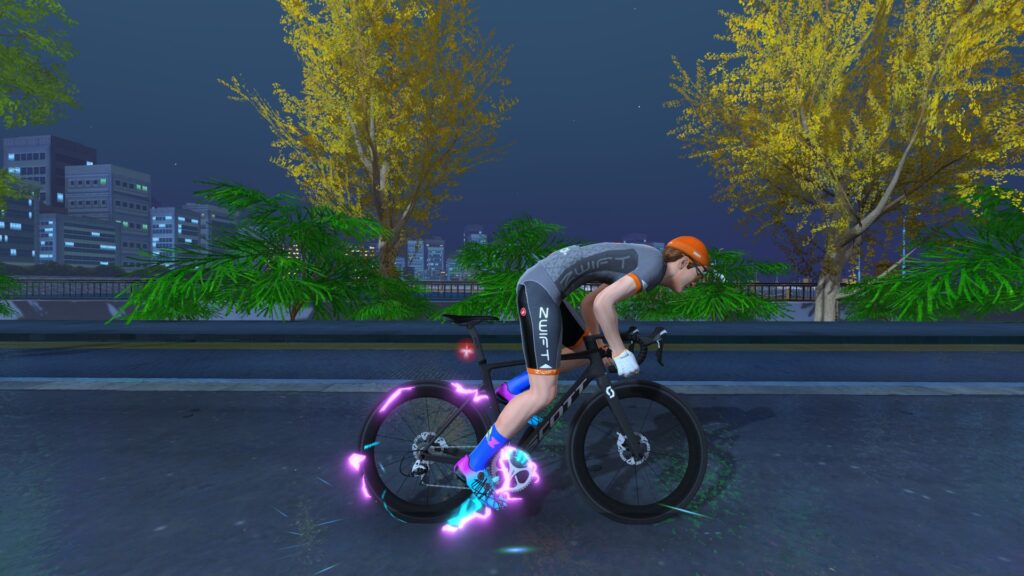
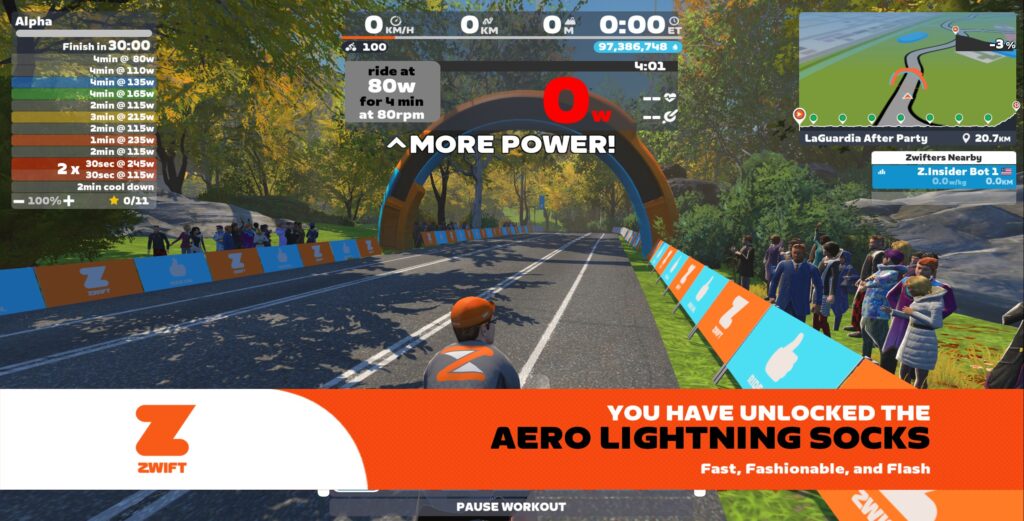
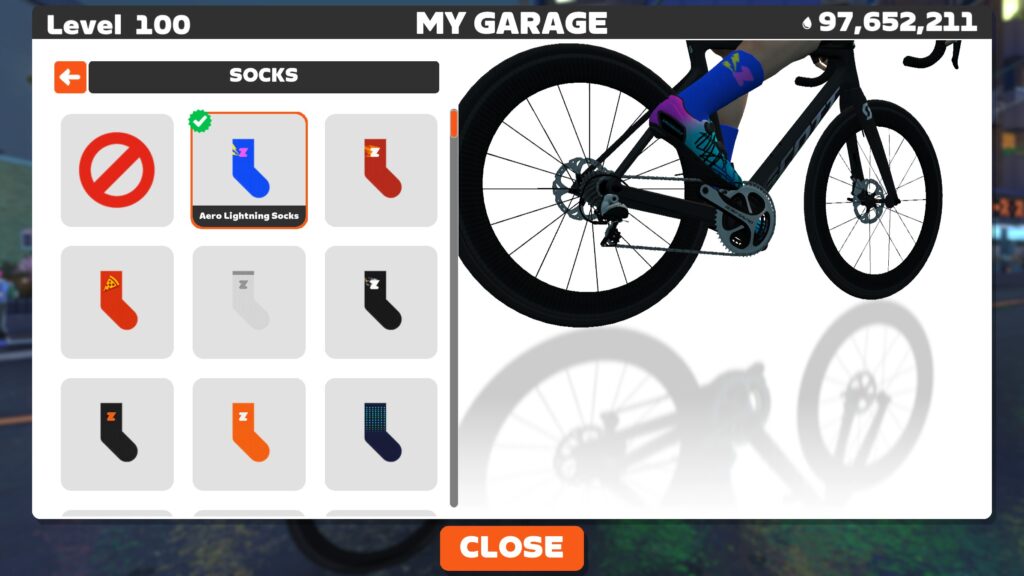
It’s time to talk about something very serious. I’ll get right to it: Zwift, like many cyclists, has a bit of a sock problem.
First came the Fire Socks, enticing us to work toward level 50 so we could sprint to flaming glory in the next race.
But that wasn’t enough. Zwift had to up the ante and create the glorious Confetti Socks so level 100 Zwifters bring a party to any peloton.
And now we have a third pair of socks: the Lightning Socks. Which is actually two pairs of socks, although you can only own one pair at a time. Confused yet? Let’s jump in and learn everything there is to learn about the newest socks on Zwift!
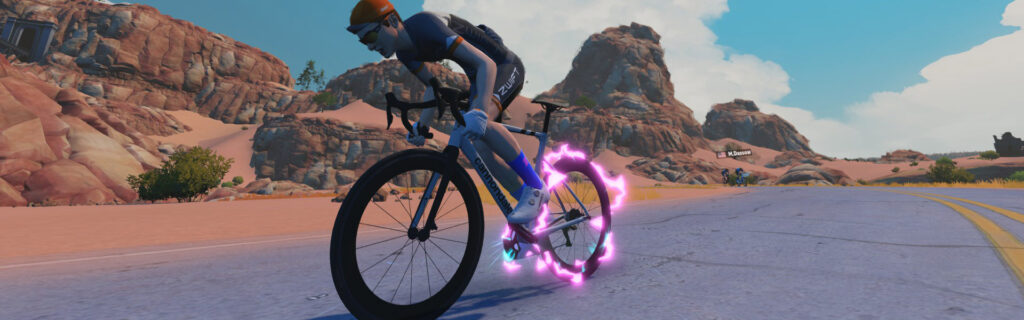
Animation/Effects Details
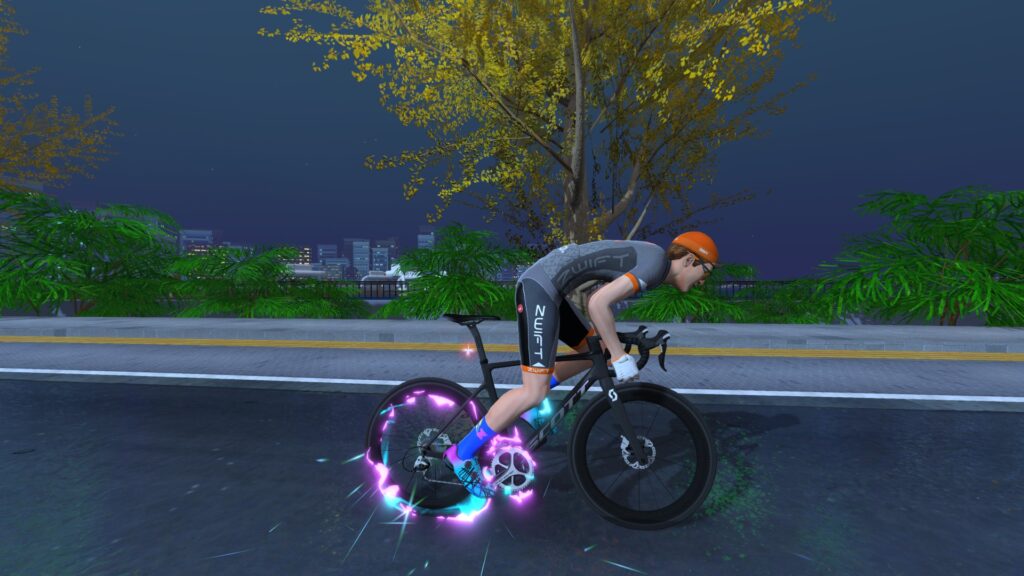
Lightning socks include cool visual effects which are triggered as you hit certain power levels. The power levels are multipliers of your FTP, and there are four levels of animation possible, triggered when you hit 1.5x, 2.1x, 2.7x, and 3.2x your in-game FTP.
If your current power is greater than 1.5 times your FTP, the first effect, called the “sparks and tire halo” effect, will appear. This works whether you’re wearing Lightning Socks or Aero Lightning Socks.
Ramp up your power to 2.1 times your FTP and the “tire size flash” effect will be added to the effect above. This works whether you’re wearing Lightning Socks or Aero Lightning Socks.
Why stop now? Pour it on and hit 2.7 times your FTP and the “full Aero Lightning effects” will be added to the effects above. (This only applies if you’re wearing the Aero Lightning Socks.)
There’s one more level! Hit 3.2 times your FTP and the “lightning feet” effect will be added to the effects above. (This only applies if you’re wearing the Aero Lightning Socks.)
Here’s a quick video showing what these animation levels look like in action:
How to Unlock Lightning Socks
Lightning Socks and Lightning Aero Socks are unlocks for Zwift’s Factory Tour Challenge. You can click to read all about that challenge if you’d like, but to summarize:
Lightning Socks are unlocked when you finish the first part of the challenge by completing 250 power units. (1 power unit=riding at 1 W/kg for 1 hour)
Your Lightning Socks are upgraded to Aero Lightning Socks when you finish the hidden and much larger second part of the challenge by completing 600 additional power units!
Lightning Socks vs Aero Lightning Socks
Lightning Socks only offer two levels of animation/effects (see samples above) and do not give any performance benefit. The Aero Lightning Socks make you more aero, and offer four levels of animation/effects.
You will automatically unlock the Lightning Socks once you complete 250 units in the Factory Tour Challenge. They will be added to your garage, and your avatar can wear them whenever you’d like.
If you continue on in the Factory Tour Challenge and do another 600 power units, you will automatically unlock the Aero Lightning Socks. These will replace your “basic” Lightning Socks, automatically upgrading them to aero socks with more effects.
Speed Tests
So, just how much faster do the Aero Lightning Socks make you?
We ran a test with and without the socks, using our standard bot (75kg, 183cm tall) at 300 watts. The Aero Lightning Socks made our bot approximately 12 seconds faster across an hour of riding on flat roads.
Questions or Comments?
Are you working on completing the Factory Tour Challenge? What do you think of the Lightning Socks as a reward? Share below!
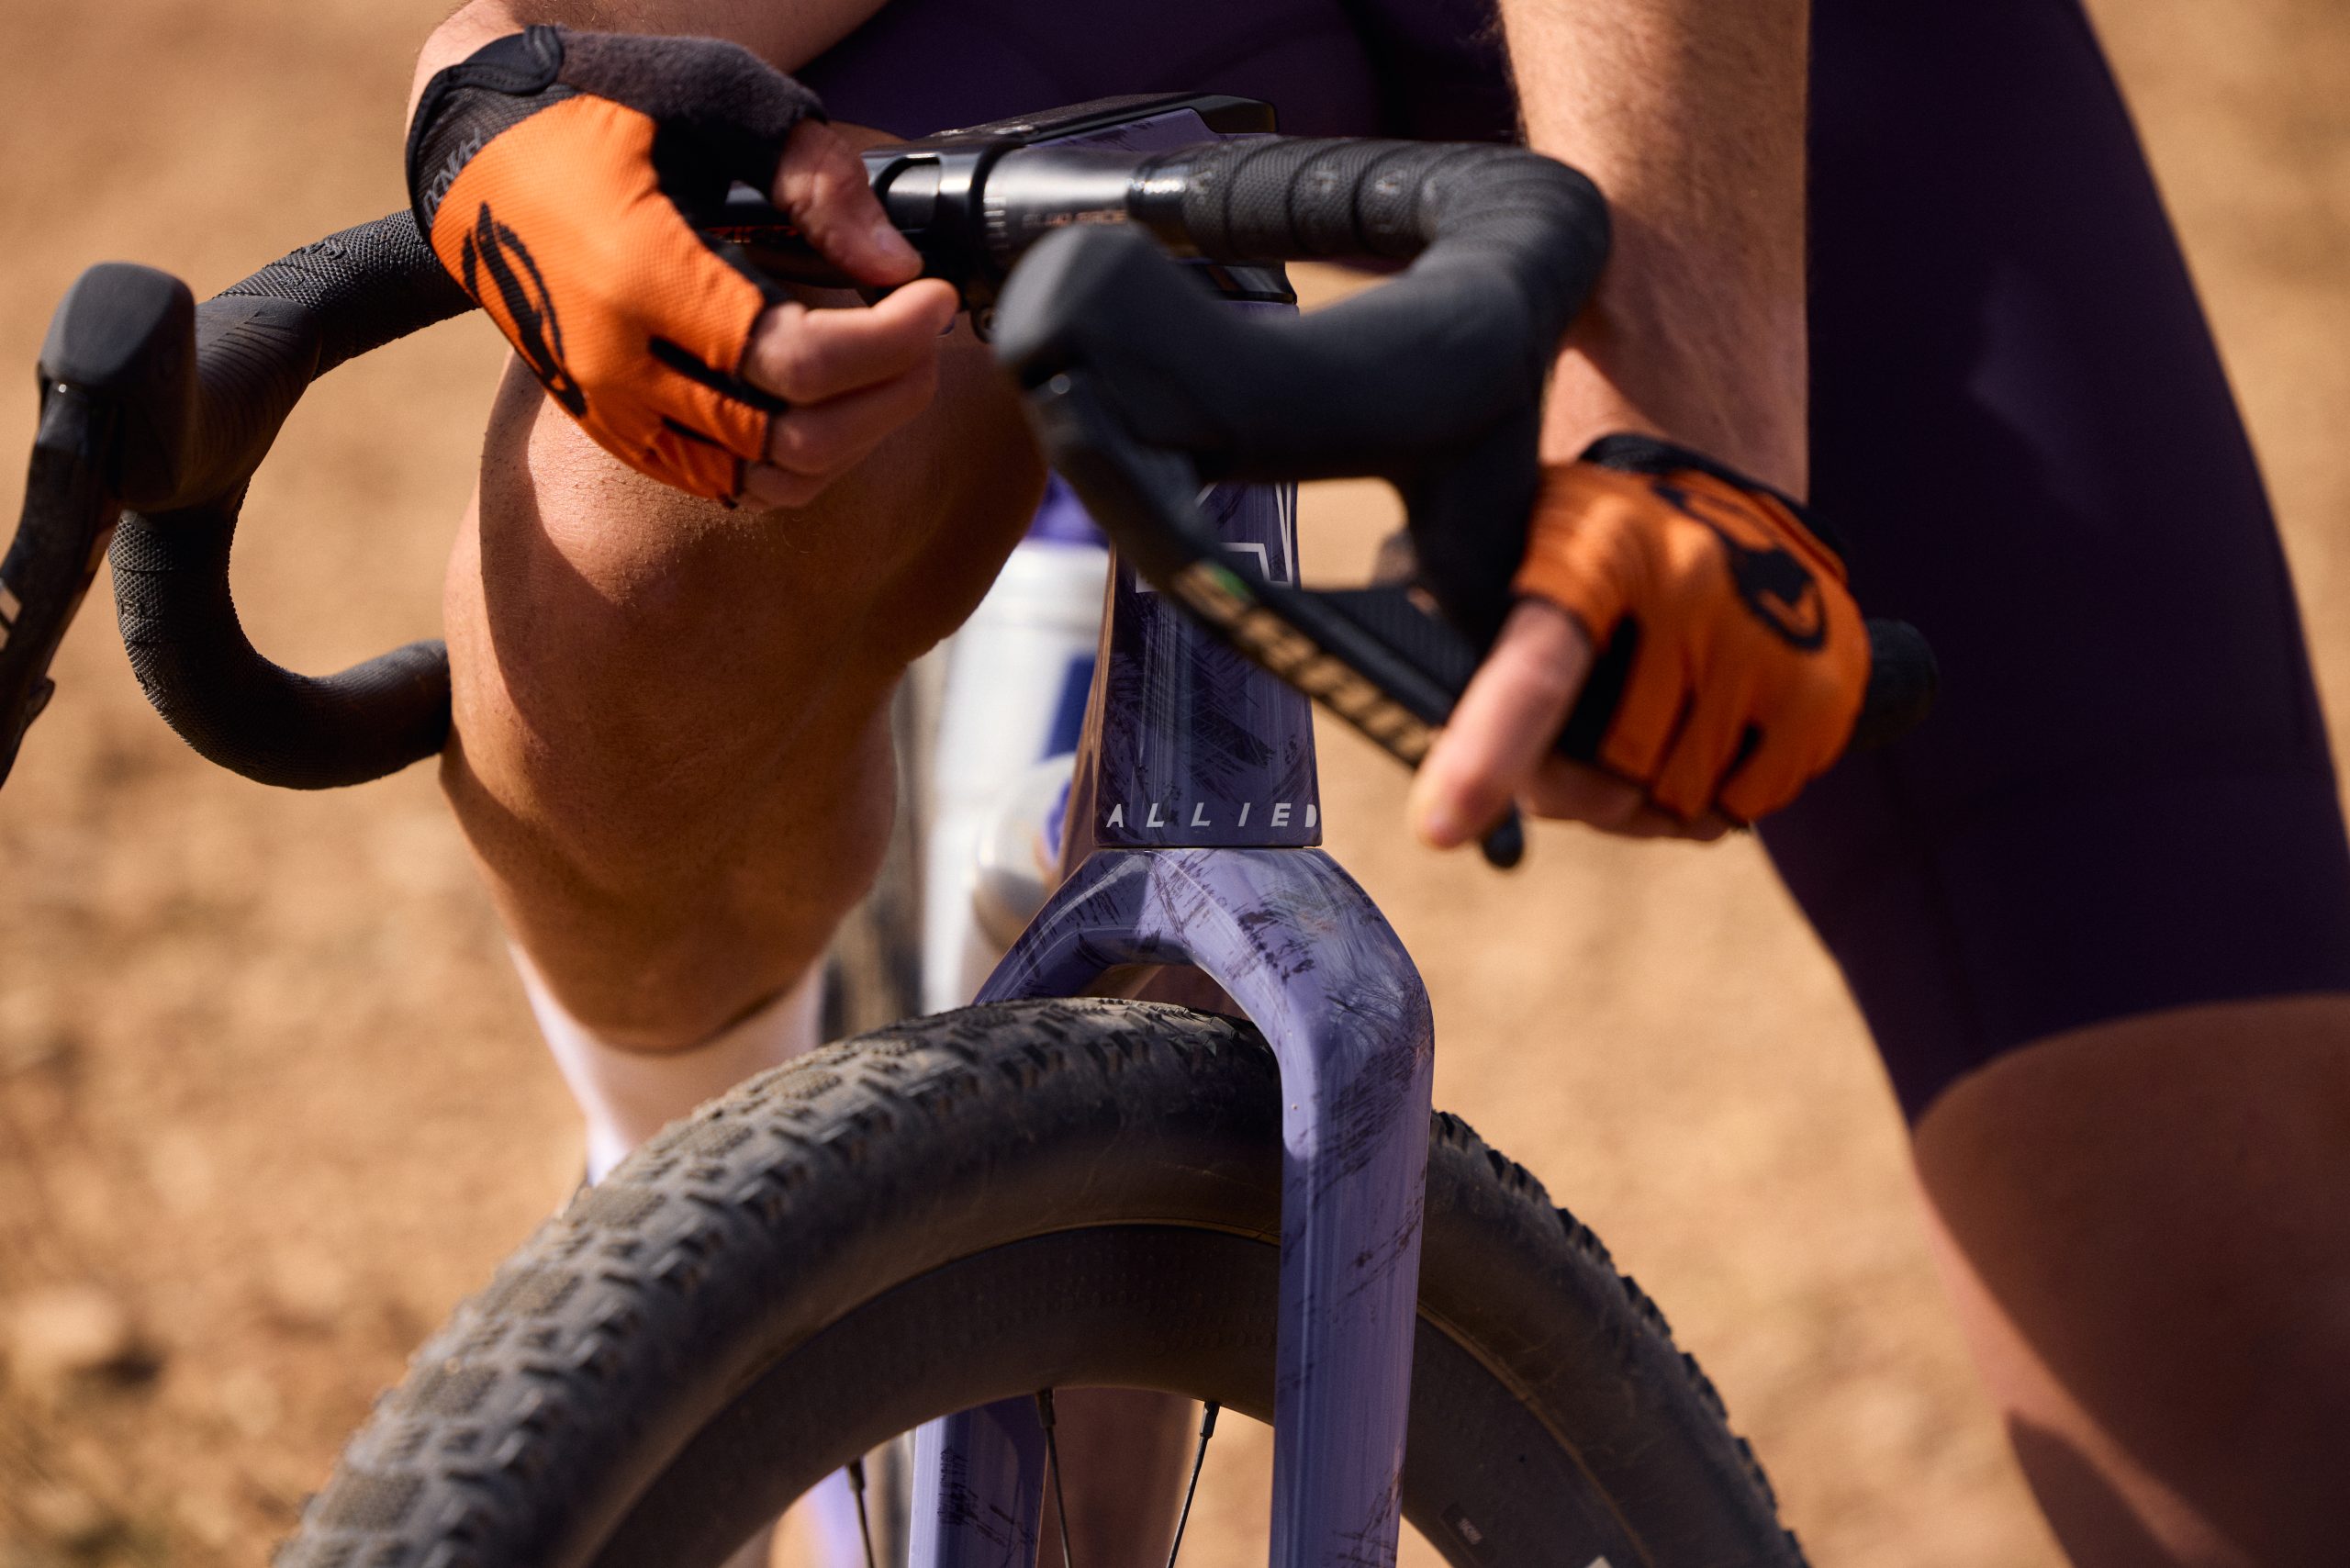
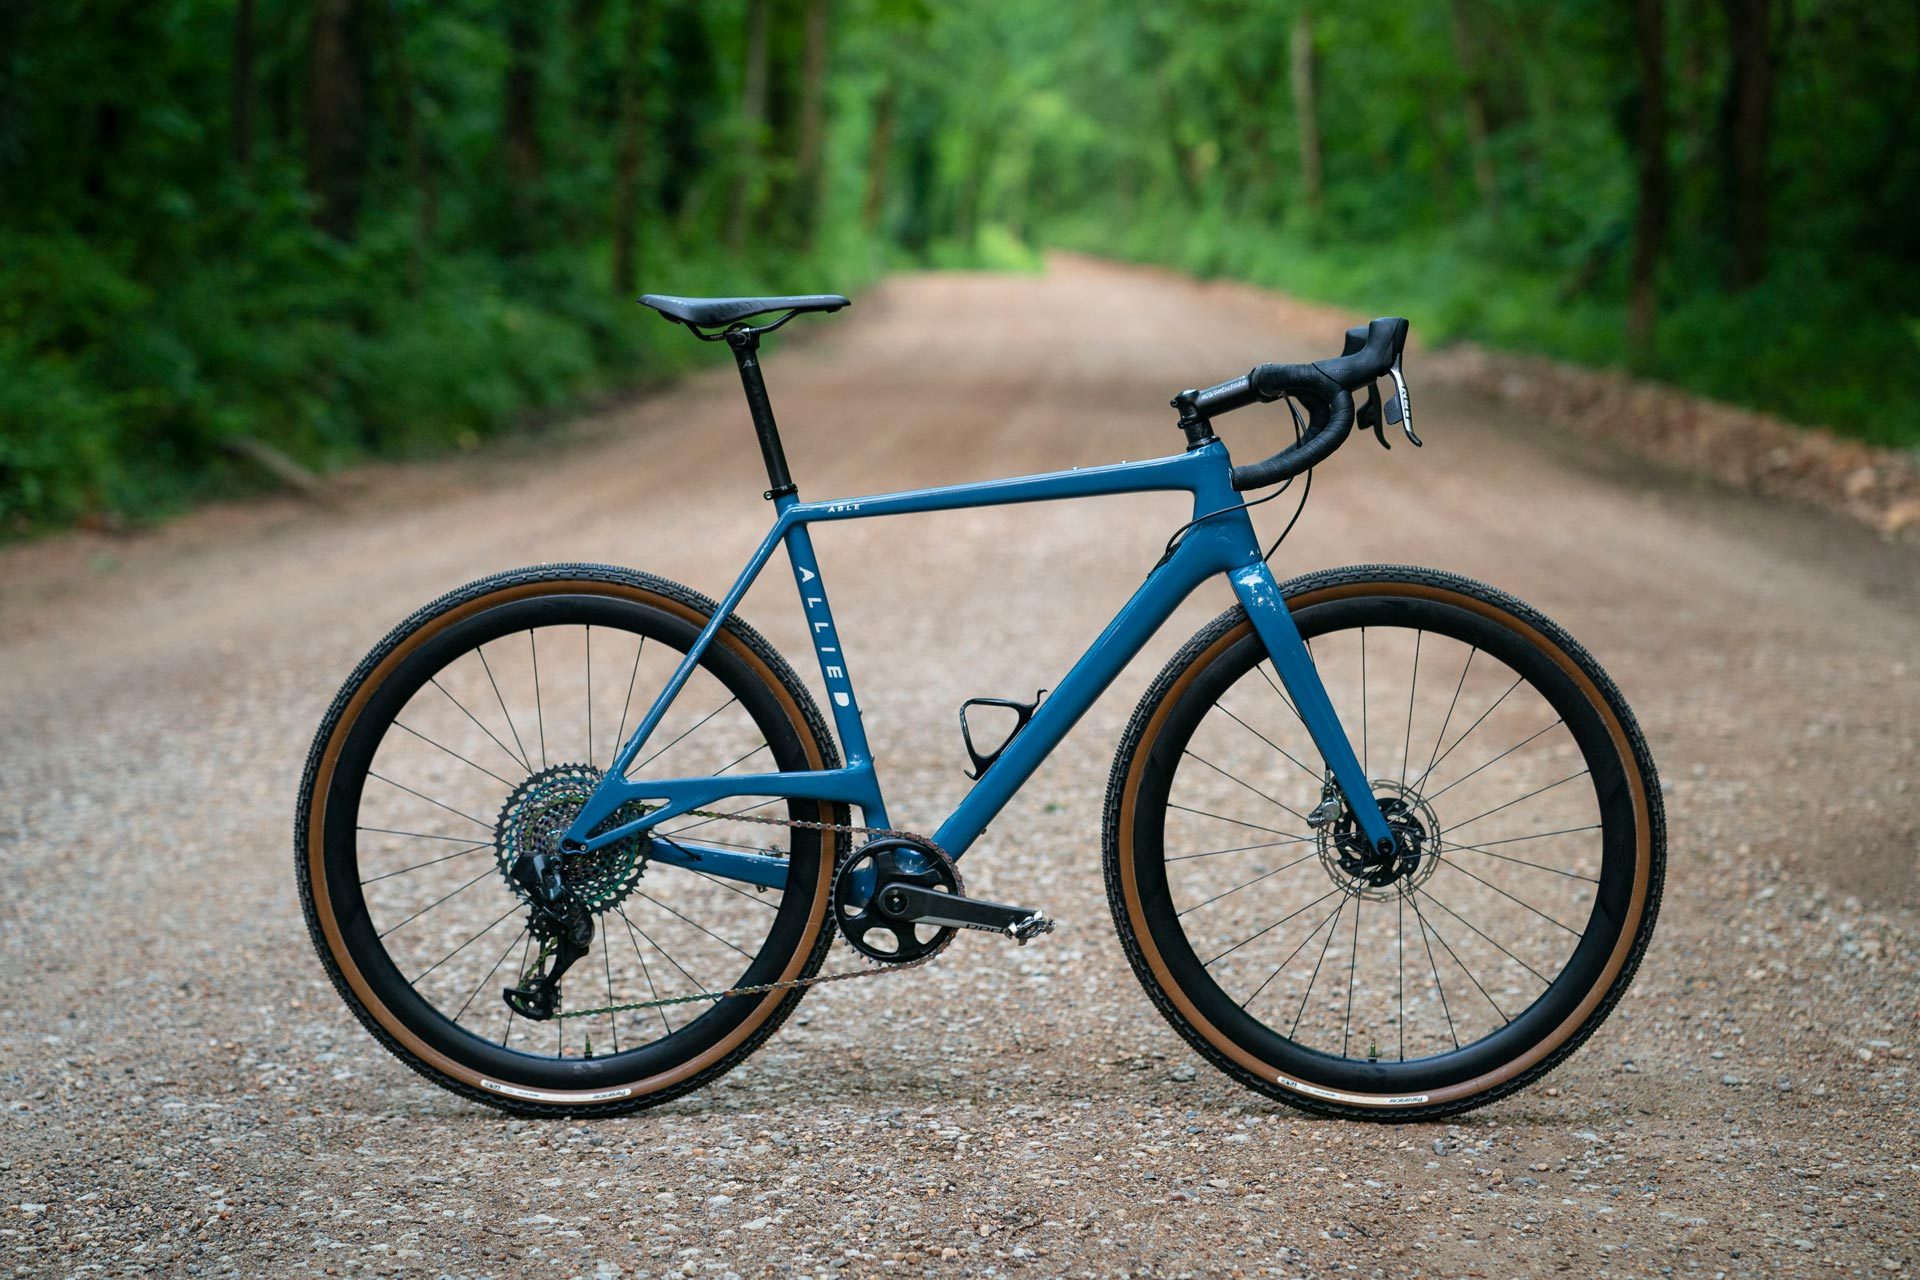
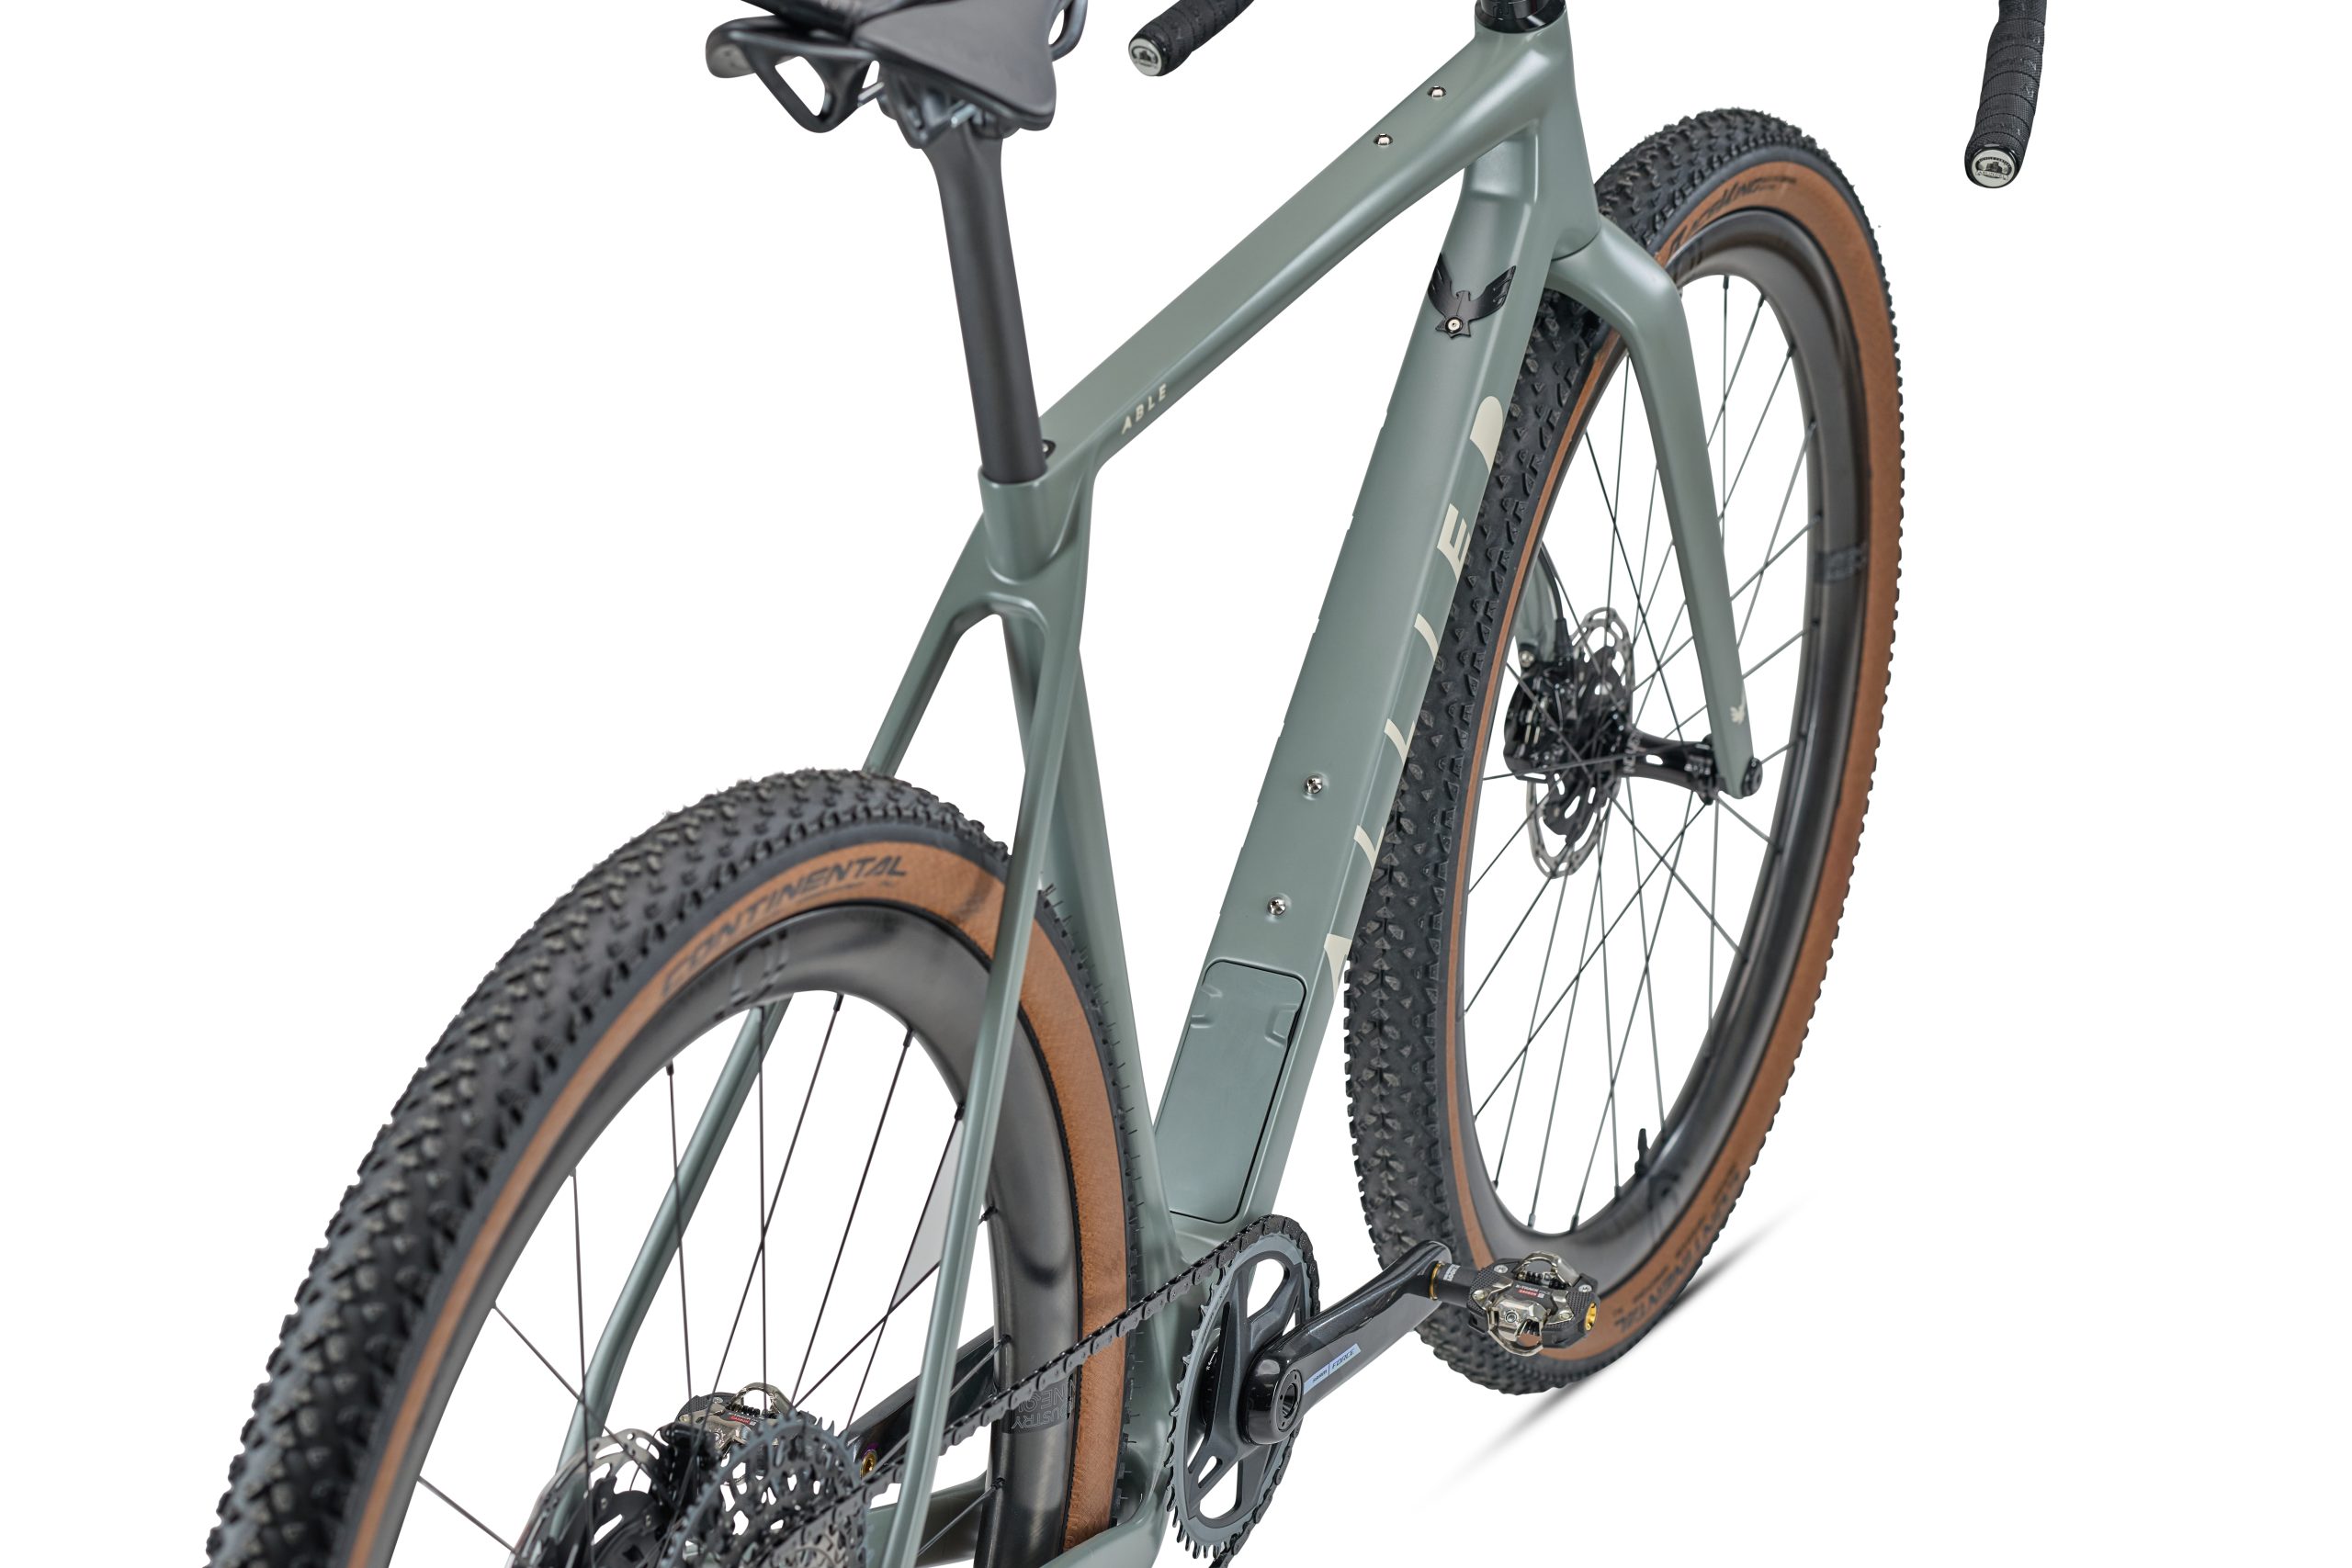
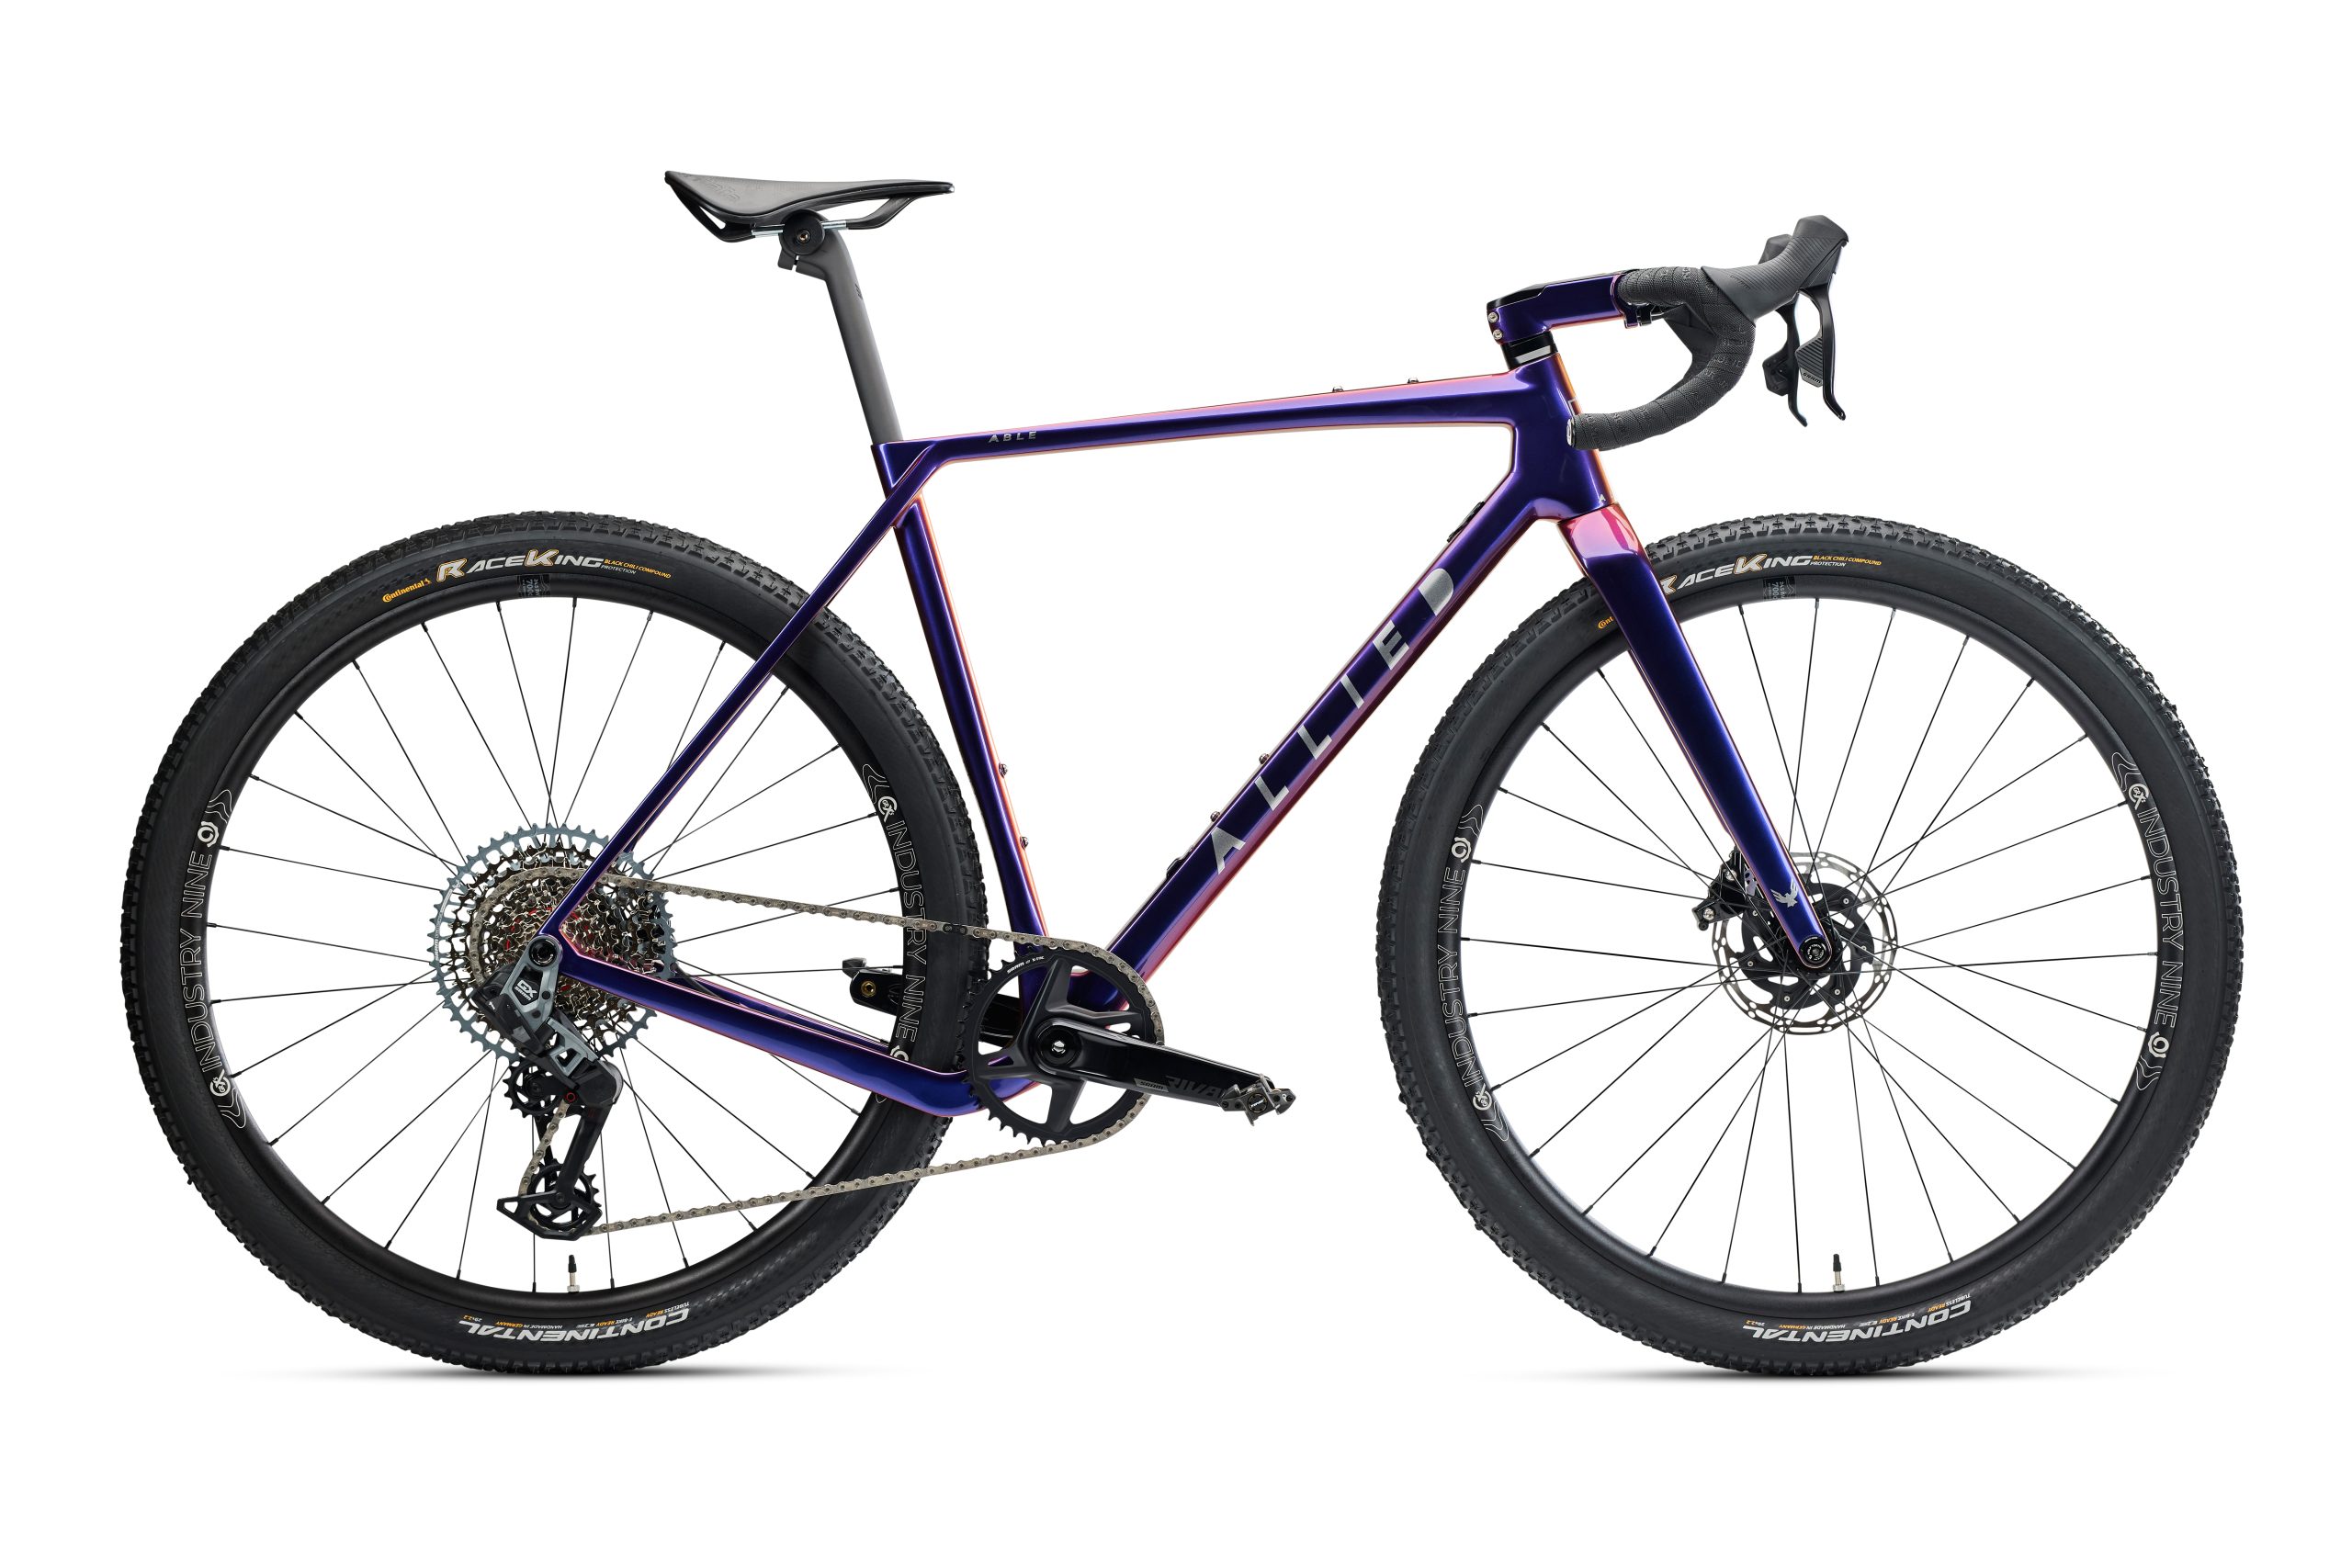
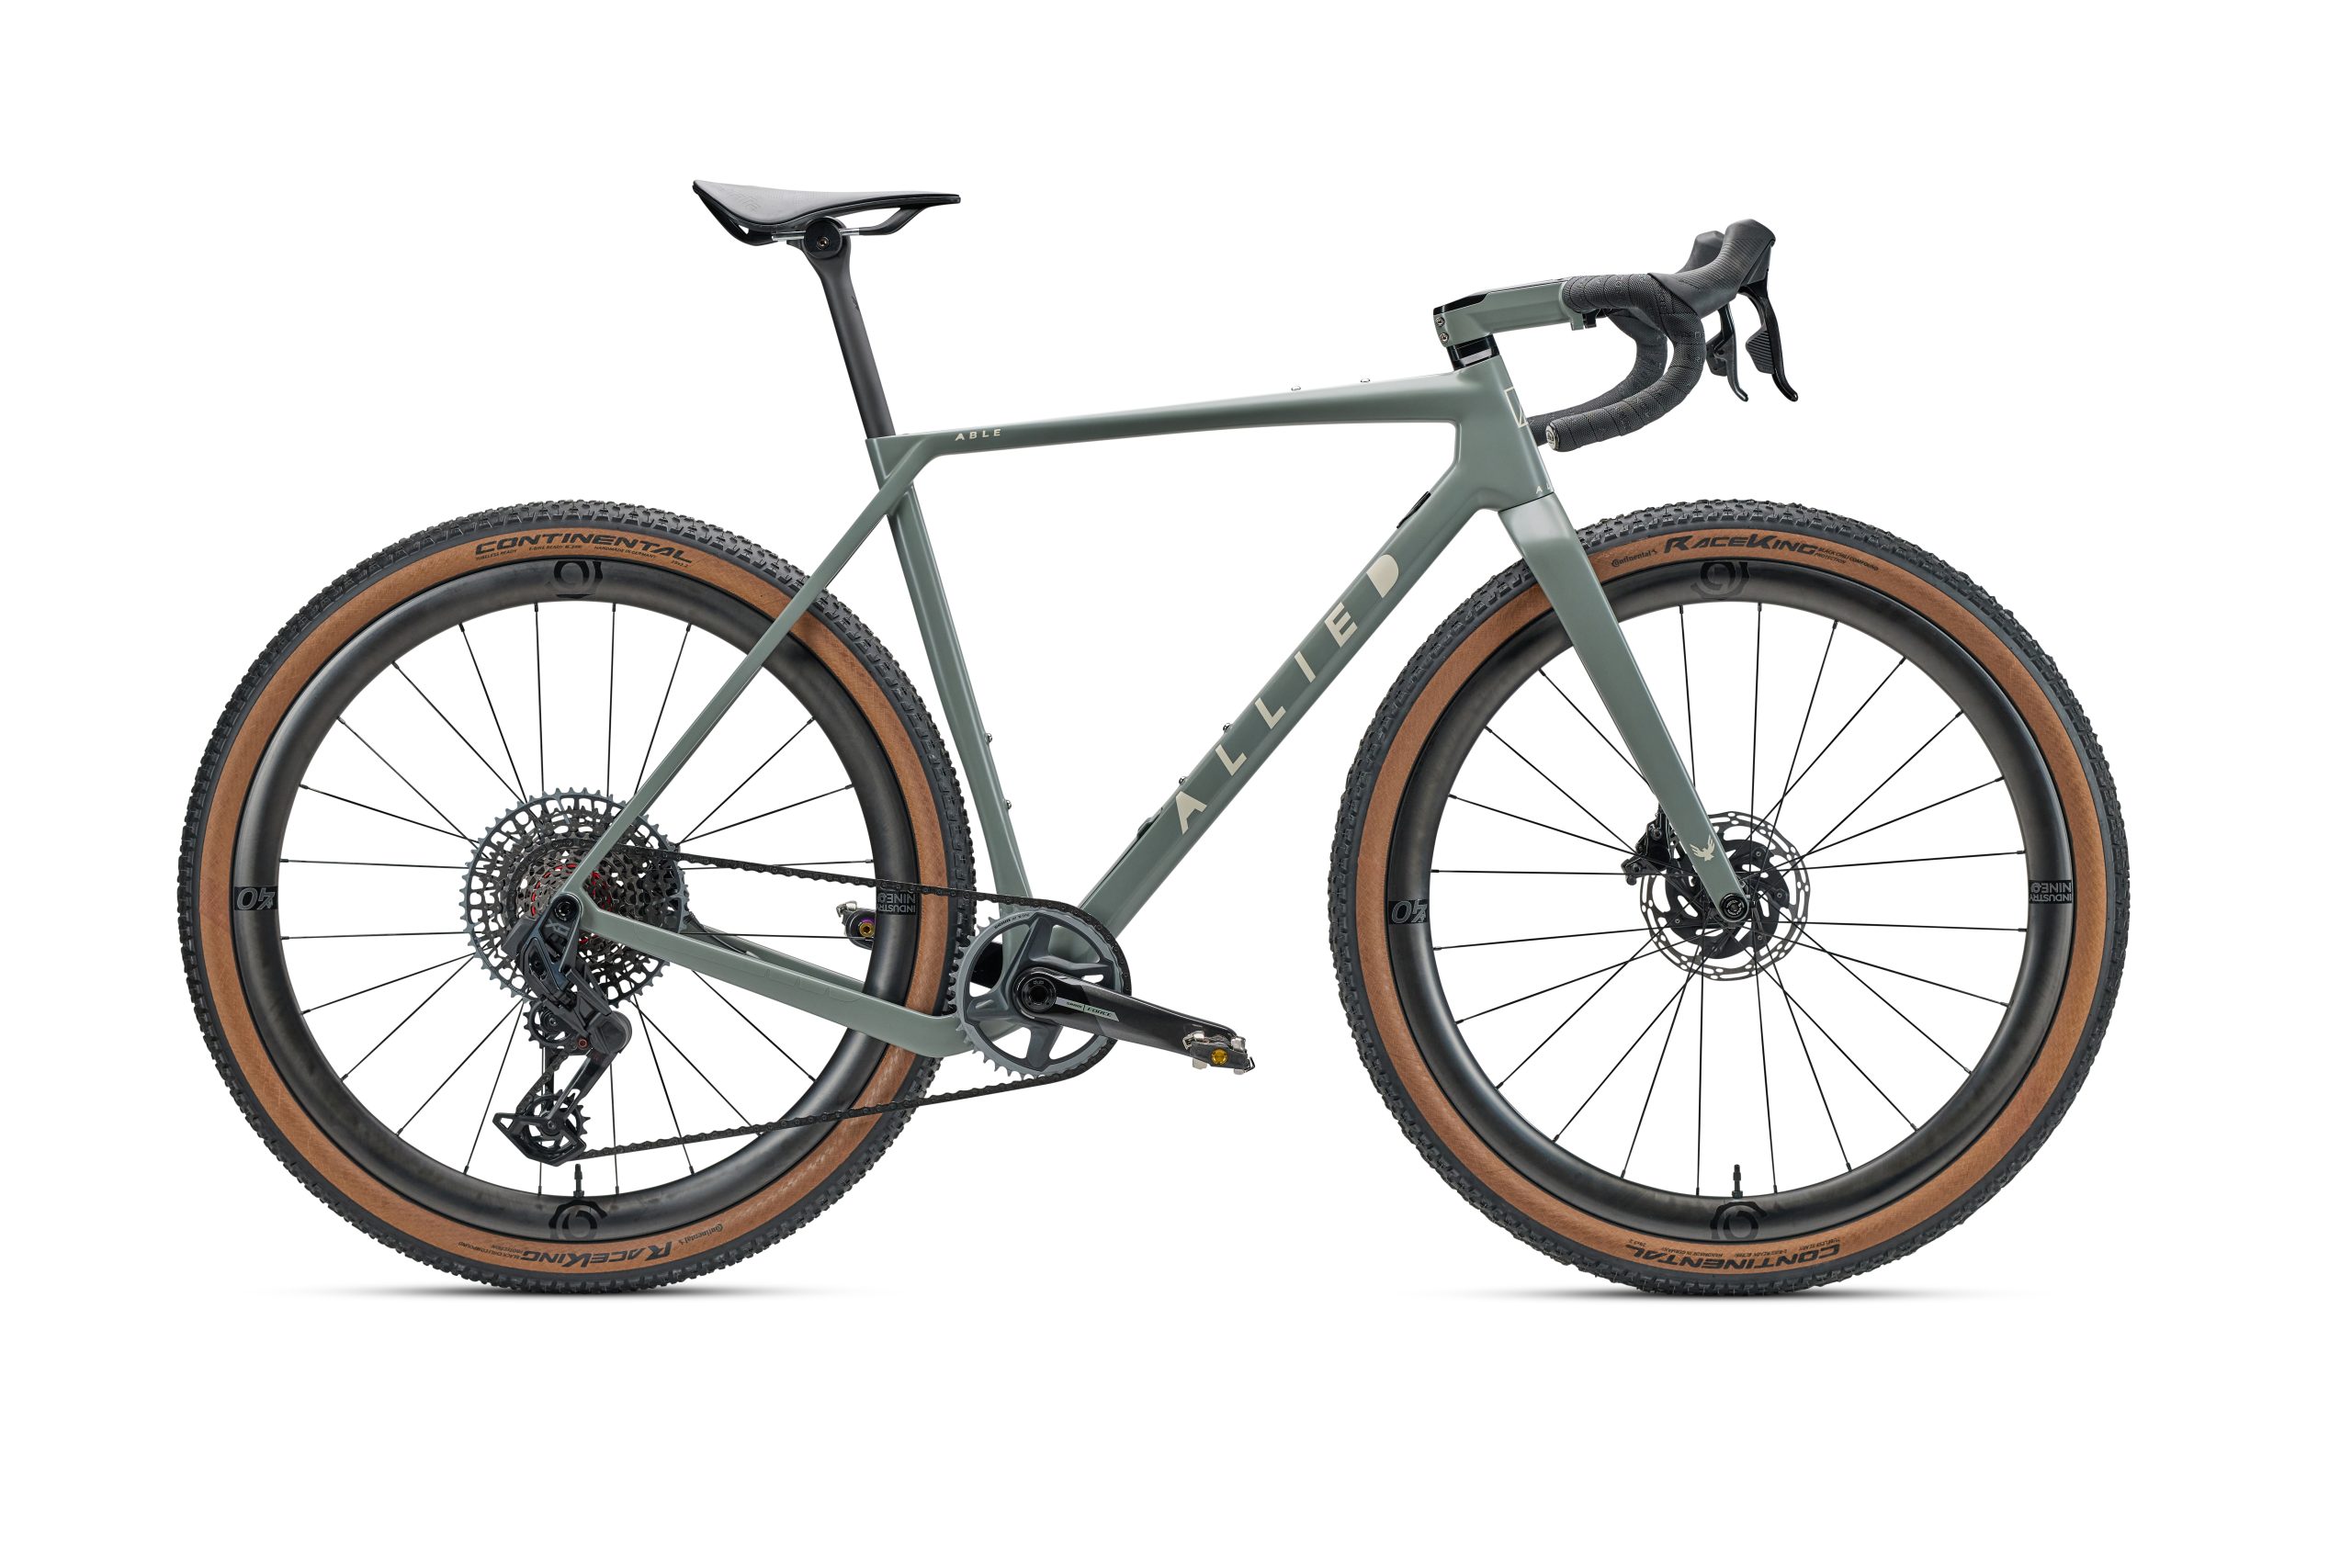
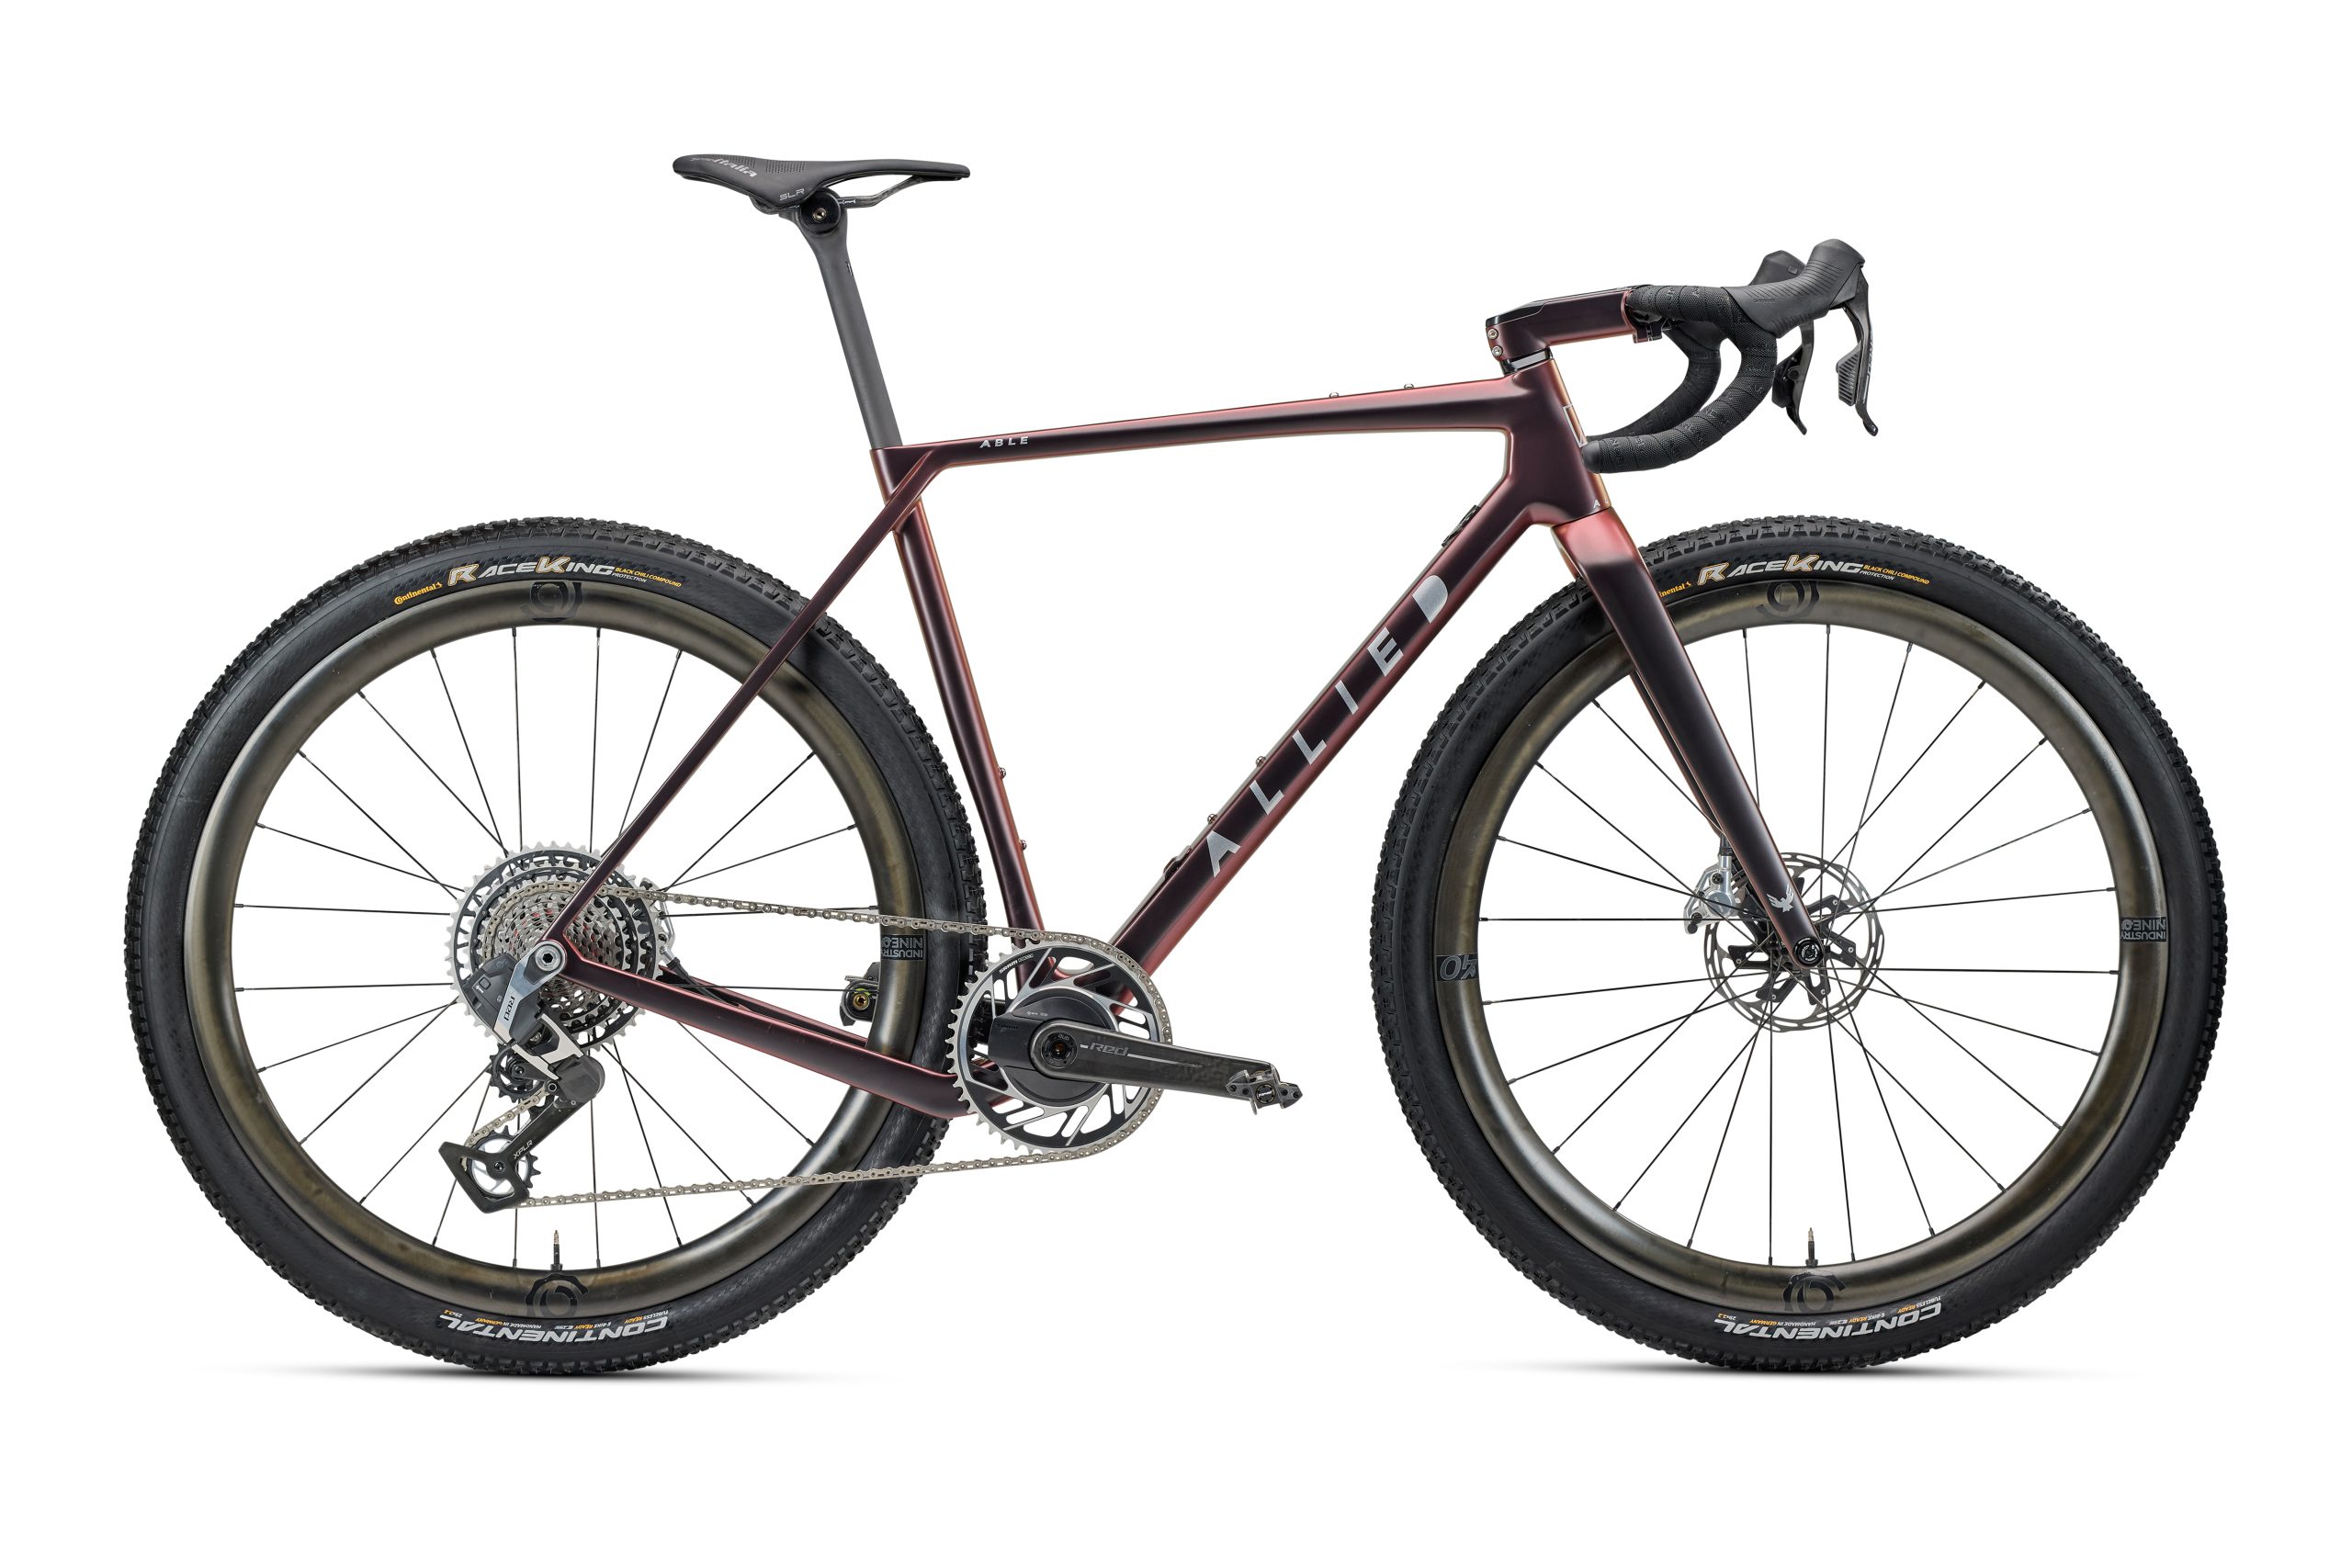
Allied has finally launched its long-teased second-generation Able, with the new gravel race bike able to accept up to a whopping 2.25in / 57mm tyre.
The distinctive elevated driveside chainstay of the outgoing model is no more, and the new Able also drops a significant amount of weight over its predecessor.
There’s also a nifty down tube storage solution, where the storage hatch is independent of the bottle cage.
We first spotted the new Able at Unbound 2024, where Payson McElveen tested a prototype which saw her take eighth place in the 200-mile event and Taylor Lideen also raced it in the 350-mile race.
The Able is available now, with the cheapest SRAM Rival eTap AXS build retailing from $6,775 and rising up to $11,500 for the top-tier SRAM Red XPLR AXS build.
A frameset, which includes a stem and seatpost, retails from $4,500.
57mm tyre clearance
The Able is yet another bike that’s following the trend for voluminous tyres Allied
Allied says it chose this clearance because it believes 2.25in are “the fastest available tyres”, although it acknowledges its initial test mules had a 2.1in / 53mm clearance.
For context, the outgoing Able was optimised around a 42mm tyre but could take up to a 43mm out back, and a 47mm up front.
Farewell weird chainstay
The distinctive elevated chainstay is no more. Allied Cycle Works
The outgoing Able was instantly recognisable for its elevated driveside chainstay, which Allied claimed improved the bike’s rear-end stiffness and also allowed the brand to run short 420mm chainstays.
Speaking to BikeRadar, Sam Pickman, head of product, said the brand removed this so its athletes could have the flexibility to run a 50t chainring with a wide-range 10-52t cassette.
Pickman explains: “to make that combination work, the elevated chainstay would have had to be really high, which would have created a whole host of other structural issues we wanted to avoid”.
Like its predecessor, the new Able is only compatible with 1x drivetrains, although when we spotted Taylor Lideens riding a prototype last year, he was riding a 2x Shimano GRX Di2 set-up.
An out-and-out gravel race bike
The Able has its eyes set firmly on the race course. Allied
Allied says the new Able has been designed for the demands of gravel racing and went through eight prototypes before settling on the final design.
Like Allied’s other bikes, the carbon frame is made in its Rogers, Arkansas facility – bypassing the typical Asian production most brands utilise.
A size medium (56cm) frame is claimed to weigh 950g (although Allied doesn’t reveal whether that’s painted or with hardware) – a 340g decrease over the previous model.
The accompanying fork is claimed to weigh 425g.
Allied has paid close attention to the riding characteristics of the fork. Allied
The new frame is claimed to have a 15 per cent reduction in front-end lateral stiffness over its predecessor, which Allied says is to improve handling and “help the bike feel more planted on rough roads”.
The rear end has a 20 per cent increase in lateral stiffness to improve pedalling efficiency, according to the brand.
Allied says the new fork is designed to match the frame’s stiffness and went through several variants before settling on the final design, and says it received feedback from some of its riders that the earlier forks were too stiff.
In a sign of its racing intent, the new Able is largely bereft of mounting points, retaining a pair of top tube mounts but losing the under-the-down-tube mounts of the previous model.
The Able is now fully integrated and uses Allied’s ST03 adjustable stem from its Alfa road model.
The brand says riders can swap between two rise options (0 and -8-degrees) without needing to re-cable the bike. The ST03 will be available in lengths from 70 to 130mm.
Cool down tube storage
Other manufacturers, take note… Allied
The new Able comes equipped with down tube storage, but its design differs from almost every other manufacturer in that the storage door is independent of the bottle cage.
Allied says this design not only saves weight versus under-the-bottle designs, but improves operation and gives you the peace of mind of traditional bottle security.
We believe this to be the first of its kind on a gravel bike, but the design isn’t new on mountain bikes – a similar setup can be found on the Canyon Exceed and YT Jeffsy.
Race-focussed geometry
The geometry isn’t quite as radical as you’d expect Allied
The Able will be offered in five sizes from XS (52cm) to XL (61cm). Allied says the new geometry “improves high-speed stability without sacrificing the nimble handling required for the technical terrain riders encounter today”.
Pickman further elaborates that Allied’s primary goal was to “position the rider comfortably yet aggressively, while carefully balancing the front and rear centre to achieve an optimal weight distribution of approximately 53/47 over the rear and front tyres”.
The head tube angle has been slackened by 0.5-degrees to 71-degrees on a size medium with a 71mm fork trail (the outgoing Able had a 66mm trail across most sizes).
Allied says it deliberately decided on these numbers “to increase confidence on varied terrain while ensuring the bike retains the necessary handling agility for navigating unpredictable situations”.
Elsewhere, there’s a 74-degree seat tube angle (except for the smallest XS size) and the reach has grown by 13mm on a size medium to 400mm, but the stack remains identical at 575mm.
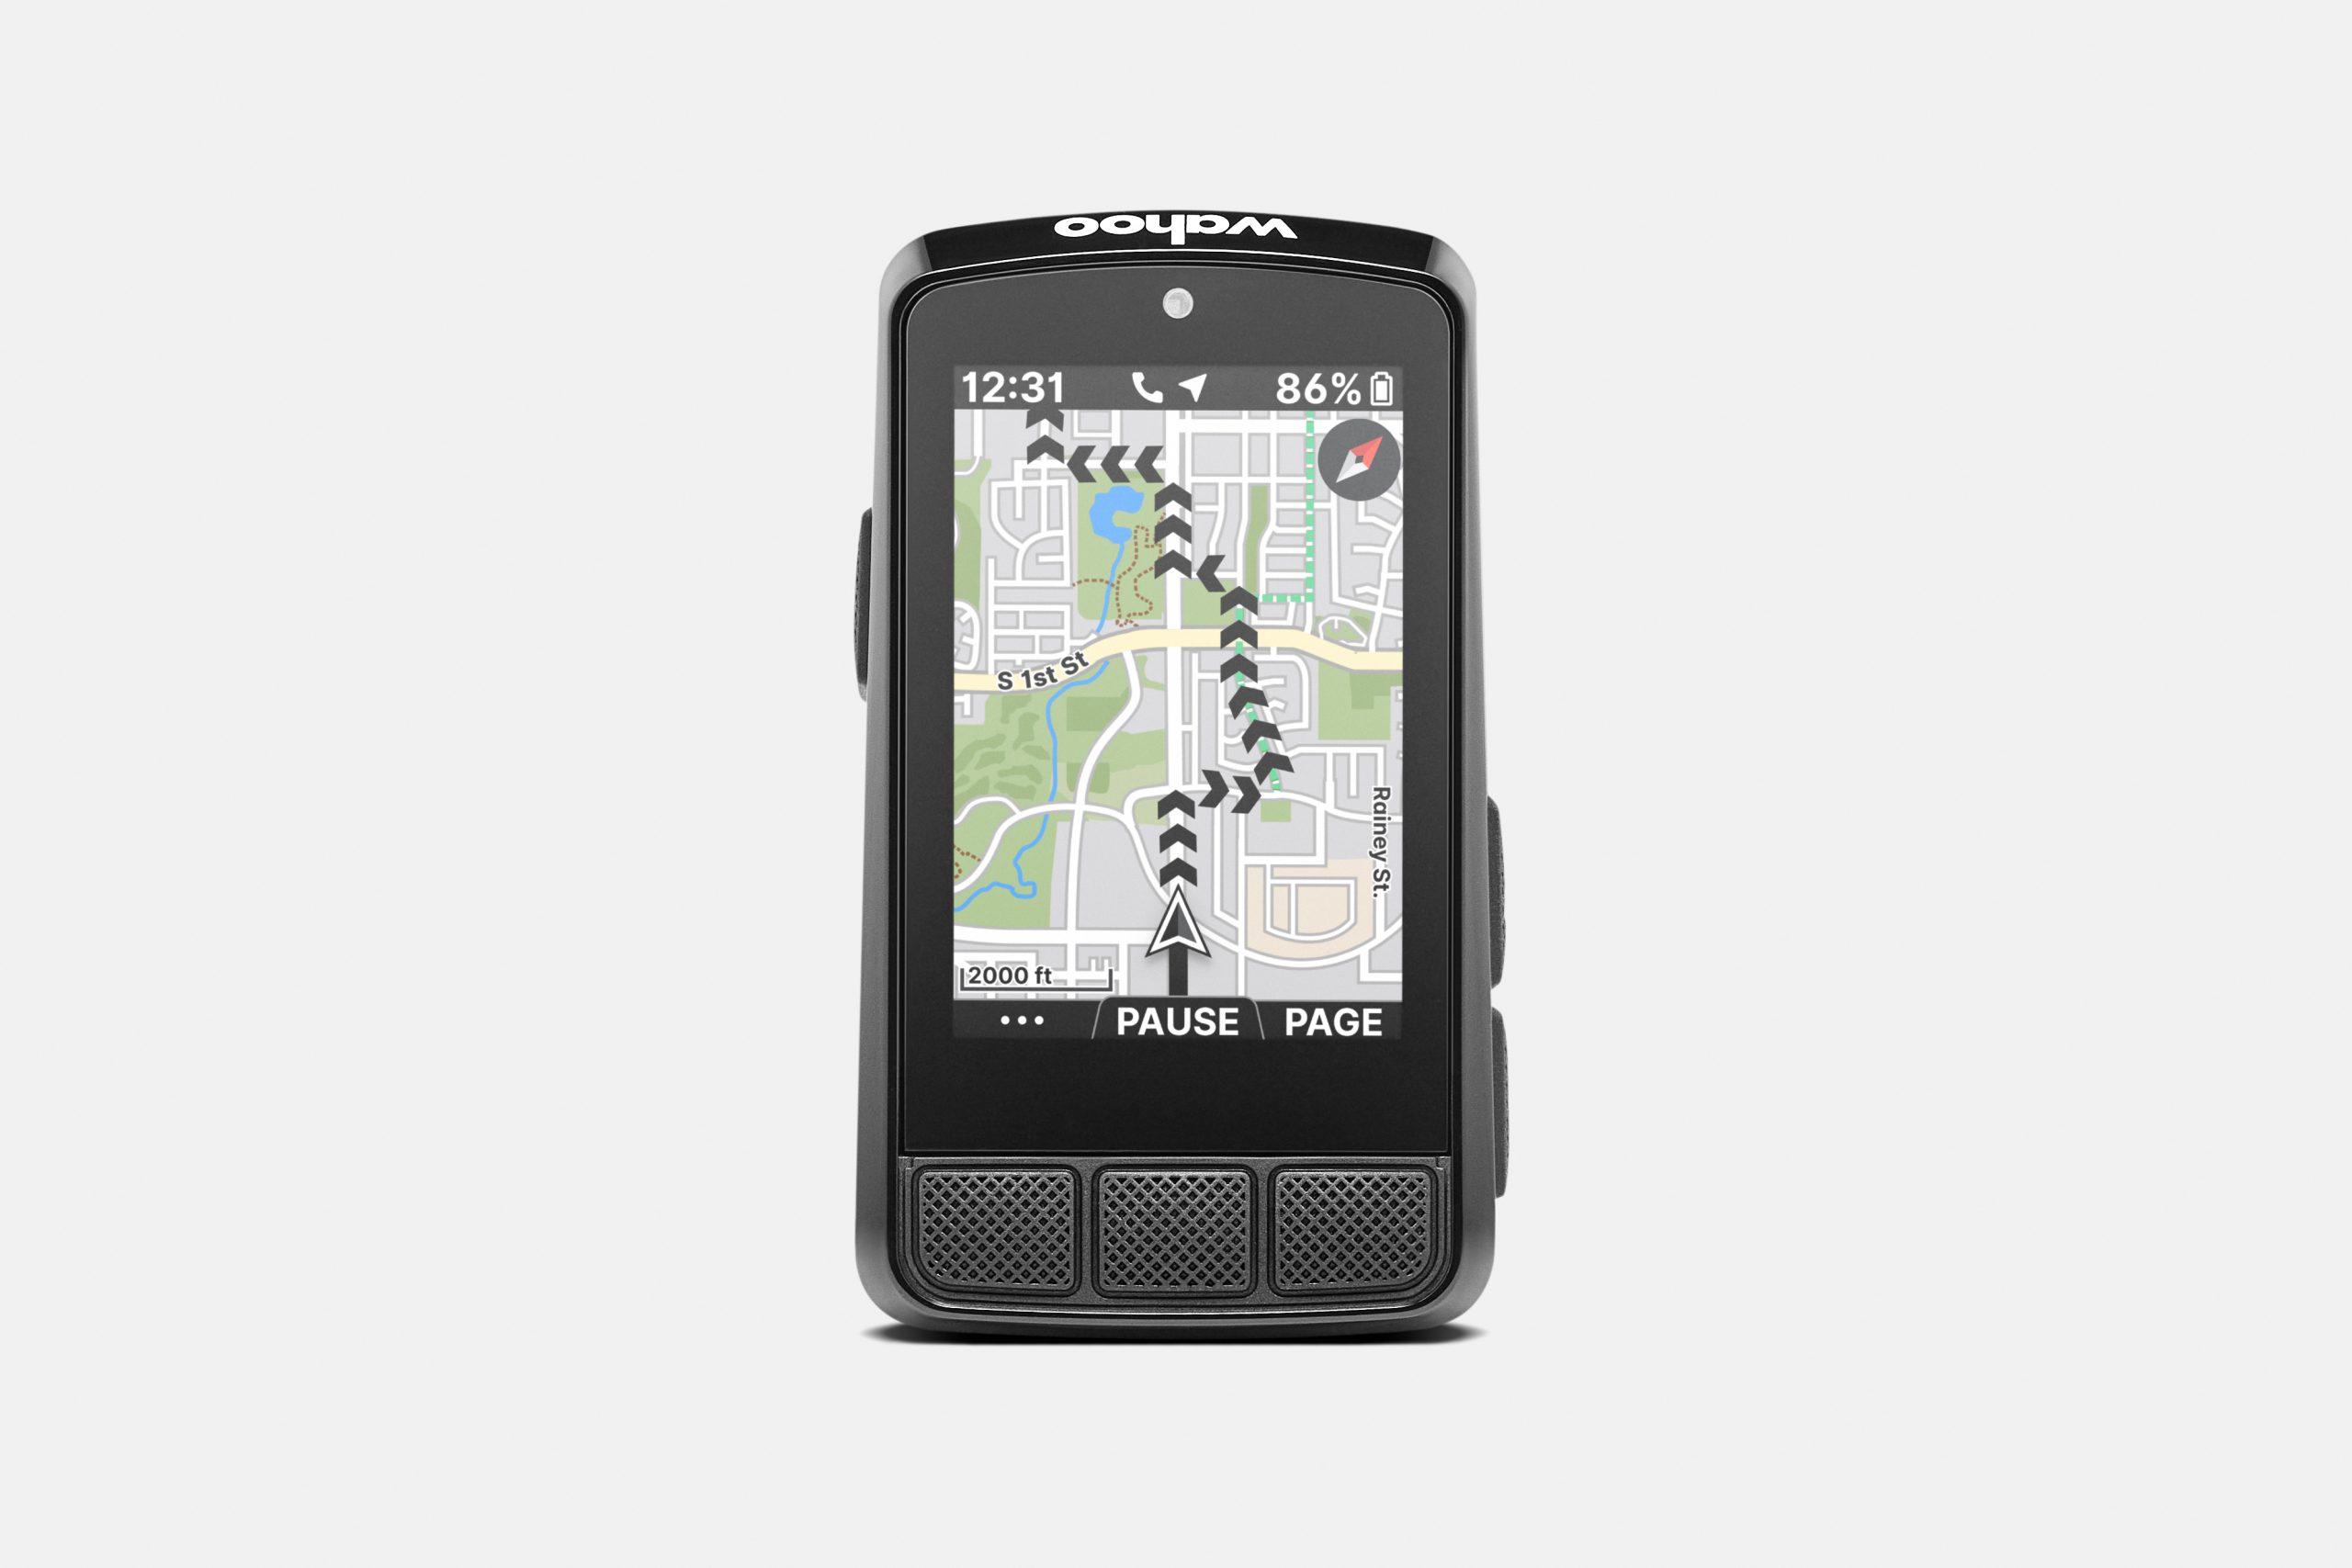
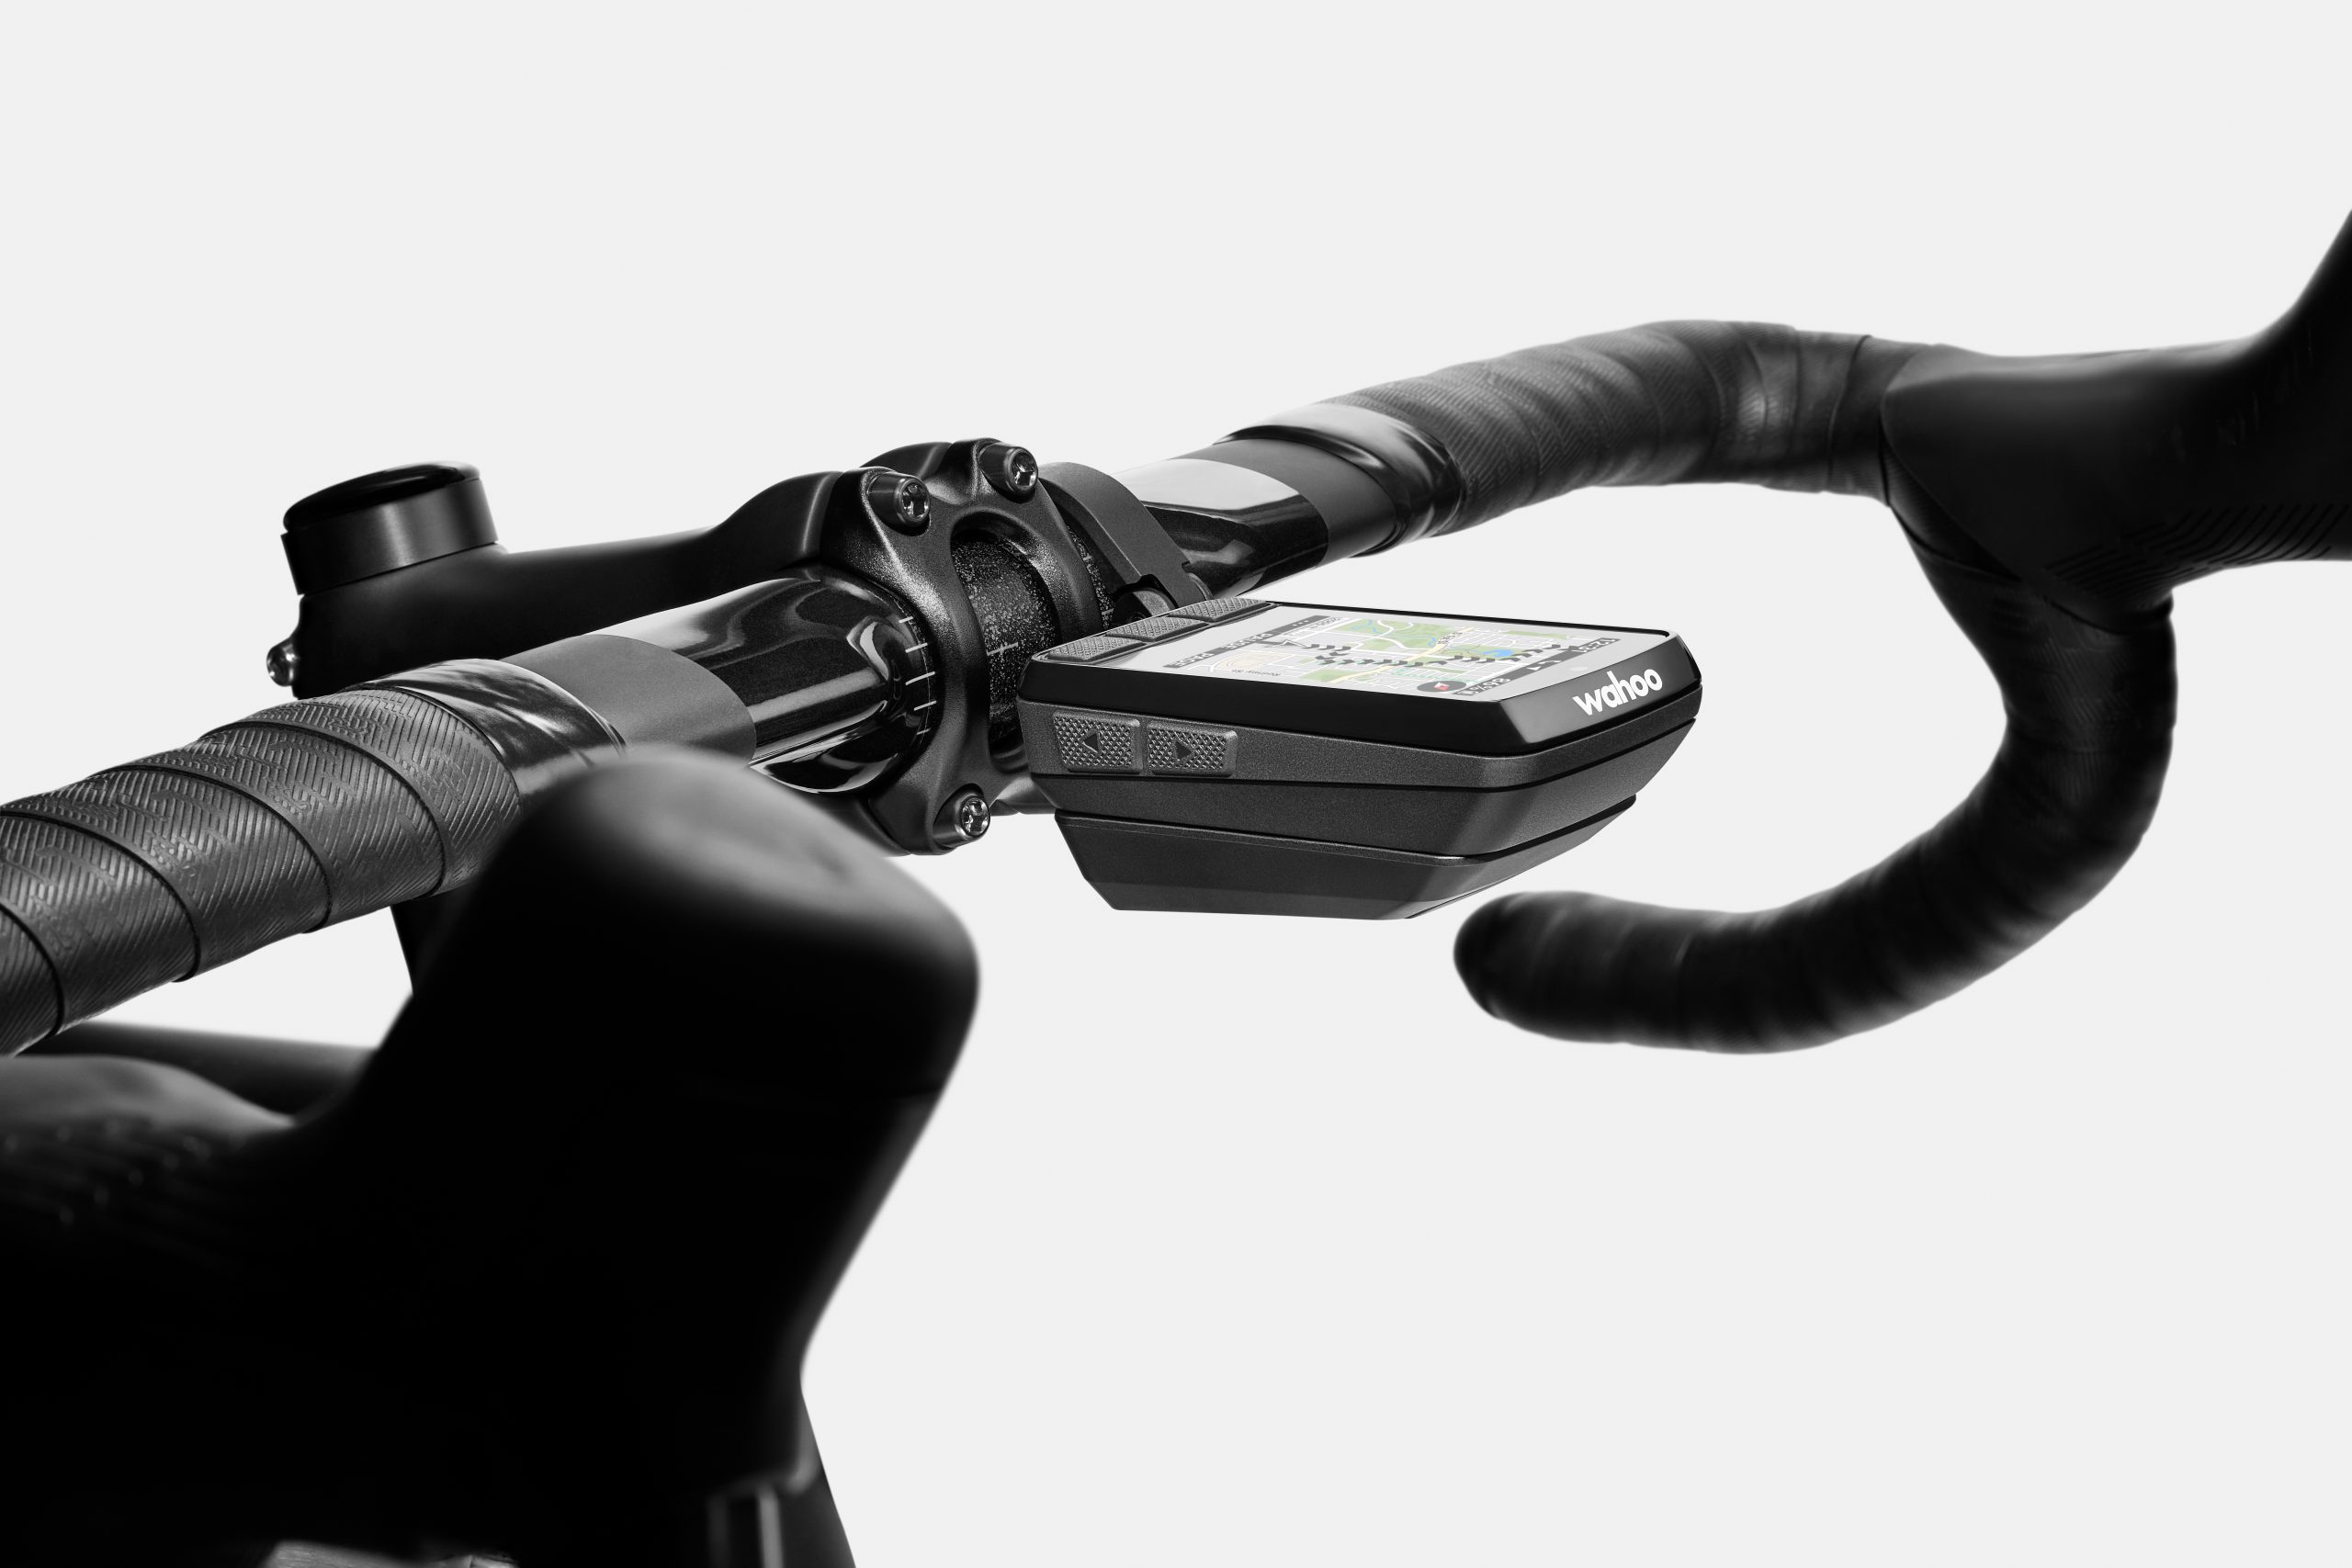
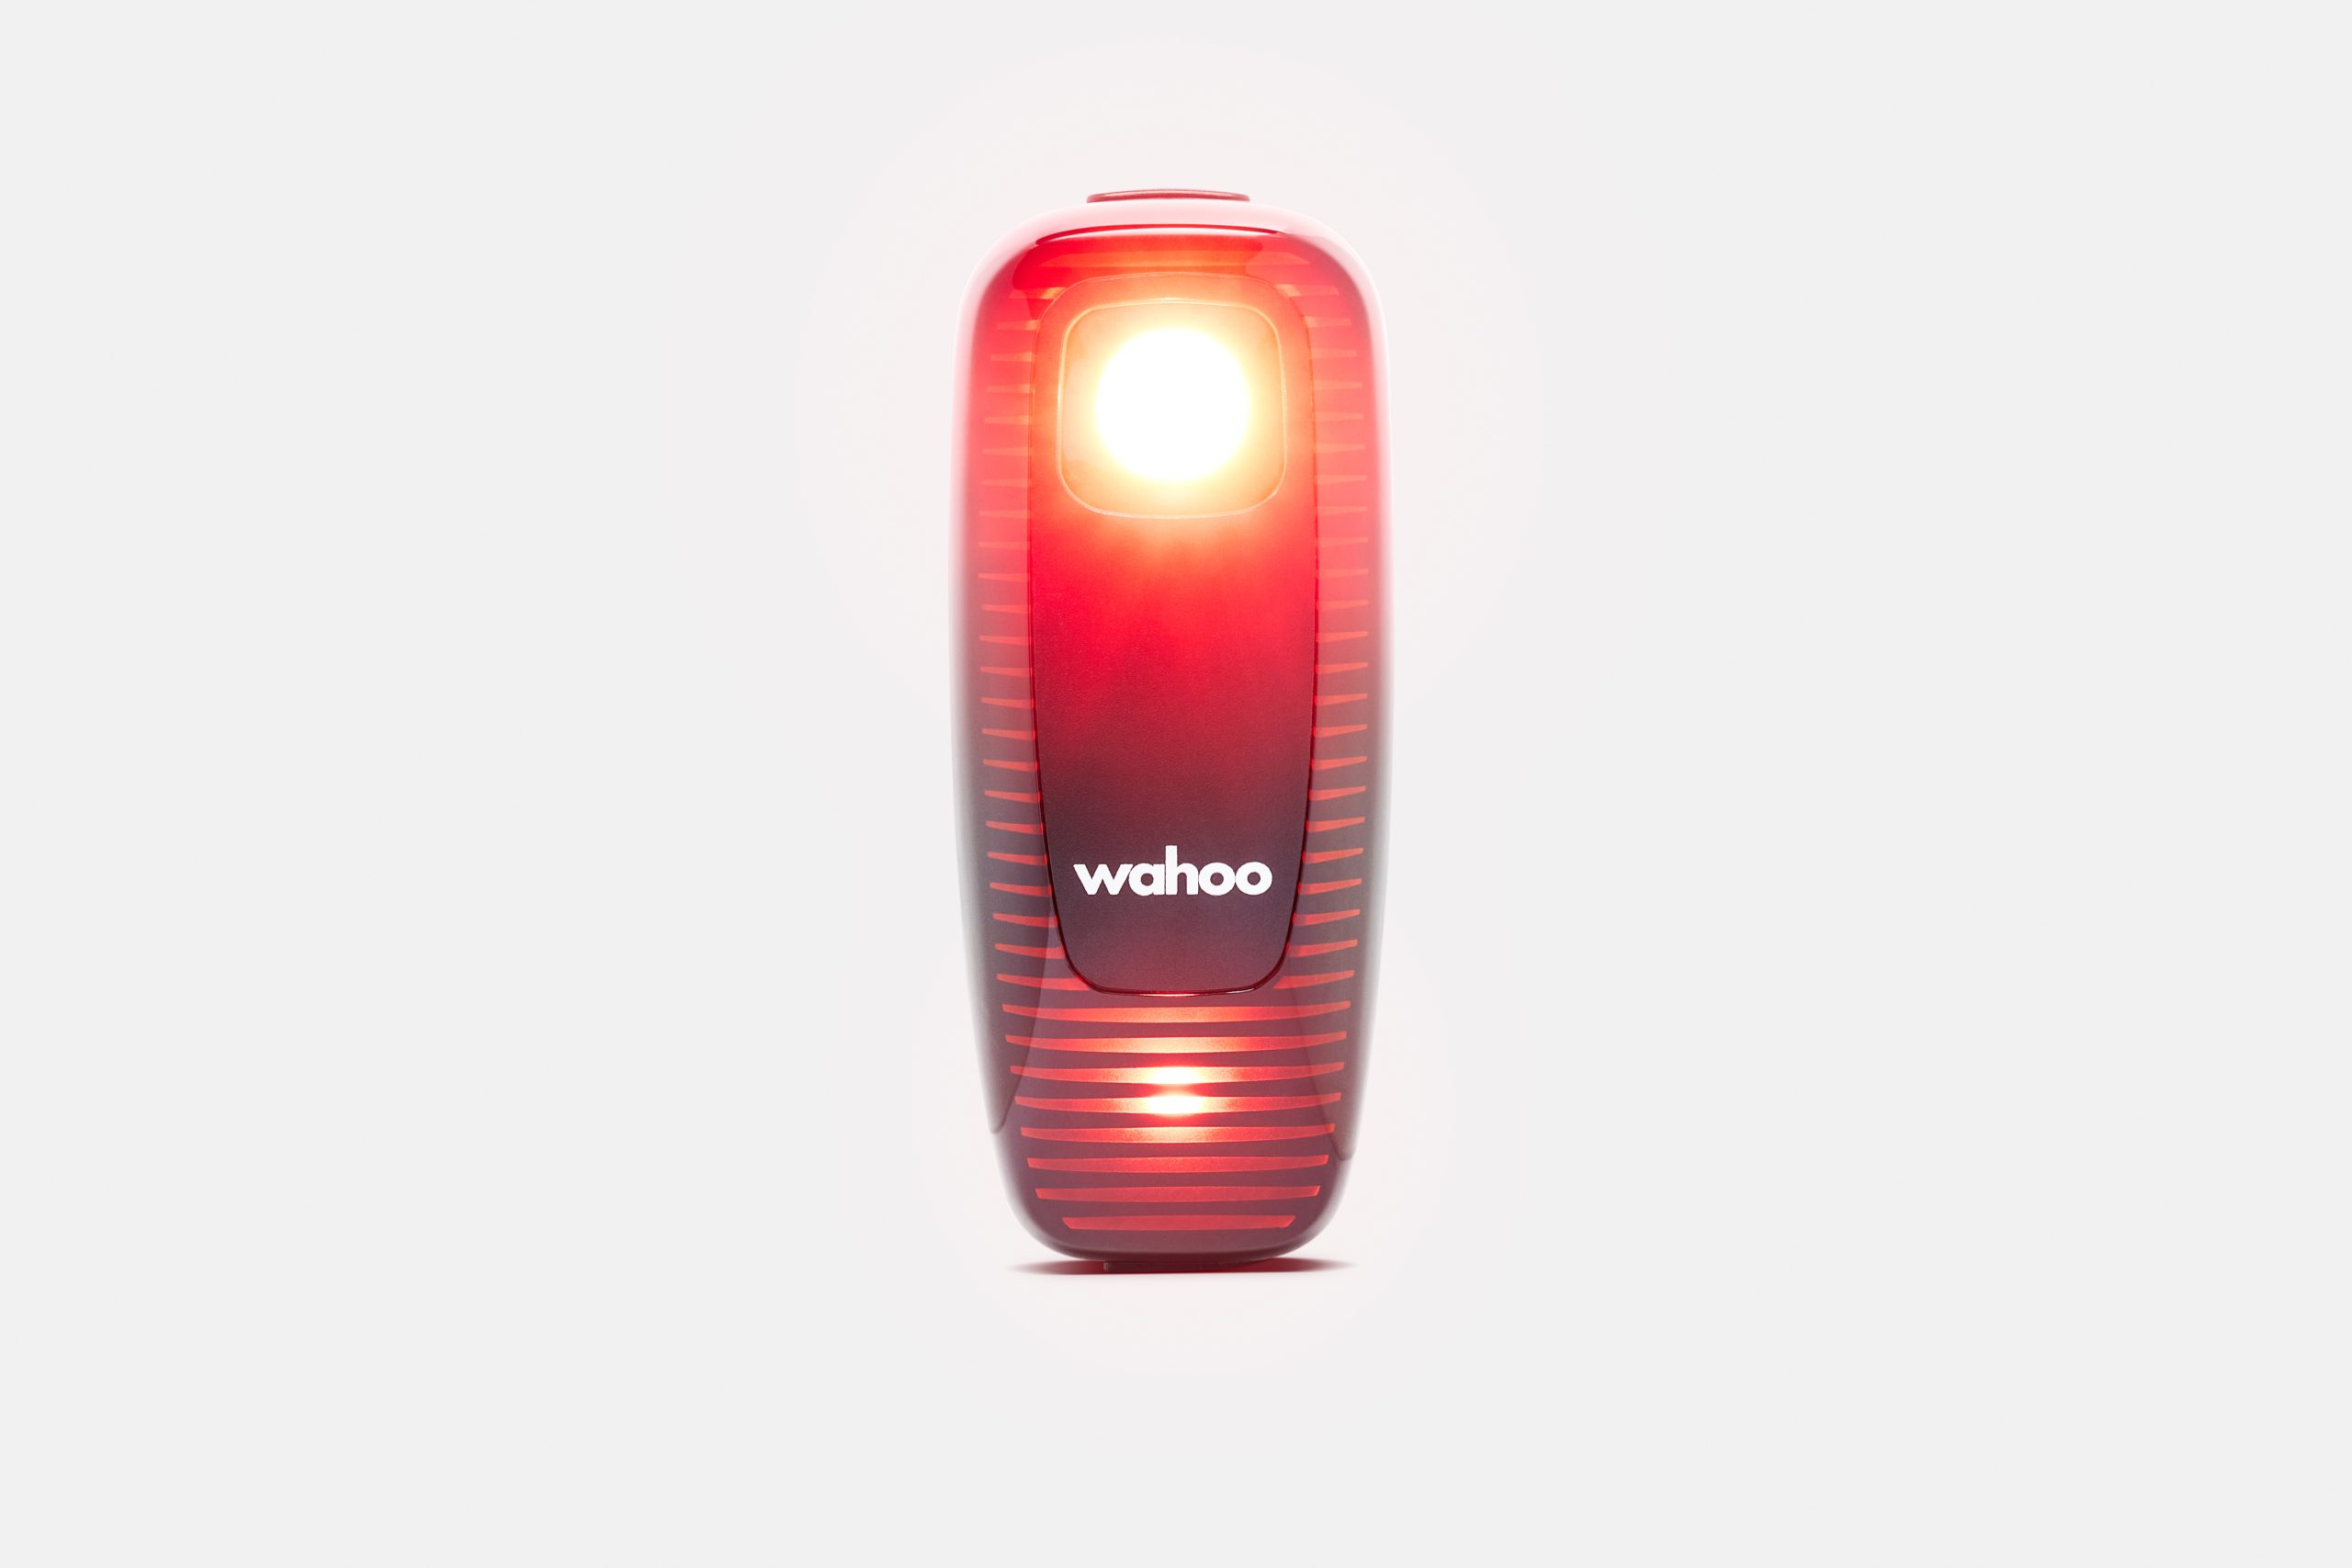
Wahoo has announced updates to its Roam and Bolt bike computers, headlining with improved screens and the integration of the brand’s overhauled user interface which debuted on the Elemnt Ace.
The Elemnt Roam 3 sees a touchscreen installed for the first time, with a small increase in size.
The smaller Elemnt Bolt 3 has received a similar screen update, although this remains non-touchscreen.
But the LED indicators – which ran along the outgoing Bolt and Roam’s bezels – have been dropped from the new bike computers.
Both have seen visible changes to their form factor, but Wahoo hasn’t shared detailed specifications.
The Roam 3 is set to cost £399.99 / $449.99 / € 449.99 / AU$749.95, and the Bolt 3 £299.99 / $329.99 / €329.99 / AU$549.99. Both will be available to buy from Tuesday 6 May.
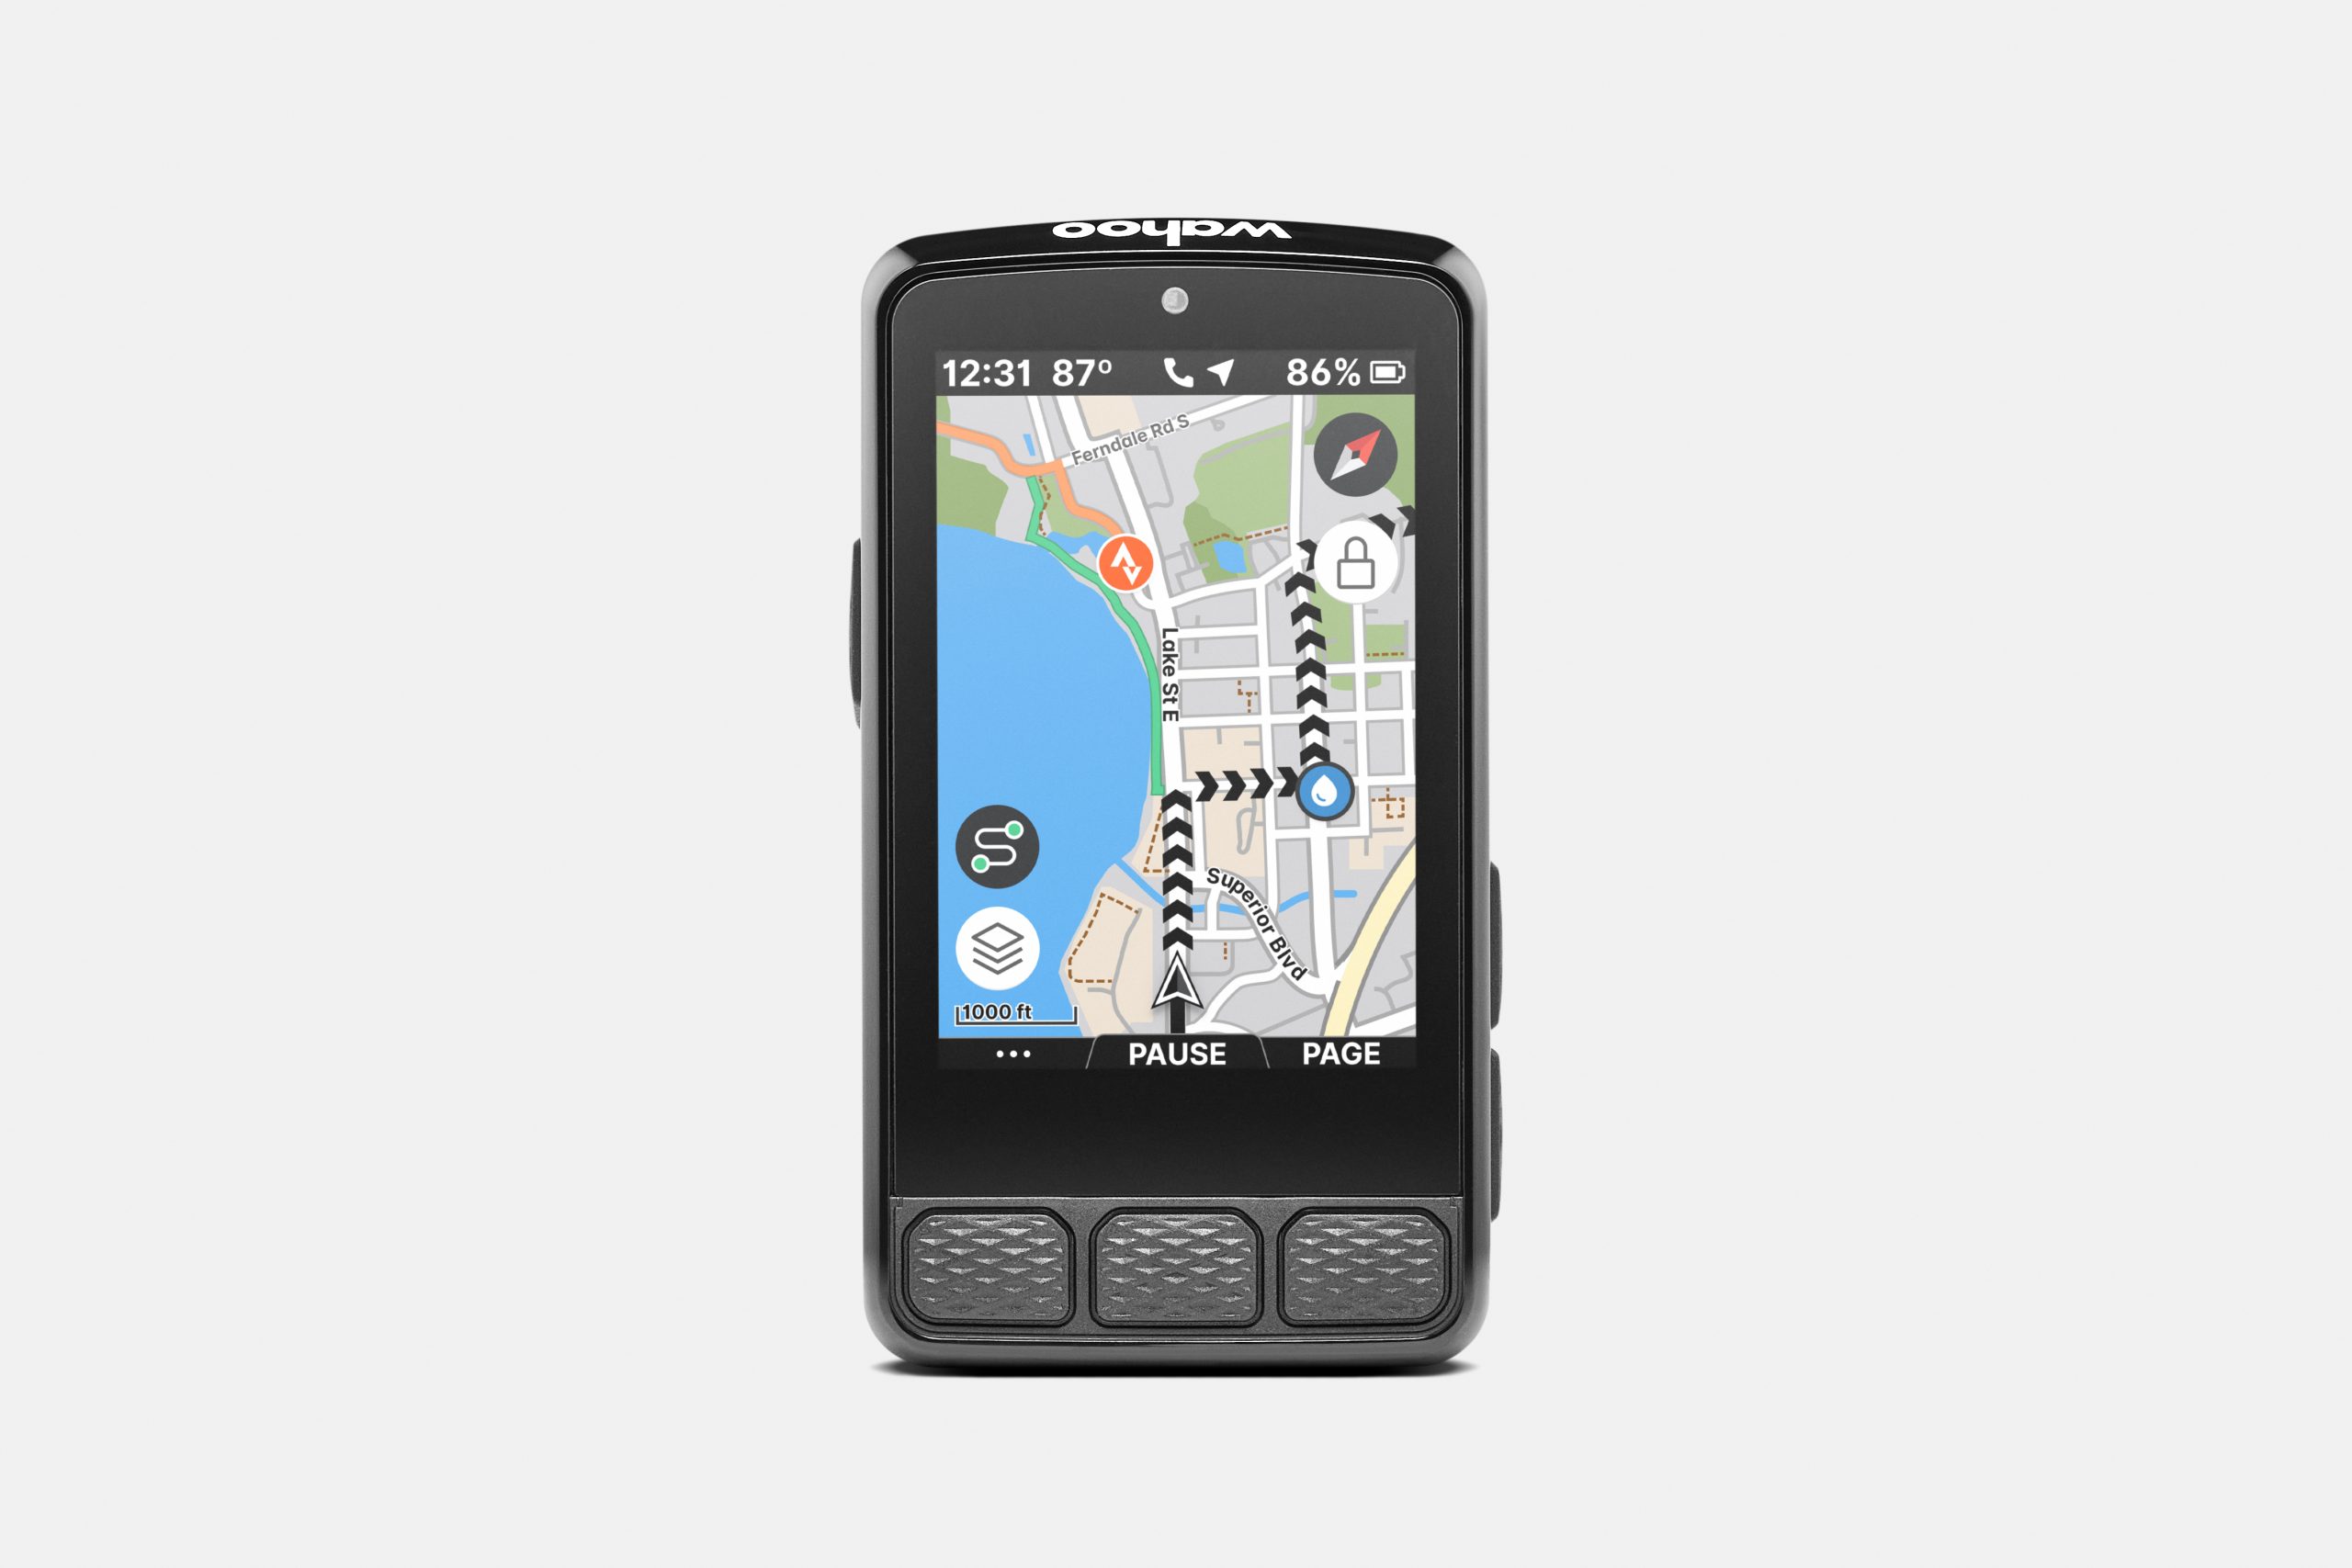
The Wahoo Elemnt Roam 3 features an improved, slightly larger screen. Wahoo
The Wahoo Elemnt Ace, which launched in December 2024, remains at the top of the Wahoo computer tree, so the latest Roam slots in between it and the smaller Bolt.
The LED indicators – which previously inhabited the top and left-hand edge of the bezel – are no more, dropped in favour of an improved screen.
This has enlarged to 2.8in (measured diagonally) from 2.7in, with thinner side bezels, and which Wahoo claims is anti-reflective. The ambient light sensor has also shifted from the top-left corner to the top-centre.
The device occupies a middle-sized ground between the Elemnt Ace and Bolt 3. Wahoo
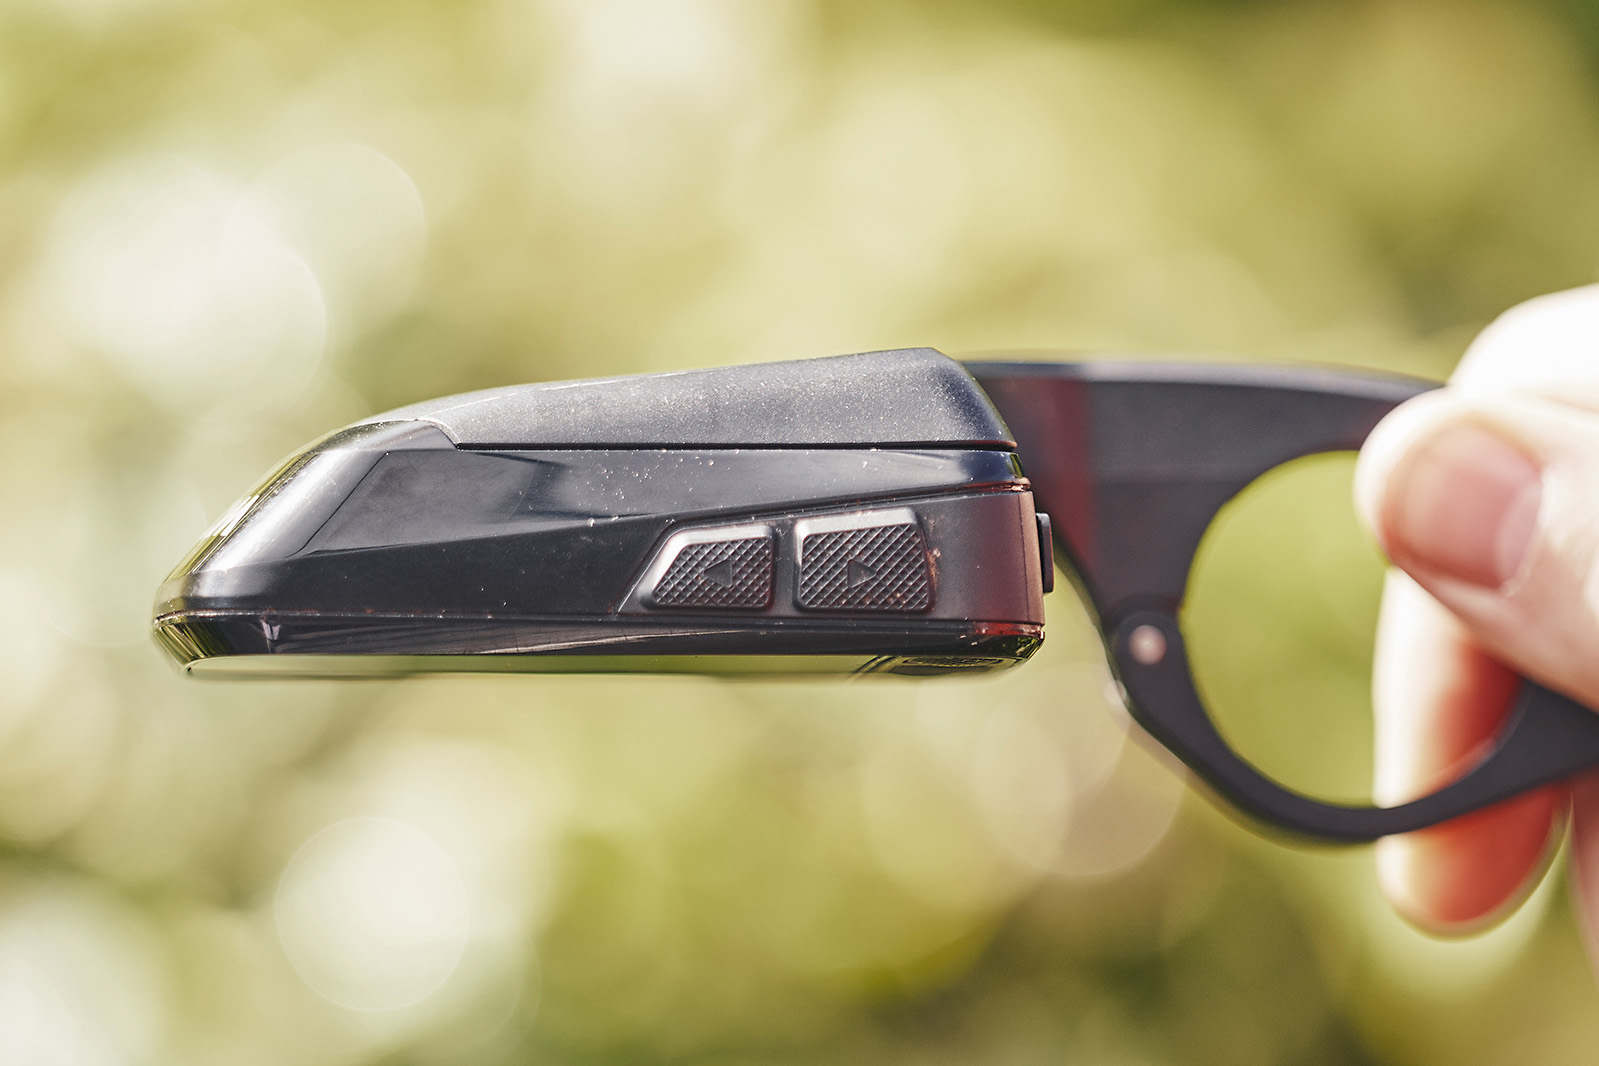
The screen is now touch-sensitive with pinch, zoom and swipe capability, but Wahoo has retained the three soft-function buttons on the bottom of the device, plus the two toggle buttons and power button.
When it launched the Elemnt Ace, the brand claimed that this dual functionality gave riders operational choice. Specifically, the buttons were said to be especially useful in the rain, and when wearing winter gloves.
Wahoo’s render images suggest that the screen is also more detailed, possibly with a higher pixel count and more colour range – the previous Roam V2 could only produce 64 colours – although the brand hasn’t confirmed this.
The Elemnt Bolt V2 had LED indicators on the top and left bezels – these are now consigned to the history books. Felix Smith / Our Media
Navigation and mapping has been improved, and voice prompts are also part of the updated feature set.
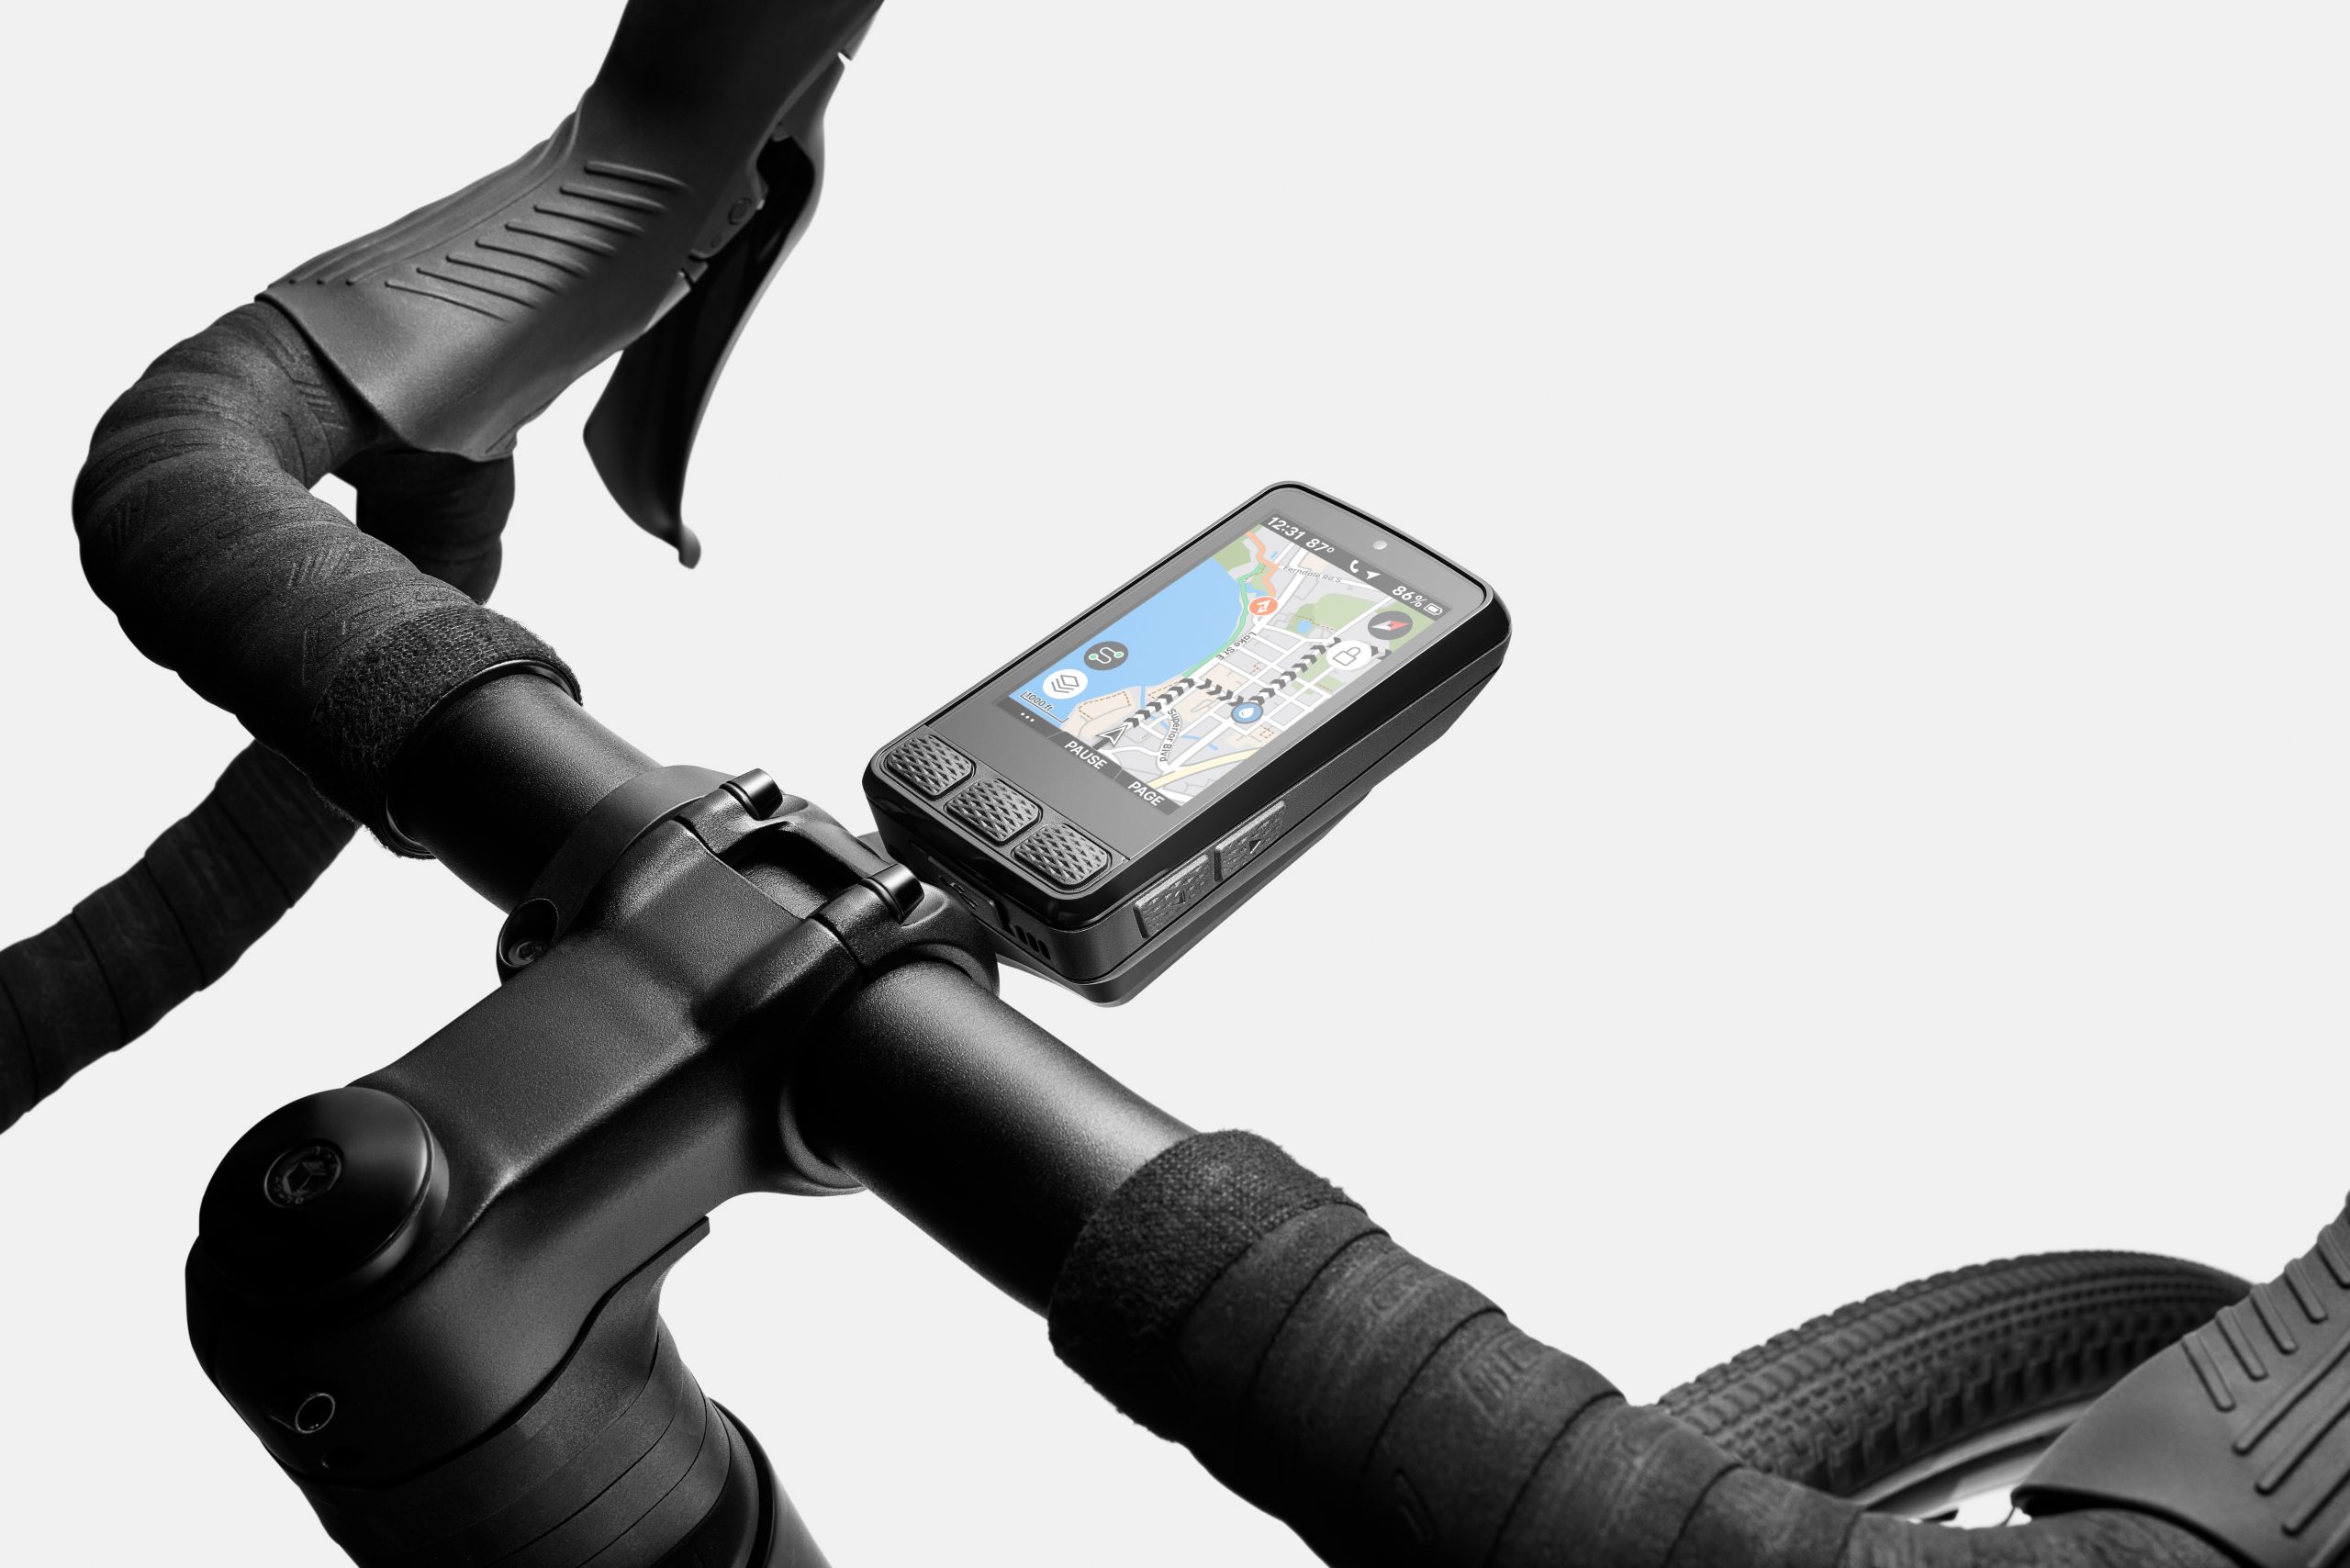
The overall form factor appears slightly longer and narrower (Wahoo hasn’t shared detailed specs), with a similar depth. It uses the same click-mount interface, although it’s unclear yet whether the supplied out front mount (which features a supporting frame) has been modified.
Internal specifications have yet to be fully confirmed, but the claimed battery life has increased by around seven hours. Wahoo
Wahoo says the Elemnt Roam 3’s battery will last for “up to 25 hours”, a marked improvement on the previous Roam’s 17 hours claim (which we found to be close to the mark in real-world testing).
This indicates that the battery capacity has been updated, alongside potential improvements to the device’s battery management and internal components – albeit, again, this hasn’t been confirmed.
This is also linked to the brand’s updated software and Wahoo app, which debuted on the Elemnt Ace, and has now been rolled out across the Roam and Bolt 3.
This sees a refined interface on start-up, as well as full setup and customisation of the screens carried in the app.
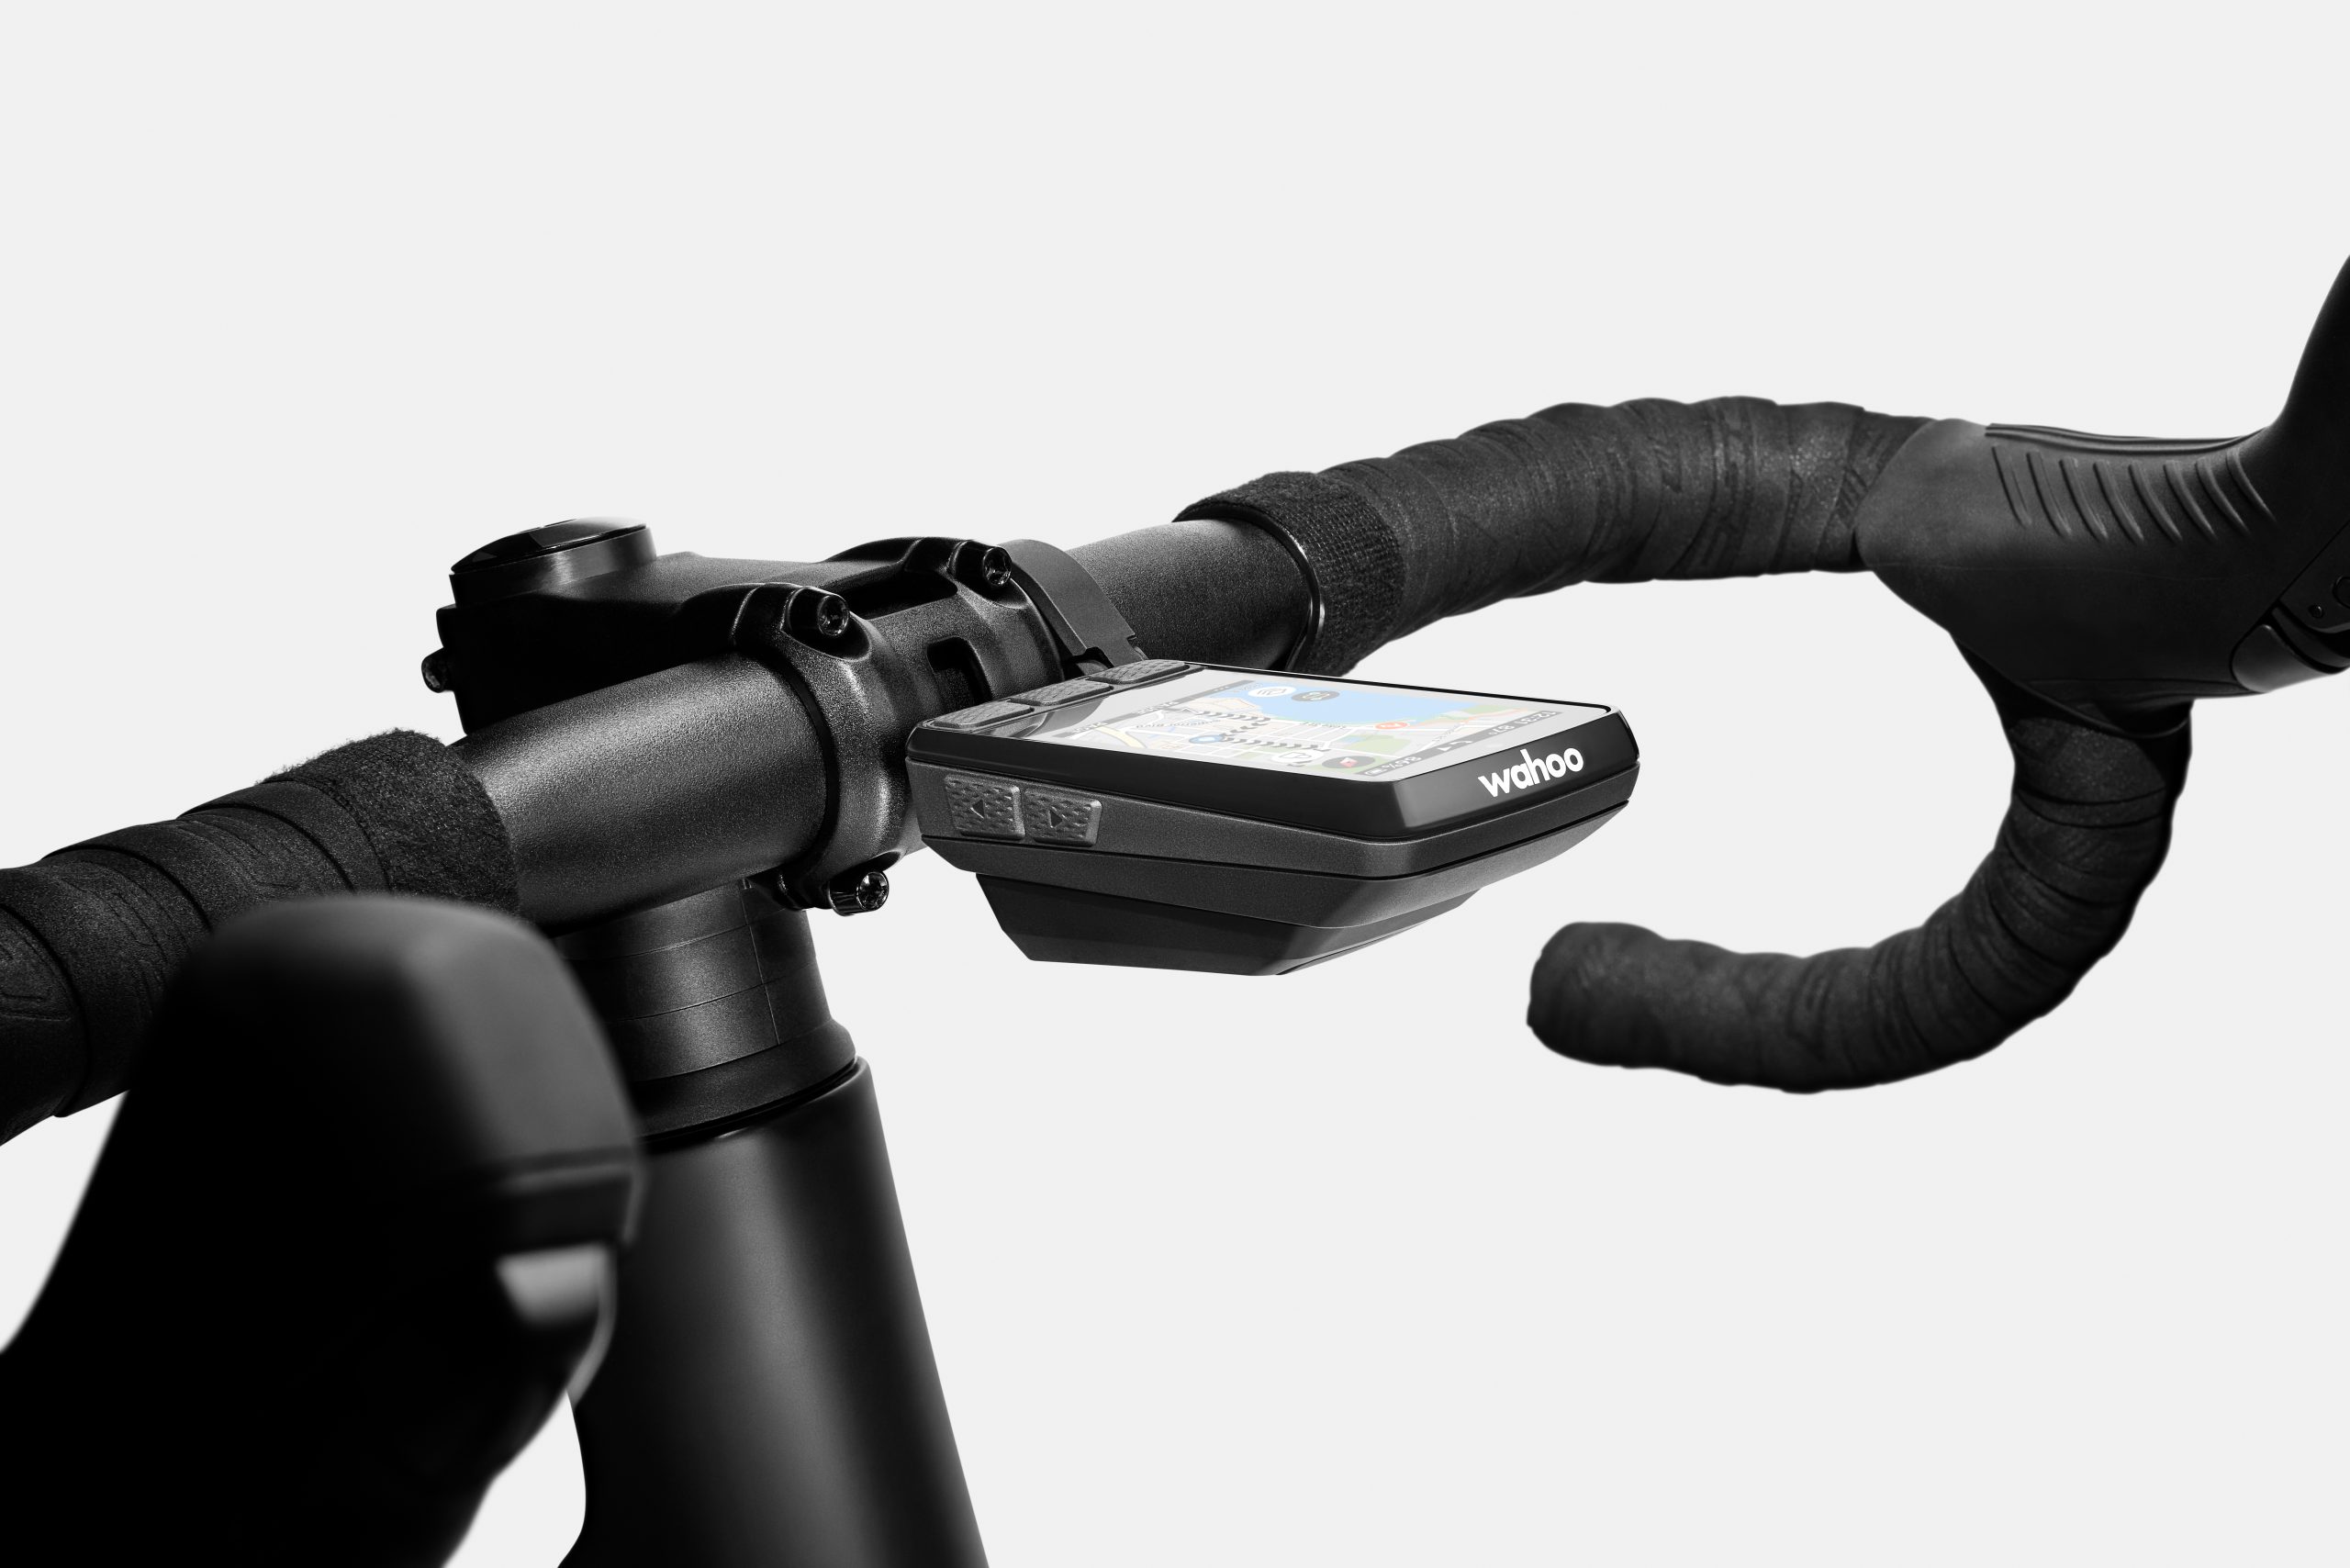
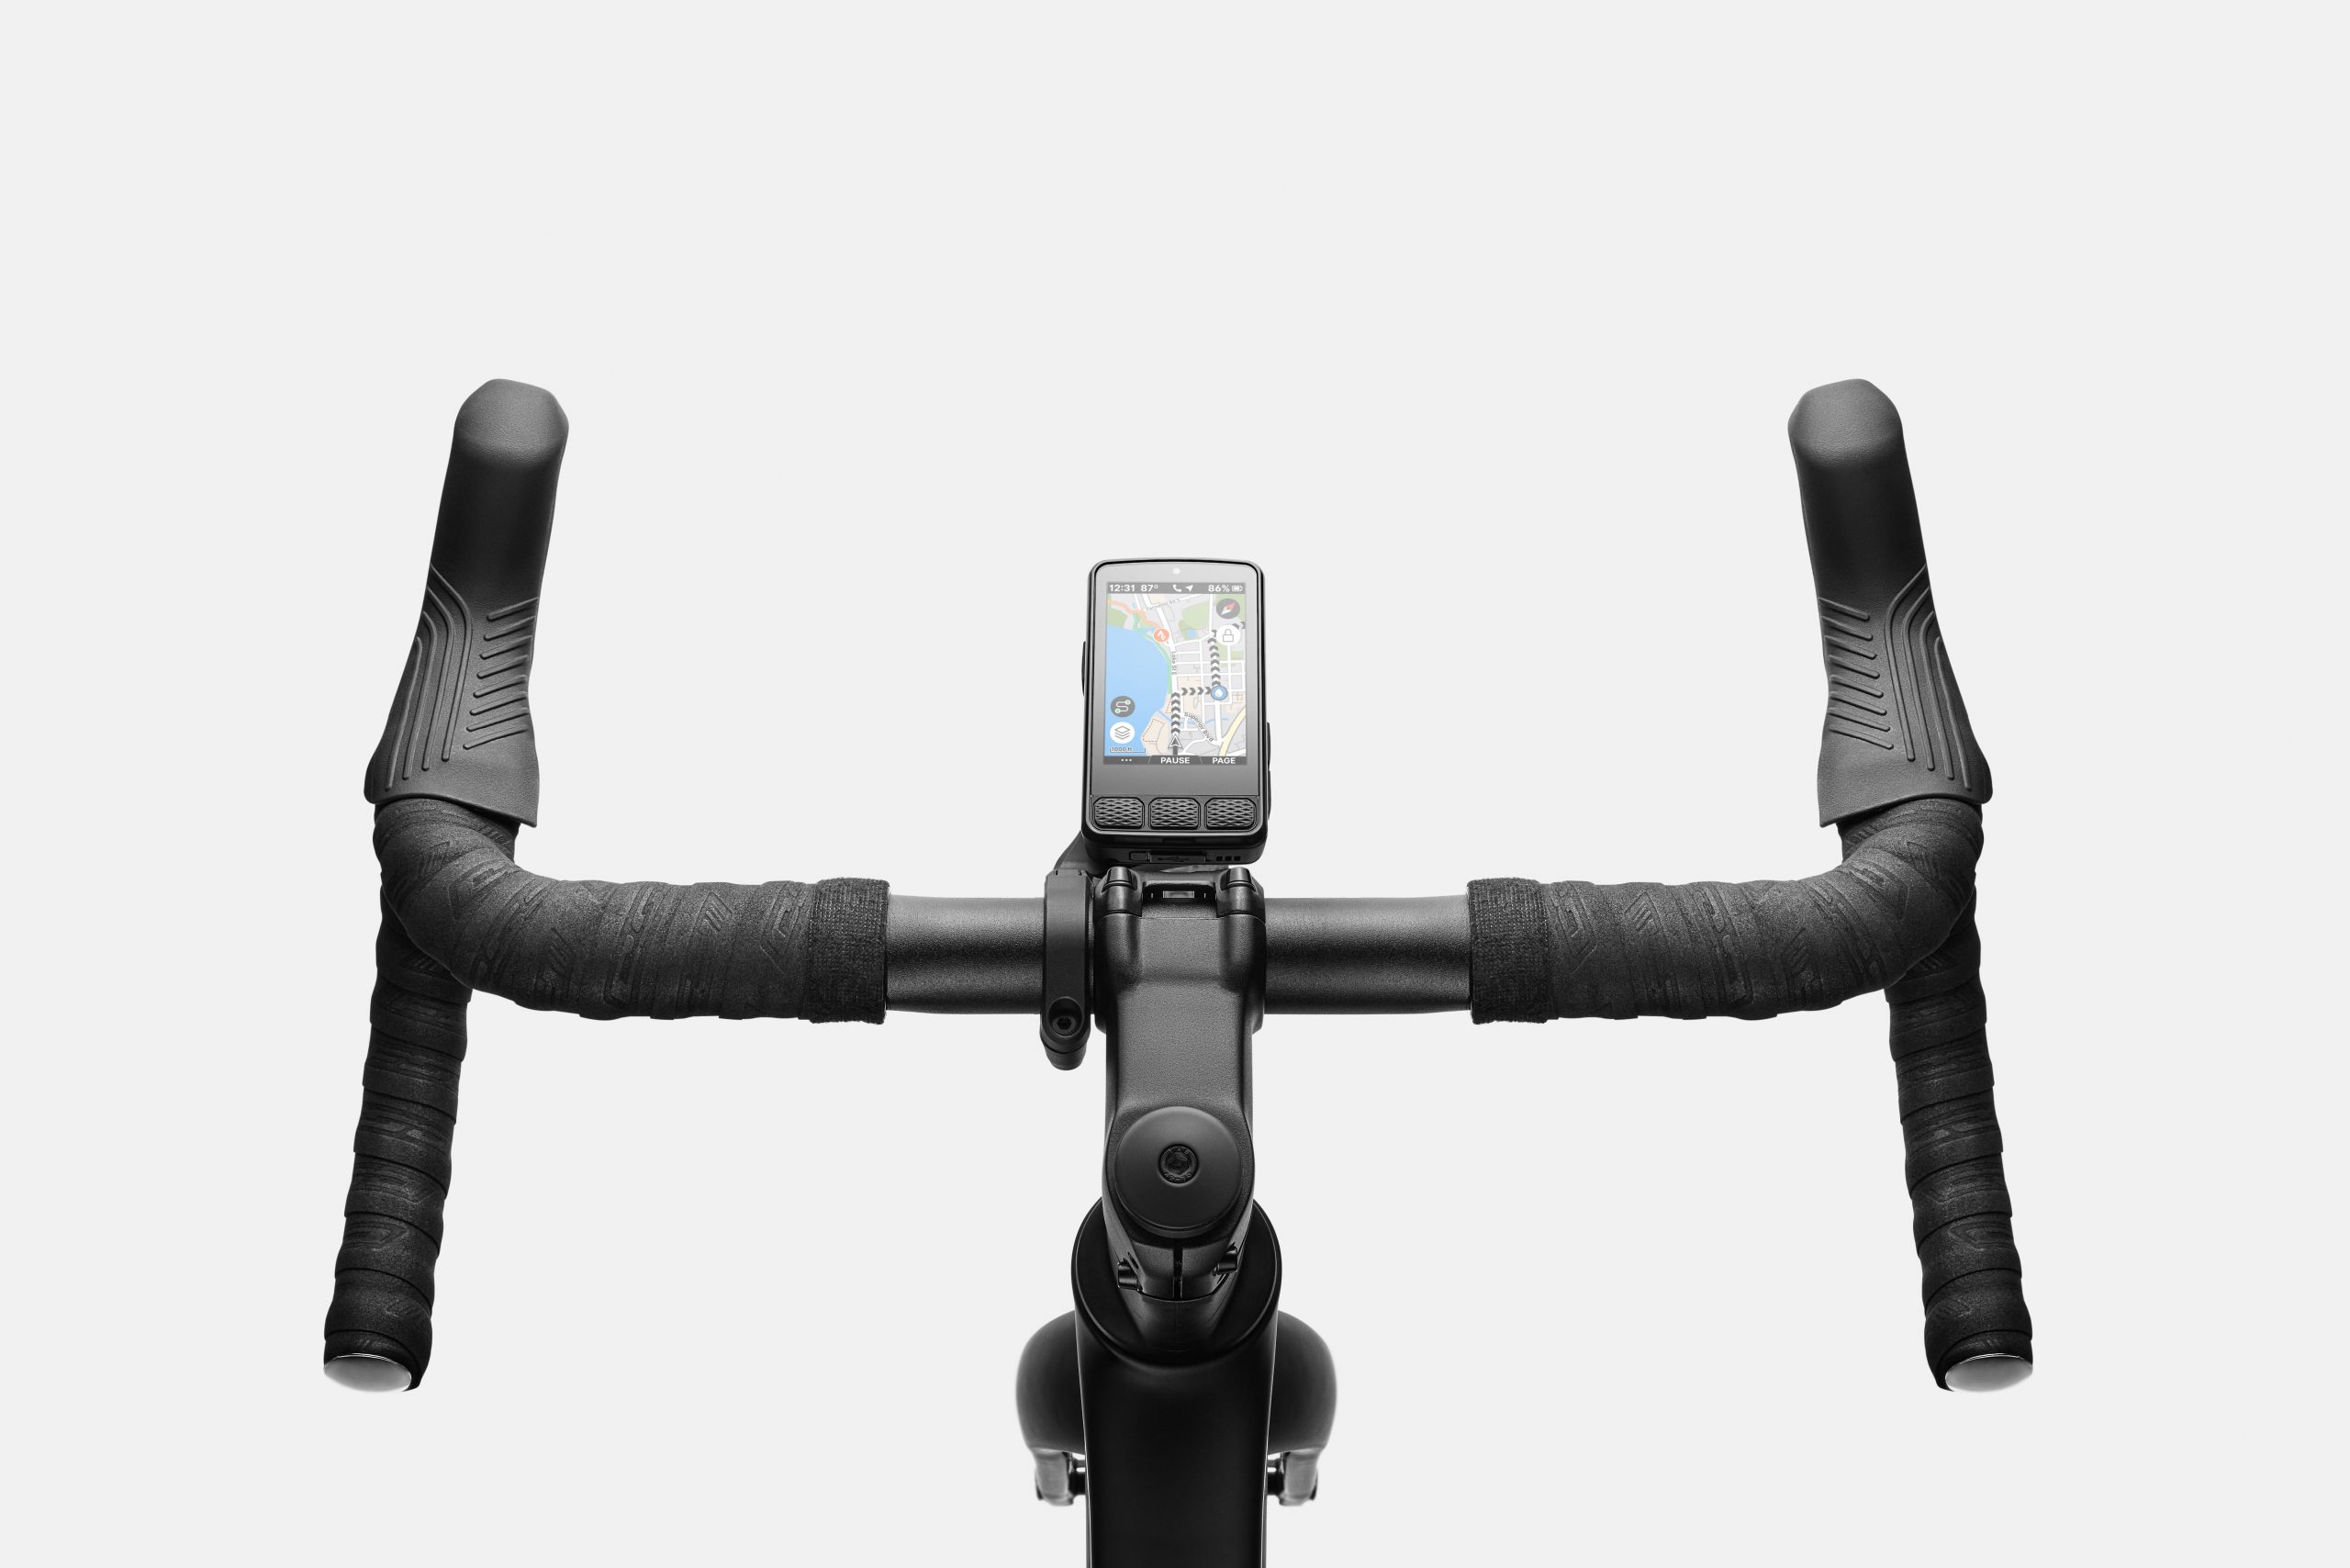
Wahoo Elemnt Bolt 3
The Elemnt Bolt 3 remains the smallest of the three Elemnt computers. Wahoo
The Wahoo Elemnt Bolt 3 has seen similar updates to its screen and design, with a slight bump in screen size (and detail, judging from the brand’s press images). The LED indicators have been dropped from the top bezel.
Like the Roam 3, the ambient light sensor has shifted to the top centre of the device.
The Bolt 3 remains the brand’s smallest and cheapest bike computer, and continues to be pitched as “compact and aerodynamic”.
Press images show the computer to be substantially thicker than the outgoing model (including the mount). Wahoo
That said, close inspection of the Wahoo’s supplied images reveals that the Bolt 3 is thicker compared to the previous generation, suggesting an overhaul under the hood.
The Bolt v2 appears much sleeker, by comparison. Steve Sayers / Our Media
Wahoo’s claimed run time has increased from 15 to “up to 20 hours”, hinting that a larger battery could be the main cause for this.
As with the Roam 3, though, exact hardware specifications have yet to be shared.
Pricing and availability
The new computers aren’t available to buy just yet. Wahoo
Wahoo says the new Elemnt Roam and Bolt 3 computers will be available to buy on Tuesday 6 May.
Roam 3: £399.99 / $449.99 / € 449.99 / AU$749.95
Bolt 3: £299.99 / $329.99 / €329.99 / AU$549.99.
Our test units are soon to arrive at BikeRadar HQ, when we’ll get to grips with all the changes and report on whether you should think about upgrading.
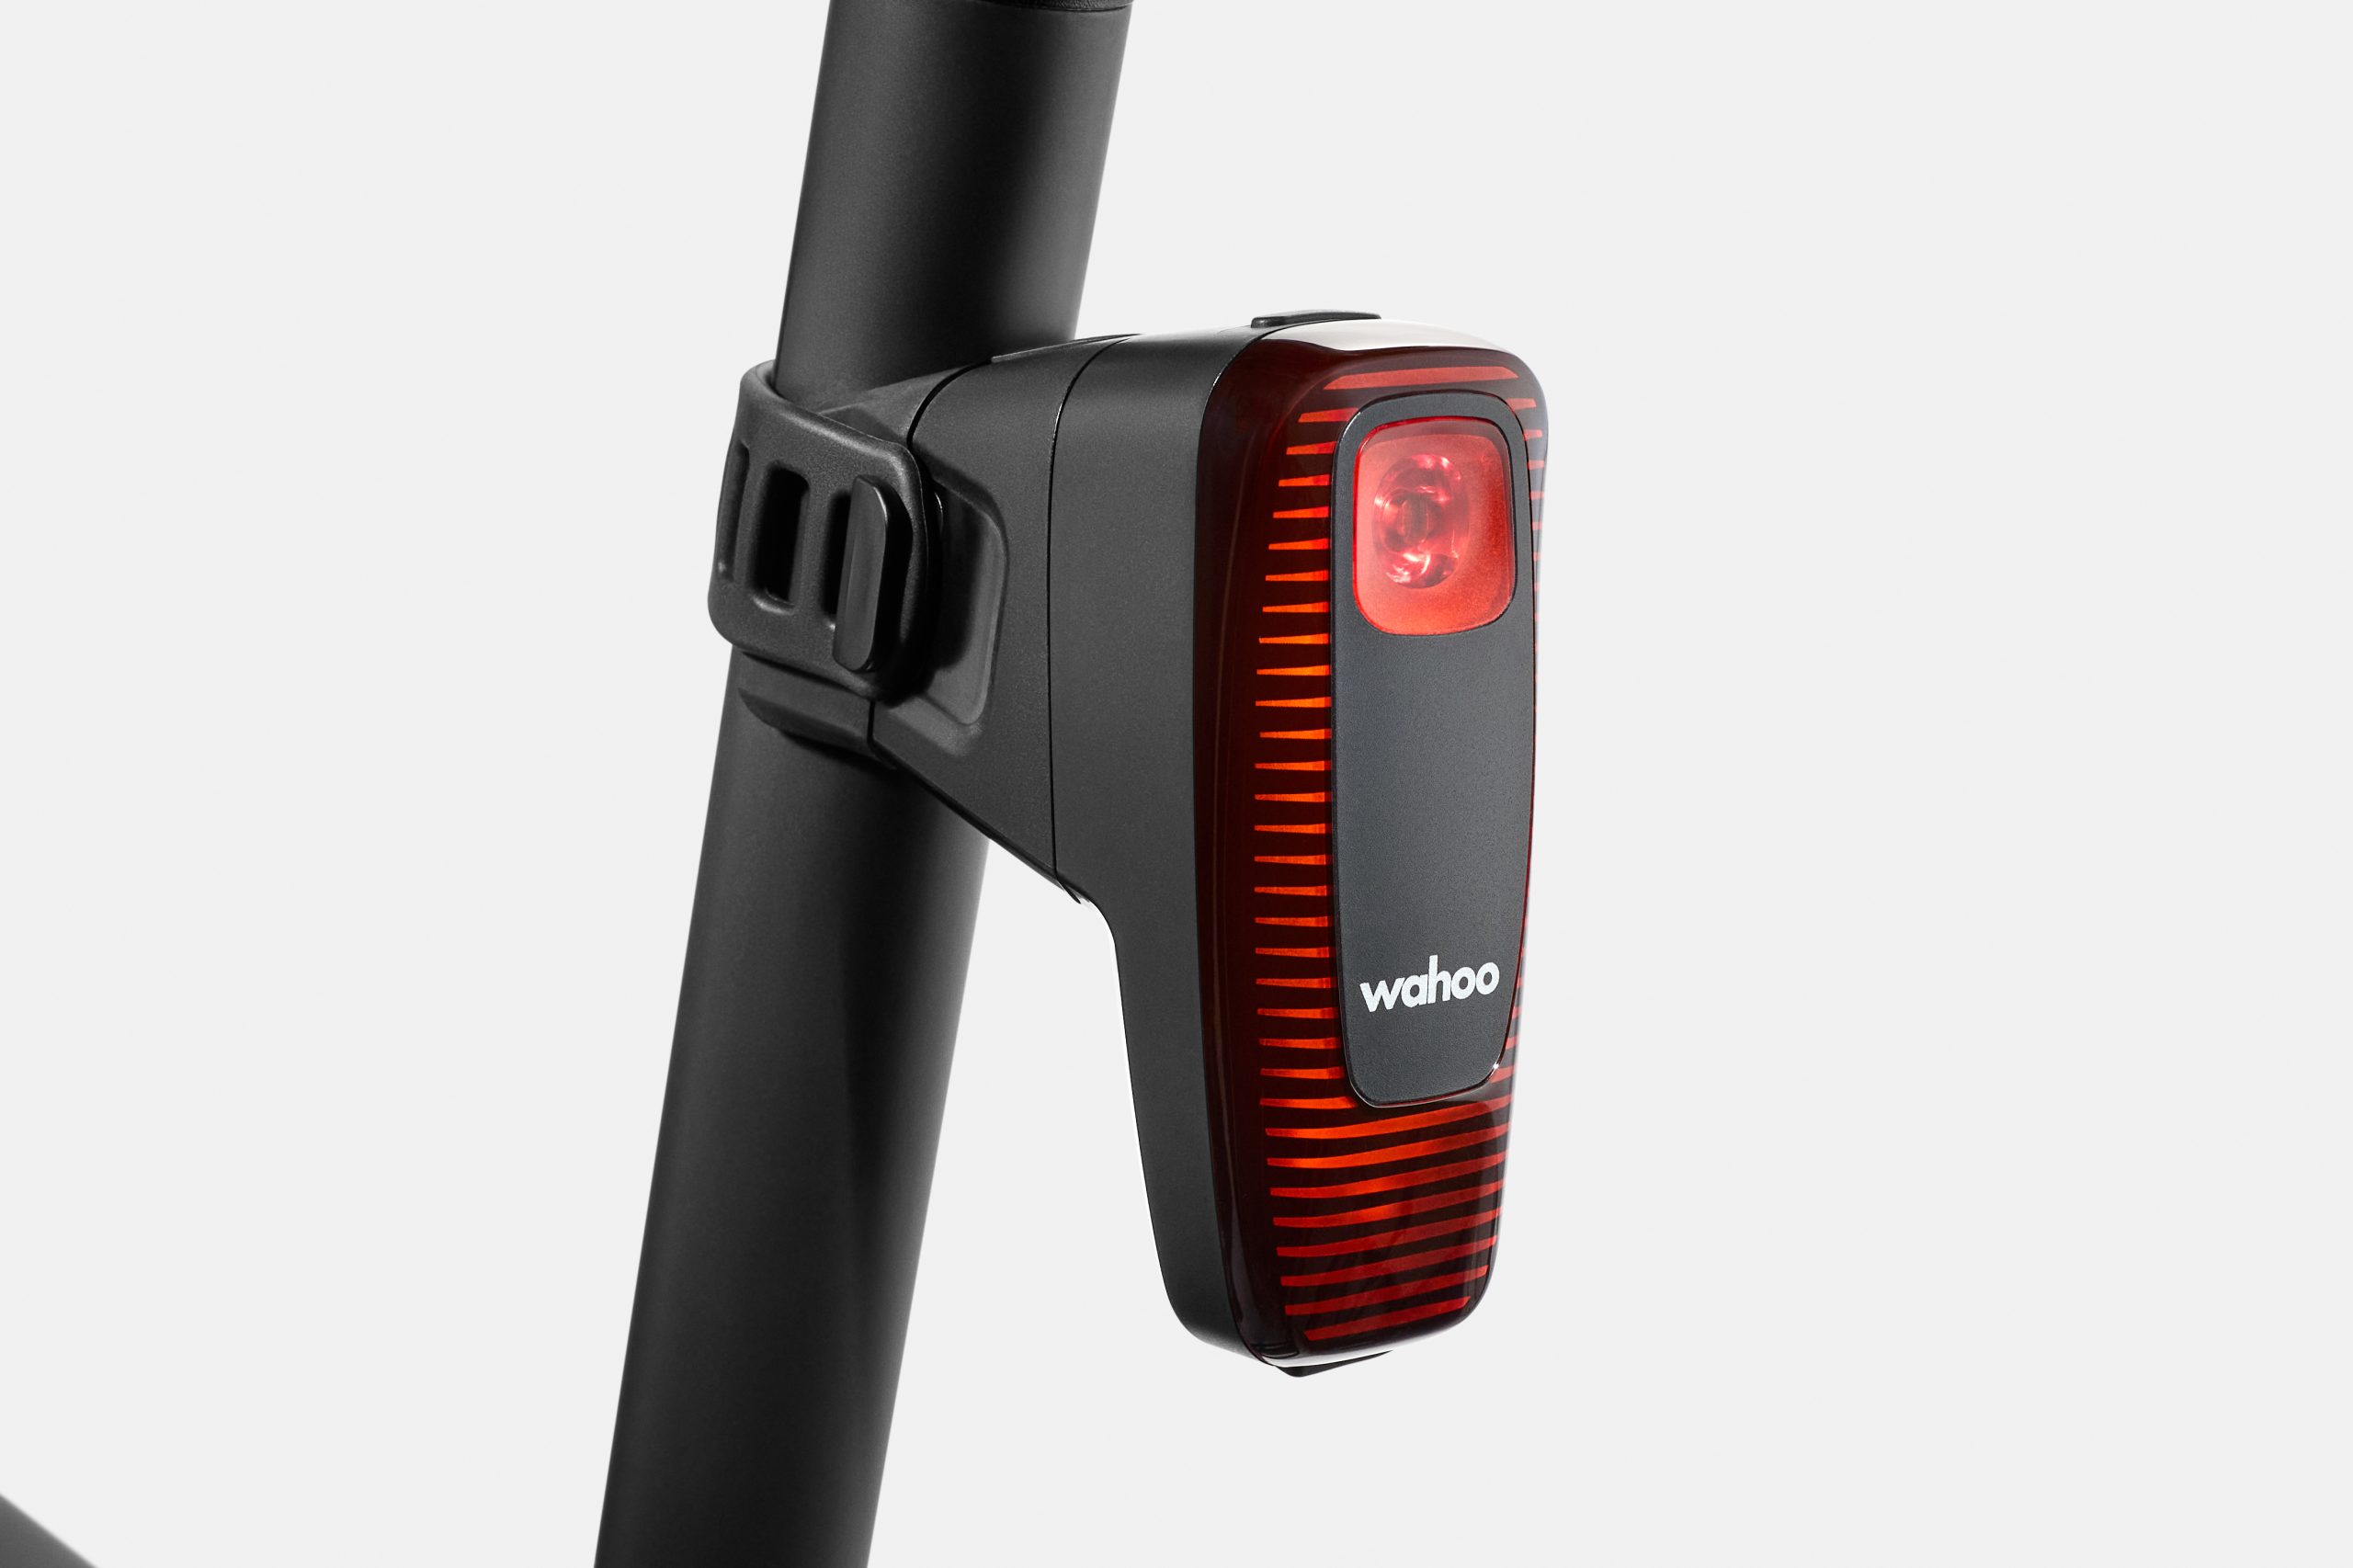
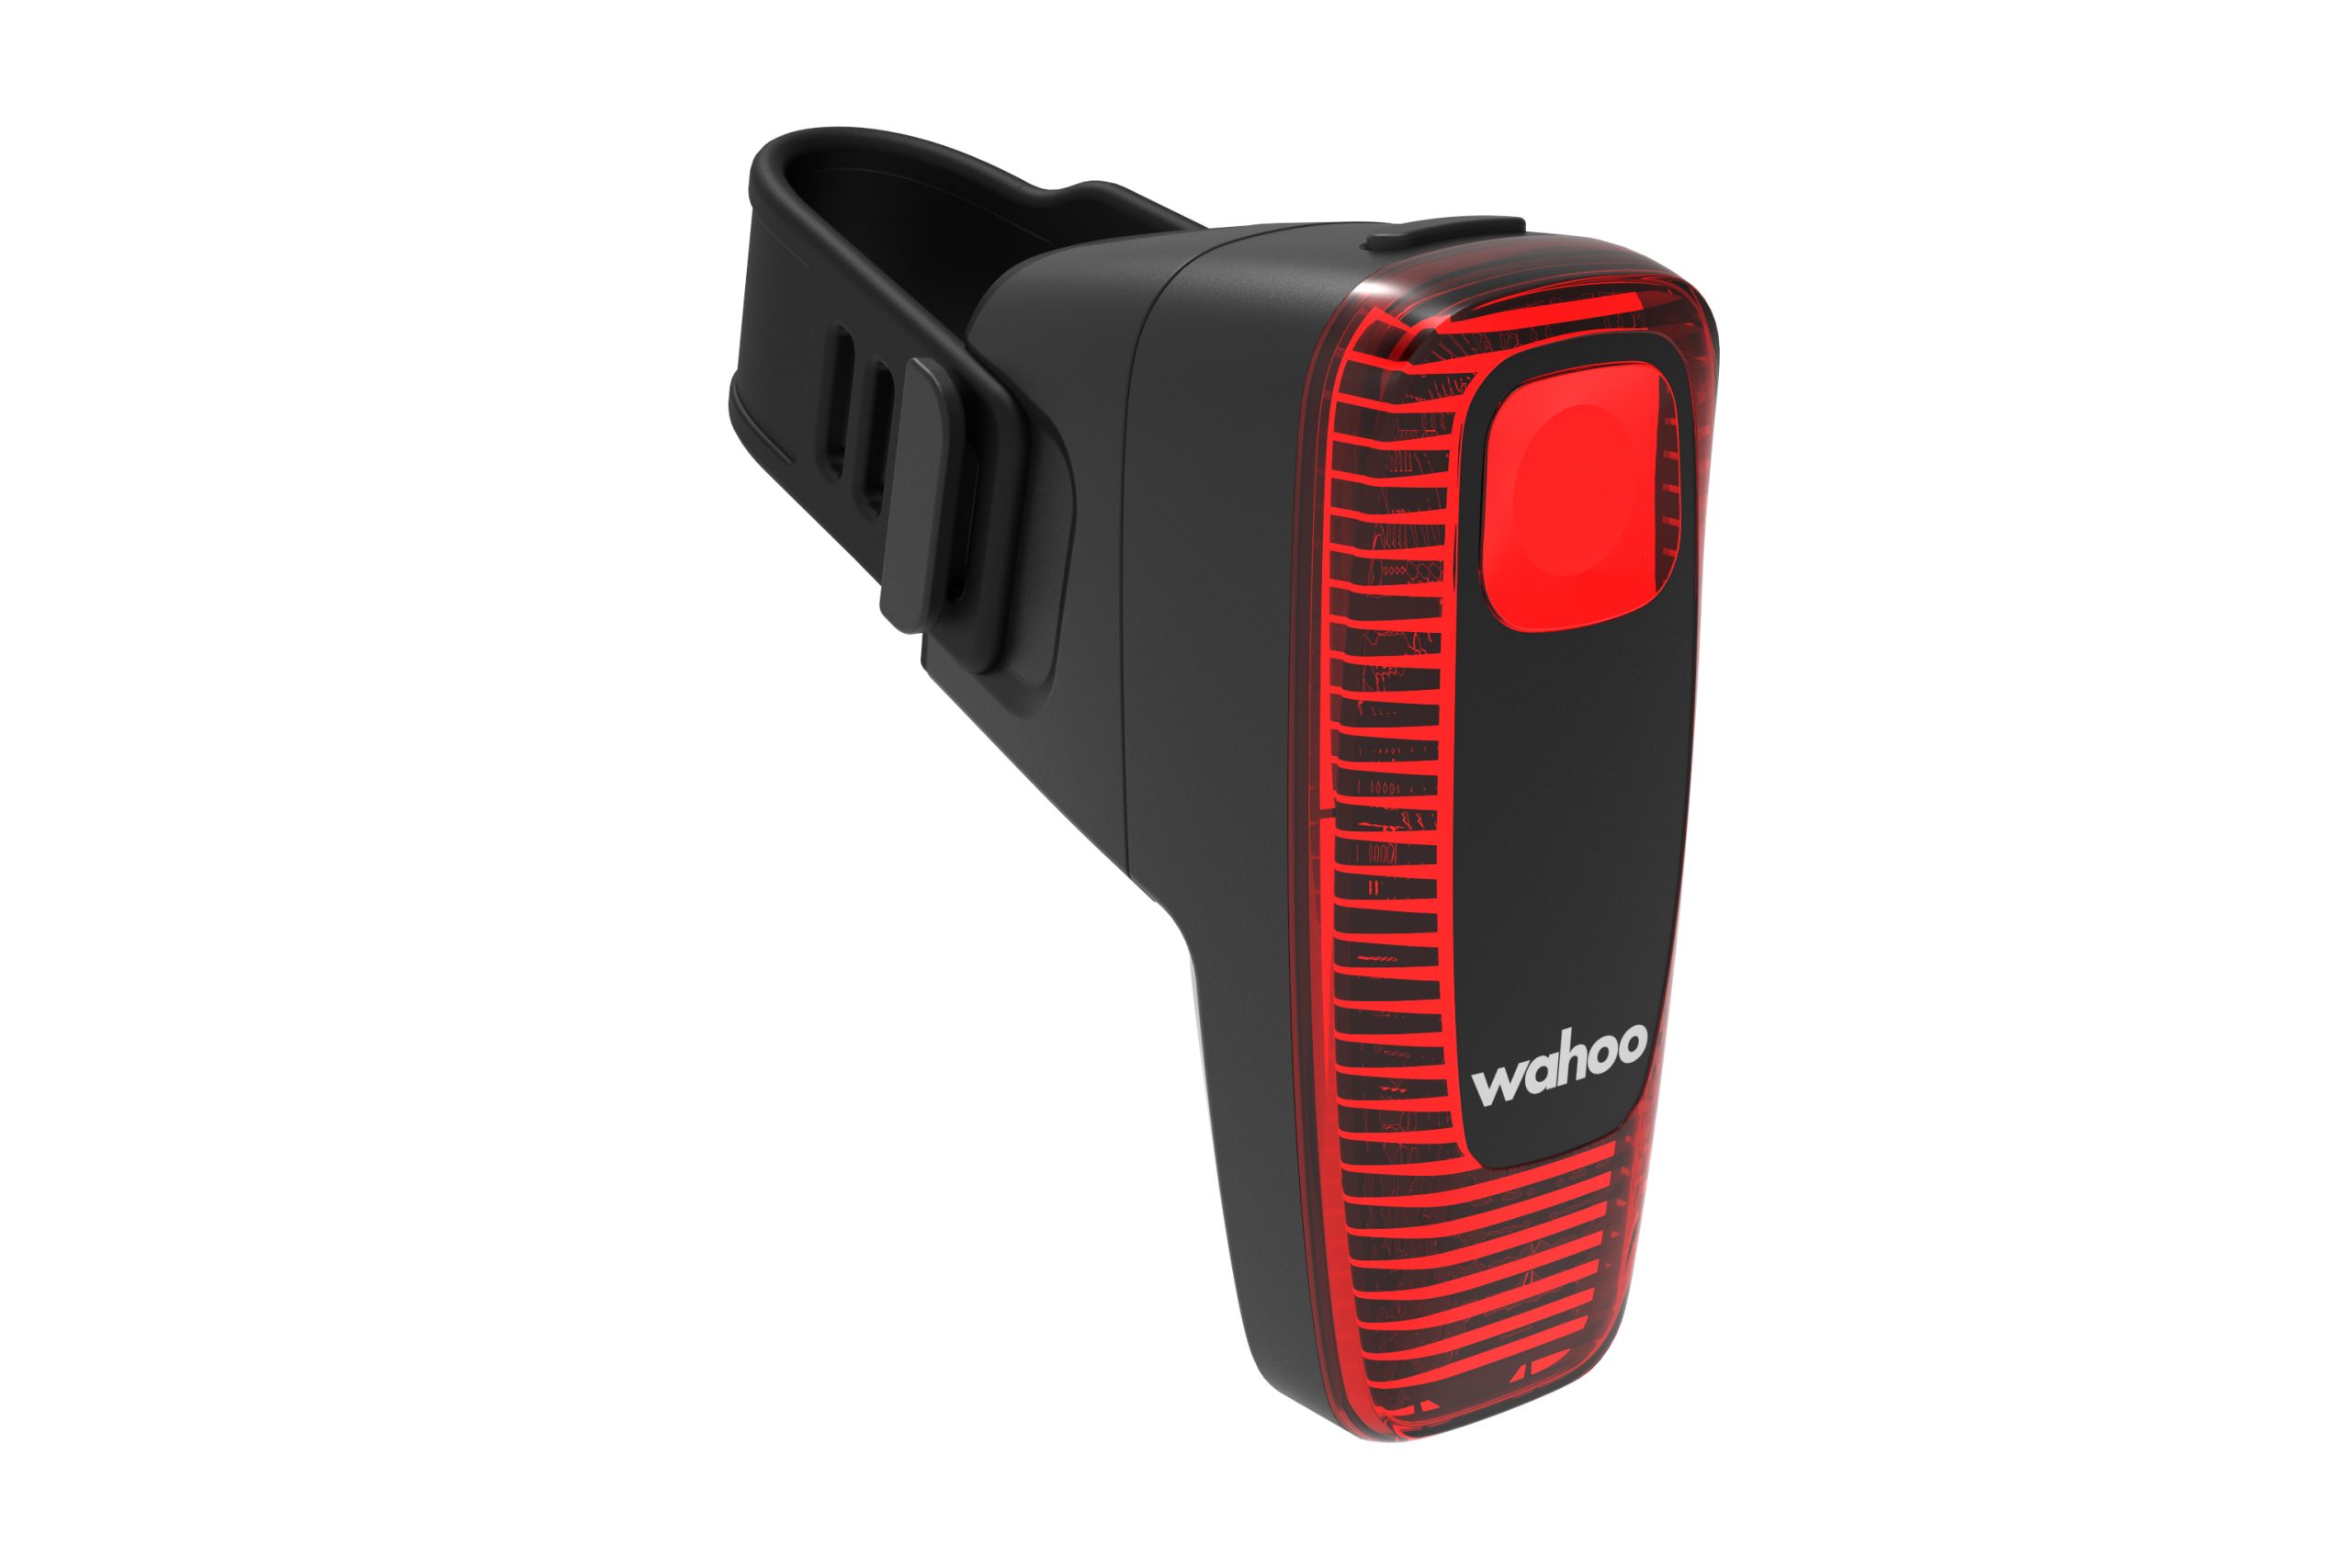
Wahoo has launched the Trackr Radar – the brand’s first rear view vehicle detection system.
In a similar vein to Garmin’s Varia radar products, it’s designed to pair with the brand’s own bike computers – although Wahoo says it will also work with “other compatible Bluetooth or ANT+ bike computers.”
Wahoo has yet to confirm an on-sale date, but says the unit will cost £179.99 / $199.99 / €199.99/ AU$349.95 when it does become available.
The Wahoo Trackr Radar doesn’t rip up the rearview radar rulebook – like other radar systems, it works by sending a millimetre wavelength radar signal out, receiving the bounced-back signal from objects behind, then transmitting this data by ANT+ or Bluetooth to display on a compatible bike computer.
Upon detecting an approaching vehicle, the built-in rear light powers up its flash pattern and brightness to increase rider visibility.
The light will work with Garmin bike computers. Wahoo
It’s worth noting that Garmin’s Varia devices also work with Wahoo computers – meaning neither brand is intentionally locking you out of using its radar system if you use the other’s computer.
That said, testing will reveal if functionality is different depending on which computer you’re using, such as the Hammerhead Karoo and Coros Dura.
The Trackr Radar also features an accelerometer, which detects braking, upping its output and flashing more aggressively when the rider decelerates.
Wahoo says the light reduces in brightness when there’s no traffic around, saving battery life in the process. It suggests the Trackr Radar can provide up to 20 hours of burn time.
The American brand has yet to confirm the full technical specification of the Trackr Radar, including light modes, lumen counts and weight – although we’ll soon be putting our test unit to the test against its natural rival, the Garmin Varia RTL515.
Wahoo Trackr Radar prices and availability
Availability for the new light is TBC. Wahoo
Wahoo has yet to confirm when the Trackr Radar will be available to buy, but says it will cost £179.99 / $199.99 / €199.99/ AU$349.95.
Garmin’s Varia RTL515 is the same in the US and Europe, but £10 cheaper in the UK and AU$20 more expensive in Australia.
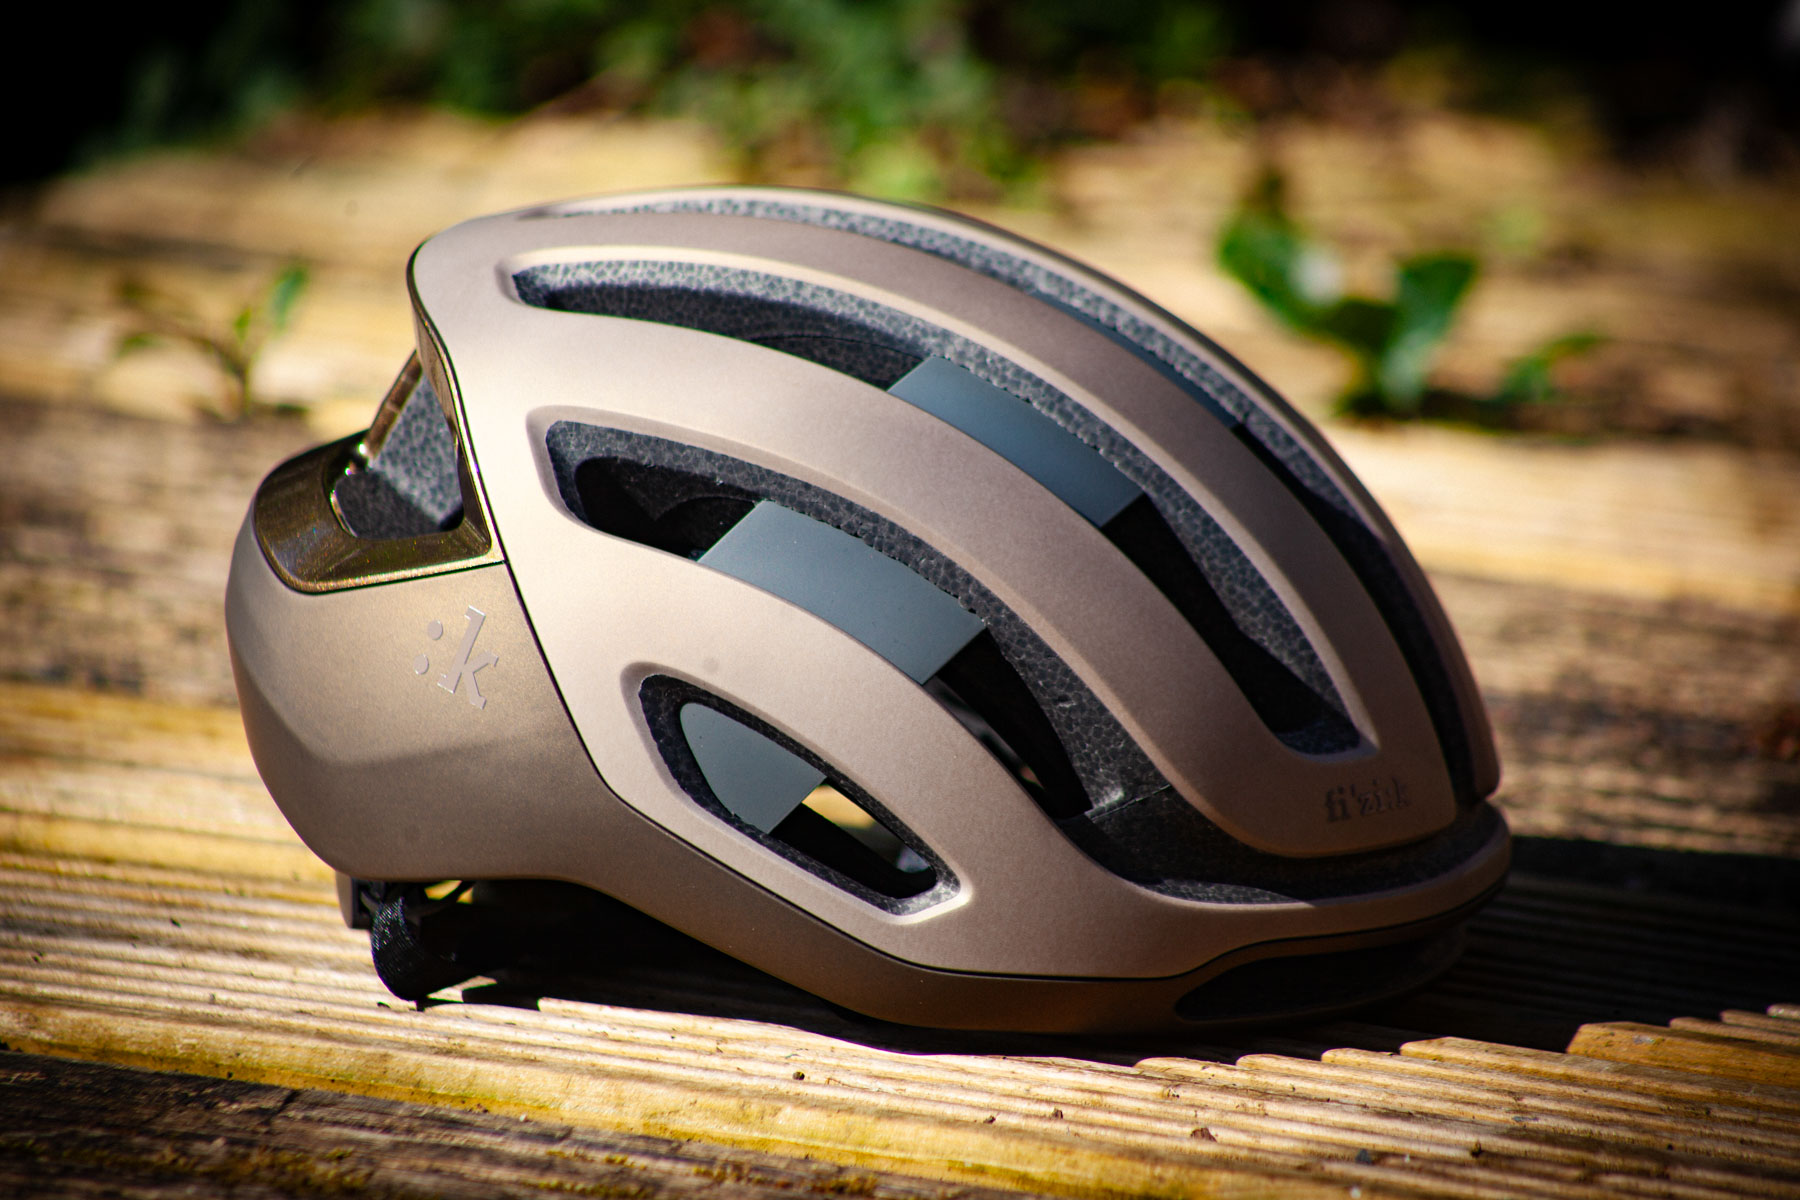
Fizik, the saddle specialists who turned its hand to a successful shoe range, has now branched out into helmets.
Today’s launch sees four models: the Kudo, Kudo Aero, Kassis, and Kunée. Both the Kudo and Kudo Aero are aimed at road, gravel, and XC riding. The Kassis is aimed at off-road trail riders, and the Kunée is a specialist aero helmet for TT and Triathlon.
The helmets, however, don’t come cheap, starting at £189.99 / $199.99 for the trail-focused Kassis, with the road going Kudo and Kudo Aero at £269.99 / $289.99. The TT-specific Kunée tops the price list at £359.99 / $379.99.
That puts Fiziks new helmets at the premium end of the market along with the likes of Kask’s Elemento WG11 (£335), Trek’s Velocis (£230), and Lazer’s Kineticore Z1 (£230) for the road, and Fox’s Crossframe Pro (£190) and Giro’s Merit Spherical (£190) on the mountain bike side.
Air flow
Fizik says its helmets balance cooling with aero considerations. Warren Rossiter / Our Media
Fizik says that all of the helmet designs were guided by CFD (computational fluid dynamics).
The aim is to streamline airflow and minimize wind resistance – not only for aerodynamics, but also to channel air through the helmet vents for comfort and cooling.
Fizik claims the shape of the vents and internal channelling is designed to induce the venturi effect, where airflow velocity increases on entry and is pushed out at the rear, helping to keep a constant flow of a cool draft.
Advanced fit
The rear cradle offers lots of vertical adjustment. The temple anchors can also be adjusted to change the shape of the retention system between round and oval.
Whilst Fiziks’ retention system looks very much like any other premium helmet, it has introduced design tweaks enabling the fit to be adjusted over a wider range with more fine-tuning than competing designs.
The rear cradle has 5 anchor points, offering 5cm of vertical adjustment. Adjusting this also adjusts the tilt of the helmet.
The micro dial rear adjuster works in unison with internal retention anchors at the temples.
These offer three-position adjustment, which alters the shape of the retention system from a round shape in its shortest position to a more oval shape in its longest position.
It should mean that Fizik’s design and fit system will suit more head shapes than most.
The helmet range is available in a broad size range from 52cm up to 61cm
Safety
The road/gravel Kudo and Kudo Aero, along with the trail-focused Kassis, feature MIPS Air Node. The latest multi-impact-protection system, with its anti-rotational design integrated into the pad system and how it anchors into the helmet, is much less intrusive than previous generation designs, and doesn’t hinder airflow.
The light offers 90 minutes of run time in solid mode, double that for flashing. Fizik
For added safety, the Kudo, Kudo Aero, and Kassis all come with a clip-in rear light with a 35-lumen output and 90-minute run time on solid, or 180 minutes in flash mode. The light is available separately for £29.99 / $29.99 / €29.
All helmets are compliant with CE EN 1078:2012 or CPSC 1203 safety standards, depending on country, and rated 5 stars in the Virginia Tech Helmet Ratings.
Fizik helmet range overview
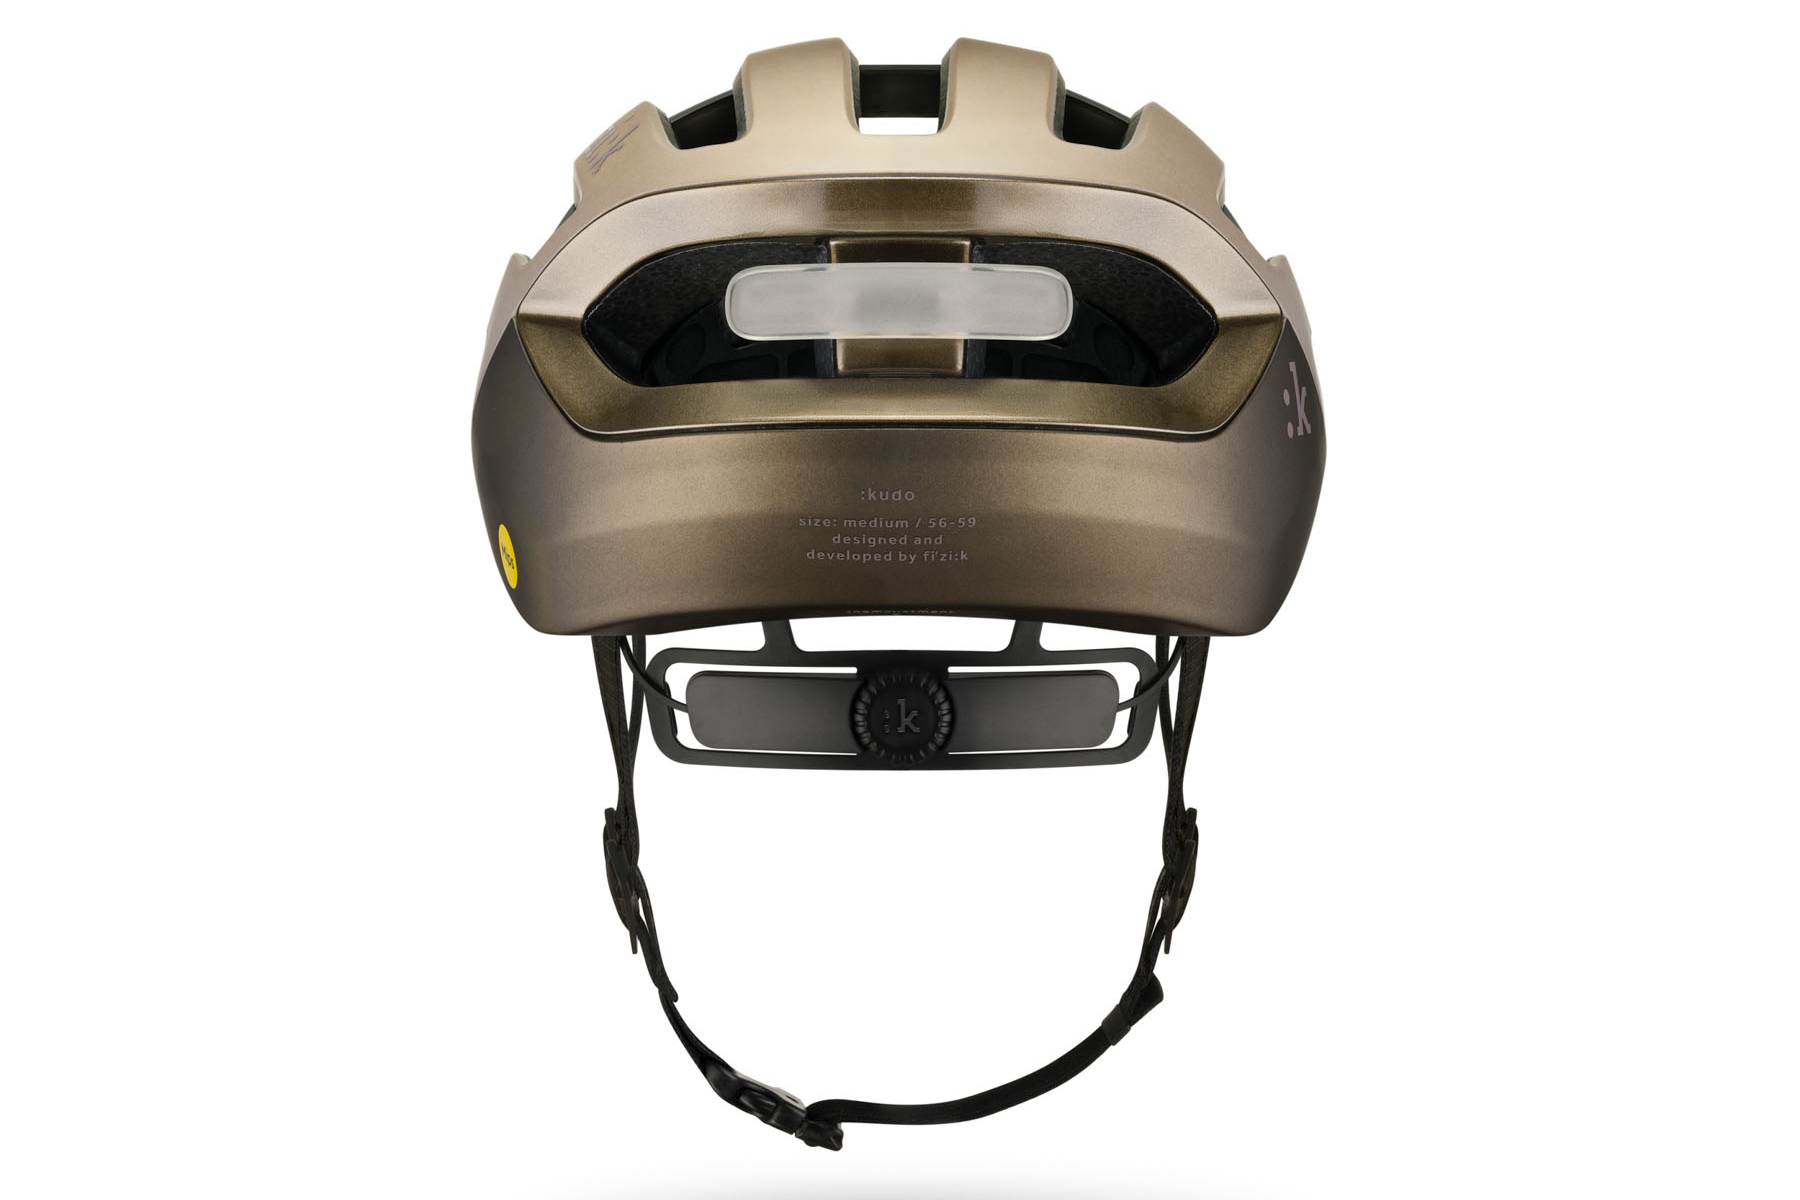
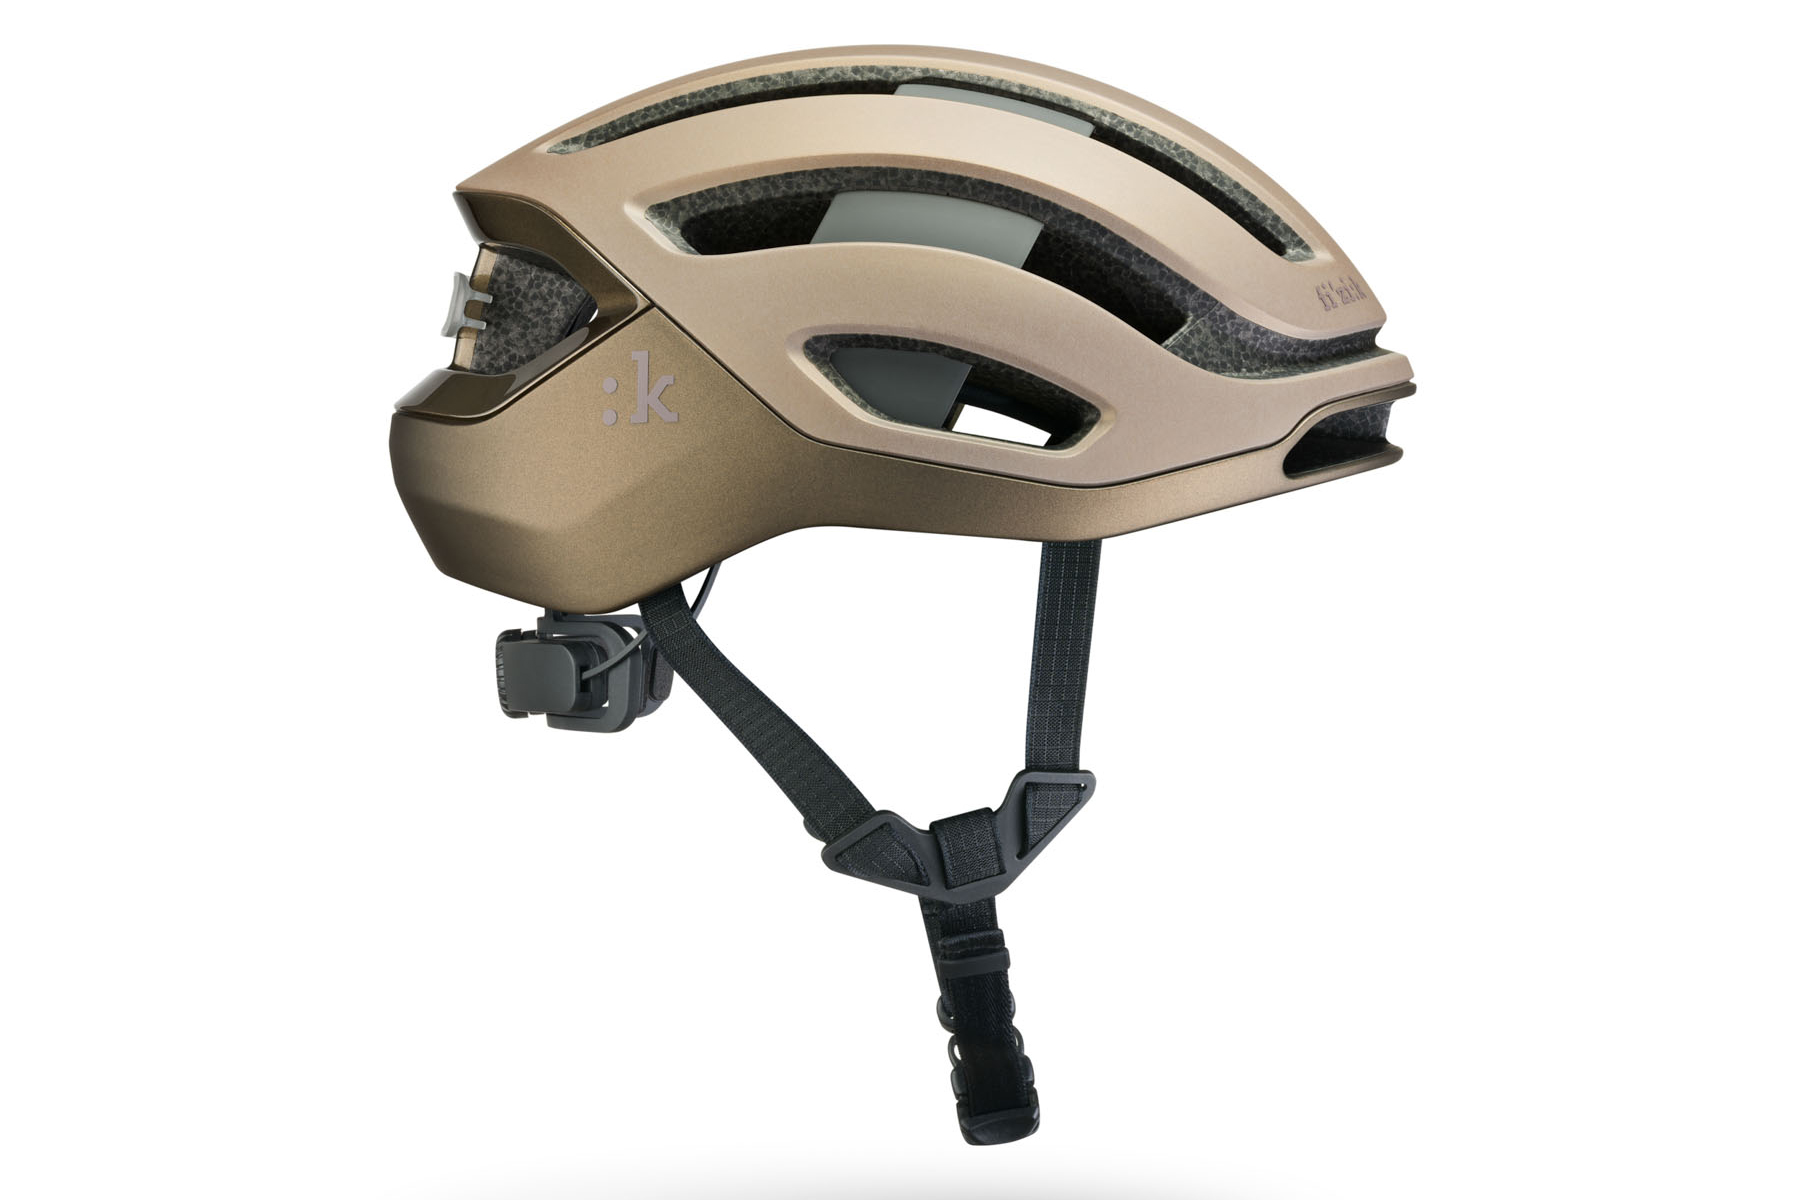
Kudo
The Kudo’s compact, rounded shape looks good. Fizik
The Kudo is Fiziks’ lightest and coolest design. Fizik claims the rounded low-volume design makes for a helmet that reduces wind resistance whilst providing optimal thermoregulation thanks to the venturi effect created by the brow vents, internal channels, and large exhaust port.
The side vents are designed to also hold sunglasses securely.
Fizik produces different helmets to meet the different global sagety standards. This results in the US (CPSC) helmets weighing slightly more than the European (CE) versions:
S: 52-56 (CE 270g/CPSC 310g)
M: 56-59 (CE 280g/CPSC 320g)
L: 59-61 (CE 310g/CPSC 360g)
The Kudo comes with a soft bag and rear light as standard and in white, black, and bronze.
Price: £269.99 / $289.99 / €290
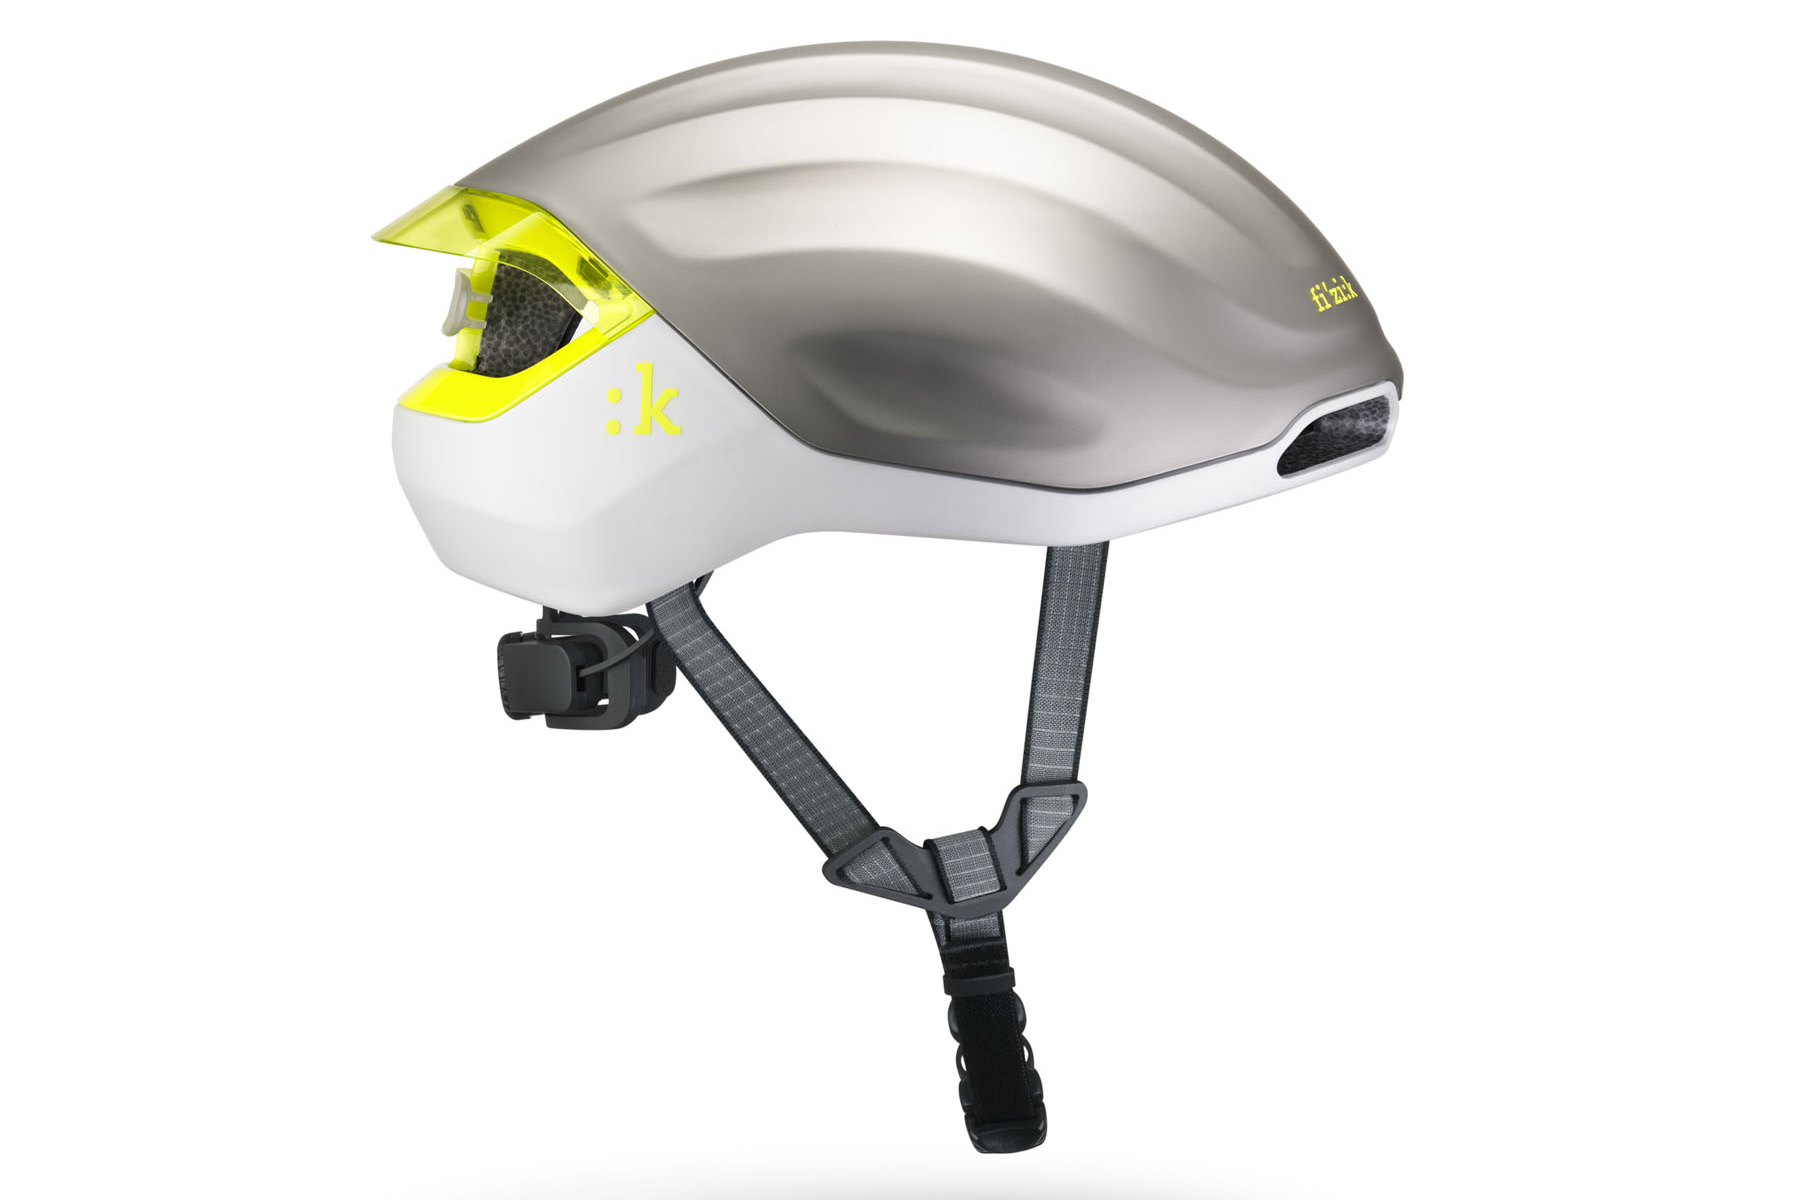
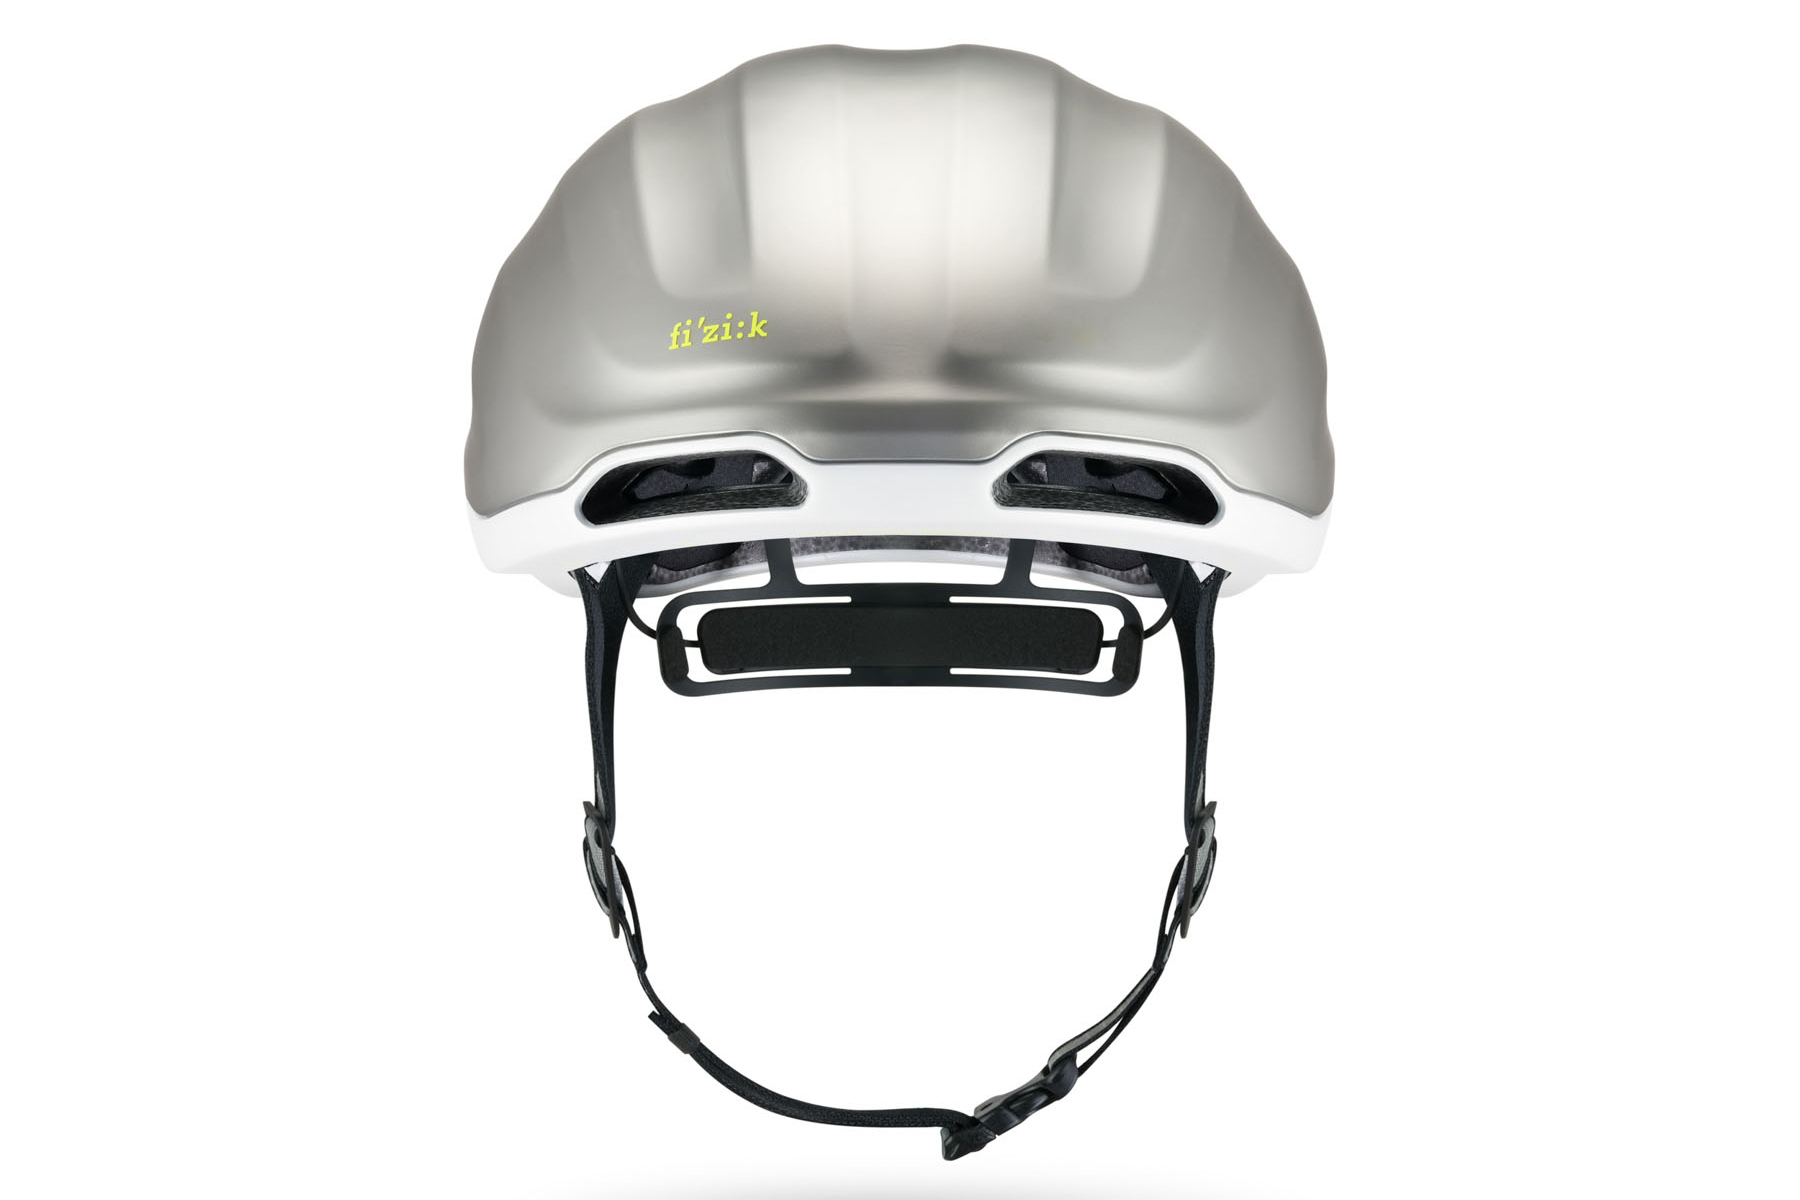
Kudo Aero
The Kudo Aero uses a Venturi effect design to aid cooling. Fizik
The Kudo Aero looks rather like the Kudo with the vents filled in.
Fizik, however, claims the Kudo Aero’s shape is very aerodynamically efficient with the addition of the clear rear breakaway spoiler working in conjunction with the Venturi effect of the brow vents and large exhaust port to increase airflow for comfort whilst reducing drag.
S: 52-56 (CE 270g/CPSC 300g)
M: 56-59 (CE 290g/CPSC 320g)
L: 59-61 (CE 320g/CPSC 360g)
The Kudo Aero’s brow vents force cooling air across the rider’s head.
The Aero comes with a soft bag and rear light as standard and in white, black, and silver.
Price: £269.99 / $289.99 / €290
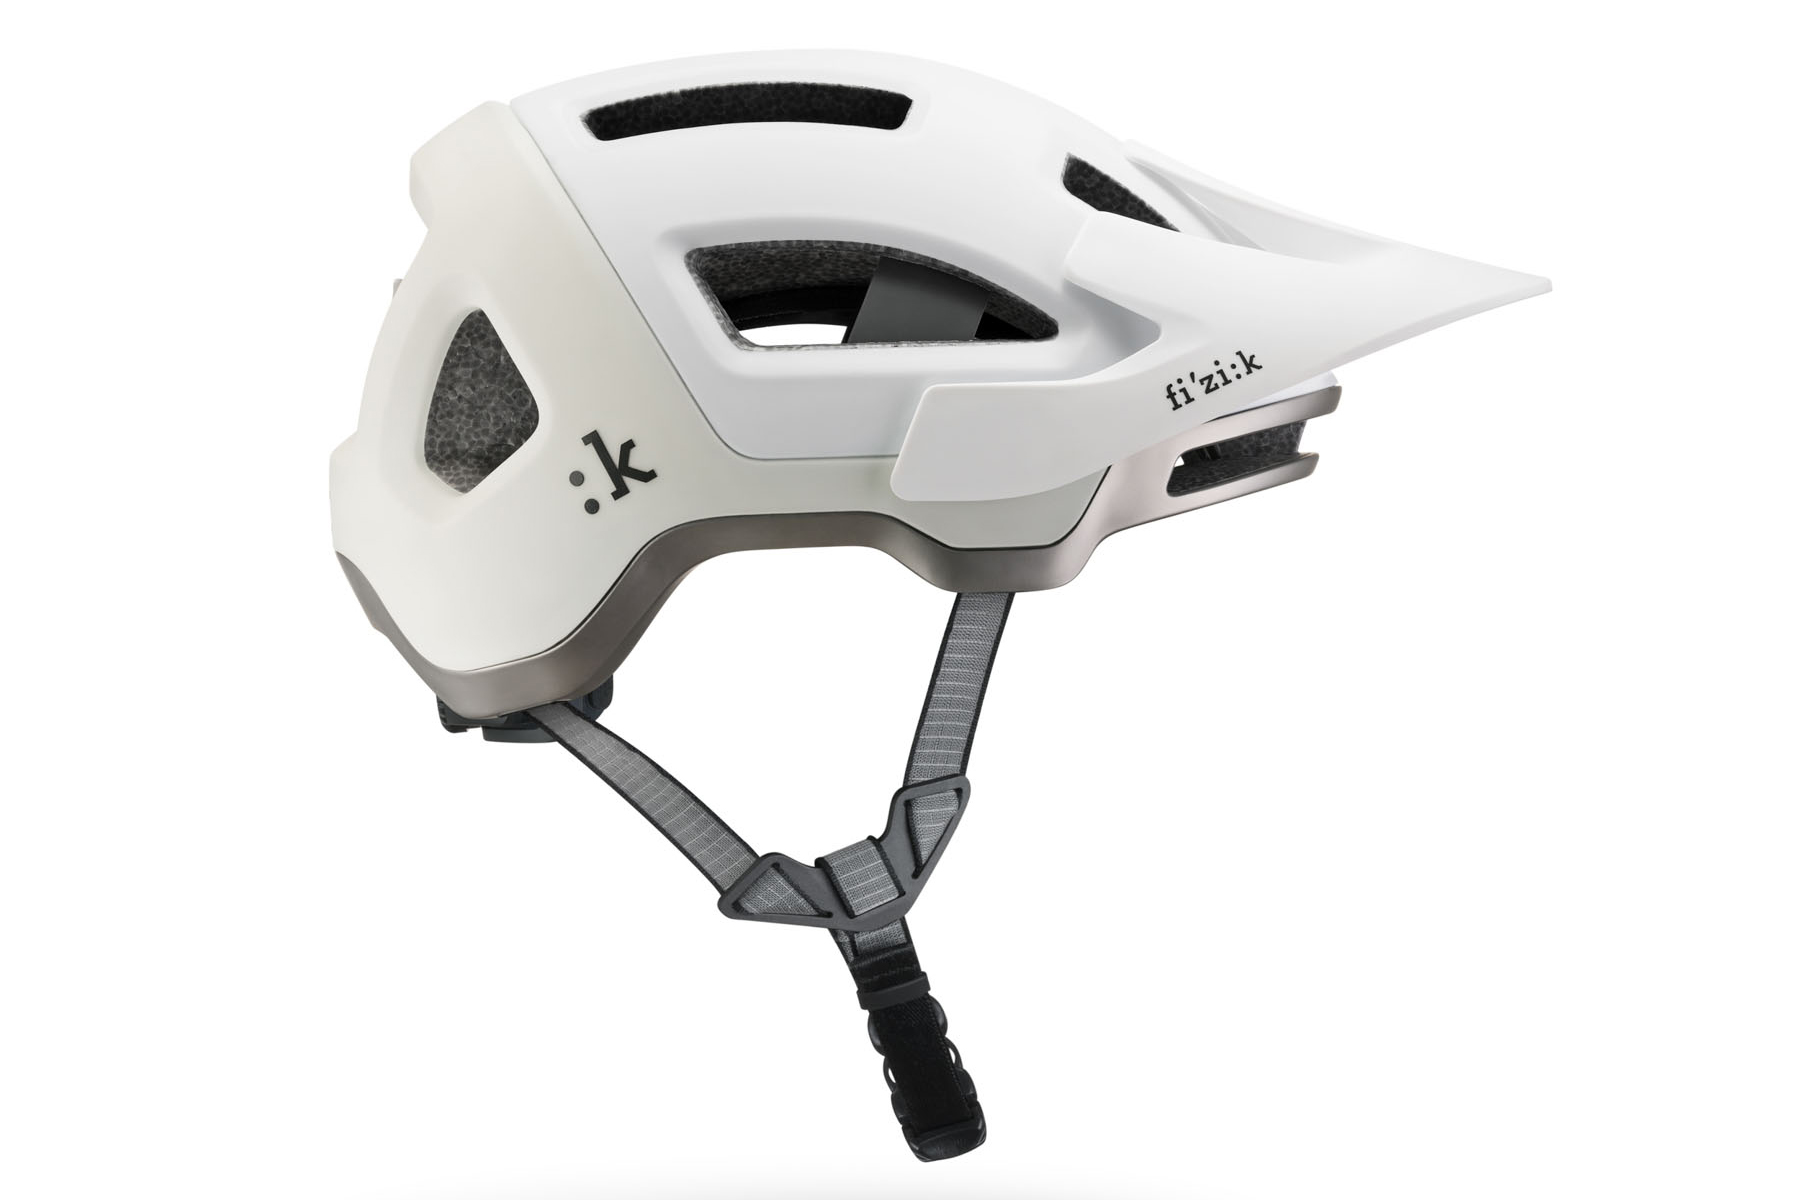
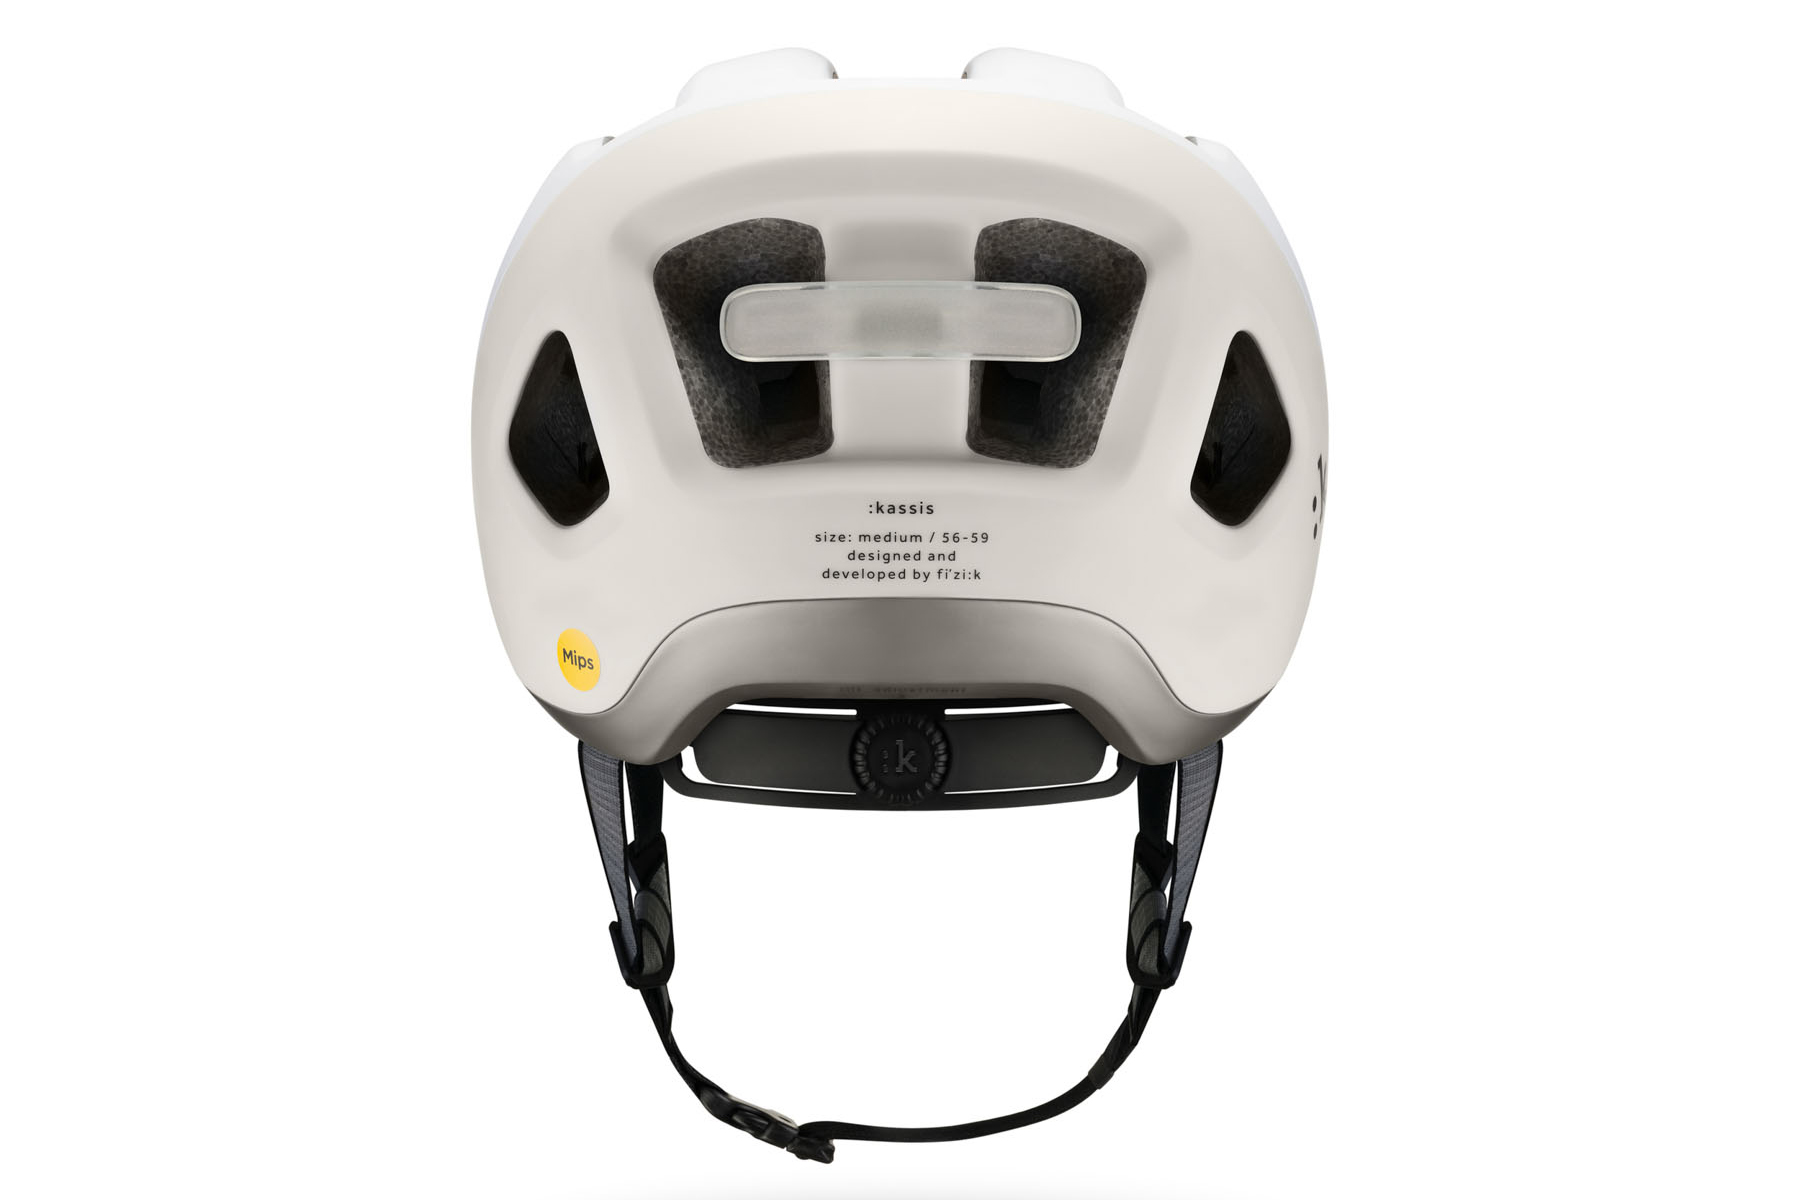
Kassis
The Kassis breakaway peak has plenty of adjustment. Fizik
The Kassis follows the same compact rounded design as the road-going helmets but with extended coverage at the temples and the rear.
It comes with a fully adjustable peak with the twin large rear side vents doubling up as sunglass holders.
The Kassis offers more coverage at the rear for added protection. Fizik
The Kassis is available in white, dark navy, and mud-sand colours, and is compliant with CE EN 1078:2012 and NTA 8776 or CPSC 1203 safety standards.
S: 52-56 (CE 330g/CPSC 380g)
M: 56-59 (CE 360g/CPSC 420g)
L: 59-61 (CE 400g/CPSC 460g)
Price: £189.99 / $199.99 / €200
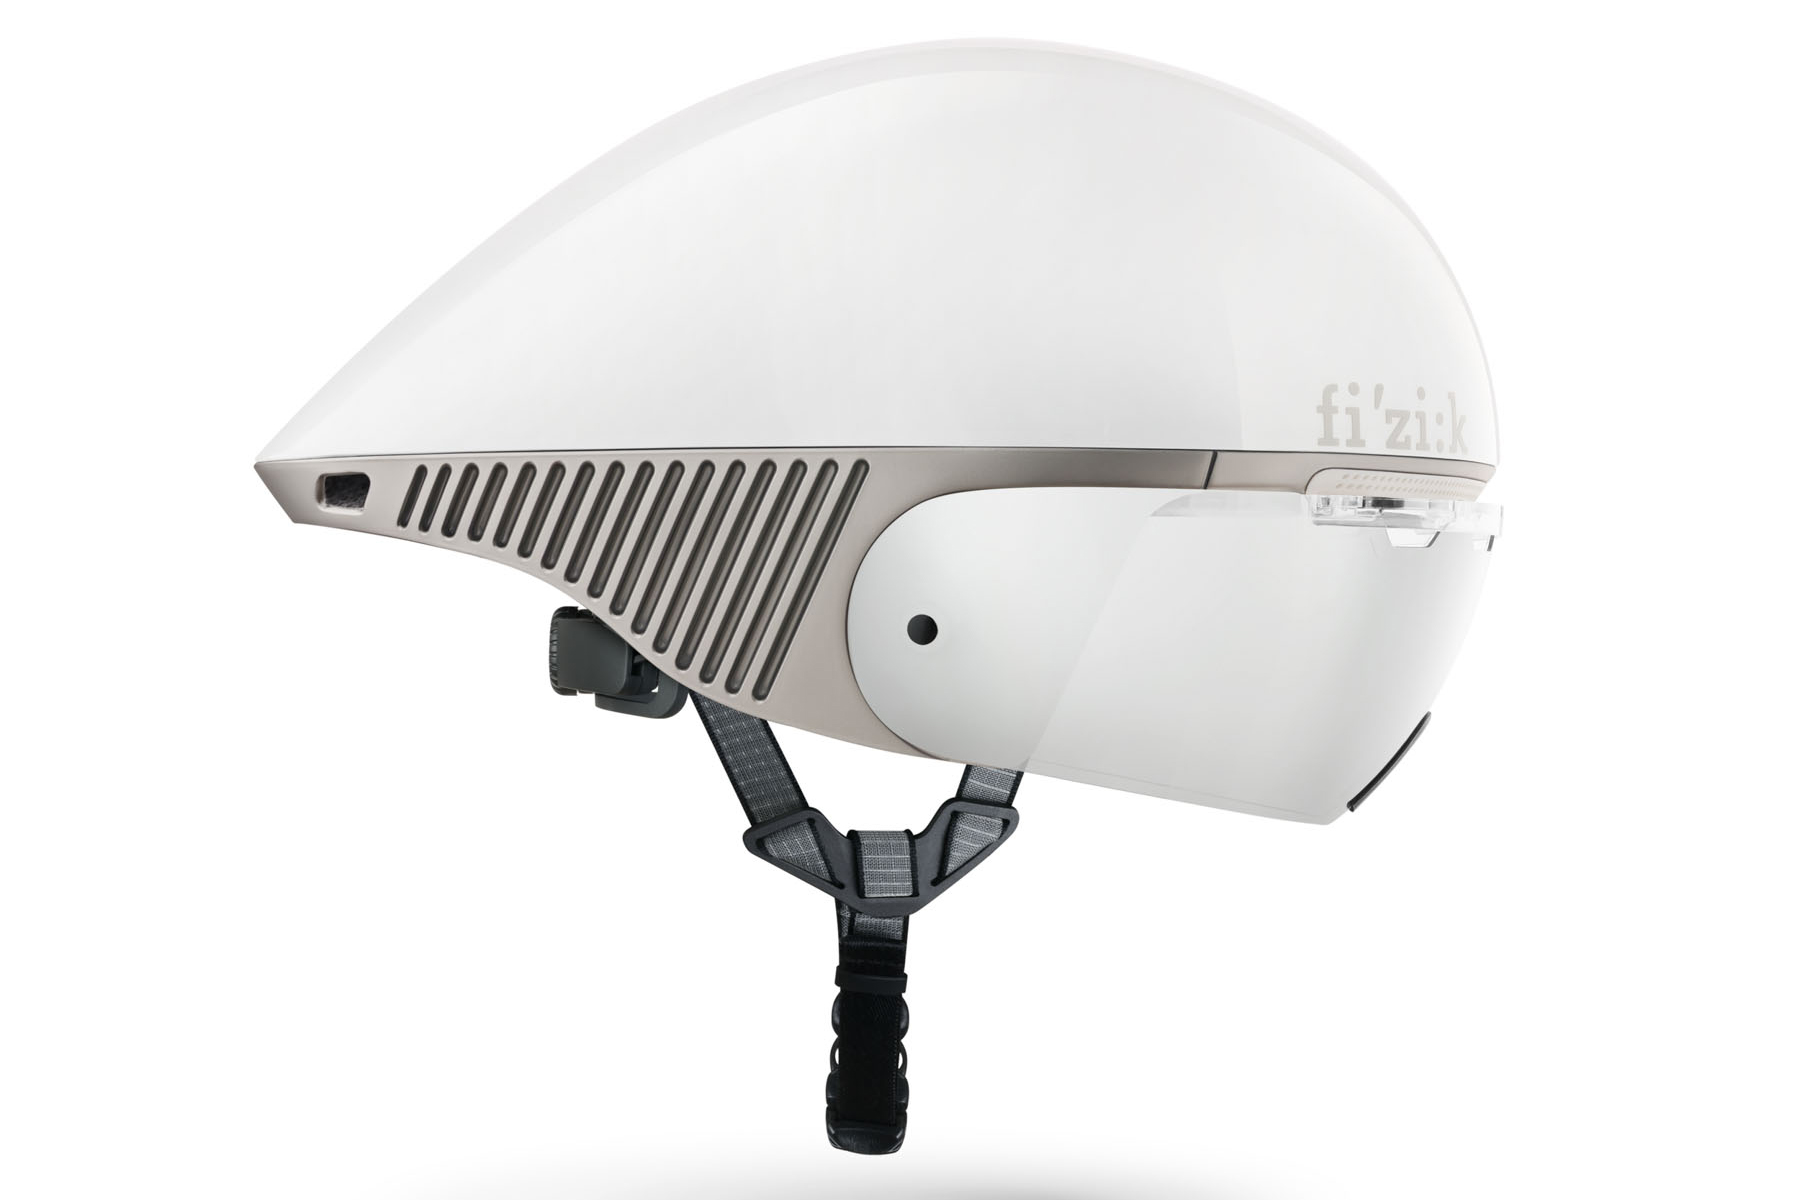
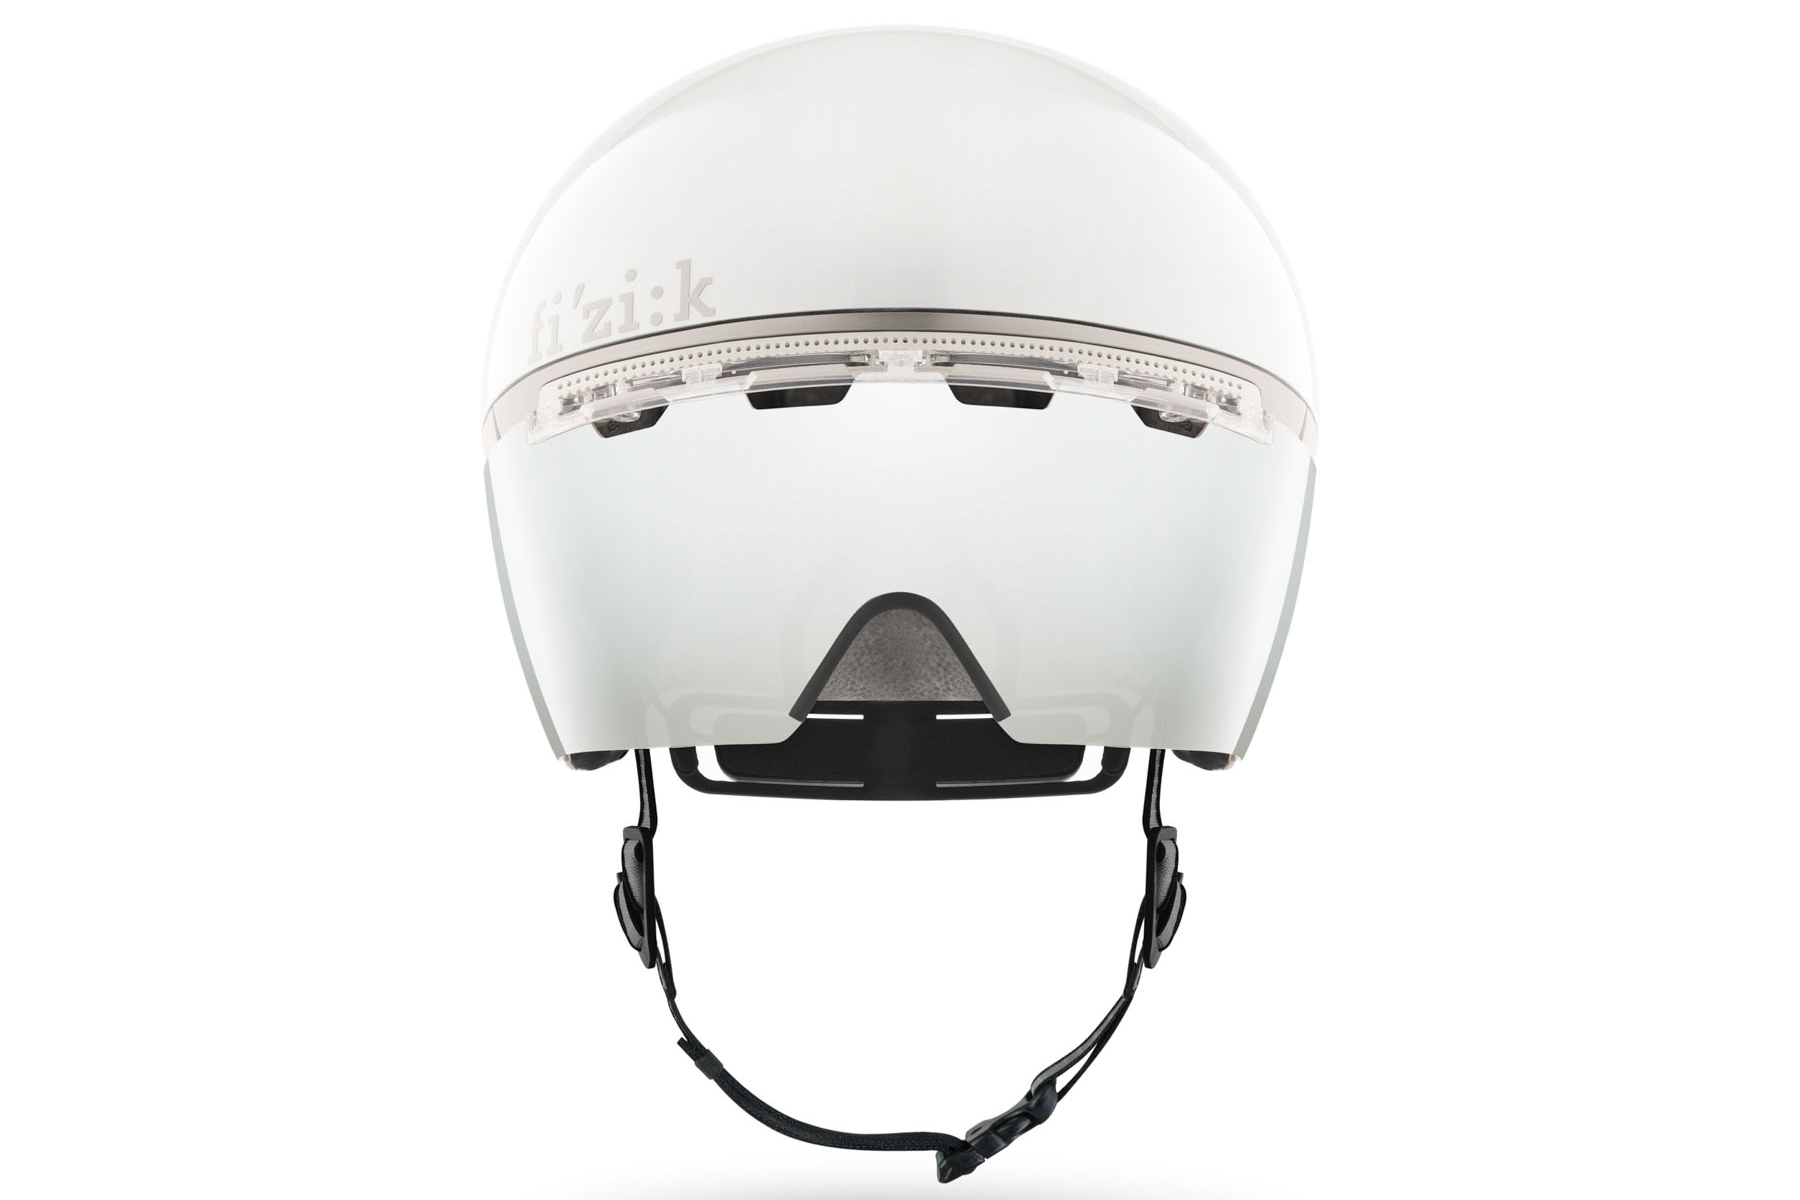
Kunée
The Kunée’s corrugated side panels help condition the air flow over the rider’s shoulders. Fizik
The TT/Triathlon Kunée was designed with a smooth frontal surface and teardrop shape, with a magnetic, wide, seamless visor.
The visor has brow vents that mesh seamlessly with the 3 vents on the helmet.
Using the same Venturi design as the road helmets, Fizik claims the Kunée’s cooling airflow is amongst the best of any TT design, though they haven’t released any performance data yet
The wide visor attaches magnetically. Fizik
On the teardrop’s rear flanks, Fizik has used a corrugated set of side panels designed to keep the disruptive air close for a much smoother transition around the riders’ shoulders.
Fizik says this corrugation has enabled it to keep the size and volume of the Kunée smaller whilst having similar aerodynamic performance to wider helmets designed to shelter the riders’ shoulders.
This more compact and lighter shape makes for a more comfortable helmet.
The helmet was designed in collaboration with athletes, with wind tunnel and real-world testing as part of its development.
It complies with CE EN 1078:2012 and CPSC 1203 safety standards.
The Kunée comes in 2 sizes: S/M and M/L, and in white only
It comes with both a clear and mirrored visor, plus a travel case.
The OPTIS (Odyssey Pneumatic Tire Insert System) is a lightweight, tunable, tyre insert, which is inflated with a bike pump rather than arriving as a fully turgid foam strip. Similar to a motorcycle mousse, the OPTIS is a departure from the standard foam inserts.
It works by using a not-very-stretchy inner tube, which forms a very lightweight band inside the rim.
Instead of expanding outward into the tyre’s casing like an ordinary inner tube, once inflated, the OPTIS cinches down, hugging the rim.
This creates a bead lock, preventing the tyre from burping. It also protects the rim from impact.
The OPTIS is an inner tube, of sorts, that provides sidewall support and rim protection. Odyssey MTB
Odyssey claim that the OPTIS adds only 90g to a traditional tubeless setup, making it much lighter than most inserts.
Besides weight saving, the insert’s firmness can be tuned to suit conditions and rider tastes.
Odyssey claims that the OPTIS adds just 90g to the weight of a tubeless setup. Odyssey
The inner tube is filled with air through a special valve, which uses the same central valve stem as the Presta valve, which fills the tubeless tyre above the insert.
Odyssey claims installation is easier than a standard insert, and can even be used to help seat stubborn tubeless tyres.
Odyssey also claims the OPTIS offers lower rolling resistance on rough surfaces than foam inserts, citing that losses from hysteresis (the foam material moving against the inside of the tyre) will be reduced.
Haven’t we seen this before?
Back in 2016 the Schwalbe Procore offered an alternative to foam inserts
The eagle-eyed amongst you may think this is a very similar concept to the Schwalbe Procore from 2016 – and you would be right, but there are a few key differences which set the OPTIS apart.
Firstly, the OPTIS uses just a bare inflatable tube made of a relatively inflexible material.
The Schwalbe Procore used a pseudo-tyre, which looked much like a beadless, blue road bike tyre, which sat over a traditional stretchy rubber inner tube.
Crucially, the valve design looks different.
The Schwalbe Procore valve was a very clever piece of engineering, but was intricate and prone to becoming blocked by the talc in the rubber inner tube.
The chunky valve on the OPTIS will hopefully alleviate these issues.