FTC Ratchets Up Microsoft Probe, Queries Rivals on Cloud, AI

The US Federal Trade Commission is accelerating scrutiny of Microsoft as part of an ongoing probe into whether the company illegally monopolizes large swaths of the enterprise computing market with its cloud software and AI offerings, including Copilot. From a report: The agency has issued civil investigative demands in recent weeks to companies that compete with Microsoft in the business software and cloud computing markets, according to people familiar with the matter. The demands feature an array of questions on Microsoft’s licensing and other business practices, according to the people, who were granted anonymity to discuss a confidential investigation.

With the demands, which are effectively like civil subpoenas, the FTC is seeking evidence that Microsoft makes it harder for customers to use Windows, Office and other products on rival cloud services. The agency is also requesting information on Microsoft’s bundling of artificial intelligence, security and identity software into other products, including Windows and Office, some of the people said.


Read more of this story at Slashdot.

The Easiest (and Cheapest) Ways to Turn Your Attic Into Useful Storage Space

We may earn a commission from links on this page.

If you own a home with an unfinished attic, you’ve probably thought about all that precious space and how you might make it more useful. Your attic already serves an important purpose in temperature and moisture regulation in the house, of course, but that doesn’t mean it can’t do more. If you’ve got the budget, you can transform an attic into a bedroom or office space, or a crisp, well-lit storage option.

If you don’t have the budget to really build out your attic, though, you can still make it into a more useful space, even if it’s small or slightly scary. With just a few modest purchases (and possibly some sweat equity), you can make your attic an ideal storage space.

Install easy, modular flooring on the attic’s floor

Your first step towards making your attic useful is to make it safe to walk around. Even if your attic is shallow and standing up straight is impossible, having a stable surface will reduce your chances of falling through the ceiling.

Putting down plywood or oriented strand board (OSB) is a cheap and relatively easy option, but it’s also labor-intensive and pretty permanent. If you want a faster solution, floor panels like these from Attic Dek are sized to fit most standard joist spacings and are designed to just snap together, allowing you to quickly drop a floor into place without needing to cut them. They come with screws, and it’s a good idea to secure them in place, but if you just need a temporary floor that can bear weight (up to 250 pounds) you can just click them into place and bolt them down later.

Add no-wiring lights to the attic’s ceiling

If your attic isn’t wired up or lacks light fixtures, you don’t need to hire an electrician and spend a mountain of cash. Just pick up one or two of these rechargeable ceiling lights and stick them to the ceiling or overhead joist (literally—you place a magnetic sticker on the ceiling and that holds the light in place—no screws required). It’s motion-activated, so every time you haul yourself up into the attic, the light will come on and save you from stumbling about in the dark.

Install adjustable storage that fits the space

Once you have a sturdy, safe floor in your attic, you can start installing storage options. You could, of course, just pile up some boxes or bins and call it a day, but you can do a lot better than that without breaking the bank:

  • Installing some hanging rods designed for slanted surfaces (like an attic ceiling or rafters) will give you the option of hanging clothing or storage bags without cluttering up the floor.

  • A few cheap, adjustable shelving units like this one can add all the shelf space you need to keep bins of stuff organized and off the floor, making it easy to store or retrieve items.

  • If your attic is tight and trusses make it difficult to store anything, you can install some truss-friendly shelving. This can be a relatively easy DIY job involving screwing some support brackets into the trusses (as seen here). If you don’t have a floor in your attic, you have to avoid placing heavy storage boxes or bins directly on insulation—compressed insulation isn’t very effective. You can purchase some truss brackets that support plastic bins or other storage boxes off the floor.

Install a way to transport your stuff into the attic

Once you’ve got storage, you need a way to get stuff up into the attic, which can be more challenging than you expect. Carrying awkward, heavy boxes up flimsy, pull-down attic stairs is a recipe for accidents, so consider rigging up some mechanical assistance. You can spend a fair amount of money on a fancy lift system that will make bringing stuff up to your attic pretty easy, but if that’s too rich for your blood, you could opt for a simpler winch system that will allow you to haul up to 440lbs of stuff up there at a time. If that’s still a little too much, you could also opt for a classic pulley system, using good old-fashioned mechanical advantage to get your stuff up into the attic.

Quest 3S On Sale For $250 With Batman: Arkham Shadow Again At Walmart

Walmart is offering Quest 3S for $250 again, $50 off, and it comes with the $50 VR blockbuster Batman: Arkham Shadow.

That’s the price for the 128GB base model, and the 256GB storage model is also on sale for $50 off, bringing it down to $350.

As well as including Batman: Arkham Shadow, the offering comes with 3 months of the Horizon+ games subscription, as with all new Quest headset purchases.

Arkham Shadow was officially included with all Quest 3S purchases for the headset’s first seven months on the market, though this was effectively extended during multiple sales and honored for any SKUs with the game’s logo on the box. The game, which Meta recently canceled the sequel for, earned a 4.5-star rating in our review, and it’s a rare example of a truly made-for-VR AAA title.

Batman: Arkham Shadow Review – A Triumphant Return
Batman: Arkham Shadow is a brilliant return for the Dark Knight, and it expertly adapts the series for VR on Quest 3 and Quest 3S.
UploadVRHenry Stockdale

This is far from the only time we’ve seen Quest 3S on sale for $250, and over the holidays it even dropped to as low as $200 for Costco members. But it still remains immense value – a fully standalone and wireless VR headset with tracked controllers, hand tracking, and mixed reality for less than the price of a traditional games console.

One consideration you may want to make if you’re considering jumping into VR with this deal, however, is whether the higher-end Quest 3 or Valve’s upcoming Steam Frame might better suit your needs.

While Quest 3S can run all the same content as Quest 3, and has the same fundamental capabilities (including the same XR2 Gen 2 chipset and 8GB RAM), Quest 3 features Meta’s advanced pancake lenses which are clearer and sharper over a wider area, have a wider field of view, and have precise separation adjustment, making them suitable for essentially everyone’s eyes. Meanwhile, Steam Frame has a significantly more comfortable design and promises to make wireless PC VR seamless.

But Quest 3 costs twice as much as Quest 3S on sale, and Steam Frame is likely to cost around three times as much. If you’re looking to jump into VR on a budget, or gift a friend or loved one, it’s impossible to beat the raw value of Quest 3S.

You can find the deal at Walmart.com.

$1.8 million MST3K Kickstarter brings in (almost) everyone from the old show

Longtime fans of the cult TV show Mystery Science Theater 3000 know that the series’ one constant is change (well, that and bad movies).

The show’s cast and crew were in a near-constant state of flux, a byproduct of the show’s existence as a perennial bubble show produced in the Twin Cities rather than a TV-and-comedy hub like New York or LA. It was rare, especially toward the middle of its 10-season original run on national TV, for the performers in front of the camera (and the writers’ room, since they were all the same people) to stay the same for more than a season or two.

Series creator Joel Hodgson embraced that spirit of change for the show’s Kickstarter-funded, Netflix-aired revival in the mid-2010s, featuring a brand-new cast and mostly new writers. And that change only accelerated in the show’s brief post-Netflix “Gizmoplex” era, which featured a revolving cast of performers that could change from episode to episode. Hodgson leaned into the idea that as long as there were silhouettes and puppets talking in front of a bad movie, it didn’t matter much who was doing the talking.

Read full article

Comments

EPA Reverses Long-Standing Climate Change Finding, Stripping Its Own Ability To Regulate Emissions

President Donald Trump announced Thursday that the Environmental Protection Agency is rescinding the legal finding that it has relied on for nearly two decades to limit the heat-trapping pollution that spews from vehicle tailpipes, oil refineries and factories. From a report: The repeal of that landmark determination, known as the endangerment finding, will upend most U.S. policies aimed at curbing climate change. The finding — which the EPA issued in 2009 — said the global warming caused by greenhouse gases like carbon dioxide and methane endangers the health and welfare of current and future generations.

“We are officially terminating the so-called endangerment finding, a disastrous Obama-era policy,” Trump said at a news conference. “This determination had no basis in fact — none whatsoever. And it had no basis in law. On the contrary, over the generations, fossil fuels have saved millions of lives and lifted billions of people out of poverty all over the world.”

Major environmental groups have disputed the administration’s stance on the endangerment finding and have been preparing to sue in response to its repeal.


Read more of this story at Slashdot.

Tiny, 45 base long RNA can make copies of itself

There are plenty of unanswered questions about the origin of life on Earth. But the research community has largely reached consensus that one of the key steps was the emergence of an RNA molecule that could replicate itself. RNA, like its more famous relative DNA, can carry genetic information. But it can also fold up into three-dimensional structures that act as catalysts. These two features have led to the suggestion that early life was protein-free, with RNA handling both heredity and catalyzing a simple metabolism.

For this to work, one of the reactions that the early RNAs would need to catalyze is the copying of RNA molecules, without which any sort of heritability would be impossible. While we’ve found a number of catalytic RNAs that can copy other molecules, none have been able to perform a key reaction: making a copy of themselves. Now, however, a team has found an incredibly short piece of RNA—just 45 bases long—that can make a copy of itself.

Finding an RNA polymerase

We have identified a large number of catalytic RNAs (generically called ribozymes, for RNA-based enzymes), and some of them can catalyze reactions involving other RNAs. A handful of these are ligases, which link together two RNA molecules. In some cases, they need these molecules to be held together by a third RNA molecule that base pairs with both of them. We’ve only identified a few that can act as polymerases, which add RNA bases to a growing molecule, one at a time, with each new addition base pairing with a template molecule.

Read full article

Comments

Nintendo’s Virtual Boy accessory lets you play VR Mario and Zelda on Switch 2

The forthcoming Nintendo Virtual Boy accessory for Switch and Switch 2 can play VR-supported games, as reported by Video Games Chronicle. There are four available games to play, including Super Mario Odyssey, Super Smash Bros Ultimate, The Legend of Zelda: Breath of the Wild and Captain Toad: Treasure Tracker.

These aren’t new VR builds of the games, rather they are the versions previously released for the Nintendo Labo VR set. This was a kit for the original Switch that allowed users to build a cardboard VR headset, among other items.

However, this is very good news for Switch 2 owners as Labo creations generally don’t work with Nintendo’s shiny new console. So this is the only way to experience the VR versions of the aforementioned four games. It’s also worth noting that the Switch 2 upgrade for Breath of the Wild still includes the VR mode.

There are some caveats. The Virtual Boy accessory is available to purchase as a hardware unit or in cardboard. The cardboard version is much cheaper, at $25, and is actually the preferred method for playing these games in VR.

That’s because the hardware version sits on a stand, like the original Virtual Boy, making it harder to move one’s head around. The cardboard headset is free from those constraints. The hardware also includes red filters over the lenses, to better mimic the original experience, but these can be removed.

However, the hardware version is better for playing actual Virtual Boy games, as they were designed for a static headset resting on a table. You’ll have to decide if that trade-off is worth $100. It’s also worth noting that Virtual Boy games will not work with the original Labo VR headset, which is a bummer for OG Switch fans.

Both versions of the Virtual Boy accessories will be available on February 17, which is the same day several of the retro console’s games head to the Nintendo Switch Online + Expansion Pack subscription service. They can be purchased at the My Nintendo Store. We got a chance to try the headset and came away fairly impressed, though noted that the revamped accessory is “just as eccentric and ungainly as the original was three decades ago.”

For those wondering what all the fuss is about, the Virtual Boy was an actual console released by Nintendo all the way back in 1995. It was one of the first mass-market VR devices and, as such, was decades ahead of the curve. It was cumbersome, the games were only in red and there was nothing by way of motion control. Americans only got 14 games before the console was discontinued.

This article originally appeared on Engadget at https://www.engadget.com/gaming/nintendo/nintendos-virtual-boy-accessory-lets-you-play-vr-mario-and-zelda-on-switch-2-172138483.html?src=rss

Sony Touts PS5 Console Leasing Plans In The UK, Will The US Be Next?

Sony Touts PS5 Console Leasing Plans In The UK, Will The US Be Next?
If buying a modern game console is too expensive these days, Sony has an alternative solution—lease a PlayStation 5 and select accessories for a monthly fee (cue the groans). Interested gamers can select from 12-month, 24-month, and 36-month lease options, after which they have to option to upgrade, keep paying a monthly fee, or return the

Bootstrap Island To Exit Early Access Next Month

Two years after debuting in Early Access on Steam, VR survival game Bootstrap Island moves to its 1.0 release in March.

Since debuting in Early Access in February 2024, developer Maru VR has steadily added features such as elemental dangers, new boss fights and areas to explore, and hallucinations. Its next update, scheduled for March 12th, 2026, will officially end the Early Access period and add new content to expand on the game’s narrative and gameplay mechanics.

0:00

/1:27

Bootstrap Island Full Release Trailer

As seen in the full release trailer, the 1.0 update introduces a local island tribe and with it, a new trading and communication system. Players will be able to forge relationships, friendly or hostile, that will impact their chances of survival.

Maru VR has promised to conclude the story of the survivor as well with added cutscenes and voice acting. New weapons, combat mechanics, and a new boss encounter are also on the list of planned updates.

The full release will coincide with a price increase from the current Early Access price of $24.99. At the time of this article, the final price is not known.

Bootstrap Island is currently available on SteamVR for $24.99. A PSVR2 port has also been announced for sometime in 2026.

OpenAI Claims DeepSeek Distilled US Models To Gain an Edge

An anonymous reader shares a report: OpenAI has warned US lawmakers that its Chinese rival DeepSeek is using unfair and increasingly sophisticated methods to extract results from leading US AI models to train the next generation of its breakthrough R1 chatbot, according to a memo reviewed by Bloomberg News.

In the memo, sent Thursday to the House Select Committee on China, OpenAI said that DeepSeek had used so-called distillation techniques as part of “ongoing efforts to free-ride on the capabilities developed by OpenAI and other US frontier labs.” The company said it had detected “new, obfuscated methods” designed to evade OpenAI’s defenses against misuse of its models’ output.

OpenAI began privately raising concerns about the practice shortly after the R1 model’s release last year, when it opened a probe with partner Microsoft Corp. into whether DeepSeek had obtained its data in an unauthorized manner, Bloomberg previously reported. In distillation, one AI model relies on the output of another for training purposes to develop similar capabilities.

Distillation, largely tied to China and occasionally Russia, has persisted and become more sophisticated despite attempts to crack down on users who violate OpenAI’s terms of service, the company said in its memo, citing activity it has observed on its platform.


Read more of this story at Slashdot.

10 Hacks for Hanging Pictures Perfectly Every Time

We may earn a commission from links on this page.

Who among us has not looked at a newly framed picture, then looked at their wall and thought, “Eh, surely I can eye-ball it this time.” Hanging pictures should be an easy feat, but so often they end up uncentered or slightly crooked, causing us to add more holes the wall than intended or desired. The next time you hang pictures or artwork in your home, use one of these 10 hacks so they’re level and evenly spaced on the first try.

Use a small ball as a makeshift level to hang pictures

A level is essential when hanging art—a frame that’s even slightly crooked will be an eyesore, and if you’re hanging multiple pieces in a group, it’s even more important that everything be level. If you forgot to grab your level, or you don’t have one, you can use a small ball, like a ping pong ball or a marble. Place it on top of the frame and adjust until the ball sits still, then mark it on the wall.

Use painter’s tape to accurately space two nails when hanging a picture

If your frame has two widely spaced hooks, knowing where to insert your nail, screw, or other fastener on the wall can be a mind-bending challenge. But if you have some painter’s tape on hand, it’s easy: Place a piece of tape across the back of the frame, with the top of the tape lined up with the top of the hooks. Mark the position of the hooks with a marker or pen, then remove the tape and place it on the wall at the desired height. Using a level, adjust the tape until it’s placed correctly. Then drive your nails right through the tape at the marked locations, remove the tape, and hang your picture. Here’s a visual tutorial.

Use toothpaste to help you mark the spots where hooks or nails need to go

An alternative to the painter’s tape method is to use some toothpaste (or any gooey, sticky stuff that will wash off your wall easily). Mark the hooks on the back of the frame with a gob of toothpaste, check that it’s level and at the desired height on your wall, then press the frame against the wall. The toothpaste will mark the precise spot where you need to drive your nails to hang the frame. Insert your fasteners, clean everything up, and hang that picture in the perfect spot. Here’s a visual tutorial.

Make this quick DIY tool to mark the spot for a hook or nail when hanging a picture

If you have spare cardboard (a cereal box will do) and a pin or thumbtack, you can make a little DIY tool that will make marking the spot for a hook or nail easy. Cut out a rectangle of cardboard, then cut a tab at the bottom that’s narrow enough to fit through the hook on the back of the frame. Slide the tab through, and push a pin or tack through from the back. Then push the picture into the wall at the right spot, and the pin will create a tiny hole where your hook or nail needs to be. Here’s a visual tutorial.

Use string to guide a hook onto a nail when hanging a picture

Got the nail in the wall, but can’t seem to catch the hook on the picture frame? Get a piece of string and loop it around the nail, then adjust so the ends are even. Take both ends together and run them through the hook, then pull the string tight as you bring the frame toward the wall. The string will guide the hook right onto the nail, no guesswork required. Here’s a visual tutorial.

Use a fork to guide wire onto a nail when hanging a picture

If your frame uses a wire across the back to catch a nail or hook in the wall, you know that sometimes you question your own perception of reality as you repeatedly fail to catch the hook on the wire. There’s an easy hack: Grab a fork from the kitchen and place it on the nail or hook in the wall so it leans outward. Then hook the wire onto the stem of the fork and slide the frame down, letting the fork guide the wire down. When it’s hooked, remove the fork and admire your work. (And wash the fork, probably.) Here’s a visual tutorial.

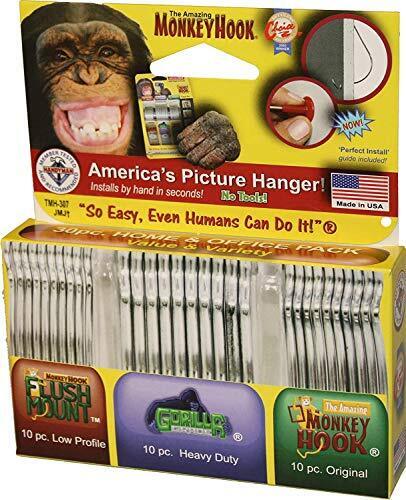
Hang pictures with Monkey Hooks if you don’t want to use any tools

Hanging art on drywall and dread all the mess and trouble of drilling or nailing? Skip it by using Monkey Hooks instead. These are self-drilling pieces of wire—you just poke them through the wall with a tiny bit of elbow grease—that spin around and provide strong, secure hooks that can hold up to 50 pounds of weight, all without a single tool. Here’s a visual tutorial.

Make this paper template when you’re hanging multiple pictures in one area

If you’re going to be hanging multiple frames on the wall, grab some paper and create a template first. You can use wrapping paper, butcher paper or any kind of paper you have lying around or can get your hands on cheap (you can also use cardboard if that’s what you have on hand). Lay your frames out on the paper and trace them carefully. Then use the toothpaste or cardboard/nail hacks described above to mark where the nails need to be placed. Hang the template on the wall (ensuring it’s level), hammer in your nails, remove the template, and hang your frames. Here’s a visual tutorial.

Use an envelope to catch dust when drilling to hang a picture

If you’re going to drill or nail into your walls to hang pictures, you’re going to get a lot of annoying dust all over the place, unless you use a very simple hack: Tape an envelope to the wall underneath where you’ll be drilling. It will catch all that dust and save you the extra step of vacuuming afterward. If you don’t have any envelopes (or tape), some Post-it Notes will do in a pinch—just fold one in half and stick it to the wall under the spot where you’ll be drilling, and it will catch that dust. You can combine more than one Post-it if you need to. Here’s a visual tutorial.

Use your own saliva to mark the spot where you need to hang a picture

If all else fails, and you need to hang a framed picture but you are short on time or patience, there’s a simple solution: Lick the back of your finger, curl it over the hanging hook on the back of the frame, and place it against the wall at the desired height (typically around 57-60 inches from the floor). Your own saliva will leave a faint, temporary mark on the wall where you can confidently place your hook without fuss or delay.