How (and Why) I Use My Garmin Running Watch to Track Rests During Strength Workouts

We may earn a commission from links on this page.

The strength training mode in Garmin watches like the Forerunner 570 is a little confusing at first, but once you get the hang of it, it’s incredibly useful in the gym. Garmin handles rest timers better than any other wearable I’ve tried, and when combined with a third-party app called LiftTrack, you can even track your volume and PRs. I’ll lead you through how I use this workout mode, and how it’s helped me do more work in less time in the gym.

How to find strength workouts in Garmin Connect
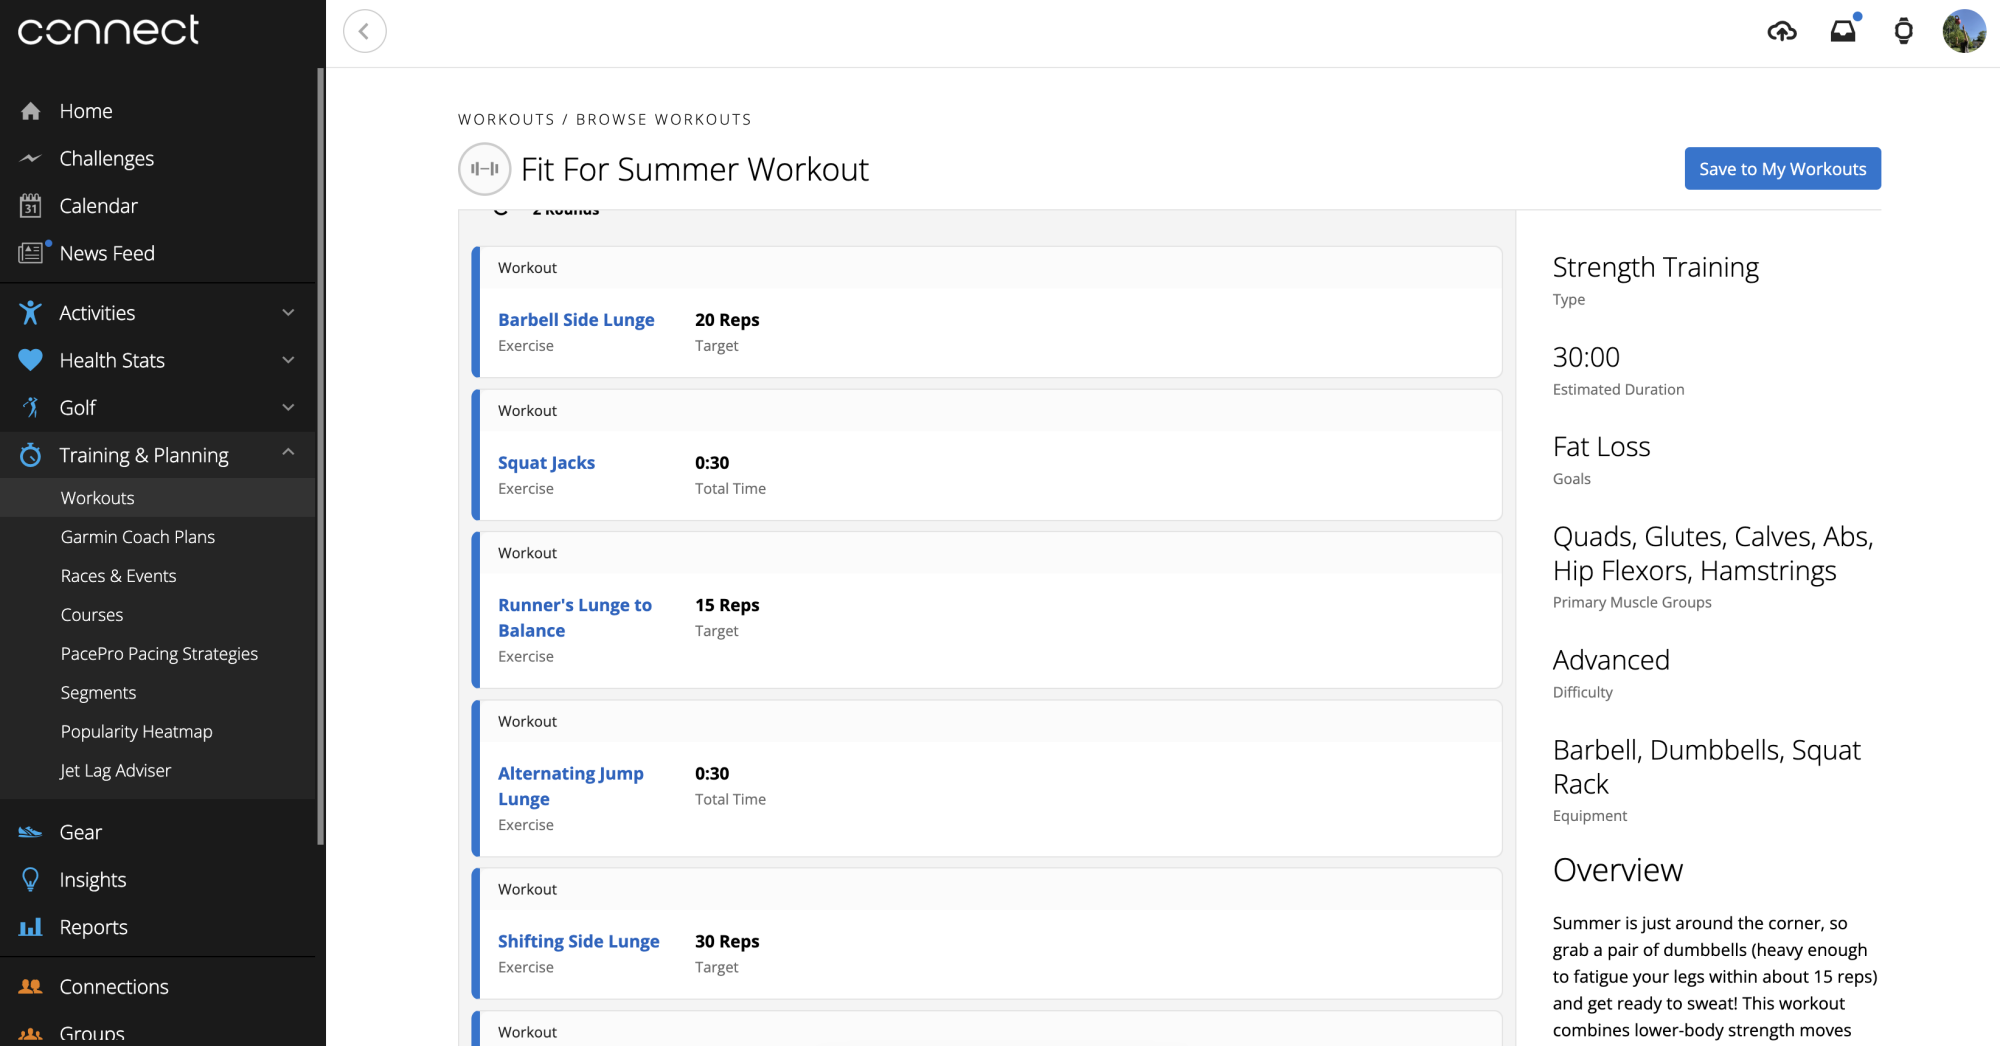
A workout in Garmin Connect web

Credit: Garmin

I’ll get into how to create workouts in a minute, but first I just want to let you know that there are some strength workouts already available for download, if you’d like to just select one and start doing it right now. Go to either your Garmin Connect app or to Garmin Connect on the web, tap Training & Planning, then Workouts, then Find a Workout. 

You’ll be able to choose workouts from a library, and you can search by type (including weights, yoga, and bodyweight cardio). Most of the workouts are short, simple, and don’t use much equipment. If you’re experienced at strength training, you’ll probably want to create your own workouts or use the coach feature, but these will get you started in the meantime.
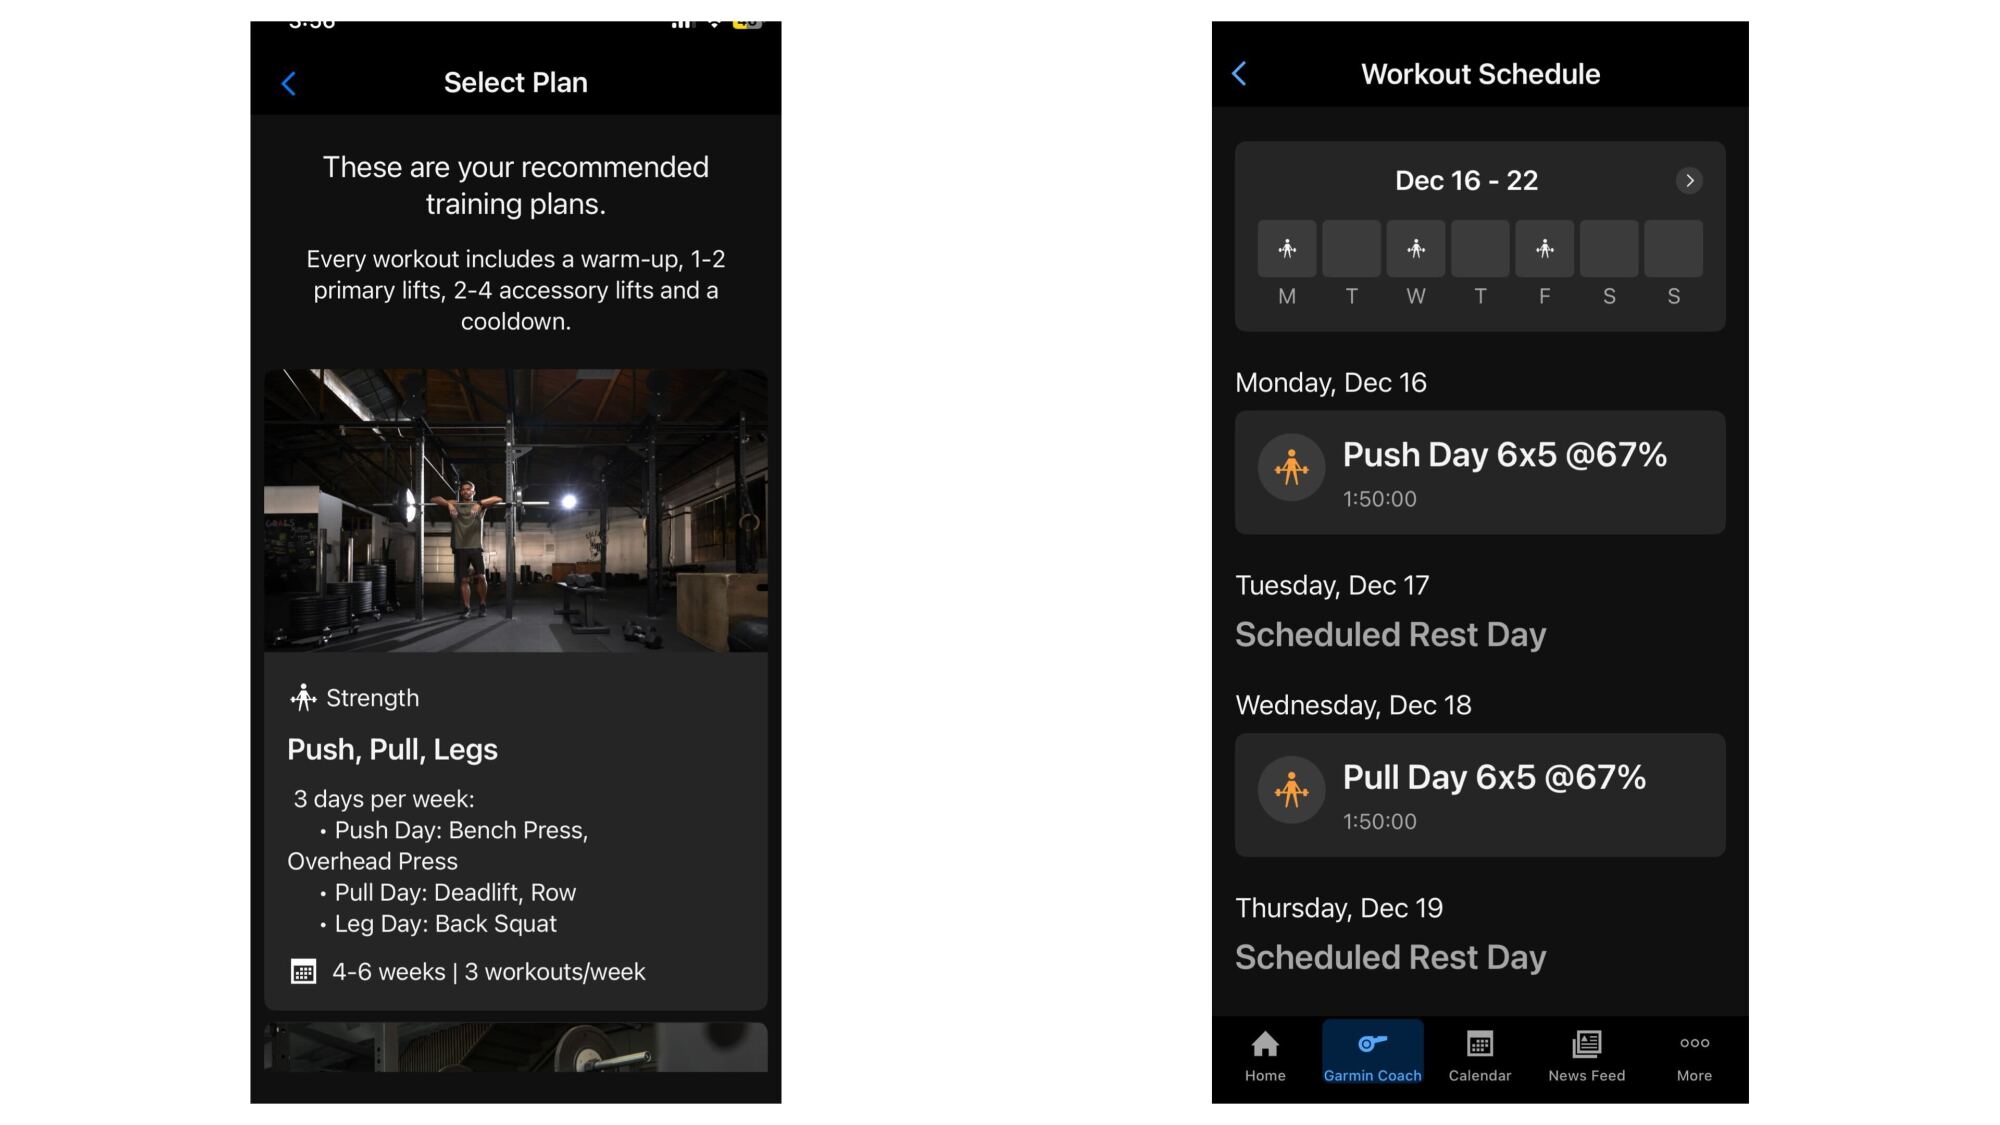
screenshots of push/pull/legs program in Garmin Connect app

Credit: Garmin

As for that coach feature, it works much like the adaptive running coach plans. You can read more here from Garmin, but basically you set it up by selecting Garmin Coach and telling it your goals and schedule. Workouts will then appear for you each day. The image above shows a Push/Pull/Legs workout programmed by Garmin Coach. It let me choose which workout happens on which day, had me set my max lifts as benchmarks (this program uses percentages), and even let me edit the workouts to swap exercises before finally putting them on my calendar.

How to create strength workouts in Garmin Connect
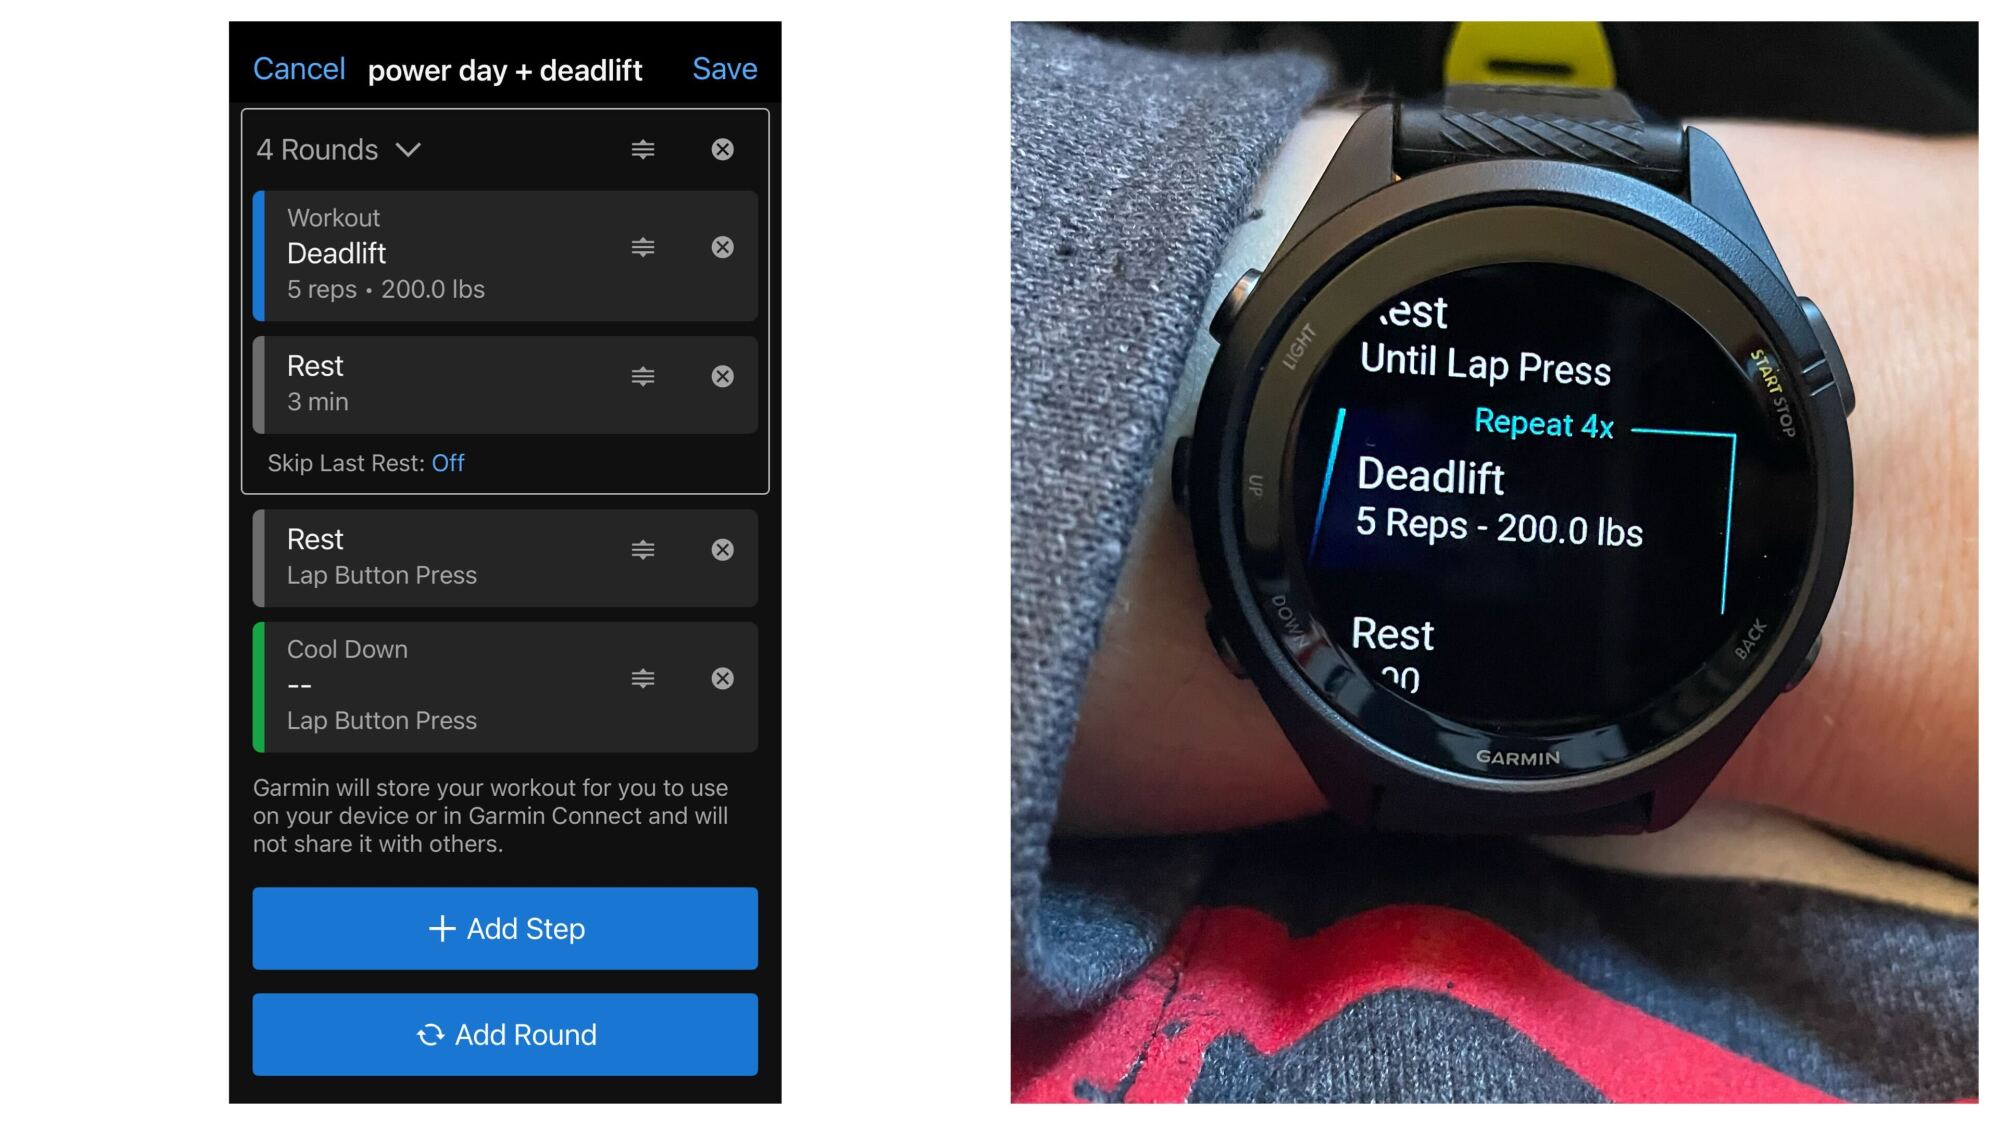
screenshot of a workout in the Garmin Connect workout builder, and then the same workout displayed on the watch

Credit: Beth Skwarecki/Garmin

I’m going to walk you through this step-by-step, because I was so confused the first time I tried to build a workout. Again, you can do this either on your phone or on the web. I usually end up creating my workouts on the phone, and it’s not hard once you get the hang of it. One tip, though: you can skip this whole process if you’re willing to install a third-party app. LiftTrack takes care of workout planning and syncs to your Garmin account, and you can read more about how to use that app here.

Go to the “More” menu on your phone (or the sidebar on web) and select Training & Planning, then Workouts, and then Create a Workout. From here, select Strength, and you’ll be given a skeleton of a workout with a warmup, cooldown, and one slot for an exercise. 

To start adding exercises, tap Add Round, which will give you a workout card and a recovery card, both in a little box that says “2 Rounds” at the top. Here’s what you do to turn this into a traditional sets-and-reps format (in this example, we want to do four sets of five deadlifts at 200 pounds):

  1. Tap the card that says workout. 

  2. Select an exercise (deadlift), a weight (200 pounds), and a target type. In this case, the target type will be Reps (five). Hit the arrow on the top left of the screen to return to the main workout editing page.

  3. For the recovery card, you’ll want to change that to Rest rather than Recovery. For that one, the target type should be Time. Let’s set it to three minutes. Return to the main workout screen again.

  4. Now, tap the dropdown at the top of the round and set it to the number of sets you want to do (four). If your watch supports it, you can select Skip Last Recovery to avoid the final rest period.

  5. Before you add another set, go to the bottom of the screen and tap Add Step. Change this new step to Rest (it will be outside of the repeat) and set the target to Lap Button Press.

Now you have a repeat that will give you four sets of five deadlifts with a three-minute rest timer in between. After you finish that, there will be a rest period that lasts until you press the lap button. This is to give you as much time as you need to find your equipment and set up for the next exercise. Continue adding repeats and steps as desired, and make sure to save the workout when you’re done.

How to send Garmin workouts to your watch

After creating a workout, it doesn’t automatically show up on your watch. You need to tap the “send to watch” icon that you’ll see on the top right of your screen when you’re looking at the workout. 

You can also schedule a workout (which will automatically send it to your watch for the scheduled day) by using the three dots menu to add it to your calendar. 

How to use a Garmin strength workout from your watch

There are a few ways to access the strength workouts, but here’s the easiest: When it’s gym time, hit the button that starts an activity, and rather than selecting Strength, scroll down until you find Workouts. Tap the one you want to do. 

Pay attention here: You’ll need to select the workout, tell it you want to do the workout, and start the workout. (Just keep pressing the select button until the workout actually begins.)

The exact details of which buttons do what will vary from watch to watch, but on a Forerunner, your top right button starts and stops the workout, and your bottom right button is a lap button. (During a timed rest, you can press the lap button to skip to the end of that rest and start the next set.) From the top right button, you can also skip a group of sets (say, if the squat rack was busy, you can skip squats) and then use the same menu later to View Skipped and add it back in. 

Why I like the strength training feature

I love using the strength workout feature for one main reason: the customizable timed rests. Rest is important in the gym because you’ll be able to lift more if you dial in the perfect rest time for each exercise. It’s easy to sit around scrolling on your phone between sets and realize too late that it’s been 10 minutes since you did your last deadlift. But when I program the workout as above, all I have to do is hit the lap button after my set. Three minutes later, my watch will buzz to let me know it’s time to do the next set. 

Pro tip: Set your rest timer for the longest time you might want to rest between sets. If you’re aiming for three to five minutes, set it for five minutes. If you’re ready to go after three, just hit the lap button to skip the remainder of that rest. 

You can also program exercises in other ways besides the traditional sets and reps. For example, set the Target Type to Time to do a five-minute density set. Or do EMOMs (every-minute-on-the-minute intervals) by putting just one card inside a repeat, and setting that card to a one-minute target time. You’ll get a beep at the top of each minute. 

The Garmin strength features I don’t use

I don’t worry too much about the weights or reps in the app, to be honest. By default, the watch will ask you after each set how many reps you did and how heavy the weight was. I’ve turned that feature off, and I don’t even bother to set rep or weight targets in the app. I use the workouts for timing, not to log the details of my workout. (I have a notebook for that.) 

I also haven’t found the automatic set detection or rep counting to be very useful. The watch is impressively good sometimes—how did it know I was doing pullups?!—but it’s just not good enough to be generally useful. It also doesn’t recognize a lot of the Olympic weightlifting exercises I do. And the rep counting? Sometimes OK, but more often useless. Again, I’d rather jot down my reps in that notebook than fiddle with selecting a number on my watch screen after each set. 

Meta is reportedly working on a new AI model called ‘Avocado’ and it might not be open source

Mark Zuckerberg has for months publicly hinted that he is backing away from open-source AI models. Now, Meta’s latest AI pivot is starting to come into focus. The company is reportedly working on a new model, known inside of Meta as “Avocado,” which could mark a major shift away from its previous open-source approach to AI development. 

Both CNBC and Bloomberg have reported on Meta’s plans surrounding “Avocado,” with both outlets saying the model “could” be proprietary rather than open-source. Avocado, which is due out sometime in 2026, is being worked on inside of “TBD,” a smaller group within Meta’s AI Superintelligence Labs that’s headed up by  Chief AI Officer Alexandr Wang, who apparently favors closed models.

It’s not clear what Avocado could mean for Llama. Earlier this year, Zuckerberg said he expected Meta would “continue to be a leader” in open source but that it wouldn’t “open source everything that we do.” He’s also cited safety concerns as they relate to superintelligence. As both CNBC and Bloomberg note, Meta’s shift has also been driven by issues surrounding the release of Llama 4. The Llama 4 “Behemoth” model has been delayed for months; The New York Times reported earlier this year that Wang and other execs had “discussed abandoning” it altogether. And developers have reportedly been unimpressed with the Llama 4 models that are available. 

There have been other shakeups within the ranks of Meta’s AI groups as Zuckerberg has spent billions of dollars building a team dedicated to superintelligence. The company laid off several hundred workers from its Fundamental Artificial Intelligence Research (FAIR) unit. And Meta veteran and Chief AI Scientist Yann LeCun, who has been a proponent for open-source and skeptical of LLMs, recently announced he was leaving the company. 

That Meta may now be pursuing a closed AI model is a significant shift for Zuckerberg, who just last year said “fuck that” about closed platforms and penned a lengthy memo titled “Open Source AI is the Path Forward.” But the notoriously competitive CEO is also apparently intensely worried about falling behind OpenAI, Google and other rivals. Meta has said it expects to spend $600 billion over the next few years to fund its AI ambitions.

This article originally appeared on Engadget at https://www.engadget.com/ai/meta-is-reportedly-working-on-a-new-ai-model-called-avocado-and-it-might-not-be-open-source-215426778.html?src=rss

Adobe Integrates With ChatGPT

Adobe is integrating Photoshop, Express, and Acrobat directly into ChatGPT so users can edit photos, design graphics, and tweak PDFs through the chatbot. The Verge reports: The Adobe apps are free to use, and can be activated by typing the name of the app alongside an uploaded file and conversational instruction, such as “Adobe Photoshop, help me blur the background of this image.” ChatGPT users won’t have to specify the name of the app again during the same conversation to make additional changes. Depending on the instructions, Adobe’s apps may offer a selection of results to choose from, or provide a UI element that the user can manually control — such as Photoshop sliders for adjusting contrast and brightness.

The ChatGPT apps don’t provide the full functionality of Adobe’s desktop software. Adobe says the Photoshop app can edit specific sections of images, apply creative effects, and adjust image settings like brightness, contrast and exposure. Acrobat in ChatGPT can edit existing PDFs, compress and convert other documents into a PDF format, extract text or tables, and merge multiple files together.

The Adobe Express app allows ChatGPT users to both generate and edit designs, such as posters, invitations, and social media graphics. Everything in the design can be edited without leaving ChatGPT, from replacing text or images, to altering colors and animating specific sections. If ChatGPT users do want more granular control over a project they started in the chatbot, those photos, PDFs, and designs can be opened directly in Adobe’s native apps to pick up where they left off.


Read more of this story at Slashdot.

Apple TV and Apple Music are down for some users

Apple Music and Apple TV are experiencing an outage, according to Apple’s System Status page. The outage was logged on Apple’s own system at around 2:53PM ET, and is currently affecting both of the company’s streaming services, along with Apple TV’s Channels feature, which lets you subscribe to and watch other streaming services inside the Apple TV app.

Only “some” users are affected by the outage, according to Apple. Anecdotally, multiple members of Engadget’s staff were still able to stream content as usual. On DownDetector, reports of issues with Apple TV and Apple Music first appeared right around 2:33PM ET, a little before Apple officially confirmed the outage on its own site.

Developing…

This article originally appeared on Engadget at https://www.engadget.com/entertainment/streaming/apple-tv-and-apple-music-are-down-for-some-users-214425626.html?src=rss

Yep, Apple Music and Apple TV Are Down

If you picked up your iPhone to round out your Apple Music Replay for the year, or turned on your TV to watch a show like Pluribus, you might have noticed something odd: Neither service is working. It’s not just you: Apple Music, Apple TV, and Game Center are currently down.

That’s directly from Apple’s “System Status” website, which tracks all of Apple’s web-based services and identifies which ones may be experiencing problems. While most of Apple’s services, like the App Store, Find My, and iMessage, are all “Available,” four of these services are experiencing an outage: Apple Music, Apple TV, Apple TV Channels, and Game Center.

If you click on each, you can see the service’s full status report:

  • Apple Music – Outage

    Today, 2:53 PM – ongoing

    Some users are affected

    Users may be experiencing intermittent issues with this service.

  • Apple TV Channels – Outage

    Today, 2:53 PM – ongoing

    Some users are affected

    Users may be experiencing intermittent issues with this service.

  • Apple TV – Outage

    Today, 2:53 PM – ongoing

    Some users are affected

    Users may be experiencing intermittent issues with this service.

  • Game Center – 1 Outage, 1 Resolved Issue

    Outage: Today, 2:53 PM – ongoing

    Some users are affected

    Users may be experiencing a problem with this service. 

    Resolved Issue: Today, 8:43 AM – 9:14 AM

    Some users were affected

    Users may have experienced a problem with this service.

It’s not clear what is causing the outages, though they all went down at 2:53 p.m.. (Apple doesn’t specify, but I imagine that’s ET.) This isn’t the first time this has happened, of course. In fact, Apple Music was down earlier this year, though it was actually still working for me when Apple said the outage was active.

That appears to be the situation today, as well. Each report says “some users are affected,” not all. As it happens, Apple Music is working on my Mac, and I’m able to stream the free pilot episode of Pluribus without issue.

Apple will likely get these services back up and running for affected users. In the meantime, if your Apple Music or Apple TV won’t cooperate, this is likely the cause.

Instagram Is Finally Letting You Control the Reels You See

After years of suffering from a crippling TikTok addiction, I decided enough was enough: I quit the app cold turkey and deleted it from my phone. Then, I discovered Instagram Reels, and my attention span hasn’t been the same since.

TikTok’s algorithm is infamous, but we don’t give Instagram’s enough credit. This platform is addicting. I hardly use the app to keep up with friends and family anymore: Reels grabs my attention and doesn’t let go, and before I know it, it’s midnight, and I’ve done nothing with my evening. How many videos did I watch? What did I even watch? Whatever Meta has going on in that algorithm is dangerous stuff.

You can influence the algorithm, of course: The decisions you make in the app—likes, comments, watch time, sharing—tell the algorithm which videos you like, which you don’t, and inform its fraction-of-a-second decisions about what to show you next. But until now, you haven’t been able to see what’s driving those decisions. You’re kind of flying blind—you can try to steer the algorithm in a new direction, but you’ll never know exactly what direction you’re really going in.

That’s now changing. As reported by Wired, Meta is rolling out a new tab for Reels viewers that will let us see why the algorithm is delivering us these particular videos. This tab, called, appropriately, “Your Algorithm,” is now rolling out, first in the U.S., but soon to the rest of the world—at least, only to English speakers. It seems reminiscent of TikTok’s “Manage Topics” feed, which lets you adjust the content types that appear in your For You feed.

How “Your Algorithm” works on Instagram

When “Your Algorithm” hits your phone, you’ll find it in the top right corner of the Reels feed: two lines with heart icons placed on each. (I had to update the app and force quit it a couple times to get it to appear.) Once you open this tab, you’ll see a short summary of the type of content the algorithm says you’ve liked recently. In Meta’s example, it says, “Lately you’ve been into creativity, sports hype, fitness motivation, [and] skateboarding.” Mine says, “Lately you’ve been into classic video games, laughing at comedy clubs, and making beats in the studio.”

Beneath this summary, you’ll find the “What you want to see more of” section. Here, you can choose specific content categories you’d like to appear in your feed more often. Instagram will populate some choices here based on your past interests—Meta’s example from above shows things like “Sports,” “GRWM,” “Thrifting,” and “Horror movies”—but you can tap an “Add” button to contribute your own requests. You can tap any of these content types to find the option to watch Reels in that category, in case you want to test drive any before locking in your choices.

Beneath this, you’ll find “What you want to see less of.” This is the same concept, but the reverse: You can choose any content types you don’t want in your feed anymore. If you’re sick of seeing hiking videos, but Instagram continues to show them to you, here’s your chance to directly tell the algorithm to cut it out.

If you tap the three dots in the top right, you’ll find some shortcuts to existing content controls, too, like whether to suggest political content on your feed, “sensitive” content controls, and specific words and phrase filters, to name a few. You can also tap the share button to share your algorithm summary to your story. I’m not sure who would want to do that, but I guess I shared my summary here, so who am I to judge.

Meta’s changing content controls

Wired highlights how these changes come as the European Commission is pushing Meta to present more data controls to EU users: These users have so far been able to pay to not see ads, but since the European Commission didn’t think that was enough, Meta will allow users to choose whether to allow all their data to be used for personalized ads, or only a small percentage.

That’s not happening here in the U.S., but that doesn’t mean Meta is staying the same, either. “Your Algorithm” is launching as Meta is facing criticism over how it handles younger users on its platforms. Reports suggest Meta understands how addictive its apps are, especially to teens, and the company’s internal policies for chatbot interactions with minors was, frankly, appalling. The company has rolled out Teen Accounts across apps like Instagram and Facebook, which offer limits on communications and interactions, and new AI parental controls are also on their way. “Your Algorithm” seems to be the latest in a string of efforts to make it easier for users to control the experience on Meta platforms. Theoretically, you could even use these controls to make your Reels experience less addicting.

Those are all good developments as far as I’m concerned, but I fear there’s still quite a lot of work to do to make Meta’s products—as well as many other social media products—less addictive, and, overall, better for us. Case in point: I opened the app to test out “Your Algorithm,” and not only did I not find it at first, I ended up losing five minutes of my life watching the first video that appeared in my feed. I need to delete Instagram from my phone.

Conservative attacks on NPR and PBS continue with call to take FCC licenses

A conservative group yesterday urged the Federal Communications Commission to take licenses away from NPR and PBS stations and let other entities use the spectrum. The request came from the Center for American Rights (CAR), a nonprofit law firm that has played a prominent role in the news-distortion investigations spearheaded by FCC Chairman Brendan Carr.

“In the wake of the wind-down of the Corporation for Public Broadcasting and the end of federal funding for NPR and PBS, the Center respectfully suggests that the Commission open an inquiry that looks at the future of ‘public’ broadcasting in that new environment,” a Center for American Rights filing said.

The CPB is set to shut down after Congress approved President Trump’s request to rescind its funding. The Center for American Rights said the CPB shutdown should be used as an opportunity to reassign spectrum used by NPR and PBS stations to other entities.

Read full article

Comments

The Newest Amazon Echo Show Is Almost $50 Off

We may earn a commission from links on this page. Deal pricing and availability subject to change after time of publication.

The wall-mounted Amazon Echo Show 15 has built-in Fire TV, but it also functions as a customizable family hub that keeps you on track with calendars, lists, and more. Right now, it’s $254.99 (originally $299.99), its lowest price on Amazon to date, according to price-tracking tools.

The newest generation Amazon Echo Show features a bright 15.6-inch display and a remote control that lets you navigate the Fire TV interface and control media playback. It’s well-suited for mounting in an office, kitchen, or living room where you need a home-organization hub that hangs easily like a picture (it also doubles as a digital picture frame). It also makes for a helpful alternative to a laptop or tablet for comfortable video calling with a wide field of view, 3.3x zoom, and a 13 MP camera.

Like all Echo Show devices, the experience is centered around Amazon’s Alexa, so it’s better for those already in the Amazon ecosystem. It comes complete with smart home controls and widgets that make it more capable as a shared household device. It also supports multiple profiles, recognizing users by voice or face using the camera. This PCMag review notes that although the Fire TV interface is capable and the speakers are louder than the previous generation, they could be clearer and more dynamic.

Still, even though sound quality isn’t perfect, the Amazon Echo Show 15 performs well as a productivity-forward, centralized smart display rather than a smart TV used solely for entertainment (unless you want to add an external speaker to the larger screen model, which is 13% off right now).

A new open AI coding model is closing in on proprietary options

On Tuesday, French AI startup Mistral AI released Devstral 2, a 123 billion parameter open-weights coding model designed to work as part of an autonomous software engineering agent. The model achieves a 72.2 percent score on SWE-bench Verified, a benchmark that attempts to test whether AI systems can solve real GitHub issues, putting it among the top-performing open-weights models.

Perhaps more notably, Mistral didn’t just release an AI model, it released a new development app called Mistral Vibe. It’s a command line interface (CLI) similar to Claude Code, OpenAI Codex, and Gemini CLI that lets developers interact with the Devstral models directly in their terminal. The tool can scan file structures and Git status to maintain context across an entire project, make changes across multiple files, and execute shell commands autonomously. Mistral released the CLI under the Apache 2.0 license.

It’s always wise to take AI benchmarks with a large grain of salt, but we’ve heard from employees of the big AI companies that they pay very close attention to how well models do on SWE-bench Verified, which presents AI models with 500 real software engineering problems pulled from GitHub issues in popular Python repositories. The AI must read the issue description, navigate the codebase, and generate a working patch that passes unit tests. While some AI researchers have noted that around 90 percent of the tasks in the benchmark test relatively simple bug fixes that experienced engineers could complete in under an hour, it’s one of the few standardized ways to compare coding models.

Read full article

Comments

The Thrill Of The Fight 2 Review: Between Realism And Fun

The Thrill of the Fight 2 with career mode is available now on Quest headsets, so I put on my boxing gloves to throw some punches.

As a fan of the original The Thrill of the Fight, I had high hopes for the sequel coming into this, buying The Thrill of the Fight 2 in early access to try its multiplayer mode. I encountered arm-flailing multiplayer matches that saw spam fighters rack up damage, so I put it down and decided to wait for the more fleshed-out full release, which arrived several weeks ago.

The Facts

What is it?: A boxing simulator with training, career, and multiplayer modes.
Platforms: Quest (reviewed on Quest 3)
Release Date: Out now
Developer/Publisher: Halfbrick Studios
Price: $19.99

A virtual boxing game where the opponent faces the viewer with gloves up, and a crowd in the background
Facing off in career mode

The Thrill of the Fight 2 welcomes you with a main menu presented on a small tablet held in your gloved hands. After it calibrates your height and arm length, you hold a stylus to choose multiplayer, career, or training mode. Training mode practices with a dummy or spars with a bot fighter. There are also settings for customizing your fighter to make them look reasonably unique.

Comfort

The Thrill of the Fight 2 is intended as a standing game that engages your body in physical exertion. That said, there aren’t many comfort options to speak of. If you don’t have much room in your physical space to play, there is an optional standing mode. Analog stick-based turning can be assigned to either the left or right hand. Health warnings are present when the game starts, and users must agree to those before proceeding to play.

I chose Career mode first and find myself inside a ring for my first fight. Coming from the first Thrill of the Fight, the updated difficulty is an immediate shock. The previous game took a more arcade-style approach to the boxing, so I wasn’t expecting the AI to be this intense.

0:00

/0:37

I throw out jabs it sees coming and deftly dodges, infuriating me. I lean in and get called for a foul. Occasionally the bot will clip directly into me while throwing punches and a foul gets called on my behalf instead. The game repeatedly fails to detect how much space I have around me to fight in “roomscale” mode, forcing me to smaller confines for standing mode during fights. This contributed to the problem of stepping outside of bounds while the AI fighter is still sending punches my way. Whenever the fighting gets intense, I can see flashes of my room boundary as the fists fly.

Coach yells directions at you during the fight, and the jeers of the crowd can be heard too. Outside the ring, they realistically move in their seats, craning their necks for a better view. I saw solid performance across each stage with strong immersion throughout.

I backed on up to training mode and tried sparring. Sparring mode provided a better onboarding experience with practice for proper fighting form. Training with a dummy gives instruction via tutorial videos on how to punch with drill exercises to perfect different moves. Still, I can’t land punches as well as I want to because of my scores.

0:00

/0:24

Testing the dummy in training mode

The numbers next to the training dummy show how much force is applied to each move you make, including how much “body effort” is included. Body effort is a way for The Thrill of the Fight 2 to grade punches with the aim of stopping players from cheating during matches. The problem is it doesn’t record the effort in my punches properly most of the time.

You can see how the camera moves as I swing; I’m not sitting there and flailing my arms. I’m not being sufficiently graded for my efforts, and it cuts into the fun. Difficulty is never a dealbreaker for me, but the system needs a few fixes. Is head movement calculated as part of the attack? How does it impact the sensitivity of the movement detection? Currently, the fighting system feels like pillows – not gloves – have been put on my hands.

At the end of each training session, there are points for attack and defense added to my profile. The numbers for these didn’t make much sense; they change depending on the training session type you choose.

Career mode provides a certain amount of fights to win in order to qualify for a tournament. If you miss out, you can skip to the next year to continue training and fighting. Although I’m happy to win after training so much, my desire to keep fighting in career mode eventually evaporated. I opted to switch to multiplayer mode to experience facing off against other players instead.

0:00

/0:42

A good multiplayer fight

Multiplayer is greatly improved in the full release for The Thrill of the Fight 2. You can either fight players to rank on a global list, or you can pick a round of casual sparring. I matched up in a casual round with a player who paused and evaluated where I was throwing punches before he moved in. Within a few swings, I’m knocked out.

Despite the swift loss, I laughed because I’m still having a good time. The other player was sportsmanlike, and we made sure to touch gloves as a sign of respect. While I can’t guarantee everyone you face in multiplayer will be as polite, I’m impressed by the game mode improvements. I hope to never meet another flailing toddler in the ring again.

The Thrill of the Fight 2 – Final Verdict

The Thrill of the Fight 2 is a bit of a departure from the first game and might surprise anyone expecting more of the same. You should instead look forward to improving your boxing form and working more seriously toward beating the challenges in this installment. The damage system needs further work to detect when you put your body into a punch, and the bot should not clip into you during fighting.

What’s working for this title are beautiful graphics and a great choice in how you choose to play the game. You can spend time in multiplayer exclusively, try to conquer career mode, or enjoy both. My muscles may be sore from playing this sequel, but I’m not complaining there. This game can eventually be an all-timer with some improvements, just like the first installment is.


UploadVR uses a 5-Star rating system for our game reviews – you can read a breakdown of each star rating in our review guidelines.

Spotify’s new playlist feature gives users more control over their recommendation algorithm

Spotify is attempting to give users more control over the music the streaming service recommends with a new playlist feature called “Prompted Playlist.” The beta feature is rolling out in New Zealand starting on December 11, and will let users write a custom prompt that Spotify can use — alongside their listening history — to create a playlist of new music.

By tapping on Prompted Playlist, Spotify subscribers participating in the beta will be presented with a prompt field where they can type exactly what they want to hear and how they want Spotify’s algorithm to respond. And while past AI features took users’ individual taste into consideration, Spotify claims Prompted Playlist “taps into your entire Spotify listening history, all the way back to day one.” 

A gif showing how users will create a new Prompted Playlist.
Prompted Playlist will exist alongside Spotify’s other playlist features.
Spotify

Prompts can be as broad or specific as users want, and Spotify says playlists can also be set to automatically update with new songs on a specific cadence. An “Ideas” tab in the Prompted Playlist setup screen can provide suggestions for users who need inspiration for their prompt. And interestingly, Spotify says each song in the playlist will be presented with a short description explaining why the algorithm chose it, which could help direct future fine-tuning.

If this all sounds familiar, it’s because Spotify has already tried AI-generated playlists in the past. The difference here, besides Spotify framing the new feature as giving users more “control,” is the detail of the prompts, the depth of user data Spotify is applying and the options users will have to keep playlists up-to-date. Prompted Playlist is only available in English for now, but Spotify says the feature will evolve as it adds more users.

Spotify isn’t the first company to offer users more direct control over how content is recommended to them. Meta has recently started experimenting with algorithm-tuning options in Threads and Instagram, and TikTok lets users completely reset their For You page to start fresh. The irony of all these features is that algorithm-driven feeds were supposed to be able to recommend good music, posts and videos without additional prompting. Now that prompting is being pitched as a feature, rather than extra work.

This article originally appeared on Engadget at https://www.engadget.com/entertainment/music/spotifys-new-playlist-feature-gives-users-more-control-over-their-recommendation-algorithm-203237903.html?src=rss

Google Maps Will Now Automatically Save Your Parking Spot on iPhone

Forgetting where you parked your car isn’t just a sitcom trope—though it does make for classic TV. Even in the age of the smartphone, it’s all too easy to walk away from your car and retain zero memory of where you left it. As it happens, Google Maps has a solution—provided you have an iPhone.

So long as you’re running the app on an Apple device, Google Maps can automatically remember where you parked and display that information on the map. There’s no need to mark the location yourself, tell the app to save your spot, or take a picture of the cross streets in case you forget: You can simply glance at the screen to find a “You parked here” label.

The thing is, while some are reporting this feature is relatively new to them, others suggest it’s been out for a while. What gives?

How Google Maps automatically saves your parking location on iOS

This feature works if you connect your iPhone to your car, whether via Bluetooth, CarPlay, or a USB cable. When you disconnect your iPhone from your car, Google Maps will assume you’ve parked, and will automatically mark that location on the map. The feature will also work if you give Google Maps permission to access your Motion & Fitness data, which allows the app to tell when you’ve started and stopped driving. (You can check on this setting from Google Maps’ in-app settings: Head to Navigation, then, under “Automatically save parking,” tap Let maps use your motion to save your parking.)

You can also choose to set Google Maps’ location permissions to “Always,” which gives the app persistent access to your location data, and also lets it figure out when you’ve stopped your car. You can change this option on your iPhone by navigating t0 Settings > Privacy & Security > Location Services > Google Maps.

Is this feature actually new?

This feature is genuinely great, and I’m happy Google Maps supports it—even if Android users are inexplicably being excluded for now. But you might also be wondering to yourself, wasn’t this already a feature? It doesn’t sound all that new. Yet you might have even seen a flurry articles like this one today, all reporting on this “new” Google Maps parking feature.

As it turns out, the answer is a bit complicated. The coverage today all references this announcement on LinkedIn from Google Maps senior product manager Rio Akasaka—only that post is, according to LinkedIn, a month old. Some of the comments are more recent, but others appear to be from the original posting date.

Potentially adding to the confusion, other navigation apps, like Apple Maps, already support automatically saving your parking spot, and while Google Maps has also had an option to save your parking spot for some time, it previously wasn’t automatic. If you wanted the app to remember where you stopped, you needed to tap your blue dot on the map and choose “Save your parking.” That’s how it still is on Android, since the automatic feature only works on iOS.

Looking through the comment sections on articles from outlets like The Verge or MacRumors, some users insist they’ve had this feature for some time—well before that month-old LinkedIn announcement. This commenter says they’ve had the feature for years, while this one claims they’ve had it for “ages.” So what gives? Have at least some iPhone users have had this feature for years? It is possible Google has been testing out the feature with smaller subsets of users and only recently rolled it out en masse, but whether or not that actually happened is unclear at this time.

I’ve reached out to Google for clarification about the timeline of this feature’s implementation, and I will update this article if I get an answer. Until then, I can only hope Google is actively working on rolling out the feature to Android, as that really would be something new.

Cable channel subscribers grew for the first time in 8 years last quarter

In a surprising, and likely temporary, turn of events, the number of people paying to watch cable channels has grown.

On Monday, research analyst MoffettNathanson released its “Cord-Cutting Monitor Q3 2025: Signs of Life?” report. It found that the pay TV operators, including cable companies, satellite companies, and virtual multichannel video programming distributors (vMVPDs) like YouTube TV and Fubo, added 303,000 net subscribers in Q3 2025.

According to the report, “There are more linear video subscribers now than there were three months ago. That’s the first time we’ve been able to say that since 2017.”

Read full article

Comments

Intel loses its latest challenge to 16-year-old EU antitrust case

Intel will have to pay up in an antitrust case dating back to 2009, Reuters reported on Wednesday. The company has lost its challenge against a €376 million ($438.7 million) regulatory fine levied by the European Commission. However, Intel managed to get the amount reduced to 237 million euros ($276.6 million).

The case began in 2009, when mobile computing was in its infancy and netbooks (remember those?) were all the rage in the PC space. At the time, the EU ruled that Intel violated antitrust laws on multiple fronts. First, it used illegal hidden rebates to push rivals out of the PC processor market. Second, it paid manufacturers to delay or stop production of AMD-powered products.

The latter, the portion that today’s fine deals with, was classified as “naked restrictions.” It regarded anticompetitive payments Intel made to HP, Acer and Lenovo between 2002 and 2006.

As often happens in these situations, the legal process bounced back and forth through the courts for years. In 2017, Europe’s highest court ordered the case to be re-examined, citing a lack of proper economic assessment of how Intel’s behavior affected its rivals. Europe’s second-highest court then overturned the judgment from the first (hidden rebates) portion of the fine in 2022, a move confirmed by the EU Court of Justice last year. That penalty, initially set at a whopping €1.06 billion ($1.2 billion), was wiped off the books.

The second (“naked restrictions”) fine was imposed in 2023 after European courts upheld that portion. Intel’s latest challenge sought to have that one removed, too. Instead, it will have to settle for shaving one-third off the initial sum.

With today’s judgment, it’s tempting to declare the matter over and done with. But the Commission and Intel can still appeal the decision to the EU Court of Justice on points of law. Tune in next year to see if this long, strange saga has another chapter.

This article originally appeared on Engadget at https://www.engadget.com/big-tech/intel-loses-its-latest-challenge-to-16-year-old-eu-antitrust-case-200746004.html?src=rss

10 Ways to Use Your Hand Tools and Power Tools Together to Do More

One of the best lessons I’ve learned across years of DIY projects is the fact that, whether powered by hand or by electricity, your tools can can serve more than the purpose for which you purchased them—provided you get creative with how you put them to use. Often, you can use two tools together to improve their performance, make them more versatile, make them easier to use, or even to to replace a tool you’re missing.

Here are 10 unexpected ways to combine your hand tools and power tools to make DIY work a little easier.

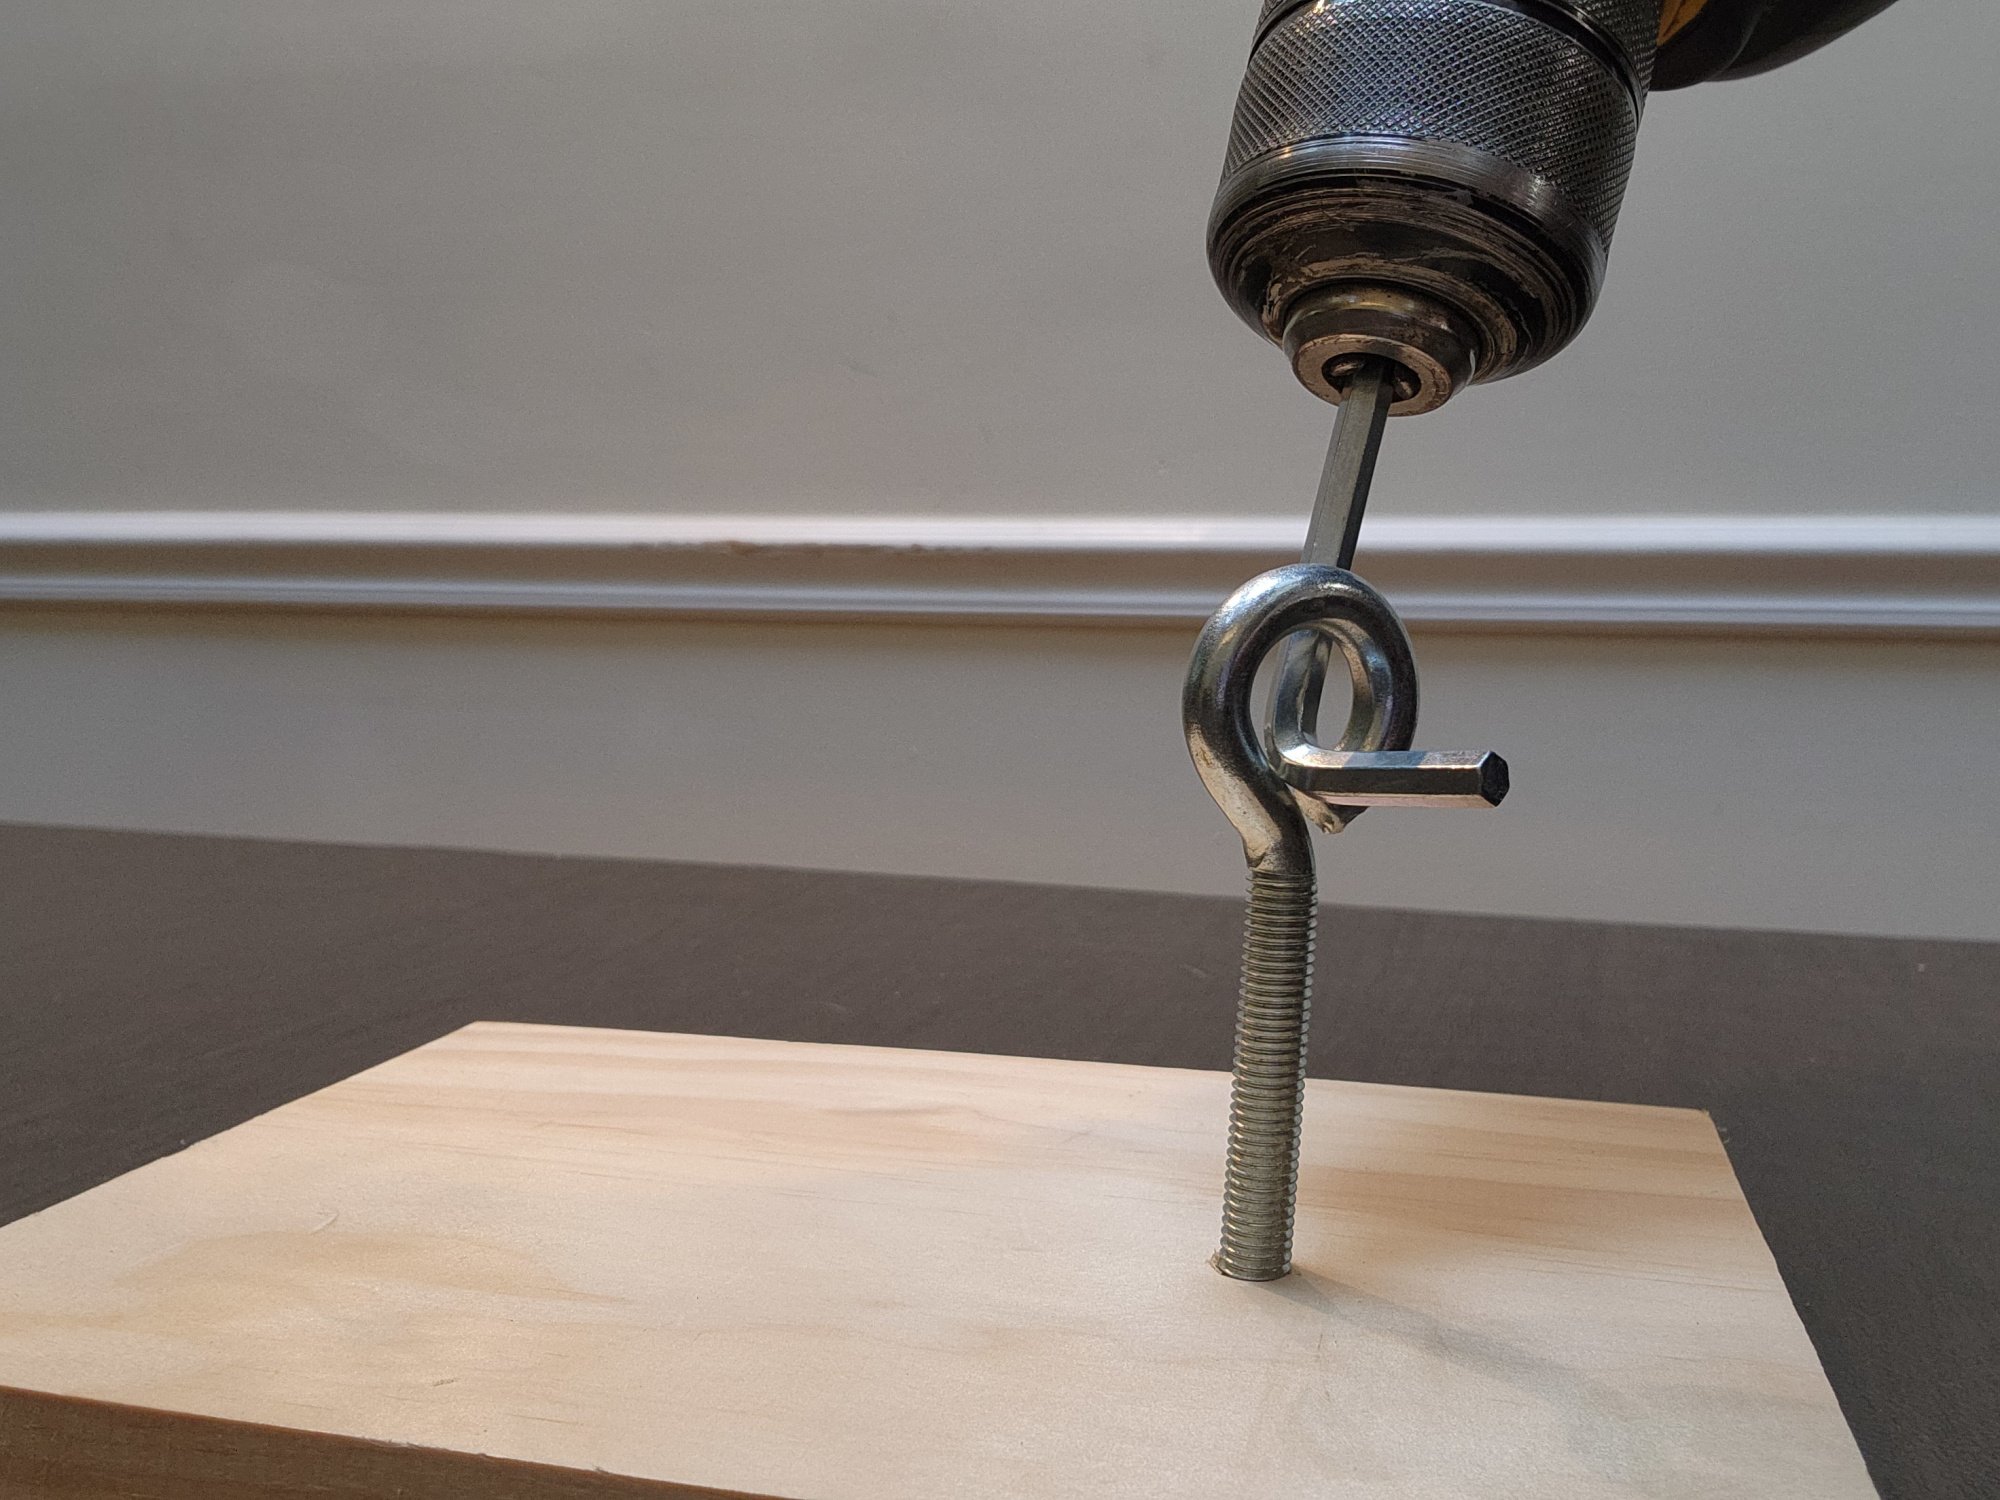
Stick an Allen wrench into your drill

Power drill and Allen wrench being used to extract eyehook
Credit: Jeff Somers

Eye hooks serve a wide range of uses, but if you’ve ever had to drive a bunch of them into wood, you know how frustrating they can be. The usual move is to either slip a screwdriver through the hook and twist, which is slow and awkward, or to clamp a wrench or pair of pliers on top and twist, which is…also slow and awkward.

This works better: Place an Allen wrench in your power drill’s chuck, slide the end of the wrench into the eyehook, and let the drill do the work. It’s faster, it saves your elbows and wrists the strain, and you’ll wonder why you never thought of it before.

Use a shop vac to inject wood glue

Wood glue can be a lifesaver when you have a damaged piece of lumber—but only if you can actually get the glue inside the crack. If you’ve ever tried, you know that you wind up with glue smeared everywhere, but only a small amount seeps into the crack, leading to a pretty quick failure.

By combining a shop vac with your gluing efforts, you can make this much more effective. Position the shop vac up close against one end of the crack and turn it on. Then apply the glue from the other end, moving toward the shop vac. The suction will pull the glue into the crack, filling it up and resulting in a stronger bond.

Use a sander to clean your putty knives

Orbital sander cleaning knife
Credit: Jeff Somers

Drywall knives and putty knives can develop a thick, lumpy buildup of drywall mud, paint, and anything else they’re used to scrape. Eventually, they’re almost useless because their flat surface has developed its own topography.

You can try cleaning them, but water will rust them and it’s often a laborious process, especially if they’re covered in cement or thinset. If you’ve got an orbital sander, however, cleaning your putty knives and drywall knives is pretty easy. Using a moderate grit (120 works well) pad, just sand down your blade with gentle pressure—don’t overdo it; just let the sandpaper do its work. You’ll have shiny, clean blades in no time.

Use a carpenter’s square and a chalk line as a makeshift level

Getting things level is surprisingly challenging—at least for me. I can measure things five times and still somehow wind up slightly off. That makes a spirit level an essential part of my toolbox for any project (and even then, I am level-challenged, somehow).

If I forget my level, I’m in trouble—unless I happen to have a carpenter’s square and a chalk line. Place the bottom of the square on the surface you’re checking, and loop your chalk line over the top at the 90° mark so it dangles down. Then adjust until the line is directly over the 45° mark on the bottom. That’s means it’s level.

Use a screwdriver and hammer to remove stubborn nails

Hammer and screwdriver extracting nail
Credit: Jeff Somers

Trying to remove a stuck nail can be an entire project in itself. Your progress freezes while you sweat and strain, and eventually you start to damage the surface as your attempts to pull that nail get wilder and more violent.

To protect a surface you don’t want to damage and give yourself a little extra leverage on the nail, place a screwdriver under your hammer. This will give your pull a little more oomph while stopping your hammer from gouging the surface beneath.

Use a vise grip with a putty knife to remove a headless nail

Got a stubborn nail and don’t have your hammer or prybar? Or dealing with a nail that’s lost its head? You can get it free with the help of a vise grip and a putty knife. Lock the vise grip onto the nail and slide a putty knife onto the surface behind the nail. Rotate the vise grips like a lever, and the nail will slowly pull free, while the putty knife blade protects the surface underneath from damage.

Combine a wrench or pliers and a screwdriver for more torque

Screwdriver and pliers extracting screw
Credit: Jeff Somers

When dealing with a screw that seems to be frozen in place, your hand screwdriver often can’t deliver enough torque, and using a power drill with a screwdriver bit is often overkill, stripping the screw in no time. To increase the torque your screwdriver can provide, combine it with a wrench or pair of adjustable pliers. Lock the pliers onto the screwdriver at a 90° angle, push down, and turn with the plier handles. Even the most stubborn screws will work themselves free.

Use locking pliers and a flat prybar to remove nails

Another way to tackle a nail that just won’t work itself free (or that’s lost its head) is to combine a vise grip and a flat prybar. Lock the grips onto the top of the nail to act as the head, then angle the prybar underneath and apply pressure. You can also slide a putty knife under the prybar blade if you want to protect the surface you’re extracting the nail from.

Use a hammer and driver bit to remove painted over screws

Hammer and drill bit cleaning screw head
Credit: Jeff Somers

When I used to rent, I was always infuriated by the “landlord special” repairs that covered screw heads with multiple layers of paint, often to the extent that I couldn’t get a screwdriver or bit to bite. That meant a lot of slow effort scraping paint out of the grooves until I got them clean enough to extract.

Instead of doing that, combine a hammer and a screwdriver bit: position the bit on the screw head and give it some solid taps with the hammer. The crusted paint will fall right out, and you can get on with your work.

Use an adjustable wrench to find the right drill bit

How much time do you think you’ve wasted trying to eyeball a drill bit when driving bolts? You estimate the bit size, you drill the hole—nope, too small. So you grab the next-largest bit and do it again. Or, worse, you estimate the drill bit and the hole is too big, and now you’ve got a problem.

If you’ve got an adjustable wrench, spare yourself the drama. Tighten the jaws of the wrench onto the bolt, then see which drill bit matches the wrench’s opening. You’ll never have to drill three times for one bolt ever again.