Meta Reportedly Set to Raise VR Headset Prices, Keep Existing Devices in Market Longer

Meta appears to be planning to raise the price of its VR headsets moving forward, according to a recent internal memo, which company leaders hope will combat rising costs. Meta may also be retiring the Quest 3 and 3S line a little later than expected.

The News

As reported by Business Insider, a December 4th memo from metaverse leaders Gabriel Aul and Ryan Cairns notified employees that Meta has “made a shift” in its VR efforts which could include price increases to combat costs associated with tariffs, as well as keep existing hardware in the market for longer.

“Our devices will be more premium in price going forward, but we’ll have a healthier business to anchor on and free ourselves from feeling existential about any singular device’s success,” Aul and Cairns’ memo reads.

The memo, which thus far has only been viewed by Business Insider, also includes a call for high-quality software experiences meant to match the “excellence” of its devices. Additionally, Aul and Cairns’ said Meta will “ship new hardware at a slower cadence going forward.”

“We’re committed to VR for the long-haul so we need to align our business model and roadmap to an approach that will make this possible,” the memo says. “We’ve been working hard to bend the curve and accelerate ahead of the category’s natural growth rate, which means running multiple programs in parallel as well as carrying costs like tariffs and subsidies for content, GTM, and devices.”

Notably, the memo also included info on a critical delay of a puck-tethered XR headset, and a new Quest headset which is set to be a “large upgrade” in capabilities from current devices, and will “significantly improve unit economics.”

Meta currently sells Quest 3, starting at $500, and Quest 3S, starting at $300—the latter of which is currently on sale for $250.

My Take

Meta regularly subsidizes Quest in an effort to recoup on software sales, making them technically cheaper than they might otherwise be. It’s a strategy console platform creators have been doing for ages, and it certainly works at getting people through the door.

But now, it seems we’re headed for another rough patch that Meta needs to navigate if it wants to continue its role as the holder of the most popular VR platform. And above all, I’m curious how Meta will keep serving the entry level user while pushing prices higher. It’s basically stemmed the flow of cash to third-party studios, making platform exclusives few and far between nowadays. And competition is coming from both sides: Google’s Android XR represents a threat to the low end, and Valve’s Steam Frame on the enthusiast end of things.

While the memo said the next Quest will “significantly improve unit economics,” I’m afraid that doesn’t really mean much since it didn’t come with a supporting statement. Relative to what? Previous pricing estimations? Current prices?

Anyway, Meta could hike prices in a number of ways we’ll be watching out for in the coming year: Quest 3 may get a price bump over its regular $500 MSRP, leaving Quest 3S at the low end. This could keep the flow of new users coming at the regular pace, while effectively only “taxing” users looking for the technically better headset.

Quest 3S (left), Quest 3 (right) | Images courtesy Meta

Then again, both headsets may see a modest price bump, which is then teased down in successive sales periods, like it did with Quest 2 when that one was hiked from $300 to $400 following supply chain shock stemming from the COVID-19 pandemic. The company could also equally leave pricing the same, and only apply hikes on forthcoming devices.

Any which way, I’d expect Meta to attempt to soften price shock with included first-party games (even older ones) and possibly longer free memberships to Horizon+, its monthly game service.

And whatever the case, it’s pretty clear the Quest 3 platform is going to be around for a while, which means developers will need to keep it in mind even as Meta tries to push better hardware, which could include more powerful chipsets, higher pixel density displays, and stuff like built-in eye-tracking.

The post Meta Reportedly Set to Raise VR Headset Prices, Keep Existing Devices in Market Longer appeared first on Road to VR.

Opera Wants You To Pay $20 a Month For Its AI Browser

Opera has opened its AI-powered browser Neon to the public after a couple of months of testing, and anyone interested in trying it will need to pay $19.90 per month. The Norway-based company first unveiled Neon in May and launched it in early access to select users in October. Like Perplexity’s Comet, OpenAI’s Atlas, and The Browser Company’s Dia, Neon bakes an AI chatbot into its interface that can answer questions about pages, create mini apps and videos, and perform tasks. The browser uses your browsing history as context, so you can ask it to fetch details from a YouTube video you watched last week. The subscription also grants access to AI models including Gemini 3 Pro and GPT-5.1.


Read more of this story at Slashdot.

OpenAI signs deal to bring Disney characters to Sora and ChatGPT

It looks like Disney wasted no time delivering on CEO Bob Iger’s promise to bring AI-generated content to Disney+. On Thursday, the company announced the start of a three-year licensing agreement with OpenAI to bring more than 200 of its beloved characters, including those from Star Wars and Pixar, to the Sora app and ChatGPT. With the deal in place, OpenAI users will be able to prompt ChatGPT to generate images that tap into Disney’s intellectual property, with costumes, props, vehicles and environments covered.

The agreement does not cover voices or “talent likenesses.” On paper, that should mean Sora users won’t be able prompt the app to make a video with Black Widow and get something with Scarlett Johansson likeness in it.

Developing…

This article originally appeared on Engadget at https://www.engadget.com/ai/openai-signs-deal-to-bring-disney-characters-to-sora-and-chatgpt-144344820.html?src=rss

Oracle shares slide on $15B increase in data center spending

Oracle stock dropped after it reported disappointing revenues on Wednesday alongside a $15 billion increase in its planned spending on data centers this year to serve artificial intelligence groups.

Shares in Larry Ellison’s database company fell 11 percent in pre-market trading on Thursday after it reported revenues of $16.1 billion in the last quarter, up 14 percent from the previous year, but below analysts’ estimates.

Oracle raised its forecast for capital expenditure this financial year by more than 40 percent to $50 billion. The outlay, largely directed to building data centers, climbed to $12 billion in the quarter, above expectations of $8.4 billion.

Read full article

Comments

I Tried Photoshop in ChatGPT, and It Went Better Than I Expected

Generative AI tools continue to improve in terms of their photo editing capabilities, and OpenAI’s latest upgrade brings Adobe Photoshop right inside your ChatGPT app window (alongside Adobe Acrobat for handling PDFs, and Adobe Express for graphic design). It’s available to everyone, for free—you just need a ChatGPT account and an Adobe account.

As per Adobe, the idea is to make “creativity accessible for everyone” by plugging Photoshop tools directly into ChatGPT. The desktop version of Photoshop already comes with plenty of generative AI features of its own, so this is AI layered on top of more AI—but is it actually useful?

How to get started with Photoshop inside ChatGPT

Adobe Photoshop, Adobe Express and Adobe Acrobat are available now inside ChatGPT on the desktop, on the web, and on iOS. At the time of writing, you can also get Adobe Express inside ChatGPT for Android, with Photoshop and Acrobat “coming soon.” To weigh the capabilities of the new integration, I tested it in a desktop web browser.

To get started, all you need to do is type “Photoshop” at the start of your prompt: ChatGPT should recognize what you’re trying to do, and select Adobe Photoshop as the tool to use for the next prompt. You’ll also need to click through a couple of confirmation dialog boxes, and connect an Adobe account (if you don’t have one, you can make one for free).

Photoshop in ChatGPT
You’ll need to connect ChatGPT to your Adobe account.
Credit: Lifehacker

With all the connections and logins completed, Photoshop is then added to the overflow menu in the prompt box, so just click on the + (plus) to select it. You can start describing what you want to happen using the same natural, conversational language you’d use for any other ChatGPT prompt. You do need to also upload an image or provide a public link to one—if you don’t do this before you submit your prompt, you’ll be asked to do it after.

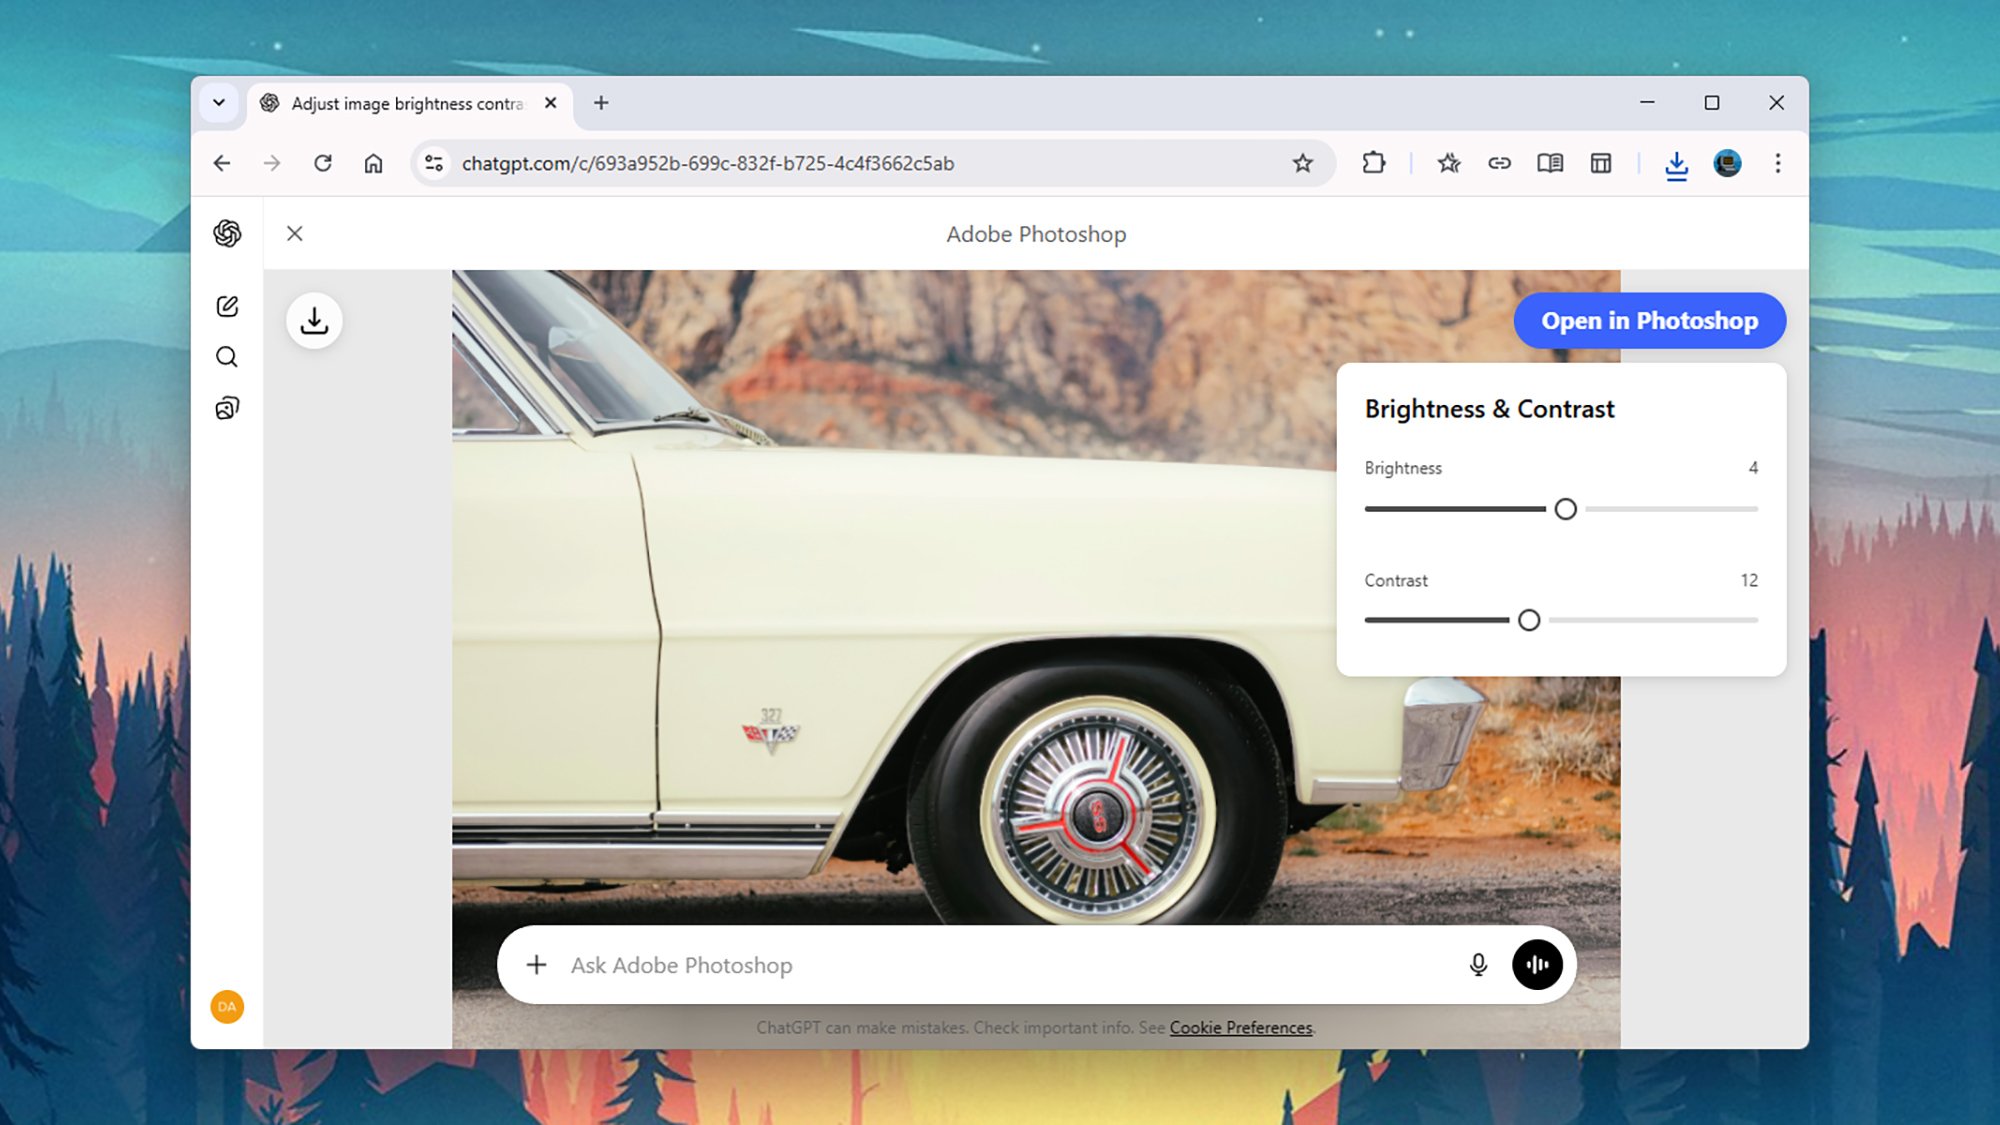
You don’t need to know the names of all the Photoshop tools: Just describe what you want to happen and the relevant tools will be selected for you. One example Adobe gives is using the prompt “make my image pop,” which brings up the Bloom, Grain, and Lens Distortion effects—and each one can be adjusted via sliders on screen. It’s actually quite simple to use.

Photoshop in ChatGPT
Simple adjustments can be made with on-screen sliders.
Credit: Lifehacker

If you do know the name of the tools you want, you can call them up by name, and the classic brightness and contrast sliders are a good place to start. You can either say something like “make the picture brighter” or “adjust the image brightness”—both will bring up an overlay you can use to make brightness adjustments, but if you use the former prompt, the image will already have been made a little brighter.

ChatGPT and Photoshop let you add edit upon edit as needed, and you can save the image at any stage. There’s also the option to open your processed file in the Photoshop web app whenever you like: This web app uses a freemium model, with advanced features requiring a subscription, and seems to be what the ChatGPT integration is largely based on.

What you can do with Adobe in ChatGPT

Adobe offers a handy ChatGPT prompts cheat sheet you can browse through, which gives you a good idea of what’s possible, and what you’re still going to need Photoshop proper for. Note that you can specify certain parts of the image to focus on (like “the face” or “the car”) but this depends on Photoshop-in-ChatGPT being able to correctly figure out where you want your selection to be. It needs to be pretty obvious and well delineated.

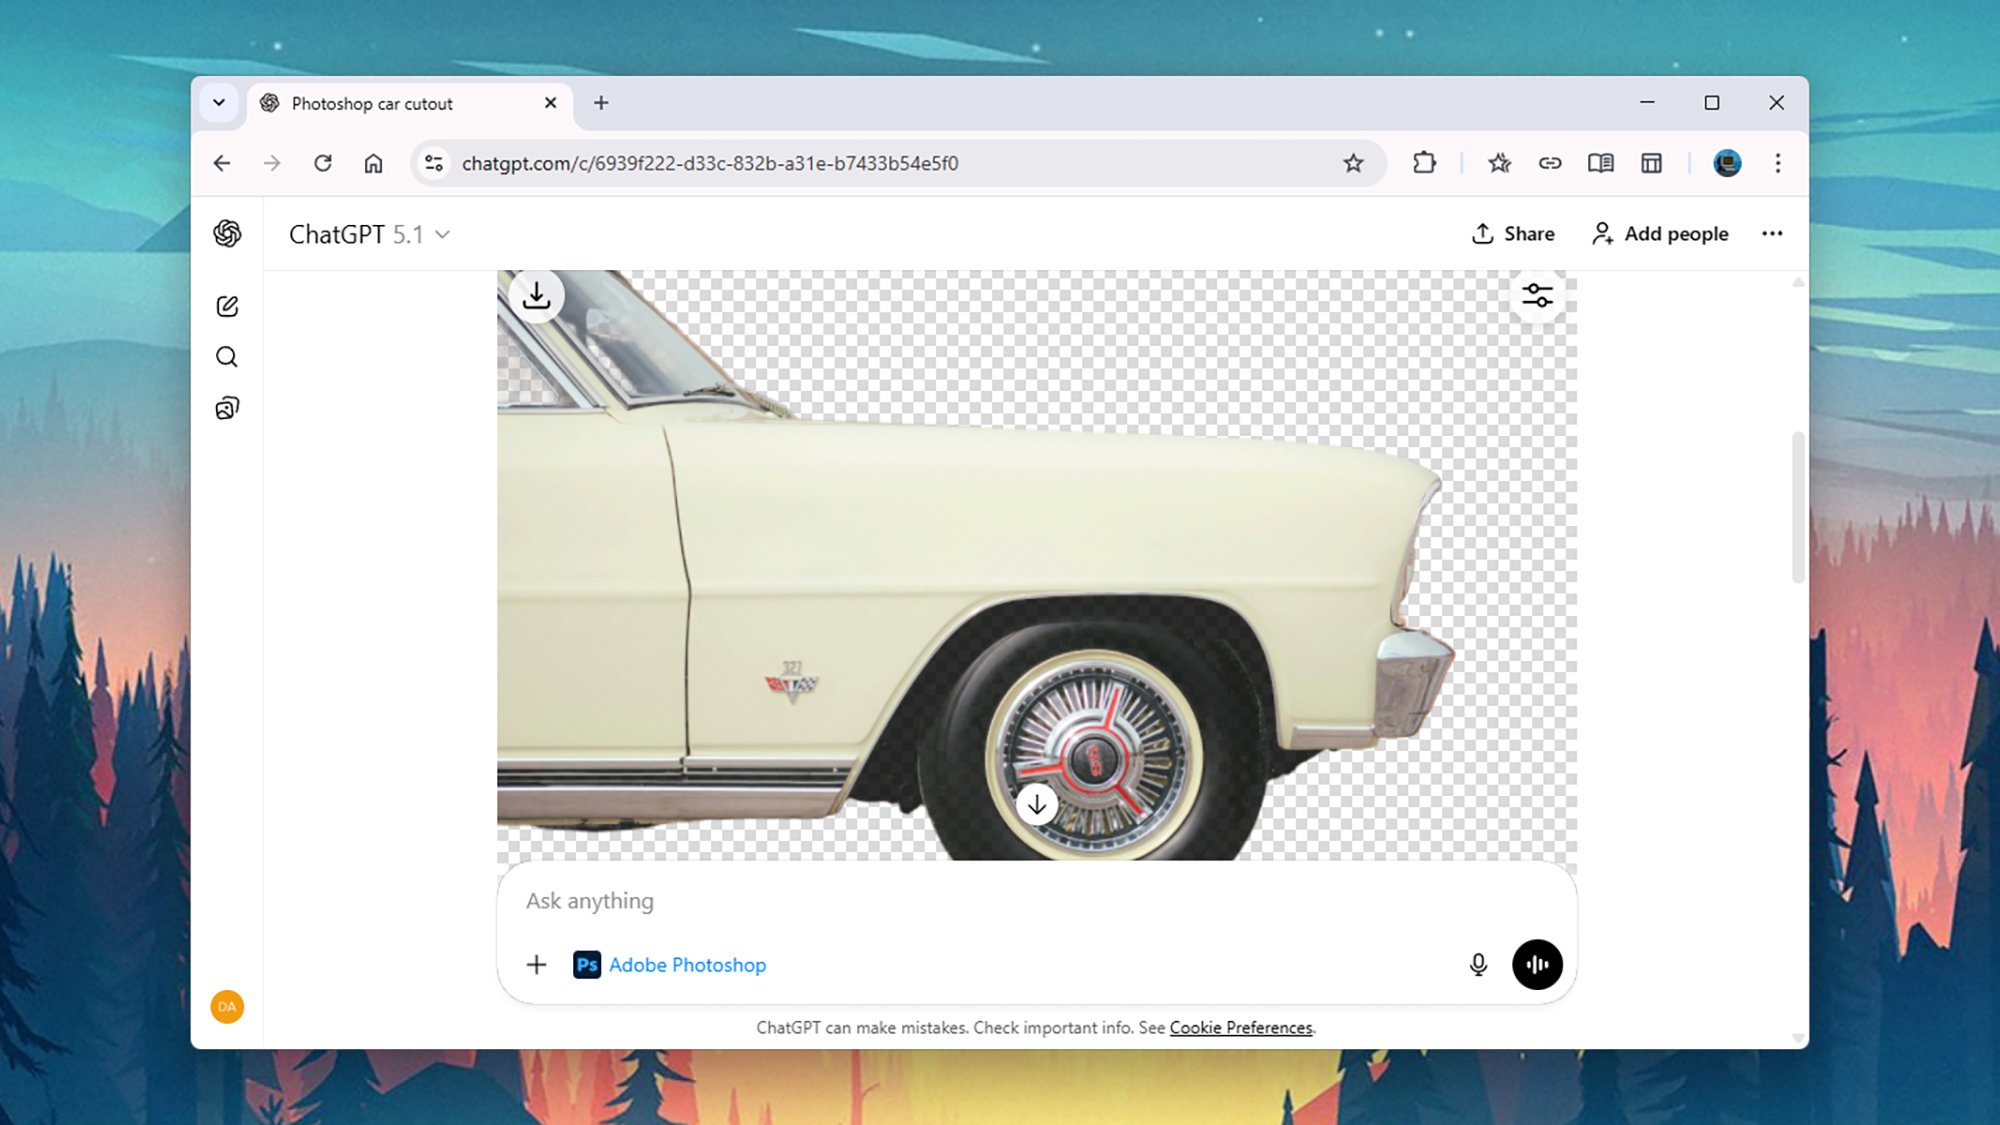
When I tried cutting out objects and removing backgrounds, this worked well—but then I had to turn to Photoshop on the web to actually drop in a different background. There’s no way to work with layers or masks here, and you can’t remove people or objects from photos, either. Sometimes, however, you do get a spool of “thinking” from ChatGPT about how it can’t do what the user is asking for.

Photoshop in ChatGPT
Cut-outs are one of the tricks you can do.
Credit: Lifehacker

I was able to apply some nice colorizations here, via prompts like “turn all the hues in this image to blue,” and I like the way ChatGPT will give you further instructions on how to get the effect you want. You can even say “show some examples” and it gives you a few presets to choose from—all of which can be adjusted via the sliders again.

The ability to run prompts like “turn this into an oil painting” or “turn this into a cartoon” are useful too, though the plug-in is limited by the effects available in Photoshop for the web: You’ll be directed to the closest effect and advised how to tweak it to get the look you want.

Actually, some of these effects work better in ChatGPT’s native image editor, which maybe explains why Adobe wanted to get involved here.

Photoshop in ChatGPT
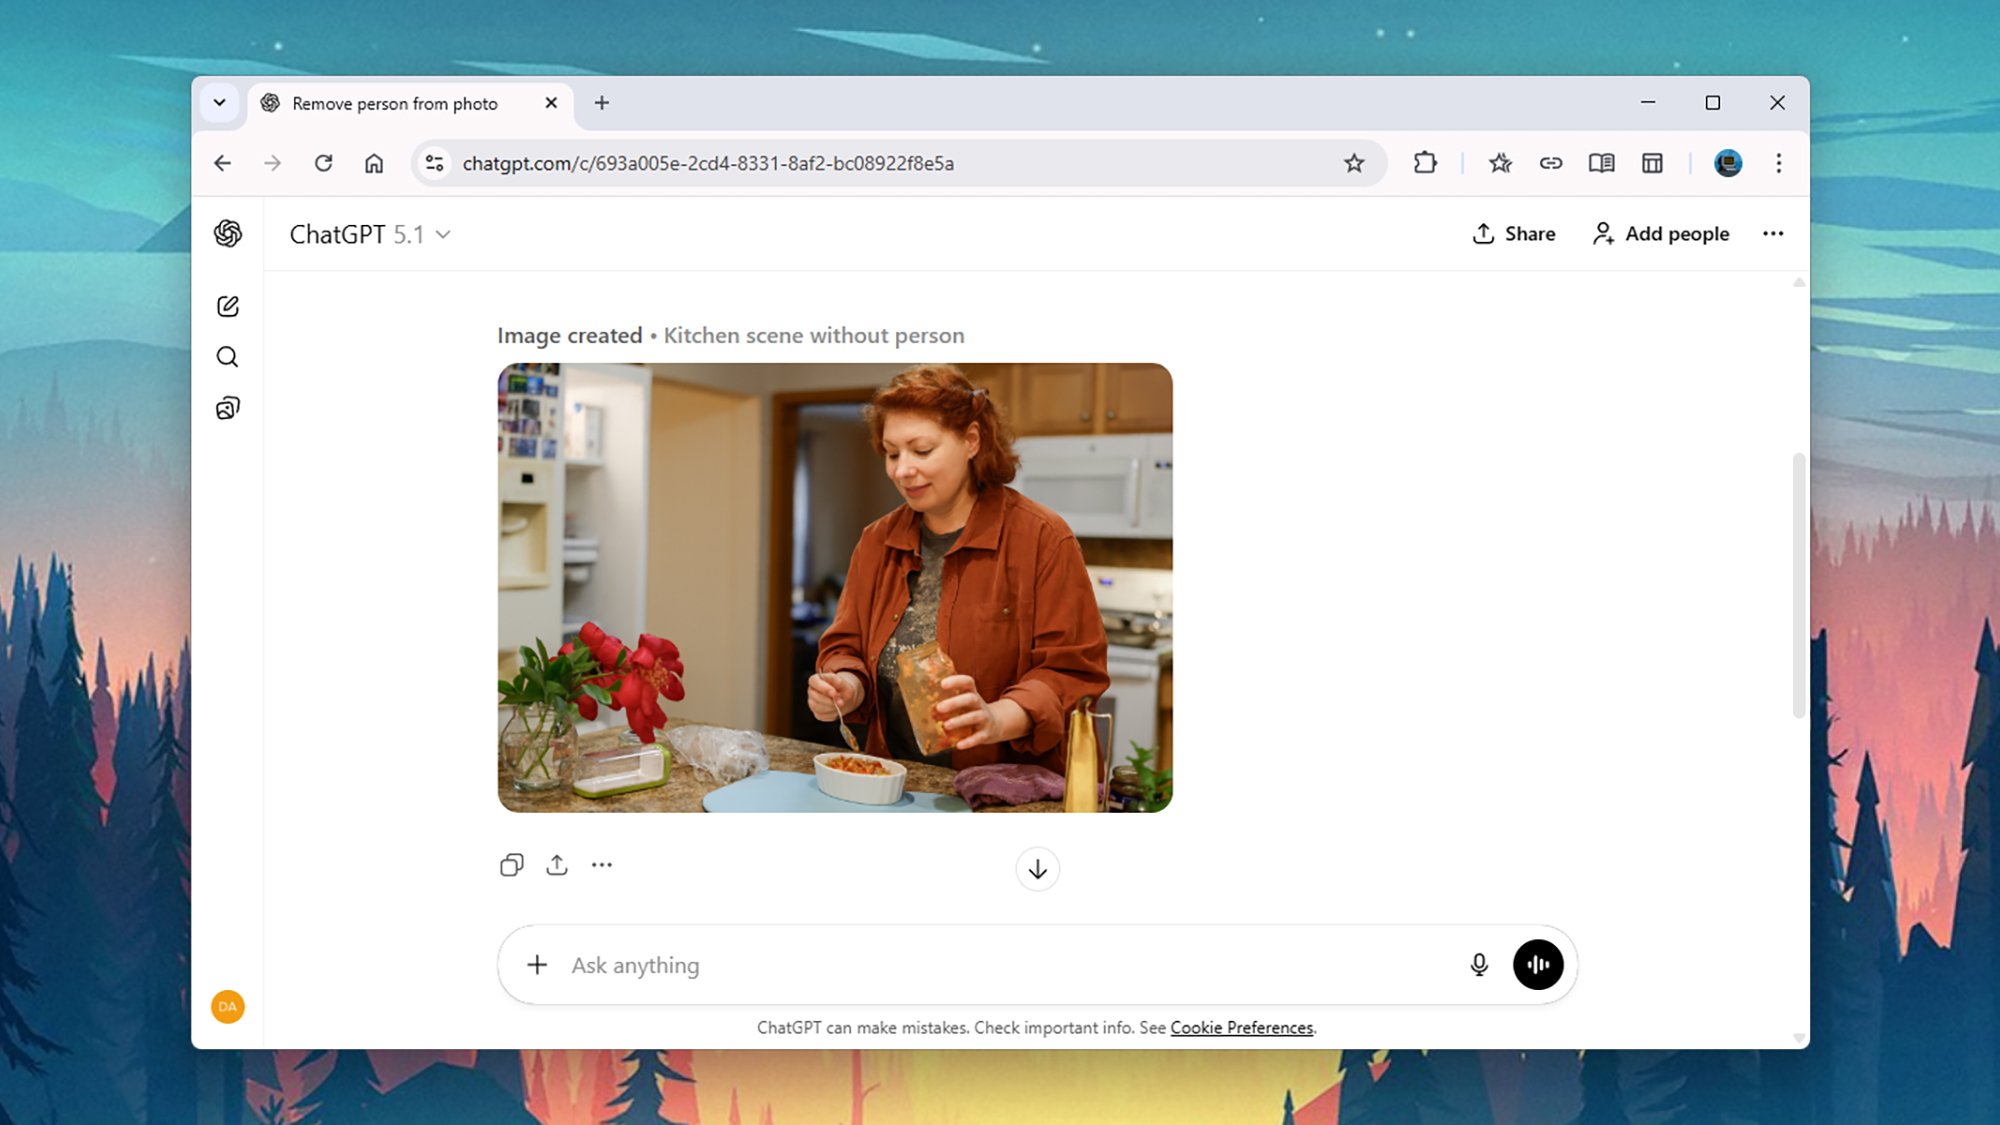
ChatGPT removed someone from this picture, no Photoshop required.
Credit: Lifehacker

If ChatGPT’s image manipulation gets good enough, then Photoshop is no longer going to be needed by a substantial number of users: ChatGPT can already remove people and objects from photos, for example, quite effectively. What it’s not quite as good at is some of the basic adjustments (like colors and contrast) that Adobe software has been managing for years.

For quick, basic edits you want to type out in natural language—especially where you want to adjust the edits manually and need advice on what to do next—Photoshop inside ChatGPT is a handy tool to be able to turn to, especially as it’s free. For serious edits, though, you’re still going to want to fire up the main Photoshop app, or maybe even shun Adobe altogether and make use of ChatGPT’s steadily improving editing tools.

ASUS ROG Strix 5K Fast IPS Gaming Monitor Has A Trick To Hit 330Hz

ASUS ROG Strix 5K Fast IPS Gaming Monitor Has A Trick To Hit 330Hz
ASUS is rolling out a new gaming monitor that will make your buddy’s 4K panel feel like old tech, especially if theirs is not a dual-mode display. The monitor in question is the ROG Strix 5K XG27JCG, and as the model designation implies, it sports a native 5K resolution (5120×2880). At that tier, even the fastest GPUs like the GeForce RTX

US Could Ask Foreign Tourists For Five-Year Social Media History Before Entry

Tourists from dozens of countries including the UK could be asked to provide a five-year social media history as a condition of entry to the United States, under a new proposal unveiled by American officials. From a report: The new condition would affect people from dozens of countries who are eligible to visit the US for 90 days without a visa, as long as they have filled out an Electronic System for Travel Authorization (ESTA) form. Since returning to the White House in January, President Donald Trump has moved to toughen US borders more generally – citing national security as a reason.

Analysts say the new plan could pose an obstacle to potential visitors, or harm their digital rights. Asked whether the proposal could lead to a steep drop-off in tourism to the US, Trump said he was not concerned. “No. We’re doing so well,” the president said on Wednesday. “We just want people to come over here, and safe. We want safety. We want security. We want to make sure we’re not letting the wrong people come enter our country.”


Read more of this story at Slashdot.

This Samsung Galaxy Smartwatch Is Nearly 50% Off Right Now

We may earn a commission from links on this page. Deal pricing and availability subject to change after time of publication.

The Samsung Galaxy Watch 7 just hit its lowest price yet at $129.99 (according to price trackers), down from its usual $249.99. If you already use a Samsung phone, this might be a good time to take a closer look.

This 40mm Bluetooth model keeps things simple but refined, with an aluminum body and a 1.3-inch OLED display that’s crisp and easy to read. It weighs only 1 ounce, and while not super slim, it doesn’t feel bulky on the wrist. It’s built to handle real-world use with an IP68 rating, 5ATM waterproofing, and MIL-STD-810H certification. That means it can survive dust, splashes, and some rough handling. Just don’t expect it to hold up during extreme activities, since Samsung reserves those upgrades for the Galaxy Watch Ultra.

Performance-wise, the Watch 7 gets a noticeable bump over the previous model. It runs Wear OS 5 with Samsung’s One UI 6 layered on top, which adds new tools like customizable widgets, photo editing, and built-in translation. The dual-frequency GPS tracks location more accurately than before, although this PCMag review notes that the watch can still be slightly off when logging runs or sleep. The screen is responsive, and gesture controls work well. The biggest limitation is battery life: With average use, you’ll get about 22 to 27 hours before needing a recharge. If you want all-day notifications and overnight sleep tracking, charging it daily will become part of the routine.

Where the Galaxy Watch 7 stands out is in its health and fitness tracking. You get the basics like heart rate, blood oxygen, ECG, and automatic workout detection. But it also adds body composition analysis, FDA-approved sleep apnea detection, and a new AI Energy Score that summarizes your fitness and sleep data into a single number. Some of the smarter features, like snore detection, only work if you have a Samsung phone nearby, which limits the experience for non-Samsung users. Still, at this new lower price, the Watch 7 offers strong value for Android users who want solid fitness tools in a durable, polished design. And if you’re considering the new Galaxy Watch 8, it’s worth checking out this side-by-side comparison by PCMag to see how much of an upgrade it really is.


Wario’s one and only 3D platformer is now playable on Switch 2

Nintendo has been slowly drip-feeding us GameCube games since the console joined its Nintendo Classics offering when the Switch 2 launched in June, and we just got another one. Switch Online + Expansion Pack subscribers can now play Wario’s one and only 3D platformer on the service.

Wario World launched in 2003 and was developed by Treasure (Gunstar Heroes, Ikaruga). You play as Wario, the flatulent antithesis of Nintendo’s primary mascot, in what is a combat-heavy platformer. Wario’s castle has been overthrown by an evil piece of sentient jewellery called Black Jewel, and it’s up to the garlic-loving antihero to punch and piledrive everything in sight in order to reclaim it.

Wario World was a relative commercial hit for Nintendo, but while many reviewers praised its chaotic gameplay, the game’s short length pulled the scores down. Interestingly, the same criticism was leveled at the similarly brief Luigi’s Mansion, which joined the Nintendo Classics app just ahead of Halloween.

Wario World becomes the seventh GameCube game that can be played on the Switch 2 via NSO. The service launched with The Legend of Zelda: The Wind Waker, F-Zero GX and Soulcalibur II. Since then Nintendo has added Super Mario Strikers, Chibi-Robo!, Luigi’s Mansion and now Wario World. The likes of Super Mario Sunshine and Fire Emblem: Path of Radiance will arrive at some point.

It’s been a good week for NSO subscribers who enjoy retro 3D platformers. Yesterday Nintendo announced that Rayman 2: The Great Escape and Tonic Trouble are coming to its N64 emulator on December 17.

This article originally appeared on Engadget at https://www.engadget.com/gaming/nintendo/warios-one-and-only-3d-platformer-is-now-playable-on-switch-2-133011950.html?src=rss

Use the ‘Five Whys’ to Get to the Root of Your Productivity Problems

Planning is a key part of staying productive, but it has to be done right. To succeed, you need to understand why previous attempts at planning didn’t pan out. Conducting a personal after-action review is one way to assess your work and determine how to be more efficient, but to truly understand what went wrong and prepare for the future, you need to dig deep. Try the “Five Whys” technique to get to the bottom of things. 

What is the “Five Whys” technique?

You should know, first of all, that this is yet another productivity protocol that springs from Japan’s famed factory system, like the 5S and 3M techniques. With this one, once you identify a problem, you’re going to ask, “Why?” five times, which will ultimately reveal the true root cause of the issue—and what you need to focus on fixing. 

How to use “Five Whys” for problem solving

Some variations of the technique call on you to assemble a team for brainstorming before doing this, but if you’re assessing a personal issue, that part isn’t necessary. Your “team” can be the people posting on forums about the problem, for instance, or a group chat with your friends. If the issue is a household one, chat with your family. This doesn’t have to be super formal, but if the problem is one related to work and you do have coworkers involved, bring them into the discussion. In some cases, there may be no team at all—but that doesn’t mean you can’t use the Five Whys.

Whether you’re consulting a team or not, the real work begins when you define the problem. State it clearly and concisely. Ideally, write it down. Let’s say the problem is you didn’t get the dining room clean in time for dinner, so everyone had to eat at the counter. Simplify that to, “I didn’t clean the dining room on time.”

Next, ask, “Why?” Write down the answer—maybe it’s “I had to take a phone call from work.” 

Ask, “Why?” Write down the answer and ask again. Then again, again, and again, until you’ve asked five times. So, your paper might look like this: I didn’t get the dining room clean > I had to take a phone call from work > I didn’t finish the reports my boss wanted > I didn’t have the data I needed from the sales department > The sales department was not aware of my deadline. 

When you’re finished digging into the problem, you can see how the answer to the last “Why?” caused a domino effect that led to the original issue. Fixing these more granular problems will ultimately help prevent bigger ones. So, in this case, write down, “I will communicate deadlines and needs with other departments at work early on when working on a project.” The next time you have a project to do, when you’re planning out your to-dos around it, be sure to include, “Communicate with the sales department about the deadline for the data.” 

There are plenty of productivity and scheduling apps that call on you to break your larger tasks down into smaller ones, like ABCDE or turning your responsibilities into “bites,” and it’s likely that the solution to your fifth Why will be something small enough to easily slot into one of those. Make sure you prioritize whatever that small step is, however. Use an approach like the MIT technique to prioritize your to-dos around their impact on your life. In this case, letting the sales team know about your deadline is a small task with a big impact, as it could have cleared the way for you to clean the dining room and enjoy a nice meal with your family.

Bear in mind that root causes aren’t always evident after five rounds of “Why?” For instance, maybe it’s not your job to communicate your deadline to the sales department. Maybe the person who was supposed to do that messed up or the people on that team didn’t check their emails. In that case, overhauling your protocols at work might be the answer. The “Five Whys” aren’t concrete; they’re a way to change your thinking around problems so you can easily identify their root causes and address those. Once you get in the habit of asking why and working backward, you’ll be able to do this quickly and alter your future plans more efficiently. 

Google’s Gemini AI comes to Chrome on iPhone and iPad

After rolling it out on desktop and Android earlier in 2025, Google is finally bringing its built-in Gemini AI experience to iPhone and iPad. It offers new features like summarizing pages and helping you test your knowledge about a subject you’re learning. As with any AI tool, though, it shouldn’t be trusted for anything important given the possibility of hallucinations and other errors. 

When it arrives on your iOS device, tapping the spark icon at the left of the address bar (in place of the Google Lens camera) brings up a “Pages tool” that offers Lens and the new feature, “Ask Gemini.” You can then chat with Gemini about the current web page (by default) or any other topic. It may then offer suggestions that appear in the chat box like: 

  • Summarize page: Tap to get key takeaways and insights that help you understand any topic.

  • Create FAQ about this topic: Tap to get FAQs based on info from this page and similar sites.

If you elect to just type in the chat window, here are some examples of what you can do:

  • Summarize key takeaways from an article

  • Explain a complex topic in a different way

  • Help you test your knowledge of a new subject you’re learning

  • Modify a recipe to meet dietary needs

  • Compare information or make recommendations based on your preferences

The response to your chat questions will float over the web page that then shifts to the background. A new chat can be started from the top right corner, and you’ll see a Liquid Glass overflow menu. 

For now, Gemini in Chrome on iPhone and iPad is only supported in the US with the browser language set to English. You need to be signed into Chrome and the feature doesn’t work in incognito mode. Google also noted that the feature is only available to users 18 and older and may not roll out to your device immediately. 

This article originally appeared on Engadget at https://www.engadget.com/ai/googles-gemini-ai-comes-to-chrome-on-iphone-and-ipad-130003432.html?src=rss

Use the ‘168-Hour Method’ to Track Your Weekly Productivity

We may earn a commission from links on this page.

Many years ago, I saw a tweet go around that said something like, “You have the same amount of hours in a day as Beyoncé.” On the one hand, that was annoying, because while it’s true, I don’t have the same amount of resources. Still, yes, everyone has the same amount of hours in a day—point made.

But as it turns out, what may be more important thing to understand is that we all have the same amount of hours in a week. That’s the basis for the “168 method,” so named for the number of hours in a week. This productivity technique calls on you to expand your thinking around how much time you really have to get everything done, and act accordingly.

What is the 168 method? 

This idea comes from Laura Vanderkam, author of 168 Hours: You Have More Time Than You Think. (Straightforward!) This is one of the few productivity books I recommend, because its premise is actually novel and actionable. The guiding point of the book is that when you think of your time in longer spans, like a week, you realize you have plenty of it and can get things done pretty easily. When you consider an average day, by comparison, you may come to the conclusion you don’t have enough time to do everything you need to do, so you’ll either make excuses or sacrifices, neither of which are helpful in getting it all taken care of. 

When you start thinking about your time on a bigger scale, you can stop letting the daily grind wear you down and breathe a little easier with the knowledge that you actually have a bunch of hours to work with. You can make a longer-term plan, expanding your timelines ever so slightly without giving yourself too much time to take on a given project (which is also a bad thing that can derail productivity).

How to use the 168 method to get more done

Your first task here is to start tracking your time, and I mean militantly. You can use a time tracking software, calendar or scheduling software, a planner, or a regular old spreadsheet, but you have to be diligent and you have to be honest. For at least a week, mark down everything you did and the time it took you to do it, for the full 24 hours of each of the seven days. That includes sleeping, loafing, working, showering, commuting—everything. Be detailed, too. Don’t just mark down “working” from 9 a.m, to 5 p.m. List out the tasks you worked on and for how long, the breaks you took and what you did, and any extra work you did outside of those hours. 

At the end of the week (or two or three weeks, if you’re feeling particularly serious), assess the data by conducting an objective after-action review. Did you need to spend two hours answering emails on Tuesday, or could it have been done in half an hour? What were the distractions that dragged that out? Did you spend as much time on a hobby as you wanted to? If not, when could it have fit in? Maybe Thursday night, when you were scrolling social media? And how did that scrolling make you feel? Was it a necessary moment of unwinding, or would you have felt more accomplished if you’d headed to the gym? (Don’t be too quick to write off your downtime, though, as breaks are also integral to productivity.)

Your answers to these questions will be subjective. There’s nothing inherently wrong with chilling out and doing nothing, or sleeping in, or even dragging your feet on a task. But by laying out a clear, visual schedule showing everything you did (and didn’t do), you can see exactly where, within that 168 hours, you could have done something else. You can then use this data to better plan your future to-do lists and activities. If you know you have some extra time on Wednesday nights, maybe that’s when you should practice the piano or clean the kitchen. If you know you’re taking more time than you need to on compiling inventories at work, cut that down and use the extra minutes for another task. The value in this method isn’t in shaming yourself about how you allocate your time, but in broadening your understanding of that time into a full week, where you almost certainly will find you have unaccounted-for hours that can be put toward the things you didn’t think you had time to do. 

I’m not saying you’ll emerge from this journey on the same level as Beyoncé, but you’ll be on a better level than you were before, which is a start. 

New OpenAI Models Likely Pose ‘High’ Cybersecurity Risk, Company Says

An anonymous reader quotes a report from Axios: OpenAI says the cyber capabilities of its frontier AI models are accelerating and warns Wednesday that upcoming models are likely to pose a “high” risk, according to a report shared first with Axios. The models’ growing capabilities could significantly expand the number of people able to carry out cyberattacks. OpenAI said it has already seen a significant increase in capabilities in recent releases, particularly as models are able to operate longer autonomously, paving the way for brute force attacks.

The company notes that GPT-5 scored a 27% on a capture-the-flag exercise in August, GPT-5.1-Codex-Max was able to score 76% last month. “We expect that upcoming AI models will continue on this trajectory,” the company says in the report. “In preparation, we are planning and evaluating as though each new model could reach ‘high’ levels of cybersecurity capability as measured by our Preparedness Framework.” “High” is the second-highest level, below the “critical” level at which models are unsafe to be released publicly. “What I would explicitly call out as the forcing function for this is the model’s ability to work for extended periods of time,” said OpenAI’s Fouad Matin.


Read more of this story at Slashdot.

How the Race Was Lost: Maxing Out the VO2 Max (Empire Elevation)

This week, ZRL racers headed back to New York for the final race of round 2. It was a scratch hosted on the new Empire Elevation route, and my team (Coalition Delusion) was tied for 1st place in the B1 Development Lime division. It all came down to this!

Planning and Warmup

As usual, my team was chatting on Discord in the days leading up to the race, deciding how best to ride the course. We found ourselves in a difficult spot. Sure, we were tied for 1st. But we were up against team TSE, whose strength was climbing. (Ours is not.)

We searched high and low for a brilliant race strategy to secure the overall win, but found nothing. Our conclusion? Teamate David said it well: “I think there is only one tactic for this and it’s go into the KOM with as much energy as you can and try to empty yourself on that climb.”

I’d scouted the KOM to write the week’s race guide, but that wouldn’t make it any easier. I knew I was facing an all-out 5-minute effort on some steep slopes, so I pulled the Specialized Aethos out of the garage (level 3 upgraded, good enough), fitted with the fancy new ENVE 4.5 PRO wheels.

With a whiff of PR Lotion and mint MEG gum in my nostrils, I started my warmup, putting in a few good digs and chatting about Zwift with other riders as I woke up the heart and legs. Soon enough, it was time to sign into Discord and join the start pen. Let’s race!

The Easy Part

The Empire Elevation route was brand-new, created for this specific race, and I’d never ridden it. But that didn’t mean it was unfamiliar. I’d ridden all of its roads multiple times via other routes, so I had a pretty good idea how this would play out as a scratch race.

Simply put: it would be quite easy for the first 24km. Then the KOM finish would be an all-out ~5-minute effort.

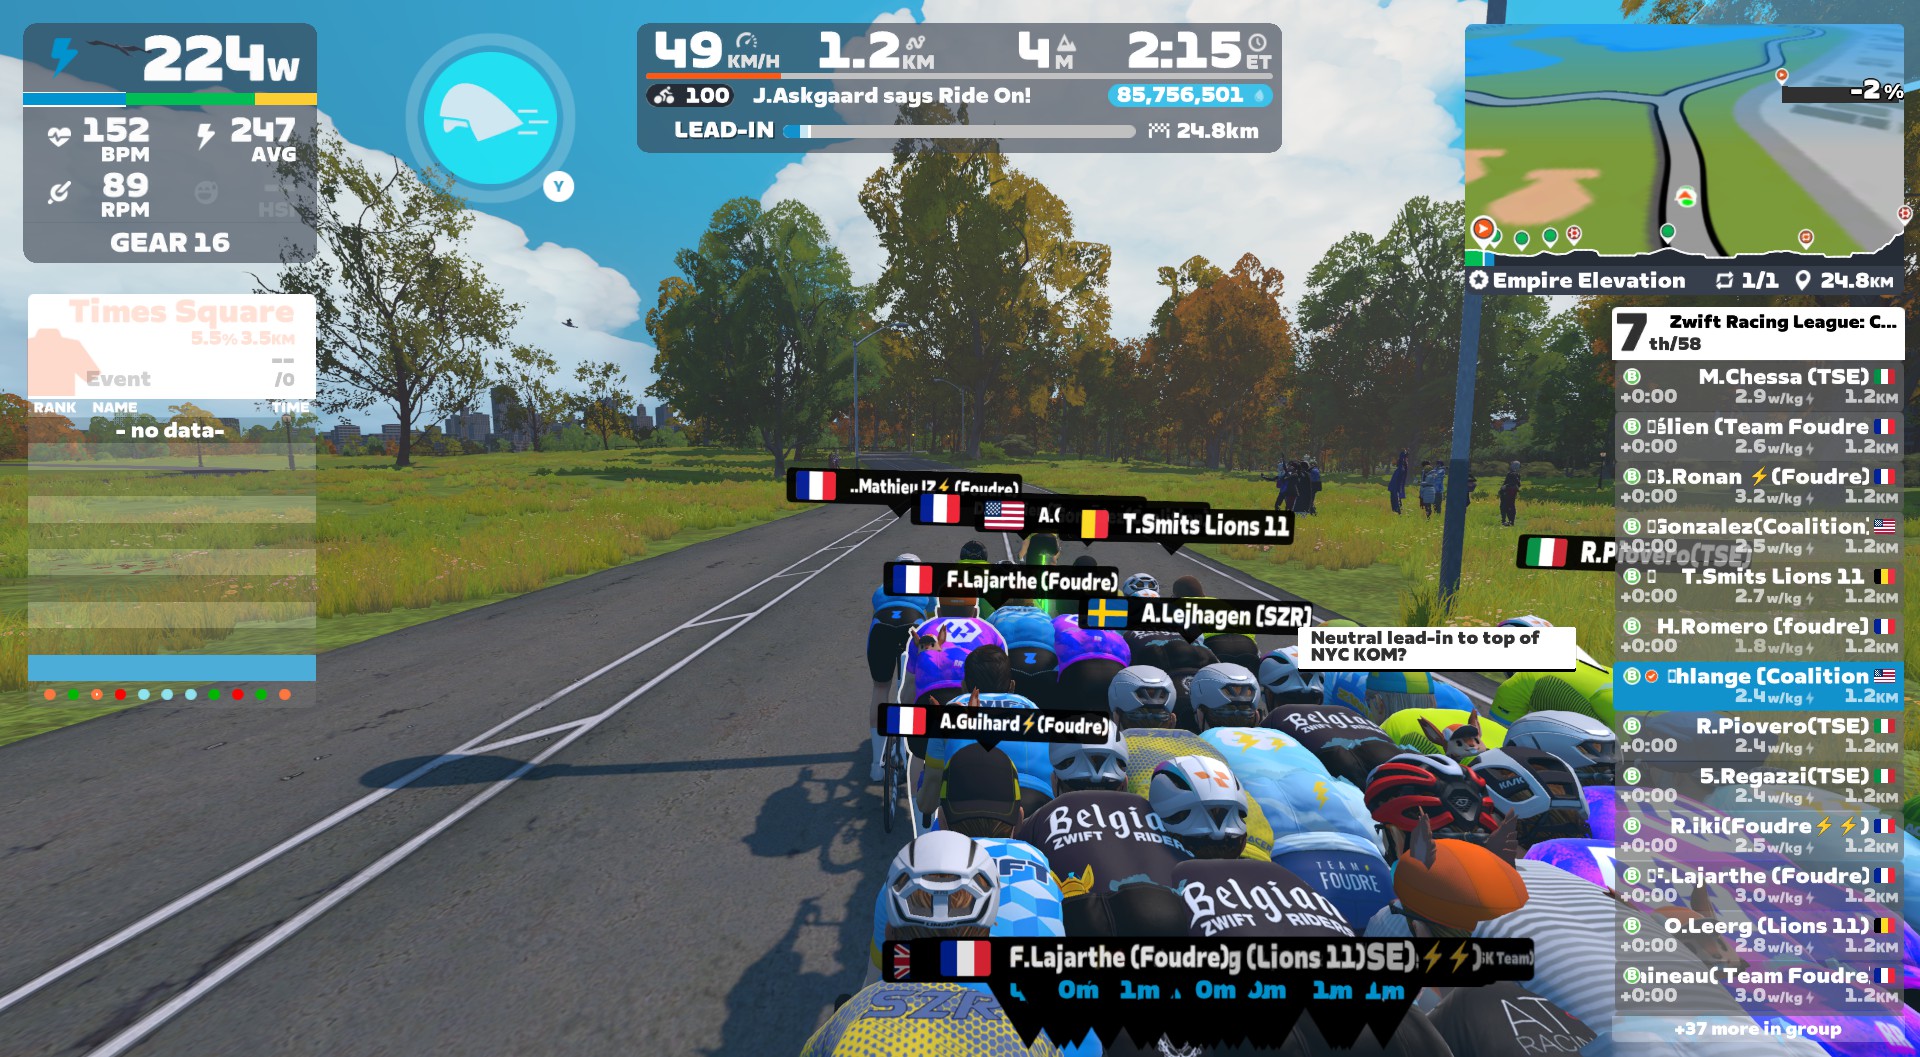
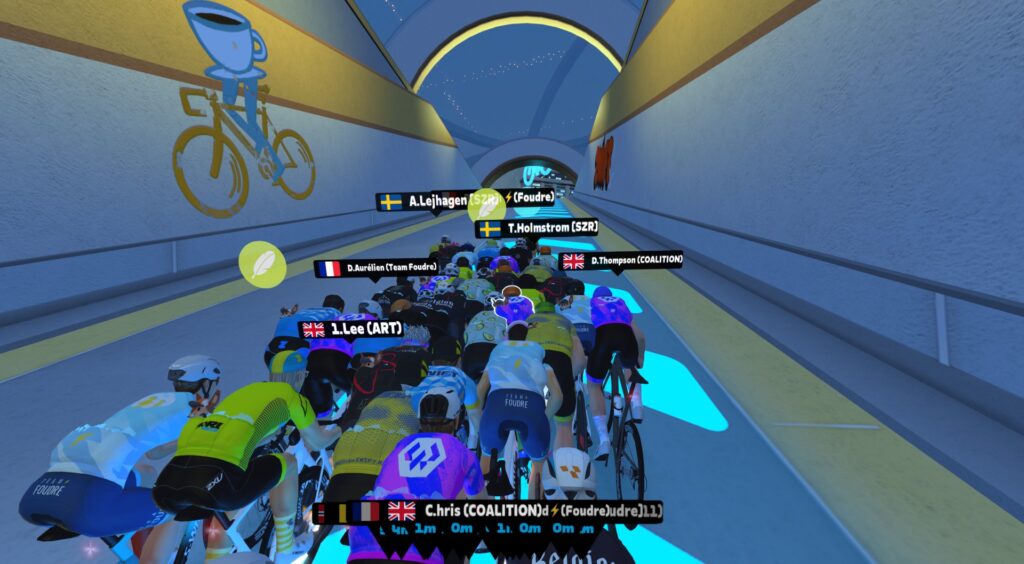
It played out as expected. Sure, some digs were required whenever the road tilted upward, including those pesky escalators. But the pace was never truly “high.” My heart rate sat firmly in the tempo zone, and I sat firmly in the draft.

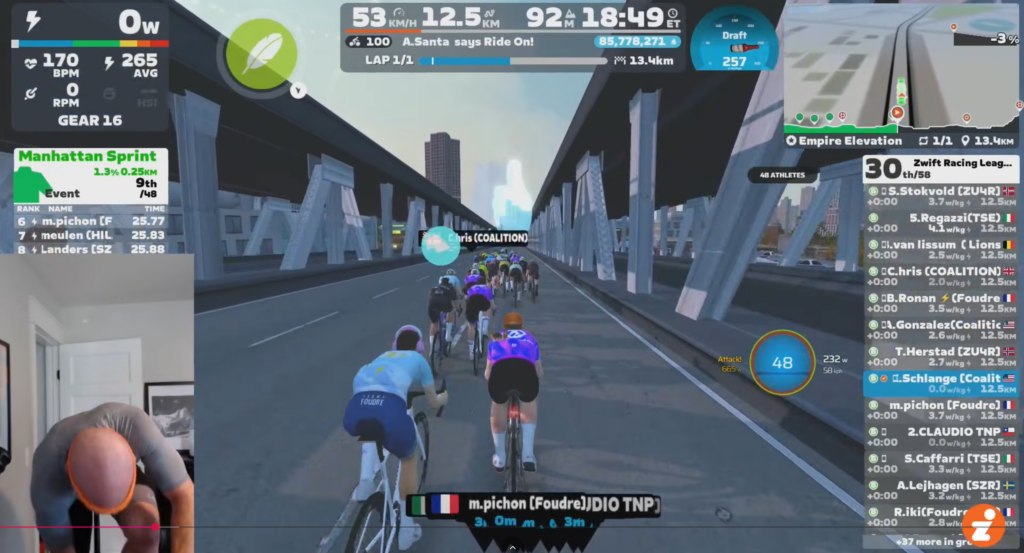
Fastening my Boa while coasting down the bridge…

There was just one snafu: I somehow neglected to fasten the upper Boa on my left shoe, and didn’t notice it until the race was underway! So I pedaled with a loose shoe until the Manhattan Bridge descent 12km in, where I managed to stop pedaling and fix it while sliding backward through the pack:

Here’s something a bit crazy, which also speaks to how easy the first bit of this course was: we didn’t lose a single rider from the starting pack of 48 in the lead-in to the final climb. When was the last time you did a ZRL race where nobody was dropped in the first 24km?

The Hard Part

35 minutes into the race, we hung a right onto the glass road of the NY KOM, and the “fun” began.

Someone on Discord said, “Last 6 minutes of the round, so lay it on the road.” Exactly right (except it would be closer to 5 minutes). I steeled myself mentally and began to push. Time to empty the tank.

I stayed close to the front on the first and second of the four ramps, and still had a feather in my pocket with 1km to go. Then we hit the “main” ramp, and the pack began to stretch out ahead. I triggered the feather and kept hammering, riding on that razor’s edge between easing and losing places or pushing harder and blowing up in spectacular fashion.

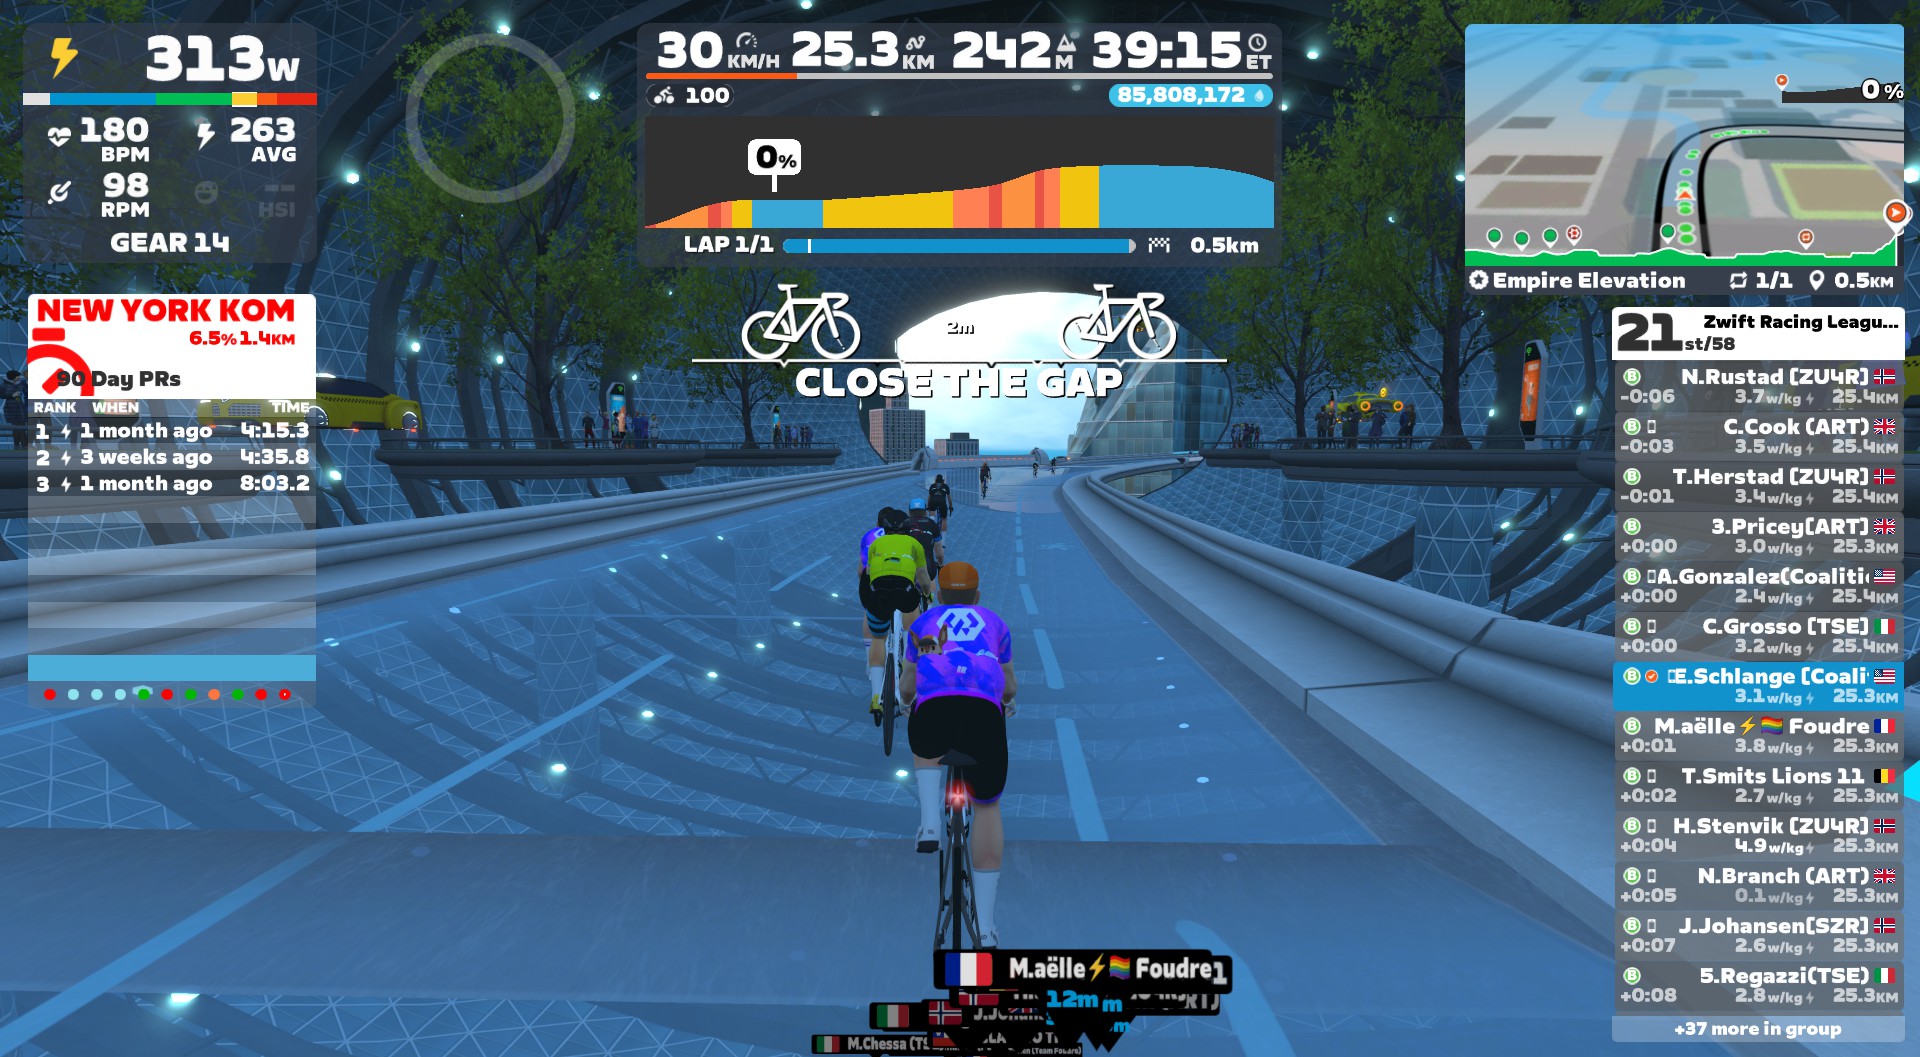
With 600 meters to go, I realized I was just behind a TSE rider named Grosso. I lacked the glycogenic bandwidth to execute complex strategies, but I knew one thing: we had to beat TSE to win 1st overall! So I dug deeper, passing him and teammate Andrew with 500 meters to go:

One ramp to go. I eased a bit on the flat road leading to the final ramp, but then Grosso flew past with 180m to go! It was now or never. I went all in to catch him, channeling my inner Pogi with a seated sprint. Glancing up from my sweaty top tube, I saw I was getting closer to Grosso. But where was the finish arch?

Another glance up and it appeared Grosso had sat up early. With 20m left, I flew past as he dropped his power to 2 W/kg. I beat him to the line! For… 15th place.

See my ride on Strava >

Watch the Video:

Results and Takeaways

Coming across the line, I saw that teammate David had taken 1st overall. Well done, sir!

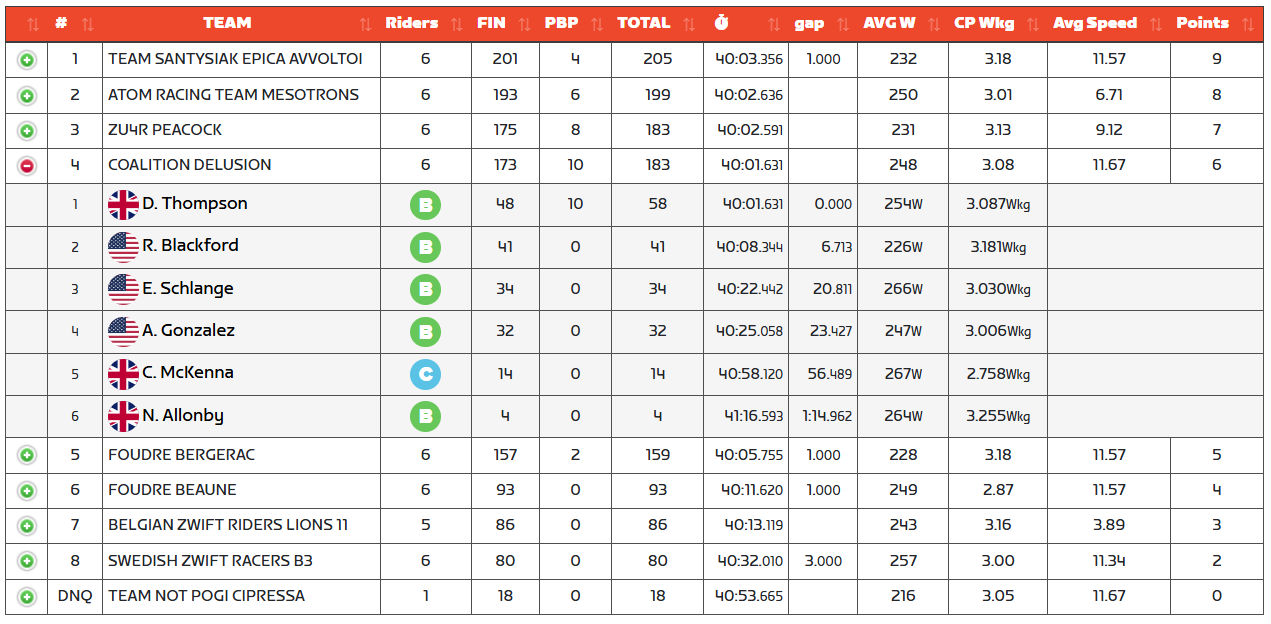
Unfortunately, our overall team performance didn’t place us on the top step this week. We tied for 3rd, and team TSE took first:

That dropped us from a tie for 1st to a firm 2nd overall. Ladies and gentlemen, the final standings for the Lime B1 Open Development Division, Round 2:

Well done, TSE!

As for my personal performance? Once again, I think I played this as well as I could. Heck, I was even doing some VO2 max training in the weeks leading up to this race!

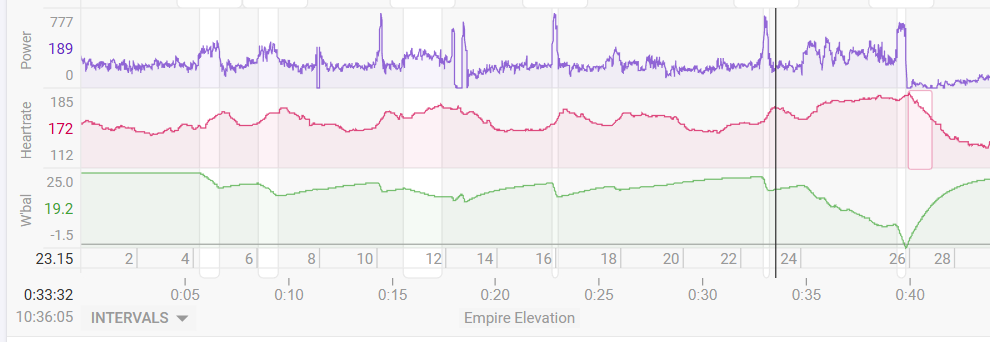
In the end, I used all my W’ weebles, according to intervals.icu:

That final climb was almost exactly 5 minutes long, which let me (almost) set a new 5-minute power PR for 2025. (I did 379W to finish this race, but did 387W in an FTP ramp test in September.) So I feel I gave it all I had. Which is all anyone can ever do.

Good work, Coalition Delusion. And chapeau to all our competitors as well. See you next round! (Watch for details of ZRL 2025/26 Round 3 to be shared here on Zwift Insider next Tuesday.)

What about you?

How did your final race of round 2 go? Share below!