We may earn a commission from links on this page. Deal pricing and availability subject to change after time of publication.
Nothing, an upstart tech brand from the U.K. that makes products like phones, smartwatches, and headphones, has quickly become one of my favorites lately. Its products offer unique features and designs, and the prices are competitive. Right now, Nothing’s latest budget over-ear headphones, which were released in October, the CMF Headphone Pros, are just $79 (originally $99), the product’s lowest price ever, according to price-tracking tools. This is a great option for anyone looking to get budget over-the-ear headphones that punch above their weight.
Very much like Nothing’s CMF Buds Pro 2 earbuds, the CMF Headphone Pros are budget headphones that punch above their weight. They are an affordable alternative to the popular Headphone 1 (which will cost you $299), and are the first to seamlessly integrate into the Nothing/CMF ecosystem, including smartphones, watches, and other audio products. There is a companion Nothing X app that allows you to customize action buttons, among other things, but the cool thing about these headphones is the control you get without needing the app.
There is a multi-function roller on one side of the headphone that you can roll to adjust volume or press to control the ANC modes, which include adaptive ANC (adjusting cancellation/transparency in real-time) and Spatial Audio (creates an immersive, 3D soundstage for music/movies). On the other side, you’ll find an “Energy Slider,” which tunes your sound in real-time, instantly adjusting the treble and bass balance. You get an impressive 100 hours of playback on a single charge (reduced to up to 50 hours with ANC turned on) as well as AAC, SBC, and LDAC support. They have an IPX2 rating for resistance against sweat, and there is a 3.5mm audio jack for wired listening.
Nothing is well known for its minimalistic design, but these headphones go a bit further by allowing you to mix and match the earcups with different colors (they sell for $25). These are a good option for those looking for a bold style budget over-ear headphones that have great battery life and punch above their price point.
The humble power bank has transformed from a simple pocket-sized battery into a feature-laden gadget that now sometimes includes screensavers, Bluetooth connectivity and built-in Wi-Fi hotspots. The Verge’s Thomas Ricker highlighted the $270 EcoFlow Rapid Pro X Power Bank 27k at CES 2026 as a prime offender — a device he declared “too expensive, too big, too slow, and too heavy.” Its giant display takes 30 seconds to wake from sleep, plays swirly graphics and blinking eyeballs, and requires a screensaver while slowly draining the battery it’s meant to preserve.
The feature creep is industry-wide. Anker no longer lists a display-less model in its 20,000mAh range, and both companies sell proprietary desk chargers. Basic alternatives exist — Anker’s PowerCore 10k runs $26 — but they’re becoming harder to find.
There are likely occasions in your day-to-day life in which you allow someone else to use your phone, whether it’s letting your kid play a game or sharing content with a friend. You may do this without thinking about the privacy implications and what might happen if another person has access to everything on your device and—accidentally or on purpose—uses it to view your search history, scroll through your photos, or send messages to your contacts.
If you’re an Android user, you should enable app pinning to keep others from snooping around your device. This feature keeps the user in the pinned app until you enter your PIN, pattern, or password. (On iOS, you can achieve a similar effect with Guided Access, which also allows you to set time limits and disable the keyboard and touch input.)
Enable app pinning on Android
To pin apps, you’ll need to enable the feature in your phone’s Settings app. To do so, go to Security or Security & location>Advanced> App pinning and toggle on Use app pinning and Ask for PIN before unpinning.
Before handing your phone over, open to the app screen you want to pin, then swipe up to the middle of the screen and hold to open your Overview. Tap the app’s icon, then tap Pin. This will keep the user locked into that app until you unpin (using your PIN, pattern, or password).
Depending on your device navigation settings, there are a few ways to unpin an app:
Gesture navigation: Swipe up and hold
2-button navigation: Touch and hold Back + Home
3-button navigation: Touch and hold Back + Overview
Note that pinning won’t prevent someone from using the app fully, such as swiping through your photos or typing in the search bar, as Android doesn’t have the option to disable touch. Pinned apps can also open other apps. At the very least, though, it keeps someone from having access to anything and everything on your device.
Installing a virtual private network (VPN) on an iPhone or iPad is easy. The days are gone when Apple users had to be content with the leavings from the Windows ecosystem — in 2026, all the best VPN services have secure, user-friendly iOS apps on par with every other platform. If you’ve decided to add a VPN to your iPhone to stay anonymous online and change your virtual location, you’ve got plenty of great choices.
Since you’re here, chances are you’re familiar with the benefits of using a VPN, including security on public Wi-Fi and the ability to explore streaming libraries in other countries. But you may still be daunted by the process of actually choosing, installing and configuring a VPN on your iPhone.
In this article, I’ll walk you through the steps, including how to configure a VPN manually without going through a service. Check out my how to use a VPN piece for more general information.
How to choose an iPhone VPN
One of the trickiest parts of installing an iPhone VPN is picking the right service. That brings us to our first pro tip: Don’t just go to the App Store and search on “VPN.” That will simply front-load whichever vendor(s) are paying for top placement (note the little “Ad” icon) as well as a laundry list of free services that come with big caveats. There are dozens of mobile VPNs out there, and many of them don’t put the user first (for example, I reported last year on popular VPNs that failed to disclose shared security flaws). Choosing hastily can leave you stuck with an iOS VPN that’s either mediocre or actively harmful.
Before downloading an iPhone VPN, do some research into the provider’s background. A dependable VPN should have a well-written customer support page, a clear timeline of its history and a way to tell at a glance who actually owns and operates it. Check the reviews on the app store — it should have at least several hundred, almost all 4s and 5s.
iPhone users have a particular advantage here: several VPNs let you download their iOS app and start using it without paying. You can use this free trial period to put the VPN through its paces. Start by testing its speed using Ookla speedtest or a similar app. You should also use an IP address checker to make sure it isn’t leaking; to confirm this, just check your phone’s IP address before and after connecting to the VPN and make sure it’s different the second time.
To keep things simple, my top recommendation for all platforms is Proton VPN. Out of all VPNs, it strikes the best balance of solid security, fast performance, useful features and a commitment to user privacy. Other iPhone VPNs I love include ExpressVPN, Surfshark and NordVPN.
How to install a VPN on your iPhone
Installing an iPhone VPN is like installing any other app. Just go to the App Store, find the VPN you’ve chosen and download it onto your phone. When it finishes downloading, open the app to grant permissions and finish setup. However, since there are a couple of potential sticking points, I’ll run through the steps in more detail.
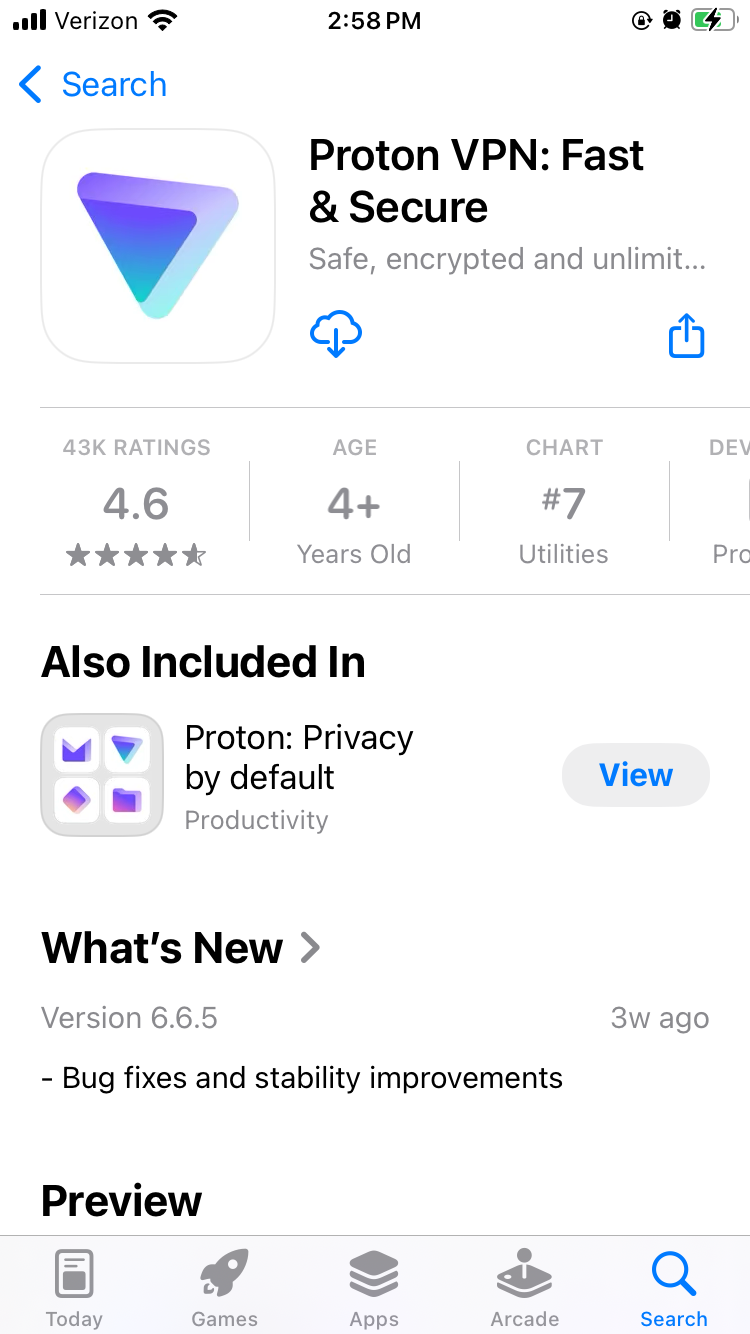
Proton VPN on the iOS app store.
Sam Chapman for Engadget
Open the App Store.
Tap the search bar and type in the name of your chosen VPN. Hit Search and look through the list of results. Be careful to pick the right one — there are some “mockbuster” VPNs that try to snare people looking for well-known names. As a rule, the one with the most reviews is the service worth using.
On the page for the VPN app, tap Get. Enter your Apple ID and password to begin the installation.
Once installation is complete, either tap Open in the App Store or find the new VPN icon on your home screen.
Create a VPN account with a username and password. Most services let you do this within the app, but you may have to shift temporarily to a browser, so make sure you’ve got internet access.
Choose a subscription. If there’s a free trial, grab it and use it to test the VPN. If not, or if it’s already expired, choose a plan that fits your budget and needs. Longer-term plans tend to save you money on average, but cost more at the start.
On the VPN app, log in with your new credentials. You’re now ready to get started.
If you aren’t interested in paying for software right now, you can still get an iOS VPN. Check out my list of the best free VPNs, which all have iPhone apps. We also constantly update a curated list of the best VPN deals for bargain hunters.
How to configure and use a VPN on your iPhone
An iOS VPN is generally usable with the default settings. Even so, it’s a good idea to look through the options — you may not end up using all of them, but many of them are vital security checks or important quality-of-life boosters.
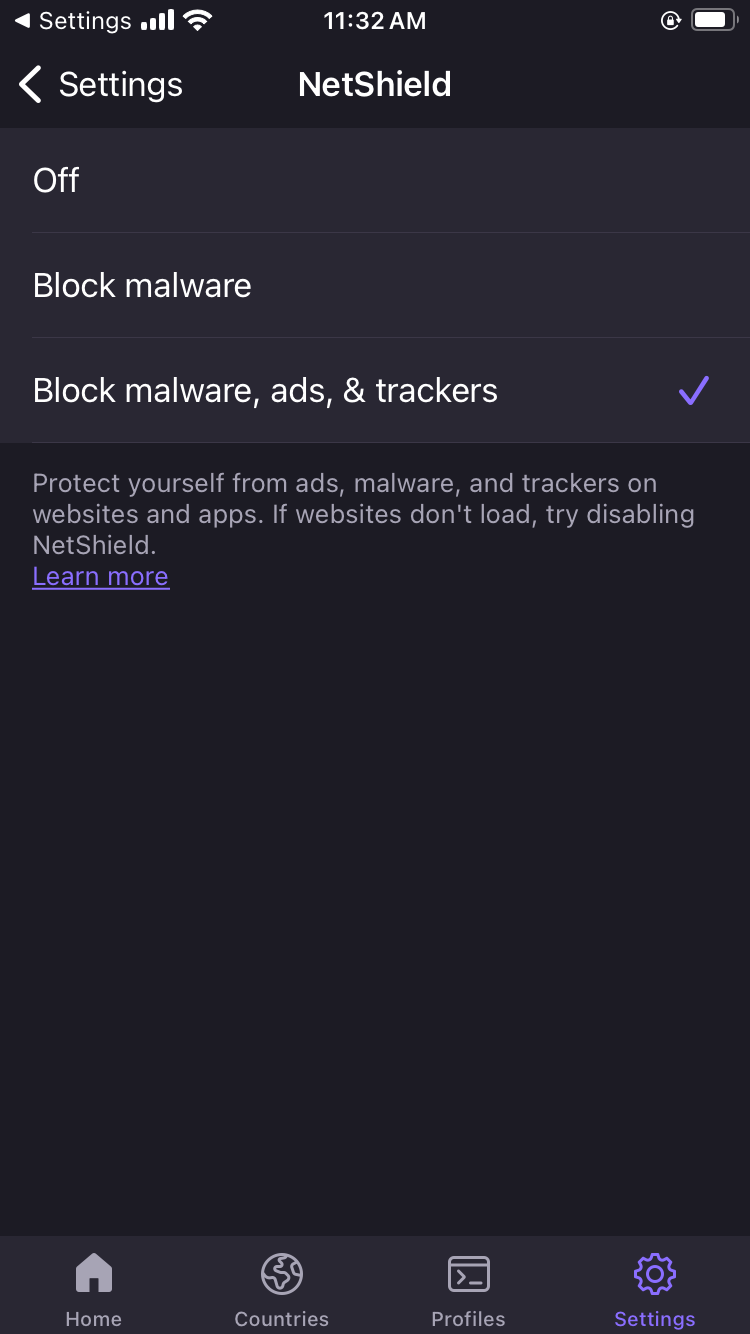
Proton VPN’s NetShield content blocker on iOS.
Sam Chapman for Engadget
Here are some quick steps to make sure you’re getting the best performance. These settings are in different places on each VPN, but most can be found by clicking a button with a gear icon, or any page labeled “settings” or “preferences.”
Turn on the kill switch. This will protect you from broadcasting any data the VPN hasn’t encrypted. In the event the VPN suddenly disconnects, the kill switch also cuts off your internet connection.
Set the VPN to always reconnect automatically if it disconnects. The method for doing this varies between services, so check the VPN’s help page. Some (like Proton VPN) have an always-on VPN setting in the app itself, while others (like ExpressVPN) handle it through iOS settings.
Configure split tunneling. Not many iPhone VPNs have this option, but if yours does, you can use it to let certain apps or websites skip the VPN tunnel. Make sure to only bypass the VPN on sites and apps that share no sensitive information, or that refuse to work with a VPN active (some banks are like this).
If your VPN has a feature for blocking ads and malware domains, I recommend using it — the worst it can do is not work. Some also include parental controls, in case you’re setting up the VPN on your child’s phone.
Create shortcuts. Sometimes called Profiles, this relatively common feature lets you connect to the VPN and open a certain website with one tap.
Decide when and how you want the VPN to send you notifications.
Check available protocols. It’s almost always best to let the VPN pick for you, but if you want to choose for yourself, IKEv2 is generally the fastest.
Look over the server list to see what choices are available.
When choosing a VPN server, think about what you need the VPN for. If you’re just using it for privacy, pick the fastest server (or let the VPN app choose it for you). On the other hand, if you want to watch a movie or TV show that’s only on streaming in another country, choose the fastest server in that country. If you’re on a good VPN, it still shouldn’t slow you down too much.
If you have the address of a VPN server and the necessary credentials, iOS lets you set up your own VPN and connect directly. This is less convenient than using a provider app, since you need to know the details about every server you connect to, but it’s nice if you’re worried about trusting your privacy to a third party. It can also be convenient for quickly accessing a work or school VPN from your phone. Here’s how to do it.
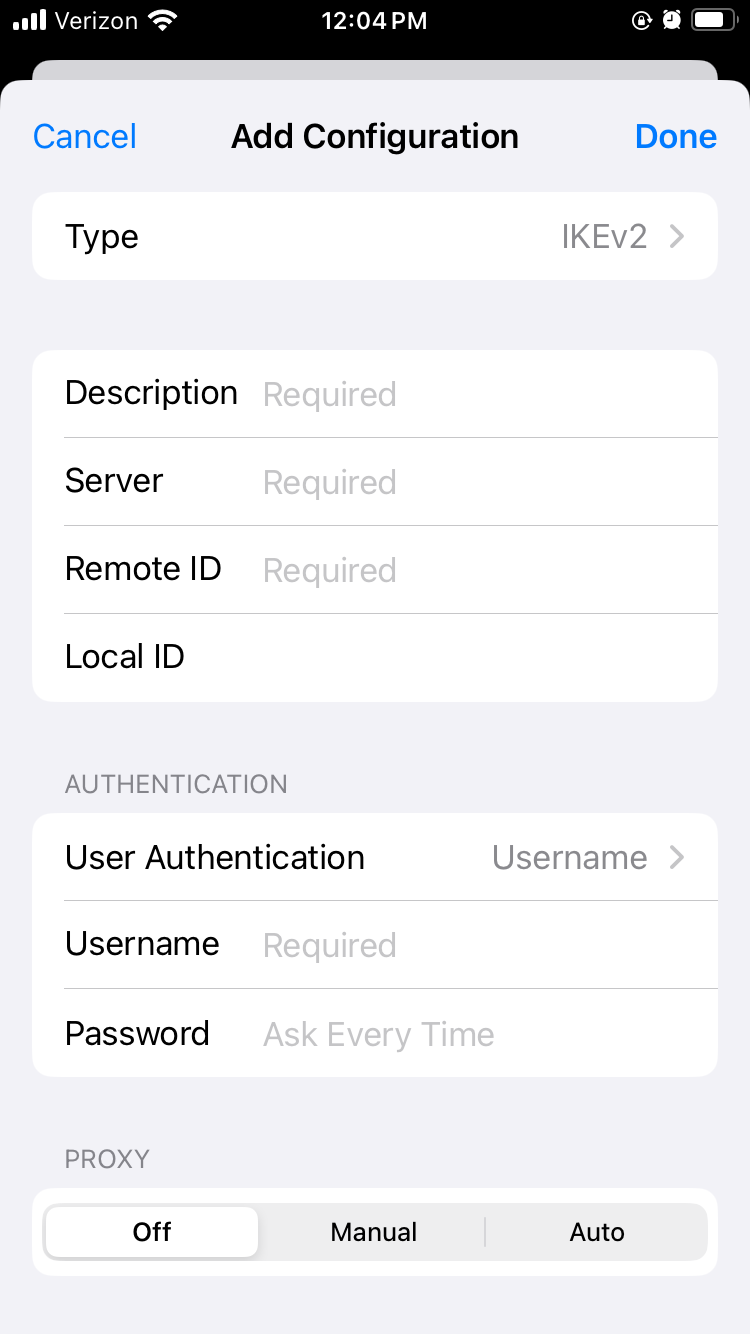
Manually setting up a VPN connection on iOS.
Sam Chapman for Engadget
Open the Settings app. Scroll down and tap General.
Scroll down again and tap VPN & Device Management. Tap the word VPN on the new page, then tap Add VPN Configuration. You should reach the screen shown above.
Make sure Type is set to IKEv2, then enter the Description, Server and Remote ID for the server you’re connecting to (plus the Local ID if there is one).
Your source for the server information should also have told you if it authenticates access with a username/password or certificate. Pick the correct option, then enter the credentials required.
Tap the Done button or the blue checkmark at the top-right of the screen.
You’ll arrive back on the previous menu with your new VPN option available. Toggle it on to connect. To turn it off, return to the same menu and deactivate the switch.
Do you need an iPhone VPN?
Whenever you get online, your internet service provider (ISP) assigns an IP address to your device — a unique fingerprint that follows you throughout the session. Your ISP may sell this knowledge to marketers to target ads at you, or in worse cases, collaborate with governments willing to violate their citizens’ rights to privacy.
When you use a VPN, though, your real IP address is hidden behind that of the VPN server, so nothing you do on the internet connects back to you. That’s why I always advise using a VPN on any device, including iPhones, that connects to the internet. It’s even more important on the unprotected public networks you sometimes find in cafes and hotels. On the fun side, you can also use a VPN to change your virtual location to show you different content libraries on Netflix and other streaming platforms.
One more thing: I often hear iPhone users ask whether they need a VPN, since iCloud Private Relay comes standard on iOS devices. Just to clear this up, iCloud Private Relay is not a VPN. As you can see from this support page, your ISP can still see your real IP address when it’s active.
This article originally appeared on Engadget at https://www.engadget.com/cybersecurity/vpn/how-to-use-a-vpn-on-iphone-201743118.html?src=rss
The Warner Bros. Discovery board has unanimously voted to rebuff Paramount’s $108.4 billion offer and urged shareholders to reject the hostile takeover bid. The board is continuing to support Netflix’s pending $82.7 billion purchase of its streaming and movie studios businesses along with a separate spinoff of the Warner Bros. cable TV division.
Warner Bros. called the Paramount bid “illusory” in a presentation for shareholders today, saying the offer requires an “extraordinary amount of debt financing” and other terms that make it less likely to be completed than a Netflix merger. It would be the largest leveraged buyout ever, “with $87B of total pro forma gross debt,” and is “effectively a one-sided option for PSKY [Paramount Skydance] as the offer can be terminated or amended by PSKY at any time,” Warner Bros. said.
The Warner Bros. presentation touted Netflix’s financial strength while saying that Paramount “is a $14B market cap company with a ‘junk’ credit rating, negative free cash flows, significant fixed financial obligations, and a high degree of dependency on its linear business.” The Paramount “offer is illusory as it cannot be completed before it is currently scheduled to expire,” Warner Bros. said.
Character.AI and Google have reportedly agreed to settle multiple lawsuits regarding teen suicide and self-harm. According to The Wall Street Journal, the victims’ families and the companies are working to finalize the settlement terms.
The families of several teens sued the companies in Florida, Colorado, Texas and New York. The Orlando, FL, lawsuit was filed by the mother of 14-year-old Sewell Setzer III, who used a Character.AI chatbot tailored after Game of Thrones’ Daenerys Targaryen. The teen reportedly exchanged sexualized messages with the chatbot and occasionally referred to it as “his baby sister.” He eventually talked about joining “Daenerys” in a deeper way before taking his own life.
The Texas suit accused a Character.AI model of encouraging a teen to cut his arms. It also allegedly suggested that murdering his parents was a reasonable option. After the lawsuits were filed, the startup changed its policies and banned users under 18.
Character.AI is a role-playing chatbot platform that allows you to create custom characters and share them with other users. Many are based on celebrities or fictional pop culture figures. The company was founded in 2021 by two Google engineers, Noam Shazeer and Daniel de Freitas. In 2024, Google rehired the co-founders and struck a $2.7 billion deal to license the startup’s technology.
On one hand, the settlements will likely compensate the victims’ families handsomely. On the other hand, not going to trial means key details of the cases may never be made public. It’s easy to imagine other AI companies facing similar suits, including OpenAI and Meta, viewing the settlements as a welcome development.
This article originally appeared on Engadget at https://www.engadget.com/ai/characterai-and-google-settle-with-families-in-teen-suicide-and-self-harm-lawsuits-201059912.html?src=rss
OLED screens that deliver vibrant HDR are becoming more common in laptops, with a strong contingent of entries at CES 2026 from Dell’s Alienware lineup, Lenovo’s newest ThinkPads and HP’s latest OMEN models. It’s a meaningful development that users can easily appreciate thanks to rich colors and unbeatable contrast, but an OLED, and particularly
An anonymous reader shares a report: Ever since the federal government began issuing the Dietary Guidelines in 1980, it has told Americans to limit themselves to one or two standard alcoholic drinks a day. Over time, the official advice morphed to no more than two drinks a day for men, and no more than one for women. No longer [non-paywalled source].
The updated guidelines issued on Wednesday say instead that people should consume less alcohol “for better overall health” and “limit alcohol beverages,” but they do not recommend clear limits. The guidelines also no longer warn that alcohol may heighten the risk of breast cancer and other malignancies. It is the first time in decades that the government has omitted the daily caps on drinking that define moderate consumption — standards that are used as benchmarks in clinical studies, to steer medical advice, and to distinguish moderate from heavy drinking, which is unquestionably harmful.
The new guidance advises Americans who are pregnant, struggle with alcohol use disorder or take medications that interact with alcohol to avoid drinking altogether. The guidelines also warn people with alcoholism in the family to “be mindful of alcohol consumption and associated addictive behaviors.” They do not, however, distinguish between men and women, who metabolize alcohol differently, nor do they caution against underage drinking. The guidelines also no longer include a warning that was in the last set issued in 2020: that even moderate drinking may increase the risk of cancer and some forms of cardiovascular disease, as well as the overall risk of dying.
I write a lot about productivity, which means I also read a lot about it. Over the last few months, I’ve noticed an uptick in people discussing something called “cognitive overload,” citing it as a potential reason for a decline in output. The phrase stuck out to me as one of those buzzy terms that has the potential to be overused until it’s meaningless—but at its core, it certainly has a real, clear definition that can be helpful tool in maximizing productivity.
Basically, cognitive overload is what happens when you’re inundated with more information than your brain can process, so your brain just gives up altogether, making hard to focus on anything at all. Here’s what to know about it and what to do once you identify it.
What causes cognitive overload?
You know all those jokes on social media about how a single news item or food product from modern times would kill a person born just a few centuries ago? They’re funny and hyperbolic, but they’re grounded in the fact that while the ways in which we produce things and share information have advanced wildly, the human brain has basically remained the same. We say it all the time but it bears repeating: We’re just not cut out to handle the onslaught of stimuli we get on a daily basis.
Think of how many times your phone lights up on a given day. I just checked my screentime app and discovered that though it’s only early afternoon, I’ve gotten 150 notifications straight to my lock screen already today. It’s only Wednesday, so I’m averaging 213 a day, which my phone assures me is down 20% from last week and I’m quite sure I’ll pick back up by the time Sunday rolls around. Considering that a few months ago, I redid all my phone settings so not all of my notifications got blasted to my lock screen, this is concerning. That’s just a lot of information to constantly see.
As it turns out, text-based info is the main cause of cognitive overload, at least according to one study. Emails, Slack and Teams messages, texts, calendar notifications—the never-ending stream of these bad boys is a major contributor to the overall feeling of being unable to process or do anything. If you think about an average day when you’ve felt too zapped to work, it probably included plenty of those. Audio-visual stimuli are less debilitating, according to the study, so a Zoom or phone call or a manager stopping by your desk may not trip you up as badly.
Beyond feeling like you can’t even think straight or like you’re too overwhelmed to take action on any one task, you may be able to recognize cognitive overload from other signs. If incoming messages make you feel frustrated or detached, for instance, no matter what they say, this could be happening to you. That’s actually the symptom I experience most often, for what it’s worth. When I’m overwhelmed by too much information, I find myself thinking, “What do you want?!” every time my phone lights up, before I even see who is reaching out. (Sorry, Mom.)
How I’m battling cognitive overload
As I was going through the study and thinking over cognitive overload, I realized I’ve already been implementing a few tricks that may have been helping me avoid it. As mentioned above, I banned my least-used apps from sending me notifications a few months ago. For years, I’ve also tinkered with my MacBook settings so I don’t get any form of push notification on my computer. My phone is next to me at all times; there’s no good reason for the top right corner of my laptop screen to be whacking me with the same notifications the phone is already showing me.
A few other tried-and-true productivity approaches came to mind for me once I got a good grasp of what cognitive overload actually is. The one-touch rule of inbox management could be useful for you if you find that messages get you worked up. With that, you open each message as you get it and make an instant decision about what to do with the contents. It might seem counterintuitive to face each incoming message head-on if you’re trying to avoid feeling burned out by the sheer volume of them, but I’ve found that when I see a message preview at the top of my screen and do nothing about it, it nags at me all day. Addressing it instantly helps me clear my mind and keep working.
Otherwise, the way you go about battling this is going to be pretty subjective, although I do have one more recommendation: If you’re not familiar with the Pomodoro technique, get familiar now. With it, you work for a set amount of time (usually 25 minutes) before taking a small break (usually five). When you’re in those focus sessions, you should be completely distraction-free, putting your devices in Do Not Disturb mode or even using specialized apps to block other, distracting apps. Knowing you have to work seriously for a certain amount of time can help get you in the zone and push you away from information and decision paralysis while knowing you eventually get a break can help you stay relaxed as you go.
Fujifilm just revealed the Instax mini Evo Cinema camera, which looks suspiciously like a vintage Super 8. More specifically, it was designed to mimic the Single-8 from 1965, which was a rival unit to the Super 8. Fujifilm’s latest device captures video, just like its retro inspiration.
Wow, the new FUJIFILM Instax Mini EVO Cinema camera looks nuts.. esp the decade slider thing for the looks. If the cost isn’t nuts this could be a must have… Needs to be around $249/299ish to be a hit https://t.co/6w8JPsBxIgpic.twitter.com/plcmNhfyT7
However, this is an Instax and the line has primarily been dedicated to snapping and printing out still images on the fly. The Evo Cinema can still do that, albeit in a slightly different way. Users shoot a video and the camera can convert a shot from the footage into an Instax print. That’s pretty cool. The bad news? It requires some kind of QR code tomfoolery.
The camera also comes equipped with something called the Eras Dial, which has nothing to do with Taylor Swift and everything to do with adjusting various effects and filters to create footage “inspired by different eras.” There are ten “eras” to choose from, including a 1960s vibe. The filter levels here are adjustable. We’ll have to take a look at some footage to see how everything translates.
Fujifilm
Fujifilm is dropping the Instax Evo Cinema on January 30, but only in Japan for now. We don’t have a price yet.
This is just the latest nifty camera gizmo the company has thrust upon the world. It recently released an Instax model that has a secondary camera for selfies.
This article originally appeared on Engadget at https://www.engadget.com/cameras/fujifilms-latest-instax-camera-looks-like-a-vintage-super-8-194537863.html?src=rss
Moving into 2026, industry experts anticipate that MLC NAND flash capacity will decrease by 41.7%, thanks to Samsung ending its own MLC shipments in June of this year and other manufacturers including SK Hynix and Micron also limiting MLC production. As demand increases and supply decreases, prices on MLC NAND devices have risen along with
Samsung Electronics has once again sidelined Ballie, a long-anticipated robot that was first announced six years ago but never released. Bloomberg News: The device — designed to roll and roam throughout the home — is completely absent from this week’s CES, the biggest electronics trade show. And though Samsung said last year that Ballie was nearly ready for a retail release, the product is now unlikely to resurface soon.
In an emailed statement, Samsung referred to Ballie as an “active innovation platform” within the company, rather than a forthcoming consumer device. “After multiple years of real-world testing, it continues to inform how Samsung designs spatially aware, context-driven experiences, particularly in areas like smart home intelligence, ambient AI and privacy-by-design,” a Samsung spokesperson said in the statement.
As power gets more dicey, personal energy generation only gets more appealing. Shine’s compact turbine isn’t going to power your house any time soon (though the company’s co-founder told me they have plans in that direction) but it can suck up the energy required to refill a smartphone in as little as 17 minutes. Of course, what it can generate depends on wind speed. That same charge could take as long as 11 hours if there’s only a slight breeze.
That power curve, and its ability to operate at night, sets the turbine apart from solar panels. Of course, on a completely still day, the Shine as inert as a becalmed sailing ship but if the wind picks up even as little as a breeze, it gets to work making power. The turbine even automatically pivots on the included stand to face into the wind.
Shine turbine 2.0
Shine
The Shine 2.0 looks like a thin space football and has a screw-off cap that reveals a hollow compartment for the stand and tie downs. The cap then doubles as a key to unlock the blades. It all weighs just three pounds, which is impressively light considering it also houses a 50W, 12,000mAh battery. This is the second version of the turbine and updates include a USB-C port instead of USB-A, as well as app connectivity.
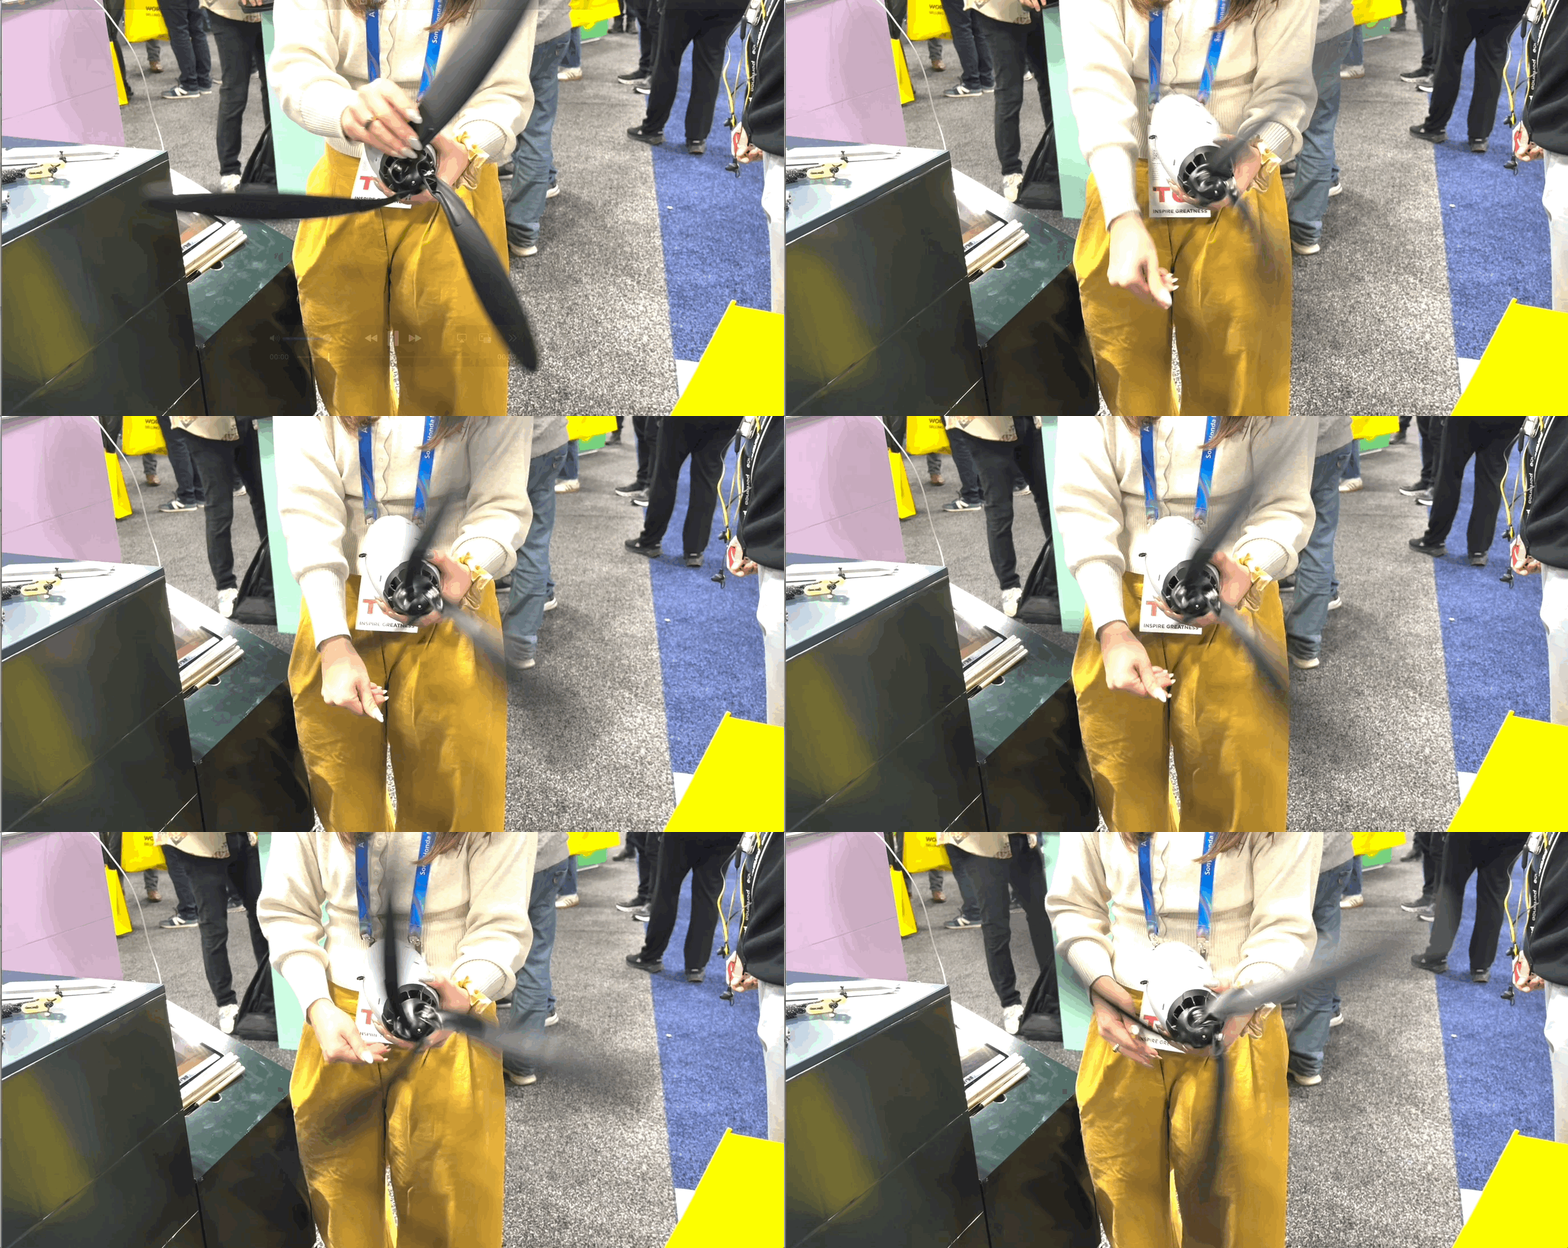
The company claims you can set the entire thing up in around two minutes. I watched the co-founder take the turbine from fully closed to unfurled and ready for the stand in about that long. Unfortunately, there was no wind rushing through the CES show floor so I couldn’t see it spin, but the rep was kind enough to spin it for me.
Spinning the Shine Turbine 2.0
Amy Skorheim for Engadget
Possibly the most exciting part is Shine’s plan for more expansive power generation. Shine 3.0, which the company is working on now, will be a 100 to 300 watt system and grid-tied turbines are on the wish list.
Pre orders are now open for the Shine 2.0 through Indiegogo for $399 and units should begin shipping this spring.
This article originally appeared on Engadget at https://www.engadget.com/home/smart-home/the-shine-20-is-a-compact-wind-turbine-for-your-next-camping-trip-191000940.html?src=rss
The latest generation of smartglasses can create huge virtual screens without the need to lug around giant monitors are a real boon to frequent travelers. However, their specs aren’t often tailored to the needs of gamers, so at CES 2026, ASUS and XREAL partnered to make a pair with two very important features you don’t normally get from rivals.
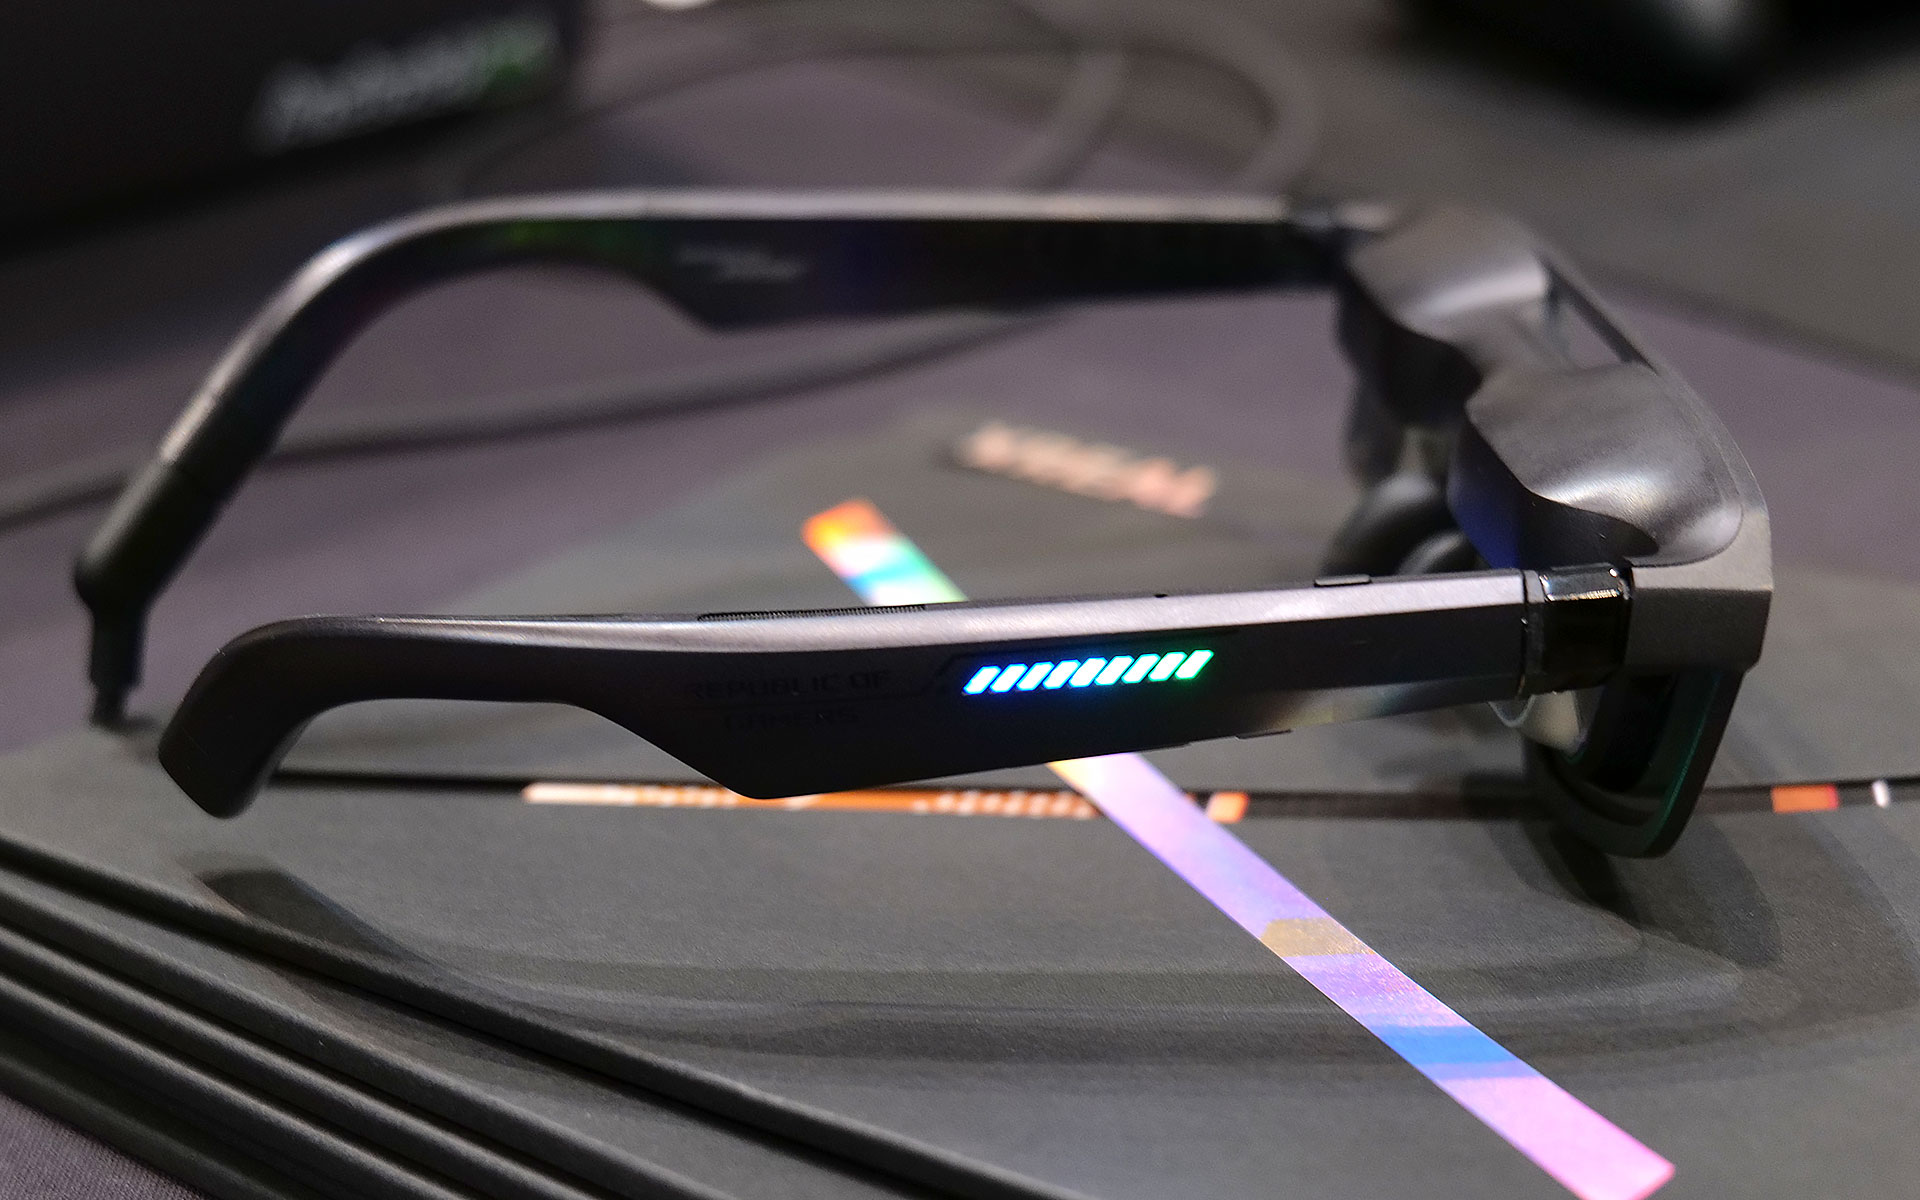
The new ROG XREAL R1 AR glasses are based on the existing XREAL One Pro, so naturally they share a lot of the same components and specs including dual micro-OLED displays with a per-eye resolution of 1,920 x 1,080, three degrees of freedom (natively), 700-nit peak brightness, 57-degree FOV and built-in speakers tuned by Bose. However, the big difference on the R1s is that instead of maxing out with a 120Hz refresh rate, ASUS and XREAL’s collab goes all the way up to 240Hz. That’s a pretty nice bump, especially for people with older hardware or anyone who might not have access to a high refresh rate display or just doesn’t want to lower their standards while traveling.
The ROG XREAL R1 AR smartglasses deliver 1,920 x 1,080 resolution to each eye with a 240Hz refresh rate and 57-degree FOV.
Sam Rutherford for Engadget
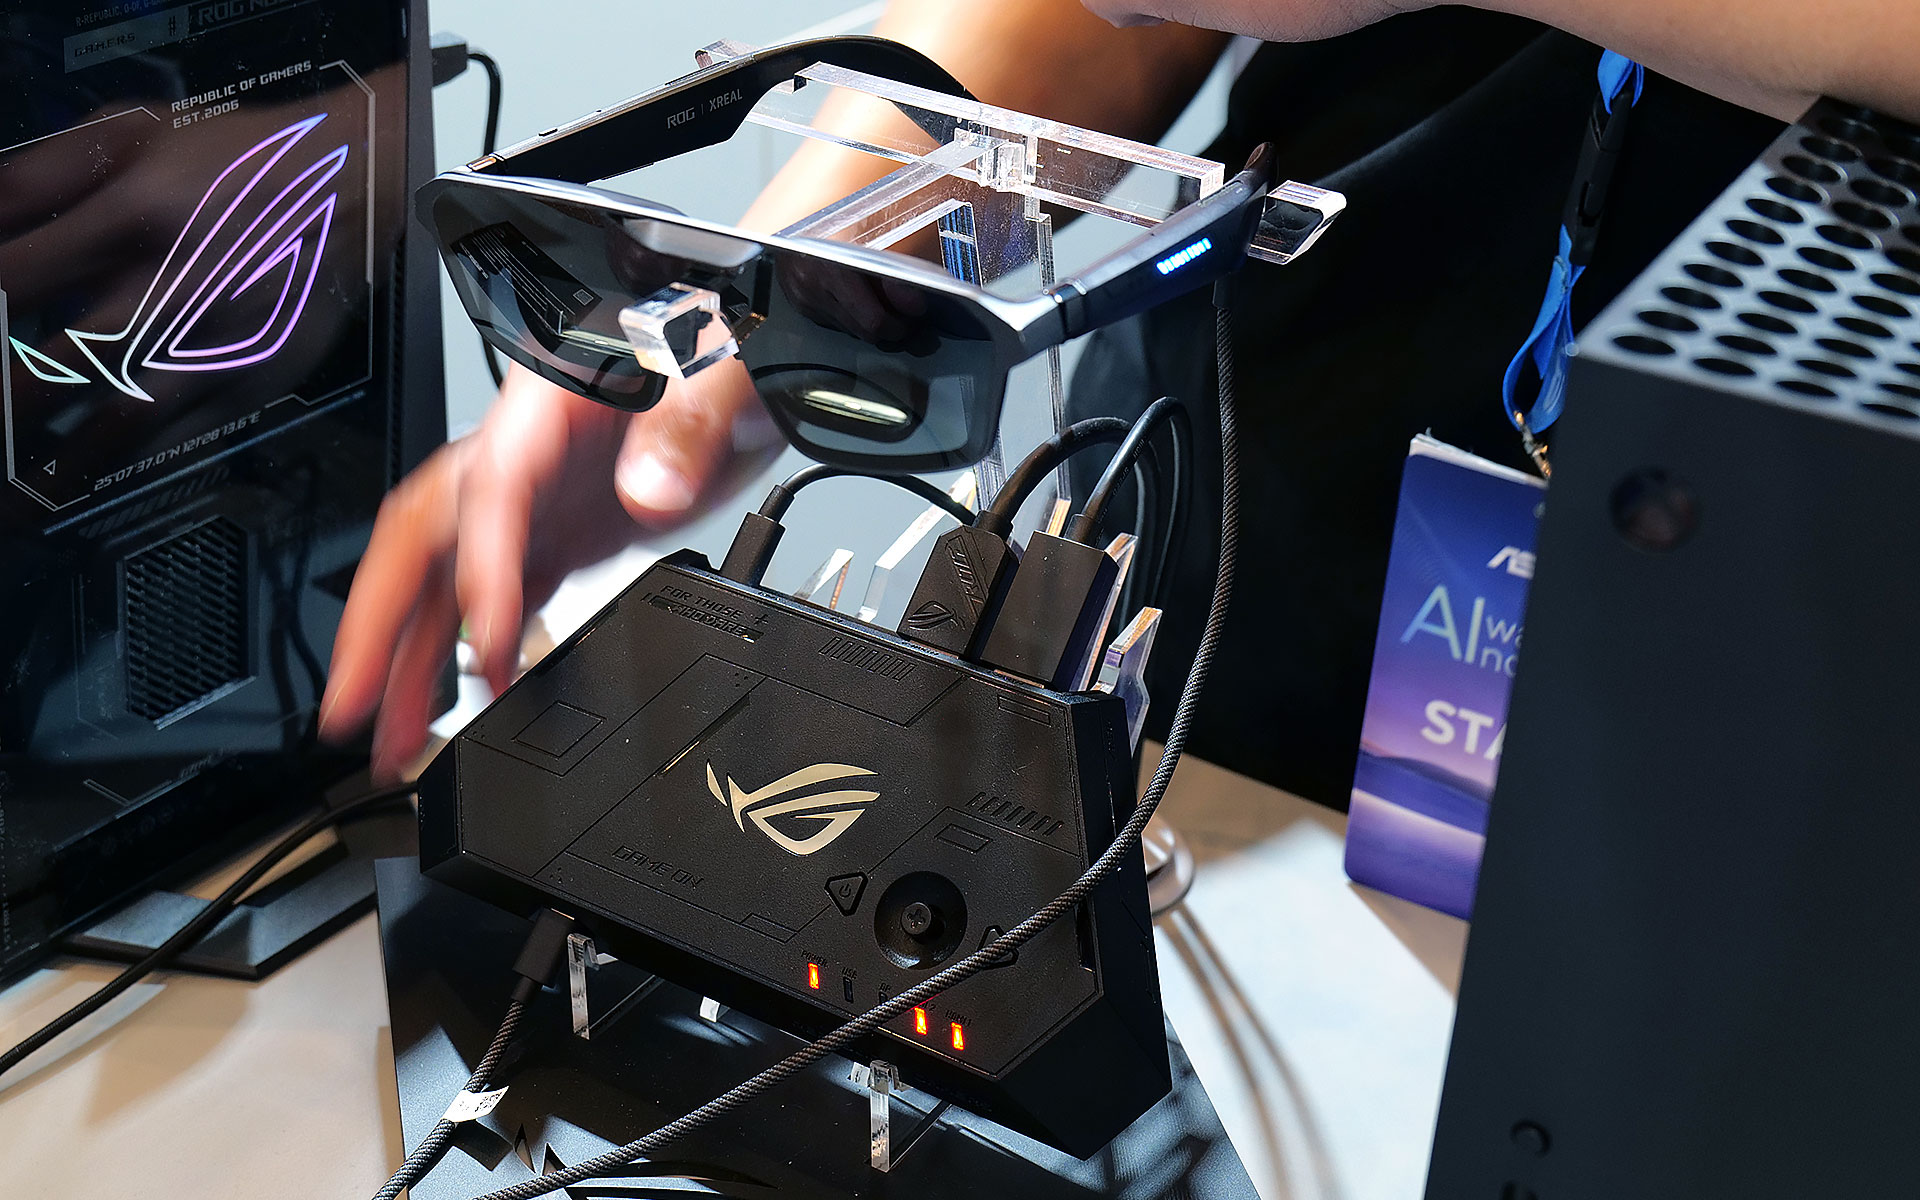
The other big addition is the R1’s included ROG Control Dock, which from what I’ve seen is slightly better suited for home use. It’s designed to be a simple hub with two HDMI 2.0 jacks, one DisplayPort 1.4 connector and a couple of USB-C slots (one is for power), so you can quickly switch between multiple systems like your desktop and console with a single touch. That said, depending on the situation you might not even need the dock at all because the R1s can also be connected to compatible PCs or gaming handhelds like the ROG Ally X and ROG Xbox Ally X (see the synergy there?) directly via USB-C.
When I got to try them out at CES, the R1s delivered a very easy to use and relatively streamlined kit. At 91 grams, they are barely heavier than the original XREAL One Pro (87g) so they don’t feel too weighty or cumbersome. I also really like the inclusion of electrochromic lenses, which allow you to change the tint of the glasses with the touch of a button. This lets you adjust how much or little light you want to come in through the front to best suit your environment. And thanks to support for three DOF, you have the ability to pin your virtual screen in one location or let it follow you around.
Of course, ASUS and XREAL couldn’t resist putting RGB lighting on the ROG XREAL R1 AR smartglasses.
Sam Rutherford for Engadget
Now it is important to remember that in order to get 240Hz on the smartglasses, you need hardware capable of pushing the kind of performance. So depending on the title, when the R1s are connected to something like a gaming handheld, you might not be able to get there. Luckily, I had the chance to use the specs when connected to a PC as well, which let me really appreciate the smoothness you get from faster refresh rates. General image quality was also quite good thanks to the glasses’ 1080p resolution, so I had no trouble reading text or discerning small UI elements.
The ROG Control dock makes it easy to connect multiple devices to the ROG XREAL R1 AR smartglasses, but it may be a bit too bulky to pull out in tight situations like on a plane.
Sam Rutherford for Engadget
My one small gripe is that I kind of wish its 57-degree FOV was a tiny bit bigger, but that’s more of a limitation of current optical technology as there aren’t a ton of similarly sized specs that can go much higher (at least not yet). That said, even with its current FOV, you can still create up to a 171-inch virtual screen at four meters away, which is massively bigger than any portable screen you might entertain carrying around.
Unfortunately, ASUS and XREAL haven’t announced official pricing or a release date for the R1s yet, but hopefully they won’t cost too much more than the XREAL One Pro, which are currently going for $649.
This article originally appeared on Engadget at https://www.engadget.com/gaming/pc/asus-and-xreal-teamed-up-at-ces-to-make-gaming-smartglasses-with-two-important-upgrades-190500897.html?src=rss
Wheelchairs are available at airports, hotels, resorts, theme parks, and on cruises, but standard wheelchairs require ongoing effort and can struggle through difficult terrain. Standard wheelchairs are simply less capable than electric ones. WheelMove wants to change that.
WheelMove is a portable wheelchair attachment that turns any standard wheelchair into an electric one, allowing people to travel more easily wherever they are. It debuted at CES 2026, marking a significant leap in accessibility for wheelchair users who travel.
When I found WheelMove at CES “Unveiled,” I thought back to a recent family trip just two weeks ago, where two of my older family members often rented wheelchairs. They don’t use wheelchairs in their day-to-day lives, but walking through a theme park all day wasn’t possible. They needed support navigating the park, and the rest of us gladly took shifts pushing their wheelchairs. With a portable attachment like WheelMove, though, wheelchair users can use less effort and enjoy more independence through the battery-powered, remote-controlled attachment.
Credit: Iyaz Akhtar
Riders simply attach WheelMove to the front of any standard wheelchair, and the device lifts the wheelchair’s smaller front wheels off the ground. Once attached, the rider controls the WheelMove through a basic remote control on their armrest, thigh, or wherever is most comfortable. The attachment weighs under 20 pounds, including its 10-inch wheel, 250W motor, and a battery that goes about 15 miles on a charge. Carrying an additional battery can double its range before needing to recharge, and it can navigate terrains including gravel, grass, and uneven surfaces like cobblestone.
WheelMove is an incredibly innovative assistive technology poised to broaden personal mobility for those who need it, and it’s also one of the finalists for the official Best of CES 2026 awards for the travel category. Pre-orders are available in France where the start-up is based, but the founders plan to expand internationally later this year. It costs about €5,000 or $6,000.
If you’ve never docked a boat before, consider yourself lucky. There are plenty of popular TikTok channels devoted to shaming those who bring their craft back home clumsily or berth them with something less than finesse. Tricky crosswinds, unpredictable surf and even the jeers of passersby can make it a stressful experience at the best of times.
Brunswick, which owns more than 50 water-borne brands like Sea Ray, Bayliner and Mercury Marine, has a solution. It’s demonstrating some self-docking tech called AutoCaptain at CES 2026 that makes this process a cinch, plus a fleet of other innovations that, in some cases, leave some of the smart cars on the show floor looking a bit remedial.
One of those technologies is edge AI. While in-car AI is an increasingly common feature, those agents are exclusively running remotely, relying on cellular connections to offload all the processing power required to drive a large language model.
Sadly, that won’t always work on a boat.
One of Brunswick’s tech-equipped boats
Brunswick
“One of the things about AI for boats is you don’t have connectivity, so there is some edge compute required,” David M. Foulkes told me. He’s chairman and CEO of Brunswick.
Many of the company’s boats do have active cellular connectivity, but head far enough offshore, and you’re on your own unless you’re packing Starlink or the like.
To solve that, Brunswick is running advanced SoCs from NVIDIA and other providers that enable running a limited agent offline — on the edge, as it were. When offline, Misty, as the on-boat AI assistant is called, won’t be able to make dinner reservations or craft a 3,000-word treatise on the history of America’s relationship with Greenland. It can, however, help with navigation or boat settings.
“It’ll help answer the kind of questions that you might need to take out a manual to understand and maybe act as an assistant to make your boating a bit smoother,” Foulkes said.
When the company’s smart boats are connected, they offer some degree of remote control. No, you can’t drive it around the docks and freak out your pier-mates, but you can check on the boat remotely to make sure nobody’s trying to stow away. You can even precondition it to get the cuddy cabin nice and cool before you come aboard.
Navan C30
Power for that, and a variety of other onboard systems, can come from an integrated power system called Fathom, which has a lot in common with modern smart home tech. Solar panels on the roof (nicely disguised beneath a black mesh) collect power to recharge an onboard battery, with various sizes upwards of 30 kWh depending on the boat’s size. That battery can also be recharged by the onboard motors, like the three 425-horsepower V10s the Sea Ray SLX 360 drydocked at the Brunswick booth at CES 2026.
The juice in that battery can then be used to power a variety of onboard systems, even charging a pair of electric hydrofoils, which another of the company’s boats, called the Navan C30, had strapped on the roof.
You’ll also find cameras on the roof of these boats. That’s how the AutoCaptain feature works, numerous fisheye lenses scanning the water in every direction. Approach a pier and the AI assistant asks if you’d like some help docking. Just tap the button on the touchscreen, then kick back and let Misty do the driving.
Between automated docking, the in-cabin AI assistant and the smart power distribution system, Brunswick’s boats offered some impressive tech. But then they’d have to, given the cost. The Sea Ray SLX 360 Outboard has a starting price of $586,000. The smaller Navan C30 is a rather more attainable, but still extreme, at $227,500. That’s still probably cheaper than hiring a real captain, though.
This article originally appeared on Engadget at https://www.engadget.com/transportation/brunswicks-latest-boats-at-ces-2026-feature-edge-ai-self-docking-capabilities-and-solar-power-185500213.html?src=rss
Bose released the Application Programming Interface (API) documentation for its SoundTouch speakers today, putting a silver lining around the impending end-of-life (EoL) of the expensive home theater devices.
In October, Bose announced that its SoundTouch Wi-Fi speakers and soundbars would become dumb speakers on February 18. At the time, Bose said that the speakers would only work if a device was connected via AUX, HDMI, or Bluetooth (which has higher latency than Wi-Fi).
After that date, the speakers would stop receiving security and software updates and lose cloud connectivity and their companion app, the Framingham, Massachusetts-based company said. Without the app, users would no longer be able to integrate the device with music services, such as Spotify, have multiple SoundTouch devices play the same audio simultaneously, or use or edit saved presets.
A startup called ReviMo has developed a robotic system that provides a way for people with limited mobility to lift and transfer themselves — like from a bed to a wheelchair, or to the toilet — without the assistance of a caregiver. ReviMo’s Niko has two sets of arms: one that forms a “scooping seat” that slides underneath the person to lift them up, and the other encircling their torso and providing a backrest. It can be operated both by remote and using the controls on its dashboard. Niko in its current iteration can carry up to 250 pounds, but the team says it’s working on a version that can support up to 400 pounds.
In addition to aiding in transfers, Niko can lift the rider to a standing level and offers retractable handlebars for support. It also has the potential to be a big help to caregivers, who in many cases assist with multiple transfers every day. Even in a situation where a person isn’t able to operate it by themselves, Niko facilitates a transfer that requires much less physical exertion than today’s common methods, like sling-based mechanical lift systems. At CES, founder Aleksandr Malaschenko gave a demonstration of its lifting capabilities, using it to scoop him up from a chair and bring him out into the aisle.
Niko is designed to work with most wheelchairs and be compact enough to navigate small bathrooms. It can position a person right above a toilet, and there are disposable seat covers. The goal is to help people with limited ability achieve more independence.
It is the kind of device that, if it delivers on its promises, could be a game-changer for people with limited mobility and paralysis, and their loved ones. My dad was diagnosed with ALS when I was a kid, and I learned how to operate a Hoyer lift by the time I was in middle school. This strikes me as something we would have really appreciated having around. Malaschenko has said the inspiration for the robotic system came from being a caregiver for his grandfather following a stroke.
Niko is expected to be available before the end of this year. The system will cost about $15,000, though the team said it’s working to get Niko covered by insurance. The company is also offering lower prices for customers who sign up for one of its premium waitlists, and there are options to rent it, for those who would only need a lift and transfer system temporarily.
This article originally appeared on Engadget at https://www.engadget.com/transportation/niko-is-a-robotic-lift-for-people-with-limited-mobility-that-doesnt-require-a-caregivers-help-184500703.html?src=rss
Several years after Samsung introduced the Frame TV in 2017 — a television designed to display fine art and resemble a framed painting when switched off — competitors are finally catching up in meaningful numbers. Amazon announced the Ember Artline TV at CES 2026 this week, a $899 model that can display one of 2,000 works of art for free and includes an Alexa AI tool to recommend pieces suited to your room. Hisense unveiled its CanvasTV late last year, TCL has the NXTvision model, and LG has announced the Gallery TV for later this year.
The surge in art-focused televisions comes down to two factors: smaller living spaces in cities where younger buyers lack dedicated rooms for large screens, and advances in matte screen technology that enable displays to absorb light like a canvas rather than reflect it like a window. Local dimming and improved backlighting processing allow these newer models to maintain their slim profiles for flush wall-mounting while delivering more realistic art reproduction than earlier edge-lit designs.
Living in a comfortable, heated house is something a lot of us take for granted. When the cold weather hits, we just put on thick socks, turn up the thermostat (or take other steps), and go about our business. But most modern homes rely on the electrical grid to keep that heat flowing. Even if your home is heated by natural gas or heating oil, there’s most likely an electric component to your heating system.
That means that when the power goes out—say, in the middle of a fierce blizzard—so does your heat. Even recently built homes can lose interior heat pretty quickly, dropping to uncomfortable (and even unsafe) temperatures within a day at most. If you’re not sure when power will be restored, you’ll need to find a way to keep the place as warm as possible if you and your property are going to come out of the experience unscathed. Here are are four ways to keep your house warm if your heat goes out.
Pre-heat your home before a storm
If you have some warning that a power loss is possible during the cold months—a winter storm warning, for example—it’s a good idea to “pre-heat” your home. The warmer your house is when the power goes out, the longer it will remain at a safe and/or comfortable temperature. You don’t necessarily want to make it tropical, but a few degrees higher than usual will buy you some time if the power goes out. Combined with sealing the house as tightly as possible—by hanging thermal curtains or blankets over windows, applying plastic insulation kits to windows, and deploying draft stoppers under doorways and anywhere else cold air is getting in—this strategy can be very effective.
Isolate your family to a single room
Trying to keep a large house warm without an active heating system is a fool’s errand. Instead, focus on a single room where everyone in the house can gather, because a small room is a lot easier to warm up. A few considerations about which room to choose:
Since heat rises, rooms on upper floors will be warmer than rooms on the main floor.
A room that gets a lot of sunlight can be warmed during the day by opening up the curtains and letting that solar energy do its thing.
Smaller rooms will be easier to heat up, but consider how many people will need to live and sleep in there.
Rooms near bathrooms (or with en-suite baths) offer a bit more convenience, especially if you’re going to be hunkering down for a while.
Once you’ve selected the room you’ll be using, try to keep it closed up as much as possible (covering windows, stopping up drafts, keeping the door closed). Introducing an indoor-safe heater is a good idea if you have one (or you can make one; see below).
If none of the rooms in your house are ideal, you could also consider setting up a tent indoors. Tents are designed to hold in heat, and can create a small, controllable environment that will be easier to keep warm in a pinch.
Make your own DIY heater with candles and clay pots
If you’ve planned ahead and have an indoor-safe propane or kerosene heater (or even a solar-powered portable heater), that will obviously help to keep your home warm (just be certain to follow all the instructions for ventilating whatever space you’re heating up). If you haven’t, or you discover that your propane tanks have leaked and you have no fuel, don’t despair. You can still generate heat by building a candle-pot heater, which is an old-school way of generating some quick heat.
A candle-pot heater is pretty easy to set up: You’ll need 1-3 clay flower pots (or similar ceramic containers) in different sizes, some non-flammable materials to set up on (bricks or stone tiles will work), and some candles. Then arrange everything:
Set up your bricks or other materials to create a raised platform, with plenty of airflow.
Place your smallest pot upside down on the bricks and cover the hole in the bottom (if it’s a flowerpot).
Place the larger pot on top, and then the largest on top of that if you have three pots.
Place your candles underneath and light them.
The candles don’t produce much heat, but the clay pots will absorb that heat and slowly start to radiate out. Instead of the candles’ heat just rising up to your ceiling and being cooled by the frigid air already in the room, the pots capture it and intensify it.
Will this replace your home’s heating system, or even a portable propane heater? Not by a mile. But it will make a difference, especially in a small space.
A few things to keep in mind here:
Candles are open flames, so never leave your heater unattended, and always be conscious of fire hazards.
You can place a foil-covered panel behind the heater to help reflect the heat in a specific direction (say, toward the chair you’re sitting in).
Get a furnace battery backup
If you have a gas furnace, it’s not that hard to keep it running even during a blackout if you have an alternative power source like a generator or even a power bank. The furnace needs electricity to run the ignition, the blower, and communication between the thermostat and the furnace or boiler. A decent generator or robust battery can definitely keep your furnace running for a while—and those extra hours or days could be crucial in an extended cold-weather blackout.
If you can see an obvious on/off switch on your furnace, you can pretty easily install a transfer switch like this one (here’s a video demonstrating how it’s done). This allows you to plug in a generator or power bank and keep your furnace running even when the power’s out—all you have to do is plug it in and flip the switch. If you’re not entirely comfortable with electrical wiring, you can hire a licensed electrician to install it as well, of course. Once it’s done, you’ll never have to worry about a cold house again—as long as you pair the switch with a generator or battery solution of sufficient power to keep things running.